Flash + IntelliJ IDEA
Hello. If you are faced with the development of Flash-applications, then most likely the standard tools provided by the Flash IDE for writing code did not cause you much enthusiasm. There are several popular environments for Flash / Flex development: FlashDevelop, FlashBuilder, FDT, there may still be a couple. The network is full of holivars about which one is better, but in this article I will proceed from the fact that you liked IntelliJ IDEA (or simply “Idea”), but you are completely unfamiliar with it and don’t know which side approach her. Well, let's try to figure it out together!

What you will find in this article:
I myself am familiar with the Idea not so long ago, so I don’t know many tasty features, I can be mistaken in something. The article is intended primarily for those who do projects on a pure ActionScript and want to transfer to the Idea. If you have previously worked with her, then most likely it will not be difficult for you to figure out those things that I will talk about.
So, we go to the site , we see that there are two versions: Community Edition (free) and Ultimate (paid; personal license $ 249, commercial $ 599; trial version for 30 days). The free version does not support ActionScript, so download the paid one - click on “Download Ultimate” (more about prices and licenses ).

Run the downloaded exe'shnik, “Next-> Next-> Next ...”, select what you need, click “Install”. Installation takes a couple of minutes, no problems should arise here. At the end, check the box next to “Run IntelliJ IDEA”, click “Finish”.
Suppose that this is your first acquaintance with the Idea, so that we respond to the proposal to import the old settings with a refusal and click OK. We drive in a license key or select "Evaluate for free for 30 days" and click "OK." Again, a license agreement, another “OK”.
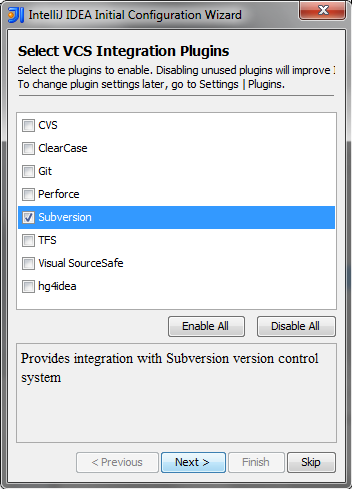
Now the more or less interesting part begins: they suggest choosing plugins for version control. Here and further a simple rule works - the fewer plugins we choose, the faster and more relaxed the Idea will load / work. Suppose I only need Subversion support:
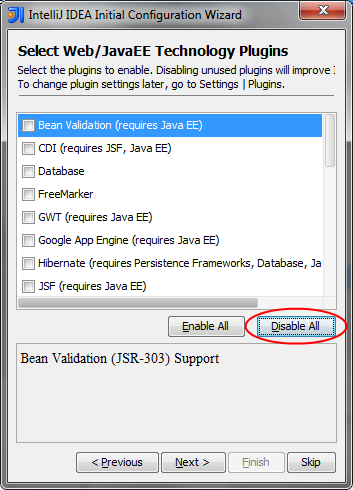
Next, we are offered to choose Web / JavaEE plugins - here you can safely remove all the checkmarks, this is all cool, of course, but we don’t need to:
Further HTML / JavaScript plugins. Here we see the Flex-plugin that interests us, which in turn is tied to JavaScript and CSS. So select these three (and even before the heap, I took the HTML plugin):

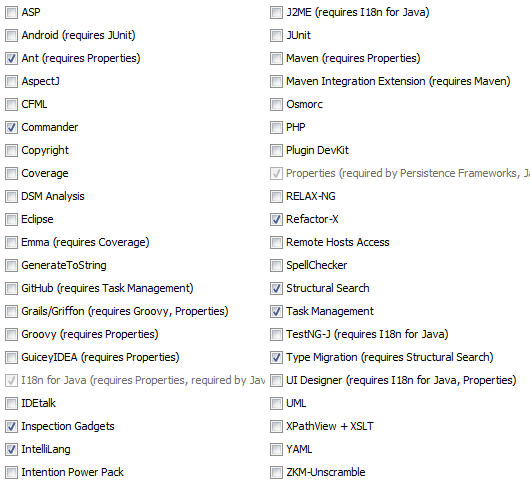
And finally, Other Plugins. There is a lot of everything, something can come in handy, something not. I navigated simply by name and cleaned up obviously unnecessary ones (for example, ASP, Android), left those that might be needed in the future (for example, Ant - leave it, it might come in handy for us). What to do with plugins with completely unfamiliar names is up to you to decide, I turned off the majority (when you click on any of them, brief information about the plugin is displayed below):
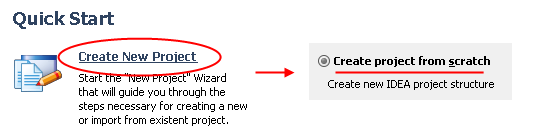
A “QuickStart” window appears in front of us, here click “Create New Project” (you can also create a project via “File-> New project”), in the next window select “Create project from scratch":
In the next window, select the project name (for example, “HelloHabr”), the folder where it will be saved, put a checkmark in front of “Create module”, select the type “ActionScript / Flash / Flex Module”. In principle, you could already click “Next”, but I want to say a few words about projects and modules. One project can have many modules and they can be in different places. Moreover, the project file can be in one place, the module file in another, and the code that the module is looking at in the third. The project has its own general settings, the module additionally has its own. Suppose that you are already working on some application and want to slip the previously written code to the module being created - it's simple. Let there be a folder C: \ Develop \ HelloHabr, with the / art and / src subpacks attached. Then in the field "Content Root" write "C: \ Develop \ HelloHabr", in the field "Module File location", for example, also "C:

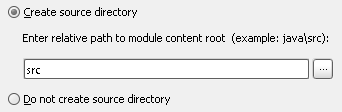
Now we will be offered to create a directory for the sources - we will specify the folder with the code of our application (you must specify the path relative to the “Content root”). Select "Create source directory" and write in the text field "src":
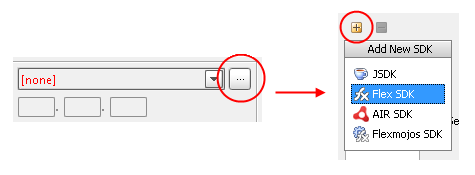
Now we need to specify the path to FlexSDK (you can download it here ), click on the "..." button in the upper right corner, in the new window click on "+" and specify the path to the unpacked SDK:
Ok, we indicated the SDK, then select “Output type” - “Application (* .swf)”, uncheck “Create sample Flex application” and “Create HTML wrapper”. Everything! Click Finish:

Hooray! Then there are 2 ways - to write code in the Idea, but still compile the application in Flash (for some it may seem wild, but many did it with FlashDevelop, it even makes some sense ... probably) or all do it in place by importing graphics through swc libraries (or loading swfs directly while the compiled application is running), and compile with the mxmlc compiler . If the first option is not interesting to you, then you can go directly to the second, they are not connected in any way. So, in order.
I myself have not done this for a long time and when I started writing this part of the article, it turned out that the previous path in version 10 of the Idea did not work. But there is a solution, albeit a little confused. In general, the following manipulations will save you from the need to manually “minimize_Idea-expand_Flash-press_Alt + Enter” with each compilation, and that's all. Whether the game is worth the candle is up to you.
Let's say “HelloHabr.fla” is in our / art folder. We want to edit the code in the Idea, then click on the “Do Well” button and so that after that Flash will deploy and compile itself. The scheme will be as follows: The idea runs a .bat file, this .bat file creates and runs the simplest JSFL script, which, in fact, is involved in compiling the project. First you need to download this batch file - “Publish in Flash IDE” Shell Script For Windows. The contents of this file, just in case: Previously, you could install the “Batch Scripts Support” plug-in and create a compilation configuration based on the downloaded batch file (for more details here ), but this method suddenly stopped working (as if to make it work again, just ask the creators of the plug-in “ Batch Scripts Support »to patch up their abandoned (?) Brainchild). I propose such a solution - create a simple ANT script that launches the downloaded .bat file. First, create a build.xml file into which we paste the following code:
We put this xml'ku next to the downloaded PublishInIDE.bat. Next, back to the Idea, we need to specify JavaSDK: RMB by the name of the project in the class tree on the left, select "Open Module Settings", in the window that opens on the left, select "SDKs", click on "+", select "JSDK", specify the path to JDK (if you do not have it, then you need to download and install it), something like “C: \ Program Files \ Java \ jdk1.6.0”.

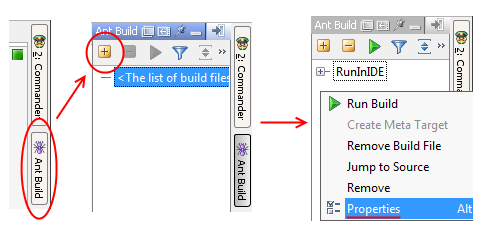
Further - on the right there is the “Ant Build” button, click on it, a tab will appear, click on “+” there, in the menu that appears, specify the path to the created build.xml. Then RMB inside the tab "Ant Build", the field "Properties":
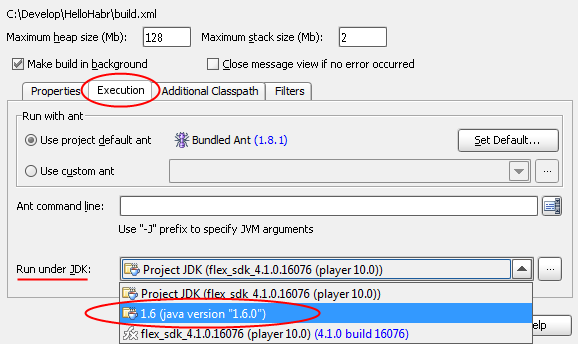
In the window that opens, select the "Execution" tab, in the "Run under JDK" list, select our freshly installed JDK:
Check if Flash is open (you need to open the project that we want to compile). And finally, solemnly (necessarily solemnly, this is important) click on the green arrow!
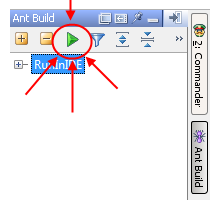
TA-dah! Works? Wow! Well, was the game worth the candle? IMHO, but without this part of the article the description would be incomplete ... Well, finally, let us move on to a healthier method of work.
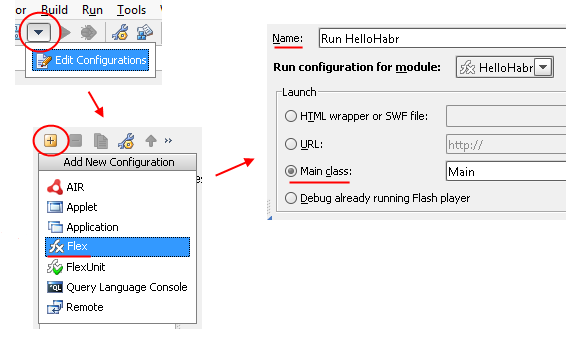
So, in the / src folder, create the file “Main.as” with the contents: This class will be the entry point to our application, now we need to say about this Idea. Set up the launch configuration: click on the “Select Run / Debug Configuration” arrow on the top toolbar, select “Edit Configurations” (or “Run-> Edit Configurations”), click on “+”, select “Flex”, set the configuration name, for example, “Run HelloHabr”, in the “Launch” area, select the “Main Class” item and specify the path to our Main.as class - “Main”:
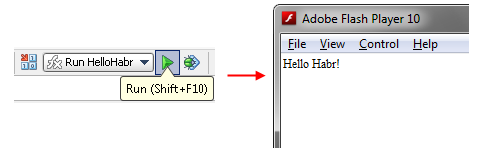
Now click on the green arrow (or “Shift + F10”) and voila! HelloHabr!
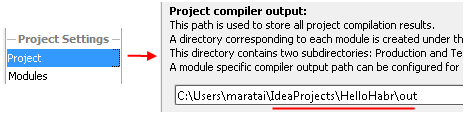
Where to find the resulting swf? By default, it lies next to the project file in a folder like ... \ IdeaProjects \ HelloHabr \ out \ production \ HelloHabr \ _Main.swf . Why such a strange name? This is a bit lower, but for now we’ll figure out how to change this path. We have a folder in which by default all compiled project modules will be placed, you can change it in the project settings: “File” -> “Project Structure”, “Project compiler output”:
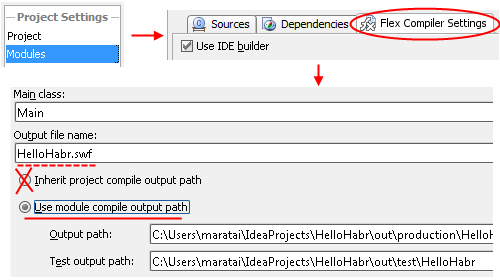
But, it seems to me, the more correct and convenient way is not to use the project’s shared folder, but to set the desired folder for a specific module. This is done like this: RMB by the name of the project in the class tree on the left, “Open Module Settings”, open the tab “Flex Compiler Settings”, uncheck the “Inherit project compile output path”, select the item “Use module compile output path” and instead change the path to a more convenient one:
Now we need to talk about the difference between “Run” (what we have done) and “Build”. Run is still something from the category of debugging, while we can play with different configurations. For example, if we unchecked “Make” in the launch configuration settings, then there would be no guarantee that after the closure of the svfka it would have been preserved somewhere (the idea, by the way, would have carefully worried about it), and so we have though would be "_Main.swf". In science, we need to do a “Make” of a project or module (which has its own advanced configuration — sort of like “Flex Compiler Settings”) - for this there is a strange-looking button to the left of the “green arrow” (or just “Ctrl + F9” ), when you click on it, you will need to specify the entry point (our Main class). This main class of the application and the name of the output swf can be changed in the previous window - the fields “Main Class” and “Output file name”, respectively. As a result, instead of "_Main.swf" we get a pretty decent "HelloHabr.swf" in a folder convenient for us.

In the end, I’ll just list a number of useful buns and underwater cobblestones that I can remember.
1) In order for messages to be displayed on "trace ()" and the Idea debugger to work, you must install the debug version of the flash player and run the project again in "debug" mode. If you have any difficulties with installation, you can do this - download the standalone debug player, and specify the path to it in the launch configuration settings in the "Options" section in the "Launch with" field:

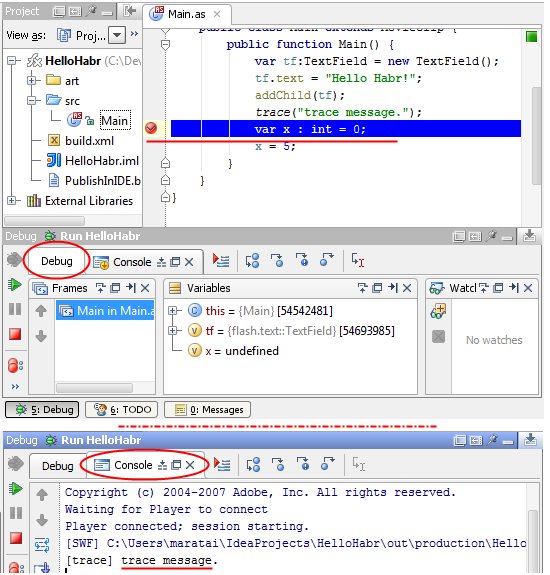
Well, since it came to this, I’ll tell you how to set breakpoints and run a debugger. To the left of the line of interest to us, click the mouse - the breakpoint is ready. The debugger is launched by clicking on the "green arrow with a bug" (or "Shift + F9"), which is located next to the "regular" green arrow. Traces are shown below in the “Console” tab, and debugging can be controlled in the “Debug” tab (the interface is pretty clear and friendly):
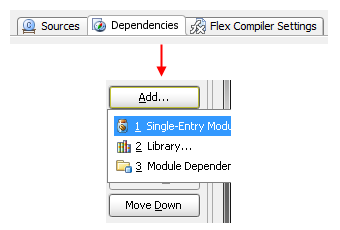
2) Import swc libraries. Suppose we want to connect a library for working with the IPA “MyMir” - “mailru-call.swc”: RMB by the name of the project in the class tree on the left, “Open Module Settings”, on the right we open the “Dependencies” tab, and to the right the “Add” button, "Single-Entry Module Library", specify the path to the desired .swc-library. Done, now the classes for this library are available to us:
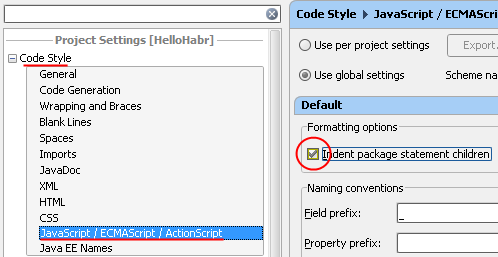
3) Change the formatting of the code as follows: “File” -> “Settings”, open the field “Code Style”. If you delve a bit here, you can probably find any settings that you might think of. For example, I’m used to it when the contents of a package are indented, for this you need to check the “Indent package statement children” checkbox in the “JavaScript / ECMAScript / ActionScript” section:
4) And finally, I will list a few hotkeys (the full list is here ), without which I already feel at ease, editing something not in the Idea:
Well, I think I will dwell on this, thank you all!
PS I took a couple of images for the article without demand, I hope no one will be very upset because of this ...
What you will find in this article:
- Short description: where to download, how to install, configure IDE
- How to create a project, get started
- How to link an IDE with a Flash project
- How to compile, run a project, connect libraries
- Description of some nice little things that I regularly use
- Some purely Flex-specific things
- Descriptions of the project assembly by ANT (although we will touch on this in passing), the use of Maven, etc.
- Describing the advantages of IDEs over analogues, its main features
Foreword
I myself am familiar with the Idea not so long ago, so I don’t know many tasty features, I can be mistaken in something. The article is intended primarily for those who do projects on a pure ActionScript and want to transfer to the Idea. If you have previously worked with her, then most likely it will not be difficult for you to figure out those things that I will talk about.
Download, installation
So, we go to the site , we see that there are two versions: Community Edition (free) and Ultimate (paid; personal license $ 249, commercial $ 599; trial version for 30 days). The free version does not support ActionScript, so download the paid one - click on “Download Ultimate” (more about prices and licenses ).
Run the downloaded exe'shnik, “Next-> Next-> Next ...”, select what you need, click “Install”. Installation takes a couple of minutes, no problems should arise here. At the end, check the box next to “Run IntelliJ IDEA”, click “Finish”.
Project creation
Suppose that this is your first acquaintance with the Idea, so that we respond to the proposal to import the old settings with a refusal and click OK. We drive in a license key or select "Evaluate for free for 30 days" and click "OK." Again, a license agreement, another “OK”.
Now the more or less interesting part begins: they suggest choosing plugins for version control. Here and further a simple rule works - the fewer plugins we choose, the faster and more relaxed the Idea will load / work. Suppose I only need Subversion support:
Next, we are offered to choose Web / JavaEE plugins - here you can safely remove all the checkmarks, this is all cool, of course, but we don’t need to:
Further HTML / JavaScript plugins. Here we see the Flex-plugin that interests us, which in turn is tied to JavaScript and CSS. So select these three (and even before the heap, I took the HTML plugin):
And finally, Other Plugins. There is a lot of everything, something can come in handy, something not. I navigated simply by name and cleaned up obviously unnecessary ones (for example, ASP, Android), left those that might be needed in the future (for example, Ant - leave it, it might come in handy for us). What to do with plugins with completely unfamiliar names is up to you to decide, I turned off the majority (when you click on any of them, brief information about the plugin is displayed below):
A “QuickStart” window appears in front of us, here click “Create New Project” (you can also create a project via “File-> New project”), in the next window select “Create project from scratch":
In the next window, select the project name (for example, “HelloHabr”), the folder where it will be saved, put a checkmark in front of “Create module”, select the type “ActionScript / Flash / Flex Module”. In principle, you could already click “Next”, but I want to say a few words about projects and modules. One project can have many modules and they can be in different places. Moreover, the project file can be in one place, the module file in another, and the code that the module is looking at in the third. The project has its own general settings, the module additionally has its own. Suppose that you are already working on some application and want to slip the previously written code to the module being created - it's simple. Let there be a folder C: \ Develop \ HelloHabr, with the / art and / src subpacks attached. Then in the field "Content Root" write "C: \ Develop \ HelloHabr", in the field "Module File location", for example, also "C:
Now we will be offered to create a directory for the sources - we will specify the folder with the code of our application (you must specify the path relative to the “Content root”). Select "Create source directory" and write in the text field "src":
Now we need to specify the path to FlexSDK (you can download it here ), click on the "..." button in the upper right corner, in the new window click on "+" and specify the path to the unpacked SDK:
Ok, we indicated the SDK, then select “Output type” - “Application (* .swf)”, uncheck “Create sample Flex application” and “Create HTML wrapper”. Everything! Click Finish:
Beginning of work
Hooray! Then there are 2 ways - to write code in the Idea, but still compile the application in Flash (for some it may seem wild, but many did it with FlashDevelop, it even makes some sense ... probably) or all do it in place by importing graphics through swc libraries (or loading swfs directly while the compiled application is running), and compile with the mxmlc compiler . If the first option is not interesting to you, then you can go directly to the second, they are not connected in any way. So, in order.
From Idea we cause compilation of Flash application
I myself have not done this for a long time and when I started writing this part of the article, it turned out that the previous path in version 10 of the Idea did not work. But there is a solution, albeit a little confused. In general, the following manipulations will save you from the need to manually “minimize_Idea-expand_Flash-press_Alt + Enter” with each compilation, and that's all. Whether the game is worth the candle is up to you.
Let's say “HelloHabr.fla” is in our / art folder. We want to edit the code in the Idea, then click on the “Do Well” button and so that after that Flash will deploy and compile itself. The scheme will be as follows: The idea runs a .bat file, this .bat file creates and runs the simplest JSFL script, which, in fact, is involved in compiling the project. First you need to download this batch file - “Publish in Flash IDE” Shell Script For Windows. The contents of this file, just in case: Previously, you could install the “Batch Scripts Support” plug-in and create a compilation configuration based on the downloaded batch file (for more details here ), but this method suddenly stopped working (as if to make it work again, just ask the creators of the plug-in “ Batch Scripts Support »to patch up their abandoned (?) Brainchild). I propose such a solution - create a simple ANT script that launches the downloaded .bat file. First, create a build.xml file into which we paste the following code:
echo document.testMovie(); > %TEMP%\PublishInIDE.jsfl

@cmd /c start %TEMP%\PublishInIDE.jsfl
 <?xml version="1.0"?>

<project name="RunInIDE" default="hello-habr" basedir=".">

     <target name="hello-habr">

         <exec executable="cmd"><arg value="/c"/><arg value="PublishInIDE.bat"/></exec>

     </target>

</project>
We put this xml'ku next to the downloaded PublishInIDE.bat. Next, back to the Idea, we need to specify JavaSDK: RMB by the name of the project in the class tree on the left, select "Open Module Settings", in the window that opens on the left, select "SDKs", click on "+", select "JSDK", specify the path to JDK (if you do not have it, then you need to download and install it), something like “C: \ Program Files \ Java \ jdk1.6.0”.
Further - on the right there is the “Ant Build” button, click on it, a tab will appear, click on “+” there, in the menu that appears, specify the path to the created build.xml. Then RMB inside the tab "Ant Build", the field "Properties":
In the window that opens, select the "Execution" tab, in the "Run under JDK" list, select our freshly installed JDK:
Check if Flash is open (you need to open the project that we want to compile). And finally, solemnly (necessarily solemnly, this is important) click on the green arrow!
TA-dah! Works? Wow! Well, was the game worth the candle? IMHO, but without this part of the article the description would be incomplete ... Well, finally, let us move on to a healthier method of work.
HelloWorld Means Ideas
So, in the / src folder, create the file “Main.as” with the contents: This class will be the entry point to our application, now we need to say about this Idea. Set up the launch configuration: click on the “Select Run / Debug Configuration” arrow on the top toolbar, select “Edit Configurations” (or “Run-> Edit Configurations”), click on “+”, select “Flex”, set the configuration name, for example, “Run HelloHabr”, in the “Launch” area, select the “Main Class” item and specify the path to our Main.as class - “Main”:
package {


     import flash.display.MovieClip;

     import flash.text.TextField;


    public class Main extends MovieClip {

         public function Main() {

             var tf:TextField = new TextField();

             tf.text = "Hello Habr!";

             addChild(tf);

         }

     }

}
Now click on the green arrow (or “Shift + F10”) and voila! HelloHabr!
Where to find the resulting swf? By default, it lies next to the project file in a folder like ... \ IdeaProjects \ HelloHabr \ out \ production \ HelloHabr \ _Main.swf . Why such a strange name? This is a bit lower, but for now we’ll figure out how to change this path. We have a folder in which by default all compiled project modules will be placed, you can change it in the project settings: “File” -> “Project Structure”, “Project compiler output”:
But, it seems to me, the more correct and convenient way is not to use the project’s shared folder, but to set the desired folder for a specific module. This is done like this: RMB by the name of the project in the class tree on the left, “Open Module Settings”, open the tab “Flex Compiler Settings”, uncheck the “Inherit project compile output path”, select the item “Use module compile output path” and instead change the path to a more convenient one:
Now we need to talk about the difference between “Run” (what we have done) and “Build”. Run is still something from the category of debugging, while we can play with different configurations. For example, if we unchecked “Make” in the launch configuration settings, then there would be no guarantee that after the closure of the svfka it would have been preserved somewhere (the idea, by the way, would have carefully worried about it), and so we have though would be "_Main.swf". In science, we need to do a “Make” of a project or module (which has its own advanced configuration — sort of like “Flex Compiler Settings”) - for this there is a strange-looking button to the left of the “green arrow” (or just “Ctrl + F9” ), when you click on it, you will need to specify the entry point (our Main class). This main class of the application and the name of the output swf can be changed in the previous window - the fields “Main Class” and “Output file name”, respectively. As a result, instead of "_Main.swf" we get a pretty decent "HelloHabr.swf" in a folder convenient for us.
Any different useful, necessary, convenient, pleasant, interesting, etc.
In the end, I’ll just list a number of useful buns and underwater cobblestones that I can remember.
1) In order for messages to be displayed on "trace ()" and the Idea debugger to work, you must install the debug version of the flash player and run the project again in "debug" mode. If you have any difficulties with installation, you can do this - download the standalone debug player, and specify the path to it in the launch configuration settings in the "Options" section in the "Launch with" field:
Well, since it came to this, I’ll tell you how to set breakpoints and run a debugger. To the left of the line of interest to us, click the mouse - the breakpoint is ready. The debugger is launched by clicking on the "green arrow with a bug" (or "Shift + F9"), which is located next to the "regular" green arrow. Traces are shown below in the “Console” tab, and debugging can be controlled in the “Debug” tab (the interface is pretty clear and friendly):
2) Import swc libraries. Suppose we want to connect a library for working with the IPA “MyMir” - “mailru-call.swc”: RMB by the name of the project in the class tree on the left, “Open Module Settings”, on the right we open the “Dependencies” tab, and to the right the “Add” button, "Single-Entry Module Library", specify the path to the desired .swc-library. Done, now the classes for this library are available to us:
3) Change the formatting of the code as follows: “File” -> “Settings”, open the field “Code Style”. If you delve a bit here, you can probably find any settings that you might think of. For example, I’m used to it when the contents of a package are indented, for this you need to check the “Indent package statement children” checkbox in the “JavaScript / ECMAScript / ActionScript” section:
4) And finally, I will list a few hotkeys (the full list is here ), without which I already feel at ease, editing something not in the Idea:
- Ctrl + Space - good old autocomplete
- Ctrl + Alt + L - code auto-formatting
- Ctrl + Alt + O - import optimization
- Shift + F6 - refactoring (powerful thing!)
- Alt + F7 - search for occurrences / use of the structure in the project
- Ctrl + F / Ctrl + Shift + F - search in a document / search in a project or in a folder
Well, I think I will dwell on this, thank you all!
PS I took a couple of images for the article without demand, I hope no one will be very upset because of this ...









