Work with sound in practice
 Hello!
 At one time, I read with pleasure the wonderful article “Guitarism for Linux - why not?” . And I decided to write a short continuation of this article and talk about some things of a more practical plan, namely to create a small guide for those who, say, unexpectedly decided to perpetuate their work by recording a relatively complicated guitar work. :)
So, let's go.
Connection
Of my three guitars, two have a pickup, and it is them that I use to record something. I use the jack for an external microphone on my laptop as an input port, which is actually not good, because this input is not sharpened for working with devices such as a guitar, and it is better to use line-in (or even better, an external sound card) . But in my case, the use of line-in is unfortunately impossible, because it simply does not exist. The minus of using the microphone jack is expressed in the appearance of a noticeable background noise, which in principle is solved rather quickly by cleaning the final file with any audio editor, for example, the well-known audacity, which, admittedly, copes with this task quite successfully.
Signal processing
Before you start recording, you need to decide what to process the guitar output to obtain the desired effect. I’ve been struck by the magnificent Rakarrack real-time guitar processor , which is probably in the repositories of most distributions. Honestly, this program struck me.
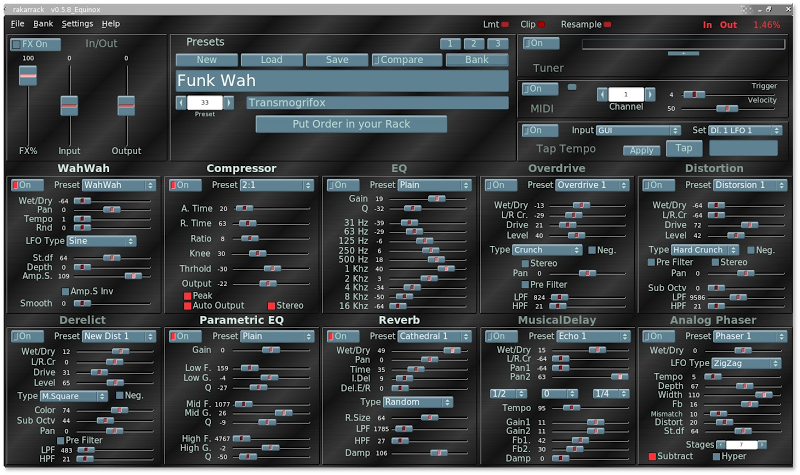
In addition to the fact that it has in its arsenal an impressive (and, importantly, expandable) number of custom guitar effects, you can also find saved presets in it with various combinations of available handlers for playing in certain styles. It was also surprising that the program really demonstrated real-time operation without applying any patches to the kernel (for example, RT). In my opinion, it’s quite difficult to describe and tell something here - it’s better to experiment yourself and see what the program is capable of. Despite the apparent complexity and congestion of the interface, it is very intuitive and does not cause much difficulty.
Rakarrack uses the JACK audio system(can also be found in almost any repository), which at first glance is not entirely obvious to understanding. The main point is this: each JACK client registers its inputs and outputs in the system, and you can control the connections of inputs and outputs from various programs. This opportunity will be useful to us in the future. Remember to run JACK before starting Rakarrack, which can be done in the console (for example, / usr / bin / jackd -r -dalsa -r48000 -p1024), but I prefer to use the small qjackctl GUI utility from the package of the same name. When starting up, Rakarrack itself will establish the necessary connections sufficient to capture sound and reproduce the processed signal.

Record
We will record a multichannel composition by superimposing one track on another (rhythm, solo, additional tunes and so on). For recording, we use a program called Ardor - a powerful and somewhat monstrous system for working with numerous audio tracks. With all my sympathy for this system, to write about its interface the same as I wrote about Rakarrack - about intuitiveness and understandability - my hand will not rise. The only plus in this sense is that the developers tried to bring the program interface to a form more or less typical of professional programs in this subject area (for example, Cubase). Another thing is that it is rather complicated. But all these are trifles and, in fact, a matter of habit, especially when you consider what opportunities are provided.
Ardor also uses JACK, which in our case is only to our advantage, since we are interested in writing the already processed sound that comes with Rakarrack. JACK will let us do this.
When creating a project, you can choose how Ardor will interact with JACK: it can automatically connect inputs and outputs to the system for each track, create a master bus, etc.

I usually disable these options and configure all connections manually, as in most cases I work with a small number of tracks. However, even if you allow the program to automatically manage the connections, in any case, already created connections can always be easily edited. The same qjackctl and its "Connections" button will help us with this. As I already said, for recording we are interested in already processed sound, so we need to arrange the connections so that the signal from the output of Rakarrack arrives at the input of Ardor, and the capture device at the entrance to Rakarrack.

In the picture above you can see how the output with the processed signal comes to the recording in the third track of Ardor. This is a very simplified scheme, because I specifically deleted all other connections for clarity. For example, in order to play the first two while recording the third track, you need to connect their outputs to the system inputs of playback. It would also be nice to hear what we play during recording: for this you need to connect the Rakarrack output not only to the inputs of the third track, but also to the already mentioned playback inputs.
As I said, we will use track overlay recording. Tracks are created from the context menu in the left middle area of the program. Near each track there is a small control panel that allows you to change its volume relative to other tracks and some other properties (mute, solo, etc.). We are most interested in the red round button with the symbol “record”. If it is pressed, it means that the signal coming to its input during the recording procedure will be recorded on the track.

Speaking about the recording procedure, I mean the following. Ardor has two modes of playback or “penetration”: simple playback or playback with recording. Which means simple playback is quite obvious - losing the signal from all tracks, taking into account the set attributes of each track (for example, tracks with the “m” button pressed (silence), will not participate at all; if the c button is pressed on any of the tracks "(Solo), then it will be played alone, etc.). This mode is activated by pressing the button with the “Play” symbol at the top of the program window on the playback control panel.
Playback with recording differs from simple playback only in that during the project progressing on tracks with the recording mode on, the signal arriving at the input will be recorded. To start playback with recording, you must first press the button with the recording symbol located on the top panel of the playback control (it will then flash), and then click on the “Play” button.
Any of the playback modes can be started anywhere in the project. Accordingly, the general recording algorithm is approximately as follows: we record the first track, turn off the recording mode on it so that it just plays while recording the next track, create and record the second track, listening (or not listening - as you wish), and so on, as long as you have enough strength and fantasies. Everything is quite convenient and thoughtful. In addition to all this, the program has a huge number of features, “goodies” (metronomes, shifters, time-scales - a lot of things) and interface details that, when used expertly, will allow you to create quite professionally.
And here, voila: our "masterpiece" is ready.

Export
The point is small - export the project to a sound file. There should not be any difficulties. In the main menu, select “File” -> “Export” -> “Export Session to Sound File”. You can also export not the entire session, but only the selected (on the timeline) part of it. After selecting the export options, everything is ready.

Post processing
I will not particularly dwell on the post-processing of the resulting file, because many may not need it at all. I use the Audacity Noise Gate filter to remove noise. Here, in my opinion, there is no specific recipe.
Conclusion
Of course, in this article we are not talking about professional work with sound. This requires expensive equipment and rare, often highly specialized software. But, believe me, to create something worthy in order to please themselves and friends, everyone is quite capable. Play, create, fantasize. :)