Hudson Continuous Integration
We all understand that testing is an integral part of the software development life cycle. The more often we test our code, the faster we can detect an error that crept into it during development and fix it faster. At the same time, it is worthwhile to understand that it is highly desirable to conduct testing in an environment as close as possible to the combat environment (OS, software, Hardware, Load), in order to be able to detect errors that do not appear on the development server, but can appear in battle. Composing the two theses mentioned above together we get a concept called Continuous Integration.
The essence of CI is to constantly (for example, after each commit) build and test the software being developed in as close as possible to the combat environment in order to detect errors as early as possible and notify the developers about them. The very idea of CI belongs to Martin Fowler, who described it in detail in his article .
There are ready-made solutions ( Hudson , CruiseControl ) for automation of the continuous assembly process , the integration of one of which (Hudson) I will describe in this article.
And so, let's say we have two projects: a Java service (with its own database), and a PHP client (with its own database) for it. Both projects are distributed as deb packages. It is necessary to set up the infrastructure for the continuous integration of these projects.
In order to have an idea of what we want to achieve in the end, we will start from the end: consider the scheme we want to implement:
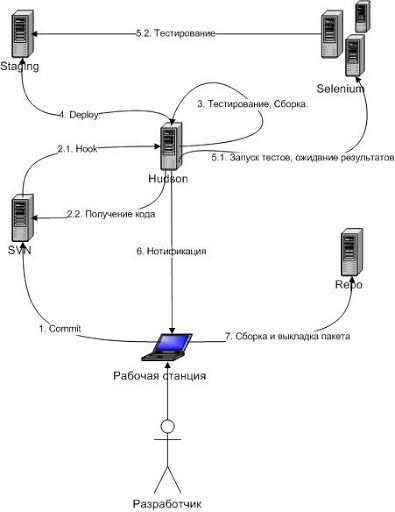
The developer makes changes to the project on his machine and commit'it them in SVN. On the SVN server, a post-commit hook is triggered, which initiates the build process of the corresponding project on the CI server. The CI server updates the package version from SVN, compiles the project, runs unit tests, puts the project on a staging server.
For projects without a web interface, integration tests are run, for projects with a web interface, Selenium tests are run. The CI server generates reports and, if necessary (in case of failure at any stage of the project build) sends an email notification to the user.
The upload of project packages to the repository for combat servers is done manually by the developer at the time of release.
The main and most interesting node in our system is the CI server. In this case, it will be Hudson as one of the most popular and common free solutions.
First of all, install it. Hudson is available as a package, so installing it is quite simple. In addition, Hudson stores its entire configuration in files ( / var / lib / hudson ), which does not require integration with any database.
Hudson’s architecture is based on plugins. That is, in essence, Hudson’s work boils down to storing project / plugin settings and building the project. In turn, the assembly of the project consists in launching in a certain order the installed plug-ins included in the project settings.
Plugins can be divided into several conditional groups that form the project’s build cycle, also referred to as the “pipeline” (the configuration of the project plugins is available through the "Project Settings" menu):
Unfortunately, Hudson allows you to change only the execution order of plugins included in the “assembly” group (the execution order of the remaining plugins within its group is determined based on the values of the @Execution annotation code of the plugins). Therefore, if you need to implement your build script, for which a set of standard plugins from the "Assembly" group is not enough, you can go in three ways:
By default, Hudson comes with plugins already installed for working with SVN and Maven. This could be quite enough if it was only about Java projects. However, suppose we also need to work with PHP projects. In this case, it is more logical to use Phing to build the project, the plugin for which needs to be installed separately. This is done by going to the section "Settings / Managing Plugins / Available Updates".

Please note that some plugins require running Hudson under Java 6. You can change the path to the JVM (just like the rest of the configuration options) in the / etc / default / hudson file . Otherwise, all configuration parameters relating directly to the operation of Hudson can be edited via a browser in the web interface.
Regarding the settings of the plugins, it is also worth mentioning that the plugin has both general settings (“System Settings / Configuring”) and project settings (“Settings / Project Name / Configure Project”).

Now that all the necessary plugins are installed, we can create a new project / task by specifying its name and settings for the corresponding plugins: URL in the SVN repository and a command for assembly.
Please note that you can build not according to any schedule or when polling the repository if there are changes in the project, but according to the commit in SVN . Due to the fact that Hudson has a “Remote Access API” that allows, among other things, to initiate the assembly of the project by making a GET request , you can easily add the appropriate post-commit hook (for example, usingsvnlook ) for your project.
Consider the build phase:
At the moment, building the package involves getting data from the repository and fulfilling the Phing goal (building the package). In principle, here you can add the launch of unit tests and deploy the project to the staging server. However, here it is worth paying attention to several points.
Firstly, the config for running the application on the staging server may differ from the combat config. In this case, the obvious solution would be to store the config for the staging server in the project and replace it with the original project during assembly (a separate target for assembly in the case of Phing or a profile for Maven ).
Secondly, install the package on the staging server using the SCP and SSH plugins(for the plugin to work, you need to make sure that the PasswordAuthentication parameter in the sshd config is set to yes, and the host of the staging server is added to the known hosts), because the SSH plugin belongs to the assembly phase of the project, and the SCP plugin refers to post-assembly operations. Therefore, the problem of deploying a project to a staging server will have to be solved using Phing or Maven + AntRun .
In order for our build script to perform actions on remote servers, it is necessary to generate ssh keys: leave the private key on the CI server, and distribute the public key across all the servers that will be interacting with: staging, repo, svn - adding them to the list known hosts (known_hosts). In addition, in order for Hudson to be able to install the package on a remote server, you will need to create the corresponding user (hudson) on the remote server and give it sudo.
Thirdly, to successfully build java applications using Maven, you will need to determine the Maven settings for the hudson user on the CI server (meaning ~ / .m2 directory ).
The next step after installing the package on the staging server should be the launch of integration tests. They can be run on the CI server itself, however, it is preferable to do this on the staging server. In the first case, everything is quite simple: we call the appropriate Phing / Maven target or configure the SeleniumHQ plugin .
However, the question remains open, what to do if you want to start the testing process on an external server - for example, access the Selenium RC server? The answer here is as simple as possible: Selenium RC has an HTTP API to work with it, so the most trivial solution in this case is to write a small script in any language you like, which initiates the testing process and from time to time polls the remote server for the completion of the test. Next, this script is connected to the build script through the plugin “Execute Shell”. I also add that the success or failure of the script is determined by Hudson based on the return code of your script.
Having set up the assembly process, we will not forget about the most important part of the process - notifying the developer about the assembly results. Hudson allows you to configure mail notifications for both specific recipients and authors of commit'ov, whose changes caused a breakdown.

In addition, I recommend that anyone who uses Hudson for PHP projects should read the relevant articles from the Hudson Wiki .
And so, as mentioned above, our infrastructure should have a server configured as close as possible to the combat one. Hudson will install the latest project packages collected via trunk on this server. This will give us the opportunity:
One of the main problems that will have to be solved when setting up this server is the silent installation of packages. In order for our packages to be installed without unnecessary dialogs (that is, they could be installed using scripts or Hudson plugins), it is necessary to reconfigure debconf ( dpkg-reconfigure debconf ), indicating to it the level of importance of the questions asked is higher than those used in installation scripts of your deb package.

In addition, there may be dependencies between packages installed on the staging server. So, for example, the project “client” depends on the project “server”. In this case, we must explicitly ensure that the installation of the “server” package necessary for it occurs on the staging server when installing the “client” package.
At first glance, the obvious solution, taking into account the distribution of the project through deb packages,
is to manage dependencies using dpkg by adding information about the server package to the dependencies control file of the client package.
In this case, we will also have to select a separate debian repository, into which all packages collected by the CI server will merge, and complete the build script with the command to copy the package to the repository. In addition, it will be necessary to organize a mechanism for automatically updating data in this repository when adding a new package, arrange access to the repository pool (for example, by raising a web server), and add this repository to sources-list on the staging server. When organizing auto-update manually (by launching the package scanner after putting the package into the repository), the new package can be installed via apt, if the repository is updated on a schedule, you will have to invent tricks like dpkg -i package; apt-get -f install . Read more about setting up your debian repository here..
However, this approach has several disadvantages. Firstly, dependencies can only be installed on the same server. Secondly, this approach complicates the whole system as a whole, which contradicts the KISS principle (well, or “SMOKE”, if in Russian: D).
The best solution, in my opinion, is to use the repository only for interaction with the battle server. At the same time, uploading packages to the repository should not be carried out automatically, but by the decision of the developer. As for the staging server, packages from the trunk of the main package and all its dependencies will be installed on it, which will significantly reduce the complexity of the CI system, while giving us the opportunity to have the latest current versions of
packages on the staging server .
Our packages can use the database. In this case, the database is also installed on the staging server, and the database structure / data is updated using the dbdeploy utility .
There are two ways to integrate dbdeploy into a project:
Separately, in this case, the question arises about changes in database data during testing. It is clear that when writing unit tests we do not work with the database, but use mock objects (for example, I like Mockito ).
However, what about integration tests that simply need to work in "real" conditions? In the case of XUnit tests, we can perform each test as part of a database transaction. In my opinion, this approach is preferable, since taking into account the versioning of the database through dbdeploy, we always know what data we have in the database at the moment and we can safely bind to it in our tests. However, in the case of testing the web interface (for example, using Selenium), we do not have the ability to run each test within a transaction.
Therefore, there are two options in my opinion: either before starting the web-interface testing, completely reinitialize the data in the database based on the available
patches, or build the tests so that they are not tied to any specific data from the database (for example, create the necessary data testing the data through the web-interface themselves) and, if possible, did not leave behind “garbage”.
In the case when the application does not have a web interface, the integration test on the staging server, as I wrote above, may well consist in running XUnit tests. However, with a user interface, it is extremely convenient to conduct a full test of the entire chain from HTML to the database using Selenuim.
Selenium is a powerful web application testing system, which can be conditionally divided into two parts:
For obvious reasons, we are interested in the second option. Since installing and configuring Selenuim is a big topic, I don’t see the point in this article: all the information is in the documentation .
It is worth noting that CI can be carried out in manual mode, each time compiling and testing the code before commit. However, automation of this process using the CI server is much more expedient. In addition, it is important to understand that CI and nightly builds are not the same thing. The latter allow you to identify bugs, but with a big delay, while the goal of CI is the speedy detection of errors. In my opinion, nightly assemblies can serve as a partial replacement for CI only if the assembly and testing of the project is a process that takes quite a lot of time. In addition, if the project has both unit and integration tests, you can split the project assembly into two parts: the first (with unit tests) is run every time when commit'e, the second with integration tests - once per hour / day.
The solution described above works and brings profit . However, as we all know, the theory, unfortunately, does not always correspond to practice. The implementation of the CI system required the solution of a number of problems, not all of which were solved ideally.
The likelihood that someone will give you resources for a staging server that is comparable to combat features is extremely small - most likely it will be a medium-sized virtual machine on a semi-abandoned host machine, which fundamentally undermines one of the principles of CI - testing in a similar environment . This, in turn, entails that integration tests can begin to take much longer than originally planned. Therefore, in my case, “continuity” had to give up and start running tests not according to SVN hooks, but according to a schedule.
In general, if your team has a certain development culture (I mean the understanding that CI is not a panacea, but only a tool that, with proper handling, can improve the quality of their work), the implementation of CI is justified.
Well, probably the most important thing: as practice has shown, the integration of the CI system is a team task. To solve it, the work of developers, testers and administrators will be required.
The essence of CI is to constantly (for example, after each commit) build and test the software being developed in as close as possible to the combat environment in order to detect errors as early as possible and notify the developers about them. The very idea of CI belongs to Martin Fowler, who described it in detail in his article .
There are ready-made solutions ( Hudson , CruiseControl ) for automation of the continuous assembly process , the integration of one of which (Hudson) I will describe in this article.
Task
And so, let's say we have two projects: a Java service (with its own database), and a PHP client (with its own database) for it. Both projects are distributed as deb packages. It is necessary to set up the infrastructure for the continuous integration of these projects.
Implementation
In order to have an idea of what we want to achieve in the end, we will start from the end: consider the scheme we want to implement:
- working machine of the programmer - writing code,
- SVN server - code storage,
- Staging server - installation and testing of assembled projects,
- Selenium server - web-interface testing,
- Repo server - storage of collected packages,
- CI server - connection of all system nodes into a single whole.
The developer makes changes to the project on his machine and commit'it them in SVN. On the SVN server, a post-commit hook is triggered, which initiates the build process of the corresponding project on the CI server. The CI server updates the package version from SVN, compiles the project, runs unit tests, puts the project on a staging server.
For projects without a web interface, integration tests are run, for projects with a web interface, Selenium tests are run. The CI server generates reports and, if necessary (in case of failure at any stage of the project build) sends an email notification to the user.
The upload of project packages to the repository for combat servers is done manually by the developer at the time of release.
Hudson
The main and most interesting node in our system is the CI server. In this case, it will be Hudson as one of the most popular and common free solutions.
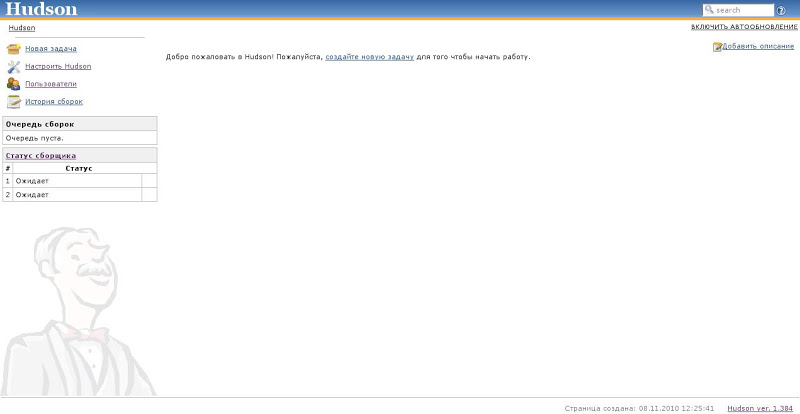
First of all, install it. Hudson is available as a package, so installing it is quite simple. In addition, Hudson stores its entire configuration in files ( / var / lib / hudson ), which does not require integration with any database.
Hudson’s architecture is based on plugins. That is, in essence, Hudson’s work boils down to storing project / plugin settings and building the project. In turn, the assembly of the project consists in launching in a certain order the installed plug-ins included in the project settings.
Plugins can be divided into several conditional groups that form the project’s build cycle, also referred to as the “pipeline” (the configuration of the project plugins is available through the "Project Settings" menu):
- source code management (receiving / updating project code from the repository),
- assembly triggers (setting autostart time for project assembly),
- build environment (setting up the build environment of the project: JVM version),
- assembly (main stage: launching plugins that implement the logic of assembly, integration and testing),
- post-assembly operations (generation / publication of reports, notification).
Unfortunately, Hudson allows you to change only the execution order of plugins included in the “assembly” group (the execution order of the remaining plugins within its group is determined based on the values of the @Execution annotation code of the plugins). Therefore, if you need to implement your build script, for which a set of standard plugins from the "Assembly" group is not enough, you can go in three ways:
- call any external executable script that implements this script (the item “Execute Shell” from the menu “Add build step”),
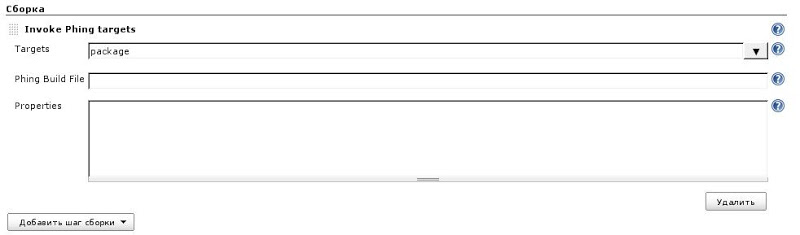
- connect the plug-in of the project build system (Phing, Ant, Maven) and specify the necessary goal,
- write your plugin.
By default, Hudson comes with plugins already installed for working with SVN and Maven. This could be quite enough if it was only about Java projects. However, suppose we also need to work with PHP projects. In this case, it is more logical to use Phing to build the project, the plugin for which needs to be installed separately. This is done by going to the section "Settings / Managing Plugins / Available Updates".
Please note that some plugins require running Hudson under Java 6. You can change the path to the JVM (just like the rest of the configuration options) in the / etc / default / hudson file . Otherwise, all configuration parameters relating directly to the operation of Hudson can be edited via a browser in the web interface.
Regarding the settings of the plugins, it is also worth mentioning that the plugin has both general settings (“System Settings / Configuring”) and project settings (“Settings / Project Name / Configure Project”).
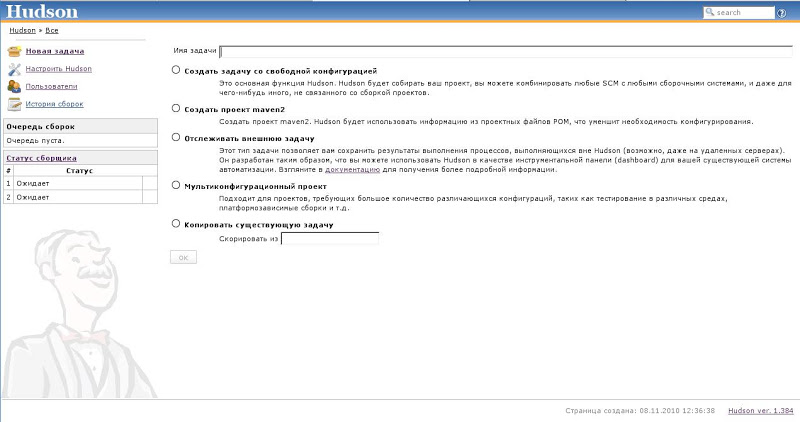
Now that all the necessary plugins are installed, we can create a new project / task by specifying its name and settings for the corresponding plugins: URL in the SVN repository and a command for assembly.
Please note that you can build not according to any schedule or when polling the repository if there are changes in the project, but according to the commit in SVN . Due to the fact that Hudson has a “Remote Access API” that allows, among other things, to initiate the assembly of the project by making a GET request , you can easily add the appropriate post-commit hook (for example, usingsvnlook ) for your project.
Consider the build phase:
At the moment, building the package involves getting data from the repository and fulfilling the Phing goal (building the package). In principle, here you can add the launch of unit tests and deploy the project to the staging server. However, here it is worth paying attention to several points.
Firstly, the config for running the application on the staging server may differ from the combat config. In this case, the obvious solution would be to store the config for the staging server in the project and replace it with the original project during assembly (a separate target for assembly in the case of Phing or a profile for Maven ).
Secondly, install the package on the staging server using the SCP and SSH plugins(for the plugin to work, you need to make sure that the PasswordAuthentication parameter in the sshd config is set to yes, and the host of the staging server is added to the known hosts), because the SSH plugin belongs to the assembly phase of the project, and the SCP plugin refers to post-assembly operations. Therefore, the problem of deploying a project to a staging server will have to be solved using Phing or Maven + AntRun .
In order for our build script to perform actions on remote servers, it is necessary to generate ssh keys: leave the private key on the CI server, and distribute the public key across all the servers that will be interacting with: staging, repo, svn - adding them to the list known hosts (known_hosts). In addition, in order for Hudson to be able to install the package on a remote server, you will need to create the corresponding user (hudson) on the remote server and give it sudo.
Thirdly, to successfully build java applications using Maven, you will need to determine the Maven settings for the hudson user on the CI server (meaning ~ / .m2 directory ).
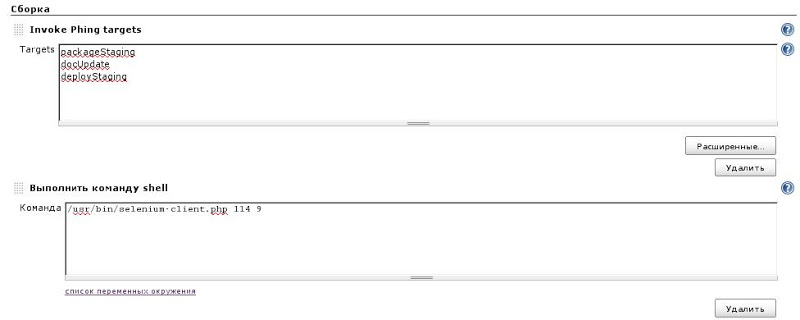
The next step after installing the package on the staging server should be the launch of integration tests. They can be run on the CI server itself, however, it is preferable to do this on the staging server. In the first case, everything is quite simple: we call the appropriate Phing / Maven target or configure the SeleniumHQ plugin .
However, the question remains open, what to do if you want to start the testing process on an external server - for example, access the Selenium RC server? The answer here is as simple as possible: Selenium RC has an HTTP API to work with it, so the most trivial solution in this case is to write a small script in any language you like, which initiates the testing process and from time to time polls the remote server for the completion of the test. Next, this script is connected to the build script through the plugin “Execute Shell”. I also add that the success or failure of the script is determined by Hudson based on the return code of your script.
Having set up the assembly process, we will not forget about the most important part of the process - notifying the developer about the assembly results. Hudson allows you to configure mail notifications for both specific recipients and authors of commit'ov, whose changes caused a breakdown.
In addition, I recommend that anyone who uses Hudson for PHP projects should read the relevant articles from the Hudson Wiki .
Staging server
Package Installation
And so, as mentioned above, our infrastructure should have a server configured as close as possible to the combat one. Hudson will install the latest project packages collected via trunk on this server. This will give us the opportunity:
- conduct integration testing in conditions as close as possible to combat conditions,
- will allow you to have a kind of platform to demonstrate the latest functionality.
One of the main problems that will have to be solved when setting up this server is the silent installation of packages. In order for our packages to be installed without unnecessary dialogs (that is, they could be installed using scripts or Hudson plugins), it is necessary to reconfigure debconf ( dpkg-reconfigure debconf ), indicating to it the level of importance of the questions asked is higher than those used in installation scripts of your deb package.
In addition, there may be dependencies between packages installed on the staging server. So, for example, the project “client” depends on the project “server”. In this case, we must explicitly ensure that the installation of the “server” package necessary for it occurs on the staging server when installing the “client” package.
At first glance, the obvious solution, taking into account the distribution of the project through deb packages,
is to manage dependencies using dpkg by adding information about the server package to the dependencies control file of the client package.
In this case, we will also have to select a separate debian repository, into which all packages collected by the CI server will merge, and complete the build script with the command to copy the package to the repository. In addition, it will be necessary to organize a mechanism for automatically updating data in this repository when adding a new package, arrange access to the repository pool (for example, by raising a web server), and add this repository to sources-list on the staging server. When organizing auto-update manually (by launching the package scanner after putting the package into the repository), the new package can be installed via apt, if the repository is updated on a schedule, you will have to invent tricks like dpkg -i package; apt-get -f install . Read more about setting up your debian repository here..
However, this approach has several disadvantages. Firstly, dependencies can only be installed on the same server. Secondly, this approach complicates the whole system as a whole, which contradicts the KISS principle (well, or “SMOKE”, if in Russian: D).
The best solution, in my opinion, is to use the repository only for interaction with the battle server. At the same time, uploading packages to the repository should not be carried out automatically, but by the decision of the developer. As for the staging server, packages from the trunk of the main package and all its dependencies will be installed on it, which will significantly reduce the complexity of the CI system, while giving us the opportunity to have the latest current versions of
packages on the staging server .
Work with a DB
Our packages can use the database. In this case, the database is also installed on the staging server, and the database structure / data is updated using the dbdeploy utility .
There are two ways to integrate dbdeploy into a project:
- a separate project in SVN is allocated for each database and, as a result, in Hudson, with its own build script initiated by the SVN hook (the option makes sense when the database is used by several projects),
- the dbdeploy file structure becomes part of the main project, and the dbdeploy database version update script is called in the postinst script of the package.
Separately, in this case, the question arises about changes in database data during testing. It is clear that when writing unit tests we do not work with the database, but use mock objects (for example, I like Mockito ).
However, what about integration tests that simply need to work in "real" conditions? In the case of XUnit tests, we can perform each test as part of a database transaction. In my opinion, this approach is preferable, since taking into account the versioning of the database through dbdeploy, we always know what data we have in the database at the moment and we can safely bind to it in our tests. However, in the case of testing the web interface (for example, using Selenium), we do not have the ability to run each test within a transaction.
Therefore, there are two options in my opinion: either before starting the web-interface testing, completely reinitialize the data in the database based on the available
patches, or build the tests so that they are not tied to any specific data from the database (for example, create the necessary data testing the data through the web-interface themselves) and, if possible, did not leave behind “garbage”.
Server selenium
In the case when the application does not have a web interface, the integration test on the staging server, as I wrote above, may well consist in running XUnit tests. However, with a user interface, it is extremely convenient to conduct a full test of the entire chain from HTML to the database using Selenuim.
Selenium is a powerful web application testing system, which can be conditionally divided into two parts:
- Selenuim IDE - a tool for developing and running test scripts in a browser (available as a plugin'a firefox),
- Selenium RC is a distributed system from the Selenium server and its subordinate clients, on which tests are run under different browsers.
For obvious reasons, we are interested in the second option. Since installing and configuring Selenuim is a big topic, I don’t see the point in this article: all the information is in the documentation .
Remarks
It is worth noting that CI can be carried out in manual mode, each time compiling and testing the code before commit. However, automation of this process using the CI server is much more expedient. In addition, it is important to understand that CI and nightly builds are not the same thing. The latter allow you to identify bugs, but with a big delay, while the goal of CI is the speedy detection of errors. In my opinion, nightly assemblies can serve as a partial replacement for CI only if the assembly and testing of the project is a process that takes quite a lot of time. In addition, if the project has both unit and integration tests, you can split the project assembly into two parts: the first (with unit tests) is run every time when commit'e, the second with integration tests - once per hour / day.
Conclusion
The solution described above works and brings profit . However, as we all know, the theory, unfortunately, does not always correspond to practice. The implementation of the CI system required the solution of a number of problems, not all of which were solved ideally.
The likelihood that someone will give you resources for a staging server that is comparable to combat features is extremely small - most likely it will be a medium-sized virtual machine on a semi-abandoned host machine, which fundamentally undermines one of the principles of CI - testing in a similar environment . This, in turn, entails that integration tests can begin to take much longer than originally planned. Therefore, in my case, “continuity” had to give up and start running tests not according to SVN hooks, but according to a schedule.
In general, if your team has a certain development culture (I mean the understanding that CI is not a panacea, but only a tool that, with proper handling, can improve the quality of their work), the implementation of CI is justified.
Well, probably the most important thing: as practice has shown, the integration of the CI system is a team task. To solve it, the work of developers, testers and administrators will be required.