CentOS 5 + ISPManager + Redmine
It all started with the fact that I needed Redmine, since this system was discussed on the hub, I won’t go into details, I’ll just say that it requires ruby 1.8.6 / 1.8.7, rails 2.3.5 rack 1.0.1 to work .
But not everything is as simple as it seems at first glance, if such instructions for Debian can be found in Google without problems with the shaft, then with CentOS everything is not so rosy, although I still found a little searching for the instructions. The situation was aggravated by the fact that ISPManager was already installed on the host, of course it was possible to install clean CentOS and not steam, but since I repeatedly noticed interest in this configuration on different freelance sites, I decided to figure out how to fix everything without disturbing normal functioning system.
Everything is installed by default, of which only nginx is installed through yum and is included in ISPManager from special changes.
First of all, we need to install ruby and of course rails, and here we come across the first problem, the fact is that in the basic CentOS package there is only version 1.8.5 which does not satisfy the Redmine system requirements. Therefore, I went to Google in search of the right version already built under CentOS, the only thing I found was a third-party repository with the version I needed, which I didn’t burn with the desire, and after a quick look at it, I found that there was only x86 packages that didn't suit me. I also came across a tip to collect Ruby from src.rpm from Fedora 13, this option was also discarded by me. As a result, Google led me to this wonderful Haut that I partially took advantage of.
Add the repository and install ruby and rails:
And so ruby and rails of the required version are installed.
Also, gem i18n versions below 0.4.0.0 are needed, since versions 0.4.0.0 and higher cause problems. And so everything is almost ready, it remains only to configure ISPManager. I want to note that in ISPManager it is possible to use Ruby on Rails right out of the box, which helped a lot since crutches are not necessary. Nevertheless, additional gestures will still be required of you. Namely:
With Phusion Passenger ™, everything is relatively simple: If everything goes as it should at the end of the apache module build process, you will see: copy the following in /etc/httpd/conf.d/passenger.conf: and restart apache You also need to install mysql support for ruby On that's all, RoR is installed and ready to use. As I said earlier, ISPManager has RoR support, but in our case it’s not possible to turn it on directly in the panel because the panel wants to install packages from the standard repository, but as mentioned earlier, they do not suit us, but this is not a problem at all. As it turned out, RoR simply turns on through the ISPManager config . To do this, just add the line
at the end of the /usr/local/ispmgr/etc/ispmgr.conf file
and reboot ISPManager
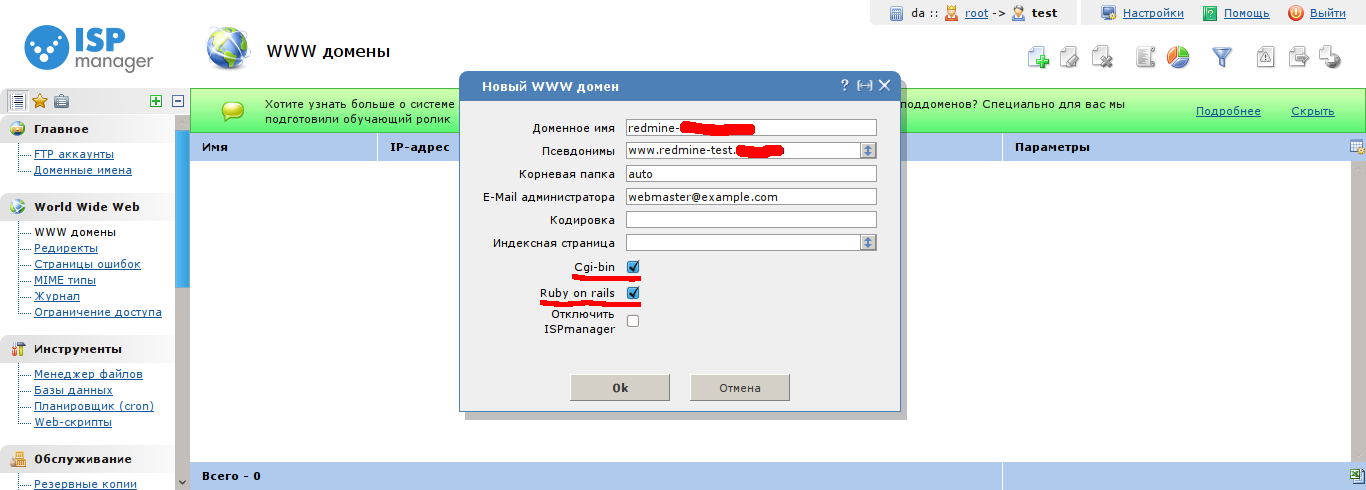
After all these manipulations, go to the ISPManager admin panel and create a domain for our Redmine.
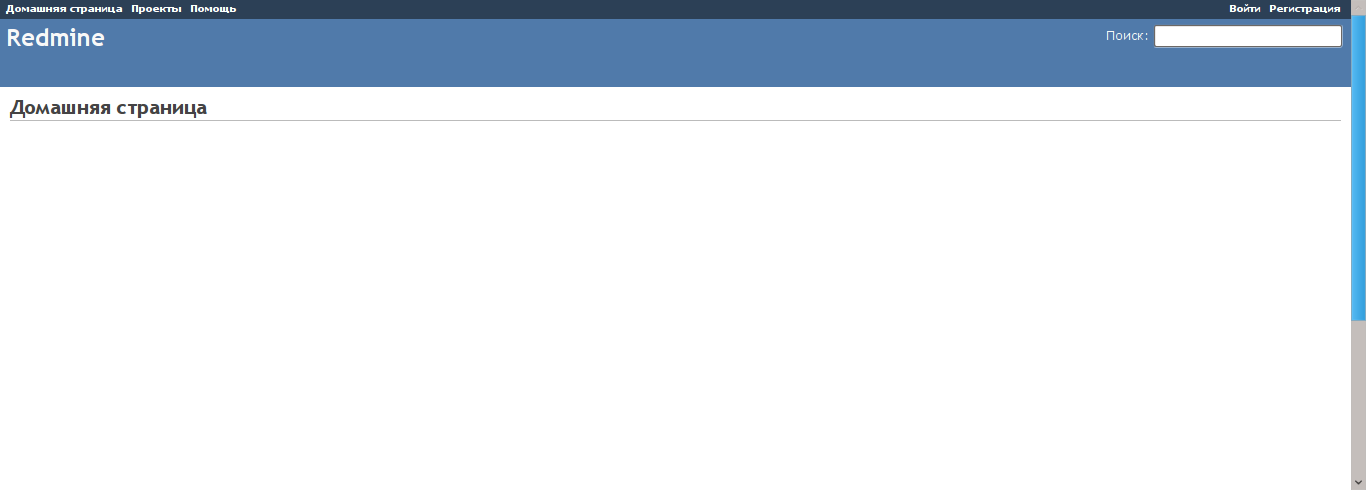
Everything is ready, now you can proceed directly to the installation of Redmine.
log in under your user via ssh and go to the web root of the newly created domain. delete the entire contents of the directory Download Redmine version 1.0.1 (I installed from the trunk) and unpack
I used mysql as the database, as far as I know there are some troubles with the Russian language when using mysql as a database for Redmine, but it didn’t matter to me (non-Russian speakers will use it). Nothing will stop you from using PostgreSQL as a database. It is understood that the database has already been created and you have all the necessary data on hand.
Before starting all the manipulations, you need to freeze the ruby version.
To do this, under the root we go to the directory where we downloaded Redmine and do the following. This will avoid problems with updates. You also need to fix one line in / var / www /
/ data / www //vendor/rails/activesupport/lib/active_support/vendor.rb
replace
with
this all to avoid problems associated with i18n.
Ok, now we return to the console of our user, and copy the example of the database config. We edit config / database.yml, everything is quite simple there, drive the necessary data to connect to the database and also the type of database. There will be something like this And we directly install Redmine That seems to be all, Redmine is installed and ready to use. Remember to remove the compiler from the battle server. Plans to screw another Git for complete happiness.
Comments and additions are welcome.
But not everything is as simple as it seems at first glance, if such instructions for Debian can be found in Google without problems with the shaft, then with CentOS everything is not so rosy, although I still found a little searching for the instructions. The situation was aggravated by the fact that ISPManager was already installed on the host, of course it was possible to install clean CentOS and not steam, but since I repeatedly noticed interest in this configuration on different freelance sites, I decided to figure out how to fix everything without disturbing normal functioning system.
What is available at the entrance:
- CentOS 5.5 x86_64
- ISPManager Lite
Everything is installed by default, of which only nginx is installed through yum and is included in ISPManager from special changes.
So, let's begin
First of all, we need to install ruby and of course rails, and here we come across the first problem, the fact is that in the basic CentOS package there is only version 1.8.5 which does not satisfy the Redmine system requirements. Therefore, I went to Google in search of the right version already built under CentOS, the only thing I found was a third-party repository with the version I needed, which I didn’t burn with the desire, and after a quick look at it, I found that there was only x86 packages that didn't suit me. I also came across a tip to collect Ruby from src.rpm from Fedora 13, this option was also discarded by me. As a result, Google led me to this wonderful Haut that I partially took advantage of.
Add the repository and install ruby and rails:
[root@example.com]# cd /tmp

[root@example.com tmp]# wget packages.endpoint.com/endpoint-rpmsign.pub

[root@example.com tmp]# rpm --import endpoint-rpmsign.pub

[root@example.com tmp]# wget packages.endpoint.com/rhel/5/os/x86_64/endpoint-repo-1.0-1.x86_64.rpm

[root@example.com tmp]# yum localinstall endpoint-repo-1.0-1.x86_64.rpm

[root@example.com tmp]# yum install ruby-enterprise ruby-enterprise-rubygems

[root@example.com tmp]# gem install -v=2.3.5 rails
And so ruby and rails of the required version are installed.
Also, gem i18n versions below 0.4.0.0 are needed, since versions 0.4.0.0 and higher cause problems. And so everything is almost ready, it remains only to configure ISPManager. I want to note that in ISPManager it is possible to use Ruby on Rails right out of the box, which helped a lot since crutches are not necessary. Nevertheless, additional gestures will still be required of you. Namely:
[root@example.com tmp]# gem install -v=0.3.7 i18n
- Install Phusion Passenger ™
- Enable RoR Support in ISPManager
With Phusion Passenger ™, everything is relatively simple: If everything goes as it should at the end of the apache module build process, you will see: copy the following in /etc/httpd/conf.d/passenger.conf: and restart apache You also need to install mysql support for ruby On that's all, RoR is installed and ready to use. As I said earlier, ISPManager has RoR support, but in our case it’s not possible to turn it on directly in the panel because the panel wants to install packages from the standard repository, but as mentioned earlier, they do not suit us, but this is not a problem at all. As it turned out, RoR simply turns on through the ISPManager config . To do this, just add the line
[root@example.com tmp]# gem install passenger

[root@example.com tmp]# yum install gcc-c++ httpd-devel

[root@example.com tmp]# passenger-install-apache2-module
The Apache 2 module was successfully installed.

Please edit your Apache configuration file, and add these lines:


 LoadModule passenger_module /usr/local/lib/ruby/gems/1.8/gems/passenger-2.2.15/ext/apache2/mod_passenger.so

 PassengerRoot /usr/local/lib/ruby/gems/1.8/gems/passenger-2.2.15

 PassengerRuby /usr/local/bin/ruby

After you restart Apache, you are ready to deploy any number of Ruby on Rails

applications on Apache, without any further Ruby on Rails-specific

configuration!

Press ENTER to continue.
LoadModule passenger_module /usr/local/lib/ruby/gems/1.8/gems/passenger-2.2.15/ext/apache2/mod_passenger.so

PassengerRoot /usr/local/lib/ruby/gems/1.8/gems/passenger-2.2.15

PassengerRuby /usr/local/bin/ruby
[root@example.com tmp]# service httpd reload
 [root@example.com tmp]# yum install mysql-devel.x86_64

 [root@example.com tmp]# gem install mysql
path rails /usr/local/bin/railsat the end of the /usr/local/ispmgr/etc/ispmgr.conf file
and reboot ISPManager
[root@example.com tmp]# killall ispmgrAfter all these manipulations, go to the ISPManager admin panel and create a domain for our Redmine.
Everything is ready, now you can proceed directly to the installation of Redmine.
log in under your user via ssh and go to the web root of the newly created domain. delete the entire contents of the directory Download Redmine version 1.0.1 (I installed from the trunk) and unpack
-bash-3.2$ cd www/redmine.example.com
-bash-3.2$ rm -rf ./* (будьте внимательны!!! пропустите точку и будет очень весело, только не знаю кому)
-bash-3.2$ wget rubyforge.org/frs/download.php/72201/redmine-1.0.1.tar.gz

-bash-3.2$ tar xvzf redmine-1.0.1.tar.gz

-bash-3.2$ mv redmine-1.0.1/* .

-bash-3.2$ rm -rf ./redmine-1.0.1*
I used mysql as the database, as far as I know there are some troubles with the Russian language when using mysql as a database for Redmine, but it didn’t matter to me (non-Russian speakers will use it). Nothing will stop you from using PostgreSQL as a database. It is understood that the database has already been created and you have all the necessary data on hand.
Before starting all the manipulations, you need to freeze the ruby version.
To do this, under the root we go to the directory where we downloaded Redmine and do the following. This will avoid problems with updates. You also need to fix one line in / var / www /
-bash-3.2$ cd /var/www//data/www/

-bash-3.2$ rake VERSION=2.3.5 rails:freeze:gems
replace
gem 'i18n', '>= 0.1.3'bwith
gem 'i18n', '>= 0.1.3', '< 0.4.0'this all to avoid problems associated with i18n.
Ok, now we return to the console of our user, and copy the example of the database config. We edit config / database.yml, everything is quite simple there, drive the necessary data to connect to the database and also the type of database. There will be something like this And we directly install Redmine That seems to be all, Redmine is installed and ready to use. Remember to remove the compiler from the battle server. Plans to screw another Git for complete happiness.
-bash-3.2$ cp config/database.yml.example config/database.yml
production:

  adapter: mysql

  database: redmine_test

  host: localhost

  username: redmine_test

  password: redmine_test

  encoding: utf8


development:

  adapter: mysql

  database: redmine_test

  host: localhost

  username: redmine_test

  password: redmine_test

  encoding: utf8
-bash-3.2$ rake generate_session_store

-bash-3.2$ RAILS_ENV=production rake db:migrate

-bash-3.2$ RAILS_ENV=production rake redmine:load_default_data
List of sources used:
- Installing Redmine (from SVN) on a clean CentOS 5.4 box
- ISPmanager configuration file (ISPmanager)
- Fix problems with i18n
Comments and additions are welcome.