Tank - your robot on Arduino
We program the robot based on Arduino.
I'll start with a theory and description of everything that comes in handy.

Let me remind you that Arduino is a hardware computing platform whose main components are a simple input / output board and a development environment in the Processing / Wiring language. The documentation for the hardware and software code are published under the “copyleft” license, but the developers expressed a desire that the name “Arduino” be a trademark for an official product and not be used for derivative works without permission. The document on the use of the name Arduino emphasizes that the project is open to all comers.
Until recently, the creation of robots was considered a very difficult procedure, requiring a highly qualified developer and special education, as well as a long development time. But with the advent of Arduino boards, almost everyone who is even a little familiar with programming can afford this activity! Nowhere is simpler, but first things first.
The Arduino board consists of an Atmel AVR microcontroller and element wiring for programming and integration with other circuits. Each board must have a 5V linear voltage regulator and a 16 MHz crystal oscillator. The bootloader is pre-flashed into the microcontroller, so an external programmer is not needed.
The Arduino project is constantly evolving and has many modifications. Currently, 10 versions of the boards are available, but specifically in this project, the Arduino Diecimila board was used. It is a small electronic board, the core of which is the ATmega168 microcontroller. On the board there are: 14 digital inputs / outputs, 6 of which can work in PWM mode (and therefore control analog devices like motors and transmit binary data), 6 analog inputs, a 16 MHz clock, power connectors and USB, ICSP port (a bit like a serial interface for digital devices), several control LEDs and a reset button. This is enough to connect the board to the computer’s USB port, install the necessary software (driver and development environment) and start programming.

Appearance of the Arduino Diecimila board.
Brief specification
Microcontroller: ATmega168
Operating voltage: 5 V
Input voltage (recommended): 7-12 V
Input voltage (limits): 6-20 V
Digital input / output ports: 14 ports (of which 6 with PWM signal)
Analog input ports : 6 ports
Current for ports: 40 mA
Current for 3.3 V source: 50 mA
EPROM (Flash Memory): 16 KB (of which 2 KB are used by the bootloader)
RAM (SRAM): 1 KB
ROM (EEPROM): 512 bytes
Clock frequency: 16 MHz
What is needed in order to make your robot?
A robot can be assembled, as many enthusiasts do, but it is possible to recycle an existing one. As a robot, any toy with moving parts is suitable. In my case, it’s a tank, with moving tracks, driven by built-in motors (the tank had a remote control). These are the motors I will control with the help of the board.
An important stage, of course, is getting one of the Arduino boards at your disposal. In my case, this is the Arduino Diecimila board. Also, to connect the board to a computer, a USB cable of any length of the AB standard is required. Through this cable, data will be exchanged between the computer and the microcontroller, as well as power supply to the board, i.e. An external power supply is optional. Another component that is needed to control motors is the MotorShield expansion board.

MotorShield Expansion Board and Parts Kit.

What and how to connect to MotorShield.
Next, you need to determine the goals: I need to attach a remote control to an existing toy tank, but not the usual “where I clicked - I went there,” but one in which coordinates would be transmitted to the tank on an imaginary field and it would reach them on its own. Those. you need to imagine that the room (or any other area along which the tank will move) is divided into squares, which are a coordinate system. Then the tank will need to transmit the coordinates of a square and it will have to turn to it and drive the necessary distance to become in that square.
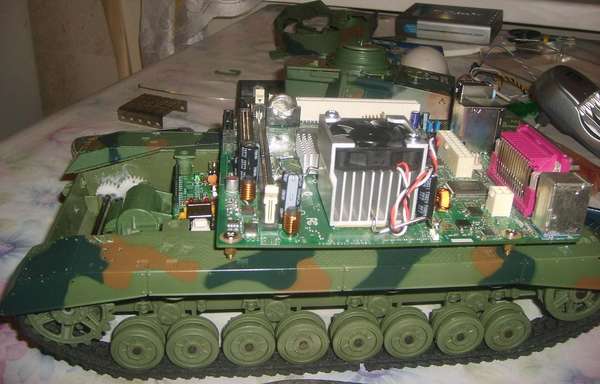
Toy tank with a motherboard.

The motherboard is clearly larger than the Arduino :).
There is a tank with motors, there is a board, there is an expansion board. A tool is needed to transmit coordinates. This will be a program on the user's computer that will transfer this data to the tank via Wi-Fi connection. I should note that Wi-Fi is not clear to the board, so the tank also has a regular motherboard (later replaced by a laptop), which will transmit data from the Wi-Fi adapter to the COM port through which there will be communication with the Arduino board. From it, signals will already arrive on the expansion board, and the motors will have to spin. The task boils down to writing two programs: one for transferring data from a computer to a Wi-Fi adapter, the other for processing data inside a microcontroller.

So let's go!
The program responsible for the exchange of data between the PC and the microcontroller via the COM port can be written on anything. Let it be Delphi.
For brevity, I will give the source code only to the function that will transmit to the tank the teams responsible for turning and moving to the desired angle / distance. The function accepts the current coordinates (x0, y0), new coordinates (x1, y1) and the current angle of rotation of the tank alpha. The function will return the new current angle. The current coordinates and angle are stored outside the function. The code is commented out in the right places, so I will not describe it.
The next step is to write a program for flashing it into the board. All we need is to receive data from the serial port and process the received command, turning on the rotation of the tank motors in the right direction. The motors turn on for a certain time and the duration of this time, movement to the required distance is achieved.
The program uses pin No. 9 (TxD) to receive data. Accordingly, the 2nd contact of the COM port of the motherboard (RxD) must be connected to pin No. 9 on the Arduino. Another requirement: you need to configure the COM port of the motherboard at a speed of 9600 baud.
To control the movement of the tank we will use two motors - for the left and right tracks (connectors M1 and M2 on the Motor Shield). To simplify the work with motors, we use the AFMotor framework, which is easily connected to our project with one line “#include“ AFMotor.h ””. The motors are denoted by the numbers 1 for the left and 2 for the right tracks. The code below shows that working with motors is not a big deal.
It remains only to flash this program in Arduino (and this is done by pressing a single button in the Arduino IDE interface) and you can have fun by sending the tank to the rear of the enemy :).
Conclusion
Of course, you can go beyond simply sending coordinates. You can add interactivity using the joystick to control the tank. And using a webcam attached to the tank turret, you can observe the movement while sitting at the computer. But this will require additional software. But even this does not make Arduino programming something unbearable. Working with such a board is simple, easy, and most importantly - affordable! Although not, the main thing is to get a lot of pleasure both from the result and from the process itself!
I'll start with a theory and description of everything that comes in handy.
Let me remind you that Arduino is a hardware computing platform whose main components are a simple input / output board and a development environment in the Processing / Wiring language. The documentation for the hardware and software code are published under the “copyleft” license, but the developers expressed a desire that the name “Arduino” be a trademark for an official product and not be used for derivative works without permission. The document on the use of the name Arduino emphasizes that the project is open to all comers.
Until recently, the creation of robots was considered a very difficult procedure, requiring a highly qualified developer and special education, as well as a long development time. But with the advent of Arduino boards, almost everyone who is even a little familiar with programming can afford this activity! Nowhere is simpler, but first things first.
The Arduino board consists of an Atmel AVR microcontroller and element wiring for programming and integration with other circuits. Each board must have a 5V linear voltage regulator and a 16 MHz crystal oscillator. The bootloader is pre-flashed into the microcontroller, so an external programmer is not needed.
The Arduino project is constantly evolving and has many modifications. Currently, 10 versions of the boards are available, but specifically in this project, the Arduino Diecimila board was used. It is a small electronic board, the core of which is the ATmega168 microcontroller. On the board there are: 14 digital inputs / outputs, 6 of which can work in PWM mode (and therefore control analog devices like motors and transmit binary data), 6 analog inputs, a 16 MHz clock, power connectors and USB, ICSP port (a bit like a serial interface for digital devices), several control LEDs and a reset button. This is enough to connect the board to the computer’s USB port, install the necessary software (driver and development environment) and start programming.
Appearance of the Arduino Diecimila board.
Brief specification
Microcontroller: ATmega168
Operating voltage: 5 V
Input voltage (recommended): 7-12 V
Input voltage (limits): 6-20 V
Digital input / output ports: 14 ports (of which 6 with PWM signal)
Analog input ports : 6 ports
Current for ports: 40 mA
Current for 3.3 V source: 50 mA
EPROM (Flash Memory): 16 KB (of which 2 KB are used by the bootloader)
RAM (SRAM): 1 KB
ROM (EEPROM): 512 bytes
Clock frequency: 16 MHz
What is needed in order to make your robot?
A robot can be assembled, as many enthusiasts do, but it is possible to recycle an existing one. As a robot, any toy with moving parts is suitable. In my case, it’s a tank, with moving tracks, driven by built-in motors (the tank had a remote control). These are the motors I will control with the help of the board.
An important stage, of course, is getting one of the Arduino boards at your disposal. In my case, this is the Arduino Diecimila board. Also, to connect the board to a computer, a USB cable of any length of the AB standard is required. Through this cable, data will be exchanged between the computer and the microcontroller, as well as power supply to the board, i.e. An external power supply is optional. Another component that is needed to control motors is the MotorShield expansion board.
MotorShield Expansion Board and Parts Kit.
What and how to connect to MotorShield.
Next, you need to determine the goals: I need to attach a remote control to an existing toy tank, but not the usual “where I clicked - I went there,” but one in which coordinates would be transmitted to the tank on an imaginary field and it would reach them on its own. Those. you need to imagine that the room (or any other area along which the tank will move) is divided into squares, which are a coordinate system. Then the tank will need to transmit the coordinates of a square and it will have to turn to it and drive the necessary distance to become in that square.
Toy tank with a motherboard.
The motherboard is clearly larger than the Arduino :).
There is a tank with motors, there is a board, there is an expansion board. A tool is needed to transmit coordinates. This will be a program on the user's computer that will transfer this data to the tank via Wi-Fi connection. I should note that Wi-Fi is not clear to the board, so the tank also has a regular motherboard (later replaced by a laptop), which will transmit data from the Wi-Fi adapter to the COM port through which there will be communication with the Arduino board. From it, signals will already arrive on the expansion board, and the motors will have to spin. The task boils down to writing two programs: one for transferring data from a computer to a Wi-Fi adapter, the other for processing data inside a microcontroller.
So let's go!
The program responsible for the exchange of data between the PC and the microcontroller via the COM port can be written on anything. Let it be Delphi.
For brevity, I will give the source code only to the function that will transmit to the tank the teams responsible for turning and moving to the desired angle / distance. The function accepts the current coordinates (x0, y0), new coordinates (x1, y1) and the current angle of rotation of the tank alpha. The function will return the new current angle. The current coordinates and angle are stored outside the function. The code is commented out in the right places, so I will not describe it.
Copy Source | Copy HTML- Function MoveTank(x0, y0, x1, y1, alpha: integer): integer;
- var newAlpha: integer; // новый угол
- FlagsField : byte; // содержит код направления движения
- angle_tmp: integer;
- TmpStr: string;
- angle, dist: byte; // угол и расстояние, передаваемые танку
- begin
- // Вычисление нового текущего угла
- newAlpha := Round(ArcTan(Abs((x0-x1)/(y0-y1)))); // Поворот относительно текущего положения
- angle_tmp := (360 + newAlpha - alpha) mod 360; // Расстояние между заданными координатами
- dist := Round(10*Sqrt(Sqr(x0-x1) + Sqr(y0-y1)));
- FlagsField := 0; // Определение оптимального направления движения
-
- if angle_tmp <= 90 then FlagsField := 0 // передом, вправо
- else if angle_tmp < 180 then
- begin
- angle_tmp := 180 - angle_tmp;
- FlagsField := FlagsField or 4; // задом, вправо
- end
- else if angle_tmp < 270 then
- begin
- angle_tmp := angle_tmp - 180;
- FlagsField := FlagsField or 6; // задом, влево
- end
- else begin
- angle_tmp := angle_tmp - 270;
- FlagsField := FlagsField or 2; //передом, влево
- end;
-
- angle := angle_tmp;
-
- // Далее нужно отправить в COM-порт сначала флаги, затем данные.
-
- FlagsField:= FlagsField or 1; // для передачи угла
- TmpStr := Chr(FlagsField);
- ComPort_.Write(TmpStr);
- TmpStr := Chr(angle);
- ComPort_.Write(TmpStr);
-
- FlagsField:= FlagsField and 254; // для передачи расстояния
-
- TmpStr := Chr(FlagsField);
- ComPort_.Write(TmpStr);
- TmpStr := Chr(dist);
- ComPort_.Write(TmpStr);
-
- Result := newAlpha;
- end;
The next step is to write a program for flashing it into the board. All we need is to receive data from the serial port and process the received command, turning on the rotation of the tank motors in the right direction. The motors turn on for a certain time and the duration of this time, movement to the required distance is achieved.
The program uses pin No. 9 (TxD) to receive data. Accordingly, the 2nd contact of the COM port of the motherboard (RxD) must be connected to pin No. 9 on the Arduino. Another requirement: you need to configure the COM port of the motherboard at a speed of 9600 baud.
To control the movement of the tank we will use two motors - for the left and right tracks (connectors M1 and M2 on the Motor Shield). To simplify the work with motors, we use the AFMotor framework, which is easily connected to our project with one line “#include“ AFMotor.h ””. The motors are denoted by the numbers 1 for the left and 2 for the right tracks. The code below shows that working with motors is not a big deal.
Copy Source | Copy HTML- #include "AFMotor.h" // библиотека для удобства обращения с движками
-
- #define TX 9 // пин на Arduino, куда подключен выход из COM-порта
-
- // кодирование команд от джойстика
-
- #define cmdForward 1
- #define cmdBackward 2
- #define cmdRapidLeft 3
- #define cmdRapidRight 4
- #define cmdLeft 5
- #define cmdRight 6
-
- // скорости вращения движков
- // MaxSpeed - обычное движение
- // MinSpeed - скорость одной из гусениц при резком повороте
- // HalfSpeed - скорость одной из гусениц при плавном повороте
-
- #define MaxSpeed 200
- #define MinSpeed 100
- #define HalfSpeed 150
-
- // движение танка со скоростями левой и правой гусениц LTS и RTS
- // в направлении Direction
-
- void MoveTank(byte LTS, byte RTS, byte Direction);
-
- // чтение одного байта с COM-порта
- byte COMread();
-
- // хранит команду, полученную с COM-порта
- byte Command = 0;
-
- // текущее направление движения
- byte CurrentDirection = FORWARD;
-
- // выбираем 1й и 2й разъемы на Motor Shield, куда подключены движки
- AF_DCMotor LeftTrack(1, MOTOR12_1KHZ);
- AF_DCMotor RightTrack(2, MOTOR12_1KHZ);
-
- void setup()
- {
- LeftTrack.setSpeed(MaxSpeed);
- RightTrack.setSpeed(MaxSpeed);
- pinMode(TX, INPUT);
- }
-
- void loop()
- {
- Command = COMread();
- switch (Command)
- {
- case cmdForward:
- MoveTank(MaxSpeed, MaxSpeed, FORWARD);
- CurrentDirection = FORWARD;
- break;
- case cmdBackward:
- MoveTank(MaxSpeed, MaxSpeed, BACKWARD);
- CurrentDirection = BACKWARD;
- break;
- case cmdRapidLeft:
- MoveTank(MinSpeed, MaxSpeed, CurrentDirection);
- break;
- case cmdRapidRight:
- MoveTank(MaxSpeed, MinSpeed, CurrentDirection);
- break;
- case cmdLeft:
- MoveTank(HalfSpeed, MaxSpeed, CurrentDirection);
- break;
- case cmdRight:
- MoveTank(MaxSpeed, HalfSpeed, CurrentDirection);
- break;
- default:
- LeftTrack.run(RELEASE); // останавливаем двигатели
- RightTrack.run(RELEASE);
- break;
- }
- }
-
- void MoveTank(byte LTS, byte RTS, byte Direction)
- {
- LeftTrack.setSpeed(LTS);
- RightTrack.setSpeed(RTS);
- LeftTrack.run(Direction);
- RightTrack.run(Direction);
- }
-
- byte COMread()
- {
- byte val = 0;
- while (digitalRead(TX));
- // ждем стартовый бит
- if (digitalRead(TX) == LOW)
- {
- delayMicroseconds(42);
- for (int k = 0; k < 8; k++)
- {
- delayMicroseconds(84);
- val |= digitalRead(TX) << k;
- }
- // ожидание 9го бита и стопового
- delayMicroseconds(168);
- return val;
- }
- }
It remains only to flash this program in Arduino (and this is done by pressing a single button in the Arduino IDE interface) and you can have fun by sending the tank to the rear of the enemy :).
Conclusion
Of course, you can go beyond simply sending coordinates. You can add interactivity using the joystick to control the tank. And using a webcam attached to the tank turret, you can observe the movement while sitting at the computer. But this will require additional software. But even this does not make Arduino programming something unbearable. Working with such a board is simple, easy, and most importantly - affordable! Although not, the main thing is to get a lot of pleasure both from the result and from the process itself!