Nokia N900. We continue to understand or "Hack your Nokia N900"
Good afternoon, dear reader. Continuing my series of articles on the Nokia N900. Here , here and here are my previous publications.
Today we continue to study the device, and today's topic is a hack. We will go into different things and change different things that are not intended for change by the developers. This is done very easily and subject to even the average user, if he has the desire. I won’t tell you how to patch the kernel or take the device to high-performance mode, I’ll just show some useful improvements that can be useful to everyone.
Warning: the author is not responsible for damage to your device in the process of following these instructions. You do everything at your own peril and risk.
Hope not really scared? I can say that killing the device to such a state that you cannot restore it is almost unrealistic (but possible !!! I know one case). But even if you succeed, then a 99% service center will help you. But the main rule is to be careful and read first, and then do it, and do it carefully and pay close attention to the sequence of actions, and most importantly, what is highlighted in red (not for nothing that I highlighted it).

The title page displays the process of the disassembled N900. There is an official service manual. But it is not publicly available. It is distributed to service centers, as far as I know. But there are instances on the network and you can find them if you wish: keywords Nokia, Service Manual RX-51. I have no right to lay it out - it contradicts copyright:
It translates approximately like this: Copying, transferring, distributing and storing parts or all of the contents of this document in any form without the prior consent of Nokia is FORBIDDEN.
I didn’t take the picture from this document, but from here , a fairly popular and widespread resource, and I personally received permission to republish from them (they claim that they have the rights to publish this image and have the right to allow republishing). But at the first appeal indicating the illegality of the distribution of this information from representatives of Nokia, I will remove this picture.
Well, in this document everything is described with pictures and does not differ much from disassembling other devices.
I apologize for the fact that I can not lay out the document, but I can’t do my own instructions, it’s a pity to disassemble my device for this :-).
In previous publications, I described many interesting applications and many of them are in extra-testing and even extra-devel repositories. This means that these applications not only do not guarantee that they will work stably, they do not guarantee that they will not break your phone :-) Plus, some of the instructions in this publication can make a brick out of your N900. Therefore, I first decided to show how to restore the device in this case.
As additional material in Russian, you can see the translation of the Maemo.org Wiki on Fruct .
Nokia in this regard, well done and you can reflash the N900 on any OS (I mean the big three Linux / MacOS / Windows, but not really all the OS :-)).
What we need:
1. The firmware tool is flasher.
download here .
these files are of interest to us there (the versions may differ, as the following versions may appear, but the names should remain the same or similar):
maemo_flasher-3.5_2.5.2.2.exe - version for Windows 7, XP, Vista.
maemo_flasher-3.5_2.5.2.2.tar.gz - version for Linux.
maemo_flasher-3.5_2.5.2.2_i386.deb is the version for the Debian Linux families.
maemo_flasher-3.5_2.5.2.2_i386.dmg - version for Intel Mac OS.
maemo_flasher-3.5_2.5.2.2_ppc.dmg - version for PPC Mac OS.
2. Download from here the image of the root system image and, if necessary, the eMMC image (this is the memory that is 32 GB).
tablets-dev.nokia.com/nokia_N900.php "> Download from this link.
There you need to enter IMEI.

It is located under the battery or in “Options” -> “About Product”. There in the popup window is the last line.

You can also get it by typing * # 06 # on the telephone keypad.
Then we accept the license agreement by clicking the "I accept" button.
We are interested in this file: RX-51_2009SE_3.2010.02-8_PR_COMBINED_MR0_ARM.bin or later, if it does (select the Europe region, since Africa and the States are not suitable, unless you bought the phone there).
And this RX-51_2009SE_1.2009.41-1.VANILLA_PR_EMMC_MR0_ARM.bin, if you decide to reflash eMMC.
Also, on the sold device, maps of the region in which it is sold are pre-loaded, but there are no cards in this image, but this is not scary, you can use Map Loader to eliminate this trouble. Why I may need this, I’ll tell you below, but if you don’t know if you need it, then you don’t need it.
If you have 64-bit Debian Linux and you install from a deb file, then you need to run this command in the directory where you saved the package
You don’t need to do anything here, the only thing you need to know is that flasher can be found in / usr / bin.
The default package is put in% Program Files% / maemo /.
In Windows 7, you must disable driver signature verification. It is easy to do.
Go to the "Start" menu and select the cmd program. Right-click on it and "Run as Administrator."
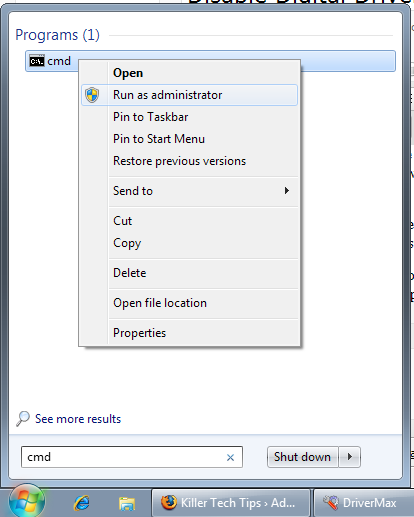
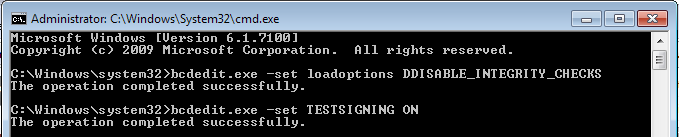
In the interpreter window, enter the following commands:
As a result, something like this should appear:
A little about the eMMC firmware. This is a flash image, in the directory tree it is located in / home / user / MyDocs. A flashing may be required only if you want to get a pristine device or you have a development version of the phone. If you just need to reflash a brick, then you do not need to flash eMMC !!!
Everything is done from the console and works exactly the same on all the above OSs. The only problem may occur with Windows 7. But I will write about this a little lower.
Warning: Charge the phone fully, it will be very bad if the battery runs out during the firmware. During firmware, the device does not charge via USB !!!
So, we all downloaded, installed the flasher utility. We launch the console (under Windows - the cmd shell, but I will call it the console anyway :-)).
And in the console we write these words:
As a result, we get this inscription:
0. If you intend to reflash the eMMC, then detach the back cover in advance and pry off the battery with something (just do not overdo it so that it does not fall out during flashing).
1.If the device is connected via USB, then disconnect it.
2. Turn it off (when turning off with the USB connected, the device does not turn off completely, so follow step number 1).
3. Hold the “u” button on the keyboard and connect the USB cable.
4. The Nokia logo should appear (sometimes on a very faded background, with very weak backlighting, less often on a bright white background) and in the upper right corner of the USB icon.
If you did everything correctly, then inscriptions will go running that tell you about the various stages of the firmware.
The device will reboot. The flashing is over for this. It's just that, isn't it?
If you are going to flash eMMC, then at this moment you need to pull out the battery, preventing the OS from loading.
EMMC can only be flashed after rootfs firmware and IN NO CASE IT IS IMPOSSIBLE TO OVERLOAD BETWEEN ROOTFS FIRMWARE AND EMMC IMAGE !!!!.
Now for those who want to flash eMMC.
and execute the same commands as above, we only sew a different image:
There will again be an inscription about a missing device:
We insert the USB cable into the device and wait until the process passes.
We insert the battery back and just connect USB without the “u” button.
It will look like this:
The process took me a little less than a minute. After that, the device will go into reboot. All is ready.
If you have a message on * nix 'Permission denied' (if you took flasher from tar.gz), then do so
If in * nix you have the message “Error claiming USB interface: Device or resource busy”, then run the command
Flasher cannot find the device, then do the following:
In general, we figured out the firmware, the process is easy and flameless (at least I did not encounter difficulties under MacOS 10.6, Linux Ubuntu 9.10 and Windows XP).
Why might this be needed?
1. If you do not like the current layout (for example, you write in Python on the device and you are annoyed by the lack of "=" on the keyboard, you have to call up a table of additional characters each time) or want to add a couple of characters.
2. If you have a “gray” phone and “blue” characters do not match the characters in the Russian layout, plus 4 arrows in the bourgeois versions, and in the Russian 2. Because of this, embarrassment begins. I bought a gray device for the very reason that English letters are more engraved Russian and it is very, very convenient. But I ran into the problem of mismatch of additional characters. Starting from a semicolon and ending with a dollar sign and brackets.
This is what the Russian keyboard looks like:

And here is the engraved bourgeois keyboard :

As you can see, it does not match.
Well, the decision turned out to be pretty.
All you need is to change the layout. The N900 uses the standard xkb X-extension. A file with layout settings can be found: / usr / share / X11 / xkb / symbols / nokia_vndr / rx-51
Details about the file format and xkb settings can be found here , here and here .
There are a lot of letters, so I’ll not describe it in detail here, but enough so that you can change at your own discretion.
So, if you open this file, then it is large to retype it. I will tell you about the main parts.
The basis of any layout is taken English - basic, this is how this section looks like:
There are 4 levels used. Each entry is a symbol, with comments they are divided into rows on the keyboard. This layout uses 4 levels (4 different values can be obtained with one button). So how do these levels switch:
Shift (up arrow on the keyboard) - increases by one level in any case. You need to either hold or press once and any next key will increase the value when you click on a level, or press twice to get Caps Lock mode, that is, all subsequent button presses will be increased by one level.
Fn (blue arrow on the keyboard) - increases two levels up. In combination with Shift, it increases three levels up.
So we get to get the desired character from the symbol table, according to the table, for example, take the first button:
"But what about switching layouts?" - you ask. And everything is simple. Let's look at the section with the Russian layout:
The first thing that catches your eye is the number of levels. In this case, there are 8, not 4. Everything is logical. At level 1-4 there is an English layout, and at levels 5-8 - Russian. This record also speaks of this:
To increase or decrease the level, use the combination Ctrl + Space. For users, it is known as switching layouts, which is a level increase of 4. When you switch the layout to Russian (thereby increasing all further presses by 4), the Shift and Fn keys work on the same principle:
But there is one limitation that you do not write in levels 7 and 8, the values will still be taken from levels 3.4. But it is better in levels 7 and 8 to write down the very same values as for 3 and 4, in order to avoid possible problems.
The second thing you need to pay attention to is this entry:
It connects a 2-button cursor (which I don’t like and plus I have 4 cursor buttons on the keys).
Let's look at the buttons section:
The first section of arrows_2btns is used in the Russian layout and in a number of others, where only two keys on the keyboard are reserved for the cursor. The property type [Group1] = “PC_FN_LEVEL2” - just determines that there are two functions on the key. In the second section of arrows_4btns, 4 keys are assigned to the cursor, and each key has only one function (how wasteful :-)), the attribute type [Group1] = “ONE_LEVEL” speaks about this.
Here you can accelerate to the fullest, you can hang 6 values on the cursor in a double layout, which I did, here is my version below:
In my version, in the Russian and English layouts, the cursor remains the cursor. Fn allows you to print Russian letters that I did not fit into the usual buttons - E, B, Yu, Kommersant . Combination of Fn with Shift type uppercase and lowercase characters. Due to the above limitations of 3.4 and 7.8 levels, Russian letters will be printed in any layout, but the loss is not great. Now the cursor buttons carry 3 functional loads (arrow and uppercase and lowercase letter). Given that there are combinations with Ctrl + arrow gives Home, End, PgUp, and PgDwn with the corresponding arrow, we get 4 functions instead of 2, as in the original.
In addition to everything, I changed the “ru” section itself, now on my “gray” keyboard the blue buttons (Fn - combinations) coincide with what is written on the keyboard. Some buttons were controversial.
,; = ЧЬ - a lot of functions, everything does not fit. I removed the solid sign and moved it to the right arrow. Another drawback, a comma, is only in the English layout, I think to transfer it instead of the pound sign in the Russian layout.
.:? Well - well, everything fit in, only the dot is again present only in the English layout, you can transfer it instead of the dollar or euro sign.
<cursor to the left> БУ - I want the cursor to always remain the cursor and the letters can be used both in capital and in upper case. With such requirements it does not fit all on one key. Therefore, I moved to <cursor down key>
my version can be said from my site here on this link . There lies the rx-51 file.
The file is located in / usr / share / X11 / xkb / symbols / nokia_vndr.
Copy the new version of the file (mine or yours) to any place on the device and from xterm you need to execute these commands:
Be extremely careful if you put a bad rx-51 file and reboot the device, then it will not be able to boot and you will have to reflash the device.
In general, a great easy way to change the layout of your choice. For example, for those who often work in the console, it would be useful to add a pipe "|". Well and so on.
To close the topic with buttons, I note that you can also change the table of additional characters that appears when you press Fn + Ctrl. But here everything is not so simple. The difficulty is that these characters are stored in binary form. And in order to create your own table, you need to assemble a special compiler of this format, write your own configuration, compile.
For those interested, here is a link to the Maemo Wiki .
This problem was a surprise for me. Rootfs is the root file system where the kernel is located and what is needed (kernel modules, system configuration files) to start the system. Rootf is located naturally in a soldered NAND Flash, and not on eMMC. To make it clear, a small digression on the types of memory.
NOR-flash is a type of flash memory that allows you to get bytes from an arbitrary place (random-access for reading), and a big plus is the execution of programs directly from the NOR address space - execute in place (XIP). The disadvantage is the price. Usually used to store settings and various little things. Non-volatile memory. Briefly - something like non-volatile RAM. Well, recently, NOR has lagged far behind NAND in terms of information.
NAND - much cheaper than NOR. The write speed in NAND is much faster than in NOR. But the main drawback is that the NAND block device can be read from it only in blocks (depending on the chip, it can be 512/2048/4096 bytes). SD / MMC cards are just the representatives of NAND.
And for clarity, another term is SoC - System on Chip. It is translated as "a system in one chip" or "System on a crystal."
So as not to spray, here is the definition and characteristics of the term .
Thus, in the “bare” N900 we have these kinds of memory:
First, I note that the root and bootloader with the kernel are located in 256Mb NAND. I will describe in more detail below.
32GB eMMC is divided into 3 sections:

Well, now more about rootfs. All 256Mb NAND formatted as UBIFS. UBIFS is a replacement for the popular JFFS2. The difference is that UBIFS is able to cache and for large volumes, a good performance gain is obtained. The disadvantage is that UBIFS is more complicated (it runs on top of UBI, which runs on top of MTD), and JFFS2 works directly with NAND. Well, UBIFS appeared only in 2007 and has been working with the kernel since version 2.6.27. That is why almost all embedded devices use JFFS2. But Nokia engineers made a bold decision to use UBIFS. You can read more about this file system here and here .
In NAND, there is a bootloader, a kernel and a root directory - "/" plus various system files that are needed to boot. On a "bare" device should be about 100MB free. The problem is that if you connect a lot of repositories, then apt’s cache is bloated very much. Plus, some libraries are also installed in rootfs, and after a week my rootfs got full. This is very sad and additional steps have to be taken to prevent this. When rootfs overflows, the system starts to slow down and updating application directories is impossible (there is nowhere to save the cache).
Ideally, everything that can be better transferred to VFAT, but this is dangerous, since it is unmounted when connected to a computer. You can drag everything to / home, as is done for / opt. It is on this that my method is based.
The state of fullness can be checked by running the command in the terminal:
The easiest way to transfer everything is to create a script with this content:
for example, you created a file called free_my_rootfs.sh
run in the console:
This script transfers the icons, the video “handshake” that starts at startup, the apt'a cache and the system locale.
Additionally, you can also drag the python “optify python” (if translated, “drag python to / opt”):
The Maps application is also stored in rootfs (the maps themselves are cached to the largest partition), you can do this:
You can still move the MicroB engine:
Well, you can move the tutorial on using the N900:
Themes also live in rootfs, but it’s not very safe to transfer them, you can get a “brick” and you have to reflash the device. Just make it a rule to keep a couple of topics and delete those that you will not use in the near future.
Well, sort of, this should all help you. There is another method, very brutal, but for real geeks. It consists in the fact that you need to create another partition (reducing the 27 GB VFAT partition) and put everything in there. A detailed description of this method can be found here . There is still a smart script that checks whether the data has already been moved and at the end will show how much space it saved on rootfs. But I do not recommend using this method to beginners.
Well and most importantly, in the next firmware
Today we continue to study the device, and today's topic is a hack. We will go into different things and change different things that are not intended for change by the developers. This is done very easily and subject to even the average user, if he has the desire. I won’t tell you how to patch the kernel or take the device to high-performance mode, I’ll just show some useful improvements that can be useful to everyone.
Warning: the author is not responsible for damage to your device in the process of following these instructions. You do everything at your own peril and risk.
Hope not really scared? I can say that killing the device to such a state that you cannot restore it is almost unrealistic (but possible !!! I know one case). But even if you succeed, then a 99% service center will help you. But the main rule is to be careful and read first, and then do it, and do it carefully and pay close attention to the sequence of actions, and most importantly, what is highlighted in red (not for nothing that I highlighted it).
We disassemble and assemble the N900.
The title page displays the process of the disassembled N900. There is an official service manual. But it is not publicly available. It is distributed to service centers, as far as I know. But there are instances on the network and you can find them if you wish: keywords Nokia, Service Manual RX-51. I have no right to lay it out - it contradicts copyright:
Reproduction, transfer, distribution or storage of part or all of the contents in this document in
any form without the prior written permission of Nokia is prohibited.
It translates approximately like this: Copying, transferring, distributing and storing parts or all of the contents of this document in any form without the prior consent of Nokia is FORBIDDEN.
I didn’t take the picture from this document, but from here , a fairly popular and widespread resource, and I personally received permission to republish from them (they claim that they have the rights to publish this image and have the right to allow republishing). But at the first appeal indicating the illegality of the distribution of this information from representatives of Nokia, I will remove this picture.
Well, in this document everything is described with pictures and does not differ much from disassembling other devices.
I apologize for the fact that I can not lay out the document, but I can’t do my own instructions, it’s a pity to disassemble my device for this :-).
Flashing N900.
In previous publications, I described many interesting applications and many of them are in extra-testing and even extra-devel repositories. This means that these applications not only do not guarantee that they will work stably, they do not guarantee that they will not break your phone :-) Plus, some of the instructions in this publication can make a brick out of your N900. Therefore, I first decided to show how to restore the device in this case.
As additional material in Russian, you can see the translation of the Maemo.org Wiki on Fruct .
Nokia in this regard, well done and you can reflash the N900 on any OS (I mean the big three Linux / MacOS / Windows, but not really all the OS :-)).
What we need:
1. The firmware tool is flasher.
download here .
these files are of interest to us there (the versions may differ, as the following versions may appear, but the names should remain the same or similar):
maemo_flasher-3.5_2.5.2.2.exe - version for Windows 7, XP, Vista.
maemo_flasher-3.5_2.5.2.2.tar.gz - version for Linux.
maemo_flasher-3.5_2.5.2.2_i386.deb is the version for the Debian Linux families.
maemo_flasher-3.5_2.5.2.2_i386.dmg - version for Intel Mac OS.
maemo_flasher-3.5_2.5.2.2_ppc.dmg - version for PPC Mac OS.
2. Download from here the image of the root system image and, if necessary, the eMMC image (this is the memory that is 32 GB).
tablets-dev.nokia.com/nokia_N900.php "> Download from this link.
There you need to enter IMEI.
It is located under the battery or in “Options” -> “About Product”. There in the popup window is the last line.
You can also get it by typing * # 06 # on the telephone keypad.
Then we accept the license agreement by clicking the "I accept" button.
We are interested in this file: RX-51_2009SE_3.2010.02-8_PR_COMBINED_MR0_ARM.bin or later, if it does (select the Europe region, since Africa and the States are not suitable, unless you bought the phone there).
And this RX-51_2009SE_1.2009.41-1.VANILLA_PR_EMMC_MR0_ARM.bin, if you decide to reflash eMMC.
Also, on the sold device, maps of the region in which it is sold are pre-loaded, but there are no cards in this image, but this is not scary, you can use Map Loader to eliminate this trouble. Why I may need this, I’ll tell you below, but if you don’t know if you need it, then you don’t need it.
Notes on installing flasher on Linux.
If you have 64-bit Debian Linux and you install from a deb file, then you need to run this command in the directory where you saved the package
sudo dpkg -i --force-architecture ./maemo_flasher-3.5_2.5.2.2_i386.deb
Notes on installing flasher on Mac OS.
You don’t need to do anything here, the only thing you need to know is that flasher can be found in / usr / bin.
Notes on installing flasher on Windows.
The default package is put in% Program Files% / maemo /.
In Windows 7, you must disable driver signature verification. It is easy to do.
Go to the "Start" menu and select the cmd program. Right-click on it and "Run as Administrator."
In the interpreter window, enter the following commands:
bcdedit.exe -set loadoptions DDISABLE_INTEGRITY_CHECKS
bcdedit.exe -set TESTSIGNING ON
As a result, something like this should appear:
A little about the eMMC firmware. This is a flash image, in the directory tree it is located in / home / user / MyDocs. A flashing may be required only if you want to get a pristine device or you have a development version of the phone. If you just need to reflash a brick, then you do not need to flash eMMC !!!
Everything is done from the console and works exactly the same on all the above OSs. The only problem may occur with Windows 7. But I will write about this a little lower.
Warning: Charge the phone fully, it will be very bad if the battery runs out during the firmware. During firmware, the device does not charge via USB !!!
So, we all downloaded, installed the flasher utility. We launch the console (under Windows - the cmd shell, but I will call it the console anyway :-)).
And in the console we write these words:
Windows:
cd "% ProgramFiles% \ maemo \ flasher-3.5"
flasher-3.5.exe -F RX-51_2009SE_3.2010.02-8_PR_COMBINED_MR0_ARM.bin -f -R
Linux:
sudo flasher-3.5 -F RX-51_2009SE_3.2010.02-8_PR_COMBINED_R0. bin -f -R
MacOS:
sudo /usr/bin/flasher-3.5 -F RX-51_2009SE_3.2010.02-8_PR_COMBINED_MR0_ARM.bin -f -R
As a result, we get this inscription:
Suitable USB device not found, waiting
0. If you intend to reflash the eMMC, then detach the back cover in advance and pry off the battery with something (just do not overdo it so that it does not fall out during flashing).
1.If the device is connected via USB, then disconnect it.
2. Turn it off (when turning off with the USB connected, the device does not turn off completely, so follow step number 1).
3. Hold the “u” button on the keyboard and connect the USB cable.
4. The Nokia logo should appear (sometimes on a very faded background, with very weak backlighting, less often on a bright white background) and in the upper right corner of the USB icon.
If you did everything correctly, then inscriptions will go running that tell you about the various stages of the firmware.
The device will reboot. The flashing is over for this. It's just that, isn't it?
If you are going to flash eMMC, then at this moment you need to pull out the battery, preventing the OS from loading.
EMMC can only be flashed after rootfs firmware and IN NO CASE IT IS IMPOSSIBLE TO OVERLOAD BETWEEN ROOTFS FIRMWARE AND EMMC IMAGE !!!!.
Now for those who want to flash eMMC.
and execute the same commands as above, we only sew a different image:
Windows:
cd "% ProgramFiles% \ maemo \ flasher-3.5"
flasher-3.5.exe -F RX-51_2009SE_1.2009.41-1.VANILLA_PR_EMMC_MR0_ARM.bin -f -R
Linux:
sudo flasher-3.5 -F RX-51_2009SE_1.2009.41- 1.VANILLA_PR_EMMC_MR0_ARM.bin -f -R
MacOS:
sudo /usr/bin/flasher-3.5 -F RX-51_2009SE_1.2009.41-1.VANILLA_PR_EMMC_MR0_ARM.bin -f -R
There will again be an inscription about a missing device:
flasher v2.5.2 (Oct 21 2009)
Image 'mmc', size 241163 kB
Version RX-51_2009SE_1.2009.41-1.VANILLA
Suitable USB device not found, waiting.
We insert the USB cable into the device and wait until the process passes.
We insert the battery back and just connect USB without the “u” button.
It will look like this:
USB device found found at bus 001, device address 006.
Found device RX-51, hardware revision 2101
NOLO version 1.4.13
Version of 'sw-release': RX-51_2009SE_1.2009.42-11.002_PR_002
Booting device into flash mode.
Suitable USB device not found, waiting.
USB device found found at bus 001, device address 007.
Raw data transfer EP found at EP2.
[writing 74% 179200/241163 kB 13180 kB / s]
Image (s) flashed successfully in 26.848 s (8982 kB / s)!
The process took me a little less than a minute. After that, the device will go into reboot. All is ready.
Problems and solutions.
If you have a message on * nix 'Permission denied' (if you took flasher from tar.gz), then do so
chmod + x ./flasher-3.5
If in * nix you have the message “Error claiming USB interface: Device or resource busy”, then run the command
sudo modprobe -r cdc_phonet
Flasher cannot find the device, then do the following:
- turn off the N900
- remove the battery
- run flasher
- plug in the USB cord
- insert battery
In general, we figured out the firmware, the process is easy and flameless (at least I did not encounter difficulties under MacOS 10.6, Linux Ubuntu 9.10 and Windows XP).
Tyun keyboard layout.
Why might this be needed?
1. If you do not like the current layout (for example, you write in Python on the device and you are annoyed by the lack of "=" on the keyboard, you have to call up a table of additional characters each time) or want to add a couple of characters.
2. If you have a “gray” phone and “blue” characters do not match the characters in the Russian layout, plus 4 arrows in the bourgeois versions, and in the Russian 2. Because of this, embarrassment begins. I bought a gray device for the very reason that English letters are more engraved Russian and it is very, very convenient. But I ran into the problem of mismatch of additional characters. Starting from a semicolon and ending with a dollar sign and brackets.
This is what the Russian keyboard looks like:
And here is the engraved bourgeois keyboard :
As you can see, it does not match.
Well, the decision turned out to be pretty.
All you need is to change the layout. The N900 uses the standard xkb X-extension. A file with layout settings can be found: / usr / share / X11 / xkb / symbols / nokia_vndr / rx-51
Details about the file format and xkb settings can be found here , here and here .
There are a lot of letters, so I’ll not describe it in detail here, but enough so that you can change at your own discretion.
So, if you open this file, then it is large to retype it. I will tell you about the main parts.
The basis of any layout is taken English - basic, this is how this section looks like:
- partial hidden alphanumeric_keys
- xkb_symbols "english_base" {
-
- // 1. row
- key
{ [ q, Q, 1, 1 ] }; - key
{ [ w, W, 2, 2 ] }; - key
{ [ e, E, 3, 3 ] }; - key
{ [ r, R, 4, 4 ] }; - key
{ [ t, T, 5, 5 ] }; - key
{ [ y, Y, 6, 6 ] }; - key
{ [ u, U, 7, 7 ] }; - key
{ [ i, I, 8, 8 ] }; - key
{ [ o, O, 9, 9 ] }; - key
{ [ p, P, 0, 0 ] }; - key
{ [ comma, semicolon, equal, equal ] }; -
- // 2. row
- key
{ [ a, A, asterisk, asterisk ] }; - key
{ [ s, S, plus, plus ] }; - key
{ [ d, D, numbersign, numbersign ] }; - key
{ [ f, F, minus, minus ] }; - key
{ [ g, G, underscore, underscore ] }; - key
{ [ h, H, parenleft, parenleft ] }; - key
{ [ j, J, parenright, parenright ] }; - key
{ [ k, K, ampersand, ampersand ] }; - key
{ [ l, L, exclam, exclam ] }; - key
{ [ period, colon, question, question ] }; -
- // 3. row
- key
{ [ z, Z, sterling, sterling ] }; - key
{ [ x, X, dollar, dollar ] }; - key
{ [ c, C, EuroSign, EuroSign ] }; - key
{ [ v, V, slash, slash ] }; - key
{ [ b, B, backslash, backslash ] }; - key
{ [ n, N, quotedbl, quotedbl ] }; - key
{ [ m, M, apostrophe, apostrophe ] }; - key
{ [ space, space, at, at ] }; - };
* This source code was highlighted with Source Code Highlighter.There are 4 levels used. Each entry is a symbol, with comments they are divided into rows on the keyboard. This layout uses 4 levels (4 different values can be obtained with one button). So how do these levels switch:
Shift (up arrow on the keyboard) - increases by one level in any case. You need to either hold or press once and any next key will increase the value when you click on a level, or press twice to get Caps Lock mode, that is, all subsequent button presses will be increased by one level.
Fn (blue arrow on the keyboard) - increases two levels up. In combination with Shift, it increases three levels up.
So we get to get the desired character from the symbol table, according to the table, for example, take the first button:
- key
{ [ q, Q, 1, 1 ] };
* This source code was highlighted with Source Code Highlighter.- to get the first level, that is, the symbol "q" - you just need to press the button
- to get the second level, that is, the symbol "Q" - you need to press Shift and the button
- to get the third level, that is, the symbol "1" - you need to press Fn and the button
- to get the fourth level, that is, the symbol "1" - you need to press Shift, Fn and the button
"But what about switching layouts?" - you ask. And everything is simple. Let's look at the section with the Russian layout:
- partial alphanumeric_keys
- xkb_symbols "ru" {
- include "nokia_vndr/rx-51(english_base)"
- include "nokia_vndr/rx-51(arrows_2btns)"
-
- name[Group1] = "Russian";
-
- key.type[Group1] = "EIGHT_LEVEL_SEMIALPHABETIC";
-
- // 1. row
- key
{ [ q, Q, 1, 1, Cyrillic_shorti, Cyrillic_SHORTI, 1, 1 ] }; - key
{ [ w, W, 2, 2, Cyrillic_tse, Cyrillic_TSE, 2, 2 ] }; - key
{ [ e, E, 3, 3, Cyrillic_u, Cyrillic_U, 3, 3 ] }; - key
{ [ r, R, 4, 4, Cyrillic_ka, Cyrillic_KA, 4, 4 ] }; - key
{ [ t, T, 5, 5, Cyrillic_ie, Cyrillic_IE, 5, 5 ] }; - key
{ [ y, Y, 6, 6, Cyrillic_en, Cyrillic_EN, 6, 6 ] }; - key
{ [ u, U, 7, 7, Cyrillic_ghe, Cyrillic_GHE, 7, 7 ] }; - key
{ [ i, I, 8, 8, Cyrillic_sha, Cyrillic_SHA, 8, 8 ] }; - key
{ [ o, O, 9, 9, Cyrillic_shcha, Cyrillic_SHCHA, 9, 9 ] }; - key
{ [ p, P, 0, 0, Cyrillic_ze, Cyrillic_ZE, 0, 0 ] }; - key
{ [ Cyrillic_ha, Cyrillic_HA, Cyrillic_hardsign, Cyrillic_HARDSIGN, Cyrillic_ha, Cyrillic_HA, Cyrillic_hardsign, Cyrillic_HARDSIGN ] }; -
- // 2. row
- key
{ [ a, A, asterisk, asterisk, Cyrillic_ef, Cyrillic_EF, asterisk, asterisk ] }; - key
{ [ s, S, plus, plus, Cyrillic_yeru, Cyrillic_YERU, plus, plus ] }; - key
{ [ d, D, numbersign, numbersign, Cyrillic_ve, Cyrillic_VE, numbersign, numbersign ] }; - key
{ [ f, F, minus, minus, Cyrillic_a, Cyrillic_A, minus, minus ] }; - key
{ [ g, G, underscore, underscore, Cyrillic_pe, Cyrillic_PE, underscore, underscore ] }; - key
{ [ h, H, exclam, exclam, Cyrillic_er, Cyrillic_ER, exclam, exclam ] }; - key
{ [ j, J, question, question, Cyrillic_o, Cyrillic_O, question, question ] }; - key
{ [ k, K, semicolon, semicolon, Cyrillic_el, Cyrillic_EL, semicolon, semicolon ] }; - key
{ [ l, L, colon, colon, Cyrillic_de, Cyrillic_DE, colon, colon ] }; - key
{ [ comma, comma, comma, comma, Cyrillic_zhe, Cyrillic_ZHE, comma, comma ] }; - key
{ [ period, period, period, period, Cyrillic_e, Cyrillic_E, period, period ] }; -
- // 3. row
- key
{ [ z, Z, dollar, dollar, Cyrillic_ya, Cyrillic_YA, dollar, dollar ] }; - key
{ [ x, X, EuroSign, EuroSign, Cyrillic_che, Cyrillic_CHE, EuroSign, EuroSign ] }; - key
{ [ c, C, slash, slash, Cyrillic_es, Cyrillic_ES, slash, slash ] }; - key
{ [ v, V, parenleft, parenleft, Cyrillic_em, Cyrillic_EM, parenleft, parenleft ] }; - key
{ [ b, B, parenright, parenright, Cyrillic_i, Cyrillic_I, parenright, parenright ] }; - key
{ [ n, N, quotedbl, quotedbl, Cyrillic_te, Cyrillic_TE, quotedbl, quotedbl ] }; - key
{ [ m, M, apostrophe, apostrophe, Cyrillic_softsign, Cyrillic_SOFTSIGN, apostrophe, apostrophe ] }; - key
{ [ Cyrillic_be, Cyrillic_BE, Cyrillic_yu, Cyrillic_YU, Cyrillic_be, Cyrillic_BE, Cyrillic_yu, Cyrillic_YU ] }; - };
* This source code was highlighted with Source Code Highlighter.The first thing that catches your eye is the number of levels. In this case, there are 8, not 4. Everything is logical. At level 1-4 there is an English layout, and at levels 5-8 - Russian. This record also speaks of this:
- key.type[Group1] = "EIGHT_LEVEL_SEMIALPHABETIC";
* This source code was highlighted with Source Code Highlighter.To increase or decrease the level, use the combination Ctrl + Space. For users, it is known as switching layouts, which is a level increase of 4. When you switch the layout to Russian (thereby increasing all further presses by 4), the Shift and Fn keys work on the same principle:
- level 5 - just a click of a button
- level 6 - Shift + click
- level 7 - Atl + click
- level 8 - Fn, Shify + click
But there is one limitation that you do not write in levels 7 and 8, the values will still be taken from levels 3.4. But it is better in levels 7 and 8 to write down the very same values as for 3 and 4, in order to avoid possible problems.
The second thing you need to pay attention to is this entry:
- include "nokia_vndr/rx-51(arrows_2btns)"
* This source code was highlighted with Source Code Highlighter.It connects a 2-button cursor (which I don’t like and plus I have 4 cursor buttons on the keys).
Let's look at the buttons section:
- partial hidden alphanumeric_keys
- xkb_symbols "arrows_2btns" {
- // rx-51 specific arrows mapping
- // normal 2nd level must not be enumerated to allow text selection with Shift key
- key
{ type[Group1] = "PC_FN_LEVEL2", symbols[Group1] = [ Left, Up ] }; - key
{ type[Group1] = "PC_FN_LEVEL2", symbols[Group1] = [ Right, Down ] }; - };
-
- partial hidden alphanumeric_keys
- xkb_symbols "arrows_4btns" {
- // standard arrows mapping
- // normal 2nd level must not be enumerated to allow text selection with Shift key
- key
{ type[Group1] = "ONE_LEVEL", symbols[Group1] = [ Up ] }; - key
{ type[Group1] = "ONE_LEVEL", symbols[Group1] = [ Left ] }; - key
{ type[Group1] = "ONE_LEVEL", symbols[Group1] = [ Down ] }; - key
{ type[Group1] = "ONE_LEVEL", symbols[Group1] = [ Right ] }; - };
* This source code was highlighted with Source Code Highlighter.The first section of arrows_2btns is used in the Russian layout and in a number of others, where only two keys on the keyboard are reserved for the cursor. The property type [Group1] = “PC_FN_LEVEL2” - just determines that there are two functions on the key. In the second section of arrows_4btns, 4 keys are assigned to the cursor, and each key has only one function (how wasteful :-)), the attribute type [Group1] = “ONE_LEVEL” speaks about this.
Here you can accelerate to the fullest, you can hang 6 values on the cursor in a double layout, which I did, here is my version below:
- partial hidden alphanumeric_keys
- xkb_symbols "arrows_rule" {
- // standard arrows mapping
- // normal 2nd level must not be enumerated to allow text selection with Shift key
- key
{ type[Group1] = "EIGHT_LEVEL_SEMIALPHABETIC", symbols[Group1] = [ Up, Up, Cyrillic_e, Cyrillic_E, Up, Up, Cyrillic_e, Cyrillic_E ] }; - key
{ type[Group1] = "EIGHT_LEVEL_SEMIALPHABETIC", symbols[Group1] = [ Left, Left, Cyrillic_be, Cyrillic_BE, Left, Left, Cyrillic_be, Cyrillic_BE ] }; - key
{ type[Group1] = "EIGHT_LEVEL_SEMIALPHABETIC", symbols[Group1] = [ Down, Down, Cyrillic_yu, Cyrillic_YU, Down, Down, Cyrillic_yu, Cyrillic_YU ] }; - key
{ type[Group1] = "EIGHT_LEVEL_SEMIALPHABETIC", symbols[Group1] = [ Right, Right, Cyrillic_hardsign, Cyrillic_HARDSIGN, Right, Right, Cyrillic_hardsign, Cyrillic_HARDSIGN ] }; - };
* This source code was highlighted with Source Code Highlighter.In my version, in the Russian and English layouts, the cursor remains the cursor. Fn allows you to print Russian letters that I did not fit into the usual buttons - E, B, Yu, Kommersant . Combination of Fn with Shift type uppercase and lowercase characters. Due to the above limitations of 3.4 and 7.8 levels, Russian letters will be printed in any layout, but the loss is not great. Now the cursor buttons carry 3 functional loads (arrow and uppercase and lowercase letter). Given that there are combinations with Ctrl + arrow gives Home, End, PgUp, and PgDwn with the corresponding arrow, we get 4 functions instead of 2, as in the original.
In addition to everything, I changed the “ru” section itself, now on my “gray” keyboard the blue buttons (Fn - combinations) coincide with what is written on the keyboard. Some buttons were controversial.
,; = ЧЬ - a lot of functions, everything does not fit. I removed the solid sign and moved it to the right arrow. Another drawback, a comma, is only in the English layout, I think to transfer it instead of the pound sign in the Russian layout.
.:? Well - well, everything fit in, only the dot is again present only in the English layout, you can transfer it instead of the dollar or euro sign.
<cursor to the left> БУ - I want the cursor to always remain the cursor and the letters can be used both in capital and in upper case. With such requirements it does not fit all on one key. Therefore, I moved to <cursor down key>
my version can be said from my site here on this link . There lies the rx-51 file.
The file is located in / usr / share / X11 / xkb / symbols / nokia_vndr.
Copy the new version of the file (mine or yours) to any place on the device and from xterm you need to execute these commands:
sudo gainroot
cp / usr / share / X11 / xkb / symbols / nokia_vndr / rx-51 /usr/share/X11/xkb/symbols/nokia_vndr/rx-5.bak
cp / home / user / MyDocs / rx-51 / usr / share / X11 / xkb / symbols / nokia_vndr / rx-51
setxkbmap en
Be extremely careful if you put a bad rx-51 file and reboot the device, then it will not be able to boot and you will have to reflash the device.
In general, a great easy way to change the layout of your choice. For example, for those who often work in the console, it would be useful to add a pipe "|". Well and so on.
To close the topic with buttons, I note that you can also change the table of additional characters that appears when you press Fn + Ctrl. But here everything is not so simple. The difficulty is that these characters are stored in binary form. And in order to create your own table, you need to assemble a special compiler of this format, write your own configuration, compile.
For those interested, here is a link to the Maemo Wiki .
Free up space on RootFS
This problem was a surprise for me. Rootfs is the root file system where the kernel is located and what is needed (kernel modules, system configuration files) to start the system. Rootf is located naturally in a soldered NAND Flash, and not on eMMC. To make it clear, a small digression on the types of memory.
NOR-flash is a type of flash memory that allows you to get bytes from an arbitrary place (random-access for reading), and a big plus is the execution of programs directly from the NOR address space - execute in place (XIP). The disadvantage is the price. Usually used to store settings and various little things. Non-volatile memory. Briefly - something like non-volatile RAM. Well, recently, NOR has lagged far behind NAND in terms of information.
NAND - much cheaper than NOR. The write speed in NAND is much faster than in NOR. But the main drawback is that the NAND block device can be read from it only in blocks (depending on the chip, it can be 512/2048/4096 bytes). SD / MMC cards are just the representatives of NAND.
And for clarity, another term is SoC - System on Chip. It is translated as "a system in one chip" or "System on a crystal."
So as not to spray, here is the definition and characteristics of the term .
Thus, in the “bare” N900 we have these kinds of memory:
- 256 Mb DDR - used as a space for executing programs, since we have already figured out that it is impossible to run programs with NAND. Located inside the SoC.
- 256 Mb NAND - used for rootfs, I will describe in more detail below. Located in SoC.
- 32 GB eMMC - used for everything else, soldered to the board.
- up to 16 GB microSD Slot - a slot for installing additional memory, it is officially written that 16 GB is supported, but since 32 GB copies have already appeared, I personally tried it and I can say that it works. Apparently at the time of writing the characterization, there were also no plans to issue cards larger than 16 GB. There is a possibility that a 64 GB card will work if it comes out of course. But you need to check.
First, I note that the root and bootloader with the kernel are located in 256Mb NAND. I will describe in more detail below.
32GB eMMC is divided into 3 sections:
- 2 Гб раздел ext3, смонтирован как /home. Тут лежат настройки программ и разная мелочь. Также сюда ведет ссылка /opt (в /home/opt), сюда устанавливаются программы размером большим 500Кб (в старых прошивках, хотя все зависит от разработчику, куда захочет, туда и засунет, и я рекомендую туда именно устанавливать свое ПО).
- 768 Мб, как swap-раздел.
- Оставшиеся 27Гб отформатированы как VFAT и смонтированы в /home/user/MyDocs. Сюда программы не устанавливаются, потому-что этот раздел размонтируется, когда вы подключаете устройство к компьютеру, для того, чтоб его моно было подключить как внешний накопитель. Кстати, никто не мешает Вам его конвертировать/переформатировать в ext3 например, но к Windows Вы сможете подключить устройство только с помощью дополнительного ПО (портированного FUSE и ext3fs драйвера в нем, например)
Well, now more about rootfs. All 256Mb NAND formatted as UBIFS. UBIFS is a replacement for the popular JFFS2. The difference is that UBIFS is able to cache and for large volumes, a good performance gain is obtained. The disadvantage is that UBIFS is more complicated (it runs on top of UBI, which runs on top of MTD), and JFFS2 works directly with NAND. Well, UBIFS appeared only in 2007 and has been working with the kernel since version 2.6.27. That is why almost all embedded devices use JFFS2. But Nokia engineers made a bold decision to use UBIFS. You can read more about this file system here and here .
In NAND, there is a bootloader, a kernel and a root directory - "/" plus various system files that are needed to boot. On a "bare" device should be about 100MB free. The problem is that if you connect a lot of repositories, then apt’s cache is bloated very much. Plus, some libraries are also installed in rootfs, and after a week my rootfs got full. This is very sad and additional steps have to be taken to prevent this. When rootfs overflows, the system starts to slow down and updating application directories is impossible (there is nowhere to save the cache).
Ideally, everything that can be better transferred to VFAT, but this is dangerous, since it is unmounted when connected to a computer. You can drag everything to / home, as is done for / opt. It is on this that my method is based.
The state of fullness can be checked by running the command in the terminal:
df -h
The easiest way to transfer everything is to create a script with this content:
#!/bin/sh

# Nokia N900 Maemo 5 Script to free up space on rootfs

# ignoring errors when creating dirs that may already exist


# Moving ?? icons to /home/opt

mkdir -p /home/opt/usr/share/icons 2> /dev/null

cp -r /usr/share/icons/* /home/opt/usr/share/icons

rm -r /usr/share/icons

ln -s /home/opt/usr/share/icons /usr/share/icons


# Moving video on start-up to /home/opt

mkdir -p /home/opt/usr/share/hildon-welcome 2> /dev/null

cp -r /usr/share/hildon-welcome/* /home/opt/usr/share/hildon-welcome

rm -r /usr/share/hildon-welcome

ln -s /home/opt/usr/share/hildon-welcome /usr/share/hildon-welcome


# ??

mkdir -p /home/opt/usr/share/pixmaps 2> /dev/null

cp -r /usr/share/pixmaps/* /home/opt/usr/share/pixmaps

rm -r /usr/share/pixmaps

ln -s /home/opt/usr/share/pixmaps /usr/share/pixmaps


# Moving 'apt cache' to /home/opt - Valid until Bug 5746 is fixed.

mkdir -p /home/opt/var/cache/apt 2> /dev/null

cp -r /var/cache/apt/* /home/opt/var/cache/apt

rm -r /var/cache/apt

ln -s /home/opt/var/cache/apt /var/cache/apt


# Moving locales Source

mv /usr/share/locale /opt

ln -s /opt/locale /usr/share/locale


* This source code was highlighted with Source Code Highlighter.
for example, you created a file called free_my_rootfs.sh
run in the console:
chmod + x free_my_rootfs.sh
./free_my_rootfs.sh
This script transfers the icons, the video “handshake” that starts at startup, the apt'a cache and the system locale.
Additionally, you can also drag the python “optify python” (if translated, “drag python to / opt”):
sudo gainroot
apt-get install pymaemo-optify
apt-get clean
The Maps application is also stored in rootfs (the maps themselves are cached to the largest partition), you can do this:
sudo gainroot
mv / usr / share / nokia-maps / home / opt /
ln -s / home / opt / nokia-maps / usr / share / nokia-maps
You can still move the MicroB engine:
sudo gainroot
mv / usr / share / microb-engine / home / opt
ln -s / home / opt / microb-engine / usr / share / microb-engine
Well, you can move the tutorial on using the N900:
sudo gainroot
mv / usr / share / tutorial-applet / home / opt
ln -s / home / opt / tutorial-applet / usr / share / tutorial-applet
Themes also live in rootfs, but it’s not very safe to transfer them, you can get a “brick” and you have to reflash the device. Just make it a rule to keep a couple of topics and delete those that you will not use in the near future.
Well, sort of, this should all help you. There is another method, very brutal, but for real geeks. It consists in the fact that you need to create another partition (reducing the 27 GB VFAT partition) and put everything in there. A detailed description of this method can be found here . There is still a smart script that checks whether the data has already been moved and at the end will show how much space it saved on rootfs. But I do not recommend using this method to beginners.
Well and most importantly, in the next firmware