PHOTOBOT-2A Overview (traffic)

Today I would like to introduce you to a rather interesting and atypical device.
I got a mini DVR (Digital Video Recorder) PHOTOROBOT-2A manufactured by SAY Technology - a device for recording audio / video from two cameras to an SD / SDHC memory card. But, unlike the Chinese toy pocket DVRs designed to record life's curiosities and then upload them to YouTube, this device is designed to quietly and calmly record everything that it sees and hears from year to year until the hour "H" or time "B" and we do not need to record it. Such a white "black box".
Positioning
The manufacturer positions the device as a compact stand-alone professional digital video surveillance system (digital video recorder, DVR) of the SOHO class. Yes - it is a compact video surveillance system, but with two “buts.”
The first “but” refers to the words “compact” and “autonomous”. In this case, this does not mean “portable” or “mobile”.
In this case, “compactness” and “autonomy” means:
- small dimensions
- modest power consumption
- wide installation options
- work without a computer
The second “but” refers to the word “video surveillance”. Looking ahead, I’ll say that you should not expect DVD quality pictures from the device. In most cases, for large professional CCTV systems, they are limited to very modest fps and basically stop at values from 2 to 12 frames per second - these values are quite enough to understand the essence of what is happening. There is a compromise between the "liveliness" of the picture and the recording duration - the higher the fps, the less time you can store the recording on the same medium. PHOTO WORK is no exception - the recording speed in this model is limited to 4 frames per second, which should be enough for the SOHO sector.
The main areas of application are the protection of small mobile and stationary objects. You can install the PHOTOBOT in the car to record what is happening around and protect yourself from shell accidents, and at home, viewing and recording nearby territory. It is possible and covertly installed inside the office / apartment to monitor negligent employees or a new maid (we will leave the legal side of the issue behind the scenes, this is not about that).
Equipment
The device is mainly supplied in a housing for indoor installation and with a complete set of everything necessary for installation, but there are options and OEM complete sets, for example ViP, ViP-S for installation in household on-door speakerphones - these are slightly modified boards from PHOTOBOT with additional functions, or assembly in industrial protected housing with integrated UPS is available.
The device came to me for a test in a standard version. It can record data from two analog cameras with sound to an SD / SDHC card up to 32Gb, which is more than enough to solve many problems. The output of the “picture” is implemented through a low-frequency Video / Audio output. Thanks to the video output, we can see the picture from both cameras in real time (in turn), view the menu and configure the device itself, but more on that below.
We print out the box and examine the contents. The delivery includes the device itself in a compact plastic case with a bracket for wall mounting, an interface cable, a remote control, two AA batteries for the remote control, a remote IR signal receiver, and an instruction manual. My equipment differs from the reference one by the presence of a power supply unit, an SD 1Gb memory card, an already soldered cable for mounting an audio / video output, a camera, a microphone, an IR receiver and a power supply connector - thanks to the guys for saving my time on finding a soldering iron :)

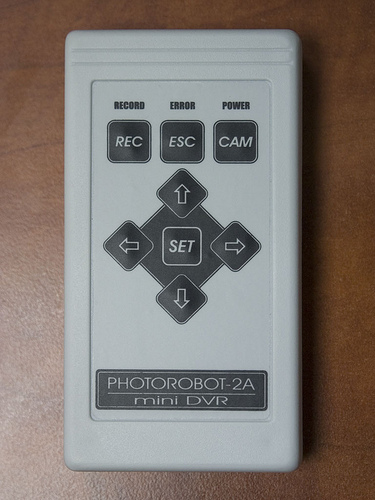
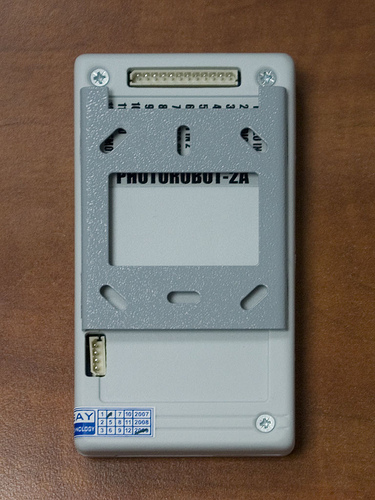
The case of the device is made of plastic, assembled firmly (does not creak). On the front panel, navigation buttons and LED labels are visible. The buttons and LEDs are sealed with a washable plastic membrane. In addition to the buttons and labels for the LEDs - below is the name of the device model. Everything is quite neat and concise: everything is there and nothing more. On the back side there is a steel bracket for wall mounting, an interface cable connector and a small service connector. Service cable and software are available on the manufacturer’s website for partners and service centers.
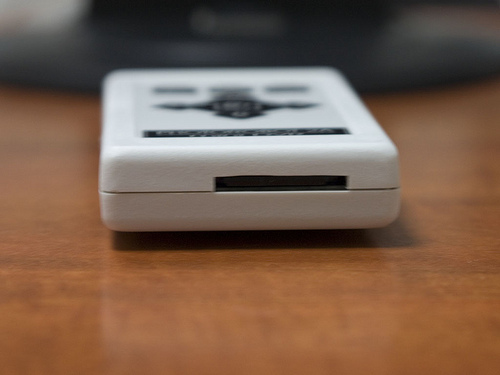
At the bottom of the device is a slot for a memory card, so there is no need to remove it from the wall to remove it. Given the rather low power consumption, and, accordingly, heat dissipation - the device can be “sewn up” into furniture, a wall, a false ceiling, or any other secluded place, as many do, complicating the task of thieves. On the remote I would like to dwell in more detail. It is compact, lightweight, quite ergonomic. But most importantly - the location of the control elements exactly duplicates those on the case of the device itself -

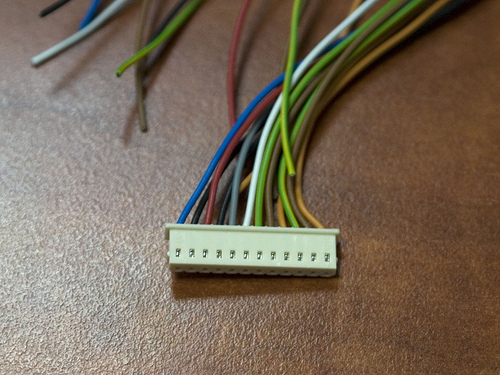
All I / O signals are concentrated on one “comb” (on the back of the device), to which the supplied cable is connected. The wiring of the cable is given in the instruction, there is nothing complicated in it, so there should not be any problems with the connection. It is clear that the installation of the device is beyond the reach of an average housewife, but if you don’t get a soldering iron out of your hands, handle it. Such a solution, unlike a bunch of cables, seems to me more reasonable (poppy drivers will understand me :)).
Inclusion and setup
Unpack, plug and watch - something seems to be happening. The recording LED flashes, which means the device is ready to work out of the box and immediately starts to work at the first start.
Apparently, the card that was provided to me in the kit is already formatted. And what will happen if you pull out the complete one and insert another (put ourselves in the place of the ordinary consumer)? But about such a dialogue is built if you insert a 32Gb SDHC card and agree to everything.

When connected to a TV, we see a live picture from the camera (if two are connected, you can switch between them) and we can go to the menu. Do not rush to check the quality of the wire and go into the settings of the video output standard, the interface is really b / w - your vision does not deceive you. At first it’s strange, and then you get used to it - the b / w interface does not distract from images from b / w cameras. The manufacturer deliberately limited the capabilities of the device, and it only works with b / w video signal, because b aboutthe majority of professional surveillance cameras in all price categories are b / w and not often there is a need to use color cameras, especially since b / w cameras have more detail and light sensitivity than color cameras of the same class, and the price is much lower. We are currently considering a lower price range recorder and there is no point in aiming to use expensive cameras. I’ll say from experience that a color camera that can produce a more or less acceptable picture in low light (corridors, landings, back yards) will cost significantly more than such a recording device, and in this aspect I personally agree with the manufacturer that color support not really needed.
The menu is graphic, quite informative and consists of four items:
- View Records
- System Setup
- Login Setting 1
- Input Setting 2
First impression: the menu does not slow down! :)
Second: the shapes are rounded corners - hi CSS :)
When viewing, we can select a camera, use the calendar navigation, where the dates for which there are entries are marked. Everything is intuitive and does not require reading documentation. For this, special thanks to the developers. Such a simple and convenient navigation through the archive is not always found even in large professional systems, of which I have seen many, and even more so in the compact.

In the system settings, you can set the date / time (the day of the week is calculated automatically), select the recording resolution, video format for output to a TV or monitor, format the memory card, configure the response to alarm sensors, update the firmware and view information about the current

In the settings of the cameras (channels), you can choose the frame rate for each recording mode, the time after recording, the parameters of the motion detector (object size, mask), the microphone response level, recording by an external sensor, timer recording.

The number of options struck me personally. The capabilities of the device are not limited to just recording by movement, as a more detailed study has shown, on its basis you can build a rather serious event recorder for a small object.
The reader may be confused by the low resolution of the recording (maximum 420x256), but for entry-level and mid-level surveillance cameras this is a typical resolution (420TVL cameras), more can be achieved only by interpolation or on cameras, the price of which is much higher than the tested recording device.
It is also worth noting that the data is written to the memory card without compression, so you will not find any JPEG artifacts, as well as settings for the degree of compression. So even with a low resolution, the picture quality is subjectively higher than what some soap dishes at higher resolutions do (I'm not talking about 8Mpx of course now, but about comparable ones). For example, my old Nokia 9500 (640x480), in good light, shoots a little worse in detail, and in case of weak light, wild noises also come out. Noises - it’s understandable, the problem is the old matrix, but the details are just the problem of JPEG compression, which seems to be “not noticeable”, but it steals the details.
In terms of the quality of the recording, I can say that it is expected - everything that 420tvl class cameras give out PHOTOROBOT-2F will be recorded and reproduced without loss, which is why it was developed.
Recording can be configured as a constant, as well as the movement and / or signal from external sensors. Sensors are supported with a standard connection, the same as that used for the usual "security". You can connect them to the same common bus. There are two independent inputs to which you can hang up a group of sensors, thus controlling two independent zones, each of which will have a camera, microphone and a set of sensors.
Software
If there is a need to view the archive in detail, save / print some parts, all this can be done using a computer here and there are more options for viewing and a more familiar mouse interface :). To do this, remove the memory card (there is no need to turn off the device, after all HotSwap :) and insert it into the card reader. Only operating systems of the Windows family are supported. the card is formatted in its proprietary format - only original software can work with it. And so, if you have Windows and autoload is not turned off, then the native utility for working with the card will start immediately, if you know where to turn off autoload, you will probably guess how to start the installer from the open section of the memory card. This is the most open section with proprietary software appears when formatting a card in the device (another plus to the manufacturer’s karma is no software disks). The program starts and installs in the system in the background and automatically registers at startup - it may not be the most correct behavior, from the point of view of an advanced user, but for a beginner it is. After starting, it settles in the tray and automatically pops up when it recognizes the PHOTOBOT format in the inserted card.
I will not describe the software for a long time - if you wish, you can download it from the manufacturer’s website and feel it yourself, like a sample recording. I will list the main functions:
- View recordings synchronously from two cameras in one window
- View the time of the first scale with filtering by event type
- Adjust the brightness / contrast of the picture and the sound volume in real time for each camera (channel) separately
- Export individual frames to BMP files
- Export video to AVI files
- Saving to a hard disk of a computer or any other medium of a recording archive in the original format
- Working with the calendar for searching, as on the device itself
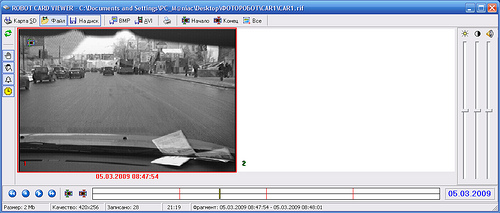
But this opportunity is especially pleasing: i.e. I can keep a complete archive of records in the native format on my screw for further viewing using the supplied software. The software was especially gratifying considering that the Chinese counterparts view the recordings with a primitive player, a la Windows Media Player, where rewind, fast view, reverse view, frame-by-frame access, real-time stamp, synchronization with sound, and other chips are absent as a class.

conclusions
I can say that I happened to feel a very non-trivial piece of iron called PHOTOROBOT-2A. Externally, the device looks much simpler than later. I absolutely did not expect so many options for fine-tuning the operation of the device. In general - I will try to reduce all impressions into two standard summary lists.
Pros:
- compactness
- energy efficiency
- autonomy
- two inputs (usually compact DVRs come with one input or even a built-in camera, which immediately kills the possibility of a hidden or outdoor installation)
- the ability to connect external sensors
- a huge number of options for fine-tuning motion detectors, sound and sensors
- SDHC card support
- data storage without compression (respectively, without loss in quality)
- convenient menu
- convenient multifunctional, but rather simple software that is constantly updated, finalized and available both in the latest firmware releases and separately on the manufacturer’s website
- The ability to easily update firmware without unnecessary dancing with a tambourine (by means of a file saved on the memory card and selecting the appropriate menu item)
Minuses:
- the supplied software works only under the Windows family of OS - Linuxoids can try to run under Wine
- low maximum recording speed (fps) - I would like to be able to sometimes write 12fps (as on adult DVRs)
- the absence of at least some compression - losless could be very pleased, increasing the recording time without loss of quality
- the lack of proprietary software for conveniently maintaining a large archive of records on a computer
- high-resolution cameras are not supported (at least 600tvl)
In fairness, it is worth noting that the developer is working on the last two points of the minuses, and the second and third have already been decided in the new model, which will appear on store shelves in the first quarter of 2010.
Additional Information
Website of the developer and manufacturer of PHOTOBOT: http://saytech.com.ua/ Product
information page: http://saytech.com.ua/robot2a
UPD: For those who are interested, the device’s retail (recommended price) price is $ 160 for model with sound and $ 135 for the younger model without sound and support for cards up to 8Gb.