Teamwork in Git
All the many git articles I could find on the net lack one essential point - the description of team work. What is usually described as teamwork is actually just working with a remote repository.
Below I want to describe my experience of team work on a project using git.
My workflow is organized as follows.
I am the lead dash developer at the Dash Project Manager. I have several developers on my team.
My work is as follows:
1) talk with the customer
2) turn the customer’s vague and confused wishes into a clearly stated task
3) put the task to the developer
4) check the result of the task by the developer
5) return the unsatisfactory result to the developer
6) present the satisfactory result to the customer for approval or immediately send it to production
7) send the result approved by the customer to production
8) return the result, not approved by the customer, to the developer for revision
The developer’s work, respectively, is as follows:
1) get a task from me
2) complete it
3) send me the result
4) if the task returned for revision, finalize it and send it to me again
I use Trac to manage tasks . Trac also maintains project documentation, both programmer and user.
Having formulated the task, I write it to Trac and assign it to some developer. Having completed the task, the developer reassigns it to me. I check the result and either reassign it to the developer again, or mark it as done.
The algorithm for working with git and the general picture of what is happening are shown schematically in the picture:
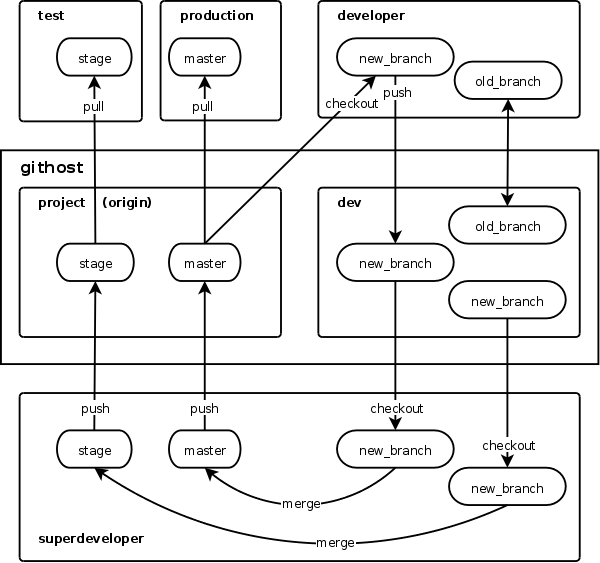
Now let's move from the theoretical part to the practical one and see what all this means and how it works.
Install Git. Read some manual . Understand the local repository.
Please note - this article is not about git commands, but about how to link these commands in the right sequence. Therefore, I will give git commands without detailed explanations, assuming that you know the purpose of the individual commands.
During team work, it will be necessary to provide access to the repository to several users. For convenient resolution of access rights to the repository, I use gitosis .
Gitosis is a set of scripts that provide convenient management of git repositories and access to them. It works like this:
- the user who owns all the repositories
is started on the server - all accesses to the repositories are done via SSH, under the name of this user, users are authenticated by keys
- when they enter via SSH, gitosis scripts are automatically launched, which, depending on the setting , allow or deny further actions with repositories
Gitosis scripts and configs are themselves stored in the repository and are configured by sending commits to this repository. It sounds crazy, but in fact, nothing really tricky, quite simple and convenient.
To install gitosis, you need (surprise!) To pull the gitosis installation repository from the gitosis developer server:
$ git clone git: //eagain.net/gitosis.git
Install gitosis:
$ cd gitosis
$ su
# python setup.py install
The installation repository is no longer needed, it can be deleted.
Now you need to create a user on the system that will own all the repositories:
$ su
# adduser gituser
And then initialize gitosis in the home directory of the created user, with the public key of the person who will be the administrator of gitosis. The public key, of course, needs to be put somewhere where the gituser user can read it from:
# su gituser
$ cd ~
$ gitosis-init <id_rsa.pub
Note that the gituser user and the gitosis administrator are not the same person. The gituser user is simply a “custodian” of repositories and never performs any actions at all.
I, as a gitosis administrator, use another user registered in the system. But, generally speaking, the administrator does not have to be a user registered in the system. The main thing is to indicate the public key of the administrator when initializing gitosis.
After initializing gitosis, the repositories directory will appear in the gituser user’s home directory, where all repositories will be stored. First, there will be only the gitosis-admin.git repository, which stores the settings for gitosis itself.
Please note - for some reasons related to the features of different versions of Python, you may need to register permissions for the post-update script located in the gitosis repository:
$ chmod 755 ~ / repositories / gitosis-admin.git / hooks / post-update
This completes the installation of gitosis'a and setup begins.
Configuring gitosis means that the administrator changes the contents of the gitosis repository.
We become the administrator of gitosis (if the administrator is a user registered in the system) or we log out of the system and log in where the administrator is registered (for example, on your laptop).
Now pull out the gitosis configuration repository:
$ git clone gituser @ githost: gitosis-admin.git
Where githost is the name of the server on which we installed gitosis (and where we will store the repositories).
Please note that no matter what name the administrator has, access to the server is always performed under the username gituser.
After that, the gitosis-admin directory will appear in the administrator’s home directory. In this directory we are interested in the gitosis.conf file, it is in it that all repositories are configured.
By default, it will have something like this:
[group gitosis-admin]
writable = gitosis-admin
members = admin @ host
Which means "admin is allowed to write to the gitosis-admin repository."
Creating a new repository consists in adding a new group to the config. The name of the group can be anything, it is just for clarity. We will need two repositories for work:
[group project-write]
writable = project
members = superdeveloper
[group project-read]
readonly = project
members = developer1 developer2 developer3 user1 user2
[group dev]
writable = dev
members = superdeveloper developer1 developer2 developer3
where superdeveloper is the lead developer, developer * are developers, user * are other interested
This config means the following:
1) the lead developer is allowed to write to the main repository
2) everyone is allowed to read from the main repository
3) the lead developer and all developers are allowed to write to the working repository
All these users, as well as the gitosis administrator, do not have to be registered users in the system. The main thing is that they have public keys.
The public keys of the users specified in the config must be copied to the gitosis-admin / keydir directory. Key files must have names of the form username.pub. In this example, these will be the names superdeveloper.pub, developer1.pub, user1.pub, etc.
After editing the config and copying the keys, you need to commit the changes to the local repository:
$ git add.
$ git commit -am 'Add project Project'
And send the commit to the central repository, where gitosis picks up the settings:
$ git push
That's it, now our repository server is configured and the necessary repositories are created (I’m lying, repositories have not been created yet, but they will be created automatically when first commit).
If in the previous section you had a question - why for one project you need two repositories - then here is the answer.
The first repository, it’s the main one, is production. The combat copy of the project will work on the code from this repository. The second repository, it’s also a worker, is development. This repository is, of course, developing a project.
I tried different schemes of team work and the most convenient at the moment seems to be a “two repository” scheme. The work in it is carried out approximately as follows:
1) I set the task for the developer
2) the developer takes the current project branch from the main repository and makes a local brunch from it
3) in this brunch, the developer solves the problem
4) the developer sends the brunch with the completed task to the working repository
5) I take this brunch from the working repository and check it
6) if the task is completed correctly, I merge this brunch with the current project branch in the main repository
This diagram has two key differences from the widely described schemes when all development goes in the master branch of one repository.
Firstly, in my scheme, developers cannot make unauthorized changes (both random and intentional) in the current branch, i.e. in production.
Secondly, the current branch is never inoperative.
The second reason, in fact, is more important. Unauthorized changes at any time can be rolled back, and then the version control system. But to resolve the inoperative state of the current branch can be very difficult.
I will explain with an example.
Let's say developer P1 made an edit to P1 and sent it to the master branch. I checked this edit and found it to be bad. Bad editing needs to be redone.
While I was checking, the P2 developer made the editing of P2 and also sent it to master. This edit turned out to be good. Good editing needs to be sent to production.
But now in the master branch there are two edits, good and bad. A good edit would need to be sent to production, but the presence of a bad edit does not allow it. You have to wait until a bad edit is fixed.
Or another example - all edits are good, but some are not approved by the customer. Unapproved edits do not allow approved people to get into production, and approval can take quite a while.
In general, you need to make sure that edits can be steered separately from each other, without dumping all of them into the master branch.
To do this, developers send all their brunches separately to the repository, without merging them with the master. I am engaged in merging. Accordingly, only the edits checked by me get into the current branch. Bad edits are sent for revision, and edits awaiting customer approval are sent to the test branch and just ... wait. And do not bother anyone.
Thus, the current branch is always in working condition.
In principle, sending brunches separately can be done in one repository. But in one repository you cannot share access to separate brunches, i.e. You cannot allow new brunches to be written to the repository and at the same time prohibit changing the current branch. Therefore, we need a second repository - in one there is an actual branch, in the other - all new work branches that appear as individual tasks are solved.
In fact, in large projects, each developer in general should have their own separate repository. But for now, it’s quite convenient for me to live with two repositories - one mine (production), the other - common to all developers (development).
Please note that the lead developer does the initial loading, since only he has the right to write to the main repository.
We create a local repository in the project directory and drive the project files into it:
$ cd / old / project directory /
$ git init
$ git add.
$ git commit -am 'poehali!'
We inform the local repository where the main repository is located:
$ git remote add origin gituser @ githost: project.git
Now we send the commit to the main repository:
$ git push origin master
Everything, the project is sent to the main repository. Now the old project directory can safely bang and start working already in the new directory (or even on another computer), under the control of git.
We go to the new directory (or to another computer in general) and pull out the main repository:
$ cd / new / project / directory
$ git clone gituser @ githost: project.git
This we got a copy of the main repository. It contains the current branch. Now you need to create a test branch.
Just copy the current branch to the main repository under the name of the test one:
$ git push origin master: stage
And then pull the test branch out of the main repository under its own name:
$ git checkout -b stage origin / stage
Now the local repository contains two branches, master and stage . Both branches are associated with the same branches in the main repository.
In this local repository, the lead developer will check the brunches sent by other developers and merge the verified brunches with the branches of the main repository.
In addition, you need to specify the location of the working dev repository:
$ git remote add dev gituser @ githost: dev.git
Our project includes not only repositories, but also "executing" nodes - production and debugging.
Production and debugging are the essence of local repositories, updated from the main repository. The difference between production and debugging is that the production is updated from the current branch, and debugging from the test one.
The launch of the production, without going into details, was as follows:
1) register a new user in the system, under which the production will work
2) add this user to gitosis (see section 5, in my example this is user *)
3) clone the main project repository to this user's directory
4) Configure the Apache virtual host (or whatever you like there) on the project directory
And now, to update the production, just go to this directory and execute one single command:
$ git pull
All updates in the current branch will be in the blink of an eye.
The debug copy of the project is identical in structure, except that after cloning the main repository, a switch was made from the current master branch to the stage test branch:
$ git checkout -b stage origin / stage
Now pull in debugging will pull updates from the test branch.
Before starting work on a project, the developer must first configure his local repository. The developer will deal with two remote repositories - the main one and the working one.
The main repository needs to be cloned:
$ git clone gituser @ githost: project.git
And the working repository is simply added to the config:
$ git remote add dev gituser @ githost: dev.git
This setting is performed only once. All further work is carried out according to the standard scheme (print a memo and stick to the monitor).
Check mail. If you received a notification from Trac about a new task - start working:
$ quake exit
Create a new brunch based on the current branch from the main repository (we agreed to call the brunch ticket numbers from Trac):
$ git checkout -b new_branch origin / master
Or return to work on the old brunch from the working repository
$ git checkout -b old_branch dev / old_branch
Pull the last changes:
$ git pull
If new files were created during the work, add them to the brunch:
$ git add.
Save the changes to the local repository:
$ git commit -am 'komment'
Send the new brunch to the working repository:
$ git push dev new_branch
Or send the old brunch there again:
$ git push
Reassign the completed task in Trac to the lead developer. Returning to the developer, it will return either with an indication of what needs to be redone, or with the status closed.
10 goto check mail;
Here I must say a couple of subtleties. The state of the local repository of each specific developer does not bother me, in general, but still, so that people do not get confused once again, I recommend that they do two things.
Firstly, the brunches sent to the working repository are no longer needed locally and can be safely deleted:
$ git branch -D new_branch
Secondly, the list of brunches in remote repositories issued by the
$ git branch -r command becomes
obsolete over time, since I I delete the brunches checked and merged with the current branch from there. To update information about remote repositories, you need to run the command
$ git remote prune dev
which will remove the brunches that are not in the remote repository from the local cache. Please note that you only need to update information about the working repository. There are never any changes in the main repository, there are always the same brunches - master and stage.
Having received a notification from Trac about a task reassigned to me, I open this task and look at what it was all about to know what to check.
Then I update the data about the remote repositories:
$ git remote update
Now I will see new brunches in the working repository, including the brunch corresponding to the task being checked:
$ git branch -r
Then I pull the checked brunch from the working repository to me (because the brunch name corresponds to the ticket number, then I always know exactly which brunch to pull out):
$ git checkout -b branch dev / branch
If this is not a new brunch, but a fix for the old one, then you still need to pull the update:
$ git pull
Now I can check the functionality and correctness of the changes made by the developer.
Let's say the revision passed the check. Further actions depend on whether this edit is simple, one that can be sent to production without agreement with the customer, or is it a big edit that needs to be agreed upon.
If the editing is simple, then I simply merge the verified brunch with the current branch and send the updated current branch to the main repository:
$ git checkout master
$ git merge branch
$ git push
After that I delete the brunch locally and from the working repository, this brunch is no one else and never will be needed:
$ git branch -D branch
$ git push dev: branch
There is such a moment - at first I wanted to instruct the developers to remove brunches from the working repository so that each of them would delete its brunches. But then he decided not to complicate people's lives. Those. the approach is this: if the developer sent a brunch that suited me, then this brunch should not bother the developer anymore.
If the edit requires coordination, the checked brunch merges not with the current branch, but with the test one:
$ git checkout stage
$ git merge branch
$ git push
After sending the updated test branch to the main repository, I delete the checked brunch only locally:
$ git branch -D branch
This brunch remains in the working repository. It is possible that the customer wants to redo something and then the developer will need this brunch to fix it.
In the test branch, the checked brunch lies and does not ask. When the customer gets to him and approves, then I will again pull this brunch from the working repository and salt with the current branch.
After all the brunches are merged with the necessary branches and the whole thing is sent to the main repository, I go to production and debugging and update them.
( original article )
Below I want to describe my experience of team work on a project using git.
1. General principle
My workflow is organized as follows.
I am the lead dash developer at the Dash Project Manager. I have several developers on my team.
My work is as follows:
1) talk with the customer
2) turn the customer’s vague and confused wishes into a clearly stated task
3) put the task to the developer
4) check the result of the task by the developer
5) return the unsatisfactory result to the developer
6) present the satisfactory result to the customer for approval or immediately send it to production
7) send the result approved by the customer to production
8) return the result, not approved by the customer, to the developer for revision
The developer’s work, respectively, is as follows:
1) get a task from me
2) complete it
3) send me the result
4) if the task returned for revision, finalize it and send it to me again
I use Trac to manage tasks . Trac also maintains project documentation, both programmer and user.
Having formulated the task, I write it to Trac and assign it to some developer. Having completed the task, the developer reassigns it to me. I check the result and either reassign it to the developer again, or mark it as done.
The algorithm for working with git and the general picture of what is happening are shown schematically in the picture:
Now let's move from the theoretical part to the practical one and see what all this means and how it works.
2. Git
Install Git. Read some manual . Understand the local repository.
Please note - this article is not about git commands, but about how to link these commands in the right sequence. Therefore, I will give git commands without detailed explanations, assuming that you know the purpose of the individual commands.
3. Access to the repository
During team work, it will be necessary to provide access to the repository to several users. For convenient resolution of access rights to the repository, I use gitosis .
Gitosis is a set of scripts that provide convenient management of git repositories and access to them. It works like this:
- the user who owns all the repositories
is started on the server - all accesses to the repositories are done via SSH, under the name of this user, users are authenticated by keys
- when they enter via SSH, gitosis scripts are automatically launched, which, depending on the setting , allow or deny further actions with repositories
Gitosis scripts and configs are themselves stored in the repository and are configured by sending commits to this repository. It sounds crazy, but in fact, nothing really tricky, quite simple and convenient.
4. Install gitosis
To install gitosis, you need (surprise!) To pull the gitosis installation repository from the gitosis developer server:
$ git clone git: //eagain.net/gitosis.git
Install gitosis:
$ cd gitosis
$ su
# python setup.py install
The installation repository is no longer needed, it can be deleted.
Now you need to create a user on the system that will own all the repositories:
$ su
# adduser gituser
And then initialize gitosis in the home directory of the created user, with the public key of the person who will be the administrator of gitosis. The public key, of course, needs to be put somewhere where the gituser user can read it from:
# su gituser
$ cd ~
$ gitosis-init <id_rsa.pub
Note that the gituser user and the gitosis administrator are not the same person. The gituser user is simply a “custodian” of repositories and never performs any actions at all.
I, as a gitosis administrator, use another user registered in the system. But, generally speaking, the administrator does not have to be a user registered in the system. The main thing is to indicate the public key of the administrator when initializing gitosis.
After initializing gitosis, the repositories directory will appear in the gituser user’s home directory, where all repositories will be stored. First, there will be only the gitosis-admin.git repository, which stores the settings for gitosis itself.
Please note - for some reasons related to the features of different versions of Python, you may need to register permissions for the post-update script located in the gitosis repository:
$ chmod 755 ~ / repositories / gitosis-admin.git / hooks / post-update
This completes the installation of gitosis'a and setup begins.
5. Configuring gitosis and creating repositories
Configuring gitosis means that the administrator changes the contents of the gitosis repository.
We become the administrator of gitosis (if the administrator is a user registered in the system) or we log out of the system and log in where the administrator is registered (for example, on your laptop).
Now pull out the gitosis configuration repository:
$ git clone gituser @ githost: gitosis-admin.git
Where githost is the name of the server on which we installed gitosis (and where we will store the repositories).
Please note that no matter what name the administrator has, access to the server is always performed under the username gituser.
After that, the gitosis-admin directory will appear in the administrator’s home directory. In this directory we are interested in the gitosis.conf file, it is in it that all repositories are configured.
By default, it will have something like this:
[group gitosis-admin]
writable = gitosis-admin
members = admin @ host
Which means "admin is allowed to write to the gitosis-admin repository."
Creating a new repository consists in adding a new group to the config. The name of the group can be anything, it is just for clarity. We will need two repositories for work:
[group project-write]
writable = project
members = superdeveloper
[group project-read]
readonly = project
members = developer1 developer2 developer3 user1 user2
[group dev]
writable = dev
members = superdeveloper developer1 developer2 developer3
where superdeveloper is the lead developer, developer * are developers, user * are other interested
This config means the following:
1) the lead developer is allowed to write to the main repository
2) everyone is allowed to read from the main repository
3) the lead developer and all developers are allowed to write to the working repository
All these users, as well as the gitosis administrator, do not have to be registered users in the system. The main thing is that they have public keys.
The public keys of the users specified in the config must be copied to the gitosis-admin / keydir directory. Key files must have names of the form username.pub. In this example, these will be the names superdeveloper.pub, developer1.pub, user1.pub, etc.
After editing the config and copying the keys, you need to commit the changes to the local repository:
$ git add.
$ git commit -am 'Add project Project'
And send the commit to the central repository, where gitosis picks up the settings:
$ git push
That's it, now our repository server is configured and the necessary repositories are created (I’m lying, repositories have not been created yet, but they will be created automatically when first commit).
6. Assignment of repositories
If in the previous section you had a question - why for one project you need two repositories - then here is the answer.
The first repository, it’s the main one, is production. The combat copy of the project will work on the code from this repository. The second repository, it’s also a worker, is development. This repository is, of course, developing a project.
I tried different schemes of team work and the most convenient at the moment seems to be a “two repository” scheme. The work in it is carried out approximately as follows:
1) I set the task for the developer
2) the developer takes the current project branch from the main repository and makes a local brunch from it
3) in this brunch, the developer solves the problem
4) the developer sends the brunch with the completed task to the working repository
5) I take this brunch from the working repository and check it
6) if the task is completed correctly, I merge this brunch with the current project branch in the main repository
This diagram has two key differences from the widely described schemes when all development goes in the master branch of one repository.
Firstly, in my scheme, developers cannot make unauthorized changes (both random and intentional) in the current branch, i.e. in production.
Secondly, the current branch is never inoperative.
The second reason, in fact, is more important. Unauthorized changes at any time can be rolled back, and then the version control system. But to resolve the inoperative state of the current branch can be very difficult.
I will explain with an example.
Let's say developer P1 made an edit to P1 and sent it to the master branch. I checked this edit and found it to be bad. Bad editing needs to be redone.
While I was checking, the P2 developer made the editing of P2 and also sent it to master. This edit turned out to be good. Good editing needs to be sent to production.
But now in the master branch there are two edits, good and bad. A good edit would need to be sent to production, but the presence of a bad edit does not allow it. You have to wait until a bad edit is fixed.
Or another example - all edits are good, but some are not approved by the customer. Unapproved edits do not allow approved people to get into production, and approval can take quite a while.
In general, you need to make sure that edits can be steered separately from each other, without dumping all of them into the master branch.
To do this, developers send all their brunches separately to the repository, without merging them with the master. I am engaged in merging. Accordingly, only the edits checked by me get into the current branch. Bad edits are sent for revision, and edits awaiting customer approval are sent to the test branch and just ... wait. And do not bother anyone.
Thus, the current branch is always in working condition.
In principle, sending brunches separately can be done in one repository. But in one repository you cannot share access to separate brunches, i.e. You cannot allow new brunches to be written to the repository and at the same time prohibit changing the current branch. Therefore, we need a second repository - in one there is an actual branch, in the other - all new work branches that appear as individual tasks are solved.
In fact, in large projects, each developer in general should have their own separate repository. But for now, it’s quite convenient for me to live with two repositories - one mine (production), the other - common to all developers (development).
7. Initial upload of the project to the repository
Please note that the lead developer does the initial loading, since only he has the right to write to the main repository.
We create a local repository in the project directory and drive the project files into it:
$ cd / old / project directory /
$ git init
$ git add.
$ git commit -am 'poehali!'
We inform the local repository where the main repository is located:
$ git remote add origin gituser @ githost: project.git
Now we send the commit to the main repository:
$ git push origin master
Everything, the project is sent to the main repository. Now the old project directory can safely bang and start working already in the new directory (or even on another computer), under the control of git.
8. Lead Developer Repository
We go to the new directory (or to another computer in general) and pull out the main repository:
$ cd / new / project / directory
$ git clone gituser @ githost: project.git
This we got a copy of the main repository. It contains the current branch. Now you need to create a test branch.
Just copy the current branch to the main repository under the name of the test one:
$ git push origin master: stage
And then pull the test branch out of the main repository under its own name:
$ git checkout -b stage origin / stage
Now the local repository contains two branches, master and stage . Both branches are associated with the same branches in the main repository.
In this local repository, the lead developer will check the brunches sent by other developers and merge the verified brunches with the branches of the main repository.
In addition, you need to specify the location of the working dev repository:
$ git remote add dev gituser @ githost: dev.git
9. Project infrastructure
Our project includes not only repositories, but also "executing" nodes - production and debugging.
Production and debugging are the essence of local repositories, updated from the main repository. The difference between production and debugging is that the production is updated from the current branch, and debugging from the test one.
The launch of the production, without going into details, was as follows:
1) register a new user in the system, under which the production will work
2) add this user to gitosis (see section 5, in my example this is user *)
3) clone the main project repository to this user's directory
4) Configure the Apache virtual host (or whatever you like there) on the project directory
And now, to update the production, just go to this directory and execute one single command:
$ git pull
All updates in the current branch will be in the blink of an eye.
The debug copy of the project is identical in structure, except that after cloning the main repository, a switch was made from the current master branch to the stage test branch:
$ git checkout -b stage origin / stage
Now pull in debugging will pull updates from the test branch.
10. Developer repository
Before starting work on a project, the developer must first configure his local repository. The developer will deal with two remote repositories - the main one and the working one.
The main repository needs to be cloned:
$ git clone gituser @ githost: project.git
And the working repository is simply added to the config:
$ git remote add dev gituser @ githost: dev.git
This setting is performed only once. All further work is carried out according to the standard scheme (print a memo and stick to the monitor).
11. Developer's memo
Check mail. If you received a notification from Trac about a new task - start working:
$ quake exit
Create a new brunch based on the current branch from the main repository (we agreed to call the brunch ticket numbers from Trac):
$ git checkout -b new_branch origin / master
Or return to work on the old brunch from the working repository
$ git checkout -b old_branch dev / old_branch
Pull the last changes:
$ git pull
---
Complete the task in a new brunch. This is where the code works.
---
If new files were created during the work, add them to the brunch:
$ git add.
Save the changes to the local repository:
$ git commit -am 'komment'
Send the new brunch to the working repository:
$ git push dev new_branch
Or send the old brunch there again:
$ git push
Reassign the completed task in Trac to the lead developer. Returning to the developer, it will return either with an indication of what needs to be redone, or with the status closed.
10 goto check mail;
Here I must say a couple of subtleties. The state of the local repository of each specific developer does not bother me, in general, but still, so that people do not get confused once again, I recommend that they do two things.
Firstly, the brunches sent to the working repository are no longer needed locally and can be safely deleted:
$ git branch -D new_branch
Secondly, the list of brunches in remote repositories issued by the
$ git branch -r command becomes
obsolete over time, since I I delete the brunches checked and merged with the current branch from there. To update information about remote repositories, you need to run the command
$ git remote prune dev
which will remove the brunches that are not in the remote repository from the local cache. Please note that you only need to update information about the working repository. There are never any changes in the main repository, there are always the same brunches - master and stage.
12. Lead Developer Actions
Having received a notification from Trac about a task reassigned to me, I open this task and look at what it was all about to know what to check.
Then I update the data about the remote repositories:
$ git remote update
Now I will see new brunches in the working repository, including the brunch corresponding to the task being checked:
$ git branch -r
Then I pull the checked brunch from the working repository to me (because the brunch name corresponds to the ticket number, then I always know exactly which brunch to pull out):
$ git checkout -b branch dev / branch
If this is not a new brunch, but a fix for the old one, then you still need to pull the update:
$ git pull
Now I can check the functionality and correctness of the changes made by the developer.
Let's say the revision passed the check. Further actions depend on whether this edit is simple, one that can be sent to production without agreement with the customer, or is it a big edit that needs to be agreed upon.
If the editing is simple, then I simply merge the verified brunch with the current branch and send the updated current branch to the main repository:
$ git checkout master
$ git merge branch
$ git push
After that I delete the brunch locally and from the working repository, this brunch is no one else and never will be needed:
$ git branch -D branch
$ git push dev: branch
There is such a moment - at first I wanted to instruct the developers to remove brunches from the working repository so that each of them would delete its brunches. But then he decided not to complicate people's lives. Those. the approach is this: if the developer sent a brunch that suited me, then this brunch should not bother the developer anymore.
If the edit requires coordination, the checked brunch merges not with the current branch, but with the test one:
$ git checkout stage
$ git merge branch
$ git push
After sending the updated test branch to the main repository, I delete the checked brunch only locally:
$ git branch -D branch
This brunch remains in the working repository. It is possible that the customer wants to redo something and then the developer will need this brunch to fix it.
In the test branch, the checked brunch lies and does not ask. When the customer gets to him and approves, then I will again pull this brunch from the working repository and salt with the current branch.
After all the brunches are merged with the necessary branches and the whole thing is sent to the main repository, I go to production and debugging and update them.
( original article )