WiFi radio WOLNA. How to create a small startup
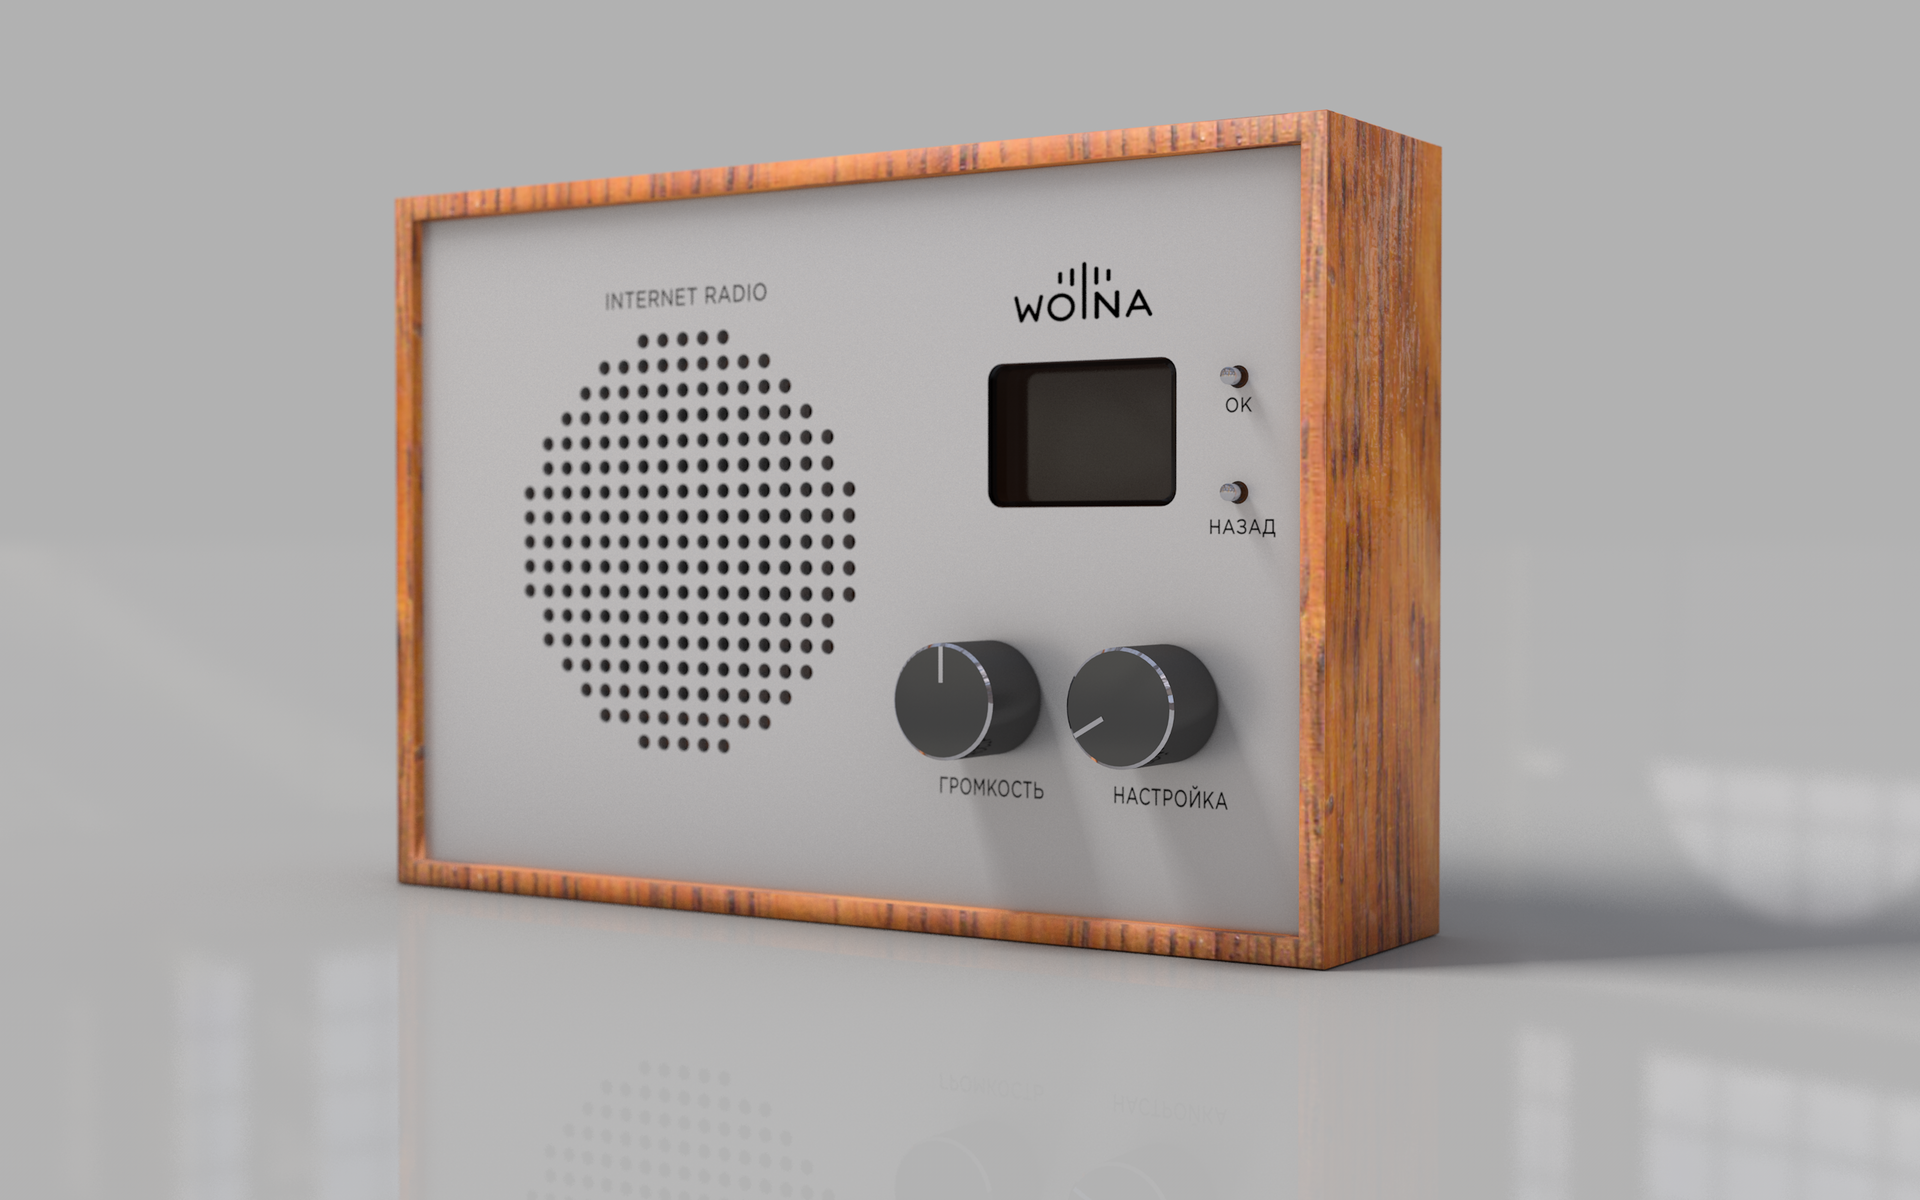
Not so long ago, I put a device of my own design, which I had been developing for the last year, to the public. This is an internet radio that works via wifi.
To vote for or against people is invited to the ruble at one of the crowdfunding sites. The device did not produce a big furore, although there are already sponsors. But since then there have been many technical questions and requests to lay out the schemes and firmware. Anyone who is interested in how the device was born, and what is made of, welcome under cat.
Spoiler: firmware will not.
So, it all started with the need to have a radio in the kitchen at home. Of course, as an electronics developer, I immediately dismissed the option to just go to the store and buy. By the way, for this reason I still do not have a normal doorbell.
FM radio has disappeared due to boring implementation. And it was decided to make Internet radio. Looking ahead, I want to show that such a receiver has turned out.
The choice of hardware
First, I had to choose a platform on which to build Internet radio. There are many options, but I chose from what was at hand:
1. Odroid W + LCD
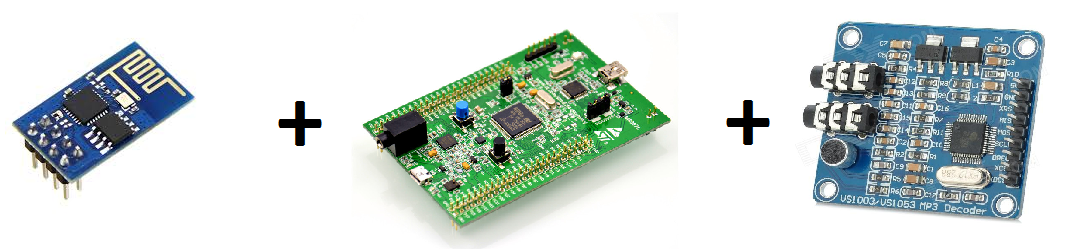
2. STM32F4DISCOVERY + ESP8266 + VS1053B
On an odroid, the development process would take less time, but minuses, in my particular case (many will not agree with me) got the better of it:
- the OS boot process takes some time
- a growing tendency to infect IoT devices with viruses
- I’m not good at Linux development
- price
Nevertheless, I asked one of my good friends to write a softphone for Odroid W, which would start at the start of the system and play Internet radio. But the impossibility of really correcting the project without tugging a friend buried this option, and pushed me to the second.
And I collected the following scheme on a breadboard:
How to work with Internet radio
After that, I began to look at how Internet radio works. It turned out that the overwhelming majority of stations use the icecast for broadcasting . It is spinning somewhere on a server with a fixed IP, and is waiting for a connection. As a rule on port 8000 or 8080. Although there are many exceptions. After connecting, you need to send a request of this type, substituting in it the name of the stream and server:
In response, anendless mp3 stream begins to fall , which can already be decoded and reproduced.
Opening TCP connections and other joys of working with ESP8266 are performed using AT commands. I will not dwell on them, full of information on the Internet. Everything is very well written in the Russian-speaking community esp8266 . The procedure for working with it is simple:
1. We are waiting for a WiFi connection, if there is no network connection, enter the password.
2. Open the TCP connection to the radio station server. Server addresses, ports and stream names are stored directly in the flash memory of the microcontroller, but more on that later.
3. Send the GET request above.
4. We receive in response a continuous mp3 stream.
5. If it is necessary to switch the station, close the TCP connection, and repeat from step 2.
I will tell you a little about how the stations get into the flash memory of the microcontroller. Initially, at the verification stage, I simply wrote down the address, port numbers and stream names into one of the program memory pages. But over time, when the devices dispersed to relatives and friends had to add the ability to centrally update the list. It was decided to create a server with a fixed IP on which the file with the list of stations would be stored. When connected via TCP, the server waits for a password, and issues a file, and the microcontroller writes it to itself in flash memory. Since I first encountered the creation of “something on the Internet,” I was pleasantly surprised that it turns out that renting a virtual machine with a fixed IP costs only 100 rubles per month. Miracles :)
Circuitry
Having played around with STM32F4Discovery, I decided to make my board, on which all the receiver elements will be located, and I wouldn’t have to pull the wires either to the display or to the connectors. This greatly increases reliability and manufacturabilityand everyone dreams about it .
The scheme can be downloaded here. [SCHEME] . I did not decorate it and did not brush it specifically for publication. This is a working version, and this should be enough for those who are really interested.
The scheme consists of the main parts:
1. MK STM32F415 with strapping, two quartz and a battery for a real time clock.
2. ESP8266
3. VS1053 with binding strictly on datasheet. Started on MK through SPI.
4. Power - two linear regulators LM1117 for 3.3 and 1.8 volts.
5. Display, connectors, buttons, potentiometer. All this is done on the GPIO microcontroller.
Also, the PAM8403 class D amplifier is not displayed on the diagram as it stands as a separate purchase module.
Board
For a good, before you make a board, you must determine the location of the elements protruding from the body - buttons, connectors, display. So I did, but on the body later.
The fee turned out like this. Caution geek strawberries!
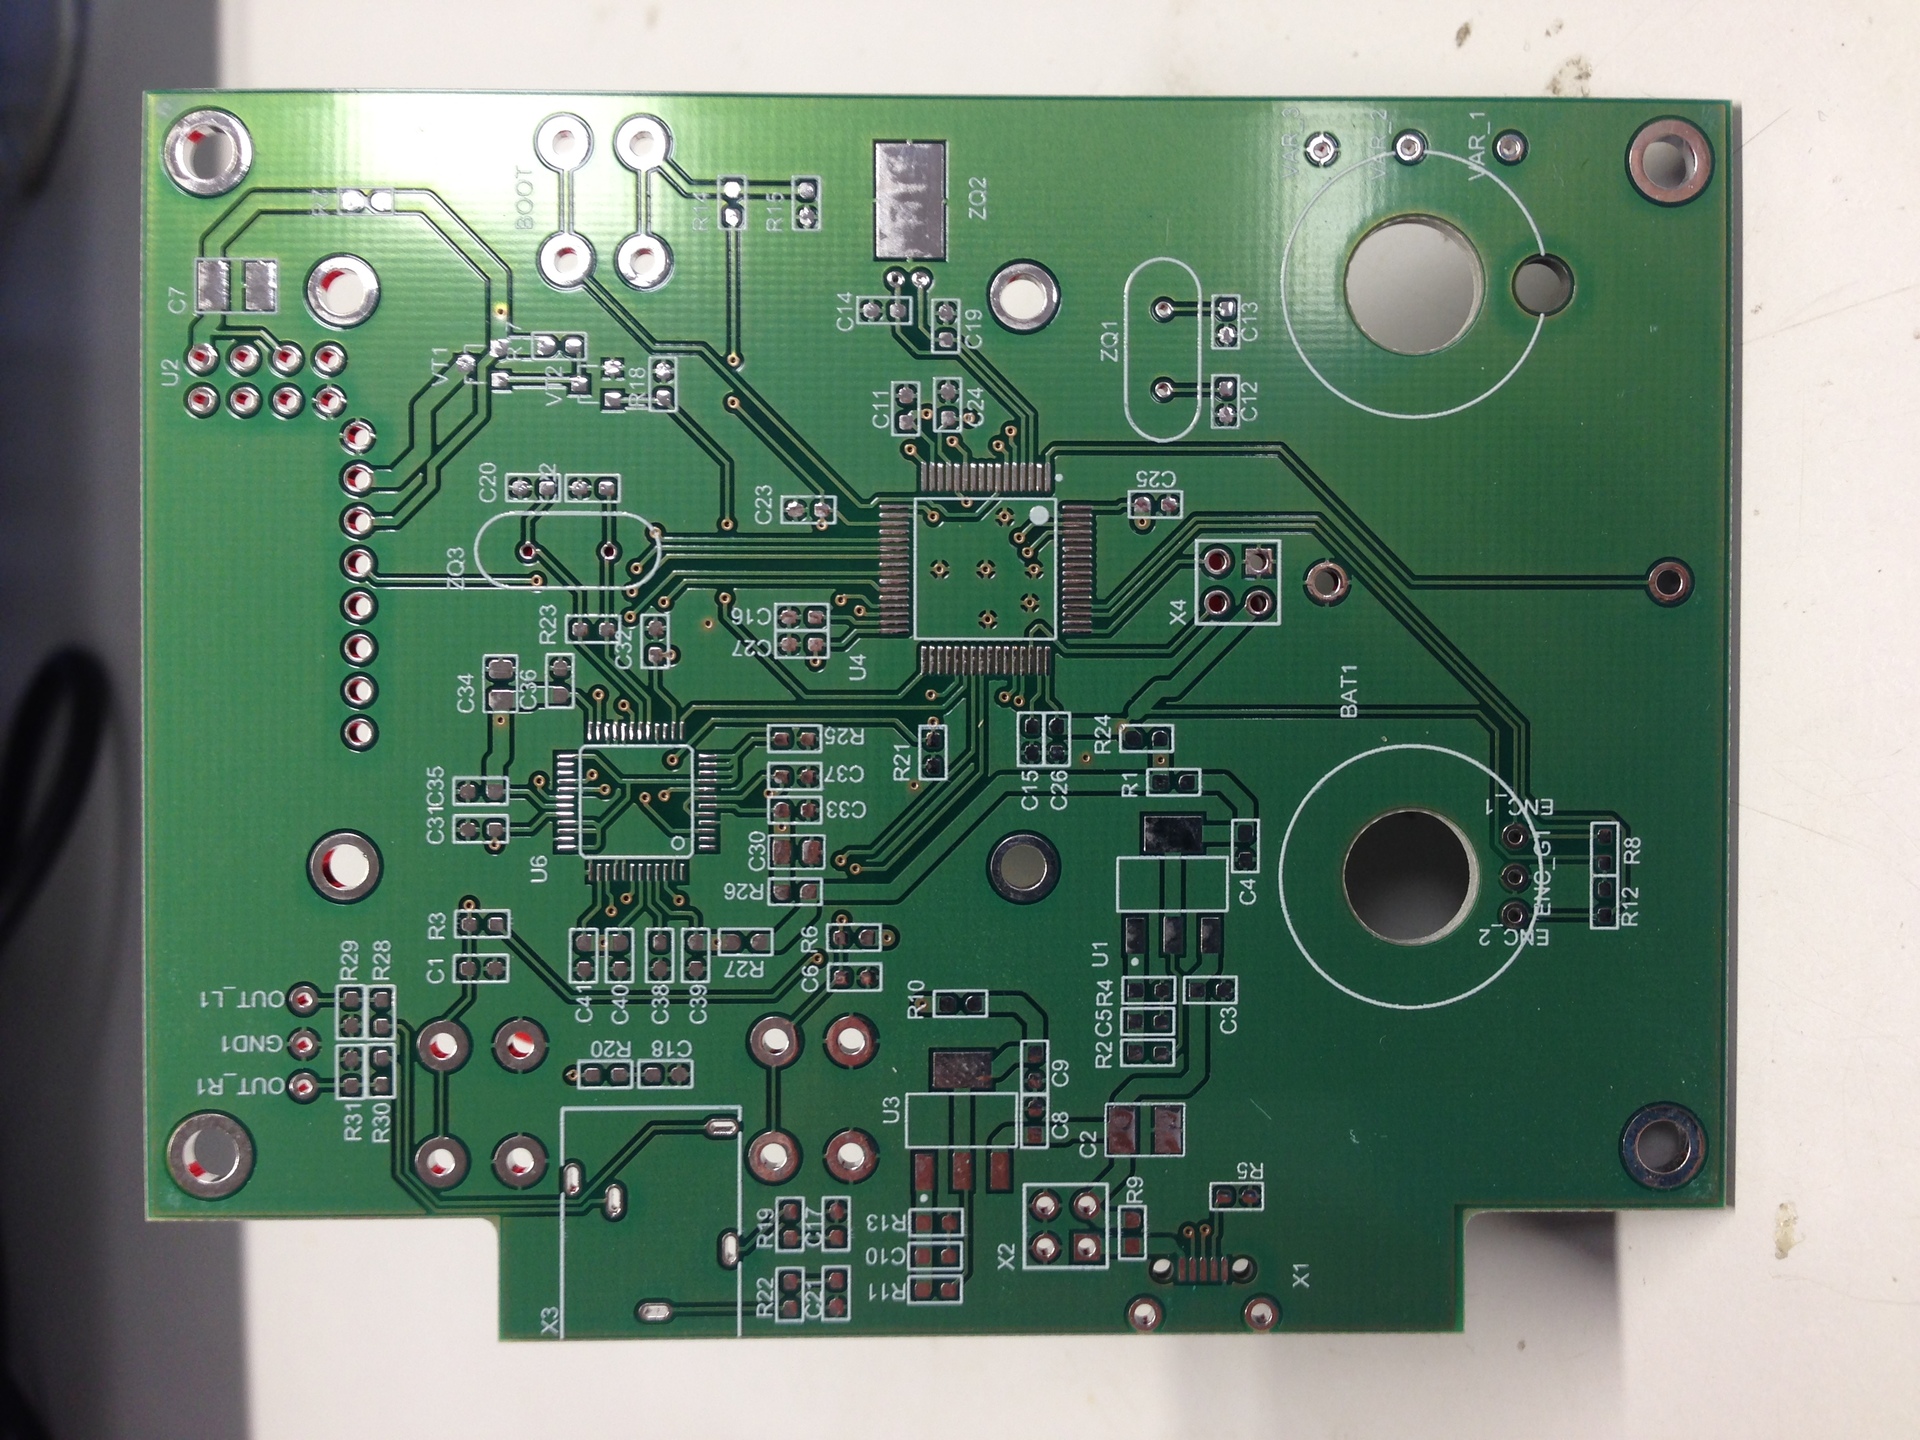
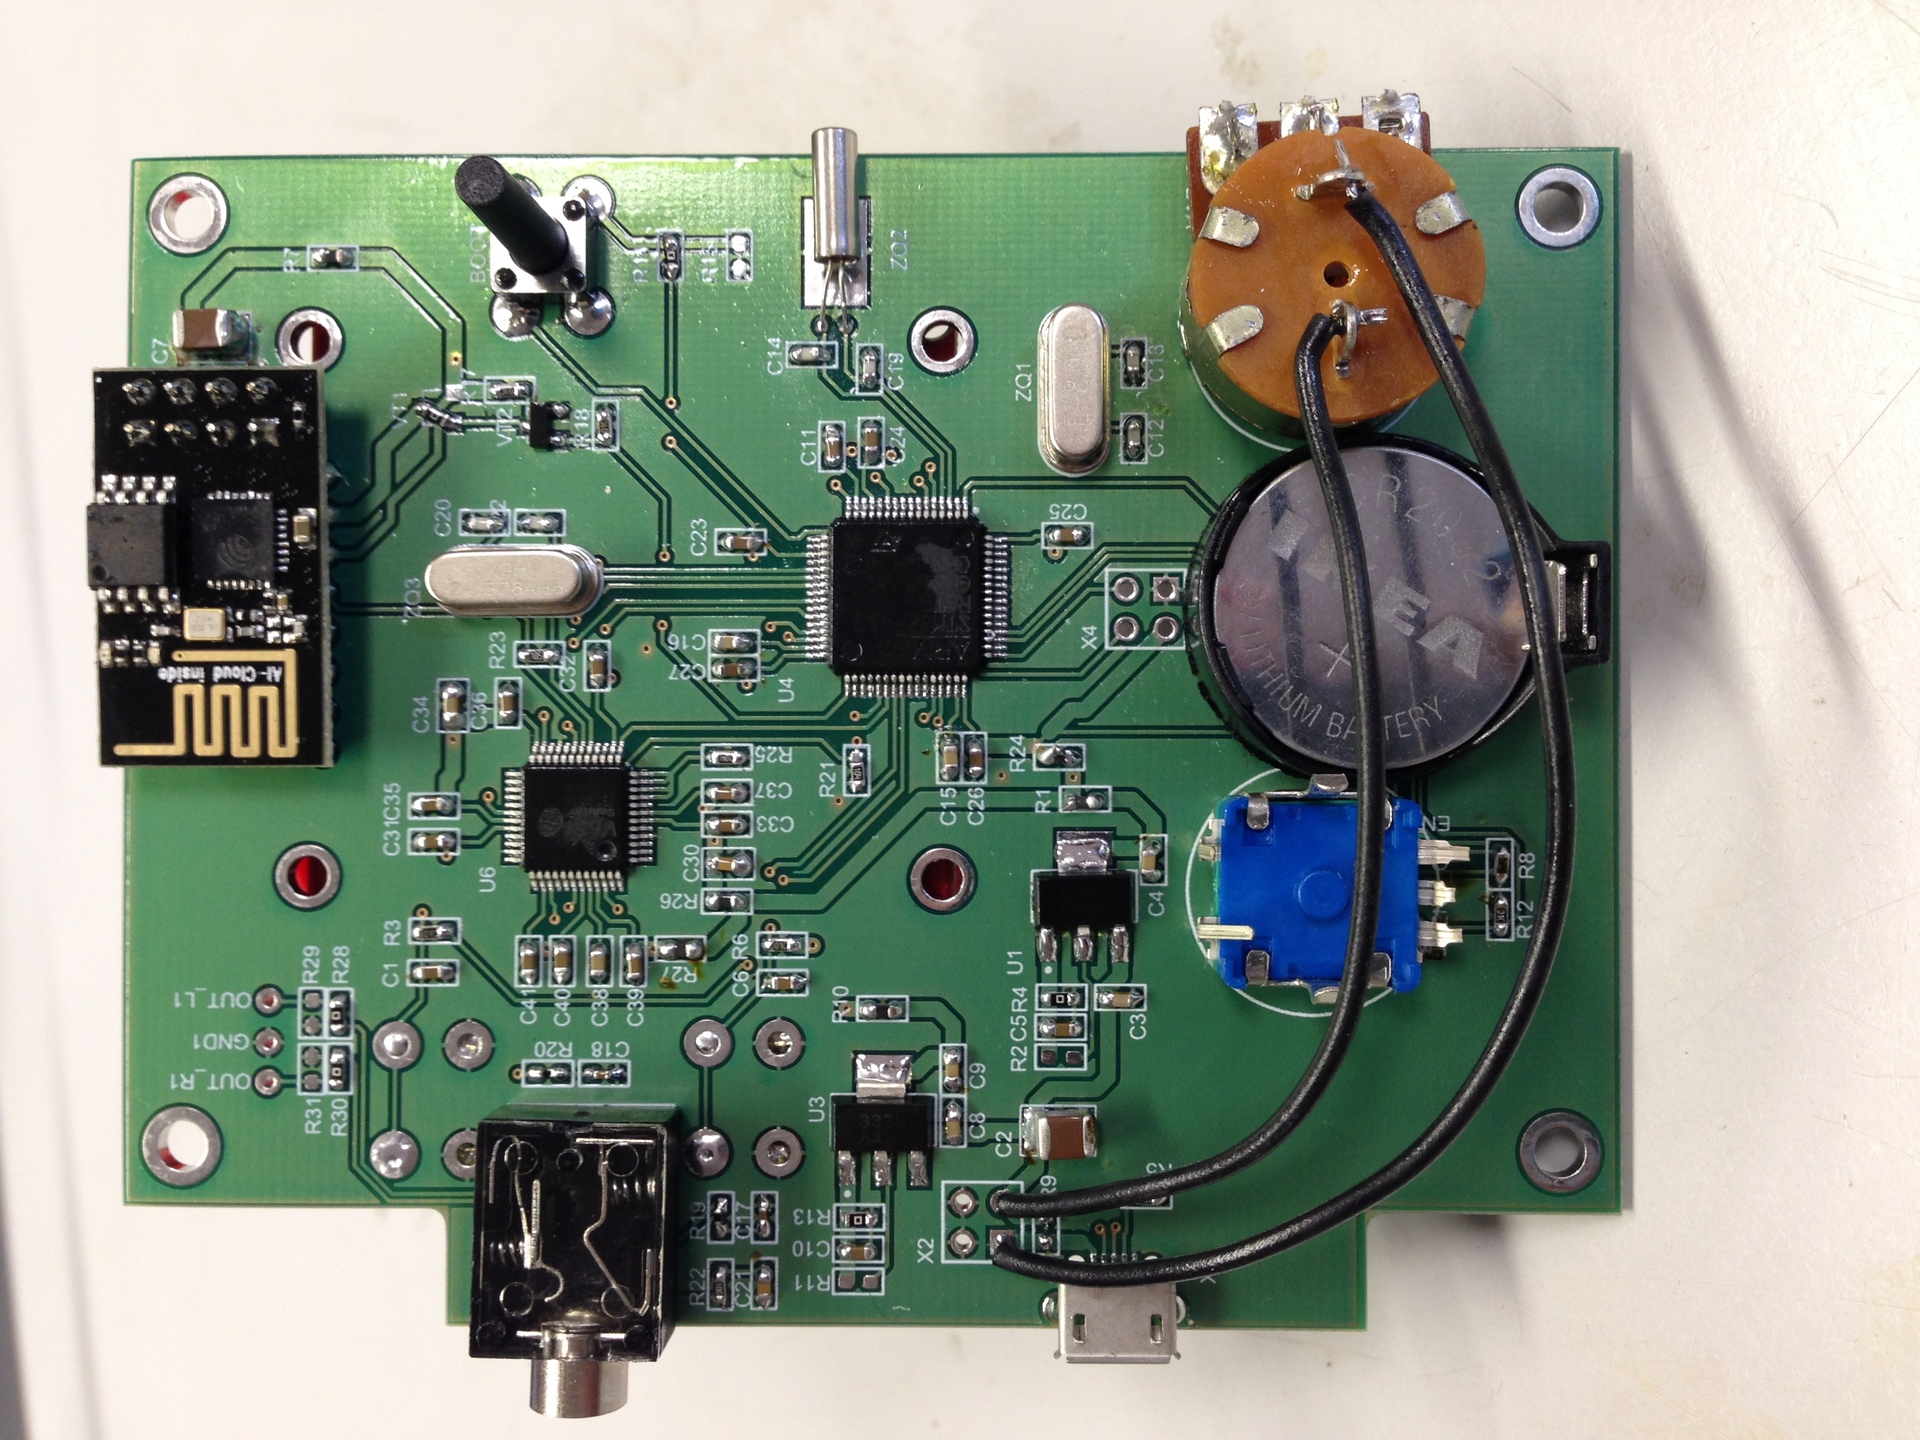
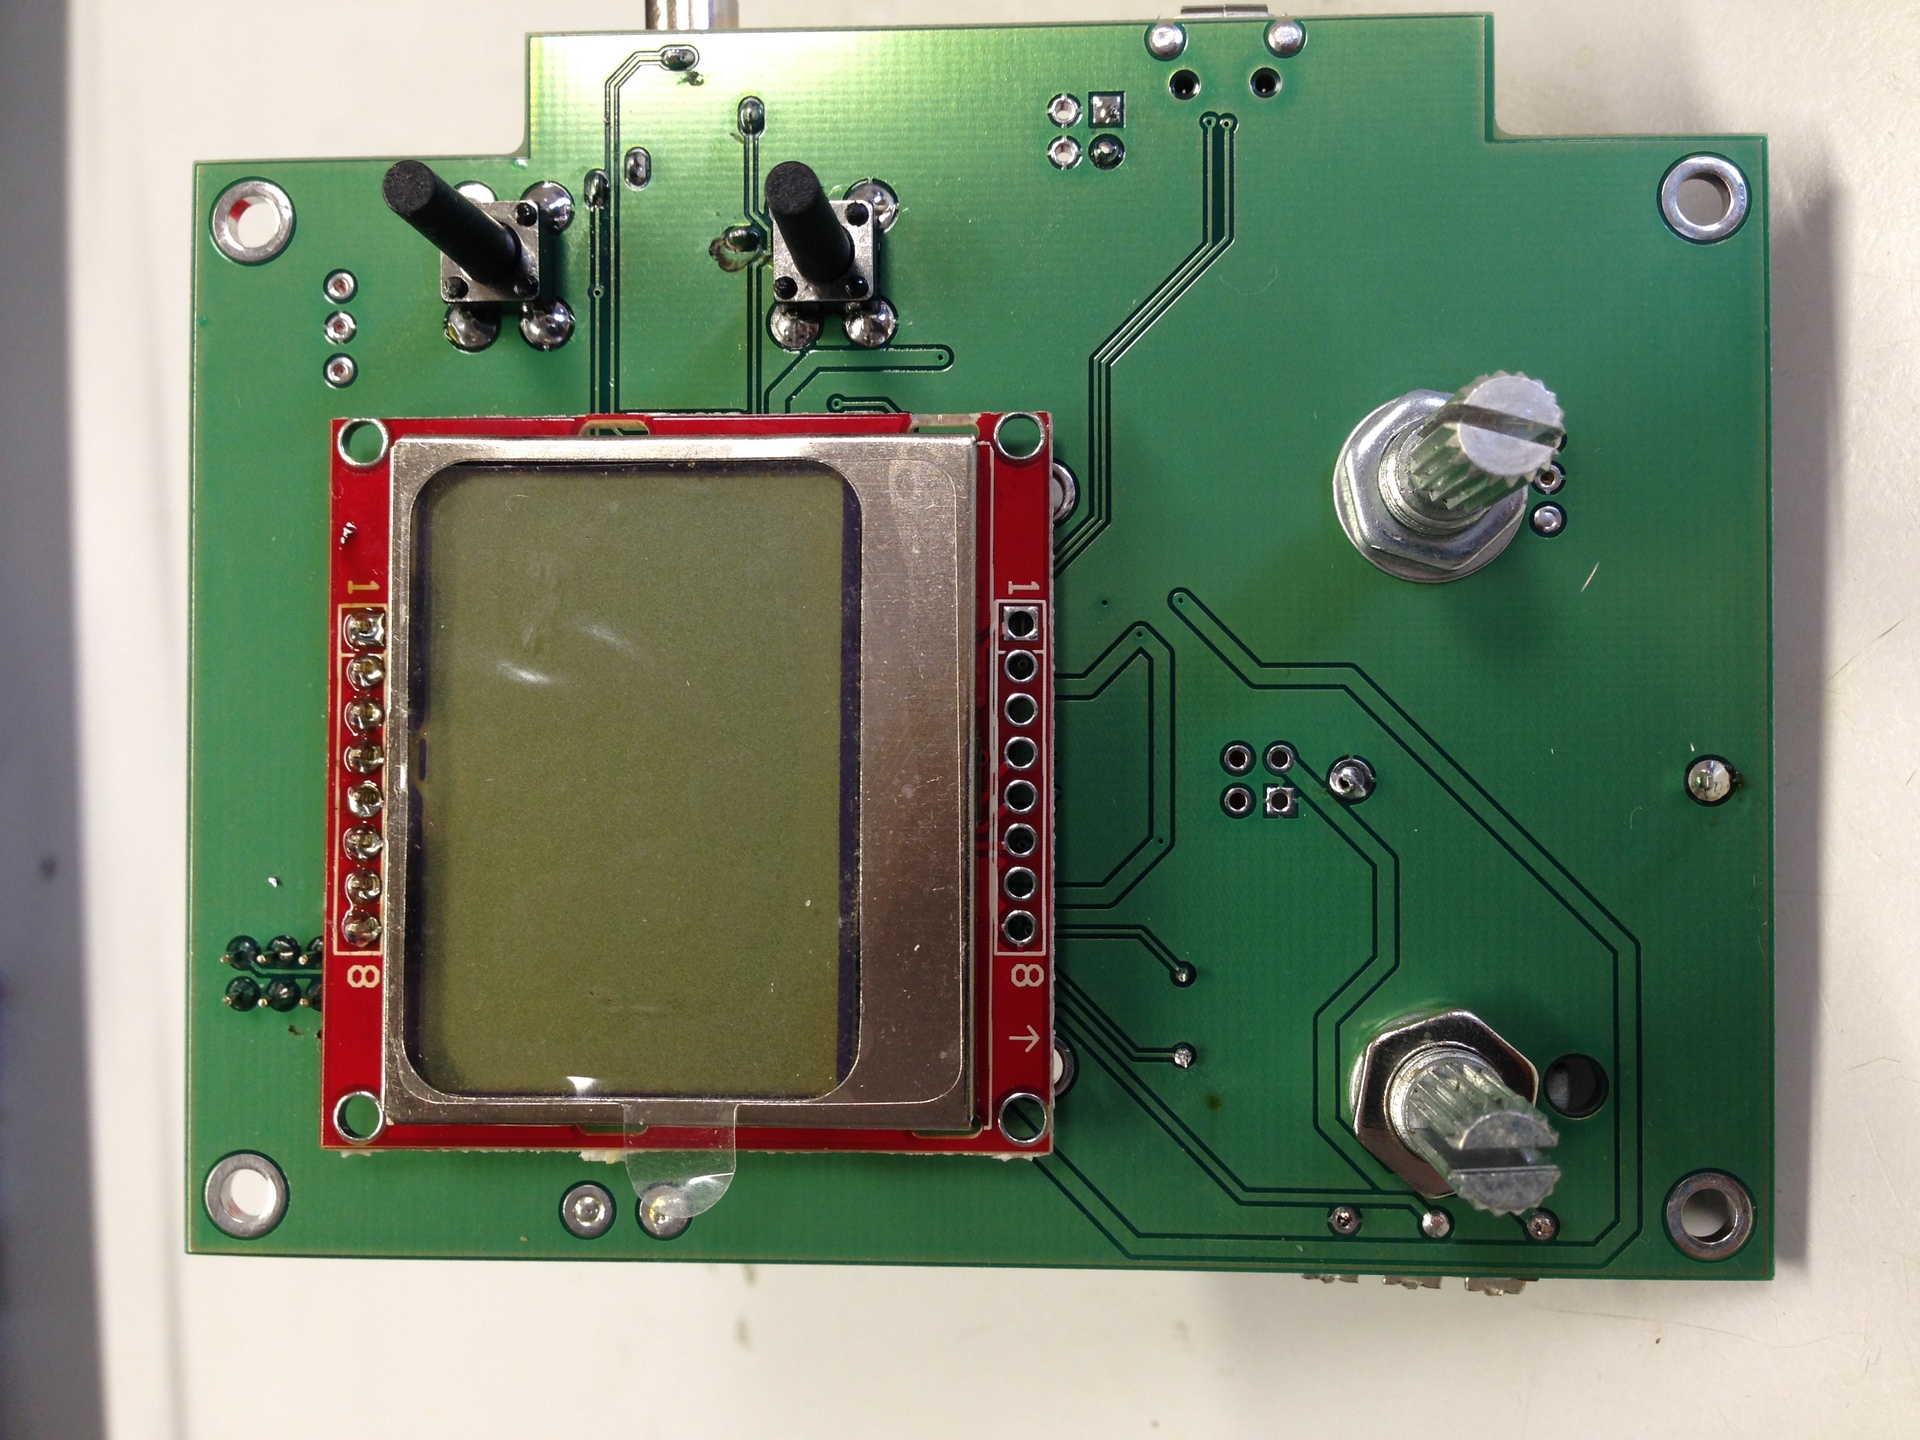
The payment is two-layer, thickness is 1.5 mm. All smd components are located on one side, which facilitates automatic installation. However, it is not yet reached him.
On Peekaboo, I was already chewed by several experts for small flaws in the layout. However, the board works, and works as it should. I do not see the value in the drawings of the board, so I do not post it. If there are requests, lay out. Anyway, I will redo it. And of course, well-founded criticism is very welcome!
Case The
case is the pain of all electronic enthusiasts. And even if you are not an amateur, by making a case for your money you turn into it.
For small batches, the most affordable option is either milling or laser cutting. In variants with metal, it may still be sheet metal, but this is not my case. Therefore, I chose the milling of wooden parts + laser cutting panels. In terms of sound, the wooden case is also a huge plus.
The result was such a set of parts:
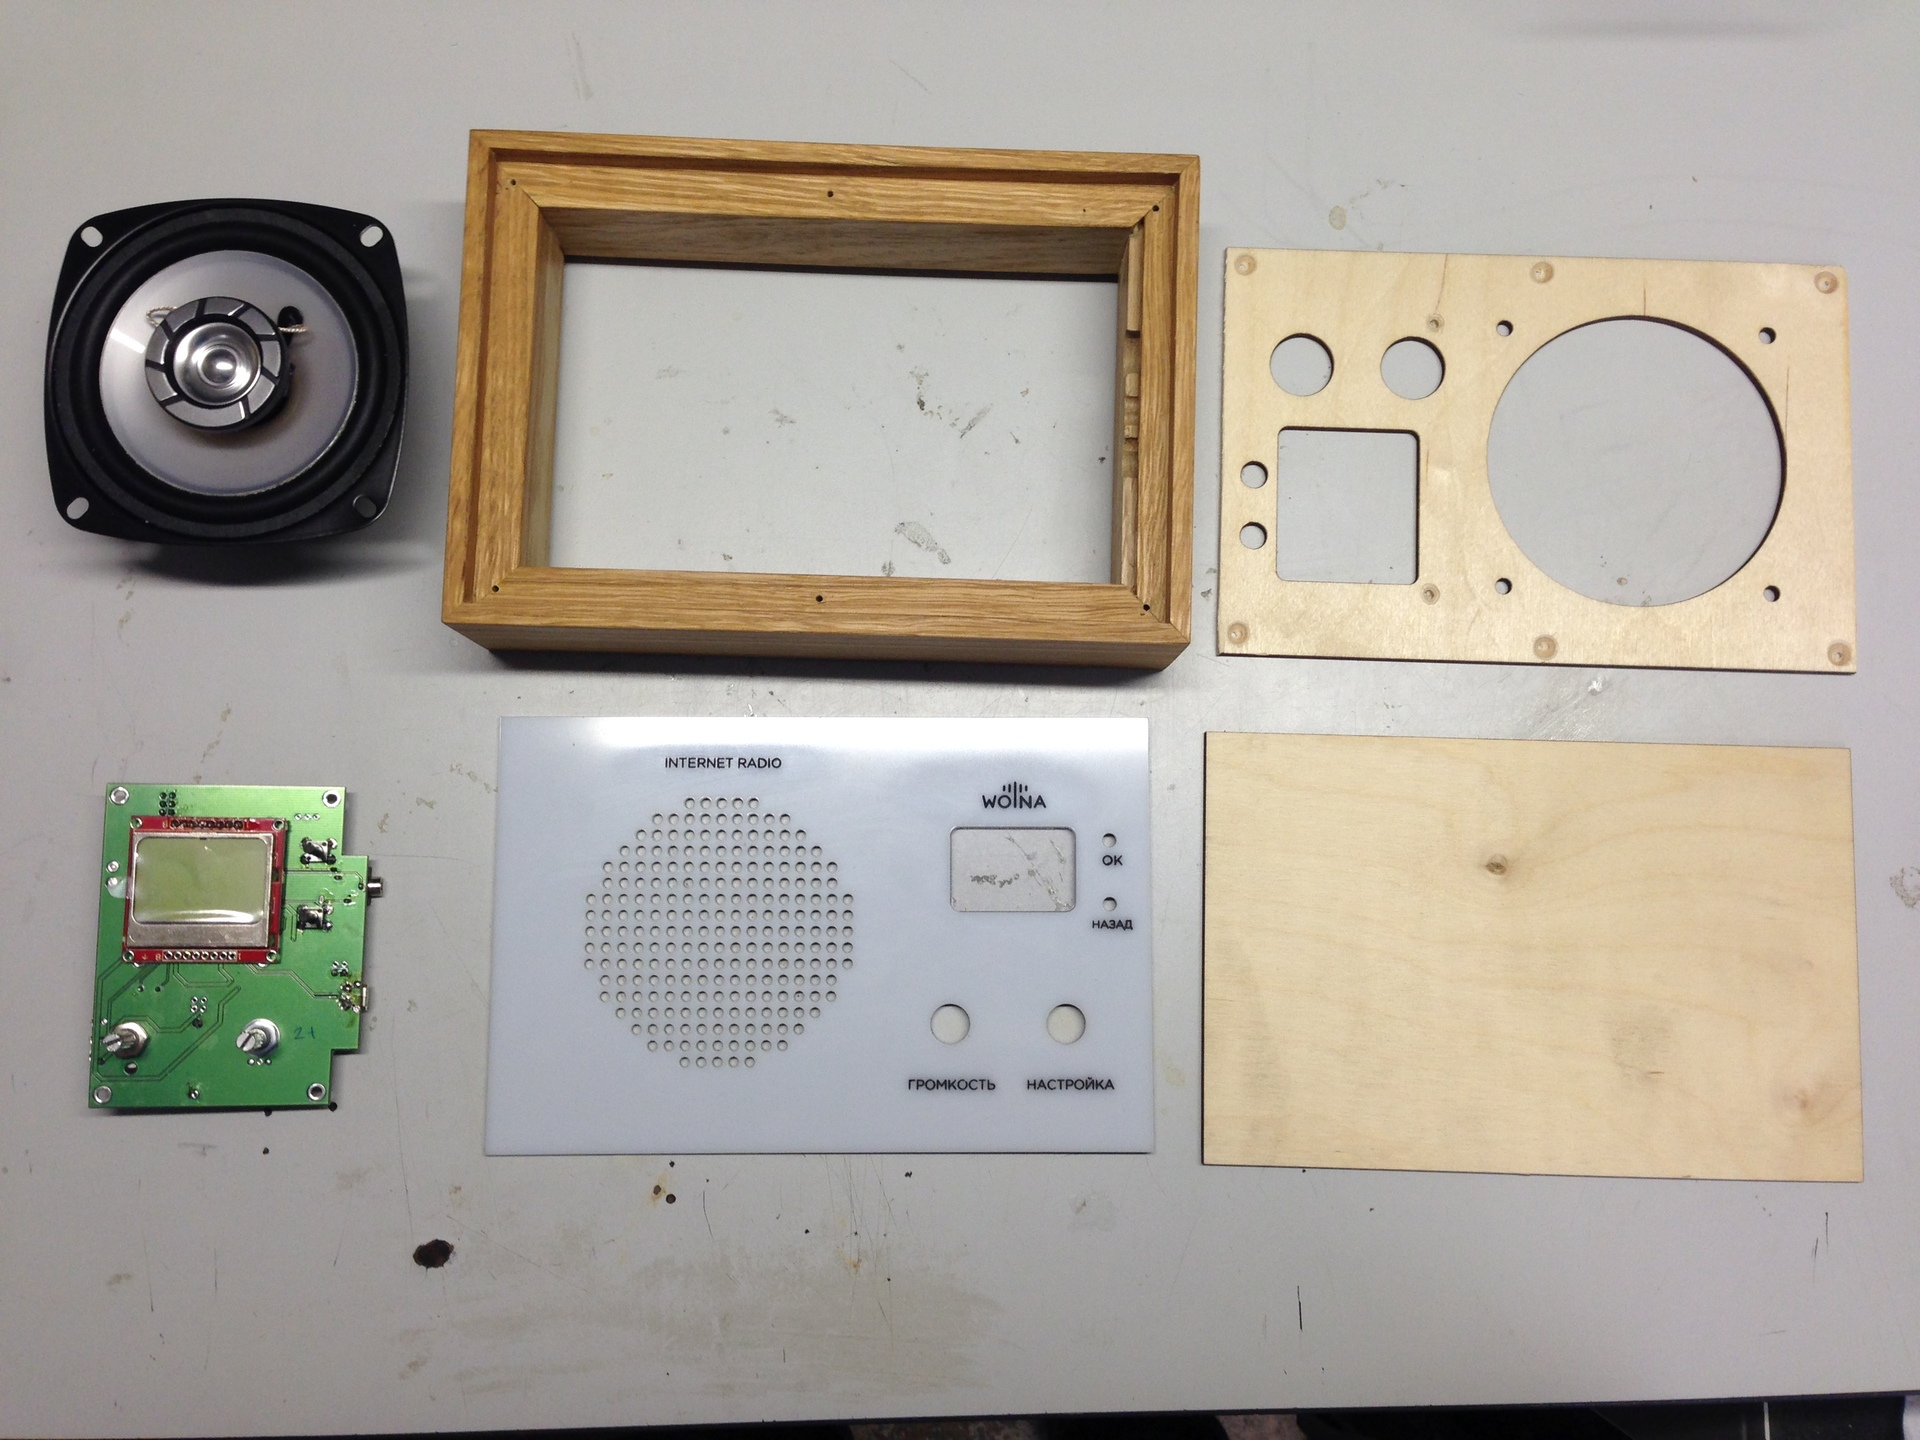
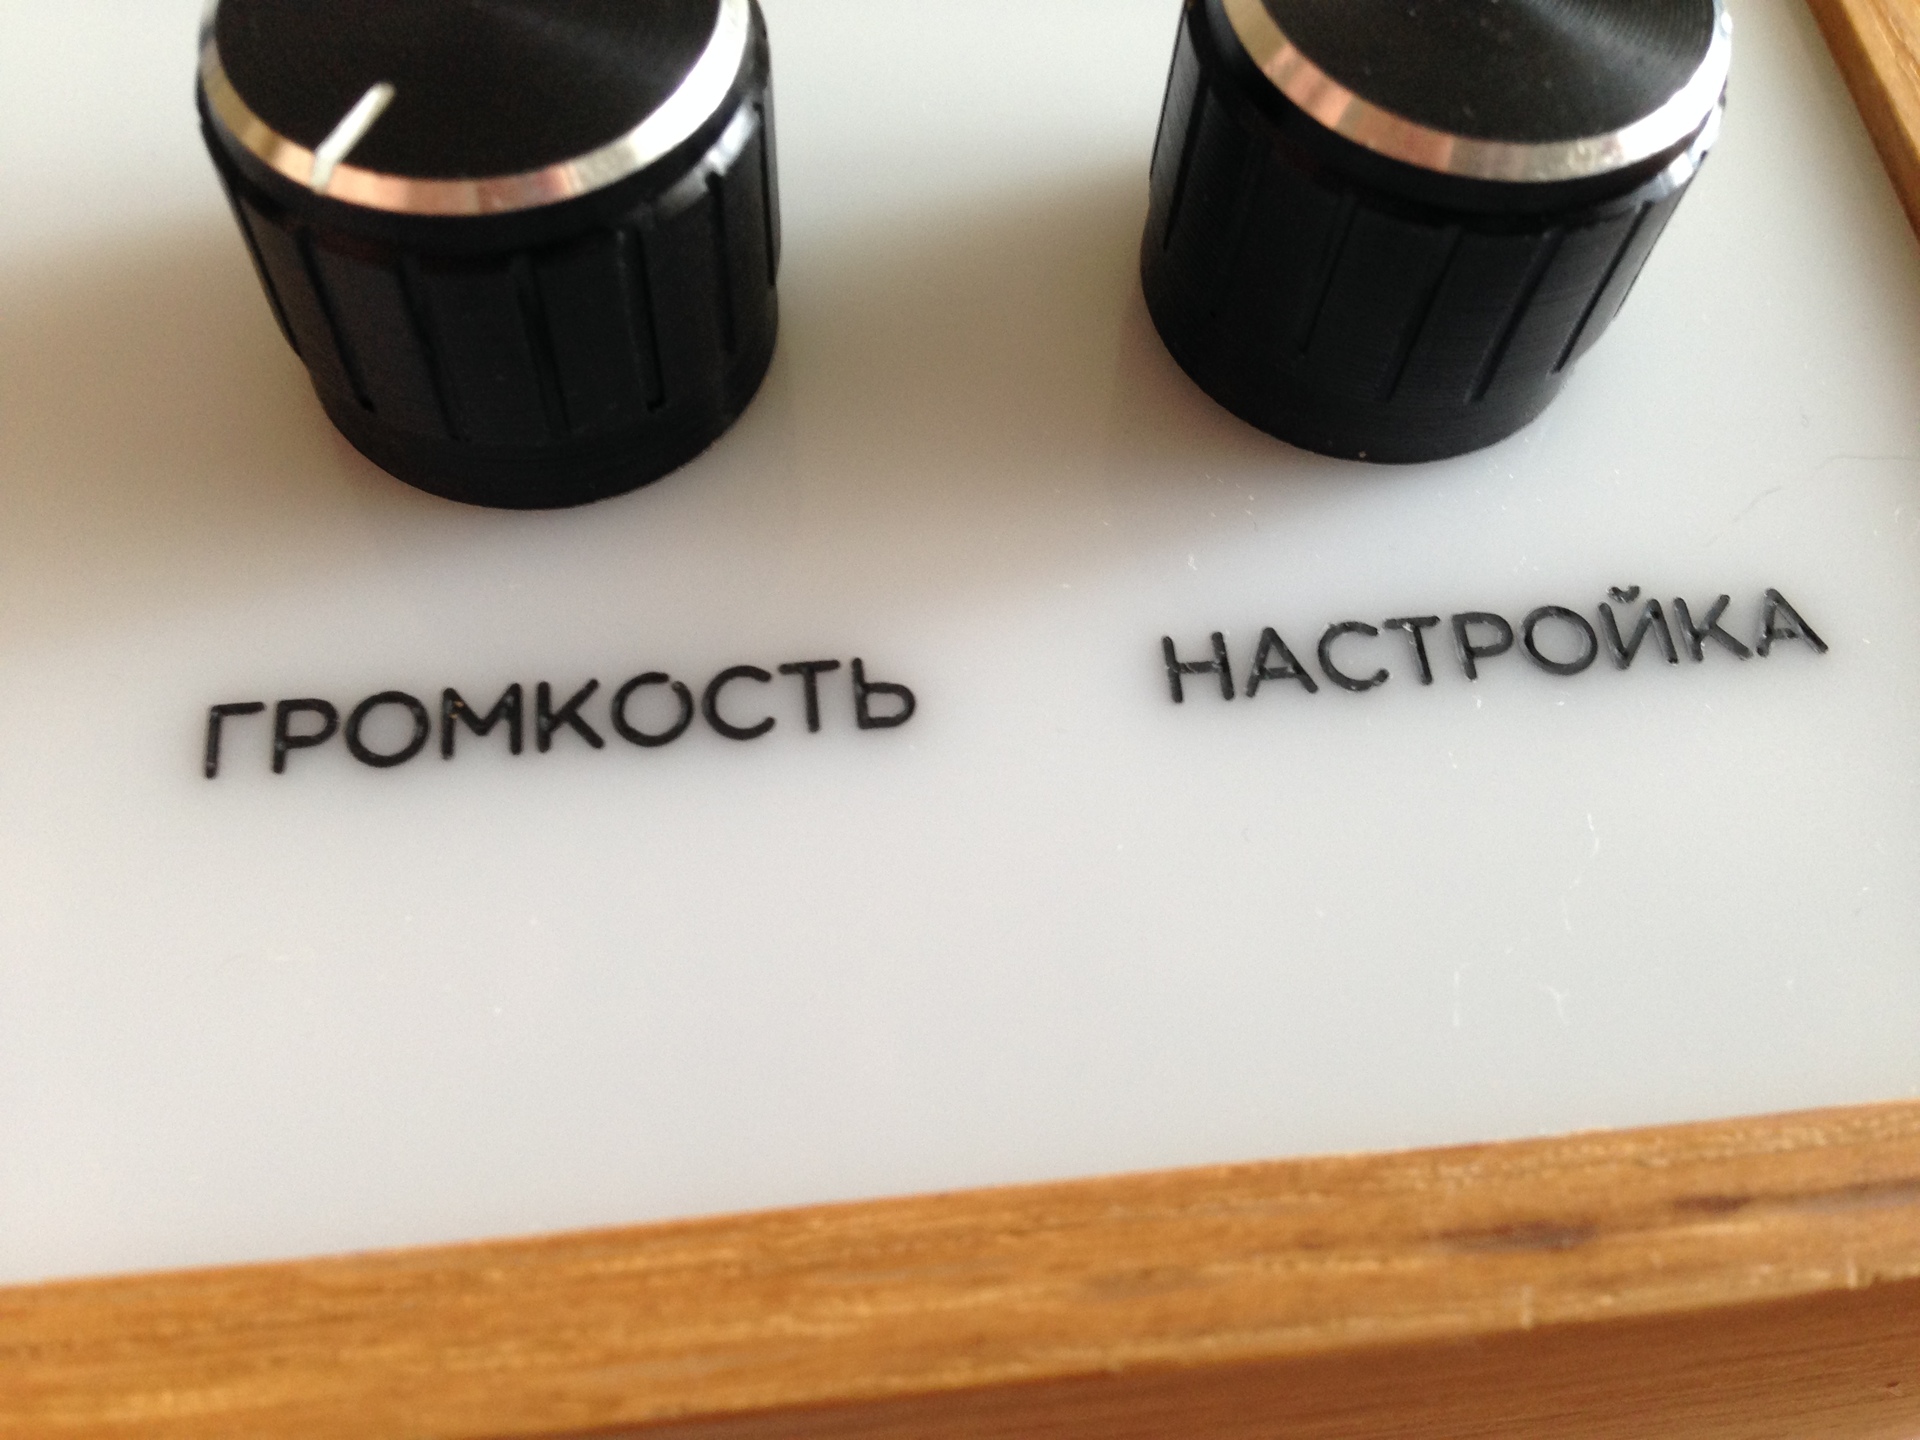
Inscriptions deserve special attention. After much deliberation, how to put them, it was decided to perform them by the method of grouting. That is, the inscription is first selected with a thin mill on the panel, and then paint is poured in there. After drying the paint its excess is removed. A very expensive operation, but I was already unstoppable. In addition, one of the most durable ways. If someone has experience with other methods of writing, please share.
Here are the resulting inscriptions.
And here is what the collected radio looks like from the inside:
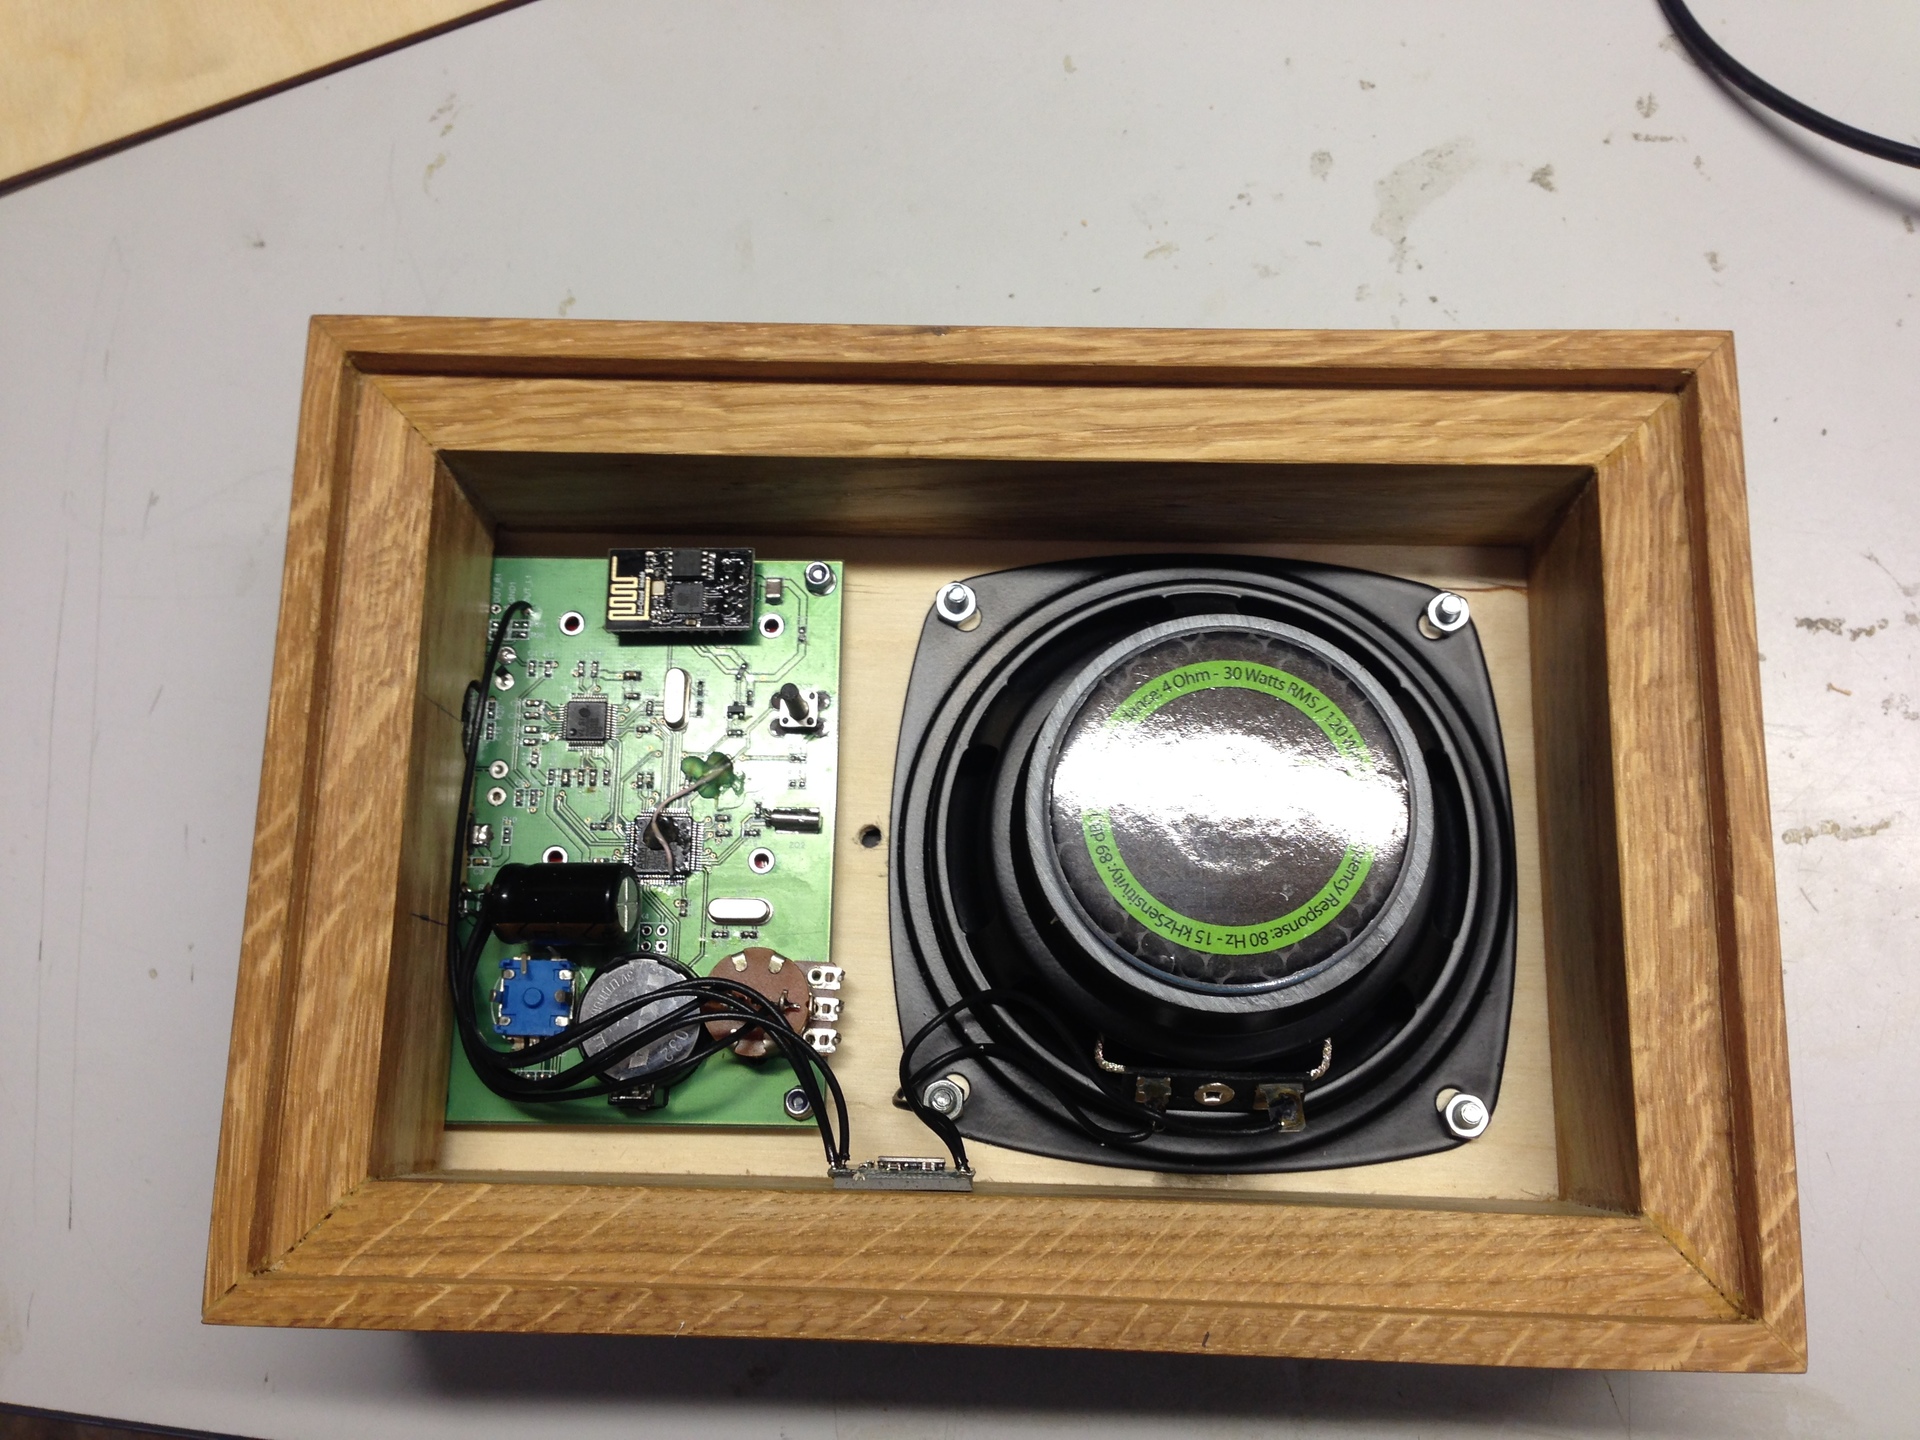
And one more photo from the outside:
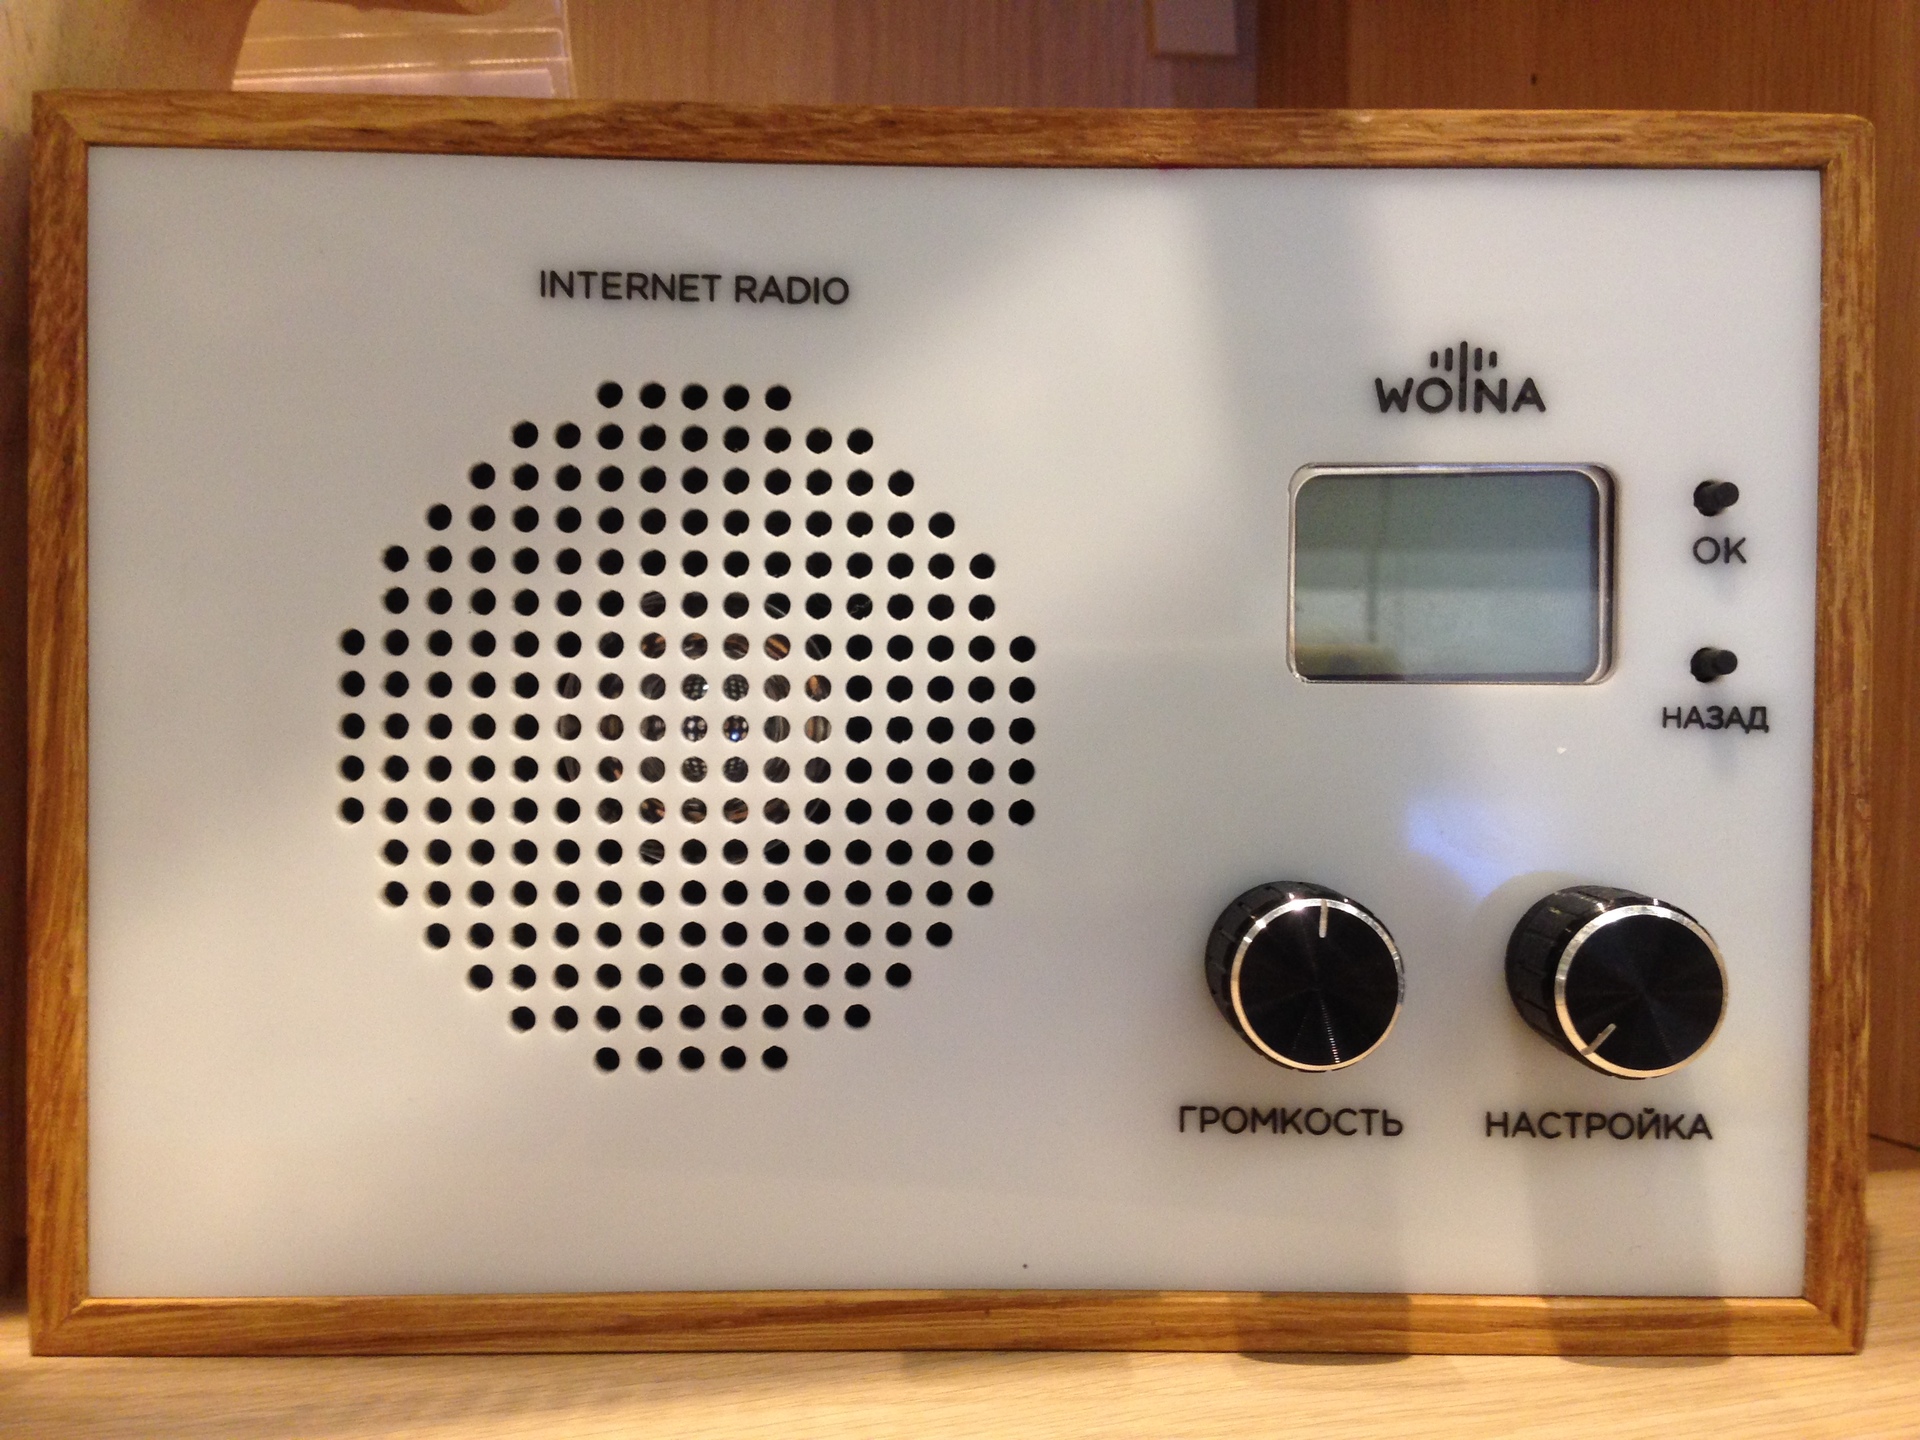
Conclusion This article outlined in broad strokes the details of the design of the device. It is quite difficult to write about the details, on the one hand, because their sea, on the other hand, they all separately seem obvious. I could write on a separate article devoted to the circuitry, printed circuit board, firmware, c esp8266 and vs1053b, if I get enough interest I will definitely write. For I really want Internet radio to become popular.
To vote for or against people is invited to the ruble at one of the crowdfunding sites. The device did not produce a big furore, although there are already sponsors. But since then there have been many technical questions and requests to lay out the schemes and firmware. Anyone who is interested in how the device was born, and what is made of, welcome under cat.
Spoiler: firmware will not.
So, it all started with the need to have a radio in the kitchen at home. Of course, as an electronics developer, I immediately dismissed the option to just go to the store and buy. By the way, for this reason I still do not have a normal doorbell.
FM radio has disappeared due to boring implementation. And it was decided to make Internet radio. Looking ahead, I want to show that such a receiver has turned out.
The choice of hardware
First, I had to choose a platform on which to build Internet radio. There are many options, but I chose from what was at hand:
1. Odroid W + LCD
2. STM32F4DISCOVERY + ESP8266 + VS1053B
On an odroid, the development process would take less time, but minuses, in my particular case (many will not agree with me) got the better of it:
- the OS boot process takes some time
- a growing tendency to infect IoT devices with viruses
- I’m not good at Linux development
- price
Nevertheless, I asked one of my good friends to write a softphone for Odroid W, which would start at the start of the system and play Internet radio. But the impossibility of really correcting the project without tugging a friend buried this option, and pushed me to the second.
And I collected the following scheme on a breadboard:
How to work with Internet radio
After that, I began to look at how Internet radio works. It turned out that the overwhelming majority of stations use the icecast for broadcasting . It is spinning somewhere on a server with a fixed IP, and is waiting for a connection. As a rule on port 8000 or 8080. Although there are many exceptions. After connecting, you need to send a request of this type, substituting in it the name of the stream and server:
GET /stream HTTP/1.1
Icy-MetaData: 0User-Agent: Mozilla/5.0 (X11; U; Linux i686; en-US; rv:1.6) Gecko/20040413 Epiphany/1.2.1
Host: internetradioserver.ru
Cache-Control: no-cache
In response, an
Opening TCP connections and other joys of working with ESP8266 are performed using AT commands. I will not dwell on them, full of information on the Internet. Everything is very well written in the Russian-speaking community esp8266 . The procedure for working with it is simple:
1. We are waiting for a WiFi connection, if there is no network connection, enter the password.
2. Open the TCP connection to the radio station server. Server addresses, ports and stream names are stored directly in the flash memory of the microcontroller, but more on that later.
3. Send the GET request above.
4. We receive in response a continuous mp3 stream.
5. If it is necessary to switch the station, close the TCP connection, and repeat from step 2.
I will tell you a little about how the stations get into the flash memory of the microcontroller. Initially, at the verification stage, I simply wrote down the address, port numbers and stream names into one of the program memory pages. But over time, when the devices dispersed to relatives and friends had to add the ability to centrally update the list. It was decided to create a server with a fixed IP on which the file with the list of stations would be stored. When connected via TCP, the server waits for a password, and issues a file, and the microcontroller writes it to itself in flash memory. Since I first encountered the creation of “something on the Internet,” I was pleasantly surprised that it turns out that renting a virtual machine with a fixed IP costs only 100 rubles per month. Miracles :)
Circuitry
Having played around with STM32F4Discovery, I decided to make my board, on which all the receiver elements will be located, and I wouldn’t have to pull the wires either to the display or to the connectors. This greatly increases reliability and manufacturability
The scheme can be downloaded here. [SCHEME] . I did not decorate it and did not brush it specifically for publication. This is a working version, and this should be enough for those who are really interested.
The scheme consists of the main parts:
1. MK STM32F415 with strapping, two quartz and a battery for a real time clock.
2. ESP8266
3. VS1053 with binding strictly on datasheet. Started on MK through SPI.
4. Power - two linear regulators LM1117 for 3.3 and 1.8 volts.
5. Display, connectors, buttons, potentiometer. All this is done on the GPIO microcontroller.
Also, the PAM8403 class D amplifier is not displayed on the diagram as it stands as a separate purchase module.
Board
For a good, before you make a board, you must determine the location of the elements protruding from the body - buttons, connectors, display. So I did, but on the body later.
The fee turned out like this. Caution geek strawberries!
The payment is two-layer, thickness is 1.5 mm. All smd components are located on one side, which facilitates automatic installation. However, it is not yet reached him.
On Peekaboo, I was already chewed by several experts for small flaws in the layout. However, the board works, and works as it should. I do not see the value in the drawings of the board, so I do not post it. If there are requests, lay out. Anyway, I will redo it. And of course, well-founded criticism is very welcome!
Case The
case is the pain of all electronic enthusiasts. And even if you are not an amateur, by making a case for your money you turn into it.
For small batches, the most affordable option is either milling or laser cutting. In variants with metal, it may still be sheet metal, but this is not my case. Therefore, I chose the milling of wooden parts + laser cutting panels. In terms of sound, the wooden case is also a huge plus.
The result was such a set of parts:
Inscriptions deserve special attention. After much deliberation, how to put them, it was decided to perform them by the method of grouting. That is, the inscription is first selected with a thin mill on the panel, and then paint is poured in there. After drying the paint its excess is removed. A very expensive operation, but I was already unstoppable. In addition, one of the most durable ways. If someone has experience with other methods of writing, please share.
Here are the resulting inscriptions.
And here is what the collected radio looks like from the inside:
And one more photo from the outside:
Conclusion This article outlined in broad strokes the details of the design of the device. It is quite difficult to write about the details, on the one hand, because their sea, on the other hand, they all separately seem obvious. I could write on a separate article devoted to the circuitry, printed circuit board, firmware, c esp8266 and vs1053b, if I get enough interest I will definitely write. For I really want Internet radio to become popular.