December 7, 2008 at 17:20
A little more about layout and widgets
This is a continuation of a series of articles about PyGTK.
In a previous article, we prepared Windows and Ubuntu for developing PyGTK applications, worked with the Glade interface editor, examined horizontal and vertical layout types, used the scroll pane and text editor, a vertical group of buttons, buttons, and, a little, signals. As a result, we got the first real cross-platform application that worked successfully on Ubuntu and Windows. If you have not read the previous article , I recommend that you start with it.
In this article we will create a simple game, and along the way we will learn a little more about the layout, continue to familiarize yourself with PyGTK widgets, and work with the dialogs.
First of all, I want to say about what we will do. It will be a game. The game should be simple and fun. The simplest thing that occurred to me was tic-tac-toe. The game must have an opponent character. The coolest character I know is Bender. Therefore, we will make tic-tac-toe, with Bender as an opponent.
Take the algorithm for the game on Wikipedia : it is very simple and intelligibly described. I remind you that we are mastering PyGTK, so complex algorithms would be taken away from the main topic. If you want to learn all about algorithms, check out Donald Knuth .
The scenario is this: the player will put daggers, Bender will answer with zeros. At the end of the game, a dialogue will be displayed with congratulations to the winner, after which the game will start again.
I’ll note right away that from the point of view of usability, the game is very bad, as dialogs that overlap the main window will be used. The good news is that you will get acquainted with the dialogs, be able to make modal dialogs from any windows.
Let's sketch the interface in Inkscape :

We will use the Glade interface editor to create the interface file. Please run Glade. If you do not know what is at stake, please read the previous article .
The table layout is very convenient when you want to place a large number of widgets, this is just our case.
From the sketch you can see that you need three lines for tic-tac-toe, as well as one line to place the buttons on the top and bottom.
We create a new window,

immediately make it visible (this will be the main window of our program),

and add a table layout

with five rows and three columns
 .
.
I expanded the window so that the table cells were square, it’s easier to present the final result
 .
.
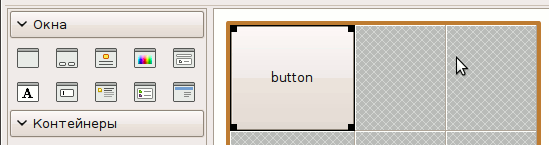
Add two buttons. Place the button into the first cell of the table:
 .
.
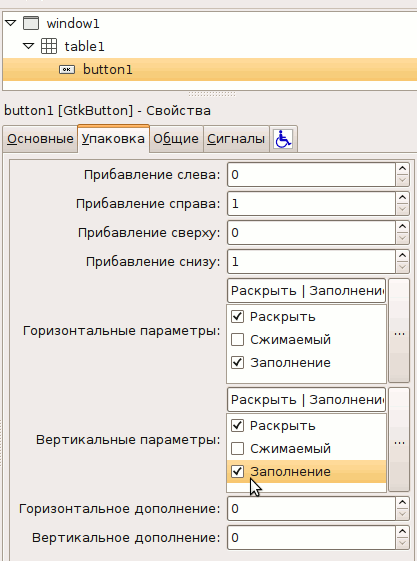
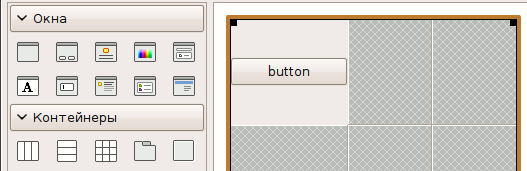
As you can see, the button occupied the entire cell. We could use this feature to draw the playing field, but we won’t do it, and here we don’t need this behavior either, so we switch to the “Packaging” tab in the properties. In the "Vertical Options" uncheck the "Fill"
 .
.
Thus, we indicate that the button should not fill all the space available to it in height
 .
.
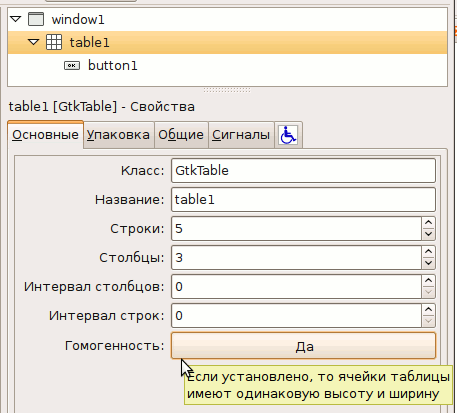
If you notice, the table cells are not the same in width. This will prevent us from creating a playing field with the same cells. Therefore, we select table1, in the main properties we change “Homogeneity” to “Yes”
 , the
, the
cells have become the same in width.
In the sketch, the upper and lower buttons occupy the entire horizontal space, and now the upper button occupies only one cell. It is necessary that it occupies three cells in width. Select the button, the properties "Packaging", "Add on the right",

increase the value to three. The button occupies three cells in width
 .
.
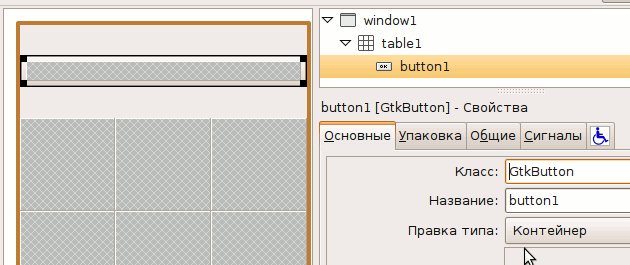
I want the buttons “New game” and “Quit the game” to contain not only text, but also icons. This is pretty easy to do. In the main properties, change "Edit Type" to "Container"
 .
.
Now we can place anything in the container on the surface of the button.
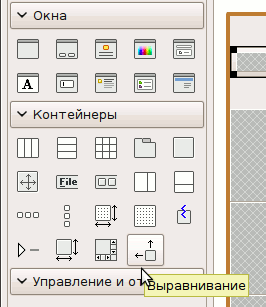
The easiest and most correct way to put text with an icon there is to use another layout tool - alignment. Add to the “Alignment” button
 ,
,
in the main properties we set the vertical and horizontal scaling to zero
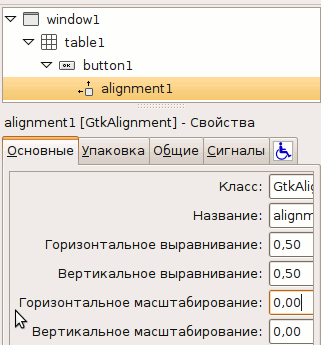 ,
,
so the alignment will not “capture” all the space available to it, but will be limited to the minimum necessary. We need this so that the icon does not creep away from the text.
Inside the alignment there is room for only one element, and we need to place two. We use the horizontal layout with two cells, place it in the alignment
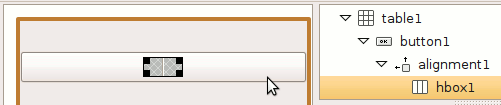 .
.
The left cell will put an icon
 ,
,
and the right - the text label with the text "New Game"
 ,
,
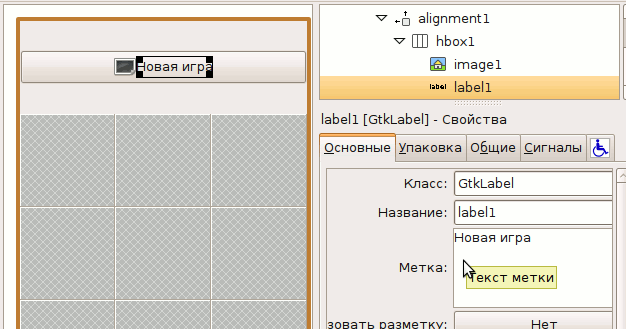 .
.
In order not to search and draw an icon, so as not to load it later when the program starts, we will use the ready-made GTK icons. Select the “Create” icon in the main properties
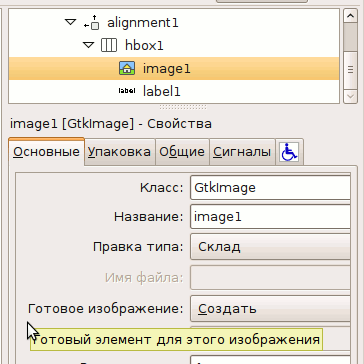 .
.
The icon is too close to the mark. This can be fixed by setting the gap size for the horizontal layout, or by setting the padding in pixels for the icon itself. I set a four pixel padding for the icon
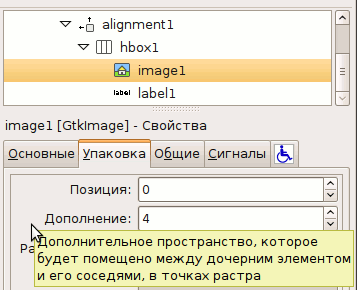 .
.
The result looks like this:
 .
.
Do the same for the bottom exit button. It should be something like this
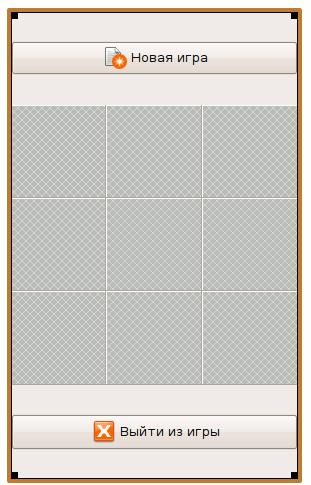 ,
,
I used the Close icon.
We save the interface in the gui.glade file, the playing field will be created at the start of the game programmatically.
We will build a playing field based on text labels in order to better study their features.
There will be nine labels, and there is no point in working with each one individually in Glade, because you can do this in a few lines of code. In addition, then it will be possible to change some properties for all labels at once, and we will need this.
Let's create the program blank:
The game field will be created in self.init_board (), we will write it:
The playing field is stored in a “two-dimensional array” created on the basis of dictionaries. The label constructor, gtk.Label (), passes the text that the label will display. The attach table method takes the widget as the first parameter, in this case our label. The second is the column number to which the left side of the label is attached, the third is the column number to which the right side of the label is attached. That is, in order to place the label in the very first column, the second and third parameters must be 0 and 1. The line where the widget should be placed is indicated in attach in exactly the same way, in the third and fourth parameter. You can read the description of all parameters in the documentation .
After starting the applets you should see this window:
 .
.
The time has come to revive the program: we will make the bottom button working, and also add a left-click handler to each label. Open Glade to add a click handler to the button. Select the button, go to the “Signals” tab in the properties, and assign a handler for the clicked signal
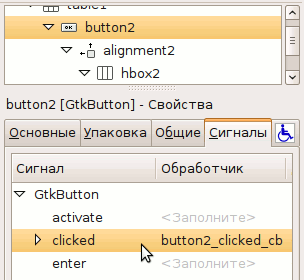 .
.
We save changes, we return to code editing. Add the following lines to __init__:
Save the code. You can check, the program closes when you click on the bottom button.
For each label, you also need a mouse click event handler, button-press-event. But if you add it right now, run the program, and check if it works, then make sure it does not work. A label is not capable of handling such events because it does not have its own window. All widgets that do not have their own window are listed in this list .
To overcome this limitation, you need to use a special layout type - the event area. On the Glade palette, it looks like this
 .
.
It works as follows: the event area is placed in the window, and the label is placed in the event area. Event handlers are assigned to the event pane. As a result, all necessary events will be intercepted.
You need to reflect this in self.init_board (), at the same time add an event handler for event areas:
In the connect function, in addition to the signal and the widget, we also specify two additional parameters - a row and a column. These parameters are read in label_clicked, and then will be used to control the game. Both the event area and the label must be made visible using show (). If you run the program and click on the labels, in the console you will see the reaction in the form of the output of the column and row of the table in which the label is located.
The interface is almost ready, but it is inconvenient to play without lines of marking on cells. You need to add frames to the labels. GTK has a special container widget that displays a frame. In Glade it’s called “Frame”
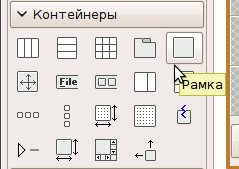 .
.
You need to change the code so that the event area is inside the frame. At the same time, we remove the output of text on labels, we no longer need this.
it turns out such a window
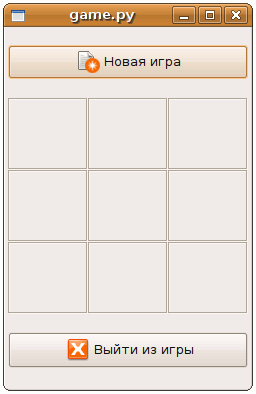
Tags can display formatted text. You can display text in a specific font, size, style, color . Add a couple of lines to init_board
Run the program:
 .
.
Glade has dialogs for almost every occasion. I will show you how to make your modal dialogue based on any window.
Create a new window, go to its properties.

Arrows highlight two important properties - the modality of the window, and the associated window. Why modality should be noted, I think it’s clear - we are making a modal dialogue. The “Linked window” property indicates for which main window this will be a modal dialog.
Using the widgets and layouts already known to you, I sketched the following dialog:
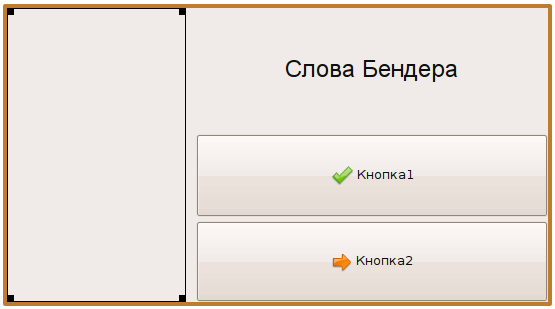
widget tree:
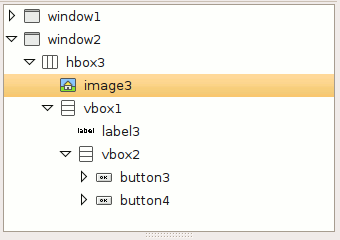
everything is very simple, you just have to note that for the image, the file is specified as the source:
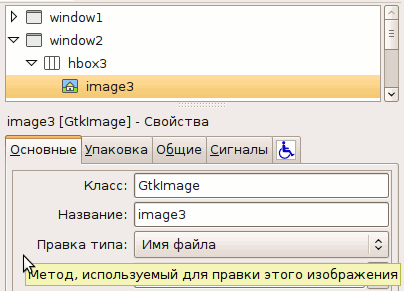
Save the interface and return to the code editor.
The first thing to do is set up a handler for the delete-event dialog window event. If this is not done, after closing the dialog with the X button in the window title (or in any other way through the window manager), all widgets of this window are "annihilated". The next time you open this window, it will be microscopic, and completely empty. So in __init__ we add
the on_delete_event method must return True to prevent further processing of the event.
In general, almost everything is ready, now the method code is interesting, which displays the winner of the game:
The set_from_file method is used to specify a picture file, set_markup for a label indicates markup, self.winner_dialog.show () opens a dialog.
It remains to run the game under Windows:
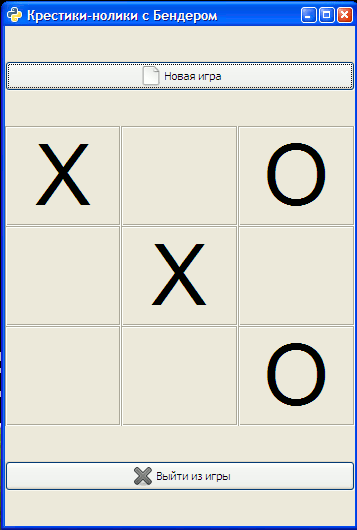
and Linux.
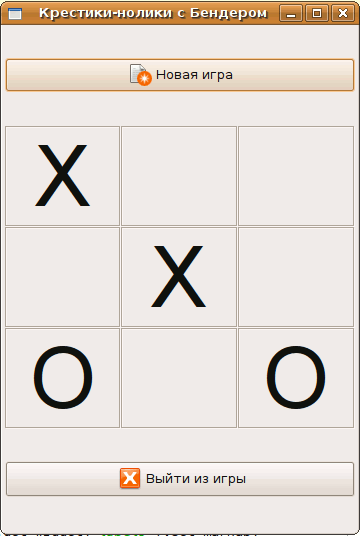
Everything works under both OSs, as intended!
The algorithm, if the player is weak (for example, a child), makes a move by chance, so that you will have a chance to win, and Bender will lose.
Now is the time to download the game , and play with Bender.
In a previous article, we prepared Windows and Ubuntu for developing PyGTK applications, worked with the Glade interface editor, examined horizontal and vertical layout types, used the scroll pane and text editor, a vertical group of buttons, buttons, and, a little, signals. As a result, we got the first real cross-platform application that worked successfully on Ubuntu and Windows. If you have not read the previous article , I recommend that you start with it.
In this article we will create a simple game, and along the way we will learn a little more about the layout, continue to familiarize yourself with PyGTK widgets, and work with the dialogs.
Idea, script
First of all, I want to say about what we will do. It will be a game. The game should be simple and fun. The simplest thing that occurred to me was tic-tac-toe. The game must have an opponent character. The coolest character I know is Bender. Therefore, we will make tic-tac-toe, with Bender as an opponent.
Take the algorithm for the game on Wikipedia : it is very simple and intelligibly described. I remind you that we are mastering PyGTK, so complex algorithms would be taken away from the main topic. If you want to learn all about algorithms, check out Donald Knuth .
The scenario is this: the player will put daggers, Bender will answer with zeros. At the end of the game, a dialogue will be displayed with congratulations to the winner, after which the game will start again.
I’ll note right away that from the point of view of usability, the game is very bad, as dialogs that overlap the main window will be used. The good news is that you will get acquainted with the dialogs, be able to make modal dialogs from any windows.
Let's sketch the interface in Inkscape :
We will use the Glade interface editor to create the interface file. Please run Glade. If you do not know what is at stake, please read the previous article .
Table layout
The table layout is very convenient when you want to place a large number of widgets, this is just our case.
From the sketch you can see that you need three lines for tic-tac-toe, as well as one line to place the buttons on the top and bottom.
We create a new window,
immediately make it visible (this will be the main window of our program),
and add a table layout
with five rows and three columns
. I expanded the window so that the table cells were square, it’s easier to present the final result
. Add two buttons. Place the button into the first cell of the table:
.As you can see, the button occupied the entire cell. We could use this feature to draw the playing field, but we won’t do it, and here we don’t need this behavior either, so we switch to the “Packaging” tab in the properties. In the "Vertical Options" uncheck the "Fill"
. Thus, we indicate that the button should not fill all the space available to it in height
. If you notice, the table cells are not the same in width. This will prevent us from creating a playing field with the same cells. Therefore, we select table1, in the main properties we change “Homogeneity” to “Yes”
, the cells have become the same in width.
In the sketch, the upper and lower buttons occupy the entire horizontal space, and now the upper button occupies only one cell. It is necessary that it occupies three cells in width. Select the button, the properties "Packaging", "Add on the right",
increase the value to three. The button occupies three cells in width
.Icon button
I want the buttons “New game” and “Quit the game” to contain not only text, but also icons. This is pretty easy to do. In the main properties, change "Edit Type" to "Container"
. Now we can place anything in the container on the surface of the button.
The easiest and most correct way to put text with an icon there is to use another layout tool - alignment. Add to the “Alignment” button
, in the main properties we set the vertical and horizontal scaling to zero
, so the alignment will not “capture” all the space available to it, but will be limited to the minimum necessary. We need this so that the icon does not creep away from the text.
Inside the alignment there is room for only one element, and we need to place two. We use the horizontal layout with two cells, place it in the alignment
. The left cell will put an icon
, and the right - the text label with the text "New Game"
, . In order not to search and draw an icon, so as not to load it later when the program starts, we will use the ready-made GTK icons. Select the “Create” icon in the main properties
. The icon is too close to the mark. This can be fixed by setting the gap size for the horizontal layout, or by setting the padding in pixels for the icon itself. I set a four pixel padding for the icon
. The result looks like this:
.Do the same for the bottom exit button. It should be something like this
, I used the Close icon.
We save the interface in the gui.glade file, the playing field will be created at the start of the game programmatically.
Playing field
We will build a playing field based on text labels in order to better study their features.
There will be nine labels, and there is no point in working with each one individually in Glade, because you can do this in a few lines of code. In addition, then it will be possible to change some properties for all labels at once, and we will need this.
Let's create the program blank:
#! / usr / bin / env python
# coding: utf-8
import sys
import os
import pygtk
pygtk.require ('2.0')
import gtk
import gtk.glade
class App:
    def __init __ (self):
        # Download the interface file
        self.gladefile = "gui.glade"
        # tree of interface elements
        self.widgetsTree = gtk.glade.XML (self.gladefile)
        #table
        self.table1 = self.widgetsTree.get_widget ("table1")
        # initialize the playing field
        self.init_board ()
        # We connect a window closing event with the application termination function
        self.window = self.widgetsTree.get_widget ("window1")
        if (self.window):
            self.window.connect ("destroy", self.close_app)
    def close_app (self, widget):
        gtk.main_quit ()
if __name__ == "__main__":
    app = App ()
    gtk.main ()
The game field will be created in self.init_board (), we will write it:
    def init_board (self):
        # dictionary storage labels of the playing field
        self.board_widgets = {}
        # we will add labels in lines 1-3
        for row in range (0.3):
            # initialize the storage line, create an empty dictionary
            # to store the contents of table cells
            self.board_widgets [row] = {}
            # go through columns 0-2
            for column in range (0,3):
                # create a label, its text includes the row and column number
                self.board_widgets [row] [column] = \
                                gtk.Label ("label_% d_% d"% (column, row))
                # attach the label to the table
                self.table1.attach (self.board_widgets [row] [column],
                                   column, column + 1,
                                   row + 1, row + 2)
                # make the label visible
                self.board_widgets [row] [column] .show ()
The playing field is stored in a “two-dimensional array” created on the basis of dictionaries. The label constructor, gtk.Label (), passes the text that the label will display. The attach table method takes the widget as the first parameter, in this case our label. The second is the column number to which the left side of the label is attached, the third is the column number to which the right side of the label is attached. That is, in order to place the label in the very first column, the second and third parameters must be 0 and 1. The line where the widget should be placed is indicated in attach in exactly the same way, in the third and fourth parameter. You can read the description of all parameters in the documentation .
After starting the applets you should see this window:
.Event Area, Frame
The time has come to revive the program: we will make the bottom button working, and also add a left-click handler to each label. Open Glade to add a click handler to the button. Select the button, go to the “Signals” tab in the properties, and assign a handler for the clicked signal
. We save changes, we return to code editing. Add the following lines to __init__:
        # Vocabulary specifying event associations with handler functions
        dic = {
                "button2_clicked_cb": self.close_app,
            }
        # A magic command connecting signals to handlers
        self.widgetsTree.signal_autoconnect (dic)
Save the code. You can check, the program closes when you click on the bottom button.
For each label, you also need a mouse click event handler, button-press-event. But if you add it right now, run the program, and check if it works, then make sure it does not work. A label is not capable of handling such events because it does not have its own window. All widgets that do not have their own window are listed in this list .
To overcome this limitation, you need to use a special layout type - the event area. On the Glade palette, it looks like this
.It works as follows: the event area is placed in the window, and the label is placed in the event area. Event handlers are assigned to the event pane. As a result, all necessary events will be intercepted.
You need to reflect this in self.init_board (), at the same time add an event handler for event areas:
    def init_board (self):
        # dictionary storage labels of the playing field
        self.board_widgets = {}
        # we will add labels in lines 1-3
        for row in range (0.3):
            # initialize the storage line, create an empty dictionary
            # to store the contents of table cells
            self.board_widgets [row] = {}
            # go through columns 0-2
            for column in range (0,3):
                # create an event area
                event_box = gtk.EventBox ()
                # create a label, its text includes the row and column number
                label = gtk.Label ("label_% d_% d"% (column, row))
                # make the label visible
                label.show ()
                # put the label in the event area
                event_box.add (label)
                # define an event handler for the area
                event_box.connect ("button_press_event", self.label_clicked, row, column)
                # write all this economy in storage
                self.board_widgets [row] [column] = event_box
                # attach the event area with a label to the table
                self.table1.attach (self.board_widgets [row] [column],
                                   column, column + 1,
                                   row + 1, row + 2)
                # make the event area with the label visible
                self.board_widgets [row] [column] .show ()
    def label_clicked (self, widget, event, row, column):
        print "column% s, row% s"% (column, row)
In the connect function, in addition to the signal and the widget, we also specify two additional parameters - a row and a column. These parameters are read in label_clicked, and then will be used to control the game. Both the event area and the label must be made visible using show (). If you run the program and click on the labels, in the console you will see the reaction in the form of the output of the column and row of the table in which the label is located.
The interface is almost ready, but it is inconvenient to play without lines of marking on cells. You need to add frames to the labels. GTK has a special container widget that displays a frame. In Glade it’s called “Frame”
. You need to change the code so that the event area is inside the frame. At the same time, we remove the output of text on labels, we no longer need this.
    def init_board (self):
        # dictionary storage labels of the playing field
        self.board_widgets = {}
        # we will add labels in lines 1-3
        for row in range (0.3):
            # initialize the storage line, create an empty dictionary
            # to store the contents of table cells
            self.board_widgets [row] = {}
            # go through columns 0-2
            for column in range (0,3):
                # create a frame
                frame = gtk.Frame ()
                frame.set_shadow_type (gtk.SHADOW_ETCHED_IN)
                # create an event area
                event_box = gtk.EventBox ()
                # create a label
                label = gtk.Label ()
                # make the label visible
                label.show ()
                # put the label in the event area
                event_box.add (label)
                # define an event handler for the area
                event_box.connect ("button_press_event", self.label_clicked, row, column)
                event_box.show ()
                frame.add (event_box)
                # write all this economy in storage
                self.board_widgets [row] [column] = frame
                # attach the event area with a label to the table
                self.table1.attach (self.board_widgets [row] [column],
                                   column, column + 1,
                                   row + 1, row + 2)
                # make the event area with the label visible
                self.board_widgets [row] [column] .show ()
it turns out such a window
Formatted text output on labels
Tags can display formatted text. You can display text in a specific font, size, style, color . Add a couple of lines to init_board
                # after label = gtk.Label ()
                label.set_use_markup (True)
                label.set_markup (" X ")
Run the program:
.Dialogues
Glade has dialogs for almost every occasion. I will show you how to make your modal dialogue based on any window.
Create a new window, go to its properties.
Arrows highlight two important properties - the modality of the window, and the associated window. Why modality should be noted, I think it’s clear - we are making a modal dialogue. The “Linked window” property indicates for which main window this will be a modal dialog.
Using the widgets and layouts already known to you, I sketched the following dialog:
widget tree:
everything is very simple, you just have to note that for the image, the file is specified as the source:
Save the interface and return to the code editor.
The first thing to do is set up a handler for the delete-event dialog window event. If this is not done, after closing the dialog with the X button in the window title (or in any other way through the window manager), all widgets of this window are "annihilated". The next time you open this window, it will be microscopic, and completely empty. So in __init__ we add
        self.winner_dialog = self.widgetsTree.get_widget ("window2")
        self.winner_dialog.connect ("delete-event", self.on_delete_event)
the on_delete_event method must return True to prevent further processing of the event.
In general, almost everything is ready, now the method code is interesting, which displays the winner of the game:
    def show_winner (self):
        if self.game.and_the_winner_is () == -1:
            self.widgetsTree.get_widget("image3").set_from_file('1.png')
            self.widgetsTree.get_widget("label3").set_markup(
                        "Ну что, ты понял, что я умнее тебя ?")
            self.widgetsTree.get_widget("label4").set_text("Да, я червяк и признаю это.")
            self.widgetsTree.get_widget("label5").set_text(
                         "Ты всего лишь\nконсервная банка, Бендер,\nи я тебе докажу это сейчас !")
        else:
            self.widgetsTree.get_widget("image3").set_from_file('2.png')
            self.widgetsTree.get_widget("label3").set_markup(
                        "Человек обязан проиграть роботу !")
            self.widgetsTree.get_widget ("label4"). set_text ("Yeah, just lucky.")
            self.widgetsTree.get_widget ("label5"). set_text ("Are you few? Well, hold on!")
        self.winner_dialog.show ()
The set_from_file method is used to specify a picture file, set_markup for a label indicates markup, self.winner_dialog.show () opens a dialog.
It remains to run the game under Windows:
and Linux.
Everything works under both OSs, as intended!
The algorithm, if the player is weak (for example, a child), makes a move by chance, so that you will have a chance to win, and Bender will lose.
Now is the time to download the game , and play with Bender.