Ubuntu + Aptana = ... Installing Aptana in Pictures
Hello.
I fulfill the promise, I describe the installation of Aptana on Kubuntu 8.04.
What is aptana?
On the official website, developers declare:
“Aptana Studio is a powerful development environment for web pages and web applications. There is support for developing JavaScript, Ruby on Rails, PHP using Ajax, DOM, HTML, CSS. In addition, plugins are provided that allow you to develop applications for Adobe AIR and Apple iPhone.
For sophisticated web developers, Aptana Studio Pro provides additional product manufacturing benefits as well as superior support.
Aptana Studio 1.1 also has an integrated version of Aptana's Ajax server - Aptana Jaxer. ”
Tasty?
There are a lot of similar instructions on the Web, but I have n’t seen them in Russian .
So do not judge strictly, with the world on a thread ...
So, let's get started.
Preamble: I use Yakuake, because the terminal snapshots will already be non-trivial.
So. Download Aptana
from the official site . While the download is in progress, get ready. 1. If Java is not installed, install, together with some add-ons: UPD from Maniak 's colleague :

2. I am sure that most already have Firefox 2.0.0.x (I personally have 2.0.0.14).
If not, it doesn’t matter: we execute the command in the console:
Explanation of why the "deuce": installed the third beta, but it worked very unstably,
somehow stressfully (brakes, gmail experienced glitches in the interface, etc.).
3. After making sure that Aptana has successfully copied to our machine (about 73 Mb),
create a folder:
and unzip the archive there.
Actually, the installation on this is completed :)
4. Next is the sharpening for debugging our scripts. The bowels of the Internet gave a
wonderful solution for launching Aptana with the following parameters:
4.1. We create a script with the extension .sh in the folder / usr / local / aptana (e.g. runAptana.sh)
sudo nano /usr/local/aptana/runAptana.sh
4.2. We write the following information into it: Save :) 4.3. We make the script “executable”. To do this, in the console, enter: UPD from joedm :

5. Now we connect our Firefox with Aptana for effective debugging of future scripts:
5.1. From the console, call the Firefox profile manager
and create a new profile, for example, AptanaDebug
5.2. We launch Firefox with our new profile:
and use the developers of this product: install an extension that makes life much easier
(development and debugging) for Firefox:
Firebug.xpi
With a pure soul, close Firefox.
6. Let us return to the Aptana: create a desktop shortcut to start, call the Aptana, as a command to start writing:
and beauty - as icons fasten icon "styrennye" here:
the Aptana the ICO's
Done. We launch our studio and “finish” it to the end.
7. Go to Run -> Debug ...
7.1. Select Web Browser in the left pane
7.2. In the Name: field, name our new configuration and write:
- Browser executable: / usr / bin / firefox-2
- Arguments: -P AptanaDebug -no-remote
8. Save the changes (Apply) - “beer is ready!”
Now when you start debugging Aptana will automatically use our AptanaDebug profile in Firefox.
Thanks for attention.
Also a special thanks to Jason Leveille for the late ignition on my part and a valuable script, as well as the involuntary control of my actions.
I fulfill the promise, I describe the installation of Aptana on Kubuntu 8.04.
What is aptana?
On the official website, developers declare:
“Aptana Studio is a powerful development environment for web pages and web applications. There is support for developing JavaScript, Ruby on Rails, PHP using Ajax, DOM, HTML, CSS. In addition, plugins are provided that allow you to develop applications for Adobe AIR and Apple iPhone.
For sophisticated web developers, Aptana Studio Pro provides additional product manufacturing benefits as well as superior support.
Aptana Studio 1.1 also has an integrated version of Aptana's Ajax server - Aptana Jaxer. ”
Tasty?
There are a lot of similar instructions on the Web, but I have n’t seen them in Russian .
So do not judge strictly, with the world on a thread ...
So, let's get started.
Preamble: I use Yakuake, because the terminal snapshots will already be non-trivial.
So. Download Aptana
from the official site . While the download is in progress, get ready. 1. If Java is not installed, install, together with some add-ons: UPD from Maniak 's colleague :
sudo apt-get install sun-java6-jre sun-java6-plugin sun-java6-fontsAfter installing the aptana in the console, you need to perform itsudo update-alternatives --config java
and select in the menu that appears./usr/lib/jvm/java-6-sun/jre/bin/java
Otherwise, instead of comfortable work in a good IDE, we will get inhuman brakes.
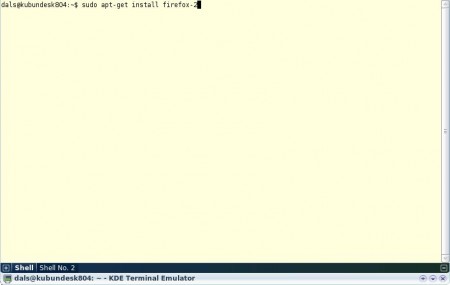
2. I am sure that most already have Firefox 2.0.0.x (I personally have 2.0.0.14).
If not, it doesn’t matter: we execute the command in the console:
sudo apt-get install firefox-2Explanation of why the "deuce": installed the third beta, but it worked very unstably,
somehow stressfully (brakes, gmail experienced glitches in the interface, etc.).
3. After making sure that Aptana has successfully copied to our machine (about 73 Mb),
create a folder:
sudo mkdir /usr/local/aptanaand unzip the archive there.
Actually, the installation on this is completed :)
4. Next is the sharpening for debugging our scripts. The bowels of the Internet gave a
wonderful solution for launching Aptana with the following parameters:
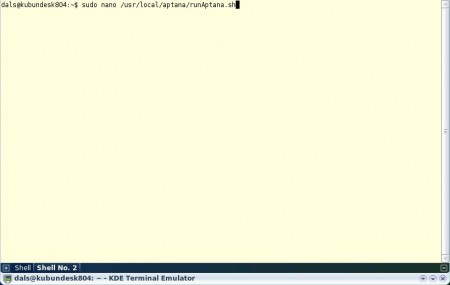
4.1. We create a script with the extension .sh in the folder / usr / local / aptana (e.g. runAptana.sh)
sudo nano /usr/local/aptana/runAptana.sh
4.2. We write the following information into it: Save :) 4.3. We make the script “executable”. To do this, in the console, enter: UPD from joedm :
#!/bin/bash

export MOZILLA_FIVE_HOME=/usr/lib/firefox

/usr/local/aptana/AptanaStudio
sudo chmod a+x runAptana.shadd another
export LD_LIBRARY_PATH = $ MOZILLA_FIVE_HOME: $ LD_LIBRARY_PATH to the script to run,
or install xulrunner and register it ./xulrunner --register-global, then you will not need to set MOZILLA_FIVE_HOME.
5. Now we connect our Firefox with Aptana for effective debugging of future scripts:
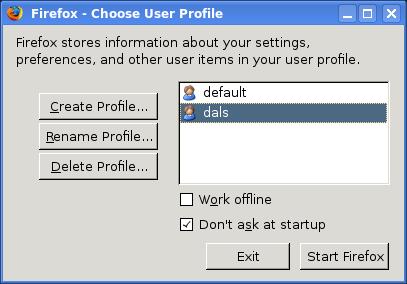
5.1. From the console, call the Firefox profile manager
sudo firefox-2 -Pand create a new profile, for example, AptanaDebug
5.2. We launch Firefox with our new profile:
sudo firefox-2 -P AptanaDebugand use the developers of this product: install an extension that makes life much easier
(development and debugging) for Firefox:
Firebug.xpi
With a pure soul, close Firefox.
6. Let us return to the Aptana: create a desktop shortcut to start, call the Aptana, as a command to start writing:
/usr/local/aptana/runAptana.sh, and beauty - as icons fasten icon "styrennye" here:
the Aptana the ICO's
Done. We launch our studio and “finish” it to the end.
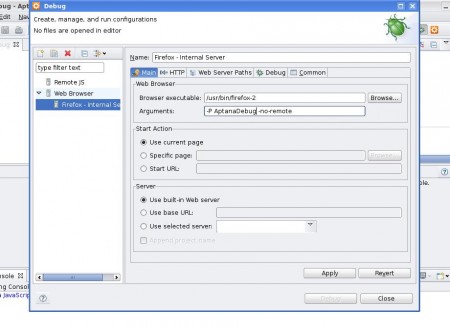
7. Go to Run -> Debug ...
7.1. Select Web Browser in the left pane
7.2. In the Name: field, name our new configuration and write:
- Browser executable: / usr / bin / firefox-2
- Arguments: -P AptanaDebug -no-remote
8. Save the changes (Apply) - “beer is ready!”
Now when you start debugging Aptana will automatically use our AptanaDebug profile in Firefox.
Thanks for attention.
Also a special thanks to Jason Leveille for the late ignition on my part and a valuable script, as well as the involuntary control of my actions.