Step 2. Internet Setup
In the first step, I looked at installing Ubuntu and the details that are very important in this.
Let's go ahead and take a look at the things that should be set up right after installing Ubuntu.
Despite the network-manager package, there may be problems setting up the Internet on Ubuntu.
If your network is configured without static IPs, then you may be lucky and the entire configuration will go through the GUI.

NetworkManager starts automatically and sits in the notification area. By default, all network interfaces are switched to Roaming mode. This means that they all rely on DHCP . NetworkManager will automatically detect all wireless adapters and all you need to do is configure access (all via the GUI).
If you have VPN (PPTP) , you should install pptp-linux and network-manager-pptp packages.
The network-manager-pptp package is downloaded from Windows.
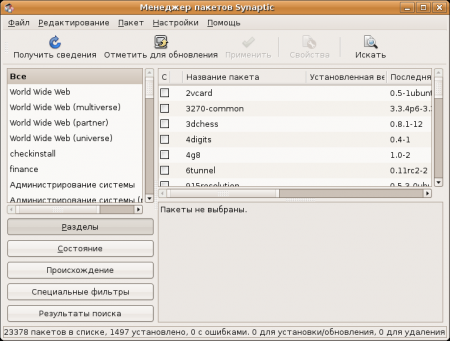
Packages are delivered through the Terminal (Applications-> Accessories-> Terminal), through the Synaptic Package Manager (System-> Administration-> Synaptic Package Manager), or by directly launching a specific deb-package.
Installation through the Terminal is performed by entering the command:
sudo aptitude install (installation packages)
In our case:
sudo aptitude install pptp-linux
It should be noted that the sudo command requires a password.
And double-click to install the network-manager-pptp package, which we downloaded back in Windows.
Then reboot the network:
sudo NetworkManager restart
Support for static IP will be only with NetworkManager 0.7, so you will have to configure it manually.
The static IP itself is configured through network-admin ( sudo network-admin ).
We immediately open the terminal, we will have to work a lot in it.
1. Install the necessary packages:
sudo aptitude install pptp-linux
2. Edit the file /etc/ppp/options.pptp
sudo gedit /etc/ppp/options.pptp
Erase everything and write it there:
lock
noauth
refuse-eap
refuse-chap
refuse- mschap
nobsdcomp
nodeflate
3. Edit the file / etc / ppp / pap-secrets
sudo gedit / etc / ppp / pap-secrets
Add the line YourLogin to the end
PPTP YourPassword *
4. Edit the file / etc / ppp / peers / myvpn
sudo gedit / etc / ppp / peers / myvpn
Write there:
pty "pptp YourVNPServer --nolaunchpppd"
name YourLogin
remotename PPTP
defaultroute
file /etc/ppp/options.pptions
ipparam server
replacedefaultroute
5. Add a route to the VPN server.
We edit the file /etc/network/if-up.d/if-up-eth0 (Either eth1 / eth2 / ... depends on the network interface that you use for VPN. You can find out ifconfig command).
sudo gedit /etc/network/if-up.d/if-up-eth0 We
write there:
#! / bin / sh
route add -net YourVNPServernetmask 255.255.255.255 gw Your Gateway Run
:
sudo chmod + x /etc/network/if-up.d/if-up-eth0
Done. Connect to the Internet
using the command: sudo pon myvpn
Disconnect from the Internet
using the command: sudo poff myvpn
You can specify an automatic connection when the computer boots.
This is done simply:
gedit /etc/rc.local
Add a line (anywhere, but before the exit command):
sudo pon myvpn
Open the terminal and execute:
sudo -s
cd / tmp /
wget -c www.roaringpenguin.com/files/download/rp-pppoe-3.8.tar.gz
tar zxvf rp-pppoe-3.8.tar.gz -C / opt /
chown -R root: root /opt/rp-pppoe-3.8/
gedit /usr/share/applications/RP-PPPoE.desktop
This algorithm will work if you have a different Internet source. Otherwise, download the rp-pppoe-3.8.tar.gz package in advance, put it in the / tmp / folder and skip the line with wget.
In the editor that opens, we write:
[Desktop Entry]
Name = RP-PPPoE
Comment = RP-PPPoE
Exec = gksudo /opt/rp-pppoe-3.8/go-gui
Icon = pppoeconf.xpm
Terminal = false
Type = Application
Categories = Application; Network ;
Updating the panels:
killall gnome-panel
Now we can configure PPPoE (ADSL) through the GUI (Applications-> Internet-> RP-PPPoE).
This is pretty simple.
We execute the command:
sudo apt-get install gnome-ppp
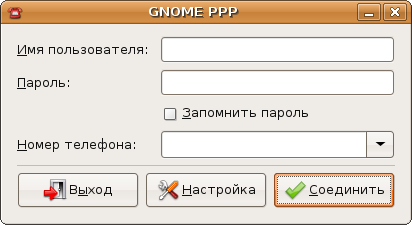
Now we can configure Dial-up via the GUI (Applications-> Internet-> GNOME PPP).
GPRS can be configured using the same program that we used when setting up Dial-up.
You can read about it here .
If you have any additions, I will gladly improve the article.
Guide: Step Backward , Step Forward , Table of Contents
Let's go ahead and take a look at the things that should be set up right after installing Ubuntu.
Internet setting
Despite the network-manager package, there may be problems setting up the Internet on Ubuntu.
If your network is configured without static IPs, then you may be lucky and the entire configuration will go through the GUI.
NetworkManager starts automatically and sits in the notification area. By default, all network interfaces are switched to Roaming mode. This means that they all rely on DHCP . NetworkManager will automatically detect all wireless adapters and all you need to do is configure access (all via the GUI).
If you have VPN (PPTP) , you should install pptp-linux and network-manager-pptp packages.
The network-manager-pptp package is downloaded from Windows.
Packages are delivered through the Terminal (Applications-> Accessories-> Terminal), through the Synaptic Package Manager (System-> Administration-> Synaptic Package Manager), or by directly launching a specific deb-package.
Installation through the Terminal is performed by entering the command:
sudo aptitude install (installation packages)
In our case:
sudo aptitude install pptp-linux
It should be noted that the sudo command requires a password.
And double-click to install the network-manager-pptp package, which we downloaded back in Windows.
Then reboot the network:
sudo NetworkManager restart
What to do if you have static IP and VPN (PPTP)
Support for static IP will be only with NetworkManager 0.7, so you will have to configure it manually.
The static IP itself is configured through network-admin ( sudo network-admin ).
We immediately open the terminal, we will have to work a lot in it.
1. Install the necessary packages:
sudo aptitude install pptp-linux
2. Edit the file /etc/ppp/options.pptp
sudo gedit /etc/ppp/options.pptp
Erase everything and write it there:
lock
noauth
refuse-eap
refuse-chap
refuse- mschap
nobsdcomp
nodeflate
3. Edit the file / etc / ppp / pap-secrets
sudo gedit / etc / ppp / pap-secrets
Add the line YourLogin to the end
PPTP YourPassword *
4. Edit the file / etc / ppp / peers / myvpn
sudo gedit / etc / ppp / peers / myvpn
Write there:
pty "pptp YourVNPServer --nolaunchpppd"
name YourLogin
remotename PPTP
defaultroute
file /etc/ppp/options.pptions
ipparam server
replacedefaultroute
5. Add a route to the VPN server.
We edit the file /etc/network/if-up.d/if-up-eth0 (Either eth1 / eth2 / ... depends on the network interface that you use for VPN. You can find out ifconfig command).
sudo gedit /etc/network/if-up.d/if-up-eth0 We
write there:
#! / bin / sh
route add -net YourVNPServernetmask 255.255.255.255 gw Your Gateway Run
:
sudo chmod + x /etc/network/if-up.d/if-up-eth0
Done. Connect to the Internet
using the command: sudo pon myvpn
Disconnect from the Internet
using the command: sudo poff myvpn
You can specify an automatic connection when the computer boots.
This is done simply:
gedit /etc/rc.local
Add a line (anywhere, but before the exit command):
sudo pon myvpn
How to configure PPPoE (ADSL)
Open the terminal and execute:
sudo -s
cd / tmp /
wget -c www.roaringpenguin.com/files/download/rp-pppoe-3.8.tar.gz
tar zxvf rp-pppoe-3.8.tar.gz -C / opt /
chown -R root: root /opt/rp-pppoe-3.8/
gedit /usr/share/applications/RP-PPPoE.desktop
This algorithm will work if you have a different Internet source. Otherwise, download the rp-pppoe-3.8.tar.gz package in advance, put it in the / tmp / folder and skip the line with wget.
In the editor that opens, we write:
[Desktop Entry]
Name = RP-PPPoE
Comment = RP-PPPoE
Exec = gksudo /opt/rp-pppoe-3.8/go-gui
Icon = pppoeconf.xpm
Terminal = false
Type = Application
Categories = Application; Network ;
Updating the panels:
killall gnome-panel
Now we can configure PPPoE (ADSL) through the GUI (Applications-> Internet-> RP-PPPoE).
How to configure Dial-up
This is pretty simple.
We execute the command:
sudo apt-get install gnome-ppp
Now we can configure Dial-up via the GUI (Applications-> Internet-> GNOME PPP).
How to configure GPRS
GPRS can be configured using the same program that we used when setting up Dial-up.
How to set up WiFi
You can read about it here .
If you have any additions, I will gladly improve the article.
Guide: Step Backward , Step Forward , Table of Contents