Homemade electronic altimeter variometer-squeaker (3.3 volt version)
Significantly reworked my project altimeter vario with sound and light signals.
Therefore, I decided to issue the material as a separate article.
As before, there is a parachute and paraglider versions of the firmware.
Component connection scheme

Parachute works both with and without a display.
Paragliding - so far without display.
Used inexpensive and accessible components.
What is new? What had to be refused?
In the new version of the device:
- powered from one 3.7V LiPo - cell (instead of 9 volt element "Kron");
- Arduino ProMini 3.3V 8 MHz board (instead of 5 volt Arduino Nano V3);
- liquid crystal display Nokia 5110 (instead of the LCD display 1602);
-charge-discharge card LiPo - element with a micro USB connector.
Sensor Gy-68 (BMP180) I use the same.

Connecting the display from Nokia 5110 to Arduino .

Assembly (video)
Priborchik transformed, became smaller. The size of a small alarm clock.

And if you remove the display, then in a protective helmet will enter!
I think to roll it in shrink, maybe even transparent.
Let it be seen "high-tech" content.

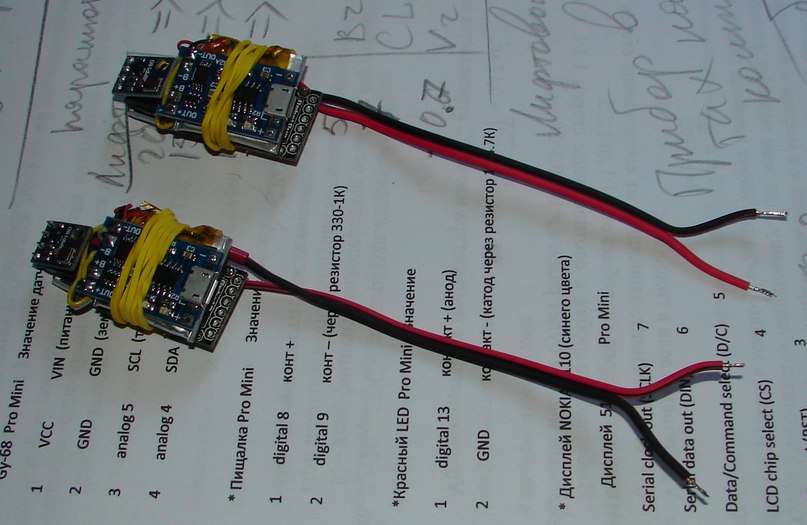
On the left is a battery with a charge-discharge controller, on the right is a board with a sensor and a speaker from a cell phone. Consistently connected to the speaker resistance of 120 ohms. The volume is quite acceptable if placed in a helmet.

Brought in the form of a "tail" wire where you can solder any switch, what your heart desires. I used a regular computer jumper.
The algorithm works all the same. Both parachute and paragliding version.
Without a display with an element capacity of 100 mA, AltVar V2 worked continuously for more than 10 hours.
With the display connected (the backlight was on)
and a 200 mA element - more than 7 hours.
No display backlight - more than 20 hours.
Kata on the elevator device with parachute firmware - works like my previous version .
Can be used as a normal high-precision altimeter variometer.

Information output format:
A: 15 (height in meters)
--- v --- (sign of decline, in the case of climb +++ ^ +++)
V: 0.0 - (vertical speed in m / s)
Paragliding firmware - so far without a display. In the display version revealed some sound glitches. Until I figured out why ... Therefore, I do not publish the sketch.
Paragliding version without display works well and this firmware can be used.
The sketch that I used as the basis of my project also works .
Huge my thanks to its author!
The piezo squeezer replaced, as I have already pointed out, the speaker from a cell phone, by connecting a 47 Ohm impedance in series with it.
Quite loud and distinctly sounds. The speaker put it like this.

All the connections of the components are indicated in the “header” of the sketch.
For example, connecting the display (taken from this “cap”):
Display NOKIA 5110 (blue)
Display 5110 Pro Mini
Serial clock out (SCLK) 3
Serial data out (DIN) 4
Data / Command select (D / C) 5
LCD chip select (CS) 6
LCD reset (RST) 7
VCC (not more than 3.3 volts) VCC
BL (backlight) VCC (for red display - GND)
GND GND
The same compiler - 1.0.6

Stitched using a standard TTL-UART USB adapter CH340G .
He stands up, does not reset Arduin. Therefore, after compiling, I pressed the RESET button myself.
All firmwares send height, vertical speed and pressure data to the COM port. The truth in the work in this mode, the system can define it as a kind of maykrosoftovsky gadget, and incorrectly working.
In general, it turned out quite simple and quite budget.
I thank everyone who responded to my previous article on this topic.
I took some of your comments into account when creating a new modification of my device.
PS And here is the firmware version of the display for the paraglider.
Compared to the headless display, it turned out to be more “inhibited”.
Not so smartly reacting to a change in pitch, there is some delay in the audio response.
The rest is quite workable. Here it is .
Therefore, I decided to issue the material as a separate article.
As before, there is a parachute and paraglider versions of the firmware.
Component connection scheme
Parachute works both with and without a display.
Paragliding - so far without display.
Used inexpensive and accessible components.
What is new? What had to be refused?
In the new version of the device:
- powered from one 3.7V LiPo - cell (instead of 9 volt element "Kron");
- Arduino ProMini 3.3V 8 MHz board (instead of 5 volt Arduino Nano V3);
- liquid crystal display Nokia 5110 (instead of the LCD display 1602);
-charge-discharge card LiPo - element with a micro USB connector.
Sensor Gy-68 (BMP180) I use the same.
Connecting the display from Nokia 5110 to Arduino .
Assembly (video)
Priborchik transformed, became smaller. The size of a small alarm clock.
And if you remove the display, then in a protective helmet will enter!
I think to roll it in shrink, maybe even transparent.
Let it be seen "high-tech" content.
On the left is a battery with a charge-discharge controller, on the right is a board with a sensor and a speaker from a cell phone. Consistently connected to the speaker resistance of 120 ohms. The volume is quite acceptable if placed in a helmet.
Brought in the form of a "tail" wire where you can solder any switch, what your heart desires. I used a regular computer jumper.
The algorithm works all the same. Both parachute and paragliding version.
Without a display with an element capacity of 100 mA, AltVar V2 worked continuously for more than 10 hours.
With the display connected (the backlight was on)
and a 200 mA element - more than 7 hours.
No display backlight - more than 20 hours.
Kata on the elevator device with parachute firmware - works like my previous version .
Can be used as a normal high-precision altimeter variometer.
Information output format:
A: 15 (height in meters)
--- v --- (sign of decline, in the case of climb +++ ^ +++)
V: 0.0 - (vertical speed in m / s)
Paragliding firmware - so far without a display. In the display version revealed some sound glitches. Until I figured out why ... Therefore, I do not publish the sketch.
Paragliding version without display works well and this firmware can be used.
The sketch that I used as the basis of my project also works .
Huge my thanks to its author!
The piezo squeezer replaced, as I have already pointed out, the speaker from a cell phone, by connecting a 47 Ohm impedance in series with it.
Quite loud and distinctly sounds. The speaker put it like this.
All the connections of the components are indicated in the “header” of the sketch.
For example, connecting the display (taken from this “cap”):
Display NOKIA 5110 (blue)
Display 5110 Pro Mini
Serial clock out (SCLK) 3
Serial data out (DIN) 4
Data / Command select (D / C) 5
LCD chip select (CS) 6
LCD reset (RST) 7
VCC (not more than 3.3 volts) VCC
BL (backlight) VCC (for red display - GND)
GND GND
The same compiler - 1.0.6
Stitched using a standard TTL-UART USB adapter CH340G .
He stands up, does not reset Arduin. Therefore, after compiling, I pressed the RESET button myself.
All firmwares send height, vertical speed and pressure data to the COM port. The truth in the work in this mode, the system can define it as a kind of maykrosoftovsky gadget, and incorrectly working.
In general, it turned out quite simple and quite budget.
I thank everyone who responded to my previous article on this topic.
I took some of your comments into account when creating a new modification of my device.
PS And here is the firmware version of the display for the paraglider.
Compared to the headless display, it turned out to be more “inhibited”.
Not so smartly reacting to a change in pitch, there is some delay in the audio response.
The rest is quite workable. Here it is .