Using Avocode for site layout. Review for beginners. Bonus - register a 30-day trial period
- Tutorial
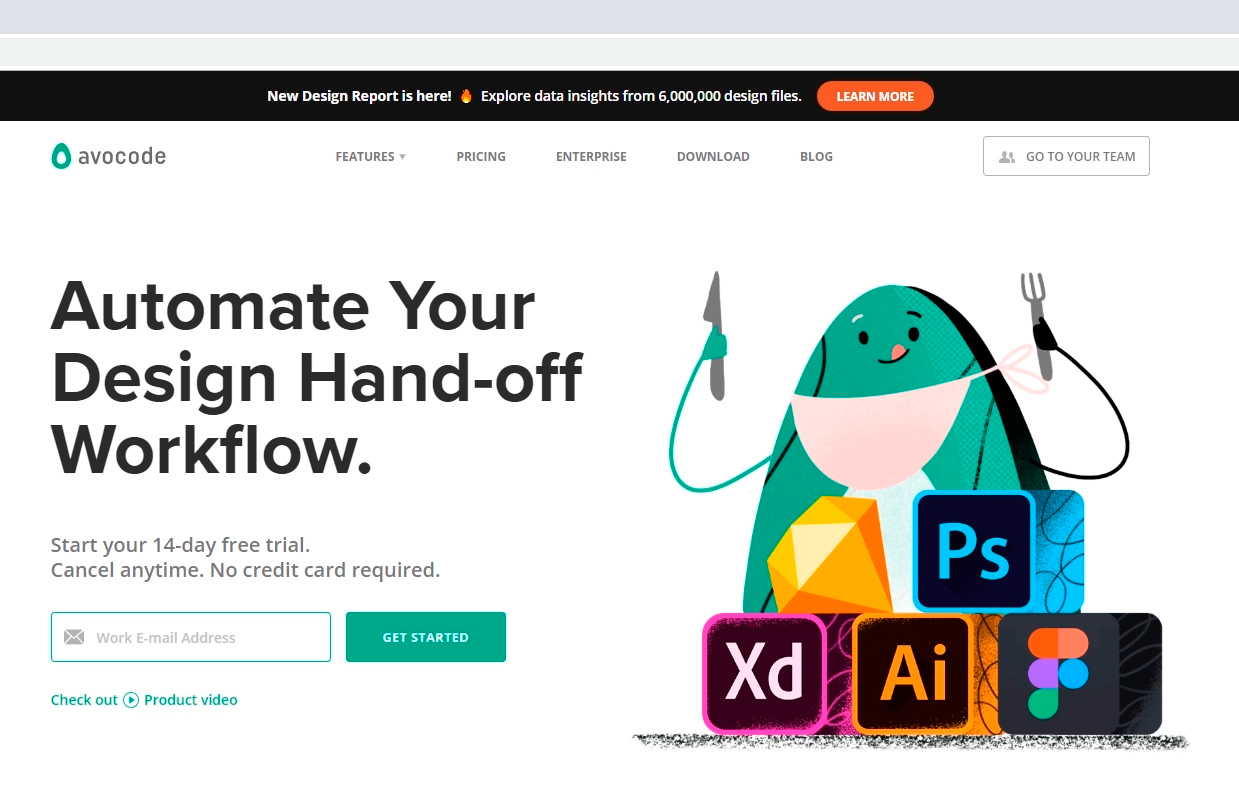
As we all know, site layout is actually coding a design layout, and to make us more comfortable we use various programs for working with layouts. Photoshop? Sketch? Zeplin? Yes, these are all great tools, but today we’ll talk about a product with which it’s really nice to make a site’s layout. It's about Avocode.
By going to the Avocode website, we are immediately offered to issue a free 14-day period, but take your time, I will show you how to register a 30-day cool tariff plan. First things first.
You can work right here on the site, but I recommend downloading the program to the computer. We find the download tab , select the system, download.
Having opened the program, we must log in, but we are not yet registered in the system. As mentioned above, you need to do this as profitably as possible.

So, back to the site. Scroll down and look for the Avocode vs. link Zeplin and click on it. Zeplin is an alternative to Avocode.
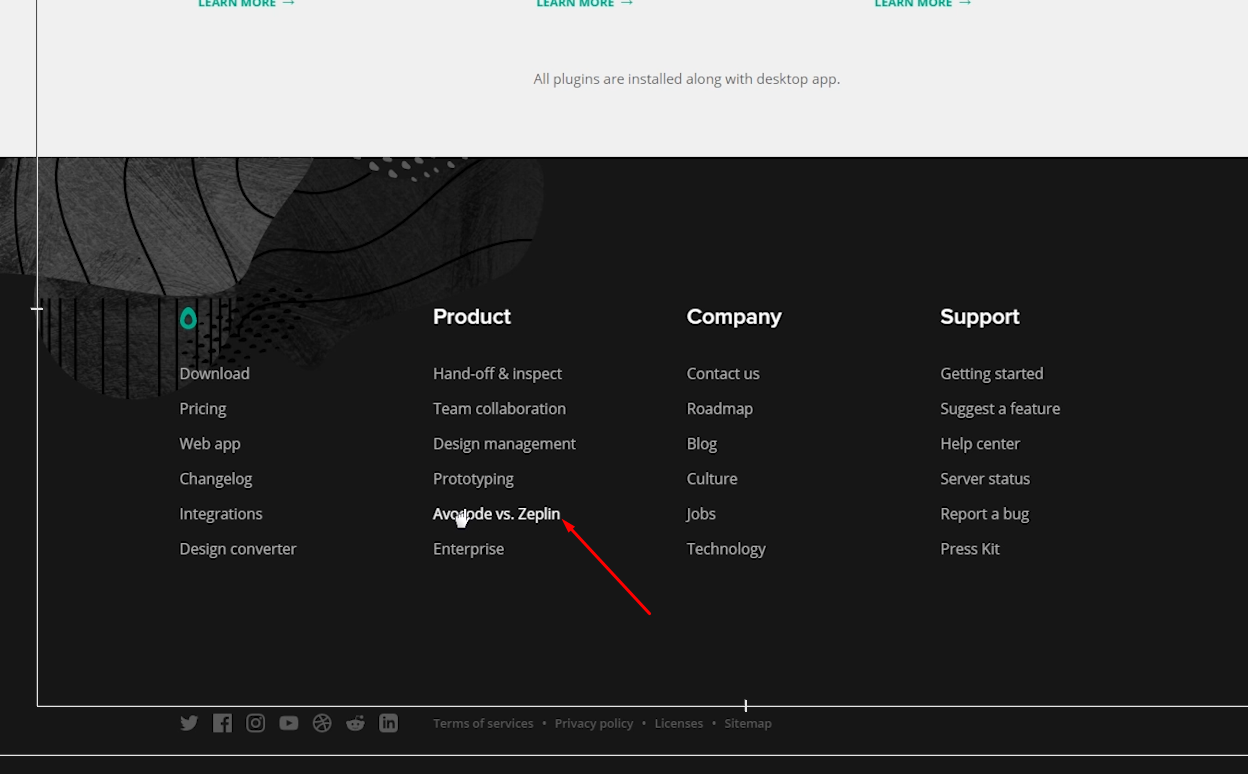
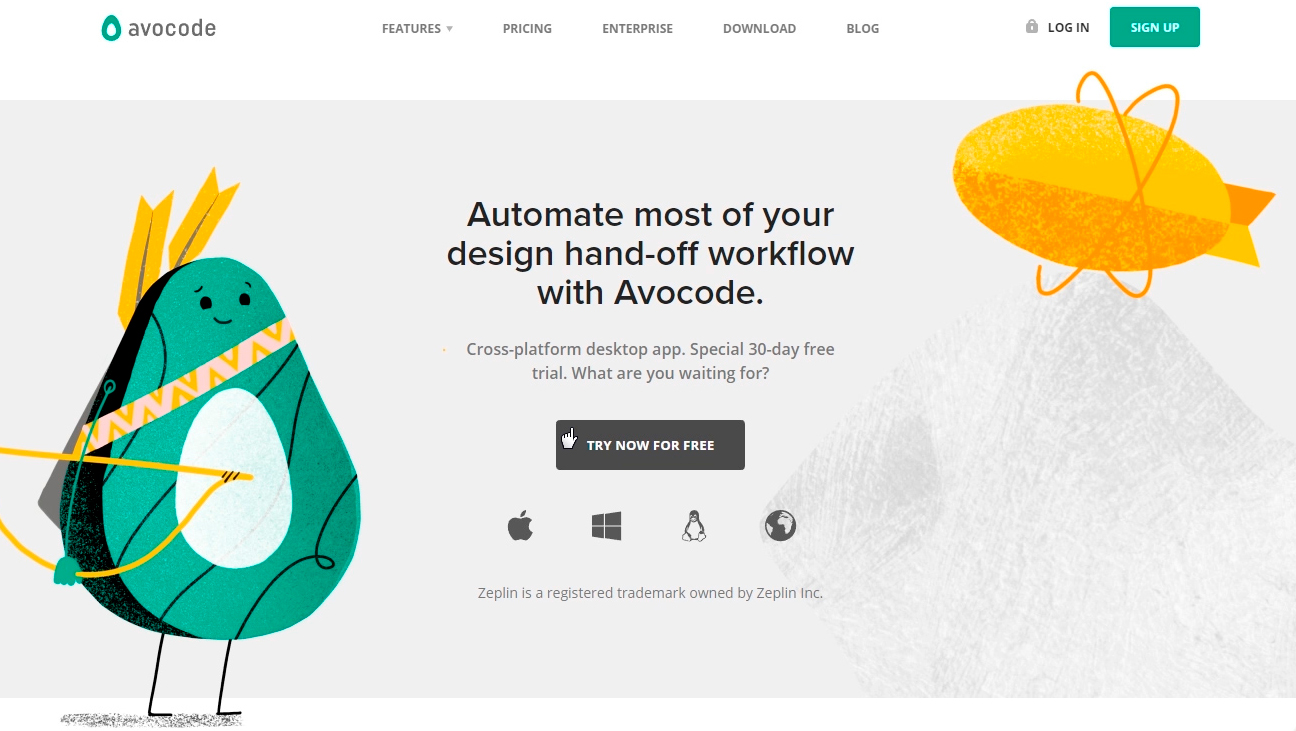
We are interested in the very bottom of the page, twist we are looking for this block. It says here that you can get the avacode for free for 30 days via this link, and they ask us “What are we waiting for?” And really what? Having rejected all doubts, click on the button and fill out the form.
And then I will immediately hint to you that if you do not have time to enjoy the program for a month, then this procedure can be repeated by registering another email. Obviously, you can repeat these actions endlessly). But personally, I pay for the avocode and advise you. On the other hand, while you are a beginner, you can save money. It's up to you.
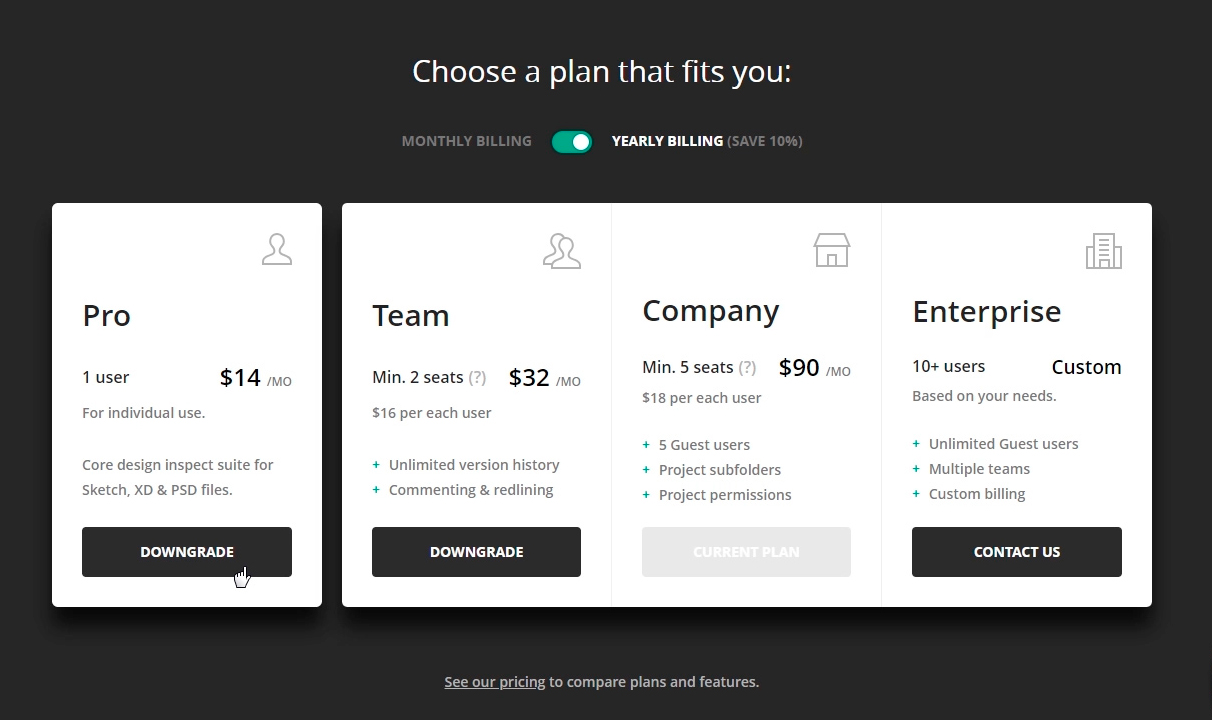
We confirm our email by clicking on the link in the letter and go to the application. Immediately go to the menu and click on your nickname, then in the billing tab , we see that we have 30 ball days, and even the cool, expensive Company plan, it costs such $ 100 / month by the way. Rejoice. The main feature of this tariff is that it is designed for 5 people, that is, you can invite four more loafers to your team. You can do this in the members tab . Read more about tariffs on the program website.
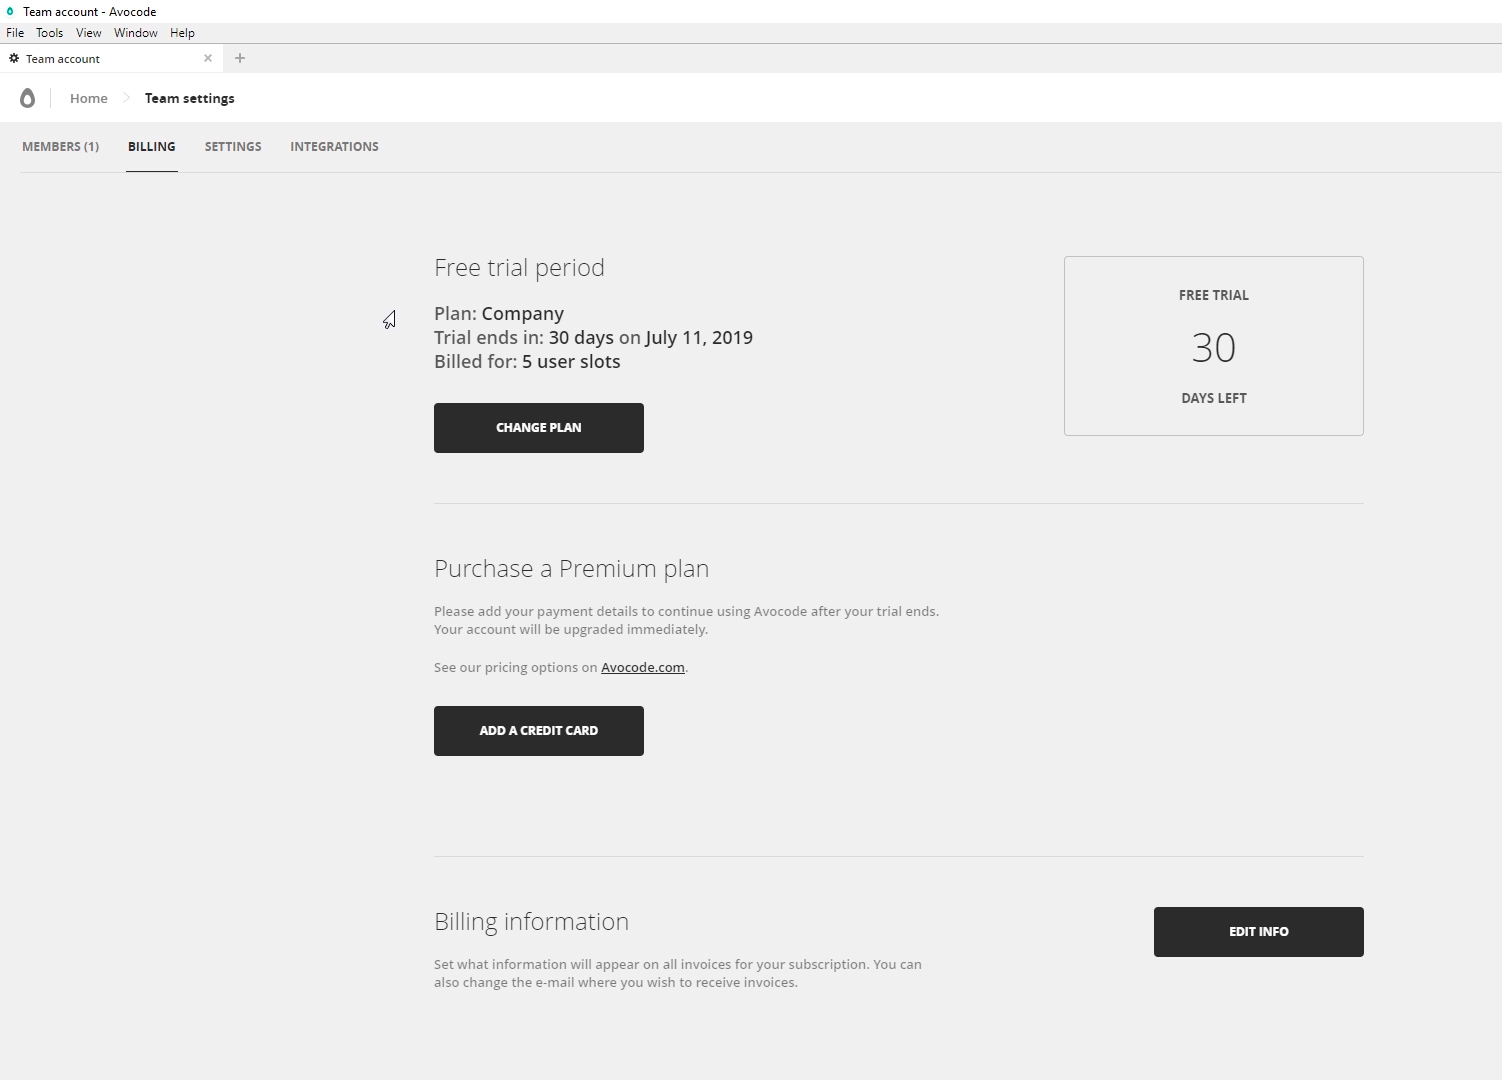
By the way, if you decide to pay for the program, then do not forget to change the tariff plan on a simpler one. Go to billing - change planand the cheapest one is fine. After that, you need to add a credit card and roll off 168 greens a year. But again, do not rush, after a 30-day period, Avocode usually offers to extend familiarization for $ 1 by the same email. At least it works today.
So what do we get for this money? And why is Avocode so cool. It's time to see what he knows.
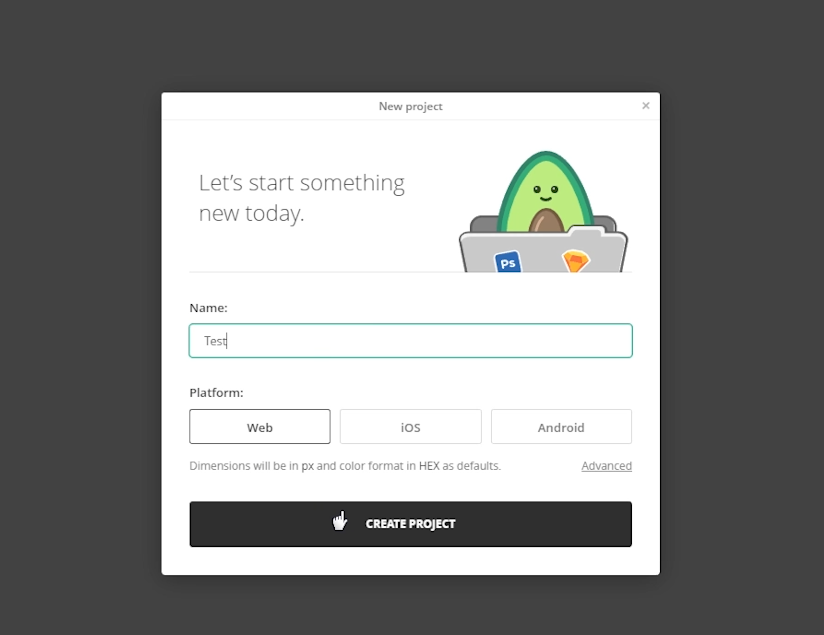
Let's create our test project. Click New Project .
So, one of the main advantages of the avocode for the layout designer is the supported formats without any plugins. And this, for a second, Photoshop (PSD) , Sketch , Adobe XD and Illustrator . As well as partial integration with Figma . Well, what is not a universal combine?
Besides the fact that files can be loaded directly, the avocode can be synchronized through plugins in the graphical editors themselves, as well as using dropbox . I'm somehow used to uploading files.
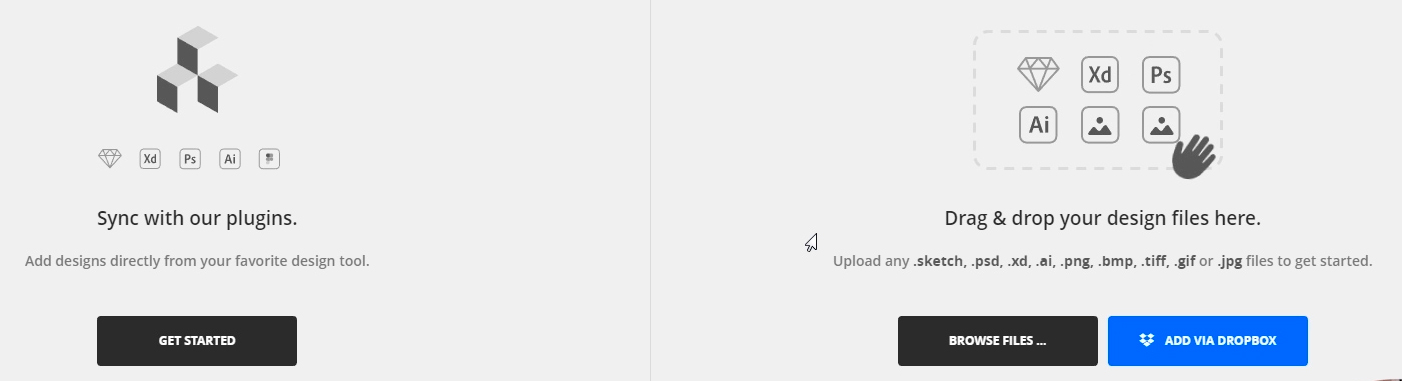
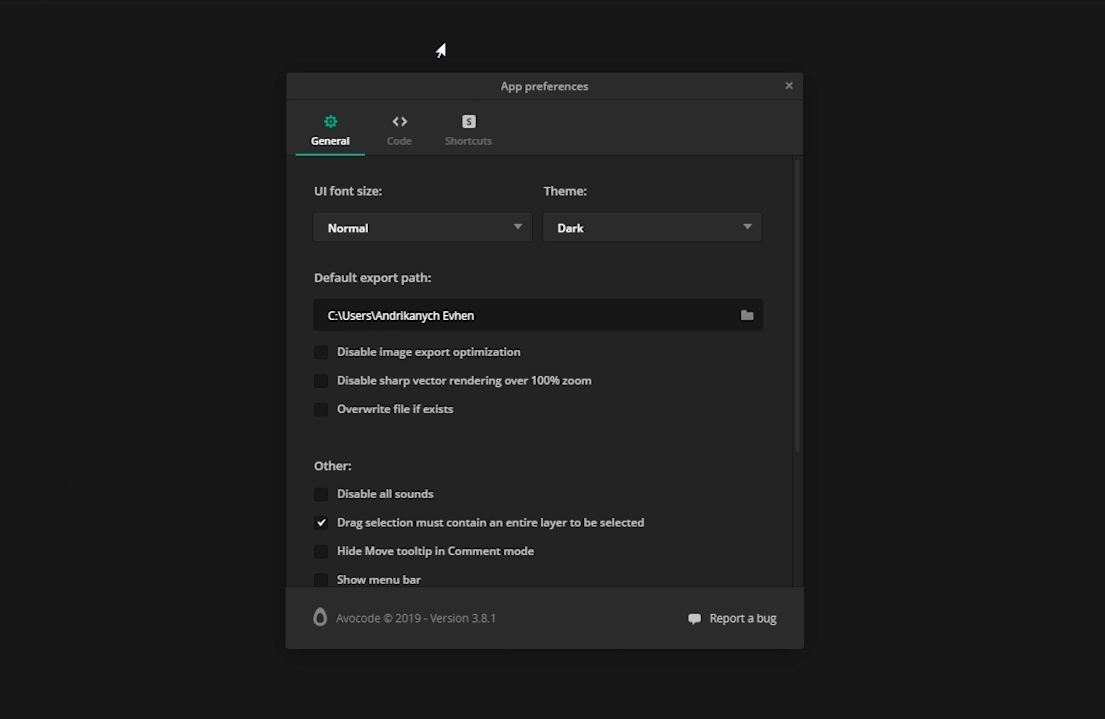
So, we’ll add any layout, for this you can either drag the file to this area and select it on the disk. After downloading, we can open the file and talk about the program interface, but I will start with the general settings. Click our Avatar - App preferences.
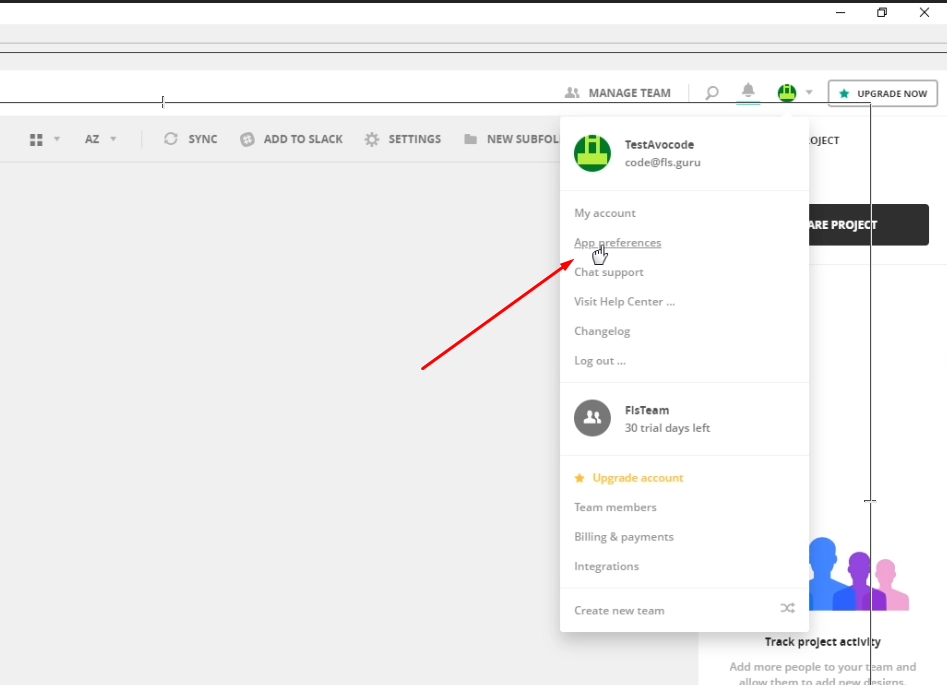
First of all, I will switch to the dark side of Theme Dark power. Next, I can select the default folder for exporting images, as well as disable image optimization, disable anti-aliasing when the layout is zoom, enable overwrite of the exported image. And a number of minor settings that I do not use. In fact, here I just turn on a dark topic, leave everything else as it is.
To work with the layout, we need the Inspect tab. On the left we see something like layers like in Photoshop, they can be hidden and shown by clicking on the eye. To the left we see a toolbar and I use all two - this is a ruler and an eyedropper. Here's why:
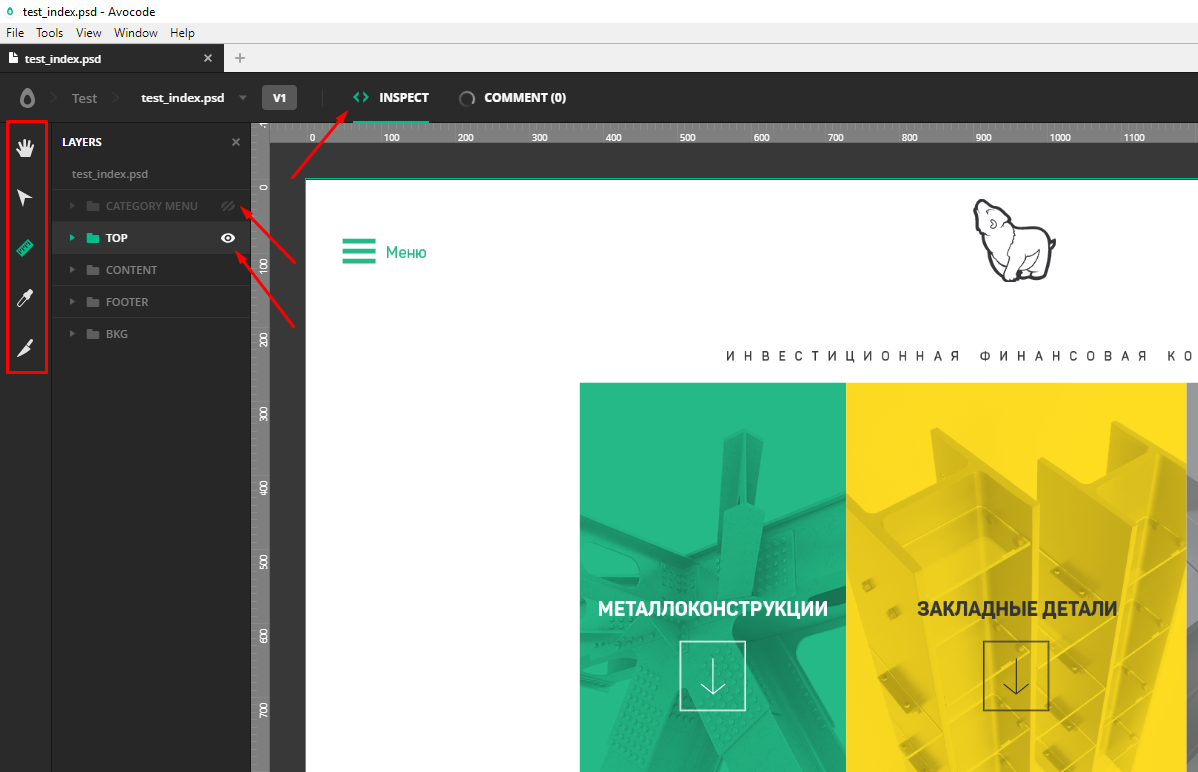
Hand - allows us to move the layout by holding the right mouse button. But the line can do the same with the space bar clamped.
Arrow (select selection) - allows you to select multiple layers. But the line can do exactly the same.
Knife (slice) - can select an arbitrary area with the subsequent export of the picture, but somehow I never used it anyway.
The eyedropper is sometimes needed - it copies the color code of the selected area.
And finally, the line. When you select this tool, magic begins.
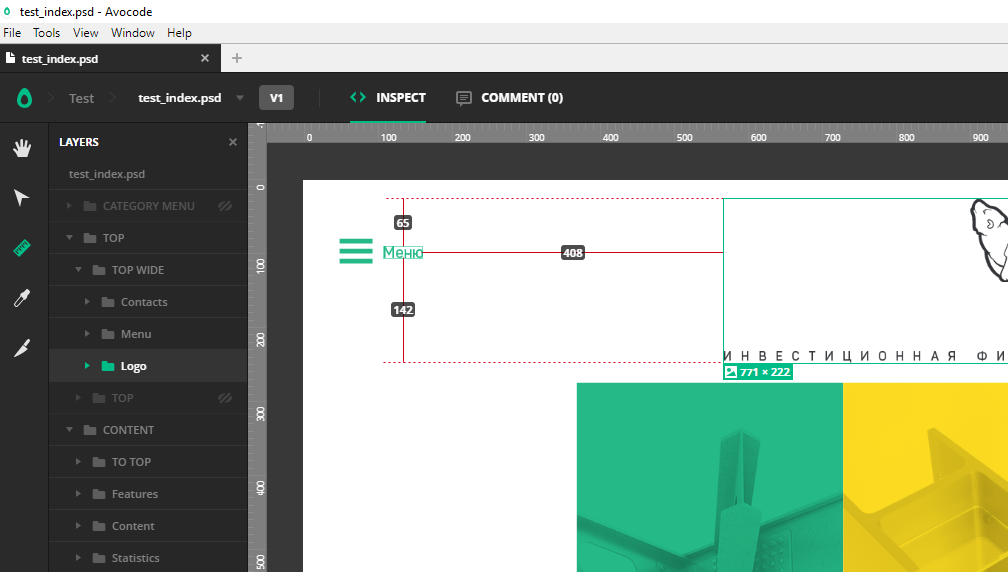
For example, I need to know the size of an object, as well as the distance from it to other elements.
To do this, I just click on the object, immediately see its dimensions in pixels, when I hover over neighboring objects, I immediately see different distances, which is incredibly convenient during layout.
If for some reason the distances do not appear, we can measure them manually by holding the left mouse button and stretching between the necessary objects. The height and width of the selected area are displayed on the right in the information window.
Seamlessly go to the right side of the program. First, click on the top level of our layers, in fact, on the file name. On the right we will see:
A picture of the entire layout, its size. The ability to upload a screenshot of the layout, which is convenient for the portfolio. General information: what, where, when. The following is a list of all the colors used in the layout, which is useful, but even more useful is a list of all the fonts used in the layout.
Fonts are usually provided by the designer along with the layout, but this is not always the case, so this list will help us find the fonts we need on our own.
Further, for more advanced users, it is possible to configure various variables for themselves.
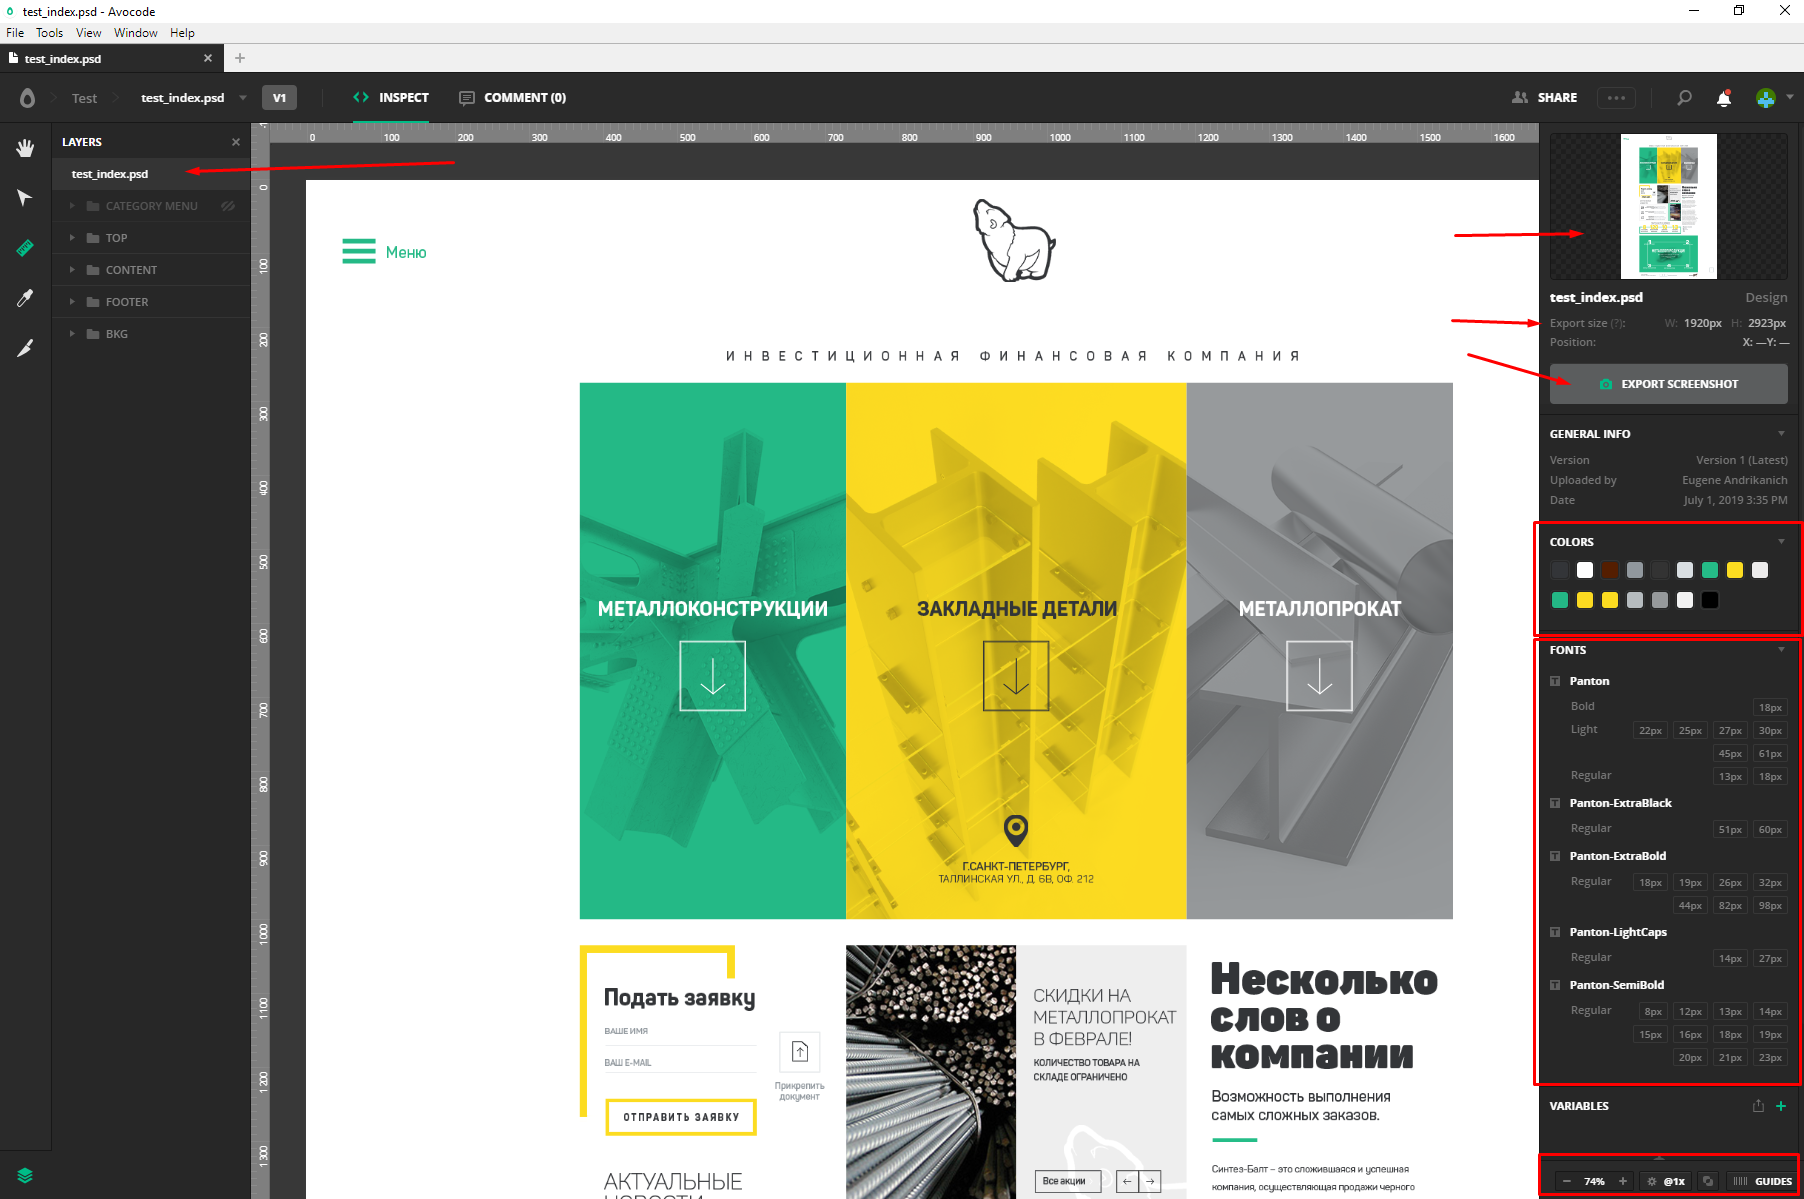
The lower strip, although small in size, is no less useful. Here you have the scale of the layout. It can also be changed by holding control and spinning the mouse wheel. Next, we have the layout verification tool on Pixel Perfect, that is, pixel by pixel. With it, we can impose a translucent layout on the layout and verify the sizes and indents. The tool has a number of useful settings, such as transparency and turning off the layout background.
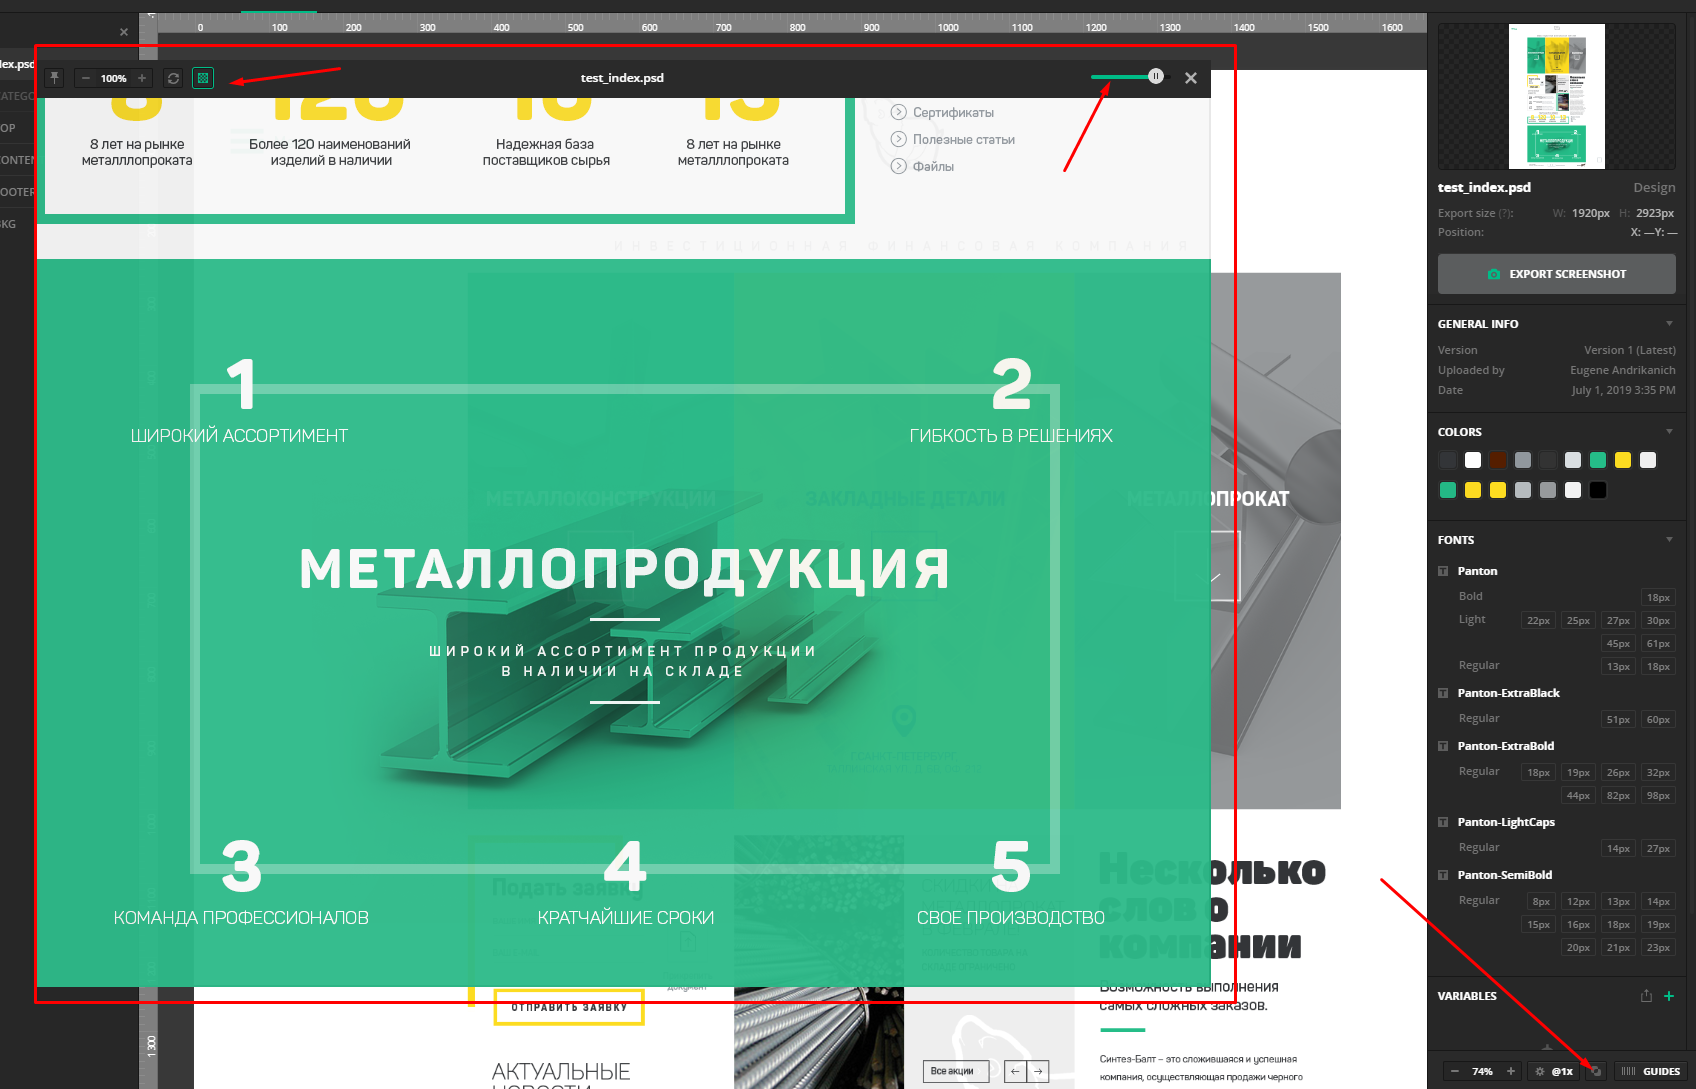
The last point is guides. Here you can enable the designer guides or add your own. Between them, too, you can measure the distance.

So, the panel for the entire layout was taken apart, now let's see what the panel for a separate object will offer us. Click, for example, on the picture. On the right we see the selected object, its size and a button for exporting the picture.
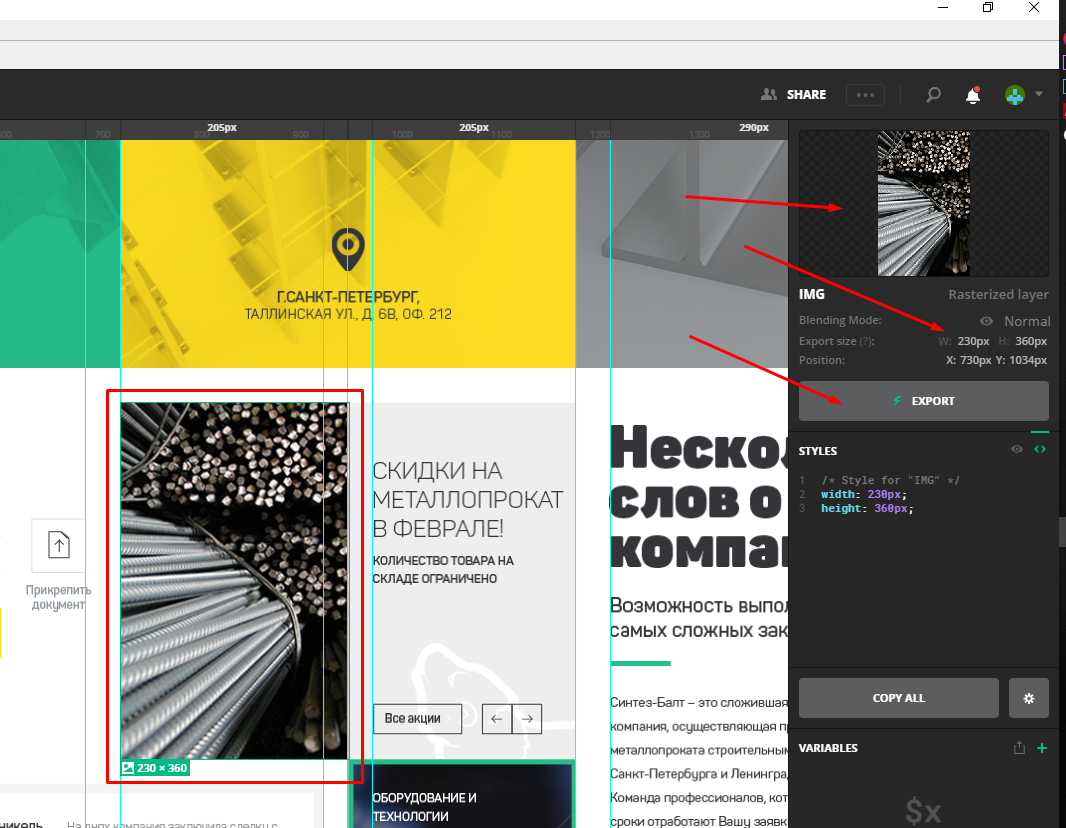
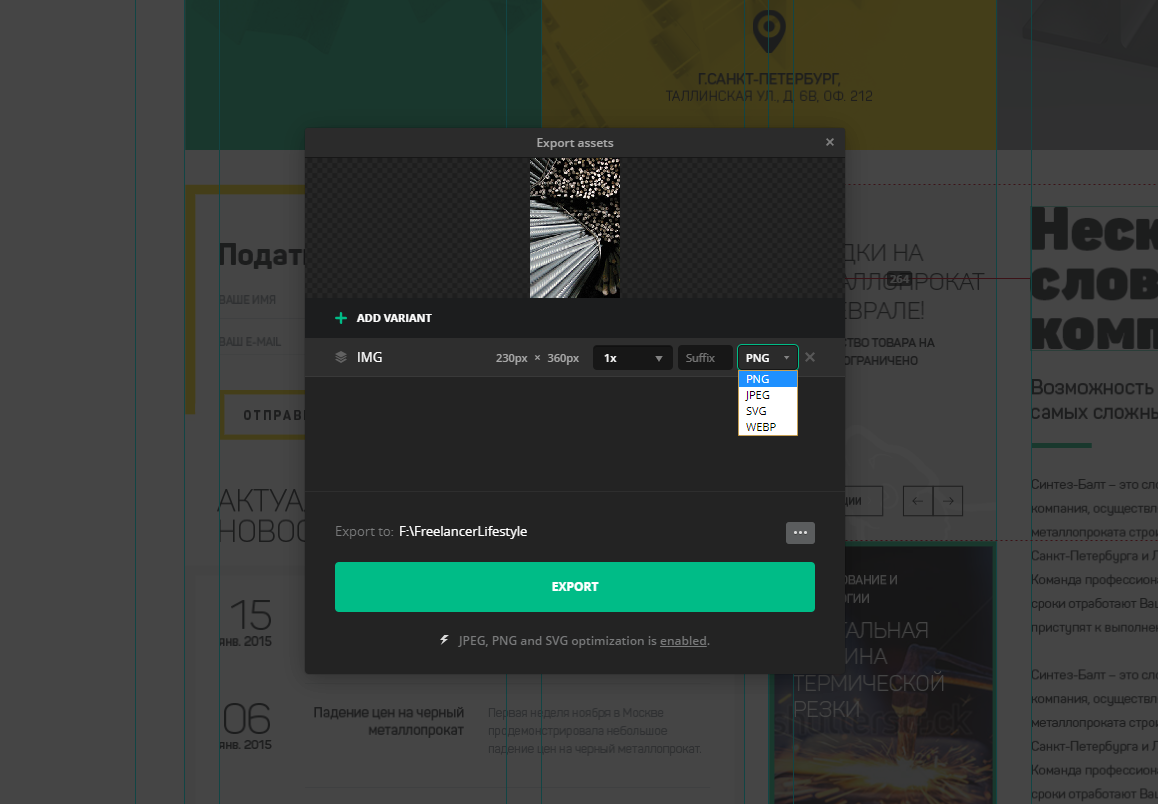
Click. Here we can set the file name, scale, suffix and PNG JPEG SVG and WEBP format. Below you can select the folder where the picture will be saved. You can upload several pictures into one file by selecting them with the mouse or by clicking on the desired ones with the shift pressed . You can also click on the picture with the left mouse button and select the desired item.
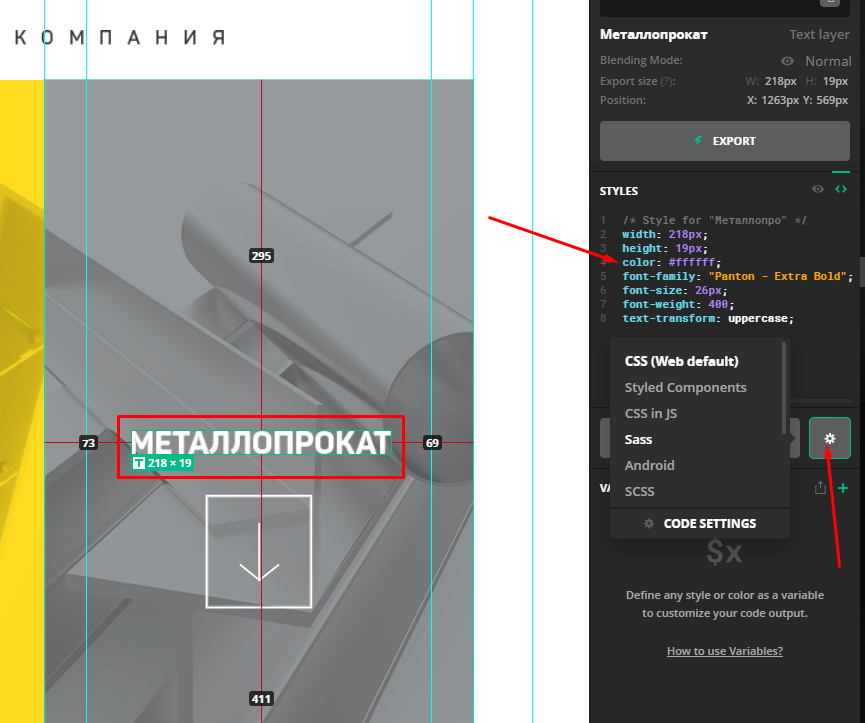
Now the fun part is the text and other design elements. For example, click on the text. On the right in the Styles window we see the holy of holies - all the finished CSS code of our element! We can copy everything, copy only one parameter by clicking on it, and also configure the look and type of our code. And in order to copy our text, just double-click on it with the mouse.
One avocode is able to almost completely replace the native graphic editors for each of the formats. Using this program, working with the layout is a pleasure and saves a lot of time!
Based on the release of Avocode for the layout designer. How to use Avocode 30 days for free ”, from the series“ Programs and Tools for Website Layout ”, on the YouTube channel“ Freelancer for Life ”.
By going to the Avocode website, we are immediately offered to issue a free 14-day period, but take your time, I will show you how to register a 30-day cool tariff plan. First things first.
You can work right here on the site, but I recommend downloading the program to the computer. We find the download tab , select the system, download.
Having opened the program, we must log in, but we are not yet registered in the system. As mentioned above, you need to do this as profitably as possible.
Registration of the trial period for 30 days.
So, back to the site. Scroll down and look for the Avocode vs. link Zeplin and click on it. Zeplin is an alternative to Avocode.
We are interested in the very bottom of the page, twist we are looking for this block. It says here that you can get the avacode for free for 30 days via this link, and they ask us “What are we waiting for?” And really what? Having rejected all doubts, click on the button and fill out the form.
And then I will immediately hint to you that if you do not have time to enjoy the program for a month, then this procedure can be repeated by registering another email. Obviously, you can repeat these actions endlessly). But personally, I pay for the avocode and advise you. On the other hand, while you are a beginner, you can save money. It's up to you.
We confirm our email by clicking on the link in the letter and go to the application. Immediately go to the menu and click on your nickname, then in the billing tab , we see that we have 30 ball days, and even the cool, expensive Company plan, it costs such $ 100 / month by the way. Rejoice. The main feature of this tariff is that it is designed for 5 people, that is, you can invite four more loafers to your team. You can do this in the members tab . Read more about tariffs on the program website.
By the way, if you decide to pay for the program, then do not forget to change the tariff plan on a simpler one. Go to billing - change planand the cheapest one is fine. After that, you need to add a credit card and roll off 168 greens a year. But again, do not rush, after a 30-day period, Avocode usually offers to extend familiarization for $ 1 by the same email. At least it works today.
So what do we get for this money? And why is Avocode so cool. It's time to see what he knows.
Work with the program
Let's create our test project. Click New Project .
So, one of the main advantages of the avocode for the layout designer is the supported formats without any plugins. And this, for a second, Photoshop (PSD) , Sketch , Adobe XD and Illustrator . As well as partial integration with Figma . Well, what is not a universal combine?
Besides the fact that files can be loaded directly, the avocode can be synchronized through plugins in the graphical editors themselves, as well as using dropbox . I'm somehow used to uploading files.
So, we’ll add any layout, for this you can either drag the file to this area and select it on the disk. After downloading, we can open the file and talk about the program interface, but I will start with the general settings. Click our Avatar - App preferences.
First of all, I will switch to the dark side of Theme Dark power. Next, I can select the default folder for exporting images, as well as disable image optimization, disable anti-aliasing when the layout is zoom, enable overwrite of the exported image. And a number of minor settings that I do not use. In fact, here I just turn on a dark topic, leave everything else as it is.
Program interface
To work with the layout, we need the Inspect tab. On the left we see something like layers like in Photoshop, they can be hidden and shown by clicking on the eye. To the left we see a toolbar and I use all two - this is a ruler and an eyedropper. Here's why:
Hand - allows us to move the layout by holding the right mouse button. But the line can do the same with the space bar clamped.
Arrow (select selection) - allows you to select multiple layers. But the line can do exactly the same.
Knife (slice) - can select an arbitrary area with the subsequent export of the picture, but somehow I never used it anyway.
The eyedropper is sometimes needed - it copies the color code of the selected area.
And finally, the line. When you select this tool, magic begins.
For example, I need to know the size of an object, as well as the distance from it to other elements.
To do this, I just click on the object, immediately see its dimensions in pixels, when I hover over neighboring objects, I immediately see different distances, which is incredibly convenient during layout.
If for some reason the distances do not appear, we can measure them manually by holding the left mouse button and stretching between the necessary objects. The height and width of the selected area are displayed on the right in the information window.
Seamlessly go to the right side of the program. First, click on the top level of our layers, in fact, on the file name. On the right we will see:
A picture of the entire layout, its size. The ability to upload a screenshot of the layout, which is convenient for the portfolio. General information: what, where, when. The following is a list of all the colors used in the layout, which is useful, but even more useful is a list of all the fonts used in the layout.
Fonts are usually provided by the designer along with the layout, but this is not always the case, so this list will help us find the fonts we need on our own.
Further, for more advanced users, it is possible to configure various variables for themselves.
The lower strip, although small in size, is no less useful. Here you have the scale of the layout. It can also be changed by holding control and spinning the mouse wheel. Next, we have the layout verification tool on Pixel Perfect, that is, pixel by pixel. With it, we can impose a translucent layout on the layout and verify the sizes and indents. The tool has a number of useful settings, such as transparency and turning off the layout background.
The last point is guides. Here you can enable the designer guides or add your own. Between them, too, you can measure the distance.
So, the panel for the entire layout was taken apart, now let's see what the panel for a separate object will offer us. Click, for example, on the picture. On the right we see the selected object, its size and a button for exporting the picture.
Click. Here we can set the file name, scale, suffix and PNG JPEG SVG and WEBP format. Below you can select the folder where the picture will be saved. You can upload several pictures into one file by selecting them with the mouse or by clicking on the desired ones with the shift pressed . You can also click on the picture with the left mouse button and select the desired item.
Now the fun part is the text and other design elements. For example, click on the text. On the right in the Styles window we see the holy of holies - all the finished CSS code of our element! We can copy everything, copy only one parameter by clicking on it, and also configure the look and type of our code. And in order to copy our text, just double-click on it with the mouse.
One avocode is able to almost completely replace the native graphic editors for each of the formats. Using this program, working with the layout is a pleasure and saves a lot of time!
Based on the release of Avocode for the layout designer. How to use Avocode 30 days for free ”, from the series“ Programs and Tools for Website Layout ”, on the YouTube channel“ Freelancer for Life ”.
Only registered users can participate in the survey. Please come in.
What program do you use for working with layouts (for HTML layout)
- 38.4% Avocode 20
- 5.7% Sketch 3
- 36.5% Photoshop 19
- 7.6% Adobe XD 4
- 5.7% Adobe Illustrator 3
- 30.7% Figma 16
- 17.3% Other 9