We turn a cardboard electrical circuit into a real one or how to make a simple designer from a board game
Earlier, I already talked about how to make a home-made analogue of “electric cubes” from cardboard and how I came up with a board game for building electrical circuits (which later successfully raised funds for publication through crowdfunding and which you can already buy).
After the launch of the game, "Do Not Short The Chain!" I was visited by the thought: “What if we do the reverse process?”. That is, is it possible to turn square beautiful pieces of cardboard into components of a simple electrical designer and, preferably, without spoiling the cardboard tokens of the game itself.
The challenge was accepted and the work began to boil.
It was also decided to take the magnetic principle of fastening as a basis. The question was how to fix the magnets, from which to make the contact pads of the components and, most importantly, how to get around with improvised means and do everything budgetary? Of course, it would be possible to simply make and print the case on the same 3D printer, place all the components, bend the contacts and cardboard cards from the metal into special recesses, but ... The solution was found to be more "elegant" and this ...
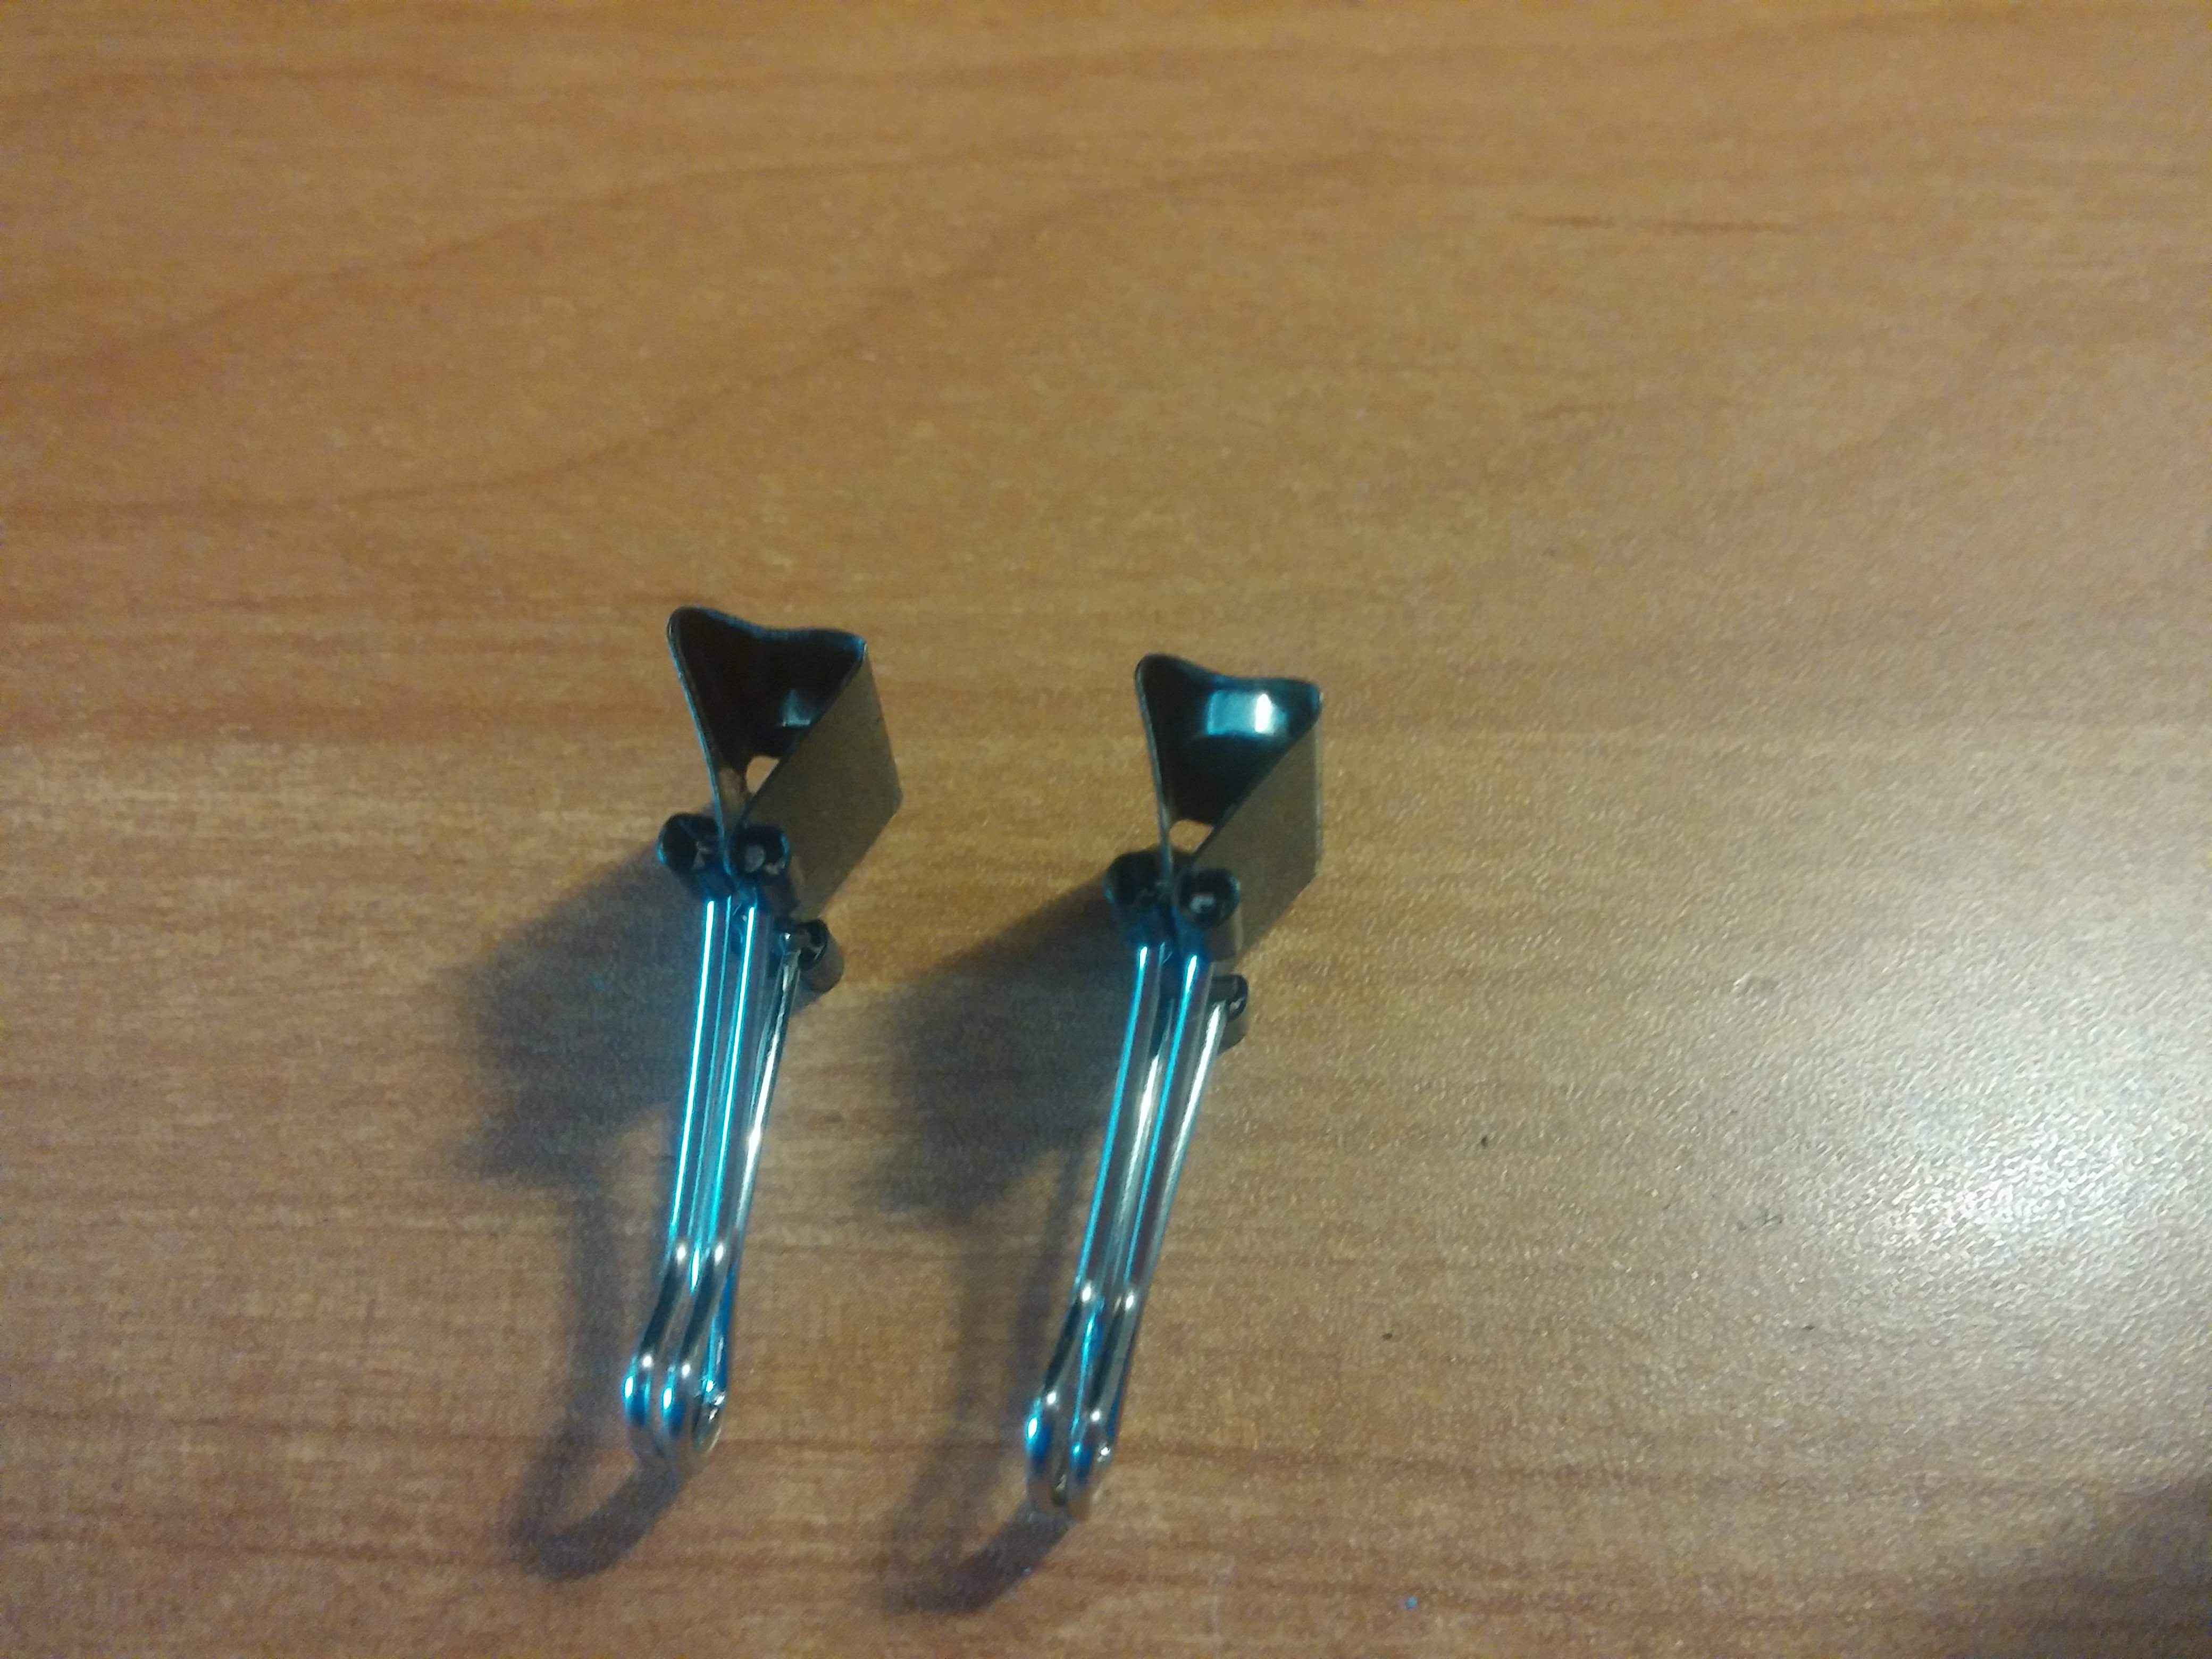
... Simple paper clips. Purchased at the nearest stationery store. I used a width of 25 mm. I also needed magnets that can be ordered on a heap of sites with a diameter of 5 mm and a thickness of 2 mm. And some radio components and wires.
The first task (and problem) to be solved is to make the clamp conductive. It is covered with paint, which alas does not conduct current. There was mechanical work ahead. We take sandpaper (or a file) and "sand off" the paint from the ends of the clamp.


Then we “clamp” the skin and remove the paint from the inside (it is enough for us to get contact in the zone of contact of the “paws” of the clamp).

We put a magnet in each clip inside. The polarity does not matter, since the magnets are small and if you have not guessed with the mutual polarity, they simply move slightly inside the clamp and pull the opposite in any case.
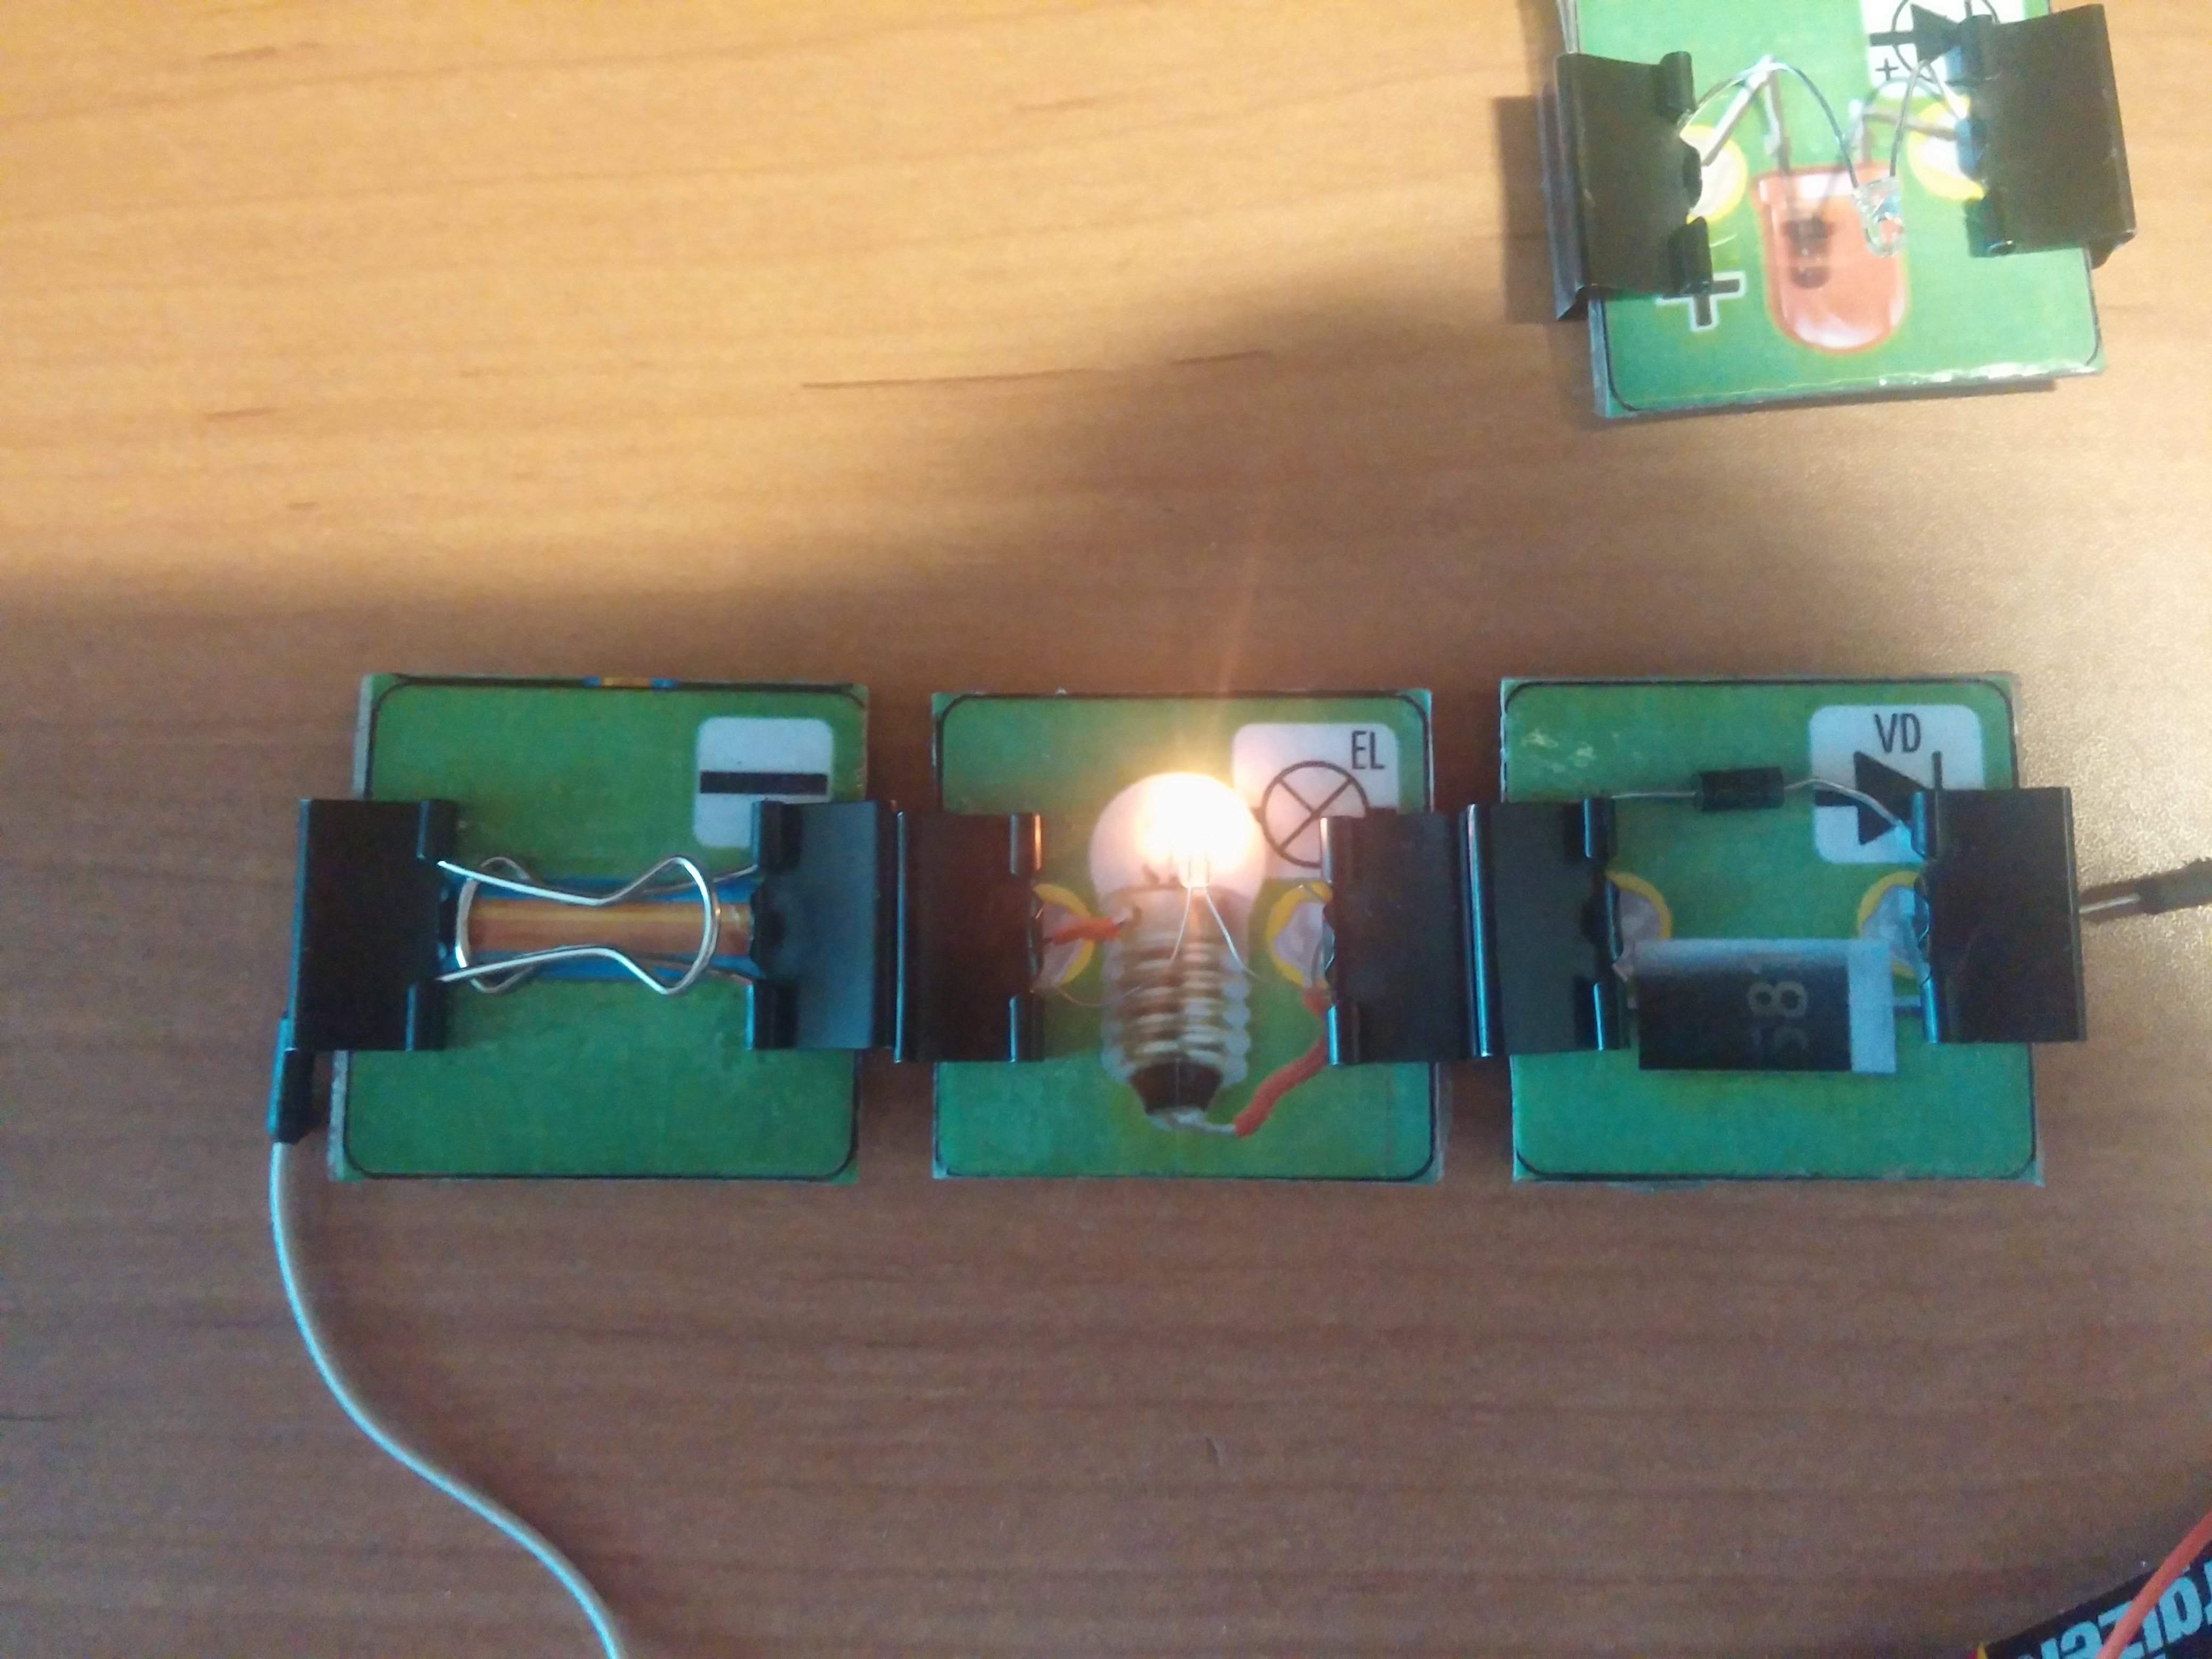
After that, you can collect our first "electric" box. To do this, take the card from the game (its prototype in the photo, but the real game is the same, only much more beautiful) and hold it on both sides with the previously made “contacts” along with the desired radio component (bulb, diode, resistor or LED).

After that, we “remove” the metal staples and get the finished component.

To obtain blocks of conductors, you can “clamp” a piece of wire, but you can do it easier - just do not remove the spring clamp brackets and simply end them with each other.

Moreover, this circuit as it turned out works as a switch - just raise one bracket, and the circuit breaks. In the same way matters a T-shaped element. For the intersection of all four sides and the crossing conductors, it would be better to take and “clamp” pieces of wire (for crossing without insulation, and for crossing with insulation in the middle).
Similarly, you can make a switch.

Having spent a little time, we create the necessary number of components. It remains to connect the circuit to the power source. We also make terminals from terminals (or you can simply “magnetize” the conductors to the extreme contacts).

You can use the battery compartments, or you can just connect the batteries through the same magnets.
We got a simple designer of electrical circuits. What can it be used for? For exampleto analyze the performance of circuits from a board game . I wrote earlier that the “engine” of the game has certain limitations and we get a great way to check everything.

You can also show the effect of the polarity of the connection of semiconductors on their work, the influence of a resistor on the operation of components and other fundamentals of building electrical circuits.

You can also show the operation of parallel and serial connections.

Someone may argue that this is too simple and not interesting, but the process of creating such a designer and turning a "soulless cardboard" into a working electrical circuit will be important for children. And then it’s already possible to move on to prototyping boards and more complex schemes, and return the board game to its original state and use it as a fascinating logical abstract, into which it is interesting to hack from time to time both children and adults.
After the launch of the game, "Do Not Short The Chain!" I was visited by the thought: “What if we do the reverse process?”. That is, is it possible to turn square beautiful pieces of cardboard into components of a simple electrical designer and, preferably, without spoiling the cardboard tokens of the game itself.
The challenge was accepted and the work began to boil.
It was also decided to take the magnetic principle of fastening as a basis. The question was how to fix the magnets, from which to make the contact pads of the components and, most importantly, how to get around with improvised means and do everything budgetary? Of course, it would be possible to simply make and print the case on the same 3D printer, place all the components, bend the contacts and cardboard cards from the metal into special recesses, but ... The solution was found to be more "elegant" and this ...
... Simple paper clips. Purchased at the nearest stationery store. I used a width of 25 mm. I also needed magnets that can be ordered on a heap of sites with a diameter of 5 mm and a thickness of 2 mm. And some radio components and wires.
The first task (and problem) to be solved is to make the clamp conductive. It is covered with paint, which alas does not conduct current. There was mechanical work ahead. We take sandpaper (or a file) and "sand off" the paint from the ends of the clamp.
Then we “clamp” the skin and remove the paint from the inside (it is enough for us to get contact in the zone of contact of the “paws” of the clamp).
We put a magnet in each clip inside. The polarity does not matter, since the magnets are small and if you have not guessed with the mutual polarity, they simply move slightly inside the clamp and pull the opposite in any case.
After that, you can collect our first "electric" box. To do this, take the card from the game (its prototype in the photo, but the real game is the same, only much more beautiful) and hold it on both sides with the previously made “contacts” along with the desired radio component (bulb, diode, resistor or LED).
After that, we “remove” the metal staples and get the finished component.
To obtain blocks of conductors, you can “clamp” a piece of wire, but you can do it easier - just do not remove the spring clamp brackets and simply end them with each other.
Moreover, this circuit as it turned out works as a switch - just raise one bracket, and the circuit breaks. In the same way matters a T-shaped element. For the intersection of all four sides and the crossing conductors, it would be better to take and “clamp” pieces of wire (for crossing without insulation, and for crossing with insulation in the middle).
Similarly, you can make a switch.
Having spent a little time, we create the necessary number of components. It remains to connect the circuit to the power source. We also make terminals from terminals (or you can simply “magnetize” the conductors to the extreme contacts).
You can use the battery compartments, or you can just connect the batteries through the same magnets.
We got a simple designer of electrical circuits. What can it be used for? For exampleto analyze the performance of circuits from a board game . I wrote earlier that the “engine” of the game has certain limitations and we get a great way to check everything.
You can also show the effect of the polarity of the connection of semiconductors on their work, the influence of a resistor on the operation of components and other fundamentals of building electrical circuits.
You can also show the operation of parallel and serial connections.
Someone may argue that this is too simple and not interesting, but the process of creating such a designer and turning a "soulless cardboard" into a working electrical circuit will be important for children. And then it’s already possible to move on to prototyping boards and more complex schemes, and return the board game to its original state and use it as a fascinating logical abstract, into which it is interesting to hack from time to time both children and adults.