June 13, 2019 at 15:45
Chromium is not only a browser, but also a good framework

Most people are used to the fact that Chromium is both a browser and the basis for other browsers. Until recently, I also thought so, but, studying this topic for a couple of months, I began to discover another wonderful world. Chromium is a huge ecosystem in which there is everything: a dependency system, a cross-platform build system, and components for almost all occasions. So why not try to create your own applications using all this power?
Under kat a small guide on how to start doing this.
Environment preparation
In the article I will use Ubuntu 18.04, the procedure for other OSs can be found in the documentation:
The following steps require Git and Python. If they are not installed, then they must be installed using the command:
sudo apt install git pythonSetting depot_tools
depot_tools Is a Chromium development toolkit. To install it, you must perform:git clone https://chromium.googlesource.com/chromium/tools/depot_tools.gitAnd add the path to the PATH environment variable:
export PATH="$PATH:/path/to/depot_tools"Important: if you
depot_toolswere downloaded to your home folder, do not use it ~in a variable PATH, otherwise problems may occur. You must use the variable $HOME:export PATH="$PATH:${HOME}/depot_tools"Code retrieval
First you need to create a folder for the source. For example, in the home directory (about 30 GB of free space is needed):
mkdir ~/chromium && cd ~/chromiumAfter that, you can download the sources using the utility
fetchfrom depot_tools:fetch --nohooks --no-history chromiumNow you can go for tea / coffee, as the procedure is not fast. For experiments, no story is needed, so the flag is used
--no-history. The story will be even longer.Dependency Installation
All sources are in the folder
src, go to it:cd srcNow you need to put all the dependencies using the script:
./build/install-build-deps.shAnd run the hooks:
gclient runhooksThis completes the preparation of the environment.
Build system
Ninja is used as the main assembly system of Chromium , and the GN utility is used to generate
.ninja-files. To understand how to use these tools, I propose to create a test utility example. To do this,
srccreate a subfolder in the folder example:mkdir exampleThen in the folder
src/exampleyou need to create a file BUILD.gnthat contains:executable("example") {
sources = [
"example.cc",
]
}BUILD.gnconsists of a target (executable file example) and a list of files that are needed to build the target. The next step is to create the file itself
example.cc. To begin, I propose to make a classic application "Hello world":#include
int main(int argc, char **argv) {
std::cout << "Hello world" << std::endl;
return 0;
} Source code can be found on GitHub .
For GN to learn about the new project, you need to add the line in the file
BUILD.gnthat is srcin the section :deps"//example"...
group("gn_all") {
testonly = true
deps = [
":gn_visibility",
"//base:base_perftests",
"//base:base_unittests",
"//base/util:base_util_unittests",
"//chrome/installer",
"//chrome/updater",
"//net:net_unittests",
"//services:services_unittests",
"//services/service_manager/public/cpp",
"//skia:skia_unittests",
"//sql:sql_unittests",
"//third_party/flatbuffers:flatbuffers_unittests",
"//tools/binary_size:binary_size_trybot_py",
"//tools/ipc_fuzzer:ipc_fuzzer_all",
"//tools/metrics:metrics_metadata",
"//ui/base:ui_base_unittests",
"//ui/gfx:gfx_unittests",
"//url:url_unittests",
# ↓↓↓↓↓↓↓↓
"//example",
]
...Now you need to go back to the folder
srcand generate the project using the command:gn gen out/DefaultGN also allows you to prepare a project for one of the supported IDEs:
- eclipse
- vs
- vs2013
- vs2015
- vs2017
- vs2019
- xcode
- qtcreator
- json
More information can be obtained using the command:
gn help genFor example, to work with a project
examplein QtCreator, you need to run the command:gn gen --ide=qtcreator --root-target=example out/DefaultAfter that, you can open the project in QtCreator:
qtcreator out/Default/qtcreator_project/all.creatorThe final step is to build the project using Ninja:
autoninja -C out/Default exampleThis brief introduction to the assembly system can be completed.
The application can be launched using the command:
./out/Default/exampleAnd see Hello world. In fact, you can write a separate article about the assembly system in Chromium. Perhaps not one.
Work with the command line
As a first example of using the Chromium code base as a framework, I suggest playing around with the command line.
Task: display all the arguments passed to the application in the Chromium style.
To work with the command line, you need to include the header file in example.cc:
#include "base/command_line.h"And also one must not forget to
BUILD.gnadd dependence on the project base. BUILD.gnshould look like this:executable("example") {
sources = [
"example.cc",
]
deps = [
"//base",
]
}Now everything you need will be connected to
example. To work with the command line, Chromium provides a singleton
base::CommandLine. To get a link to it, you need to use the static method base::CommandLine::ForCurrentProcess, but first you need to initialize it using the method base::CommandLine::Init:base::CommandLine::Init(argc, argv);
auto *cmd_line = base::CommandLine::ForCurrentProcess();All arguments passed to the application on the command line and starting with a character are
-returned in the form base::SwitchMap(in essence ) using the method . All other arguments are returned as (essentially ). This knowledge is enough to implement the code for the task:mapGetSwitchesbase::StringVectorvectоrfor (const auto &sw : cmd_line->GetSwitches()) {
std::cout << "Switch " << sw.first << ": " << sw.second << std::endl;
}
for (const auto &arg: cmd_line->GetArgs()) {
std::cout << "Arg " << arg << std::endl;
}The full version can be found on GitHub .
To build and run the application you need to run:
autoninja -C out/Default example
./out/Default/example arg1 --sw1=val1 --sw2 arg2
The screen will display:
Switch sw1: val1
Switch sw2:
Arg arg1
Arg arg2
Networking
As a second and last example for today, I propose to work with the network part of Chromium.
Task: display the contents of the URL passed as an argument .
Chromium Network Subsystem
The network subsystem is quite large and complex. The entry point for requests to HTTP, HTTPS, FTP and other data resources is
URLRequestone that already determines which client to use. A simplified diagram looks like this: The 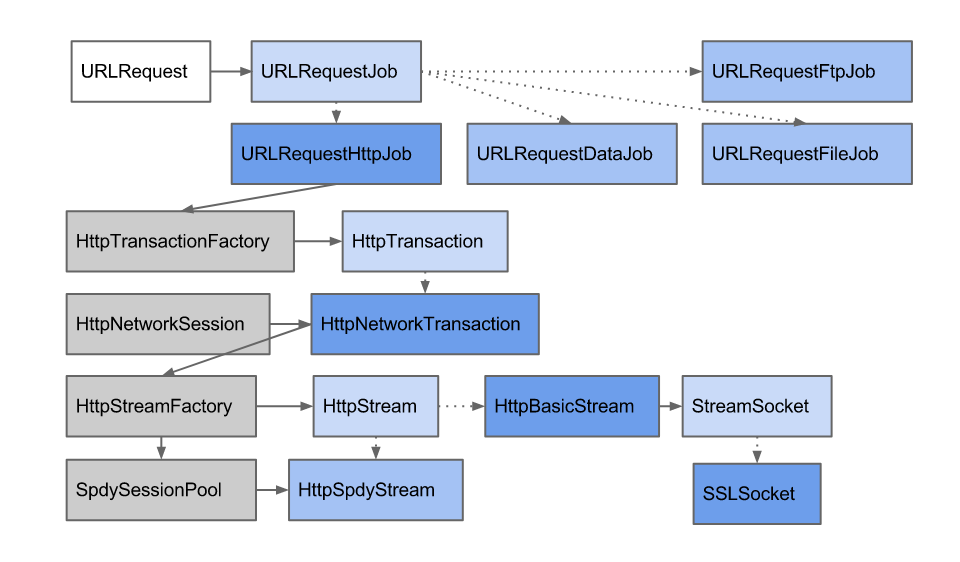
full version can be found in the documentation .
To create
URLRequesta must be used URLRequestContext. Creating a context is a rather complicated operation, therefore it is recommended to use it URLRequestContextBuilder. It will initialize all the necessary variables with default values, but, if desired, they can be changed to their own, for example:net::URLRequestContextBuilder context_builder;
context_builder.DisableHttpCache();
context_builder.SetSpdyAndQuicEnabled(true /* http2 */, false /* quic */);
context_builder.SetCookieStore(nullptr);Multithreading
The Chromium network stack is designed to work in a multi-threaded environment, so you can not skip this topic. The basic objects for working with multithreading in Chromium are:
- Task — задача для выполнения, в Chromium это функция с типом
base::Callback, которую можно создать с помощьюbase::Bind. - Task queue — очередь задач для выполнения.
- Physical thread — кроссплатформенная обёртка над потоком операционной системы (
pthreadв POSIX илиCreateThread()в Windows). Реализовано в классеbase::PlatformThread, не используйте напрямую. - base::Thread — реальный поток, который бесконечно обрабатывает сообщения из выделенной очереди задач; не рекомендуется создавать их напрямую.
- Thread pool — пул потоков с общей очередью задач. Реализован в классе
base::ThreadPool. Как правило, создают один экземпляр. Задачи в него отправляются с помощью функций изbase/task/post_task.h. - Sequence or Virtual thread — виртуальный поток, который использует реальные потоки и может переключаться между ними.
- Task runner - an interface for setting tasks, implemented in the class
base::TaskRunner. - Sequenced task runner - an interface for setting tasks, which ensures that tasks will be executed in the same order in which they arrived. Implemented in the classroom
base::SequencedTaskRunner. - Single-thread task runner - similar to the previous one, but guarantees that all tasks will be performed in one OS thread. Implemented in the classroom
base::SingleThreadTaskRunner.
Implementation
Some components of Chromium require availability
base::AtExitManager- this is a class that allows you to register operations that must be performed when the application is completed. Using it is very simple, you need to create an object on the stack:base::AtExitManager exit_manager;When it
exit_managerleaves the scope, all registered callbacks will be executed. Now you need to take care of the availability of all the necessary multithreading components for the network subsystem. To do this, create
Thread pool, Message loopwith a type TYPE_IOfor processing network messages, and Run loop- the main program loop:base::ThreadPool::CreateAndStartWithDefaultParams("downloader");
base::MessageLoop msg_loop(base::MessageLoop::TYPE_IO);
base::RunLoop run_loop;Next you need to use
Context builder'a to create Context:auto ctx = net::URLRequestContextBuilder().Build();To send a request, you must use the method
CreateRequestof the object ctxto create the object URLRequest. The following parameters are passed:- URL, string with type GURL;
- a priority;
- delegate that handles events.
A delegate is a class that implements an interface
net::URLRequest::Delegate. For this task, it may look like this:class MyDelegate : public net::URLRequest::Delegate {
public:
explicit MyDelegate(base::Closure quit_closure) : quit_closure_(std::move(quit_closure)),
buf_(base::MakeRefCounted(BUF_SZ)) {}
void OnReceivedRedirect(net::URLRequest *request, const net::RedirectInfo &redirect_info,
bool *defer_redirect) override {
std::cerr << "redirect to " << redirect_info.new_url << std::endl;
}
void OnAuthRequired(net::URLRequest* request, const net::AuthChallengeInfo& auth_info) override {
std::cerr << "auth req" << std::endl;
}
void OnCertificateRequested(net::URLRequest *request, net::SSLCertRequestInfo *cert_request_info) override {
std::cerr << "cert req" << std::endl;
}
void OnSSLCertificateError(net::URLRequest* request, int net_error, const net::SSLInfo& ssl_info, bool fatal) override {
std::cerr << "cert err" << std::endl;
}
void OnResponseStarted(net::URLRequest *request, int net_error) override {
std::cerr << "resp started" << std::endl;
while (true) {
auto n = request->Read(buf_.get(), BUF_SZ);
std::cerr << "resp read " << n << std::endl;
if (n == net::ERR_IO_PENDING)
return;
if (n <= 0) {
OnReadCompleted(request, n);
return;
}
std::cout << std::string(buf_->data(), n) << std::endl;
}
}
void OnReadCompleted(net::URLRequest *request, int bytes_read) override {
std::cerr << "completed" << std::endl;
quit_closure_.Run();
}
private:
base::Closure quit_closure_;
scoped_refptr buf_;
}; All the main logic is in the event handler
OnResponseStarted: the contents of the response are subtracted until an error occurs or there is nothing to read. Since after reading the response you need to complete the application, the delegate must have access to a function that will interrupt the main one Run loop, in this case a callback type is used base::Closure. Now everything is ready to send the request:
MyDelegate delegate(run_loop.QuitClosure());
auto req = ctx->CreateRequest(GURL(args[0]), net::RequestPriority::DEFAULT_PRIORITY, &delegate);
req->Start();
For the request to start processing, you need to run
Run loop:run_loop.Run();The full version can be found on GitHub .
To build and run the application you need to run:
autoninja -C out/Default example
out/Default/example "https://example.com/"
The final
In fact, in Chromium you can find many useful cubes and bricks from which you can build applications. It is constantly evolving, which, on the one hand, is a plus, and on the other hand, regular changes to the API do not let you relax. For example, in the latest release it
base::TaskSchedulerturned into base::ThreadPool, fortunately, without changing the API. PS We are looking for a leading C ++ programmer in our team! If you feel the strength in yourself, then our wishes are described here: team.mail.ru/vacancy/4641/ . There is also a “Respond” button.