Install MacOS High Sierra when only WiFi is at hand
So, I had a situation that made me sweat, because I could not find detailed instructions anywhere. Itself created problems.
I went abroad, with one bag, from the equipment there was only a phone) I thought I would buy a laptop in place, so as not to lug around. As a result, I bought my first, in my opinion a good MacBook Pro 8.2 of 2011, i7-2635QM, DDR3 8GB, 256SSD. Before that, there were ordinary laptops with BIOS with Windows, on which I already ate the dog, I decided to switch to Apple, since I am very pleased with the phone. High Sierra was installed, I don’t remember the version, but not the point. I decided it means that something remains from the previous owner, passwords, etc. I think I’ll reset everything to zero, like on the phone, I assumed I would just go into the settings and choose to erase all the settings and content, but there wasn’t such a function ... Well, I’m still an admin, difficulties do not stop me, I got on the Internet, I started reading how to reset poppy. I found some article, without completely reading, I began to follow the points:
Then I distracted something, when the laptop returned, it was already turned off, I launch it, the apple is gone, the OS has erased, I think fine, now I’ll continue the installation from Recovery mode. I go into Recovery mode, and it’s not the same one, it turns out when I erased the HDD, I erased the Recovery High Sierra area, and the version for my Recovery Lion laptop was downloaded from the Internet. I think okay, there will be a native system, it won’t stupid)) Already on the Internet I found how to install the OS, just in case so as not to mess up again. I click install OS X Lion, go to the authorization point, enter my AppleID and password and here the problems started) First, I have two-factor authentication, the code comes to the phone, and the input window does not appear on the laptop, it just shows that the password is not correct. Here is a message:
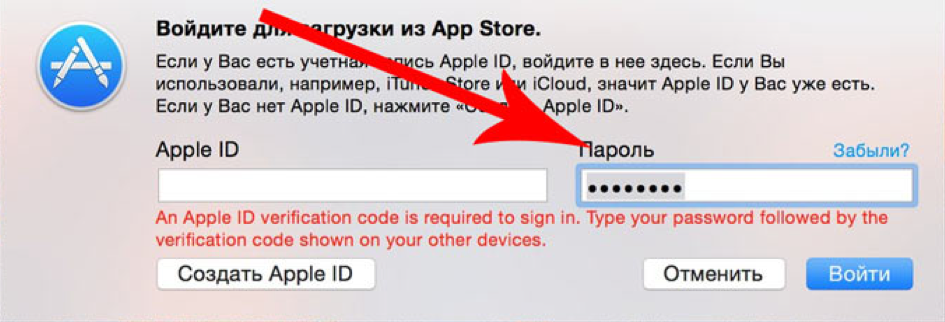
I’m looking again on the Internet, it turns out the problem is not new, and there is a solution, I need to get the code on the phone (https://support.apple.com/ru-ru/HT204974), I did this in Settings → [your name] → Password and security → Get verification code. ”
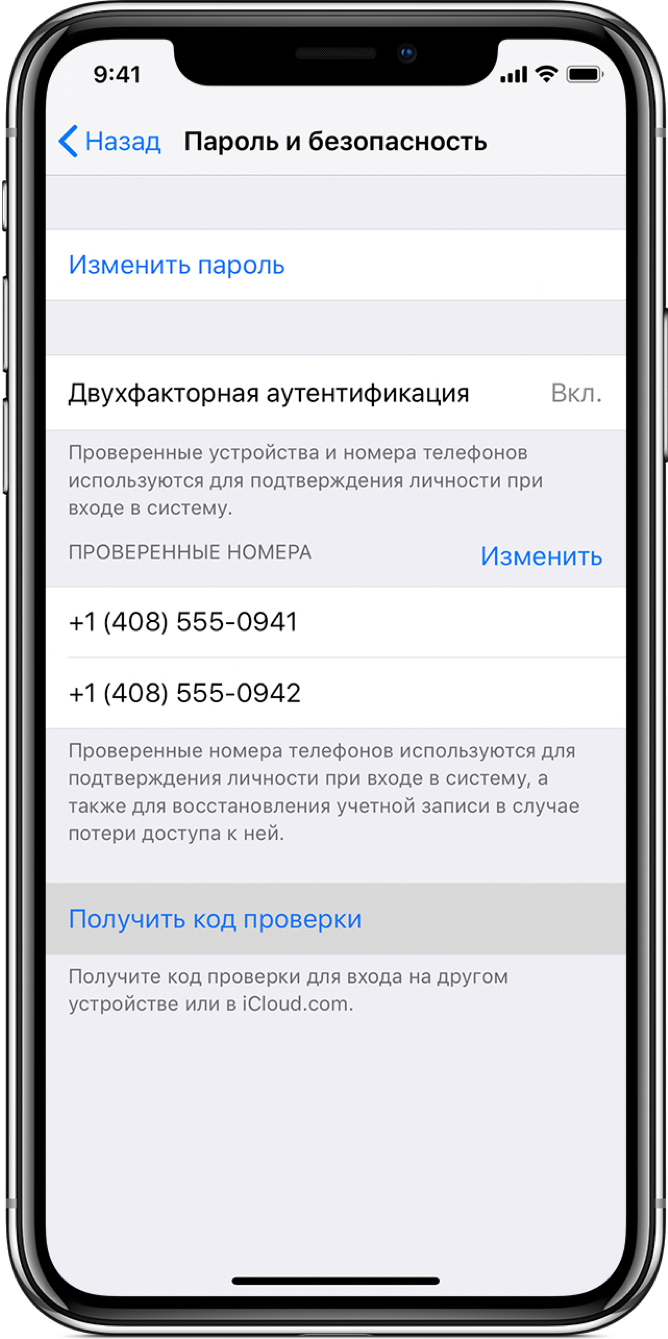
After receiving the verification code, on the laptop you need to enter the AppleID credentials and password again, but the password is already changed. For example, you have a password of 12345678, and the verification code is 333-333, so in the password field you need to enter the password in the form 12345678333333, without spaces and dashes. So, I defeated this problem and am already waiting for the new system to be installed, and here “What a surprise,” again the problem “This item is temporarily unavailable. Please try again later. ”
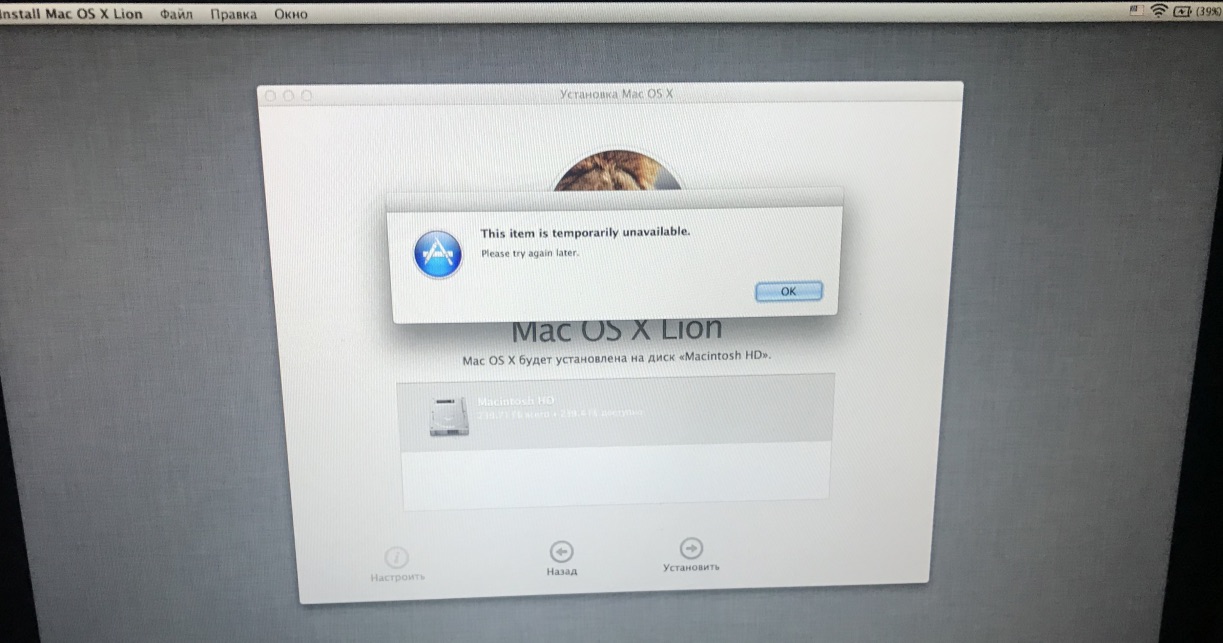
Installation is not possible to continue, I remind you only of Mac and iPhone. I'm looking for how to fix this bug. Only 4 options:
That is, the options end there. I'm already upset, I'm sitting watching how to restore a MacBook, I find options only from under Windows to create USB crutches with MacOS, and try to install. This option did not suit me, firstly, I did not have where to get another computer, and secondly, the option with an unofficial OS did not suit me.
For several days I searched on the Internet how to install MacOS without having a second MacBook or second PC at hand. I re-read a lot of articles, found an article that was very close to me, but the guy had a second laptop, although I still partially used the installation principle (https://habr.com/en/post/199164/). I downloaded the system files from the official Apple website, found official links to installer files on the Internet. I entered the entire address bar manually.
So, what exactly did I do (below I will describe a way how everything can be done without a flash drive, I later figured out when I better figured out the system):
1. I went and bought a 32GB flash drive, 16GB can also (it is needed for the installer )
2. Boot into Internet Recovery mode (Command (⌘) - Option (⌥) - R).
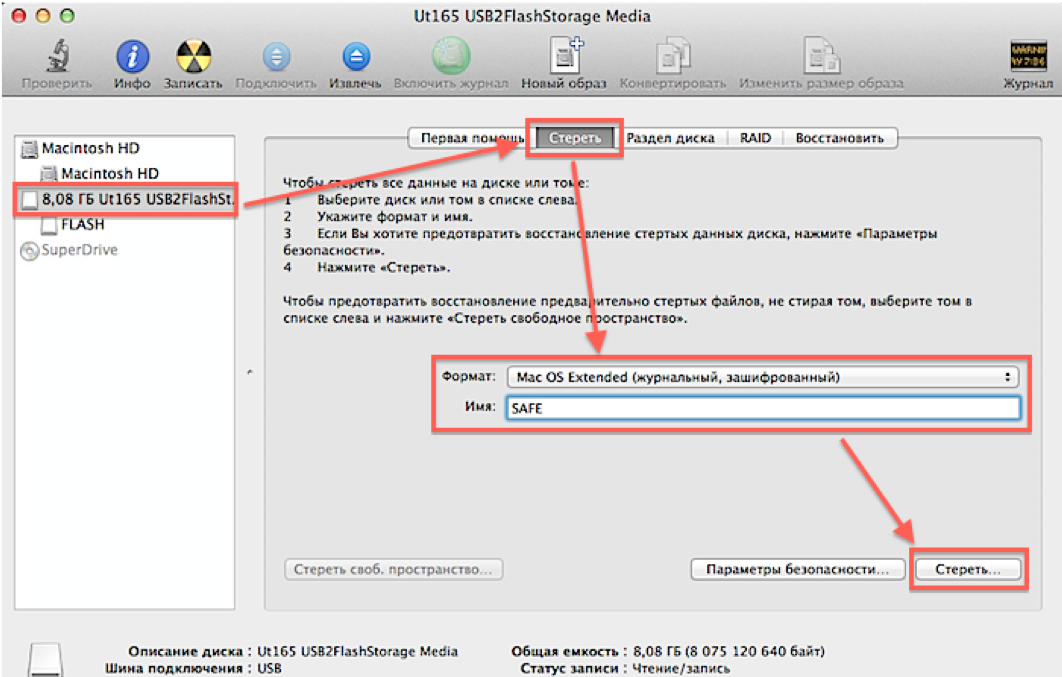
3. Run the “Disk Utility” and format our hard drive (I have the name of the Macintosh HD hard drive) and a USB flash drive with these parameters.
4. Further, it would be possible to download an image from the terminal, but alas, Recovery mode MacOS Lion does not support the elementary “curl” command for downloading files from the Internet, so I found another way.
Open Safari, in the upper menu go to “Safari → Settings → Save downloaded in a folder”, and select our HDD.

5. Close the settings and enter the address in the address bar:
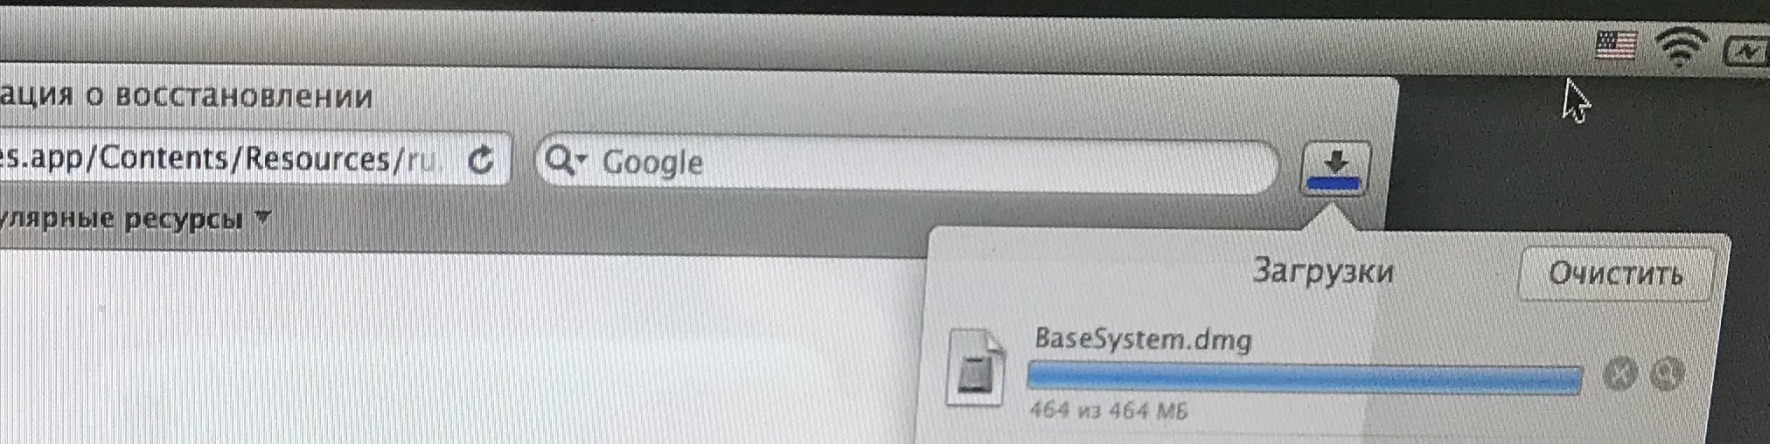
http://swcdn.apple.com/content/downloads/29/03/091-94326/45lbgwa82gbgt7zbgeqlaurw2t9zxl8ku7/BaseSystem.dmg
Press "Enter" and wait for the image to load.
6. Close Safari in the top menu “Safari → End Safari” and open “Utilities → Terminal”
7. Next, mount the image “OS X Base System”. We
enter the following command in the terminal: hdiutil mount / Volumes / Macintosh \ HD / BaseSystem.dmg
(deviating slightly from the topic, a slash from left to right means a space in the name, that is, this command can also be entered like this: hdiutil mount “/ Volumes / Macintosh HD /BaseSystem.dmg ”)
We wait while the image is mounted.
8. Then in the upper menu “Terminal → End Terminal”
9. Open the “Disk Utility” again and restore the bootloader to our flash drive as in the screenshot (Please note that during recovery we select the source image itself, not the partition, and the destination - the flash drive section):

10. Well, we have prepared the flash drive and we can reboot laptop with the Option (⌥) key pressed, our flash drive will appear in the list, boot from it.
11. We get into Recovery mode, but already Mac OS High Sierra, and just select "Install macOS".
Then everything goes fine already, no problems should arise.
An option for those who do not have the opportunity to buy a flash drive.
The actions are identical, only we in the disk utility divide our hard drive into two sections, one we do 16 GB for the installer, it is advisable to add it to the end of the hard drive if there is such a choice. Further, the steps are the same, we download the image to the main partition, mount it, restore it no longer to the USB flash drive, but select the 16 GB partition we created that we created. After rebooting with the Option (⌥) key pressed, our recovery partition will appear in the list, boot from it and install OS on the main partition.
Have a nice day (or night). I hope my article is helpful.
PS: Screenshots were made after installation, because there are already more sections.
I went abroad, with one bag, from the equipment there was only a phone) I thought I would buy a laptop in place, so as not to lug around. As a result, I bought my first, in my opinion a good MacBook Pro 8.2 of 2011, i7-2635QM, DDR3 8GB, 256SSD. Before that, there were ordinary laptops with BIOS with Windows, on which I already ate the dog, I decided to switch to Apple, since I am very pleased with the phone. High Sierra was installed, I don’t remember the version, but not the point. I decided it means that something remains from the previous owner, passwords, etc. I think I’ll reset everything to zero, like on the phone, I assumed I would just go into the settings and choose to erase all the settings and content, but there wasn’t such a function ... Well, I’m still an admin, difficulties do not stop me, I got on the Internet, I started reading how to reset poppy. I found some article, without completely reading, I began to follow the points:
- Enter Recovery Mode (Command (⌘) - R)
- Open Disk Utility
- Select railway and erase it ...
Then I distracted something, when the laptop returned, it was already turned off, I launch it, the apple is gone, the OS has erased, I think fine, now I’ll continue the installation from Recovery mode. I go into Recovery mode, and it’s not the same one, it turns out when I erased the HDD, I erased the Recovery High Sierra area, and the version for my Recovery Lion laptop was downloaded from the Internet. I think okay, there will be a native system, it won’t stupid)) Already on the Internet I found how to install the OS, just in case so as not to mess up again. I click install OS X Lion, go to the authorization point, enter my AppleID and password and here the problems started) First, I have two-factor authentication, the code comes to the phone, and the input window does not appear on the laptop, it just shows that the password is not correct. Here is a message:
I’m looking again on the Internet, it turns out the problem is not new, and there is a solution, I need to get the code on the phone (https://support.apple.com/ru-ru/HT204974), I did this in Settings → [your name] → Password and security → Get verification code. ”
After receiving the verification code, on the laptop you need to enter the AppleID credentials and password again, but the password is already changed. For example, you have a password of 12345678, and the verification code is 333-333, so in the password field you need to enter the password in the form 12345678333333, without spaces and dashes. So, I defeated this problem and am already waiting for the new system to be installed, and here “What a surprise,” again the problem “This item is temporarily unavailable. Please try again later. ”
Installation is not possible to continue, I remind you only of Mac and iPhone. I'm looking for how to fix this bug. Only 4 options:
- I didn’t want to try to use the AppleID with which I first entered this MacBook (I immediately rejected this option, because I was 90% sure that it would not work, either it was not the first owner, or even if there was no sense to enter ... )
- Change the date through the terminal (checked, the date is normal, tried to change the sense, too, zero)
- Through Safari in Recovery mode, log in to iCloud.com under your AppleID and try to continue the installation again. I tried, the Apple website says the browser is not supported
- Internet Recovery, the mode I am in ...
That is, the options end there. I'm already upset, I'm sitting watching how to restore a MacBook, I find options only from under Windows to create USB crutches with MacOS, and try to install. This option did not suit me, firstly, I did not have where to get another computer, and secondly, the option with an unofficial OS did not suit me.
For several days I searched on the Internet how to install MacOS without having a second MacBook or second PC at hand. I re-read a lot of articles, found an article that was very close to me, but the guy had a second laptop, although I still partially used the installation principle (https://habr.com/en/post/199164/). I downloaded the system files from the official Apple website, found official links to installer files on the Internet. I entered the entire address bar manually.
So, what exactly did I do (below I will describe a way how everything can be done without a flash drive, I later figured out when I better figured out the system):
1. I went and bought a 32GB flash drive, 16GB can also (it is needed for the installer )
2. Boot into Internet Recovery mode (Command (⌘) - Option (⌥) - R).
3. Run the “Disk Utility” and format our hard drive (I have the name of the Macintosh HD hard drive) and a USB flash drive with these parameters.
4. Further, it would be possible to download an image from the terminal, but alas, Recovery mode MacOS Lion does not support the elementary “curl” command for downloading files from the Internet, so I found another way.
Open Safari, in the upper menu go to “Safari → Settings → Save downloaded in a folder”, and select our HDD.
5. Close the settings and enter the address in the address bar:
http://swcdn.apple.com/content/downloads/29/03/091-94326/45lbgwa82gbgt7zbgeqlaurw2t9zxl8ku7/BaseSystem.dmg
Press "Enter" and wait for the image to load.
6. Close Safari in the top menu “Safari → End Safari” and open “Utilities → Terminal”
7. Next, mount the image “OS X Base System”. We
enter the following command in the terminal: hdiutil mount / Volumes / Macintosh \ HD / BaseSystem.dmg
(deviating slightly from the topic, a slash from left to right means a space in the name, that is, this command can also be entered like this: hdiutil mount “/ Volumes / Macintosh HD /BaseSystem.dmg ”)
We wait while the image is mounted.
8. Then in the upper menu “Terminal → End Terminal”
9. Open the “Disk Utility” again and restore the bootloader to our flash drive as in the screenshot (Please note that during recovery we select the source image itself, not the partition, and the destination - the flash drive section):
10. Well, we have prepared the flash drive and we can reboot laptop with the Option (⌥) key pressed, our flash drive will appear in the list, boot from it.
11. We get into Recovery mode, but already Mac OS High Sierra, and just select "Install macOS".
Then everything goes fine already, no problems should arise.
An option for those who do not have the opportunity to buy a flash drive.
The actions are identical, only we in the disk utility divide our hard drive into two sections, one we do 16 GB for the installer, it is advisable to add it to the end of the hard drive if there is such a choice. Further, the steps are the same, we download the image to the main partition, mount it, restore it no longer to the USB flash drive, but select the 16 GB partition we created that we created. After rebooting with the Option (⌥) key pressed, our recovery partition will appear in the list, boot from it and install OS on the main partition.
Have a nice day (or night). I hope my article is helpful.
PS: Screenshots were made after installation, because there are already more sections.