Video surveillance on orange pi zero - cheap and not at all angry
Recently I set myself the task of implementing video surveillance with the following characteristics:
To implement this idea, the choice fell on the following components:
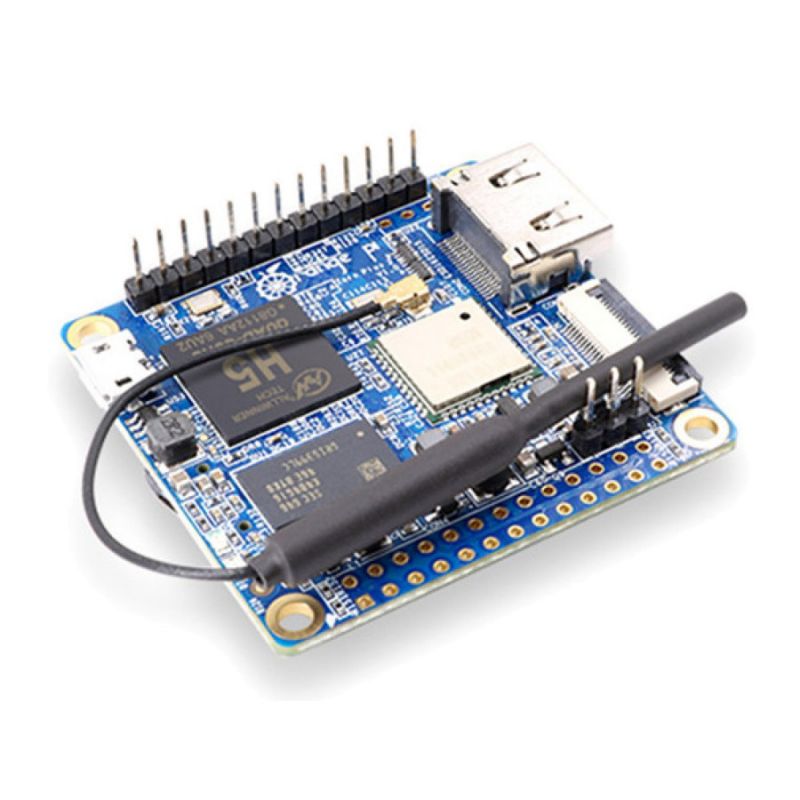
1) The cheapest single-board computer with Wi-Fi on board, on which you can roll some arm linux distribution - for example, my favorite debian. Malinka is a little expensive, but orange pi zero on ebay will cost you only 900 rubles (a few months ago I bought it at all for 700 rubles). Here is a link to ebay - here.
2) Actually, wifi ip-cameras - nowhere without them. Small, domed, ceiling. And at least 720p - usually for video surveillance in an office-porch is no longer required. The issue price is about 1,500 rubles per camera. What far to go, here on aliexpress - here

3) 32 GB microSD card. Why 32, not more or less? Because for my case, you need to be able to rewind the video from two cameras a few days ago. Well, then, another 300-400 rubles.
4) Power adapters for single board and for cameras.
So what has been done. Having received the cherished parcel in the mail, I took out an orange single-payer from there, examined it and first of all I thought - damn it, but there is no video output. How to install debian and video surveillance software and make initial settings? I immediately remembered that on the raspberry there was always an ordinary composite AV, but here it is not. Well, it can’t be that the manufacturer did not leave such an opportunity as to connect via composite - I thought, and went to Google to watch the GPIO pinout. Yeah, the second pin is the earth, and the 9th is tv-out.
Solder the av-socket. Now we will use the AV-> VGA adapter (you guessed it can also be bought on aliexpress, a useful thing) and connect to our monitor. But we will not include anything yet - after all, we have not yet prepared a microsd card.
Go to www.orangepi.organd download the Debian xfce desktop distribution, write it to the card with win32 disk imager or etcher. We stick the USB flash drive into our orange, turn on the monitor, connect the power adapter and ... nothing. This is exactly what newcomers are most likely to encounter - a single-board computer does not boot in any way, but only mockingly glows with a yellow diode. What is it? An incorrectly recorded card (maybe), a non-working single-board card (unlikely, because we just unpacked it), there is no signal from the video output? The most common problem is nutrition. Orange pi, like raspberries and other single-board ones, is very power-hungry - the adapter should be 5 V / 2 A, if the adapter is weak and power sags in the first seconds of switching on a single-board, then it will not work and it won’t work. So use a good powerful power supply, and not recharge from your old android.
We connect a good power adapter, we see how the debian download went. We see the desktop - great! Now you need to configure the device so that it works through Wi-Fi. We go into network connections, create a new Wi-Fi connection, enter our username and password from the home-office Wi-Fi - now the device is on our local network and has Internet access! Now we need to get rid of the monitor.
In order to be able to see the desktop remotely, the vnc viewer program will help us, and for a single-board, vnc server. Usually this thing is already built into that debian, which is distributed by the manufacturer of single-payer data, you just need to configure it - enter authorization parameters, etc. After making sure that we now have access to the desktop inside our local network, we remove the monitor, hide the device in a box / cable channel / somewhere else and configure everything else through the vnc viewer, while sitting at the usual computer.
As a software for video surveillance, zoneminder was chosen. Why exactly him? Free, flexible, easy to configure, available in the arm version for our single board with debian. This software works on php / mysql, so first of all you need to install the necessary packages:
Next, we need to add the line in /etc/apt/sources.list:
We carry out an update:
And finally, for what we all started this:
When the console informed us that zoneminder is installed, let's move on to its configuration. The configuration process is described in detail on the official zoneminder website, it makes no sense to list all of its points in this article, so we’ll decide that the dear reader has done this, and now, if we type in our browser on the computer address_of our single subscriber / zm, we will go to the web-based video surveillance admin panel. Here we need to add the ip-addresses of the cameras, set the parameters for video recording and so on.

Now we can watch video from cameras via the browser from the internal network, both via the wired network and via Wi-Fi.

But the task was to watch video over the Internet from anywhere in the world - and we have not yet implemented this. So let's implement! At least two options come to mind:
Now it remains to add the ability to watch video from the phone. Download for our android application zoneminder client mobile (easily google), and for iphone - Surveillance Pro.

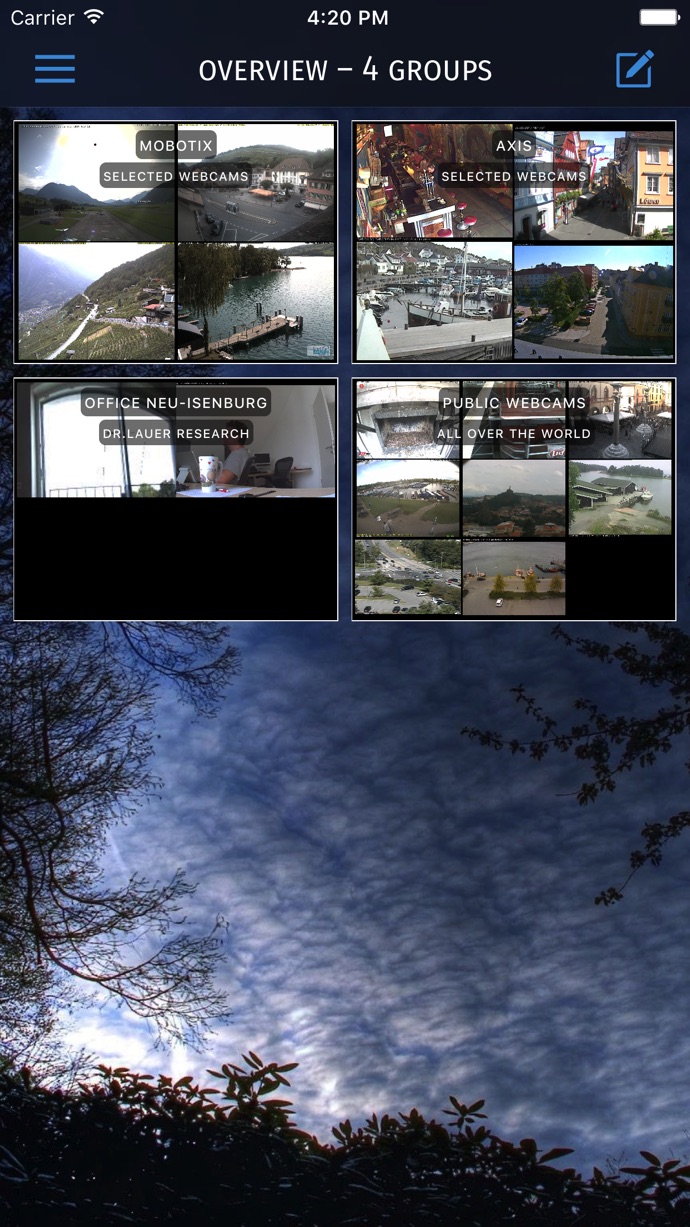
In total, for several thousand rubles we get our own mini-video surveillance server, which can be easily hidden in a cable channel and which consumes electricity for a mere penny, a pair of wireless cameras, and the ability to always watch from a computer or phone from any place where there is Internet access what happens in your office / garage / porch.
- Minimum power consumption
- The minimum size of the device that will receive video from the camera (or multiple cameras). With such a small size that you can, for example, cram it into a 10-10 cm installation box or hide it in a wide cable channel (!)
- IP cameras will be connected via wi-fi, that is, it is impossible to determine who is watching / writing video from them. You can power them from the general network, whether it is access lighting or sockets in the office
- There must be a video recording (in my case - on a microsd card), it must be possible to watch videos over the Internet from anywhere in the world as well as through a mobile application
- Of course, there should be the ability to remotely configure the entire system - add new cameras, copy-delete recordings, have access to all settings
- The minimum cost! But what about? Nowhere without it
To implement this idea, the choice fell on the following components:
1) The cheapest single-board computer with Wi-Fi on board, on which you can roll some arm linux distribution - for example, my favorite debian. Malinka is a little expensive, but orange pi zero on ebay will cost you only 900 rubles (a few months ago I bought it at all for 700 rubles). Here is a link to ebay - here.
2) Actually, wifi ip-cameras - nowhere without them. Small, domed, ceiling. And at least 720p - usually for video surveillance in an office-porch is no longer required. The issue price is about 1,500 rubles per camera. What far to go, here on aliexpress - here
3) 32 GB microSD card. Why 32, not more or less? Because for my case, you need to be able to rewind the video from two cameras a few days ago. Well, then, another 300-400 rubles.
4) Power adapters for single board and for cameras.
So what has been done. Having received the cherished parcel in the mail, I took out an orange single-payer from there, examined it and first of all I thought - damn it, but there is no video output. How to install debian and video surveillance software and make initial settings? I immediately remembered that on the raspberry there was always an ordinary composite AV, but here it is not. Well, it can’t be that the manufacturer did not leave such an opportunity as to connect via composite - I thought, and went to Google to watch the GPIO pinout. Yeah, the second pin is the earth, and the 9th is tv-out.
Solder the av-socket. Now we will use the AV-> VGA adapter (you guessed it can also be bought on aliexpress, a useful thing) and connect to our monitor. But we will not include anything yet - after all, we have not yet prepared a microsd card.
Go to www.orangepi.organd download the Debian xfce desktop distribution, write it to the card with win32 disk imager or etcher. We stick the USB flash drive into our orange, turn on the monitor, connect the power adapter and ... nothing. This is exactly what newcomers are most likely to encounter - a single-board computer does not boot in any way, but only mockingly glows with a yellow diode. What is it? An incorrectly recorded card (maybe), a non-working single-board card (unlikely, because we just unpacked it), there is no signal from the video output? The most common problem is nutrition. Orange pi, like raspberries and other single-board ones, is very power-hungry - the adapter should be 5 V / 2 A, if the adapter is weak and power sags in the first seconds of switching on a single-board, then it will not work and it won’t work. So use a good powerful power supply, and not recharge from your old android.
We connect a good power adapter, we see how the debian download went. We see the desktop - great! Now you need to configure the device so that it works through Wi-Fi. We go into network connections, create a new Wi-Fi connection, enter our username and password from the home-office Wi-Fi - now the device is on our local network and has Internet access! Now we need to get rid of the monitor.
In order to be able to see the desktop remotely, the vnc viewer program will help us, and for a single-board, vnc server. Usually this thing is already built into that debian, which is distributed by the manufacturer of single-payer data, you just need to configure it - enter authorization parameters, etc. After making sure that we now have access to the desktop inside our local network, we remove the monitor, hide the device in a box / cable channel / somewhere else and configure everything else through the vnc viewer, while sitting at the usual computer.
As a software for video surveillance, zoneminder was chosen. Why exactly him? Free, flexible, easy to configure, available in the arm version for our single board with debian. This software works on php / mysql, so first of all you need to install the necessary packages:
sudo apt-get install php5 mysql-server php-pear php5mysql php5-gdNext, we need to add the line in /etc/apt/sources.list:
deb http://ftp.debian.org/debian jessie-backports mainWe carry out an update:
sudo apt-get updateAnd finally, for what we all started this:
sudo apt-get install zoneminderWhen the console informed us that zoneminder is installed, let's move on to its configuration. The configuration process is described in detail on the official zoneminder website, it makes no sense to list all of its points in this article, so we’ll decide that the dear reader has done this, and now, if we type in our browser on the computer address_of our single subscriber / zm, we will go to the web-based video surveillance admin panel. Here we need to add the ip-addresses of the cameras, set the parameters for video recording and so on.
Now we can watch video from cameras via the browser from the internal network, both via the wired network and via Wi-Fi.
But the task was to watch video over the Internet from anywhere in the world - and we have not yet implemented this. So let's implement! At least two options come to mind:
- Enter through the remote desktop like a timeline. Alas, the timeline more or less correctly works only on "raspberries", here even with a tambourine and spells you can’t achieve anything
- We have a dedicated ip, go to the router settings, forward the necessary ports, configure the virtual server, now we can see the zoneminder admin panel, for example, at our_white_ip : 123. This is good, but what if there is no dedicated ip?
- If there is no dedicated ip, then recall vpn and dyndns. A large number of articles is devoted to this, including on Habré; look and find information
Now it remains to add the ability to watch video from the phone. Download for our android application zoneminder client mobile (easily google), and for iphone - Surveillance Pro.
In total, for several thousand rubles we get our own mini-video surveillance server, which can be easily hidden in a cable channel and which consumes electricity for a mere penny, a pair of wireless cameras, and the ability to always watch from a computer or phone from any place where there is Internet access what happens in your office / garage / porch.