Setting up automatic testing of a hybrid application
In this article I want to share my experience in solving the problem of launching automated testing of a mobile application on Android.
Automate hybrid mobile app testing.
About the application to be tested:
Perhaps these are the key points that influenced the configuration of the PC to run the tests.
We will use Appium as an automated testing tool.
In short, this is a tool that allows you to use the server to send commands to the client what to do and why.
You can get full information on the developer's website .
Let's get started.
In a place convenient for you on the disk, create the folder “Appium automation”.
For example:
Further in this folder (C: \ Appium automation) create a few more folders:
If any of the applications / components you have installed, following the instructions you just understand the logic of the relationship, i.e. it’s not necessary to reinstall everything.
We follow the link and click Download:
Next, we get to the download page for different OSs, because I have Windows 10 x64, select:

After downloading the file, open it and unpack the .exe-shnik (select the path during installation) to the folder:
(version number at the time of download may vary)
To download, follow the link .
Install in the folder:
During the first launch of Android Studio, you will need to configure the program :
Create a new project in Android Studio:
Install the SDK Tools
In Android Studio, select Tools - SDK Manager.
In the window that appears, the Android SDK section will be selected.
On the SDK Platforms tab, select the version of Android on which you will conduct testing.
And, on the SDK Tools, select the items:
Click Apply or Ok and wait for the download and installation of the components to finish.

Right-click on “My Computer” - “Properties” - “Advanced System Settings”.
In the window that opens, on the “Advanced” tab, select “Environment variables ...”
In the “System variables” section, create a new variable.


First variable. Variable
name - JAVA_HOME Variable
value -
(the path where you installed jdk in step 1, in some cases it is possible that the Program Files folder will be called Program Files (x86))
The second variable
The name of the variable is ANDROID_HOME
The value of the variable is
Addition of the Path variable
In the list of system variables, find the Path variable and click “Change ...”.
Click “Create” in the window that appears and add the variables:
As a result, you should get 4 new variables, after which you need to click Ok.

Download Appium:

Run the downloaded .exe file and install Appium on your PC. During the installation process, you will only need to choose to install globally or to a specific user. I installed globally since it doesn't matter to me.
Downloading the Appium libraries:

Move the downloaded .jar file to the folder

Move the downloaded .jar file to the folder:

Move the downloaded .jar file to the folder:
Download the Selenium libraries:

Unpack the downloaded archive into the folder:
To download, go to the link https://www.jetbrains.com/idea/download
Near the Community version and click Download (this is a free version, but it is enough for automatic tests).
The download page has a comparison of Community and Ultimate versions.
If you have a desire to buy the Ultimate version, you can safely do it! But, once again, the Community version will be enough.
Run the downloaded .exe file and install (just click Next until the program starts to install)
The first launch of IntelliJ IDEA
Creating a project in IntelliJ IDEA
Settings for the created project.
Choose File - Project Structure ...
In the window that appears, select Modules - Dependencies - “+" - JARs or directories ...

And add all previously loaded libraries to the project.

Click OK.
Now the project is ready to run tests.
Real device You
need a USB cable to connect the device to a computer and directly the smartphone itself.
To get started, go to “Settings” - “About phone” in a smartphone.
Further, on different smartphones, everything is different, but the bottom line is, you need to find the “Serial number” and click on it 5-7 times until the toaster appears that “You are now a developer” (the notification text may differ from model to model)
After this manipulation You’ll see the section “For Developers” in the phone’s settings. It can also hide from model to model in different sections, for example, somewhere it will be in “Settings” - “For Developers”, and somewhere “Settings” - “Special Features” - “For Developers”, etc. .
You need to go to the “For Developers” section and activate “USB Debugging”.
When connecting the smartphone via USB, you will see a message about debugging permission via USB, you can check “Trust this device” and click “OK”, then this message will not appear again the next time the phone is connected to this PC.
All your smartphone is ready to work in automatic tests.
Virtual device
You can also create a virtual device through Android Studio, then you will not need to connect the real device to the computer.
But on a virtual device, tests can work out more slowly than on a real one.
In order to create it, open Android Studio, then:
After the done manipulations in the section “Tools” - “AVD Manager” you will see the created device. Using the green “Play” icon, you can start the device.
How to check that your PC saw the connected device?
Run the command line (“Start” - “Utilities - Windows” - “Command line”)
and enter the command adb devices.
As a result, if the device is connected with the “USB Debugging” function enabled, you will receive the connected device and its UDID (serial number):
Add import.
We register the server and where it will have to send requests.
Install Android Driver:
We set the parameters (properties):
The name of the device (you can find it for the real device in “Settings” - “About Phone”, and for the virtual “Tools” - “AVD Manager” - the “Name” field):
Link to the APK that will need to be launched (.apk must be a debug build so that you and appium can inspect applications):
Launch the Appium Driver:
This code will be enough to launch your application on the connected device.
Additional commands
In order to pause the project for a certain amount of time, for example 8 seconds. (the value is indicated in milliseconds). It may be necessary if you need to wait for the page or application to load:
We get ContextHandles, where we understand what we are working with now (NATIVE_APP or WEBVIEW):
Assign Context to the last value received in the array. This will allow you to correctly switch to WEBVIEW, tk. default Context = NATIVE_APP:
Managed application interface
Since we are working with a hybrid application, i.e. application elements are rendered in WEBVIEW, and not in NATIVE_APP, then most often we will have to use one type of search for the findElementByCssSelector element.
Click on the OK button:
- where .button-ok is the element class. You can also use the element ID exactly.
We send the value in the field, for example, you have a search and you want to send the value “Cinema” there.
Click to find:
In this way, you can already control your application.
Sooner or later, you will run into that, not all content is placed on the smartphone screen, i.e. you need to scroll. If an element is not visible on the screen during the test, Appium will throw an error that it does not see the element and most likely all further testing will be covered with errors.
In order to scroll through the screen, you can execute the JS function scrollIntoView in Java.
In my case, this will allow you to go down to the OK button.
It may be an incident that you kind of wrote everything correctly, but the scrolling is not performed.
Try to bind to other elements on the screen and first it is better to do this through the console in Chrome - Inspect, so you are guaranteed to understand that when you bind to this element, the scroll will work.
You can go to step 8 and if everything works for you, then this is great!
But I had another pitfall.
His name is Crosswalk Browser.
When I started the project, I constantly poured an error:
So, not one test was not performed.
What you need to check in this case:
After these manipulations, add one more capabilities to your project.
- where C: \\ node_modules \\ appium-with-crosswalk-fix \\ chromedriver \\ 2.28 \\ chromedriver.exe
is the path to the fixed chromedriver
Total your project will look like this:
Such a project:
There are several main points for a project to start:
Well, then you are free to test settings, the necessary information is on the official website of the developer .
Appium can also be used to test iOS applications.
I wanted to write briefly, but it turned out as always.
Thanks to everyone who read to the end, I hope it was useful to you!
What I will tell about:
- How to run an automated testing environment using Appium
(PC OS - Windows 10) - How to avoid some errors that occur when trying to run tests in a hybrid application
- Some basic commands to run the simplest tests. We will use Java and JavaScript
Task
Automate hybrid mobile app testing.
About the application to be tested:
| Platform | Android |
| Framework | Angular, Cordova, Ionic |
| Browser | Crosswalk |
Perhaps these are the key points that influenced the configuration of the PC to run the tests.
Test environment
We will use Appium as an automated testing tool.
In short, this is a tool that allows you to use the server to send commands to the client what to do and why.
You can get full information on the developer's website .
Let's get started.
In a place convenient for you on the disk, create the folder “Appium automation”.
For example:
C:\Appium automationFurther in this folder (C: \ Appium automation) create a few more folders:
| Android SDK | C: \ Appium automation \ Android SDK |
| Android Studio | C: \ Appium automation \ Android Studio |
| APK | C: \ Appium automation \ APK |
| Appium lib | C: \ Appium automation \ Appium Lib |
| Selenium lib | C: \ Appium automation \ Selenium Lib |
If any of the applications / components you have installed, following the instructions you just understand the logic of the relationship, i.e. it’s not necessary to reinstall everything.
Filling created folders and loading other components
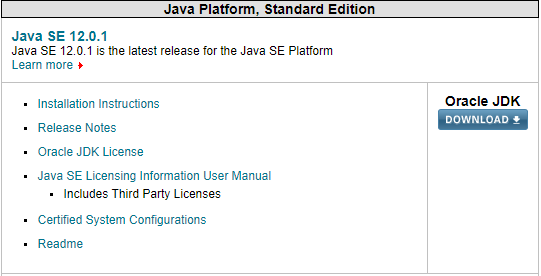
1. Java SDK
We follow the link and click Download:
Next, we get to the download page for different OSs, because I have Windows 10 x64, select:
After downloading the file, open it and unpack the .exe-shnik (select the path during installation) to the folder:
C:\Program Files\Java\jdk-12.0.1(version number at the time of download may vary)
2. Android Studio and Android SDK
To download, follow the link .
Install in the folder:
C:\Appium automation\Android StudioDuring the first launch of Android Studio, you will need to configure the program :
- Instal Type select Custom, click Next
- Choose a theme that you like, click Next
- Android SDK Location, specify C: \ Appium automation \ Android SDK, click Next
- Emulator Settings can be left on Recommended, click Next
- Click Finish and wait for the installation process to complete.
Create a new project in Android Studio:
- Click Start a new Android Studio project
- Indicate the Name, Path to your project, or you can change nothing and leave the proposed one, click Next
- In the Phone and Tablet drop-down list, select “API 23: Android 6.0 (Marshmallow), click Next
- Choose Empty Activity, click Next
- Click Next
- Click Finish
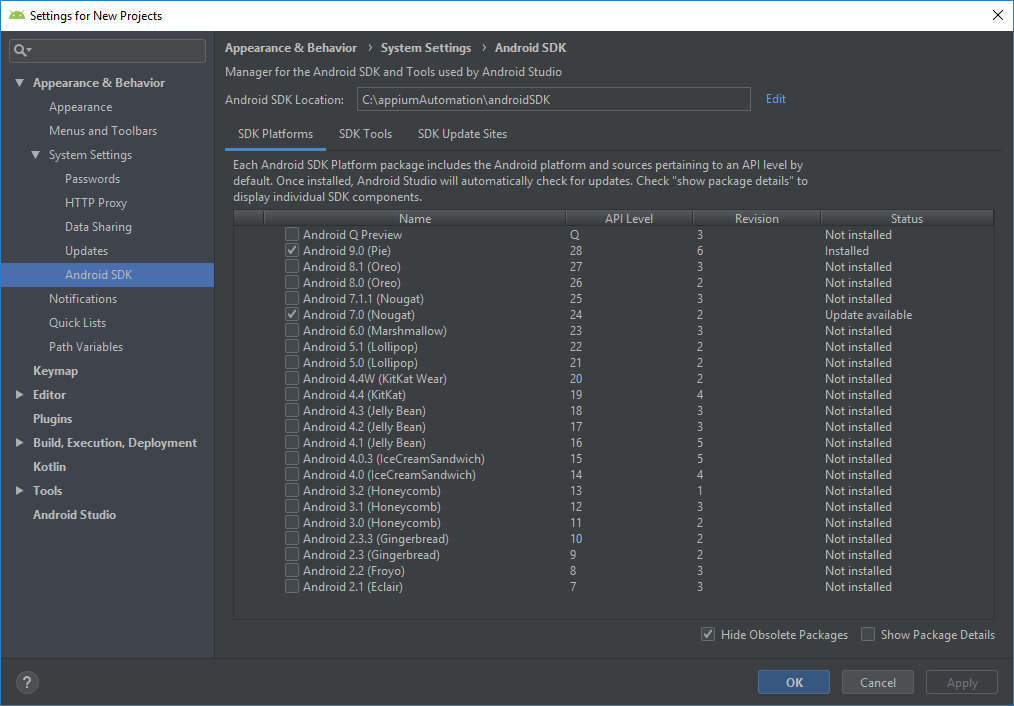
Install the SDK Tools
In Android Studio, select Tools - SDK Manager.
In the window that appears, the Android SDK section will be selected.
On the SDK Platforms tab, select the version of Android on which you will conduct testing.
And, on the SDK Tools, select the items:
- Android SDK Build-Tools
- Android Emulator
- Android SDK Platform-Tools
- Android SDK Tools
- Documentation for Android SDK
- Support repository
Click Apply or Ok and wait for the download and installation of the components to finish.
3. Create PATH variables
Right-click on “My Computer” - “Properties” - “Advanced System Settings”.
In the window that opens, on the “Advanced” tab, select “Environment variables ...”
In the “System variables” section, create a new variable.
First variable. Variable
name - JAVA_HOME Variable
value -
C:\Program Files\Java\jdk-12.0.1(the path where you installed jdk in step 1, in some cases it is possible that the Program Files folder will be called Program Files (x86))
The second variable
The name of the variable is ANDROID_HOME
The value of the variable is
C:\Appium automation\Android SDKAddition of the Path variable
In the list of system variables, find the Path variable and click “Change ...”.
Click “Create” in the window that appears and add the variables:
- % ANDROID_HOME% \ emulator
- % ANDROID_HOME% \ platform-tools
- % ANDROID_HOME% \ tools
- % ANDROID_HOME% \ tools \ bin
As a result, you should get 4 new variables, after which you need to click Ok.
4. Appium
Download Appium:
- We follow the link http://appium.io/
- Click Download
- We select Appium-windows-1.13.0.exe (the version number at the time of loading may vary)
Run the downloaded .exe file and install Appium on your PC. During the installation process, you will only need to choose to install globally or to a specific user. I installed globally since it doesn't matter to me.
Downloading the Appium libraries:
- We follow the link http://appium.io/downloads.html
- Choose a language, in my case Java
- Click the download icon
Move the downloaded .jar file to the folder
C:\Appium automation\Appium Lib- We follow the link https://mvnrepository.com/artifact/junit/junit
- We select the latest stable version (I have it 4.12)
- Click to download the .jar file
Move the downloaded .jar file to the folder:
C:\Appium automation\Appium Lib- We follow the link https://mvnrepository.com/artifact/org.hamcrest/hamcrest-core
- Choose the latest stable version (I use 1.3)
- Click to download the .jar file
Move the downloaded .jar file to the folder:
C:\Appium automation\Appium LibDownload the Selenium libraries:
- We follow the link https://www.seleniumhq.org/download
- Choose a language, in my case Java
- Click Download
Unpack the downloaded archive into the folder:
C:\Appium automation\Selenium Lib5. IntelliJ IDEA Community Edition
To download, go to the link https://www.jetbrains.com/idea/download
Near the Community version and click Download (this is a free version, but it is enough for automatic tests).
The download page has a comparison of Community and Ultimate versions.
If you have a desire to buy the Ultimate version, you can safely do it! But, once again, the Community version will be enough.
Run the downloaded .exe file and install (just click Next until the program starts to install)
The first launch of IntelliJ IDEA
- Select “Do not import settings”
- We accept the license agreement
- Choose a topic
- Click Next
- Click Start using IntelliJ IDEA
Creating a project in IntelliJ IDEA
- Choose Create New Project
- Specify the path to the Java SDK
- Click New ...
- Specify the path to the previously loaded Java SDK C: \ Program Files \ Java \ jdk-12.0.1
- Click Next
- Check the box “Create project from template”
- Click Next
- Specify the project name and location to save
- Click Finish
Settings for the created project.
Choose File - Project Structure ...
In the window that appears, select Modules - Dependencies - “+" - JARs or directories ...
And add all previously loaded libraries to the project.
Click OK.
Now the project is ready to run tests.
6. Android device setup
Real device You
need a USB cable to connect the device to a computer and directly the smartphone itself.
To get started, go to “Settings” - “About phone” in a smartphone.
Further, on different smartphones, everything is different, but the bottom line is, you need to find the “Serial number” and click on it 5-7 times until the toaster appears that “You are now a developer” (the notification text may differ from model to model)
After this manipulation You’ll see the section “For Developers” in the phone’s settings. It can also hide from model to model in different sections, for example, somewhere it will be in “Settings” - “For Developers”, and somewhere “Settings” - “Special Features” - “For Developers”, etc. .
You need to go to the “For Developers” section and activate “USB Debugging”.
When connecting the smartphone via USB, you will see a message about debugging permission via USB, you can check “Trust this device” and click “OK”, then this message will not appear again the next time the phone is connected to this PC.
All your smartphone is ready to work in automatic tests.
Virtual device
You can also create a virtual device through Android Studio, then you will not need to connect the real device to the computer.
But on a virtual device, tests can work out more slowly than on a real one.
In order to create it, open Android Studio, then:
- “Tools” - “AVD Manager” - “+ Create Virtual Device ...”
- Choose a device, click Next
- Choose the desired version of Android, click Next
- Specify the name of the device, click Finish
After the done manipulations in the section “Tools” - “AVD Manager” you will see the created device. Using the green “Play” icon, you can start the device.
How to check that your PC saw the connected device?
Run the command line (“Start” - “Utilities - Windows” - “Command line”)
and enter the command adb devices.
As a result, if the device is connected with the “USB Debugging” function enabled, you will receive the connected device and its UDID (serial number):
List of devices attached
UDID   device
7. We are writing a project
Add import.
package name;
import java.util.*;
import io.appium.java_client.android.AndroidDriver;
import io.appium.java_client.android.AndroidElement;
import io.appium.java_client.remote.MobileCapabilityType;
import org.openqa.selenium.*;
import org.openqa.selenium.remote.DesiredCapabilities;
import org.openqa.selenium.JavascriptExecutor;
import java.net.MalformedURLException;
import java.net.URL;
import java.util.concurrent.TimeUnit;
We register the server and where it will have to send requests.
Install Android Driver:
AndroidDriver<AndroidElement> driver = null;We set the parameters (properties):
DesiredCapabilities capabilities = new DesiredCapabilities();The name of the device (you can find it for the real device in “Settings” - “About Phone”, and for the virtual “Tools” - “AVD Manager” - the “Name” field):
capabilities.setCapability(MobileCapabilityType.DEVICE_NAME, "MyPhone"); Link to the APK that will need to be launched (.apk must be a debug build so that you and appium can inspect applications):
capabilities.setCapability(MobileCapabilityType.APP, "C:\\Appium automation\\APK\\My-debug-Apk.apk"); Launch the Appium Driver:
try {
            driver = new AndroidDriver<>(new URL("http://127.0.0.1:4723/wd/hub"), capabilities);
            driver.manage().timeouts().implicitlyWait(10, TimeUnit.SECONDS);
        } catch (MalformedURLException e) {
            System.out.println(e.getMessage());
        }
This code will be enough to launch your application on the connected device.
Additional commands
In order to pause the project for a certain amount of time, for example 8 seconds. (the value is indicated in milliseconds). It may be necessary if you need to wait for the page or application to load:
Thread.sleep(8000);We get ContextHandles, where we understand what we are working with now (NATIVE_APP or WEBVIEW):
Set<String> contextNames = driver.getContextHandles();
        for (String contextName : contextNames) {
            System.out.println(contextName);
        }
Assign Context to the last value received in the array. This will allow you to correctly switch to WEBVIEW, tk. default Context = NATIVE_APP:
driver.context((String) contextNames.toArray()[contextNames.toArray().length - 1]);Managed application interface
Since we are working with a hybrid application, i.e. application elements are rendered in WEBVIEW, and not in NATIVE_APP, then most often we will have to use one type of search for the findElementByCssSelector element.
Click on the OK button:
driver.findElementByCssSelector(".button-ok").click();- where .button-ok is the element class. You can also use the element ID exactly.
We send the value in the field, for example, you have a search and you want to send the value “Cinema” there.
driver.findElementByCssSelector(".search-input").sendKeys("Кино");Click to find:
driver.findElementByCssSelector(".search-button").click();In this way, you can already control your application.
Sooner or later, you will run into that, not all content is placed on the smartphone screen, i.e. you need to scroll. If an element is not visible on the screen during the test, Appium will throw an error that it does not see the element and most likely all further testing will be covered with errors.
In order to scroll through the screen, you can execute the JS function scrollIntoView in Java.
((JavascriptExecutor) driver).executeScript("document.querySelector('.button-ok').scrollIntoView({block: \"end\", behavior: \"smooth\"});");In my case, this will allow you to go down to the OK button.
It may be an incident that you kind of wrote everything correctly, but the scrolling is not performed.
Try to bind to other elements on the screen and first it is better to do this through the console in Chrome - Inspect, so you are guaranteed to understand that when you bind to this element, the scroll will work.
You can go to step 8 and if everything works for you, then this is great!
But I had another pitfall.
His name is Crosswalk Browser.
When I started the project, I constantly poured an error:
“Make sure the app has its webview configured for debugging”So, not one test was not performed.
What you need to check in this case:
- make sure you have a debug build
- make sure that debug build allows Inspect-a application
- install fixed chromedriver
- follow the link https://github.com/blutter/appium-crosswalk-fix
- installation will be via npm so install it on your PC in advance ( https://www.npmjs.com/get-npm )
After these manipulations, add one more capabilities to your project.
capabilities.setCapability("chromedriverExecutable", "C:\\node_modules\\appium-with-crosswalk-fix\\chromedriver\\2.28\\chromedriver.exe");- where C: \\ node_modules \\ appium-with-crosswalk-fix \\ chromedriver \\ 2.28 \\ chromedriver.exe
is the path to the fixed chromedriver
Total your project will look like this:
package name;
import java.util.*;
import io.appium.java_client.android.AndroidDriver;
import io.appium.java_client.android.AndroidElement;
import io.appium.java_client.remote.MobileCapabilityType;
import org.openqa.selenium.*;
import org.openqa.selenium.remote.DesiredCapabilities;
import org.openqa.selenium.JavascriptExecutor;
import java.net.MalformedURLException;
import java.net.URL;
import java.util.concurrent.TimeUnit;
publicclassMain{
publicstaticvoidmain(String[] args)throws InterruptedException {
            AndroidDriver<AndroidElement> driver = null;
            DesiredCapabilities capabilities = new DesiredCapabilities();
            capabilities.setCapability(MobileCapabilityType.DEVICE_NAME, "MyPhone");
            capabilities.setCapability(MobileCapabilityType.APP, "C:\\Appium automation\\APK\\My-debug-apk.apk");
            capabilities.setCapability("chromedriverExecutable", "C:\\node_modules\\appium-with-crosswalk-fix\\chromedriver\\2.28\\chromedriver.exe");
            try {
                        driver = new AndroidDriver<>(new URL("http://127.0.0.1:4723/wd/hub"), capabilities);
                        driver.manage().timeouts().implicitlyWait(10, TimeUnit.SECONDS);
            } catch (MalformedURLException e) {
                        System.out.println(e.getMessage());
            }
            Set<String> contextNames = driver.getContextHandles();
                    for (String contextName : contextNames) {
                        System.out.println(contextName);
                    }
            driver.context((String) contextNames.toArray()[contextNames.toArray().length - 1]);
            Thread.sleep(8000);
            driver.findElementByCssSelector(".search-input").sendKeys("Кино");
            driver.findElementByCssSelector(".search-button").click();
}
Such a project:
- Install your application on the device.
- Find the search field on the application page
- Will bring there the meaning of “Cinema”
- Click on the “Search” button
8. We start the project
There are several main points for a project to start:
- Launch Appium server (item 4)
- Use the shortcut to launch Appium
- Click “Start server”
- Connect the device to a PC or launch a virtual device (item 6)
- Set up a project (p. 5 and p. 7)
- Click Run (or on the IntelliJ IDEA toolbar, or Run - Run 'Main')
- Enjoy the result
Well, then you are free to test settings, the necessary information is on the official website of the developer .
Appium can also be used to test iOS applications.
I wanted to write briefly, but it turned out as always.
Thanks to everyone who read to the end, I hope it was useful to you!