May 21, 2019 at 19:04
How did I take data from a BLE thermometer from Xiaomi
Background: as one of my hobbies, I had a “Smart Home”. I want beautiful devices, but I also want freedom and privacy. Therefore, I am engaged in crossbreeding Xiaomi uzhik with the hedgehog Home Assistant .
To maintain a comfortable environment, we need to know what is going on at home. In short, sensors are needed. Xiaomi has many different ones, but most of all I liked the square thermometer on electronic ink. But he’s not at all smart in the sense that he doesn’t provide any interfaces at all except the graphical one - neither WiFi, nor BLE, nor ZigBee. But CR2032 batteries last for several years. There is also a version with bluetooth, but it is a little less elegant - a kind of thick pancake.
And at the beginning of spring, a new temperature / humidity sensor was announced, on electronic ink, with BLE, and even with a clock. I don’t really need a watch, but everything else immediately suppressed all rational arguments and the thermometer was ordered at one of the popular online stores, on pre-order. It rode, it rode, and finally arrived.
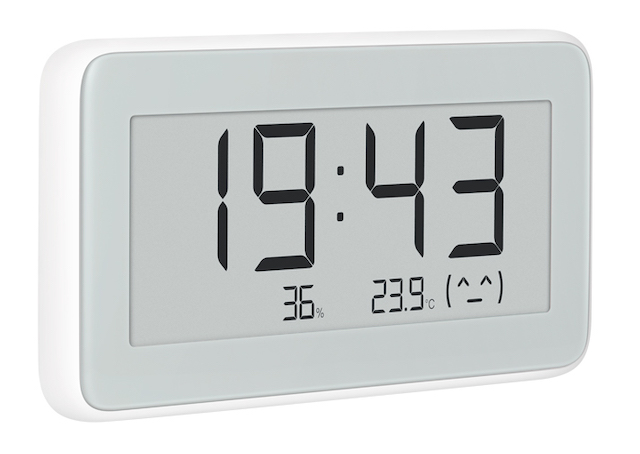
The sensor was added to the MiHome application without problems (I have an English interface everywhere, with the Russian version of MiHome, they say, there were translation difficulties). Shows the current values and the history of changes in readings.
But with the integration in the Home Assistant difficulties have occurred. The existing component for the temperature sensor in no way wanted to take data from the device and complained about the incorrect data format. Well, there’s nothing to do, we take out a shovel and start digging.
The first thought was to get acquainted with the device of the BLE protocol, but after evaluating the size of the documentation, it was decided to switch to the popular poke method.
To start, open the terminal on ubuntu and run bluetoothctl. We see the following:
MJ_HT_V1 is an old temperature sensor, LYWSD02 is a new one. The difference in the model naming format is somewhat alarming.
Then you need to somehow read, and what kind of data in general can be obtained from us. He opened the sources of the mitemp library , which is used in the Home Assistant to receive data from the old sensor. There I found that the blewrap library is used, which, in turn, is a wrapper on two Python libraries for working with BLE. I don’t need so many layers, we will use bluepy . There is documentation, it is not a lot and not a little, we read and write a script that passes through all the data fields that are on the device.
In general, everything is simple - a BLE device provides a set of services, each of which consists of a set of characteristics. Each characteristic can be one of 8 types, for one characteristic you can specify several types at the same time. Services and features are identified in two ways - an address in the form of a HEX value and a UUID. I’m more familiar with working with UUID.
So, I considered all the specifications for both sensors, looked at them and realized that again devices from completely different manufacturers are sold under the Xiaomi brand. Among the values of the old sensor, “Cleargrass Inc” was found, and in the new, “miaomiaoce.com”. The structure of services and characteristics of these two sensors is also completely different, and the list of characteristics of the new sensor is twice as long. Then it became clear that you need to write your own library for integration with the sensor (no, of course I googled at first, maybe there is something useful on request LYWSD02, but I didn’t give anything sensible google).
Among the available types of characteristics, in addition to READ, there are also WRITE and NOTIFY. WRITE - to send data to the device, and NOTIFY - to receive data. There is also WRITE NOTIFY at the same time - the device will only send data after it is subscribed by sending the desired byte with the WRITE command.
Attempts to do something with my hands did not bring any results, the first line of despair was reached, but at that moment I read articles about crafts based on chips from Nordic Semiconductors and put the nRF Connect program on my smartphone . With its help, I was able to subscribe to all the services that the device provided, saved the answer logs and began to try to understand what lies in them. These triple arrows activate the subscription.

The peculiarity of the old sensor was that the data on temperature and humidity came in the form of a UTF string, while the new one returned everything in binary form.
To receive data from the sensor, you need to send a subscription request. In the mitemp library, two bytes were sent for the characteristic for this, but it is not clear where to get it. Here I looked at how the data structure for the old sensor in nRF Connect looks and noticed that the desired address is specified for the characteristic with data, like a descriptor. Then I began to read the documentation for bluepy again and realized that the descriptor address can easily be obtained from the characteristics object. It remains only to write a class with a callback method, which will receive data from the notification.
Fortunately, only three characteristics were marked as WRITE NOTIFY, while the data came with different frequencies and, um ..., visual features.
The first request sent immediately a large footcloth of data, and then stuck. In this case, the first byte was a monotonously increasing number. This seems to be an accumulated history of averages.
The second and third were sent periodically, but looking closely, I saw that one of them does not change, and in the data of the second only one byte is changed. Well, then this is the current time (I remind you that this thermometer has a clock. There should be a clock in any self-respecting device for a smart home).
Suppose the third characteristic is useful data on temperature and humidity. To confirm the hypothesis, a physical experiment was conducted - he went to the sensor and roughly breathed on it. The data values sharply increased on the display, and bytes changed in the terminal. Hooray, the data is somewhere nearby.
I usually work with text data (get HTTP data in the form of JSON / xml, put it in a file or in a database), so I didn’t really understand how to approach the task. Therefore, I began to try to transform the data in different ways that can be made from python. I wrote here such a conversion function and began to watch how this correlates with the data on the sensor screen.
Lines of varying degrees of obscurity poured into the console, but the third byte was always a number, and this number coincided with the humidity value. For the sake of fidelity, I once again breathed on the sensor - and the humidity values on the screen and in the third byte changed the same!
Then I suggested that the temperature is stored in the first two bytes. In order for the data to change, I transferred the sensor to a heated towel rail in the bathroom. But no matter how I tried to transform the results, the required numbers did not work out.
At that moment, I looked again at the description of the sensor and saw that there was a sensor from Swiss Sensirion inside. Probably worth starting with this, but this is not our method. The site was found by Swiss Sensirion sensor pack , and datasheets for them. In the datasheet, among other things, a formula was found to convert bytes transmitted over the I2C bus to a number.
But ... It turned out very strange values. Something like -34.66, but I was clearly warmer. From sadness and sadness, I even opened the sensor and checked if the sensor from Swiss Sensirion was true there. It turned out that it was true, but with the SHTC3 index, and it needed a slightly different formula for it.
However, all the same, the data after the conversion did not even closely resemble the real ones. Here I was even sadder, opened the source code of the library for Adfruit's SHTC3 and began to try to adapt the transformation code from C ++ to python. I brought everything to the tablet - raw data, converted structure and result.
Got something like this:
Yes ... it’s kind of cold ... But, wait, wait, what is 2604? This is it, 26.0 degrees on the screen! To confirm the hypothesis, he again took the sensor to the battery, checked that the values coincide.
As a result, we get the following data conversion code:
The operation to connect to the sensor and search for the correct transformation algorithm took a couple of evenings. Several times I wanted to drop everything, but at the same time new ideas came and I continued to try.
Now the data is transferred to the Home Assistant, then you need to finish the integration code and, possibly, rewrite it from bluepy to bleak, since bleak uses async / await and is better suited for the Home Assistant written by aiohttp.

To maintain a comfortable environment, we need to know what is going on at home. In short, sensors are needed. Xiaomi has many different ones, but most of all I liked the square thermometer on electronic ink. But he’s not at all smart in the sense that he doesn’t provide any interfaces at all except the graphical one - neither WiFi, nor BLE, nor ZigBee. But CR2032 batteries last for several years. There is also a version with bluetooth, but it is a little less elegant - a kind of thick pancake.
And at the beginning of spring, a new temperature / humidity sensor was announced, on electronic ink, with BLE, and even with a clock. I don’t really need a watch, but everything else immediately suppressed all rational arguments and the thermometer was ordered at one of the popular online stores, on pre-order. It rode, it rode, and finally arrived.
The sensor was added to the MiHome application without problems (I have an English interface everywhere, with the Russian version of MiHome, they say, there were translation difficulties). Shows the current values and the history of changes in readings.
But with the integration in the Home Assistant difficulties have occurred. The existing component for the temperature sensor in no way wanted to take data from the device and complained about the incorrect data format. Well, there’s nothing to do, we take out a shovel and start digging.
The first thought was to get acquainted with the device of the BLE protocol, but after evaluating the size of the documentation, it was decided to switch to the popular poke method.
The first approach to the shell
To start, open the terminal on ubuntu and run bluetoothctl. We see the following:
[NEW] Controller 00:1A:7D:DA:71:13 fett [default]
[NEW] Device 3F:59:C8:80:70:BE LYWSD02
[NEW] Device 4C:65:A8:DC:0D:AF MJ_HT_V1
MJ_HT_V1 is an old temperature sensor, LYWSD02 is a new one. The difference in the model naming format is somewhat alarming.
Then you need to somehow read, and what kind of data in general can be obtained from us. He opened the sources of the mitemp library , which is used in the Home Assistant to receive data from the old sensor. There I found that the blewrap library is used, which, in turn, is a wrapper on two Python libraries for working with BLE. I don’t need so many layers, we will use bluepy . There is documentation, it is not a lot and not a little, we read and write a script that passes through all the data fields that are on the device.
from bluepy import btle
mac = '3F:59:C8:80:70:BE'
p = btle.Peripheral(mac)
for s in p.getServices():
    print('Service:', s.uuid)
    for c in s.getCharacteristics():
        print('\tCharacteristic:', c.uuid)
        print('\t\t', c.propertiesToString())
        if c.supportsRead():
            print('\t\t', c.read())
In general, everything is simple - a BLE device provides a set of services, each of which consists of a set of characteristics. Each characteristic can be one of 8 types, for one characteristic you can specify several types at the same time. Services and features are identified in two ways - an address in the form of a HEX value and a UUID. I’m more familiar with working with UUID.
So, I considered all the specifications for both sensors, looked at them and realized that again devices from completely different manufacturers are sold under the Xiaomi brand. Among the values of the old sensor, “Cleargrass Inc” was found, and in the new, “miaomiaoce.com”. The structure of services and characteristics of these two sensors is also completely different, and the list of characteristics of the new sensor is twice as long. Then it became clear that you need to write your own library for integration with the sensor (no, of course I googled at first, maybe there is something useful on request LYWSD02, but I didn’t give anything sensible google).
So how do you get the data?
Among the available types of characteristics, in addition to READ, there are also WRITE and NOTIFY. WRITE - to send data to the device, and NOTIFY - to receive data. There is also WRITE NOTIFY at the same time - the device will only send data after it is subscribed by sending the desired byte with the WRITE command.
Attempts to do something with my hands did not bring any results, the first line of despair was reached, but at that moment I read articles about crafts based on chips from Nordic Semiconductors and put the nRF Connect program on my smartphone . With its help, I was able to subscribe to all the services that the device provided, saved the answer logs and began to try to understand what lies in them. These triple arrows activate the subscription.
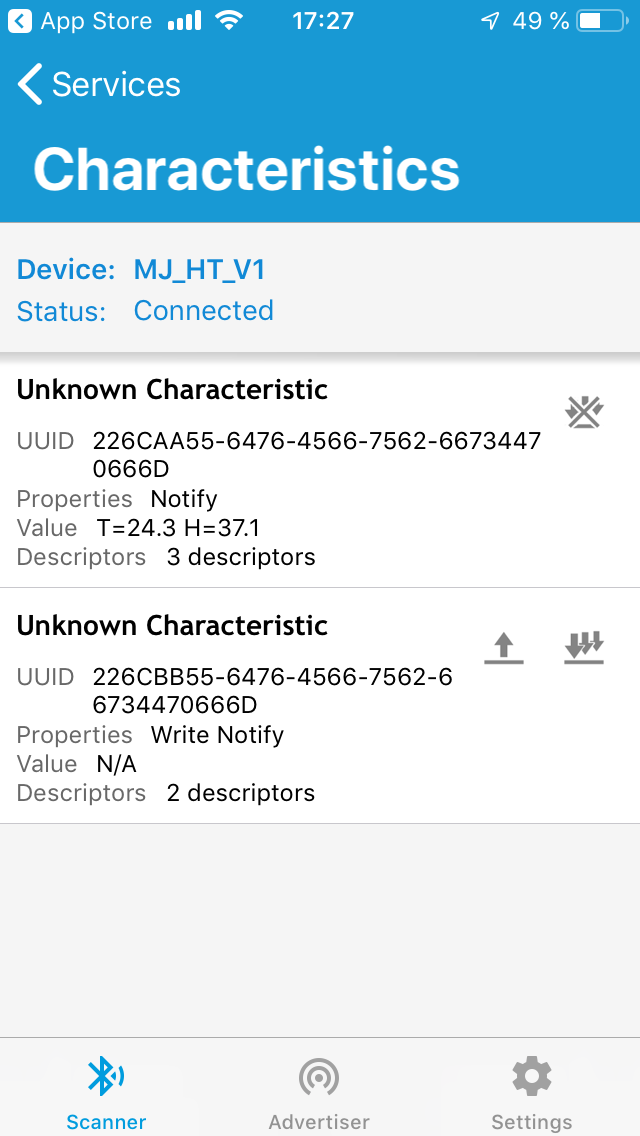
The peculiarity of the old sensor was that the data on temperature and humidity came in the form of a UTF string, while the new one returned everything in binary form.
Subscribe to Notifications
To receive data from the sensor, you need to send a subscription request. In the mitemp library, two bytes were sent for the characteristic for this, but it is not clear where to get it. Here I looked at how the data structure for the old sensor in nRF Connect looks and noticed that the desired address is specified for the characteristic with data, like a descriptor. Then I began to read the documentation for bluepy again and realized that the descriptor address can easily be obtained from the characteristics object. It remains only to write a class with a callback method, which will receive data from the notification.
class MyDelegate(btle.DefaultDelegate):
    def handleNotification(self, cHandle, data):
        print(data)
mac_addr = '3F:59:C8:80:70:BE'
p = btle.Peripheral(mac_addr)
p.setDelegate(MyDelegate())
uuid = 'EBE0CCC1-7A0A-4B0C-8A1A-6FF2997DA3A6'
# Метод всегда возвращает список, потому что может работать с диапазоном адресов
ch = p.getCharacteristics(uuid=uuid)[0]
# Получаем дескрипторы для характеристики
desc = ch.getDescriptors(forUUID=0x2902)[0]
# Значение байта, который нужно отправить был найден методом научного тыка
desc.write(0x01.to_bytes(2, byteorder="little"), withResponse=True)
while True:
        p.waitForNotifications(5.0)
We separate the grains from the chaff
Fortunately, only three characteristics were marked as WRITE NOTIFY, while the data came with different frequencies and, um ..., visual features.
The first request sent immediately a large footcloth of data, and then stuck. In this case, the first byte was a monotonously increasing number. This seems to be an accumulated history of averages.
The second and third were sent periodically, but looking closely, I saw that one of them does not change, and in the data of the second only one byte is changed. Well, then this is the current time (I remind you that this thermometer has a clock. There should be a clock in any self-respecting device for a smart home).
Suppose the third characteristic is useful data on temperature and humidity. To confirm the hypothesis, a physical experiment was conducted - he went to the sensor and roughly breathed on it. The data values sharply increased on the display, and bytes changed in the terminal. Hooray, the data is somewhere nearby.
Data parsing
I usually work with text data (get HTTP data in the form of JSON / xml, put it in a file or in a database), so I didn’t really understand how to approach the task. Therefore, I began to try to transform the data in different ways that can be made from python. I wrote here such a conversion function and began to watch how this correlates with the data on the sensor screen.
def parse(v):
    print([x for x in v])
    print('{0:#x}'.format(int.from_bytes(data, byteorder='big')))
    print('{0:#x}'.format(int.from_bytes(data, byteorder='little')))
Lines of varying degrees of obscurity poured into the console, but the third byte was always a number, and this number coincided with the humidity value. For the sake of fidelity, I once again breathed on the sensor - and the humidity values on the screen and in the third byte changed the same!
Then I suggested that the temperature is stored in the first two bytes. In order for the data to change, I transferred the sensor to a heated towel rail in the bathroom. But no matter how I tried to transform the results, the required numbers did not work out.
On the way to success
At that moment, I looked again at the description of the sensor and saw that there was a sensor from Swiss Sensirion inside. Probably worth starting with this, but this is not our method. The site was found by Swiss Sensirion sensor pack , and datasheets for them. In the datasheet, among other things, a formula was found to convert bytes transmitted over the I2C bus to a number.
![$ T [° C] = -45 + 175 \ cdot \ frac {S_T} {2 ^ 16-1} $](https://habrastorage.org/getpro/habr/formulas/d61/4f5/cee/d614f5cee279e5552426bdedb578751e.svg)
But ... It turned out very strange values. Something like -34.66, but I was clearly warmer. From sadness and sadness, I even opened the sensor and checked if the sensor from Swiss Sensirion was true there. It turned out that it was true, but with the SHTC3 index, and it needed a slightly different formula for it.
![$ T [° C] = -45 + 175 \ cdot \ frac {S_T} {2 ^ 16} $](https://habrastorage.org/getpro/habr/formulas/c60/a00/f24/c60a00f24ba45f997b731473c2a1635c.svg)
However, all the same, the data after the conversion did not even closely resemble the real ones. Here I was even sadder, opened the source code of the library for Adfruit's SHTC3 and began to try to adapt the transformation code from C ++ to python. I brought everything to the tablet - raw data, converted structure and result.
def handleNotification(self, cHandle, data):
    temp = data[:2]
    humid = data[2]
    unpacked = struct.unpack('H', temp)[0]
    print(data, unpacked, -45 + 175 * unpacked / 2 ** 19, sep='\t')
Got something like this:
b',\n2'	2604	  -44.130821228027344
b'-\n2'	2605	  -44.1304874420166
b'+\n2'	2603	  -44.131155014038086
b',\n2'	2604	  -44.130821228027344
Yes ... it’s kind of cold ... But, wait, wait, what is 2604? This is it, 26.0 degrees on the screen! To confirm the hypothesis, he again took the sensor to the battery, checked that the values coincide.
As a result, we get the following data conversion code:
def handleNotification(self, cHandle, data):
    humid_bytes = data[2]
    temp_bytes = data[:2]
    humidity = humid_bytes
    temperature = struct.unpack('H', temp_bytes)[0] / 100
    print(temperature, humidity)
Epilogue
The operation to connect to the sensor and search for the correct transformation algorithm took a couple of evenings. Several times I wanted to drop everything, but at the same time new ideas came and I continued to try.
Now the data is transferred to the Home Assistant, then you need to finish the integration code and, possibly, rewrite it from bluepy to bleak, since bleak uses async / await and is better suited for the Home Assistant written by aiohttp.