May 14, 2019 at 15:04
Working with a distributed Git version control system using the example of GitHub
Work with a distributed Git version control system by the example of GitHub
Year of the start of this publication: 2019
Year of the end of this publication: not specified
Theoretical part
Practical part
Setting up the Git program
Initializing a local repository
Working with a remote repository
So that some of your files do not fall into the repository
Branching models in Git
Conclusions
.gitignore. Uploading only those files to the repository that are needed
Warning about use:
This publication is a tutorial for learning the basics of git version control, using GitHub as an example. This is not a guide to action. You must understand what you are doing using the commands and ideas presented in the publication. Do not rush to apply what has been said to your work projects. Create a draft project, a local repository. Practice it. Create your training project on GitHub. When you understand well what and how it works, only then can you apply your knowledge in work projects. Publication is not a translation of any work. This is an authorial work to clarify some issues. See the section: “Purpose of publication” for more details.
A small remark:
The first and perhaps most important issue that should be considered is the security of the system for the developer. If your organization is protected by a system administrator. That ordinary user has to solve these issues independently.
This question is far from idle.
Extra configuration files, executable files, temporary files, repository keys, payment keys (when you work on payment services and systems like Amazon). Changes from beginners, inexperienced programmers, and poor-quality code that have not passed testing should not get into the master and release branches.
Answer the question: What is team work and you will understand how much project management is becoming more efficient with a version control system. Another advantage: The version control system facilitates the process of reviewing (revising, revising) the code. The next advantage: Automatic conflict resolution. That is, combining, for example, different versions of methods made by different developers in one branch. Here, in this article, I do not consider plugins for git in the IDE. Only general issues of working with git and working with a remote repository on GitHub are discussed here.
Test questions:
What is the time saving when using the version control system?
What are the benefits of using version control?
What is git?
How to start using git?
How to start using github?
The main (most commonly used) Git commands.
What services are there for git?
How to work with a local repository?
How to work with a distributed repository?
Git hosting under various conditions is offered by many companies.
Quite famous of them: Github, Sourceforge, Google Code, GitLab, Codebase, etc.
Git services in order of popularity (here, so that there is no holivar, I will add: In my opinion):
1. Your local service, the use of git only locally
2. GitHub
3. BitBucket
4. GitLab
You can >>">read about using your git server >>">on the hub> >>
In this publication, I mainly focus on working with the GitHub service.
Purpose of publication: Briefly tell what Git is.
Describe some basic Git console commands. Although there are quite a few descriptions of working with git on the Internet, a lot of the documentation may seem confusing and some definitions are not fully disclosed. What can mislead beginners. Some definitions should be written in a more detailed form, for clarity of understanding.
Also with practical examples it is much easier to master the system. The purpose of this article is to provide a short overview of the Git system. Show how to use some of the commands, for more rapid development by beginners. Show how to configure the system for a specific use. The next goal is to prevent the thoughtless use of certain Git commands.
Git is one of the distributed version control systems.
GitHub is one of the services for using the Git version control system.
repository - some repository of files, links to changes in
commit files - tracking changes, saves the difference in changes
HEAD - (special pointer) a symbolic link to recent changes. Note: Does not necessarily refer to commit. May indicate a branch. Status - “Detached HEAD” The
HEAD is used by the repository to determine what is selected using checkout.
Note the difference: “head” (lowercase) refers to any of the named headers in the repository; “HEAD” (upper case) refers exclusively to the currently active heading (link). This distinction is often used in Git documentation. HEAD can point to the named vertex of a branch or to commit.
Git objects Four types of objects: Blob, Tree, Commit, and References.
A branch is not defined in Git itself, but is inherited from the operating and file systems.
You can read more about Git objects in the documentation.
git services - services that provide services to git users.
working directory - working directory on your computer
staging area - prepared files area or
branch work area - branch, consists of a set of commits, usually refers to the last
merge commit - merge, merge branches into one
pull - pull in, take the project from the server, get changes
push from the remote repository - push, send changes to the server
Symbols:
# - in this case, the comment symbol
<> - angle brackets, where you need to enter what is needed excluding these brackets
$ - input prompt in the terminal
I wanted to write a small cheat sheet on git, but I got a rather long publication.
But without an explanation of certain terms and some introductory theoretical part can not do.
Git is one of the version control systems.
Designed mainly for the work of a distributed development team.
That is, developers can be in different parts of the world and work on one project.
No Git is used not only by developers, but also by designers, writers, editors, designers, translators. GitHub is often used by hr specialists and hr managers to search for successful candidates for a particular vacancy in various fields. For mathematical analysis of project success.
The Git system is very economical and does not require sending a large number of files. Changes in files and links to these changes are tracked and forwarded. That is, the main newsletter is the distribution of the difference in your edits.
Only differences in folders and files are sent. At any time, you can return to a particular state of the system. Many companies pay attention to good and fast communication between employees. In this regard, the version control system provides great opportunities. You can feel the full power and flexibility of the version control system after studying some theoretical material and putting it into practice.
Quote from Wiki:
The project was created by Linus Torvalds to manage the development of the Linux
Git kernel free system and is distributed under the GNU GPL 2 license.
The main objective of the version control system is to simplify work with streams of changing information. The main paradigm of the version control system is the localization of the data of each project developer. Each developer has a local repository on his machine. If necessary, changes are sent from the local repository to the remote repository in a specific branch. And any developer from a distributed team can download new changes to the project in order to continue joint work on the project. Here I will make some remark. It is important to comply with the standards for code design and working with the system in your organization. Standards facilitate the interaction between developers, save time, facilitate understanding of what you are doing. Some code ethics and culture,
What version control systems exist:
1. Centralized
2. Decentralized (distributed)
In a distributed version control system, in addition to the version of the repository on the server, each developer has his own repository. This allows you to quickly restore the current state of our software.
Some departure from the topic: Why have I quoted so many quotes?
The answer is the simplest. To further give more accurate and clear definitions.
To use the git system you need:
1. Install git on your system.
2. Configure the program and check its performance locally
3. Register your account on GitHub
4. Create a local repository or copy the repository of an existing project
5. Write a README.MD file.
6. If you are starting a project, create a remote repository
7. Commit the changes locally
8. Post the changes to GitHub
9. Register the accounts of the developers of your project
10. Give them a link to the project
1. Install git
On Linux:
On Windows:
Git for Windjws >>>
1. After installation, you can right-click on a folder in Windows Explorer and choose to open “Git Bash Here”. Git Bash Here - means to open the git terminal here.
In the terminal, enter the command
On Linux, (Ctrl + Alt + T - terminal, if you do not have other hotkeys assigned), open a terminal and type
If successful, the version of your git will be displayed on the console.
Note:
It should be mentioned here that you configure Git at several levels.
That is, you make some settings for a specific user of the operating system (not the git system, but the operating system). Other settings you make for all users of the operating system. Then you can make settings for a specific folder (locally). You make settings for the repository located on the server. You can not do these settings if you work only with your local repository.
In this publication, I discuss console commands in mostly Windows git-bash.
You can find more details about the differences in the documentation. Mentioned there are just some differences. For example, in the path settings for files and folders. On Windows, the / slash is used, while on Linux, the backslash is \. Although on Windows you can configure yourself to use a backslash.
User and email settings:
To enter the settings for only one repository, go to its folder and do the same without --global:
Setting up an external editor.
You can choose another text editor. For example, not emacs, a vi or nano or the other at your discretion.
On Windows, with this command you can specify a text editor, for example notepad ++.
For x64 Windows you can use the command (just write your path):
Git settings are stored in files.
Git checks 4 places for the configuration file (here on Linux):
Your computer's .gitconfig file.
Your user, your user file .gitconfig file is located in ~ / .gitconfig.
The second user configuration file located in $ XDG_CONFIG_HOME / git / config or $ HOME / .config / git / config.
Local repository configuration file: .git / config
Each file adds or overrides the git options defined in the file above it.
System configuration.
User configuration.
Repository specific configuration.
Documentation link >>>
You can view the configuration files
# for the system and all users
#for the user
Checking your git configuration settings:
If the list is large, you can scroll through it using the keyboard arrows or “pg up”, “pg dn”. To exit, press q.
# what configuration, where is it installed:
Why consider console commands? After all, there are UIs.
Often in the console you can do something much faster. Using a set of console commands, you yourself can automate the process in the future. Console commands are a more flexible tool. Why? Yes, because your UI may also “not know” about the existence of a particular team. UI may be absent as such, for example on the server due to its insecurity. At the first stage, console commands will greatly help in a general understanding of how the system works. There is no need to remember all of them. You can find help for a particular team at any time. Theoretical knowledge, without which it is nowhere, is better absorbed with practical application.
Git Commands (Console)
example:
Options:
-C - use the specified repository folder instead of the current folder;
-c parameter = value - use the specified value of the configuration parameter;
-p - scroll through the entire output with less;
Initializing a local repository.
1. Go to the project folder.
2.
3.
You can add a separate file.
For example
Thus we say - track changes to our file.
To add everything to the folder, we recommend using the command
4. Creating a commit
-m "comment" # argument to create a comment for the commit. Your changes will be with a meaningful comment.
You can use the full name of the key, instead of shortening it. For example, instead of -m you can use --message = "comment"
Here you need to make some remark. To use Russian letters in the comments, you need to make presets. You need to configure character encoding in the system, character encoding in a text editor or IDE, character encoding in the terminal, character encoding in git. Another point: Windows "does not like" single apostrophes, so the comment is enclosed in quotation marks. On Linux, it is possible to use apostrophes when making comments for commits.
5.
6.
Shows information - which branch is current.
What files are changed and so on. The command shows what is in the workspace (in the staging area).
Branches. Branches
Branch - A link to a specific commit.
Create a branch.
Tip: To continue a new branch you need to create it, then switch to it and make commit.
1. Create a branch:
2. Switch to the created branch:
3. We make commit:
Now we have a second branch named feature.
Merge branches.
Merging branches creates a commit from two parents, from the current branch and the branch specified in the git command.
1. Switch to the master branch
2. See which branch is current
3. Merge the branches
We can do it differently. Switch to the feature branch and merge it with the master
1 branch .
2.
View available branches:
stash - stack, temporary storage
Do not confuse with stage, this is not the same thing.
Command
Stash is intended to hide changes that are not needed at the moment, because it is called stash, in translation - to hide, to hide.
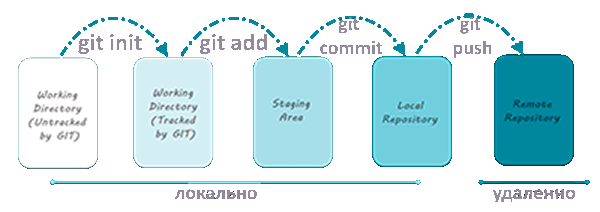
Figure 1.
The figure shows the preparation of a folder on the local computer for git.
Adding to the staging area. Adding changes to the local repository (git commit).
Sending to a remote repository (git push).
The stash entity is not shown in this diagram.

Figure 2.
The diagram in Figure 2. shows the operation of the add, commit all, commit, reset, git reset head, git update index commands.
Untacked files - non-indexed files.
Working tree - your working folder
Index - indexing files
Commit - changing files
Some clarity needs to be made here. The diagram applies to your local repository. But this is a different kind of chart. It's as if we are looking at git from various points, at a “different angle”. Shows some life cycle of indexing changes to the local repository.
Work with teams:
Very useful commands. View them yourself.
Working with a remote repository
Next, I will go on to describe how to work with a remote repository.
You can work with the remote repository and your project through the protocol [url] https: //, [/ url]
that is, in your browser (chrome, mozilla, opera and others).
GitHub.com >>>
GitHub interface in English.
To get started, you need to register on GitHub if you have not done so already or
connect the necessary branch and send the changes to the local repository.
You can learn how to register on the GitHub website itself.
Before using the remote repository, you must have a local initialized repository.
In the folder on the local computer:
Connect a branch to a remote (in this case GitHub) computer:
"Username_name" - in this case, the nickname of the user of the remote repository.
"Repository Name" - in this case, this is the name of your already created repository on GitHub
Show which paths are assigned:
Conclusion:
Usually there is one branch origin.
That is, this is not the branch itself, but its abbreviated name associated with the repository.
You can add, associate another branch on the remote repository.
remote_rep_name - refers to the short name that will be associated with the remote repository.
remote_repository_name - refers to the name of the repository on the server. That is, the name of the remote repository.
Only this command takes one branch from a remote repository.
In addition, it merges (merges, merge) all changes from the remote repository with your local ones. This command should be used when you are just starting to work with a remote repository and you don’t have your own experience in the local one yet.
This command creates a folder named Local_folder_name.
It takes all the changes from the repository " github.com/username/remote_name_repository.git " and saves them in the folder "Local_folder_name".
Here I wrote the prefix L in front of the folder name to distinguish the local folder from the remote one on the server.
The diagram below shows the difference between working with the local repository and with the repository on GitHub
[url] https://greenido.files.wordpress.com/2013/07/git-local-remote.png?w=696&h=570 [/ url]

From In this diagram you can see how to work with the local repository and how to work with the repository on the server. Only a few commands are shown for brevity and clarity.
Your local repository located on one of your workstations is the same repository. You can not register on GitHub or other servers, but work locally. You do not even need for this internet connection. You will have a local repository and version control. The same branches on which you can switch, combine them, etc. That is, to fully work locally, as with a server.
If desired, you can then send them to the server.
So that some of your files do not fall into the repository.
Do you want some files not to be indexed or to the repository?
You need to create a file called .gitignore.
In cmd windows terminal:
An empty .gitignore file created does not give you anything. To prevent some files from being sent to the server, you need to set rules in this file.
You can download the finished .gitignore file from GitHub. There is a special repository in which .gitignore templates for different languages and frameworks are saved.
Gitignore repository >>>
By default, the .gitignore file is not added to the repository.
You can read about the .gitignore file in the documentation:
git-scm.com/docs/gitignore
An example file is provided and its syntax is briefly described.
You can create a global file for the user.
Now you need to find out where the link leads and create a file.
You just have to create this file. Open a terminal (On Windows cmd).
You can copy the finished file from here >>>
Open your empty .gitignore_global file in a text editor and copy the text from the finished file to yours. Save the file.
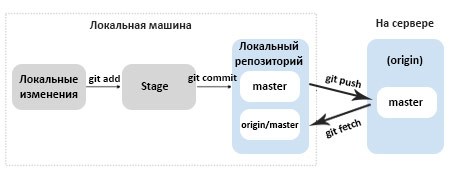
Figure 3.
This diagram shows the operation of the commands: git add, git commit, git push and git fetch.
Warning:
The fetch command takes data into your local repository, but does not merge it with any of your developments and does not modify what you are currently working on.
Simply put,
Options (keys) -n, --dry-run # many git commands have these keys. These options are needed to see what changes the team will make.
That is, you can see the result of executing this command and then apply it with confidence without the -n switches, --dry-run Branch
models in Git:
What are branch models for?
For better organization of the workflow (Workflow). For standardization. That is, in your organization, a branching model may be adopted, depending on the goals.
Central Workflow
Developer Branch Workflow
Feature Branch Workflow
Issue Branch Workflow
Forking Workflow
Patch Workflow
Central Workflow(central workflow) in this context is defined as "you are sending changes to the same repository from which you usually get your latest parent changes", regardless of whether you use rebase or merge. (pull = fetch + merge or fetch + rebase, depending on configuration and parameters)
Feature Branching is a logical extension of Central Workflow. Feature Branch workflow idea: All features should be developed in a dedicated branch instead of the main branch. The main branch should never contain broken code. This is a big advantage in continuous integration environments.
Gitflow workflow
Gitflow workflow was first published on nvie's 2010 Vincent Drissen blog. The Gitflow workflow defines a rigorous branching model designed for project release. This workflow does not add any new concepts or commands beyond what is required for the Feature Branch workflow. Instead, it assigns very specific roles to the various branches and determines how and when they should interact.
Forking Workflow Forking workflow
is different from other workflows. Instead of using a single server repository as a “central” code base, it provides each developer with a server repository. This means that each member has not one, but two Git repositories: a private local and a public server.
Recommendations:
There is no one workflow suitable for all developers in Git. It is important to develop a Git workflow that will increase the productivity of your team. In addition to team culture, the workflow should also complement the business culture. Git features, such as branches and tags, should complement the product launch schedule. If your team uses project management software to track tasks, you can use branches that are relevant to the tasks being performed.
You can find recommendations on using workflows in the Git documentation.
Conclusions:
We examined the operation of the git system and the work with remote repositories.
To some extent, they touched on the issue of installing and configuring git, registering a remote repository using GitHub as an example. Applications of git both locally and remotely. As well as some aspects of the organization of the workflow. In one article it is impossible to talk about everything. You can continue training by studying documentation materials and publications of other authors. What really fascinates me about git is the design and implementation of a good ecosystem.
.gitignore. Sending only those files to the repository that you need
You may need so that no extra files get into your repository.
You can edit the .gitignore file manually.
To automatically exclude some project files, you can download the plugin for your IDE. For example, for NetBeans 10, you can download and install the plugin from the official netbeans website:
plugins.netbeans.org/plugin/50356/gitignore-io
Plugin owner: junichi11
License: Apache License, Version 2.0
How to install:
1. Download the file to a folder on the local drive
2. Open NetBeans IDE
3. Tools / Plugin / Downloaded / Add Plugins
4. Specify the path to the plug-in on your local computer.
5. Restarting the IDE
For the Intellij Idea IDE, you can download the plugin "Add to gitignore"
plugins.jetbrains.com/plugin/7495--ignore
1. Go to the site with the plugin
2. Choose your version of the IDE
3. Read the instructions.
4. Download and install
You can install the plugin from the IDE:
Preferences> Plugins> Browse repositories ...> Search for ".ignore"> Install Plugin
After installing the "Restart Idea".
Additional resources:
Online book on Git >>>
10 useful Git commands that will facilitate work >>>
Debugging code with Git: 3 tools for finding errors >>> The
magic of Git. Students. Stanford >>>
Here, on the hub there is a wonderful publication about Git by jsirex , "Daily work with Git"
As you know, changes are made from version to version in programs.
What changes have been made for git 2.0: >>>
Here a little more should be said about the safety of using git and what relates to the use of various UIs for git.
To be continued, clarification follows ...
Year of the start of this publication: 2019
Year of the end of this publication: not specified
Theoretical part
Practical part
Setting up the Git program
Initializing a local repository
Working with a remote repository
So that some of your files do not fall into the repository
Branching models in Git
Conclusions
.gitignore. Uploading only those files to the repository that are needed
Warning about use:
This publication is a tutorial for learning the basics of git version control, using GitHub as an example. This is not a guide to action. You must understand what you are doing using the commands and ideas presented in the publication. Do not rush to apply what has been said to your work projects. Create a draft project, a local repository. Practice it. Create your training project on GitHub. When you understand well what and how it works, only then can you apply your knowledge in work projects. Publication is not a translation of any work. This is an authorial work to clarify some issues. See the section: “Purpose of publication” for more details.
A small remark:
The first and perhaps most important issue that should be considered is the security of the system for the developer. If your organization is protected by a system administrator. That ordinary user has to solve these issues independently.
This question is far from idle.
Extra configuration files, executable files, temporary files, repository keys, payment keys (when you work on payment services and systems like Amazon). Changes from beginners, inexperienced programmers, and poor-quality code that have not passed testing should not get into the master and release branches.
Be sure to read the documentation: what should not get into GitHub and how to configure .gitignore.
Answer the question: What is team work and you will understand how much project management is becoming more efficient with a version control system. Another advantage: The version control system facilitates the process of reviewing (revising, revising) the code. The next advantage: Automatic conflict resolution. That is, combining, for example, different versions of methods made by different developers in one branch. Here, in this article, I do not consider plugins for git in the IDE. Only general issues of working with git and working with a remote repository on GitHub are discussed here.
Test questions:
What is the time saving when using the version control system?
What are the benefits of using version control?
What is git?
How to start using git?
How to start using github?
The main (most commonly used) Git commands.
What services are there for git?
How to work with a local repository?
How to work with a distributed repository?
Git hosting under various conditions is offered by many companies.
Quite famous of them: Github, Sourceforge, Google Code, GitLab, Codebase, etc.
Git services in order of popularity (here, so that there is no holivar, I will add: In my opinion):
1. Your local service, the use of git only locally
2. GitHub
3. BitBucket
4. GitLab
You can >>">read about using your git server >>">on the hub> >>
In this publication, I mainly focus on working with the GitHub service.
Purpose of publication: Briefly tell what Git is.
Describe some basic Git console commands. Although there are quite a few descriptions of working with git on the Internet, a lot of the documentation may seem confusing and some definitions are not fully disclosed. What can mislead beginners. Some definitions should be written in a more detailed form, for clarity of understanding.
Also with practical examples it is much easier to master the system. The purpose of this article is to provide a short overview of the Git system. Show how to use some of the commands, for more rapid development by beginners. Show how to configure the system for a specific use. The next goal is to prevent the thoughtless use of certain Git commands.
Subject Area and Key Terms
Version control system - software to facilitate the work with changing information. The version control system allows you to store several versions of the same document, if necessary, return to earlier versions, determine who made this or that change, and much more.
Git is one of the distributed version control systems.
GitHub is one of the services for using the Git version control system.
repository - some repository of files, links to changes in
commit files - tracking changes, saves the difference in changes
HEAD - (special pointer) a symbolic link to recent changes. Note: Does not necessarily refer to commit. May indicate a branch. Status - “Detached HEAD” The
HEAD is used by the repository to determine what is selected using checkout.
Note the difference: “head” (lowercase) refers to any of the named headers in the repository; “HEAD” (upper case) refers exclusively to the currently active heading (link). This distinction is often used in Git documentation. HEAD can point to the named vertex of a branch or to commit.
Git objects Four types of objects: Blob, Tree, Commit, and References.
A branch is not defined in Git itself, but is inherited from the operating and file systems.
You can read more about Git objects in the documentation.
git services - services that provide services to git users.
HEAD - a pointer to the current branch. The current branch. In more detail: Your working tree is usually obtained from the state of the tree referenced by HEAD. HEAD is a link to one of the headers in your repository, except when using a separate HEAD, in which case it directly refers to an arbitrary commit.
working directory - working directory on your computer
staging area - prepared files area or
branch work area - branch, consists of a set of commits, usually refers to the last
merge commit - merge, merge branches into one
pull - pull in, take the project from the server, get changes
push from the remote repository - push, send changes to the server
Symbols:
# - in this case, the comment symbol
<> - angle brackets, where you need to enter what is needed excluding these brackets
$ - input prompt in the terminal
Small introduction
I wanted to write a small cheat sheet on git, but I got a rather long publication.
But without an explanation of certain terms and some introductory theoretical part can not do.
Git is one of the version control systems.
Designed mainly for the work of a distributed development team.
That is, developers can be in different parts of the world and work on one project.
No Git is used not only by developers, but also by designers, writers, editors, designers, translators. GitHub is often used by hr specialists and hr managers to search for successful candidates for a particular vacancy in various fields. For mathematical analysis of project success.
The Git system is very economical and does not require sending a large number of files. Changes in files and links to these changes are tracked and forwarded. That is, the main newsletter is the distribution of the difference in your edits.
Only differences in folders and files are sent. At any time, you can return to a particular state of the system. Many companies pay attention to good and fast communication between employees. In this regard, the version control system provides great opportunities. You can feel the full power and flexibility of the version control system after studying some theoretical material and putting it into practice.
History of creation
Quote from Wiki:
Git (pronounced "git" [8]) is a distributed version control system. The project was created by Linus Torvalds to manage the development of the Linux kernel, the first version was released on April 7, 2005. Today, he is supported by Junio Hamano.
Theoretical part (short)
The project was created by Linus Torvalds to manage the development of the Linux
Git kernel free system and is distributed under the GNU GPL 2 license.
Git is an Open Source project covered by the GNU General Public License version 2 (some parts of it are under different licenses, compatible with the GPLv2).
The main objective of the version control system is to simplify work with streams of changing information. The main paradigm of the version control system is the localization of the data of each project developer. Each developer has a local repository on his machine. If necessary, changes are sent from the local repository to the remote repository in a specific branch. And any developer from a distributed team can download new changes to the project in order to continue joint work on the project. Here I will make some remark. It is important to comply with the standards for code design and working with the system in your organization. Standards facilitate the interaction between developers, save time, facilitate understanding of what you are doing. Some code ethics and culture,
What version control systems exist:
1. Centralized
2. Decentralized (distributed)
In a distributed version control system, in addition to the version of the repository on the server, each developer has his own repository. This allows you to quickly restore the current state of our software.
Interaction with other version control systems
The standard Git distribution supports interaction with CVS (import and export, CVS server emulation) and Subversion (partial support for import and export). The standard tool for import and export within the ecosystem is the archives of a series of versioned files in the formats .tar.gz and .tar.bz2.
Fork - a remote copy of the repository on the server, different from the original. This is not even a git concept, but rather a political and social idea. Clone is not the same as fork. The clone of the remote repository is located locally. In fact, when cloning, all data is copied, including the history of commits and existing branches.
Branch, or creating a branch, is a way to make changes to a project and merge them as a result with the rest of the code. The branch is part of the repository.
A work tree (work directory, workspace) is a tree of source files that you can see and edit.
An index (prepared area, staging area) is one large binary file .git / index, which lists all the files in the current branch, their SHA1, timestamps and names. This is not a separate directory with file copies.
The HEAD pointer is a reference to the last commit in the current extracted branch.
Some departure from the topic: Why have I quoted so many quotes?
The answer is the simplest. To further give more accurate and clear definitions.
Practical part
To use the git system you need:
1. Install git on your system.
2. Configure the program and check its performance locally
3. Register your account on GitHub
4. Create a local repository or copy the repository of an existing project
5. Write a README.MD file.
6. If you are starting a project, create a remote repository
7. Commit the changes locally
8. Post the changes to GitHub
9. Register the accounts of the developers of your project
10. Give them a link to the project
1. Install git
On Linux:
sudo apt-get update && sudo apt-get upgrade #обновление перед установкойsudo apt-get install git #установка gitOn Windows:
Git for Windjws >>>
1. After installation, you can right-click on a folder in Windows Explorer and choose to open “Git Bash Here”. Git Bash Here - means to open the git terminal here.
In the terminal, enter the command
git --version #вывод версииOn Linux, (Ctrl + Alt + T - terminal, if you do not have other hotkeys assigned), open a terminal and type
git --versionIf successful, the version of your git will be displayed on the console.
2. Setting up the Git program
Note:
It should be mentioned here that you configure Git at several levels.
That is, you make some settings for a specific user of the operating system (not the git system, but the operating system). Other settings you make for all users of the operating system. Then you can make settings for a specific folder (locally). You make settings for the repository located on the server. You can not do these settings if you work only with your local repository.
In this publication, I discuss console commands in mostly Windows git-bash.
You can find more details about the differences in the documentation. Mentioned there are just some differences. For example, in the path settings for files and folders. On Windows, the / slash is used, while on Linux, the backslash is \. Although on Windows you can configure yourself to use a backslash.
User and email settings:
git config --global user.name "My Name"git config --global user.email [email protected]To enter the settings for only one repository, go to its folder and do the same without --global:
Setting up an external editor.
git config --global core.editor emacs #подключить внешний редактор emacsYou can choose another text editor. For example, not emacs, a vi or nano or the other at your discretion.
On Windows, with this command you can specify a text editor, for example notepad ++.
For x64 Windows change to: git config --global core.editor "'C: / Program Files (x86) / Notepad ++ / notepad ++. Exe' -multiInst -notabbar -nosession -noPlugin"
For x64 Windows you can use the command (just write your path):
git config --global core.editor "'C:/Program Files (x86)/Notepad++/notepad++.exe' -multiInst -notabbar -nosession -noPlugin" Git settings are stored in files.
Git checks 4 places for the configuration file (here on Linux):
Your computer's .gitconfig file.
Your user, your user file .gitconfig file is located in ~ / .gitconfig.
The second user configuration file located in $ XDG_CONFIG_HOME / git / config or $ HOME / .config / git / config.
Local repository configuration file: .git / config
cat .git/config #просмотр конфигурации локального репозиторияEach file adds or overrides the git options defined in the file above it.
System configuration.
User configuration.
Repository specific configuration.
Documentation link >>>
You can view the configuration files
# for the system and all users
git config --system --listgit config --system --edit#for the user
git config --global --listgit config --global --editChecking your git configuration settings:
git config --list #вывести на экран конфигурацию.If the list is large, you can scroll through it using the keyboard arrows or “pg up”, “pg dn”. To exit, press q.
# what configuration, where is it installed:
git config --list --show-originWhy consider console commands? After all, there are UIs.
Often in the console you can do something much faster. Using a set of console commands, you yourself can automate the process in the future. Console commands are a more flexible tool. Why? Yes, because your UI may also “not know” about the existence of a particular team. UI may be absent as such, for example on the server due to its insecurity. At the first stage, console commands will greatly help in a general understanding of how the system works. There is no need to remember all of them. You can find help for a particular team at any time. Theoretical knowledge, without which it is nowhere, is better absorbed with practical application.
Git Commands (Console)
git опции команда аргументы example:
git branch -d # удалить локальную ветку с именем name git branch -d bugFix00 #удалить локальную ветку с именем bugFix00.Options:
-C - use the specified repository folder instead of the current folder;
-c parameter = value - use the specified value of the configuration parameter;
-p - scroll through the entire output with less;
Initializing a local repository.
1. Go to the project folder.
cd ваша_папка #команда терминала, переход в папку с именем ваша_папка 2.
git init #инициализация локального репозитория3.
git add . #тут мы добавляем все. You can add a separate file.
For example
git add имя.расширениеThus we say - track changes to our file.
To add everything to the folder, we recommend using the command
git add -A4. Creating a commit
git commit #сохранить изменения в локальном репозитории-m "comment" # argument to create a comment for the commit. Your changes will be with a meaningful comment.
You can use the full name of the key, instead of shortening it. For example, instead of -m you can use --message = "comment"
git commit --message="$Ваш осмысленный комментарий"Here you need to make some remark. To use Russian letters in the comments, you need to make presets. You need to configure character encoding in the system, character encoding in a text editor or IDE, character encoding in the terminal, character encoding in git. Another point: Windows "does not like" single apostrophes, so the comment is enclosed in quotation marks. On Linux, it is possible to use apostrophes when making comments for commits.
5.
git show #показать изменения внесенные вашим коммитом6.
git status #просмотр текущего состояний gitShows information - which branch is current.
What files are changed and so on. The command shows what is in the workspace (in the staging area).
Branches. Branches
Branch - A link to a specific commit.
Create a branch.
git branch имяВетки #будет создана ветка с именем "имяВетки"Tip: To continue a new branch you need to create it, then switch to it and make commit.
1. Create a branch:
git branch feature #создание ветки с именем "feature" локально2. Switch to the created branch:
git checkout feature#выбор ветки с именем "feature" локально3. We make commit:
git commitNow we have a second branch named feature.
Merge branches.
Merging branches creates a commit from two parents, from the current branch and the branch specified in the git command.
1. Switch to the master branch
2. See which branch is current
3. Merge the branches
git merge feature #объединить текущую ветку с веткой featureWe can do it differently. Switch to the feature branch and merge it with the master
1 branch .
git checkout feature #выбор ветки feature 2.
git merge master #объединить текущую веткуView available branches:
git branch -v -a #просмотреть все доступные ветки, которые можно получитьgit diff --cached #посмотреть какие изменения добавились в stagestash - stack, temporary storage
Do not confuse with stage, this is not the same thing.
Command
git stashgit stash takes your changes, prepared and unprepared for commit, saves them for later use and removes them from the workspace.
Stash is intended to hide changes that are not needed at the moment, because it is called stash, in translation - to hide, to hide.
git stash apply #применить изменения к текущей версии
git stash list  #вывести список изменений
git stash show #вывести последние изменения
git stash drop #удалить последние изменения в списке
git stash pop  # [apply] + [drop]
git stash clear #очистить список изменений
git stash drop# удалит последний git stashgit stash drop stash@{5}#удалит git stash под номером 5Figure 1.
The figure shows the preparation of a folder on the local computer for git.
Adding to the staging area. Adding changes to the local repository (git commit).
Sending to a remote repository (git push).
The stash entity is not shown in this diagram.
Figure 2.
The diagram in Figure 2. shows the operation of the add, commit all, commit, reset, git reset head, git update index commands.
Untacked files - non-indexed files.
Working tree - your working folder
Index - indexing files
Commit - changing files
Some clarity needs to be made here. The diagram applies to your local repository. But this is a different kind of chart. It's as if we are looking at git from various points, at a “different angle”. Shows some life cycle of indexing changes to the local repository.
Work with teams:
cherry-pick
reset
revert
rebase
merge
Very useful commands. View them yourself.
Working with a remote repository
Next, I will go on to describe how to work with a remote repository.
You can work with the remote repository and your project through the protocol [url] https: //, [/ url]
that is, in your browser (chrome, mozilla, opera and others).
GitHub.com >>>
GitHub interface in English.
To get started, you need to register on GitHub if you have not done so already or
connect the necessary branch and send the changes to the local repository.
You can learn how to register on the GitHub website itself.
Before using the remote repository, you must have a local initialized repository.
In the folder on the local computer:
git init #инициализация локального репозиторияgit add -AConnect a branch to a remote (in this case GitHub) computer:
git remote add origin https://github.com/имя_ник_пользователя/ИмяРепозитория.git"Username_name" - in this case, the nickname of the user of the remote repository.
"Repository Name" - in this case, this is the name of your already created repository on GitHub
Show which paths are assigned:
git remote -vConclusion:
origin  [url]https://github.com/имя_пользователя/имя_репозитория.git[/url] (fetch)
origin  [url]https://github.com/имя_пользователя/имя_репозитория.git[/url] (push)
git remote show #показать какие ветки есть в удаленном репозиторииUsually there is one branch origin.
That is, this is not the branch itself, but its abbreviated name associated with the repository.
You can add, associate another branch on the remote repository.
git remote add <сокращенное_имя_удаленного_репозитория> [email protected]:имя_пользователя/имя_удаленного_репозитория.gitgit remote add <имя_удаленного_реп> протокол@github.com:пользователь/имя_удаленного_репозитория.gitremote_rep_name - refers to the short name that will be associated with the remote repository.
remote_repository_name - refers to the name of the repository on the server. That is, the name of the remote repository.
git remote set-url origin [url]https://имя_пользователя@github.com/имя_пользователя/test.git[/url] #установить новый путь git pull origin master #забрать все изменения с сервера из ветки origin в локальную ветку master Only this command takes one branch from a remote repository.
In addition, it merges (merges, merge) all changes from the remote repository with your local ones. This command should be used when you are just starting to work with a remote repository and you don’t have your own experience in the local one yet.
git remote -v #показать путь к удаленному репозиториюgit clone --recursive https://github.com/имя_пользователя/имя_репозитория.git #рекурсивное получение репозитория git clone --recursive https://github.com/имя_пользователя/имя_удаленного_репозитория.git Lимя_локальной_папкиThis command creates a folder named Local_folder_name.
It takes all the changes from the repository " github.com/username/remote_name_repository.git " and saves them in the folder "Local_folder_name".
Here I wrote the prefix L in front of the folder name to distinguish the local folder from the remote one on the server.
gitk #утилита отображения графа измененийThe diagram below shows the difference between working with the local repository and with the repository on GitHub
[url] https://greenido.files.wordpress.com/2013/07/git-local-remote.png?w=696&h=570 [/ url]
From In this diagram you can see how to work with the local repository and how to work with the repository on the server. Only a few commands are shown for brevity and clarity.
Your local repository located on one of your workstations is the same repository. You can not register on GitHub or other servers, but work locally. You do not even need for this internet connection. You will have a local repository and version control. The same branches on which you can switch, combine them, etc. That is, to fully work locally, as with a server.
If desired, you can then send them to the server.
So that some of your files do not fall into the repository.
Do you want some files not to be indexed or to the repository?
You need to create a file called .gitignore.
touch .gitignore #создает пустой файл .gitignoreIn cmd windows terminal:
type nul > .gitignore #создает пустой файл .gitignoreAn empty .gitignore file created does not give you anything. To prevent some files from being sent to the server, you need to set rules in this file.
You can download the finished .gitignore file from GitHub. There is a special repository in which .gitignore templates for different languages and frameworks are saved.
Gitignore repository >>>
By default, the .gitignore file is not added to the repository.
You can read about the .gitignore file in the documentation:
git-scm.com/docs/gitignore
An example file is provided and its syntax is briefly described.
You can create a global file for the user.
git config --global core.excludesfile ~/.gitignore_global #создает ссылку на файл .gitignore_globalNow you need to find out where the link leads and create a file.
git config --get core.excludesfile #показывает где должен находиться файл .gitignore_globalYou just have to create this file. Open a terminal (On Windows cmd).
cd c:\путь\где\должен_находиться_файл .gitignore_globaltype nul > .gitignore_global #создать пустой файл .gitignore_globalYou can copy the finished file from here >>>
Open your empty .gitignore_global file in a text editor and copy the text from the finished file to yours. Save the file.
Figure 3.
This diagram shows the operation of the commands: git add, git commit, git push and git fetch.
Warning:
git push -f #чревато потерей данных при работе с веткой нескольких человек…git push --force #чревато потерей данных при работе с веткой нескольких человек…git fetch #забирает изменения с сервера, но только в локальный репозиторийThe fetch command takes data into your local repository, but does not merge it with any of your developments and does not modify what you are currently working on.
git pull #берет данные с сервера в локальный репозитория и сливает их с рабочей веткой.Simply put,
git pull git fetchgit mergeOptions (keys) -n, --dry-run # many git commands have these keys. These options are needed to see what changes the team will make.
That is, you can see the result of executing this command and then apply it with confidence without the -n switches, --dry-run Branch
models in Git:
What are branch models for?
For better organization of the workflow (Workflow). For standardization. That is, in your organization, a branching model may be adopted, depending on the goals.
Central Workflow
Developer Branch Workflow
Feature Branch Workflow
Issue Branch Workflow
Forking Workflow
Patch Workflow
Central Workflow(central workflow) in this context is defined as "you are sending changes to the same repository from which you usually get your latest parent changes", regardless of whether you use rebase or merge. (pull = fetch + merge or fetch + rebase, depending on configuration and parameters)
Feature Branching is a logical extension of Central Workflow. Feature Branch workflow idea: All features should be developed in a dedicated branch instead of the main branch. The main branch should never contain broken code. This is a big advantage in continuous integration environments.
Gitflow workflow
Gitflow workflow was first published on nvie's 2010 Vincent Drissen blog. The Gitflow workflow defines a rigorous branching model designed for project release. This workflow does not add any new concepts or commands beyond what is required for the Feature Branch workflow. Instead, it assigns very specific roles to the various branches and determines how and when they should interact.
Forking Workflow Forking workflow
is different from other workflows. Instead of using a single server repository as a “central” code base, it provides each developer with a server repository. This means that each member has not one, but two Git repositories: a private local and a public server.
Recommendations:
There is no one workflow suitable for all developers in Git. It is important to develop a Git workflow that will increase the productivity of your team. In addition to team culture, the workflow should also complement the business culture. Git features, such as branches and tags, should complement the product launch schedule. If your team uses project management software to track tasks, you can use branches that are relevant to the tasks being performed.
You can find recommendations on using workflows in the Git documentation.
Conclusions:
We examined the operation of the git system and the work with remote repositories.
To some extent, they touched on the issue of installing and configuring git, registering a remote repository using GitHub as an example. Applications of git both locally and remotely. As well as some aspects of the organization of the workflow. In one article it is impossible to talk about everything. You can continue training by studying documentation materials and publications of other authors. What really fascinates me about git is the design and implementation of a good ecosystem.
.gitignore. Sending only those files to the repository that you need
You may need so that no extra files get into your repository.
You can edit the .gitignore file manually.
To automatically exclude some project files, you can download the plugin for your IDE. For example, for NetBeans 10, you can download and install the plugin from the official netbeans website:
plugins.netbeans.org/plugin/50356/gitignore-io
Plugin owner: junichi11
License: Apache License, Version 2.0
How to install:
1. Download the file to a folder on the local drive
2. Open NetBeans IDE
3. Tools / Plugin / Downloaded / Add Plugins
4. Specify the path to the plug-in on your local computer.
5. Restarting the IDE
For the Intellij Idea IDE, you can download the plugin "Add to gitignore"
plugins.jetbrains.com/plugin/7495--ignore
1. Go to the site with the plugin
2. Choose your version of the IDE
3. Read the instructions.
4. Download and install
You can install the plugin from the IDE:
Preferences> Plugins> Browse repositories ...> Search for ".ignore"> Install Plugin
After installing the "Restart Idea".
git update-git-for-windows #обновить git для windowsAdditional resources:
Online book on Git >>>
10 useful Git commands that will facilitate work >>>
Debugging code with Git: 3 tools for finding errors >>> The
magic of Git. Students. Stanford >>>
Here, on the hub there is a wonderful publication about Git by jsirex , "Daily work with Git"
As you know, changes are made from version to version in programs.
What changes have been made for git 2.0: >>>
Here a little more should be said about the safety of using git and what relates to the use of various UIs for git.
To be continued, clarification follows ...