Automatic authorization on the Strava Heatmap card
- From the sandbox
- Tutorial
This post is a response to a recent similar article . I’ll try to tell you how to automate the actions described in it.
The article examined how the Strava Heatmap maps are useful for tourists and cyclists and how to connect the navigation application on a smartphone to them using the Osmand example. The fact is that to load each piece of the map you need to specify parameters with authorization data. Like that:
To get this data, it was suggested to log in to the Strava website from a desktop browser. As a result, cookies should appear in the browser. You need to find the required lines in them and copy them to the request address. And then, manually enter the request into Osmand so that he can download the map with his help.
However, this method is not very convenient, because authorization data quickly expire and you have to repeat the above steps once every few days. In this article I will tell you how to automate the above method.
So that the user does not have to replace the request URL in the smartphone every time the cookie data expires, you need to specify some unchanged URL. I have provided a link to my server application. This application will redirect the user to various addresses depending on the specified parameters.
To quickly get to the point, I will not dwell on the description of this server application. I’ll tell you only about his main actions.
If a tile is requested with a zoom of up to 12 (Stava gives such without authorization), then the user is immediately redirected to the public URL.
If not, then a check is performed. For quick access, the application stores in its database the latest working version of the cookie. When it receives a request, it parses this file and creates a URL with all parameters set.
After that, it sends a HEAD request to this address to check if it is available or not. If the status code “200 Success” is returned, then the cookie is still working. The application simply redirects the user to this address and the map loads beautifully.
But if the code “401 Unauthorized” arrives, then the cookie is out of date and you need to get them again. In this case, the application runs a script to obtain authorization data.
The first thought that comes to mind is to log in using the Strava API. Alas, but I was not able to pull out the necessary parameters from there. So I decided to take a detour.
To do this, I used the Headless Chrome browser with remote control and wrote a script for it so that it “physically” downloaded the authorization page, entered the username and password there, and then clicked on the button.
To do this, there is a Puppeteer library that can control the browser using Node.js scripts. The syntax is well described in this article . I suggest that you familiarize yourself with it.
After reading it, the only question remains is what to run our scripts on. If you are already an experienced Node.js developer, you can skip this section. For the rest, I can offer you to use the ready-made service from Apify.com . This saves us from having to create and configure our server. For our tasks, a free account is enough.
When the script runs, it will return a cookie with authorization data. The server application will save it to its database and will use it for all subsequent Strava card requests. Until the cookies are out of date and you do not need to repeat this procedure again. Fortunately, now everything happens automatically. Without unnecessary actions on the part of the user.
Alas, not everything is so smooth. This method has a weak point - this is the speed of work. The fact is that it takes some time to start the server, load the remote browser, load two web pages and authorize on each of them. According to my estimates, more than a minute comes out.
During this time, the navigation application will simply terminate the download due to a timeout. Therefore, it is better to immediately return the user error code 401, so as not to once again plant a battery for him.
To do this, the server application will set the flag when it realizes that the cookie data is out of date. After that, it will send a request to run the script, and it will immediately return an error code to users. In other words, the server will be unavailable for a minute.
And when the response with new cookies comes from our script, the application will save them to its database and clear the flag. After that, the server will again start working as usual and instantly redirect the user to the pages for downloading the map.
The result of our labors has become unchanging URLs with which users can connect their navigator to Strava maps.
As an option, you can make ready-made presets with these addresses for your navigator. For example, on this page I posted such presets in formats for Osmand, Locus, GuruMaps and Orux. Links to downloading the Strava map can be found in the “Complete Set” section under “Overlay” or “Global - OSM - Ways”.
UDP: Over the period since the publication of the article, I added a variant of this script that works through the Docker container. The instructions can be found on my GitHub page .
The article examined how the Strava Heatmap maps are useful for tourists and cyclists and how to connect the navigation application on a smartphone to them using the Osmand example. The fact is that to load each piece of the map you need to specify parameters with authorization data. Like that:
GET https://heatmap-external-{abc}.strava.com/tiles-auth/all/hot/{z}/{x}/{y}.png?px=256&Signature={CloudFront-Signature}&Key-Pair-Id={CloudFront-Key-Pair-Id}&Policy={CloudFront-Policy}To get this data, it was suggested to log in to the Strava website from a desktop browser. As a result, cookies should appear in the browser. You need to find the required lines in them and copy them to the request address. And then, manually enter the request into Osmand so that he can download the map with his help.
However, this method is not very convenient, because authorization data quickly expire and you have to repeat the above steps once every few days. In this article I will tell you how to automate the above method.
Add an intermediate link
So that the user does not have to replace the request URL in the smartphone every time the cookie data expires, you need to specify some unchanged URL. I have provided a link to my server application. This application will redirect the user to various addresses depending on the specified parameters.
https://anygis.herokuapp.com/Tracks_Strava_All/{x}/{y}/{z}To quickly get to the point, I will not dwell on the description of this server application. I’ll tell you only about his main actions.
If a tile is requested with a zoom of up to 12 (Stava gives such without authorization), then the user is immediately redirected to the public URL.
https://heatmap-external-a.strava.com/tiles/all/hot/10/619/318.pngIf not, then a check is performed. For quick access, the application stores in its database the latest working version of the cookie. When it receives a request, it parses this file and creates a URL with all parameters set.
It turns out something like this
https://heatmap-external-a.strava.com/tiles-auth/all/hot/10/619/318.png?px=256&Signature=Q47FWl1RX-5tLNK9fGfa7hdoxqwwjCLfrxwb~L3eke8h~glz5IBHmkLmu8ofh6eNWUM3usHTz4Z3rypbQGByC2jRhdzL2iJndIOu2TY9ZU34YUJV9QgMEf0L5cDHGjEsksYSVdkCqNRvOMnnzUc96wR9sktK2a0pcsI~E5eNvqjfsGbSWi6KCdfc1-~2D8t9YjbKftokhvMY20pM~PD6Y-fGYmpoTO5LOyMfIYboXnKGm29VnA9kA8LIxD-LzpADWO81i4pOMBvkVkJuLBGtO96a79P5D4tRP05DpI7y457LuKcuqRZaVQRB1L2AXgKvQgnx6nqr9T2jRAZNoy06ng__
&Key-Pair-Id=APKAIDPUN4QMG7VUQPSA
&Policy=eyJTdGF0ZW1lbnQiOiBbeyJSZXNvdXJjZSI6Imh0dHBzOi8vaGVhdG1hcC1leHRlcm5hbC0qLnN0cmF2YS5jb20vKiIsIkNvbmRpdGlvbiI6eyJEYXRlTGVzc1RoYW4iOnsiQVdTOkVwb2NoVGltZSI6MTU1ODUwODc2Mn0sIkRhdGVHcmVhdGVyVGhhbiI6eyJBV1M6RXBvY2hUaW1lIjoxNTU3Mjg0NzYyfX19XX0_
After that, it sends a HEAD request to this address to check if it is available or not. If the status code “200 Success” is returned, then the cookie is still working. The application simply redirects the user to this address and the map loads beautifully.
But if the code “401 Unauthorized” arrives, then the cookie is out of date and you need to get them again. In this case, the application runs a script to obtain authorization data.
Auto login
The first thought that comes to mind is to log in using the Strava API. Alas, but I was not able to pull out the necessary parameters from there. So I decided to take a detour.
To do this, I used the Headless Chrome browser with remote control and wrote a script for it so that it “physically” downloaded the authorization page, entered the username and password there, and then clicked on the button.
To do this, there is a Puppeteer library that can control the browser using Node.js scripts. The syntax is well described in this article . I suggest that you familiarize yourself with it.
After reading it, the only question remains is what to run our scripts on. If you are already an experienced Node.js developer, you can skip this section. For the rest, I can offer you to use the ready-made service from Apify.com . This saves us from having to create and configure our server. For our tasks, a free account is enough.
Apify account settings for running the script
First you need to register for this service. After that, open the section with your account, go to the Actors section and create a new script.
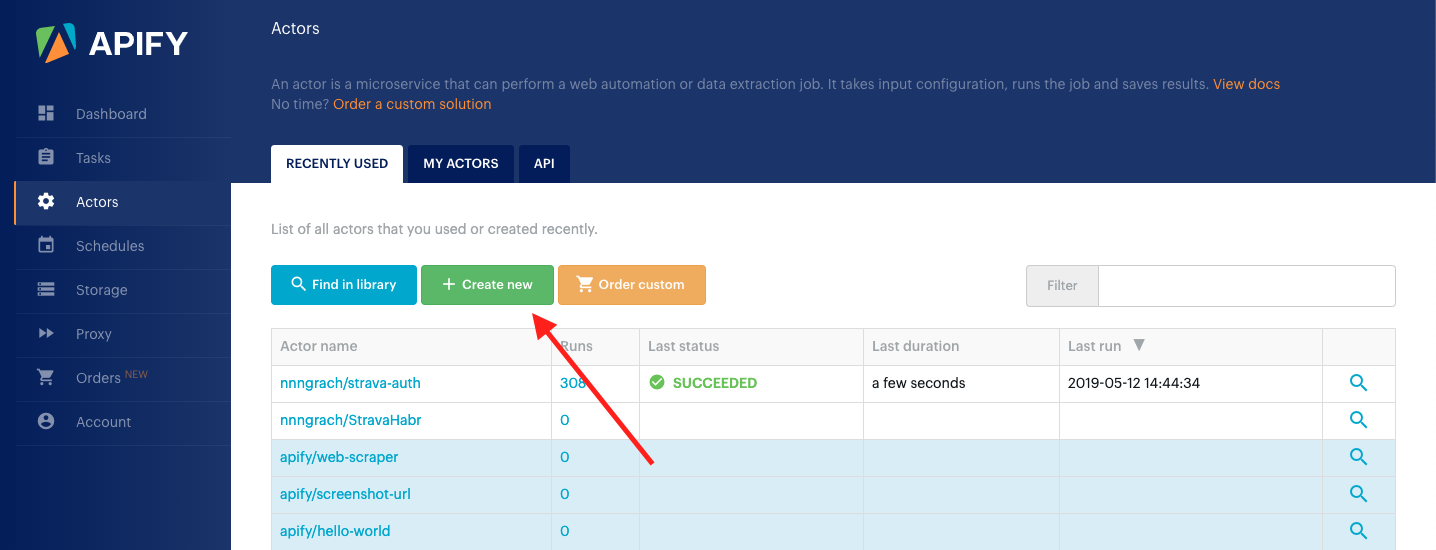
In the Name field, specify the name that will be used when running the script through Api. Click Save and go to the Source page.

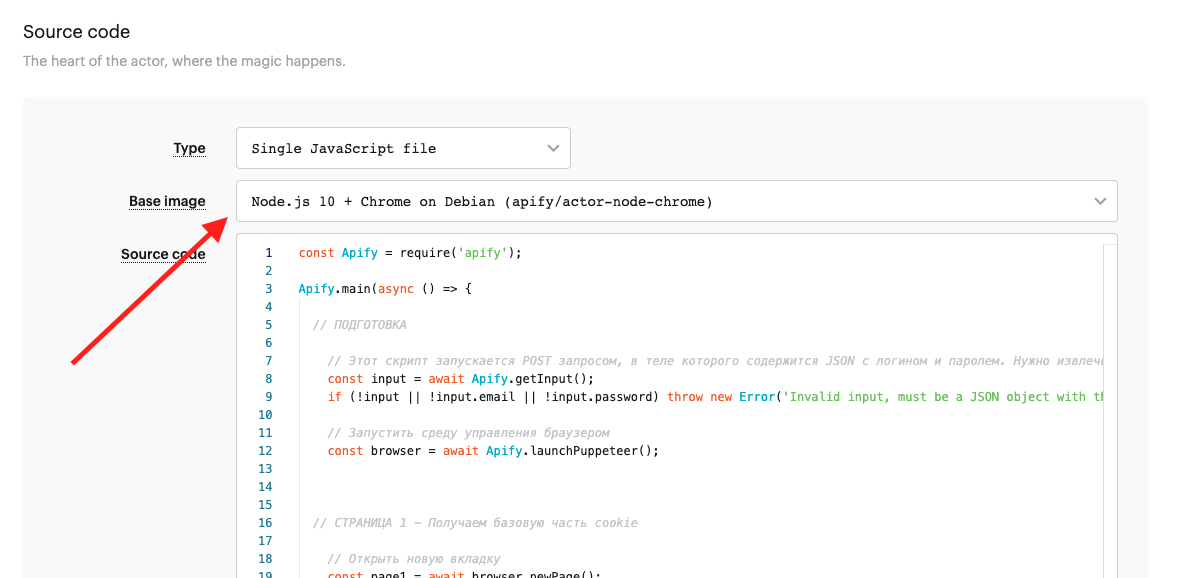
To start Headless Chrome, select the “Node.js 10 + Chrome on Debian” server image and click Save.
Now go to the Api section and copy the URL of the POST request, with which we will run our script.
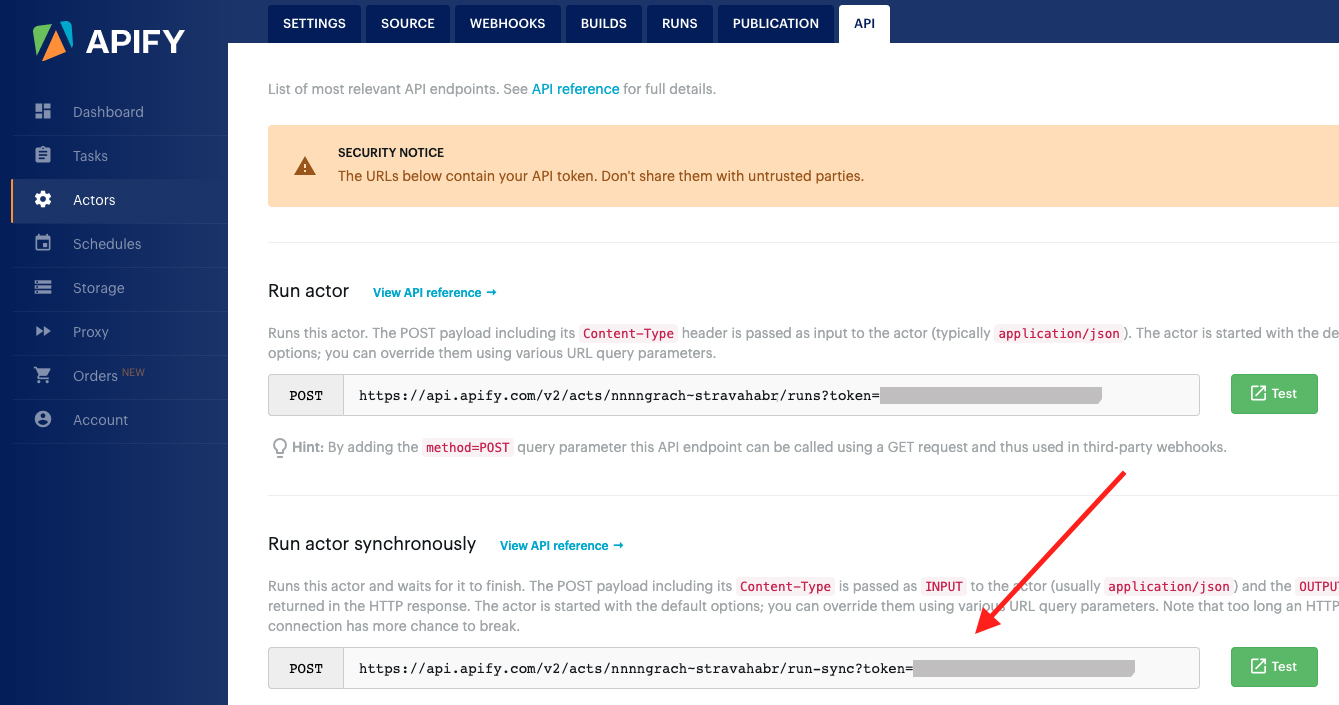
You can attach JSON with data for our script to the body of this request. I will send there my login and password for authorization on Strava.
In the Name field, specify the name that will be used when running the script through Api. Click Save and go to the Source page.
To start Headless Chrome, select the “Node.js 10 + Chrome on Debian” server image and click Save.
Now go to the Api section and copy the URL of the POST request, with which we will run our script.
You can attach JSON with data for our script to the body of this request. I will send there my login and password for authorization on Strava.
{ "email": "your_nick@gmail.com" , "password": "Your_Password" }Script to automatically receive cookie data with Strava
Now back to the Source section and go to the window with the code editor. Our script will look like this:
Or here is a link to GitHub with this script.
const Apify = require('apify');
Apify.main(async () => {
  // ПОДГОТОВКА
    // Извлечь параметры из принятого JSON
    const input = await Apify.getInput();
    if (!input || !input.email || !input.password) throw new Error('Invalid input, must be a JSON object with the "email" and "password" field!');
    // Запустить среду управления браузером
    const browser = await Apify.launchPuppeteer();
  // СТРАНИЦА 1 - Получаем базовую часть cookie
    // Открыть новую вкладку
    const page1 = await browser.newPage();
    await page1.setViewport({width: 1280, height: 1024});
    // Перейти на страницу авторизации
    await page1.goto('https://www.strava.com/login', {waitUntil: 'networkidle2'});
    // Найти на html-странице поля логин/пароль и заполнить их
    await page1.waitForSelector('form');
    await page1.type('input#email', input.email);
    await page1.type('input#password', input.password);
    // Немного подождать, чтобы выглядеть,
    // как настоящий человек, которому требуется время на ввод данных
    await page1.waitFor(200);
    // Найти кнопку Войти и кликнуть на нее
    await page1.evaluate(()=>document
      .querySelector('button#login-button')
      .click()
    );
    // Дождаться результатов и загрузить базовый cookie файл
    await page1.waitForNavigation();
    const sessionFourCookie = await page1.cookies();
  // СТРАНИЦА 2 - получаем дополненный cookie с ключами для просмотра карты
    // Открыть новую вкладку
    const page2 = await browser.newPage();
    // Перейти на страницу с просомотром карты, как залогиненный пользователь.
    // То есть, указав при этом полученные в предыдущем шаге cookie
    await page2.setCookie(...sessionFourCookie);
    await page2.goto('https://heatmap-external-a.strava.com/auth');
    // Получить новый дополненный файл cookie
    const cloudfontCookie = await page2.cookies();
  // ЗАВЕРШЕНИЕ
    // Закрыть среду исполнения
    await browser.close();
    // Вернуть дополненный файл cookie в теле ответа
    return cloudfontCookie;
});
Or here is a link to GitHub with this script.
Final stage
When the script runs, it will return a cookie with authorization data. The server application will save it to its database and will use it for all subsequent Strava card requests. Until the cookies are out of date and you do not need to repeat this procedure again. Fortunately, now everything happens automatically. Without unnecessary actions on the part of the user.
Alas, not everything is so smooth. This method has a weak point - this is the speed of work. The fact is that it takes some time to start the server, load the remote browser, load two web pages and authorize on each of them. According to my estimates, more than a minute comes out.
During this time, the navigation application will simply terminate the download due to a timeout. Therefore, it is better to immediately return the user error code 401, so as not to once again plant a battery for him.
To do this, the server application will set the flag when it realizes that the cookie data is out of date. After that, it will send a request to run the script, and it will immediately return an error code to users. In other words, the server will be unavailable for a minute.
And when the response with new cookies comes from our script, the application will save them to its database and clear the flag. After that, the server will again start working as usual and instantly redirect the user to the pages for downloading the map.
Result
The result of our labors has become unchanging URLs with which users can connect their navigator to Strava maps.
https://anygis.ru/api/v1/Tracks_Strava_All/{x}/{y}/{z}
https://anygis.ru/api/v1/Tracks_Strava_Ride/{x}/{y}/{z}
https://anygis.ru/api/v1/Tracks_Strava_Run/{x}/{y}/{z}
https://anygis.ru/api/v1/Tracks_Strava_Water/{x}/{y}/{z}
https://anygis.ru/api/v1/Tracks_Strava_Winter/{x}/{y}/{z}
https://anygis.ru/api/v1/Tracks_Strava_All_Bluered/{x}/{y}/{z}
https://anygis.ru/api/v1/Tracks_Strava_Ride_Bluered/{x}/{y}/{z}
https://anygis.ru/api/v1/Tracks_Strava_Run_Bluered/{x}/{y}/{z}
https://anygis.ru/api/v1/Tracks_Strava_Water_Bluered/{x}/{y}/{z}
https://anygis.ru/api/v1/Tracks_Strava_Winter_Bluered/{x}/{y}/{z}
As an option, you can make ready-made presets with these addresses for your navigator. For example, on this page I posted such presets in formats for Osmand, Locus, GuruMaps and Orux. Links to downloading the Strava map can be found in the “Complete Set” section under “Overlay” or “Global - OSM - Ways”.
UDP: Over the period since the publication of the article, I added a variant of this script that works through the Docker container. The instructions can be found on my GitHub page .