Thinking with Portals: creating portals in Unreal Engine 4
- Transfer
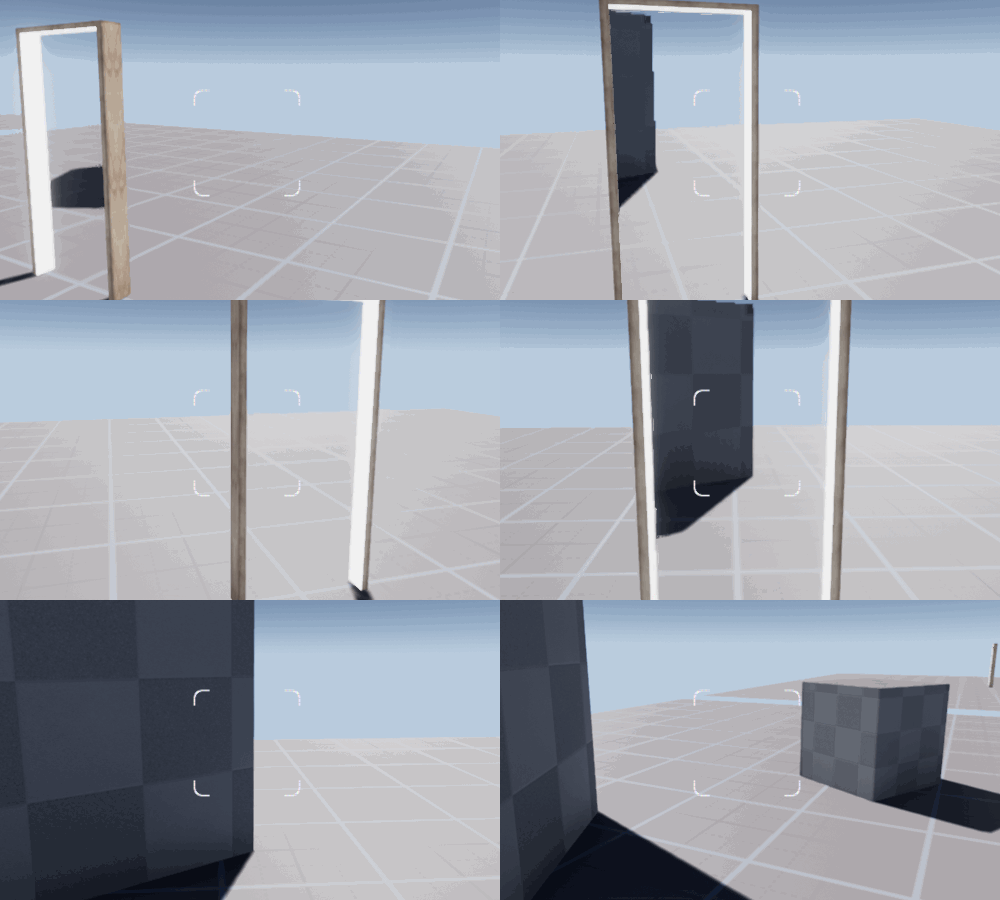
In this article I will tell you how to create portals in Unreal Engine 4. I did not find any sources that describe such a system in detail (observation through portals and passage through them), so I decided to write my own.
What is a portal?
Let's start with examples and explanations of what a portal is. The easiest way to describe the portals as a way of passage from one space to another. In some popular games, this concept is used for visual effects and even for gameplay mechanics:
Game Portal Examples (GIF)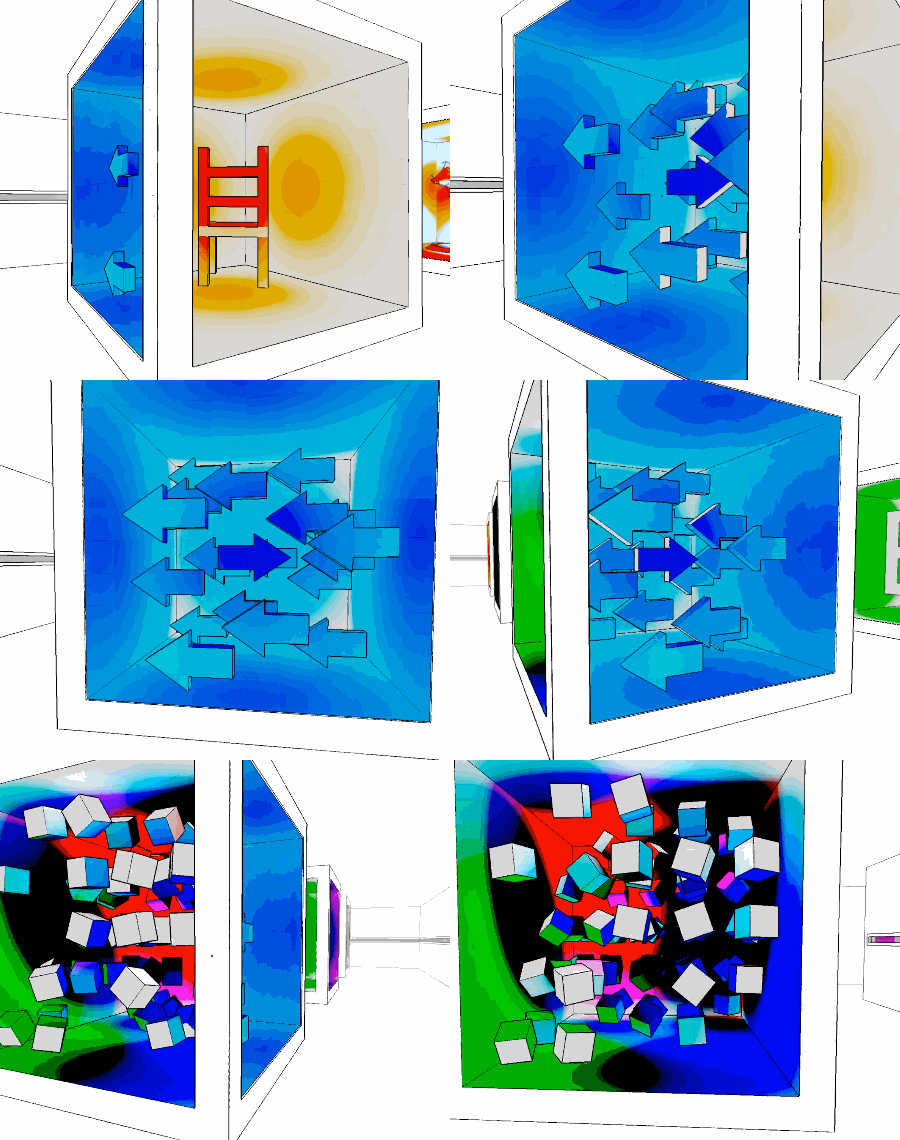
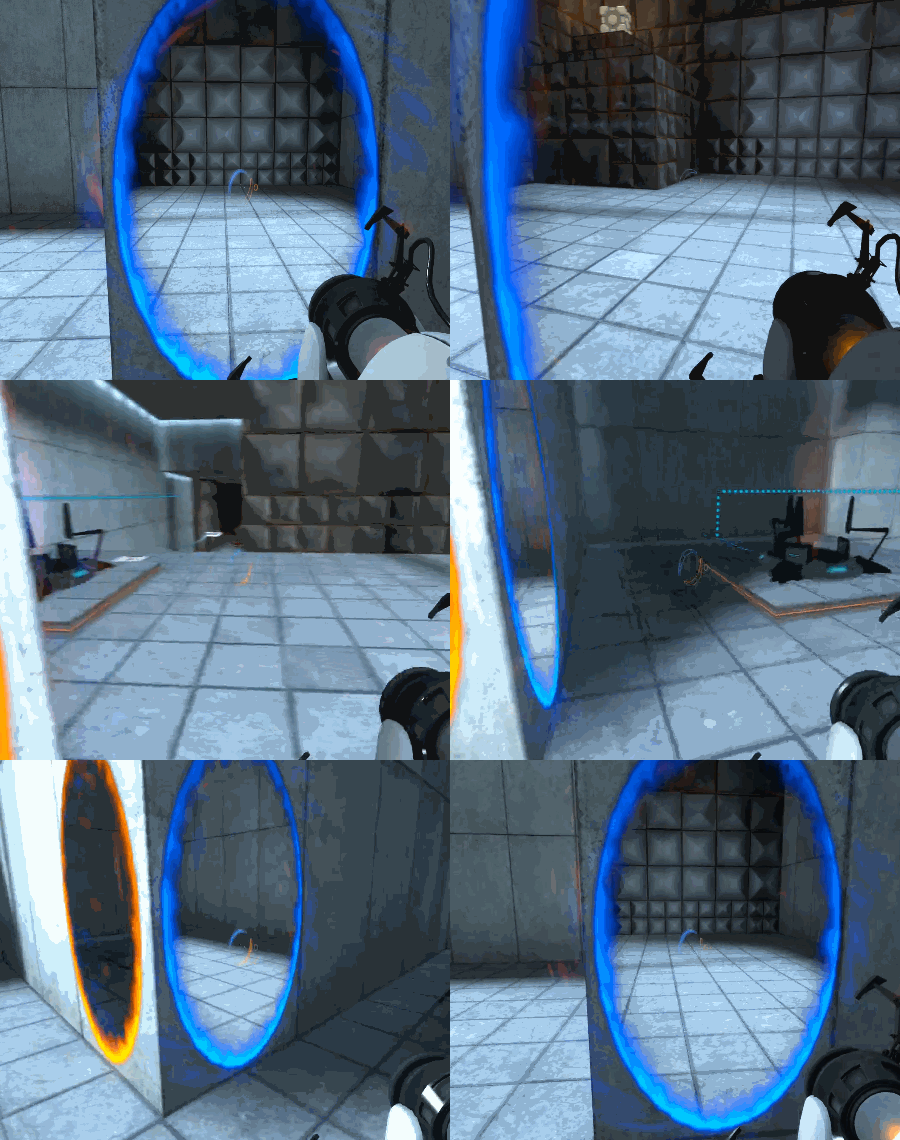
Antichamber (2013) and Portal (2007)
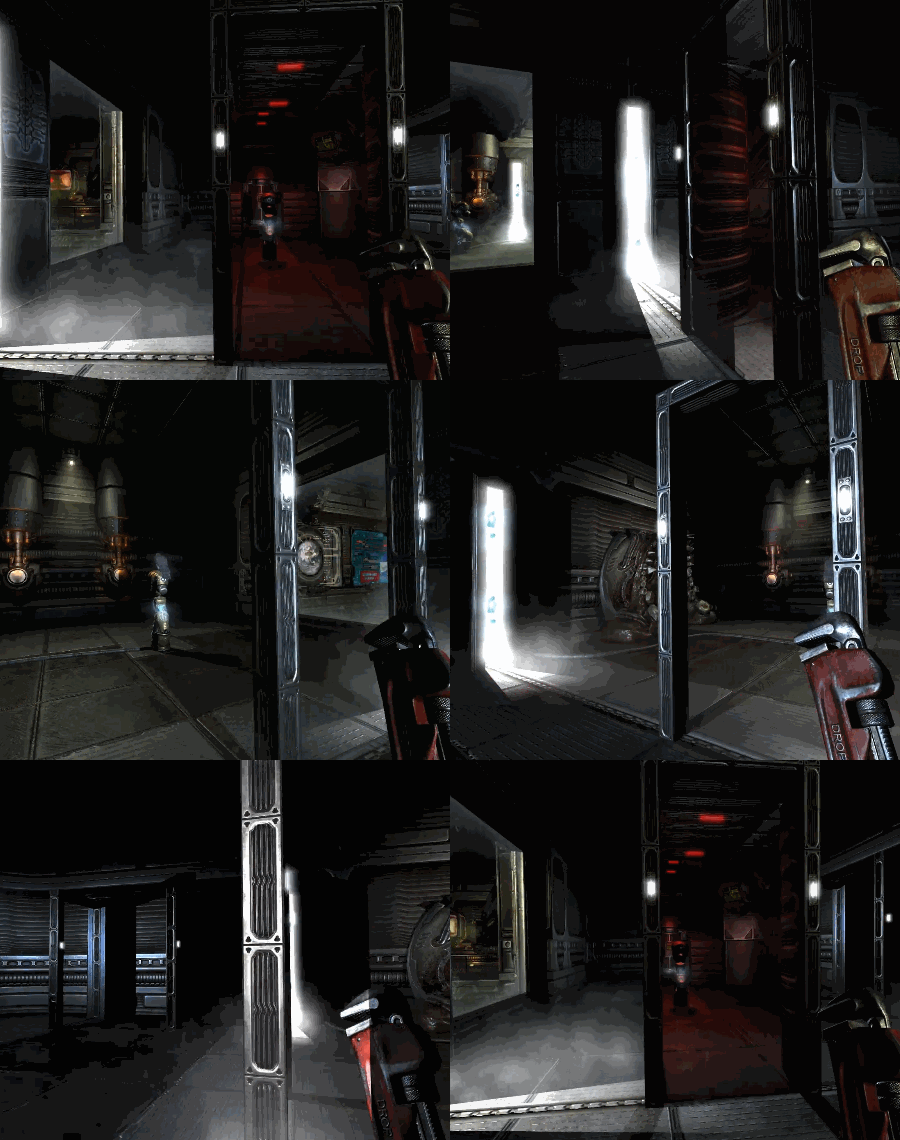
Prey, 2006


Antichamber (2013) and Portal (2007)

Prey, 2006
Of the three games, the most famous is probably Portal, but I personally have always admired Prey and it was her that I wanted to copy. Once I tried to implement my own version in Unreal Engine 4, but I didn’t really succeed, because the engine lacked functionality. Nevertheless, I managed to conduct these experiments:
However, only in new versions of Unreal Engine did I finally manage to achieve the desired effect:
Portals - how do they work?
Прежде чем приступать к конкретике, давайте рассмотрим общую картину того, как работают порталы.
По сути, портал — это окно, которое выходит не наружу, а в другое место, то есть мы локально задаём определённую точку обзора относительно объекта и реплицируем эту точку обзора где-то ещё. Пользуясь этим принципом, мы можем соединить два пространства, даже если они находятся очень далеко друг от друга. Окно напоминает маску, которая позволяет нам узнать, где и когда отображать другое пространство вместо исходного. Так как исходная точка обзора реплицируется в другое место, это даёт нам иллюзию непрерывности.
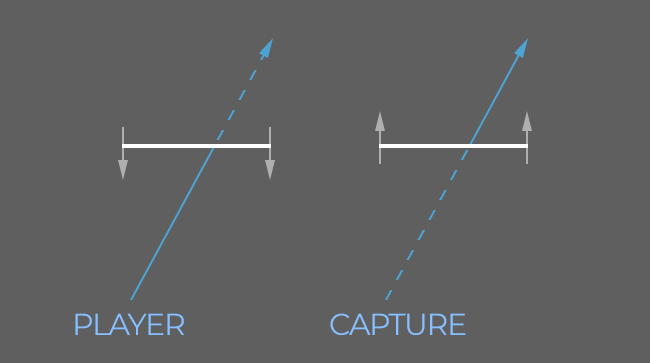
In this image, the capture device (SceneCapture in UE4) is located in front of the space that corresponds to the space seen from the player’s point of view. Everything that is visible after the line is replaced by what the capture can see. Since the capture device can be located between the door and other objects, it is important to use the so-called “clipping plane”. In the case of the portal, we want the close clipping plane to mask the objects visible in front of the portal.
Summarize. We need:
- Player Location
- Portal Entry Point
- Portal Exit Point
- Clipping device with clipping plane
How to implement this in Unreal Engine?
I built my system on the basis of two main classes managed by PlayerController and Character . The Portal class is a true portal entry point, whose view / exit point is the Target actor. There is also a Portal Manager , which is generated by the PlayerController and updated by Character to manage and update each portal at the level, as well as to manipulate the SceneCapture object (which is common to all portals).
Keep in mind that the tutorial expects you to have access to the Character and PlayerController classes from code. In my case, they are called ExedreCharacter and ExedrePlayerController.
Creating a Portal Actor Class
Let's start with the actor of the portal, which will be used to set the “windows” through which we will look at the level. The task of the actor is to provide information on the player to calculate various positions and turns. He will also be engaged in recognizing whether the player crosses the portal, and his teleportation.
Before starting a detailed discussion of the actor, let me explain a few concepts that I created to manage the portal system:
- For convenient refusal of calculations, the portal has an active-inactive status. This state is updated by Portal Manager.
- The portal has front and back sides determined by its position and direction (forward vector).
- To find out if the player crosses the portal, he stores the previous position of the player and compares it with the current one. If in the previous measure the player was in front of the portal, and in the current - behind him, then we believe that the player crossed it. The reverse behavior is ignored.
- The portal has a limiting volume, so as not to perform calculations and checks until the player is in this volume. Example: Ignore the intersection if the player is not actually touching the portal.
- The player’s location is calculated from the camera’s location to ensure correct behavior when the viewpoint crosses the portal but not the player’s body.
- The portal receives a Render Target, which displays a different viewpoint in each measure in case the texture next time is incorrect and needs to be replaced.
- The portal stores a link to another actor called Target, in order to know where the other space is to be contacted.
Using these rules, I created a new ExedrePortal class inherited from AActor as a starting point. Here is its title:
#pragma once
#include "CoreMinimal.h"
#include "GameFramework/Actor.h"
#include "ExedrePortal.generated.h"
UCLASS()
class EXEDRE_API AExedrePortal : public AActor
{
	GENERATED_UCLASS_BODY()
	protected:
		virtual void BeginPlay() override;
	public:
		virtual void Tick(float DeltaTime) override;
		//Status of the Portal (being visualized by the player or not)
		UFUNCTION(BlueprintPure, Category="Exedre|Portal")
		bool IsActive();
		UFUNCTION(BlueprintCallable, Category="Exedre|Portal")
		void SetActive( bool NewActive );
		//Render target to use to display the portal
		UFUNCTION(BlueprintNativeEvent, BlueprintCallable, Category="Exedre|Portal")
		void ClearRTT();
		UFUNCTION(BlueprintNativeEvent, BlueprintCallable, Category="Exedre|Portal")
		void SetRTT( UTexture* RenderTexture );
		UFUNCTION(BlueprintNativeEvent, Category="Exedre|Portal")
		void ForceTick();
		//Target of where the portal is looking
		UFUNCTION(BlueprintPure, Category="Exedre|Portal")
		AActor* GetTarget();
		UFUNCTION(BlueprintCallable, Category="Exedre|Portal")
		void SetTarget( AActor* NewTarget );
		//Helpers
		UFUNCTION(BlueprintCallable, Category="Exedre|Portal")
		bool IsPointInFrontOfPortal( FVector Point, FVector PortalLocation, FVector PortalNormal );
		UFUNCTION(BlueprintCallable, Category="Exedre|Portal")
		bool IsPointCrossingPortal( FVector Point, FVector PortalLocation, FVector PortalNormal );
		UFUNCTION(BlueprintCallable, Category="Exedre|Portal")
		void TeleportActor( AActor* ActorToTeleport );
	protected:
		UPROPERTY(BlueprintReadOnly)
		USceneComponent* PortalRootComponent;
	private:
		bool bIsActive;
		AActor* Target;
		//Used for Tracking movement of a point
		FVector LastPosition;
		bool 	LastInFront;
};
As you can see, there are most of the behaviors described here. Now let's see how they are processed in the body (.cpp).
Конструктор здесь занимается подготовкой корневых компонентов. Я решил создавать два корневых компонента, потому что актор портала будет сочетать в себе и графические эффекты, и коллизии/распознавание. Поэтому мне нужен был простой способ для определения того, где находится плоскость окна/портала, без необходимости использования функций блюпринтов или других трюков. PortalRootComponent будет в дальнейшем основой для всех вычислений, связанных с порталом.
Root портала задан как динамический, на случай, если класс Blueprint анимирует его (например, использует анимацию открытия/закрытия).
// Sets default values
AExedrePortal::AExedrePortal(const FObjectInitializer& ObjectInitializer)
	: Super(ObjectInitializer)
{
	PrimaryActorTick.bCanEverTick 	= true;
	bIsActive 						= false;
	RootComponent = CreateDefaultSubobject(TEXT("RootComponent"));
	RootComponent->Mobility = EComponentMobility::Static;
	PortalRootComponent	= CreateDefaultSubobject(TEXT("PortalRootComponent"));
	PortalRootComponent->SetupAttachment( GetRootComponent() );
	PortalRootComponent->SetRelativeLocation( FVector(0.0f, 0.0f, 0.0f) );
	PortalRootComponent->SetRelativeRotation( FRotator(0.0f, 0.0f, 0.0f) );
	PortalRootComponent->Mobility = EComponentMobility::Movable;
}
Здесь только функции Get и Set, и ничего больше. Состоянием активности мы будем управлять из другого места.
bool AExedrePortal::IsActive()
{
	return bIsActive;
}
void AExedrePortal::SetActive( bool NewActive )
{
	bIsActive = NewActive;
}
События блюпринта, в классе C++ я ничего не делаю.
void AExedrePortal::ClearRTT_Implementation()
{
}
void AExedrePortal::SetRTT_Implementation( UTexture* RenderTexture )
{
}
void AExedrePortal::ForceTick_Implementation()
{
}
Функции Get и Set для актора Target. В этой части тоже больше нет ничего сложного.
AActor* AExedrePortal::GetTarget()
{
	return Target;
}
void AExedrePortal::SetTarget( AActor* NewTarget )
{
	Target = NewTarget;
}
With this function, we can easily check whether a point is in front of a plane, and in our case it is a portal. The function uses FPlane structure of the UE4 engine to perform calculations.
bool AExedrePortal::IsPointInFrontOfPortal( FVector Point, FVector PortalLocation, FVector PortalNormal )
{
	FPlane PortalPlane 	= FPlane( PortalLocation, PortalNormal );
	float PortalDot 	= PortalPlane.PlaneDot( Point );
	//If < 0 means we are behind the Plane
	//See : http://api.unrealengine.com/INT/API/Runtime/Core/Math/FPlane/PlaneDot/index.html
	return ( PortalDot >= 0 );
}
This function checks to see if the point has crossed the portal plane. It is here that we use the old position to find out how the point behaves. This function is common so that it can work with any actor, but in my case it is used only with the player.
The function creates a direction / segment between the previous and current location, and then checks if they intersect the plane. If so, then we check if it crosses in the right direction (front to back?).
bool AExedrePortal::IsPointCrossingPortal( FVector Point, FVector PortalLocation, FVector PortalNormal )
{
	FVector IntersectionPoint;
	FPlane PortalPlane 	= FPlane( PortalLocation, PortalNormal );
	float PortalDot 	= PortalPlane.PlaneDot( Point );
	bool IsCrossing 	= false;
	bool IsInFront 		= PortalDot >= 0;
	bool IsIntersect 	= FMath::SegmentPlaneIntersection( 	LastPosition,
															Point,
															PortalPlane,
															IntersectionPoint );
	//Did we intersect the portal since last Location ?
	//If yes, check the direction : crossing forward means we were in front and now at the back
	//If we crossed backward, ignore it (similar to Prey 2006)
	if( IsIntersect && !IsInFront && LastInFront )
	{
		IsCrossing 	= true;
	}
	//Store values for Next check
	LastInFront 	= IsInFront;
	LastPosition 	= Point;
	return IsCrossing;
}
Teleport Actor
The last part of the portal actor that we will look at is the TeleportActor () function .
When teleporting an actor from point A to point B, you need to replicate its movement and position. For example, if a player passes into the portal, then in combination with suitable visual effects, it will seem to him that he went through an ordinary door.
The intersection of the portal feels like moving in a straight line, but in reality something completely different happens. Upon exiting the portal, the player may be in a very different context. Consider an example from Portal:
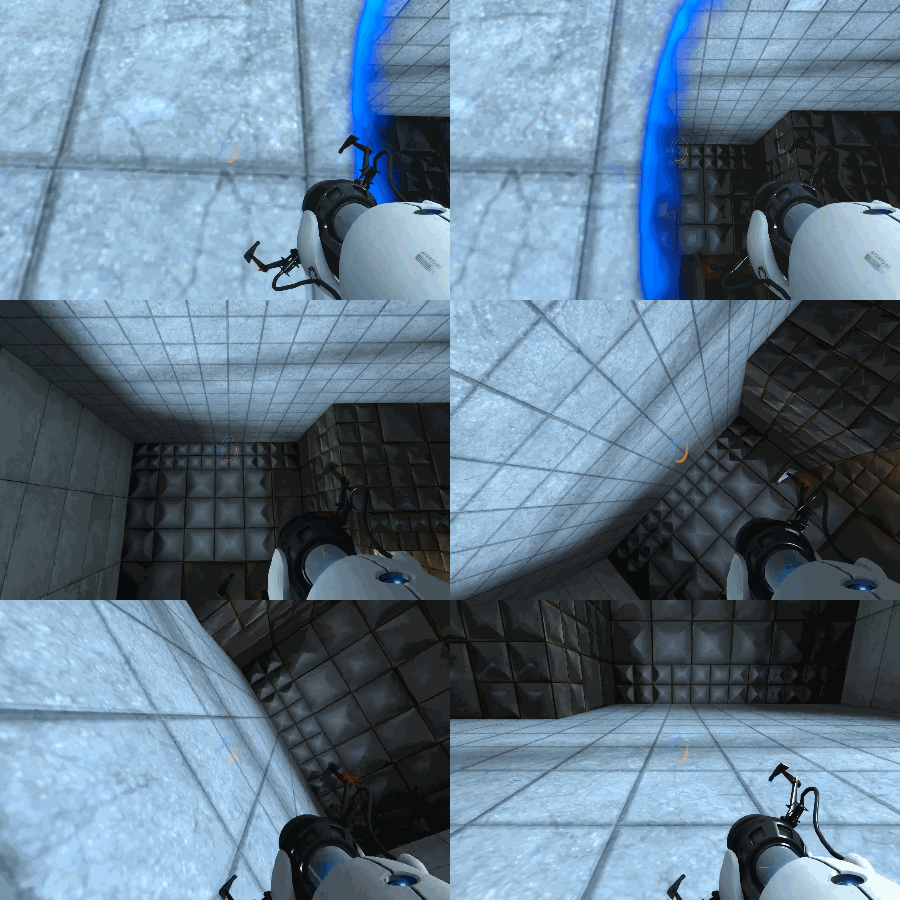
As you can see, when crossing the portal, the camera rotates relative to its forward vector (rotates). This is because the start and end points are parallel to different planes:
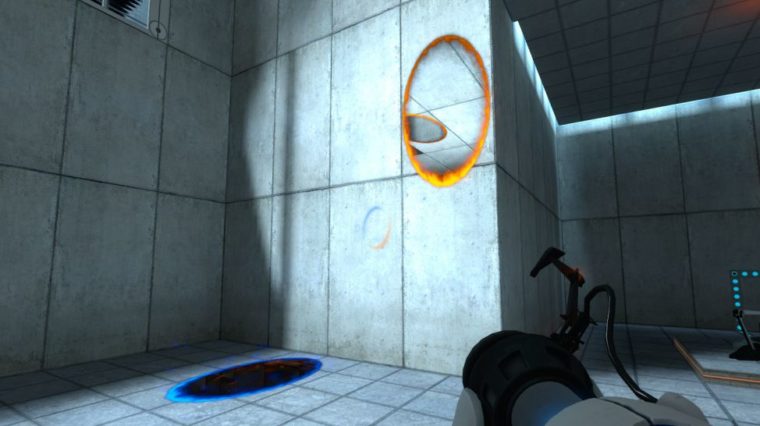
Поэтому чтобы всё сработало, нам нужно преобразовать движение игрока в относительное пространство портала, чтобы преобразовать его в пространство Target. Реализовав это, мы сможем быть уверенными в том, что после входа в портал и выхода с другой стороны игрок будет правильно выровнен относительно пространства. Это относится не только к позиции и повороту актора, но и к его скорости.
Если мы телепортируем актора без изменений, преобразовав его локальный поворот, то в результате актор может очутиться вверх ногами. Это может подходить для объектов, но неприменимо ни для персонажей, ни для самого игрока. Необходимо изменить позицию актора, как это показано выше на примере из Portal.
void AExedrePortal::TeleportActor( AActor* ActorToTeleport )
{
	if( ActorToTeleport == nullptr || Target == nullptr )
	{
		return;
	}
	//-------------------------------
	//Retrieve and save Player Velocity
	//(from the Movement Component)
	//-------------------------------
	FVector SavedVelocity 	= FVector::ZeroVector;
	AExedreCharacter* EC 	= nullptr;
	if( ActorToTeleport->IsA( AExedreCharacter::StaticClass() ) )
	{
		EC = Cast( ActorToTeleport );
		SavedVelocity = EC->GetCharMovementComponent()->GetCurrentVelocity();
	}
	//-------------------------------
	//Compute and apply new location
	//-------------------------------
	FHitResult HitResult;
	FVector NewLocation = UTool::ConvertLocationToActorSpace( 	ActorToTeleport->GetActorLocation(),
																this,
																Target );
	ActorToTeleport->SetActorLocation( 	NewLocation,
	 									false,
										&HitResult,
										ETeleportType::TeleportPhysics );
	//-------------------------------
	//Compute and apply new rotation
	//-------------------------------
	FRotator NewRotation = UTool::ConvertRotationToActorSpace( 	ActorToTeleport->GetActorRotation(),
																this,
																Target );
	//Apply new rotation
	ActorToTeleport->SetActorRotation( NewRotation );
	//-------------------------------
	//If we are teleporting a character we need to
	//update its controller as well and reapply its velocity
	//-------------------------------
	if( ActorToTeleport->IsA( AExedreCharacter::StaticClass() ) )
	{
		//Update Controller
		AExedrePlayerController* EPC = EC->GetPlayerController();
		if( EPC != nullptr )
		{
			NewRotation = UTool::ConvertRotationToActorSpace(	EPC->GetControlRotation(),
																this,
																Target );
			EPC->SetControlRotation( NewRotation );
		}
		//Reapply Velocity (Need to reorient direction into local space of Portal)
		{
			FVector Dots;
			Dots.X 	= FVector::DotProduct( SavedVelocity, GetActorForwardVector() );
			Dots.Y 	= FVector::DotProduct( SavedVelocity, GetActorRightVector() );
			Dots.Z 	= FVector::DotProduct( SavedVelocity, GetActorUpVector() );
			FVector NewVelocity 	= Dots.X * Target->GetActorForwardVector()
									+ Dots.Y * Target->GetActorRightVector()
									+ Dots.Z * Target->GetActorUpVector();
			EC->GetCharMovementComponent()->Velocity = NewVelocity;
		}
	}
	//Cleanup Teleport
	LastPosition = NewLocation;
}
As you probably noticed, to call rotation / position, I call external functions. They are called from the UTool user class, which defines static functions that can be called from anywhere (including blueprints). Their code is shown below, you can implement them in the way that seems best to you (it is probably easier to just put them in the Portal actor class).
FVector ConvertLocationToActorSpace( FVector Location, AActor* Reference, AActor* Target )
{
	if( Reference == nullptr || Target == nullptr )
	{
		return FVector::ZeroVector;
	}
	FVector Direction 		= Location - Reference->GetActorLocation();
	FVector TargetLocation 	= Target->GetActorLocation();
	FVector Dots;
	Dots.X 	= FVector::DotProduct( Direction, Reference->GetActorForwardVector() );
	Dots.Y 	= FVector::DotProduct( Direction, Reference->GetActorRightVector() );
	Dots.Z 	= FVector::DotProduct( Direction, Reference->GetActorUpVector() );
	FVector NewDirection 	= Dots.X * Target->GetActorForwardVector()
							+ Dots.Y * Target->GetActorRightVector()
							+ Dots.Z * Target->GetActorUpVector();
	return TargetLocation + NewDirection;
}
The transformation here is performed by calculating the scalar product of vectors to determine different angles. The Direction vector is not normalized, that is, we can again multiply the Dots result by Target vectors to get the position at exactly the same distance in the local space of the Target actor.
FRotator ConvertRotationToActorSpace( FRotator Rotation, AActor* Reference, AActor* Target )
{
	if( Reference == nullptr || Target == nullptr )
	{
		return FRotator::ZeroRotator;
	}
	FTransform SourceTransform 	= Reference->GetActorTransform();
	FTransform TargetTransform 	= Target->GetActorTransform();
	FQuat QuatRotation 			= FQuat( Rotation );
	FQuat LocalQuat 			= SourceTransform.GetRotation().Inverse() * QuatRotation;
	FQuat NewWorldQuat 			= TargetTransform.GetRotation() * LocalQuat;
	return NewWorldQuat.Rotator();
}
Turning transformation was a little harder to implement. In the end, the best solution turned out to be the use of quaternions , because this is much more accurate than working with normal Euler angles and requires only a few lines of code. Rotations by quaternions are performed using multiplication, so in our case, applying Inverse () to the rotation that we want to convert, we will move it to local space. Next, we just need to multiply it again by the Target turn to get the final turn.
Creating a Portal Mesh
To look beautiful from a player’s point of view, my portal system uses a specific mesh. The mesh is divided into two different planes:
- Plane 1 : The main plane on which the render target of the portal is displayed. This plane has a rather unusual behavior, because its task is to push off a little from the player as he approaches to avoid clipping by the camera. Since the borders of the plane do not move, but only its middle peaks move, this allows the player to superimpose on rendering the portal without visual artifacts. The edges on the edges have their own UV in the upper half, while the inner edges have their own UV in the lower half, which makes it easy to mask them in the shader.
- Plane 2 : This plane is only used to extend the standard bounding box of the mesh. The normals of the vertices are directed downward, so even on non-planar ground the mesh will not be visible by default (because the rendering material will not be two-sided).

Why use a mesh like this?
I decided that “plane 1” would stretch as the player approached. This allows the player to overlap the portal and pass through it without trimming (cutting). This can happen, for example, if the camera has not yet crossed the plane of the portal, but the player’s feet have already touched it. This allows you not to cut off the player and duplicate the mesh on the other hand.
The “plane 2” task is to extend the standard bounding box of the mesh. Since “plane 1” is flat, the bounding box on one axis has a thickness of 0, and if the camera is behind it, the engine will cut it off (that is, it will not render it). Plane 1 has a size of 128 × 128, so it can be easily scaled using the engine. Plane 2 is slightly larger and below the floor (below 0).
Having created the mesh, we simply export it from a third-party 3D editor and import into Unreal. It will be used in the next step.
Creating Portal Material
To display the other side of the portal, we need to create our own material. Create new material in the content browser (I called it MAT_PortalBase ):
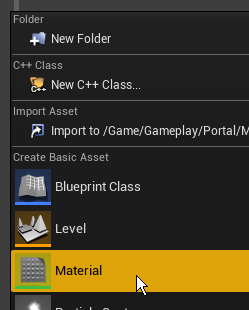
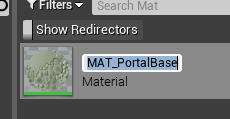
Now open it and create the following graph:
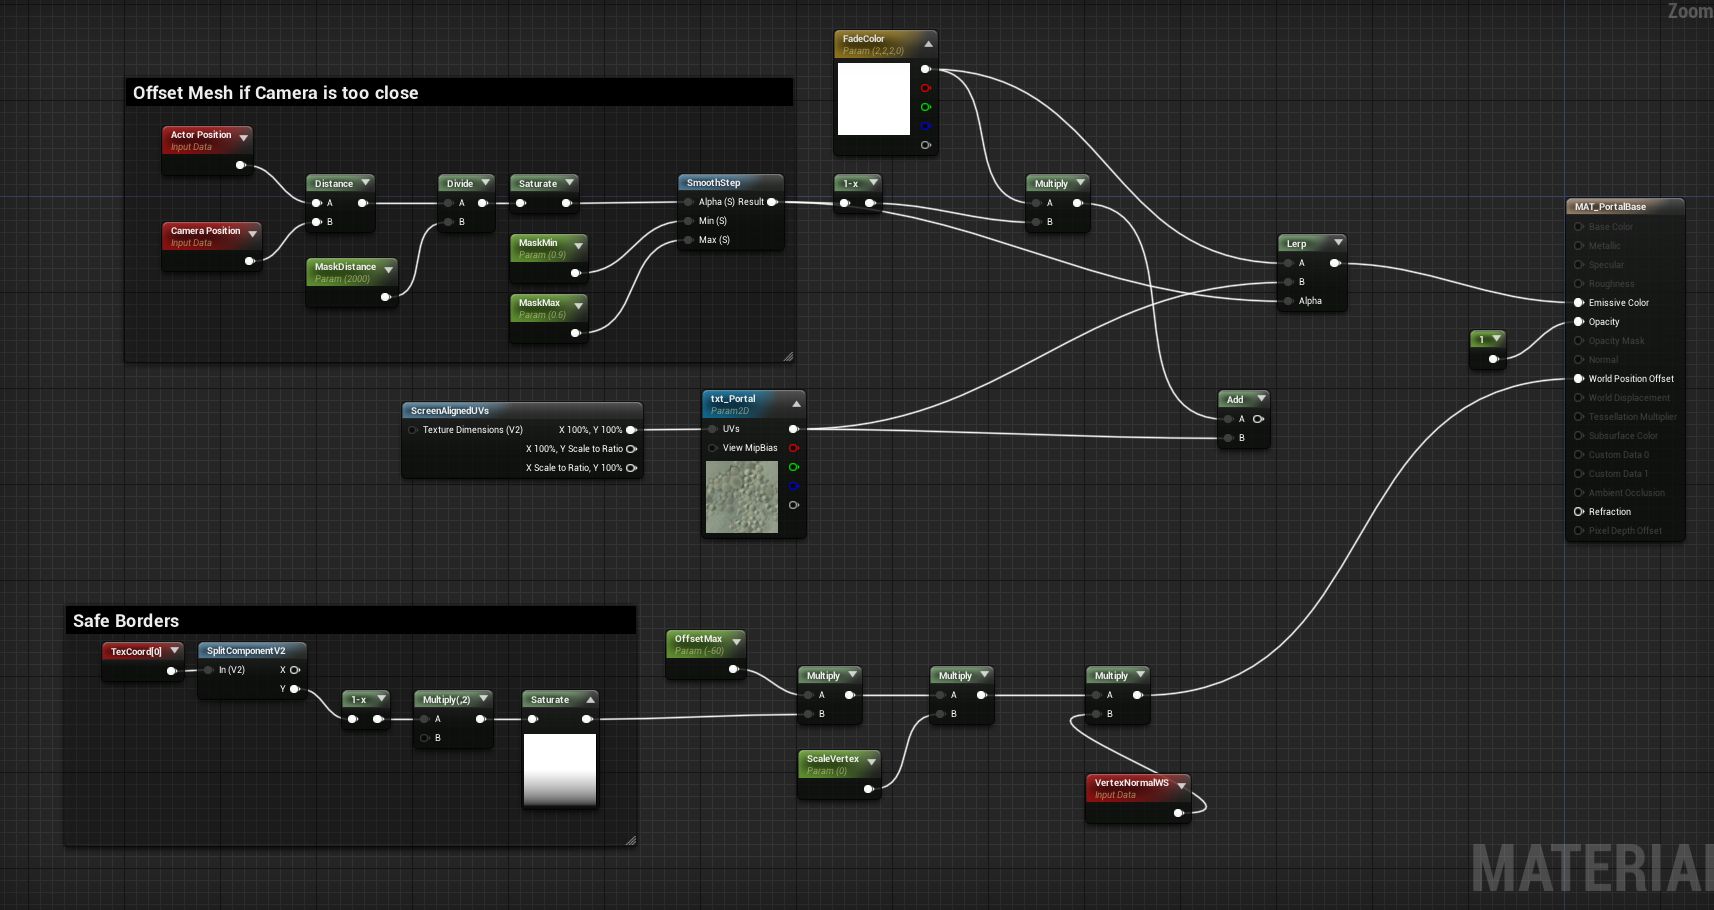
Here's how the material works:
- FadeColor is the color that will be visible through the portal when it is very far away. It is needed because we do not always render all portals, so we obscure the rendering when the player / camera is far away.
- To find out how far the player is from the portal, I determine the distance between Camera Position and Actor Position. Then I divide the distance by the maximum value with which I want to perform a comparison. For example, if the maximum I set is 2000, and the distance to the player is 1000, then we get 0.5. If the player is further, then I will get a value greater than 1, so I use saturate nodes to limit it. Next comes the Smoothstep node, used to scale the distance as a gradient and more accurately control portal shading. For example, I want when the player is close, the shadow completely disappears.
- I use distance calculation as the alpha channel value for the Lerp node to mix the shading color and the texture that will render the portal target.
- Finally, I isolate the Y component of the UV coordinates to create a mask that lets you know which vertices of the mesh will be pushed. I multiply this mask by the repulsion amount I need. I use a negative value so that when the normals of the vertices are multiplied by the vertices, they move in the opposite direction.
Having done all this, we created ready-to-use material.
Creating a Portal Actor in Blueprint
Let's set up a new blueprint class inheriting from the Portal actor. Right-click on the content browser and select the Blueprint class:
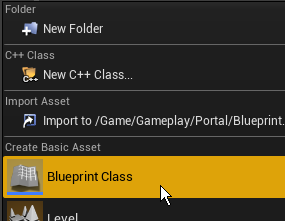
Now enter “portal” in the search field to select the portal class:
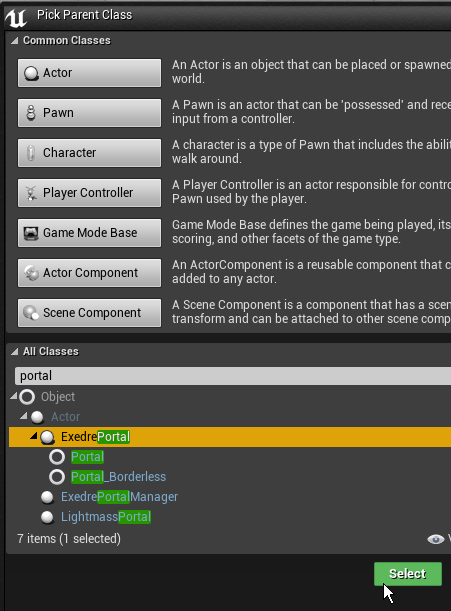
Open bluetooth if it is not already open. In the list of components you will see the following hierarchy:

As we expected, there is a root component and portal root. Let's add a static mesh component to PortalRootComponent and load the mesh created in the previous step into it:
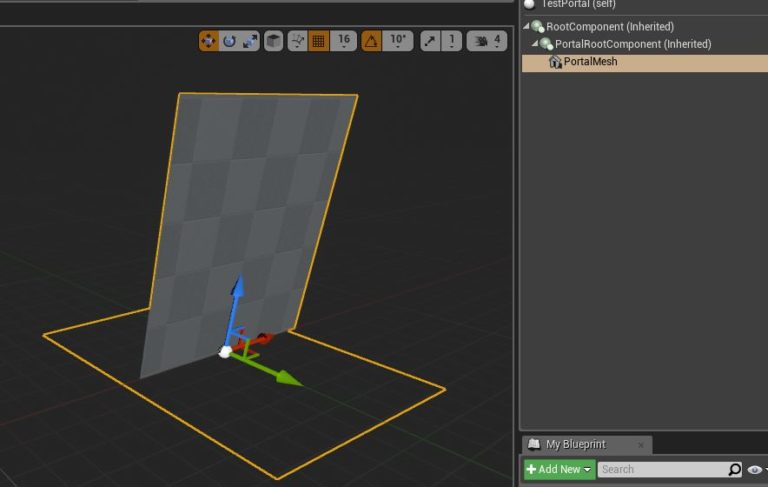
We also add the Collision Box, which will be used to determine whether the player is inside the portal volume:
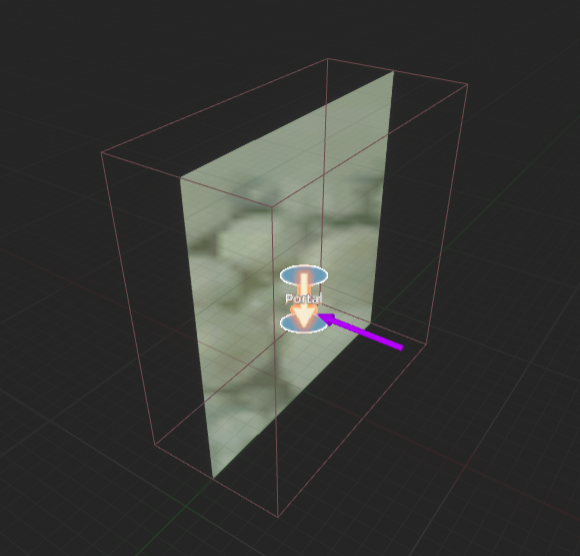

The Collision box is located below the scene component associated with the main root, and not under the Portal root. I also added an icon (billboard) and an arrow component to make the portal more visible on the levels. Of course, this is not necessary.
Now let's set up the material in blueprint.
First, we need two variables - one will be of type Actor and name is PortalTarget , the second is of type Dynamic Material Instance and is called MaterialInstance. PortalTarget will be a reference to the position that the portal window is looking at (therefore, the variable is common, with an open eye icon) so that we can change it when the actor is placed at the level. MaterialInstance will store a link to dynamic material so that in the future we can assign the render target of the portal on the fly.

We also need to add our own event nodes. It is best to open the right-click menu in the Event Graph and find the names of the events:
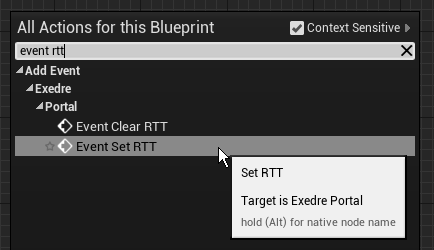
And here to create the following diagram:
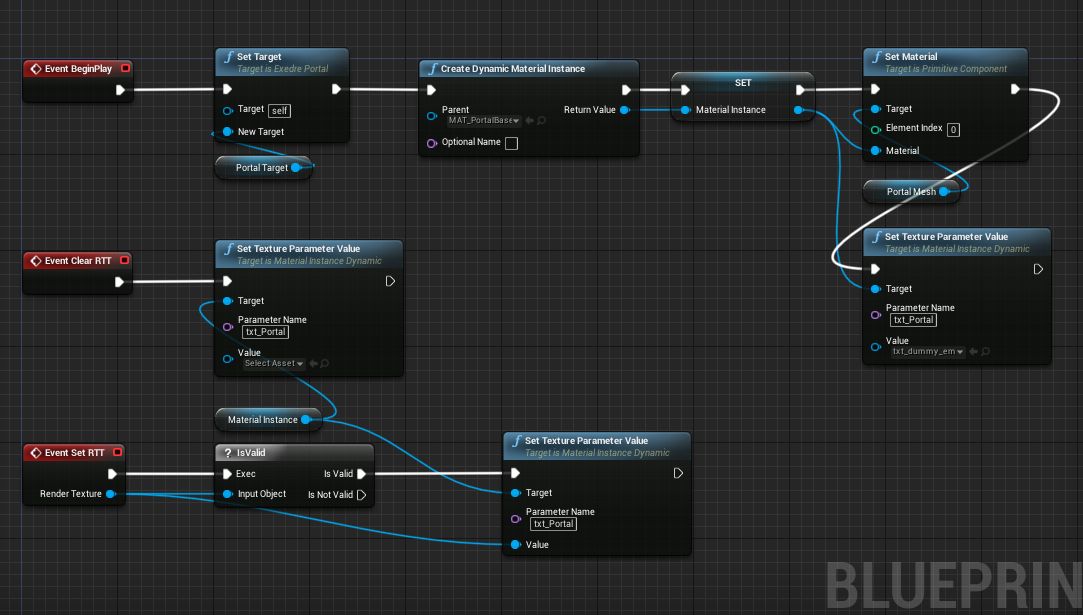
- Begin Play : here we call the parent function SetTarget () of the portal to assign it a link to the actor, which will later be used for SceneCapture. Then we create a new Dynamic Material and assign it the value of the MaterialInstance variable. With this new material, we can assign it to the Static Mesh Component. I also gave the material a dummy texture, but this is optional.
- Clear RTT : The purpose of this feature is to clear the Render Target texture assigned to the portal material. It is launched by the Portal manager.
- Set RTT : the purpose of this function is to set the render target material of the portal. It is launched by the Portal manager.
So far we are done with bluetooth, but we will return to it later to implement Tick functions.
Portal manager
So, now we have all the basic elements that are needed to create a new class inherited from AActor, which will be Portal Manager. You may not need the Portal Manager class in your project, but in my case, it greatly simplifies working with some aspects. Here is a list of tasks performed by the Portal manager:
- The Portal manager is an actor created by the Player Controller and attached to it to track the state and evolution of the player within the game level.
- Create and destroy render target portal . The idea is to dynamically create a render target texture that matches the player’s screen resolution. In addition, when changing the resolution during the game, the manager will automatically convert it to the desired size.
- Portal manager находит и обновляет на уровне акторов Portal, чтобы дать им render target. Эта задача выполняется таким образом для того, чтобы обеспечивать совместимость с level streaming. При появлении нового актора он должен получить текстуру. Кроме того, в случае изменения Render target менеджер тоже может назначить новый автоматически. Так системой управлять проще, вместо того, чтобы каждый актор Portal вручную обращался к менеджеру.
- Компонент SceneCapture прикреплён к Portal manager, чтобы не создавать по одной копии для каждого портала. Кроме того, это позволяет заново использовать его каждый раз, когда мы переключаемся на конкретный актор портала на уровне.
- When the portal decides to teleport the player, it sends a request to Portal Manager. This is necessary in order to update both the source and destination (if any) portals, so that the transition occurs without joints.
- The Portal manager is updated at the end of the Character tick () function so that everything is updated correctly, including the player’s camera. This ensures that everything on the screen is synchronized and avoids a delay of one frame during rendering by the engine.
Let's take a look at the Portal Manager header:
#pragma once
#include "CoreMinimal.h"
#include "GameFramework/Actor.h"
#include "ExedrePortalManager.generated.h"
//Forward declaration
class AExedrePlayerController;
class AExedrePortal;
class UExedreScriptedTexture;
UCLASS()
class EXEDRE_API AExedrePortalManager : public AActor
{
	GENERATED_UCLASS_BODY()
	public:
		AExedrePortalManager();
		//Called by a Portal actor when wanting to teleport something
		UFUNCTION(BlueprintCallable, Category="Portal")
		void RequestTeleportByPortal( AExedrePortal* Portal, AActor* TargetToTeleport );
		//Save a reference to the PlayerControler
		void SetControllerOwner( AExedrePlayerController* NewOwner );
		//Various setup that happens during spawn
		void Init();
		//Manual Tick
		void Update( float DeltaTime );
		//Find all the portals in world and update them
		//returns the most valid/usable one for the Player
		AExedrePortal* UpdatePortalsInWorld();
		//Update SceneCapture
		void UpdateCapture( AExedrePortal* Portal );
		//Accessor for Debug purpose
		UTexture* GetPortalTexture();
		//Accessor for Debug purpose
		FTransform GetCameraTransform();
	private:
		//Function to create the Portal render target
		void GeneratePortalTexture();
		UPROPERTY()
		USceneCaptureComponent2D* SceneCapture;
		//Custom class, can be replaced by a "UCanvasRenderTarget2D" instead
		//See : https://api.unrealengine.com/INT/API/Runtime/Engine/Engine/UCanvasRenderTarget2D/index.html
		UPROPERTY()
		UExedreScriptedTexture*	PortalTexture;
		UPROPERTY()
		AExedrePlayerController* ControllerOwner;
		int32 PreviousScreenSizeX;
		int32 PreviousScreenSizeY;
		float UpdateDelay;
};
Before going into details, I will show how an actor is created from the Player Controller class, called from the BeginPlay () function:
	FActorSpawnParameters SpawnParams;
	PortalManager = nullptr;
	PortalManager = GetWorld()->SpawnActor(	AExedrePortalManager::StaticClass(),
																	FVector::ZeroVector,
																	FRotator::ZeroRotator,
																	SpawnParams);
	PortalManager->AttachToActor( this, FAttachmentTransformRules::SnapToTargetIncludingScale);
	PortalManager->SetControllerOwner( this );
	PortalManager->Init();
So, we create an actor, attach it to the player’s controller (this), and then save the link and call the Init () function.
It is also important to note that we update the actor manually from the Character class:
void AExedreCharacter::TickActor( float DeltaTime, enum ELevelTick TickType, FActorTickFunction& ThisTickFunction )
{
	Super::TickActor( DeltaTime, TickType, ThisTickFunction );
	if( UGameplayStatics::GetPlayerController(GetWorld(), 0) != nullptr )
	{
		AExedrePlayerController* EPC = Cast( UGameplayStatics::GetPlayerController(GetWorld(), 0) );
		EPC->PortalManager->Update( DeltaTime );
	}
}
And here is the constructor of Portal Manager. Note that Tick is disabled, again because we will manually update Portal Manager through the player.
AExedrePortalManager::AExedrePortalManager(const FObjectInitializer& ObjectInitializer)
	: Super(ObjectInitializer)
{
 	PrimaryActorTick.bCanEverTick = false;
	PortalTexture = nullptr;
	UpdateDelay = 1.1f;
	PreviousScreenSizeX = 0;
	PreviousScreenSizeY = 0;
}
Here are the functions of get / set Portal Manager (after that we will move on to more interesting things):
void AExedrePortalManager::SetControllerOwner( AExedrePlayerController* NewOwner )
{
	ControllerOwner = NewOwner;
}
FTransform AExedrePortalManager::GetCameraTransform()
{
	if( SceneCapture != nullptr )
	{
		return SceneCapture->GetComponentTransform();
	}
	else
	{
		return FTransform();
	}
}
UTexture* AExedrePortalManager::GetPortalTexture()
{
	//Portal Texture is a custom component class that embed a UCanvasRenderTraget2D
	//The GetTexture() simply returns the RenderTarget contained in that class.
	//IsValidLowLevel() is used here as a way to ensure the Texture has not been destroyed or garbage collected.
	if( PortalTexture != nullptr && PortalTexture->IsValidLowLevel() )
	{
		return PortalTexture->GetTexture();
	}
	else
	{
		return nullptr;
	}
}
Obviously, the first thing to start with is the Init () function .
The main objective of this function is to create the SceneCapture component (that is, the capture device mentioned above) and configure it correctly. It begins with the creation of a new object and its registration as a component of this actor. Then we move on to setting properties related to this capture.
Properties to mention:
- bCaptureEveryFrame = false : we do not want the capture to turn on when we do not need it. We will manage it manually.
- bEnableClipPlane = true : A pretty important property for rendering portal capture correctly.
- bUseCustomProjectionMatrix = true : this allows us to replace the Capture projection with our own, based on the player’s viewpoint.
- CaptureSource = ESceneCaptureSource :: SCS_SceneColorSceneDepth : This mode is a bit expensive, but it is necessary to render a sufficient amount of information.
The remaining properties are mainly related to the post-processing parameters. They are a convenient way to control quality, and hence capture performance.
The last part calls the function that creates the Render Target, which we will see below.
void AExedrePortalManager::Init()
{
	//------------------------------------------------
	//Create Camera
	//------------------------------------------------
	SceneCapture = NewObject(this, USceneCaptureComponent2D::StaticClass(), *FString("PortalSceneCapture"));
	SceneCapture->AttachToComponent( GetRootComponent(), FAttachmentTransformRules::SnapToTargetIncludingScale );
	SceneCapture->RegisterComponent();
	SceneCapture->bCaptureEveryFrame 			= false;
	SceneCapture->bCaptureOnMovement 			= false;
	SceneCapture->LODDistanceFactor 				= 3; //Force bigger LODs for faster computations
	SceneCapture->TextureTarget 					= nullptr;
	SceneCapture->bEnableClipPlane 				= true;
	SceneCapture->bUseCustomProjectionMatrix 	= true;
	SceneCapture->CaptureSource 					= ESceneCaptureSource::SCS_SceneColorSceneDepth;
	//Setup Post-Process of SceneCapture (optimization : disable Motion Blur, etc)
	FPostProcessSettings CaptureSettings;
	CaptureSettings.bOverride_AmbientOcclusionQuality 		= true;
	CaptureSettings.bOverride_MotionBlurAmount 				= true;
	CaptureSettings.bOverride_SceneFringeIntensity 			= true;
	CaptureSettings.bOverride_GrainIntensity 				= true;
	CaptureSettings.bOverride_ScreenSpaceReflectionQuality 	= true;
	CaptureSettings.AmbientOcclusionQuality 		= 0.0f; //0=lowest quality..100=maximum quality
	CaptureSettings.MotionBlurAmount 				= 0.0f; //0 = disabled
	CaptureSettings.SceneFringeIntensity 			= 0.0f; //0 = disabled
	CaptureSettings.GrainIntensity					= 0.0f; //0 = disabled
	CaptureSettings.ScreenSpaceReflectionQuality 	= 0.0f; //0 = disabled
	CaptureSettings.bOverride_ScreenPercentage 		= true;
	CaptureSettings.ScreenPercentage				= 100.0f;
	SceneCapture->PostProcessSettings = CaptureSettings;
	//------------------------------------------------
	//Create RTT Buffer
	//------------------------------------------------
	GeneratePortalTexture();
}
GeneratePortalTexture () is a function that is called when necessary when you need to create a new Render Target texture for portals. This happens in the initialization function, but it can also be called during the Portal Manager upgrade. That is why this function has an internal check for changing the resolution of the viewport. If it did not happen, then the update is not performed.
In my case, I created a wrapper class for UCanvasRenderTarget2D. I called it ExedreScriptedTexture, it is a component that can be attached to an actor. I created this class to conveniently manage render targets with actors who have rendering tasks. He does the proper initialization of the Render Target and is compatible with my own UI system. However, in the context of portals, a regular RenderTarget2D texture is more than enough. Therefore, you can simply use it.
void AExedrePortalManager::GeneratePortalTexture()
{
	int32 CurrentSizeX = 1920;
	int32 CurrentSizeY = 1080;
	if( ControllerOwner != nullptr )
	{
		ControllerOwner->GetViewportSize(CurrentSizeX, CurrentSizeY);
	}
	CurrentSizeX = FMath::Clamp( int(CurrentSizeX / 1.7), 128, 1920); //1920 / 1.5 = 1280
	CurrentSizeY = FMath::Clamp( int(CurrentSizeY / 1.7), 128, 1080);
	if( CurrentSizeX == PreviousScreenSizeX
	&&  CurrentSizeY == PreviousScreenSizeY )
	{
		return;
	}
	PreviousScreenSizeX = CurrentSizeX;
	PreviousScreenSizeY = CurrentSizeY;
	//Cleanup existing RTT
	if( PortalTexture != nullptr && PortalTexture->IsValidLowLevel() )
	{
		PortalTexture->DestroyComponent();
		GEngine->ForceGarbageCollection();
	}
	//Create new RTT
	PortalTexture = nullptr;
	PortalTexture = NewObject(this, UExedreScriptedTexture::StaticClass(), *FString("PortalRenderTarget"));
	PortalTexture->SizeX = CurrentSizeX;
	PortalTexture->SizeY = CurrentSizeY;
	//Custom properties of the UExedreScriptedTexture class
	PortalTexture->Gamma = 1.0f;
	PortalTexture->WrapModeX = 1; //Clamp
	PortalTexture->WrapModeY = 1; //Clamp
	PortalTexture->bDrawWidgets = false;
	PortalTexture->bGenerateMipMaps = false;
	PortalTexture->SetClearOnUpdate( false ); //Will be cleared by SceneCapture instead
	PortalTexture->Format = ERenderTargetFormat::RGBA16; //Needs 16b to get >1 for Emissive
	PortalTexture->AttachToComponent( GetRootComponent(), FAttachmentTransformRules::SnapToTargetIncludingScale );
	PortalTexture->RegisterComponent();
	PortalTexture->SetOwner( this );
	PortalTexture->Init();
	PortalTexture->SetFilterMode( TextureFilter::TF_Bilinear );
}
As mentioned above, I created my own class, so the properties set here must be adapted to the usual Render Target.
It is important to understand where the capture will be displayed. Since the render target will be displayed in the game, this means that this will happen before the whole post-processing, and therefore we need to render the scene with enough information (to store values above 1 to create Bloom). That is why I chose the RGBA16 format (note that it has its own Enum, you will need to use ETextureRenderTargetFormat instead).
For more information, see the following sources:
Further we will consider update functions. The basic function is quite simple and causes more complex. There is a delay before calling the GeneratePortalTexture () function to avoid recreating the render target when resizing the viewport (for example, in the editor). During the publication of the game, this delay can be removed.
void AExedrePortalManager::Update( float DeltaTime )
{
	//-----------------------------------
	//Generate Portal texture ?
	//-----------------------------------
	UpdateDelay += DeltaTime;
	if( UpdateDelay > 1.0f )
	{
		UpdateDelay = 0.0f;
		GeneratePortalTexture();
	}
	//-----------------------------------
	//Find portals in the level and update them
	//-----------------------------------
	AExedrePortal* Portal = UpdatePortalsInWorld();
	if( Portal != nullptr )
	{
		UpdateCapture( Portal );
	}
}
We call UpdatePortalsInWorld () to find all the portals present in the current world (including all loaded levels) and update them. The function also determines which one is “active”, i.e. visible to the player. If we find an active portal, we call UpdateCapture () , which controls the SceneCapture component.
Here's how the world update works inside UpdatePortalsInWorld () :
- Мы получаем информацию об игроке (его позицию и позицию камеры)
- Создаём цикл iterator, чтобы найти все акторы порталов внутри текущего мира
- В цикле обрабатываем каждый портал, один за другим, для запуска события ClearRTT(), а затем его отключения. Также мы получаем дополнительную информацию (например, нормаль к порталу).
- Мы проверяем, является ли этот портал ближайшим к игроку, и если это так, то мы ссылаемся на него, чтобы вернуться к нему позже.
The check that determines the correctness of the portal is simple: we give priority to the portal closest to the player, because he will most likely be the most visible from his point of view. To drop relatives, but, for example, portals located behind the player, more complex checks will be required, but I did not want to focus on this in my tutorial, because it can become quite difficult.
AExedrePortal* AExedrePortalManager::UpdatePortalsInWorld()
{
	if( ControllerOwner == nullptr )
	{
		return nullptr;
	}
	AExedreCharacter* Character = ControllerOwner->GetCharacter();
	//-----------------------------------
	//Update Portal actors in the world (and active one if nearby)
	//-----------------------------------
	AExedrePortal* ActivePortal = nullptr;
	FVector PlayerLocation 		= Character->GetActorLocation();
	FVector CameraLocation 		= Character->GetCameraComponent()->GetComponentLocation();
	float Distance 				= 4096.0f;
	for( TActorIteratorActorItr( GetWorld() ); ActorItr; ++ActorItr )
	{
		AExedrePortal* Portal 	= *ActorItr;
		FVector PortalLocation 	= Portal->GetActorLocation();
		FVector PortalNormal 	= -1 * Portal->GetActorForwardVector();
		//Reset Portal
		Portal->ClearRTT();
		Portal->SetActive( false );
		//Find the closest Portal when the player is Standing in front of
		float NewDistance = FMath::Abs( FVector::Dist( PlayerLocation, PortalLocation ) );
		if( NewDistance < Distance )
		{
			Distance 		= NewDistance;
			ActivePortal 	= Portal;
		}
	}
	return ActivePortal;
}
It is time to consider the UpdateCapture () function .
This is an upgrade feature that captures the other side of the portal. From the comments everything should be clear, but here is a brief description:
- We get links to Character and Player Controller.
- We check if everything is correct (Portal, SceneCapture component, Player).
- Мы получаем Camera от игрока и Target от портала.
- Преобразуем позицию и поворот игрока, чтобы применить их к SceneCapture.
- Также мы обновляем плоскость отсечения SceneCapture на основании информации от Target.
- Теперь, когда SceneCapure находится там, где нужно, мы можем активировать портал.
- Назначаем Render Target и SceneCapture, и порталу.
- Обновляем матрицу проецирования из PlayerController.
- Наконец, мы запускаем функцию Capture компонента SceneCapture для выполнения самого рендеринга сцены.
As we can see, when teleporting a player, a key element of SceneCapture's natural and flawless behavior is the correct transformation of the position and rotation of the portal into the local Target space.
For the definition of ConvertLocationToActorSpace (), see “Teleporting an Actor”.
void AExedrePortalManager::UpdateCapture( AExedrePortal* Portal )
{
	if( ControllerOwner == nullptr )
	{
		return;
	}
	AExedreCharacter* Character = ControllerOwner->GetCharacter();
	//-----------------------------------
	//Update SceneCapture (discard if there is no active portal)
	//-----------------------------------
	if(SceneCapture 	!= nullptr
	&& PortalTexture 	!= nullptr
 	&& Portal 	!= nullptr
 	&& Character 		!= nullptr )
	{
		UCameraComponent* PlayerCamera = Character->GetCameraComponent();
		AActor* Target 	= Portal->GetTarget();
		//Place the SceneCapture to the Target
		if( Target != nullptr )
		{
			//-------------------------------
			//Compute new location in the space of the target actor
			//(which may not be aligned to world)
			//-------------------------------
			FVector NewLocation 	= UTool::ConvertLocationToActorSpace( 	PlayerCamera->GetComponentLocation(),
																			Portal,
																			Target );
			SceneCapture->SetWorldLocation( NewLocation );
			//-------------------------------
			//Compute new Rotation in the space of the
			//Target location
			//-------------------------------
			FTransform CameraTransform 	= PlayerCamera->GetComponentTransform();
			FTransform SourceTransform 	= Portal->GetActorTransform();
			FTransform TargetTransform 	= Target->GetActorTransform();
			FQuat LocalQuat 			= SourceTransform.GetRotation().Inverse() * CameraTransform.GetRotation();
			FQuat NewWorldQuat 			= TargetTransform.GetRotation() * LocalQuat;
			//Update SceneCapture rotation
			SceneCapture->SetWorldRotation( NewWorldQuat );
			//-------------------------------
			//Clip Plane : to ignore objects between the
			//SceneCapture and the Target of the portal
			//-------------------------------
			SceneCapture->ClipPlaneNormal 	= Target->GetActorForwardVector();
			SceneCapture->ClipPlaneBase		= Target->GetActorLocation()
											+ (SceneCapture->ClipPlaneNormal * -1.5f); //Offset to avoid visible pixel border
		}
		//Switch on the valid Portal
		Portal->SetActive( true );
		//Assign the Render Target
		Portal->SetRTT( PortalTexture->GetTexture() );
		SceneCapture->TextureTarget = PortalTexture->GetTexture();
		//Get the Projection Matrix
		SceneCapture->CustomProjectionMatrix = ControllerOwner->GetCameraProjectionMatrix();
		//Say Cheeeeese !
		SceneCapture->CaptureScene();
	}
}
The GetCameraProjectionMatrix () function does not exist by default in the PlayerController class, I added it myself. It is shown below:
FMatrix AExedrePlayerController::GetCameraProjectionMatrix()
{
	FMatrix ProjectionMatrix;
	if( GetLocalPlayer() != nullptr )
	{
		FSceneViewProjectionData PlayerProjectionData;
		GetLocalPlayer()->GetProjectionData( GetLocalPlayer()->ViewportClient->Viewport,
										EStereoscopicPass::eSSP_FULL,
										PlayerProjectionData );
		ProjectionMatrix = PlayerProjectionData.ProjectionMatrix;
	}
	return ProjectionMatrix;
}
Finally, we need to implement the call to the Teleport function. The reason for the partial processing of teleportation through the Portal manager is that it is necessary to guarantee the updating of the necessary portals, because only Manager has information about all the portals in the scene.
If we have two connected portals, then when switching from one to another, we need to update both in one Tick. Otherwise, the player will teleport and will be on the other side of the portal, but the Target Portal will not be active until the next frame / measure. This will create visual gaps with the offset material of the plane mesh that we saw above.
void AExedrePortalManager::RequestTeleportByPortal( AExedrePortal* Portal, AActor* TargetToTeleport )
{
	if( Portal != nullptr && TargetToTeleport != nullptr )
	{
		Portal->TeleportActor( TargetToTeleport );
		//-----------------------------------
		//Force update
		//-----------------------------------
		AExedrePortal* FuturePortal = UpdatePortalsInWorld();
		if( FuturePortal != nullptr )
		{
			FuturePortal->ForceTick(); //Force update before the player render its view since he just teleported
			UpdateCapture( FuturePortal );
		}
	}
}
Well, that’s it, we’re finally done with Portal Manager!
Finish the blueprint
Having completed the Portal Manager, we only need to complete the Portal actor itself, after which the system will work. The only thing missing here is the Tick features:

Here's how it works:
- We are updating Material so that it does not remain in an active state.
- If the portal is currently inactive , the remainder of the measure is discarded.
- We get the Character class to access Camera Location .
- The first part checks if the camera is in the collision box of the portal. If so, then we offset the portal mesh with its Material .
- The second part is to re-check the location inside the collision box. If it is executed, then we call a function that checks whether we cross the portal .
- If we actually cross it, we get the Portal manager, and then call the Teleport function .
In the screenshot of my graph, you can notice two interesting points: Is Point Inside Box and Get Portal Manager . I have not yet explained both of these functions. These are static functions that I defined in my own class so that you can call them from anywhere. This is a kind of helper class. The code of these functions is shown below, you yourself can decide where to insert them. If you do not need them outside the portal system, you can insert them directly into the Portal actor class.
At first I wanted to use the collision system to determine if the portal actor inside the collision box is in the portal, but it seemed to me not reliable enough. In addition, it seems to me that this method is faster to use and has an advantage: it takes into account the rotation of the actor.
bool IsPointInsideBox( FVector Point, UBoxComponent* Box )
{
	if( Box != nullptr )
	{
		//From :
		//https://stackoverflow.com/questions/52673935/check-if-3d-point-inside-a-box/52674010
		FVector Center 	= Box->GetComponentLocation();
		FVector Half 	= Box->GetScaledBoxExtent();
		FVector DirectionX = Box->GetForwardVector();
		FVector DirectionY = Box->GetRightVector();
		FVector DirectionZ = Box->GetUpVector();
		FVector Direction = Point - Center;
		bool IsInside = FMath::Abs( FVector::DotProduct( Direction, DirectionX ) ) <= Half.X &&
						FMath::Abs( FVector::DotProduct( Direction, DirectionY ) ) <= Half.Y &&
						FMath::Abs( FVector::DotProduct( Direction, DirectionZ ) ) <= Half.Z;
		return IsInside;
	}
	else
	{
		return false;
	}
}
AExedrePortalManager* GetPortalManager( AActor* Context )
{
AExedrePortalManager* Manager = nullptr;
//Retrieve the World from the Context actor
if( Context != nullptr && Context->GetWorld() != nullptr )
{
//Find PlayerController
AExedrePlayerController* EPC = Cast( Context->GetWorld()->GetFirstPlayerController() );
//Retrieve the Portal Manager
if( EPC != nullptr && EPC->GetPortalManager() != nullptr )
{
Manager = EPC->GetPortalManager();
}
}
return Manager;
} The last part of the Blueprint actor is ForceTick . Remember that Force Tick is called when a player crosses a portal and is next to another portal for which Portal Manager is forcing an update. Since we just teleported, it is not necessary to use the same code, and you can use its simplified version:
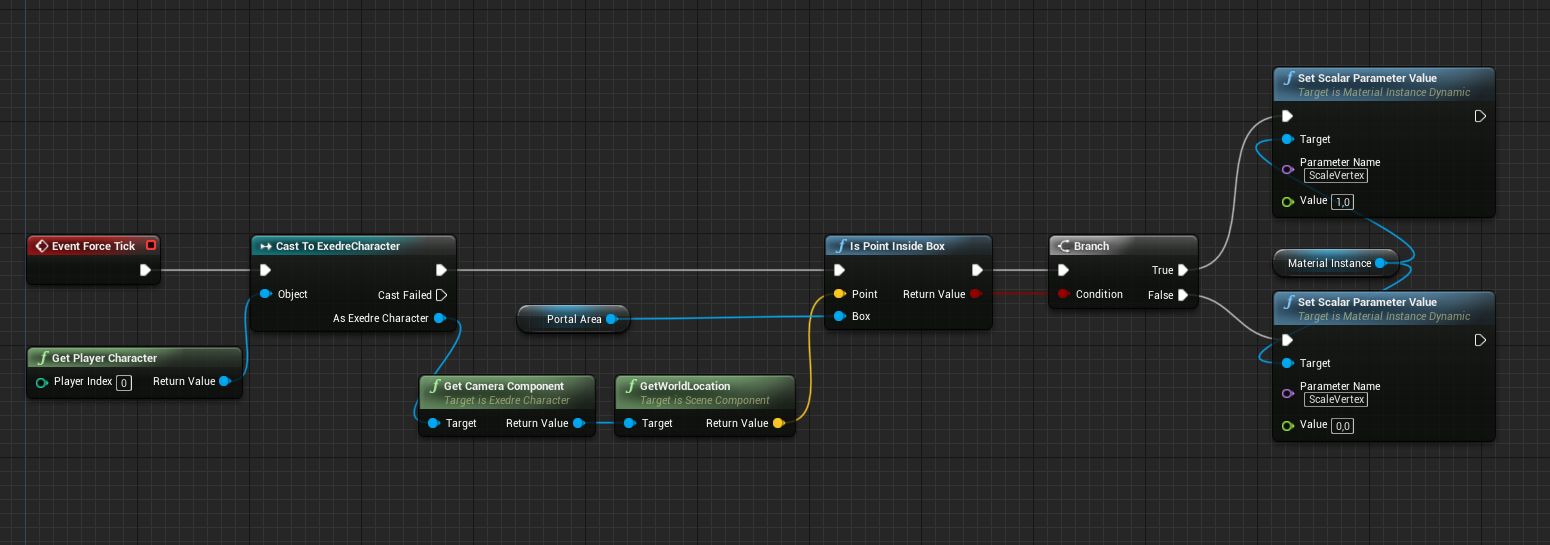
The process starts approximately at the same time as the Tick function, but we only execute the first part of the sequence, which updates the material.
Are we done?
Nearly.
If we implement the portal system in this form, then most likely we will encounter the following problem:
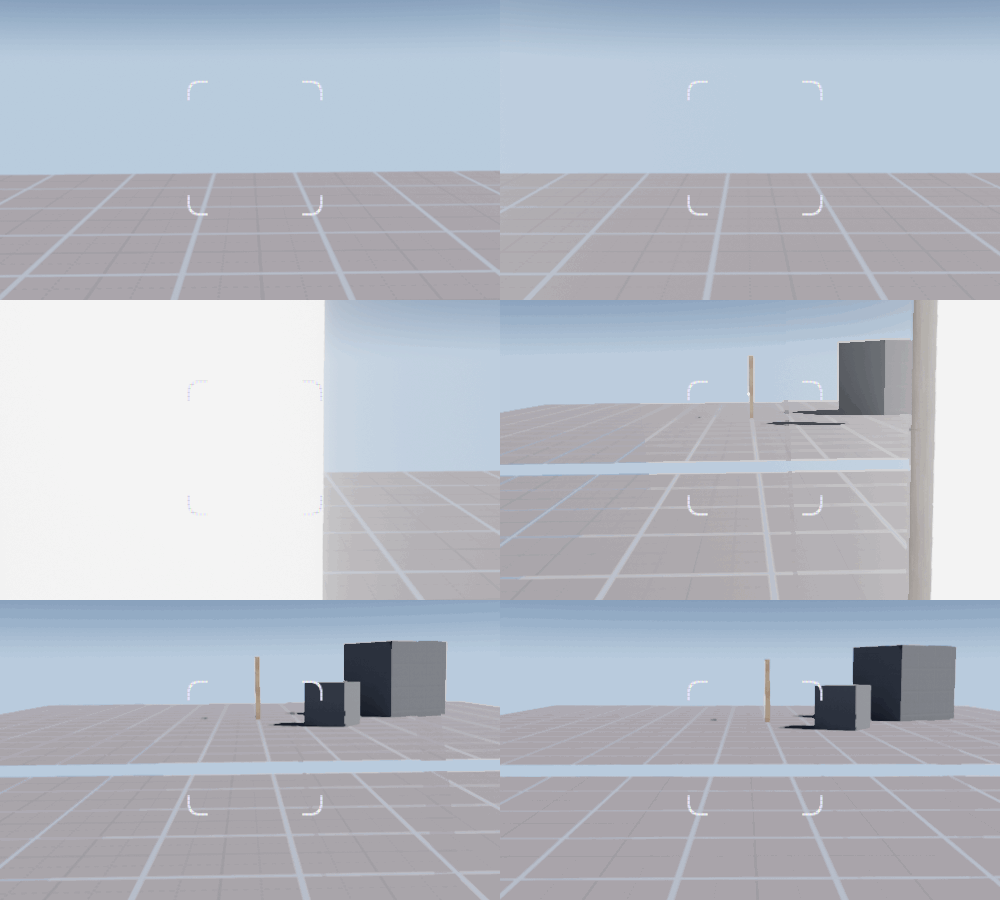
What's going on here?
In this gif, the frame rate of the game is limited to 6 FPS to show the problem more clearly. In one frame, the cube disappears because the Unreal Engine clipping system considers it to be invisible.
This is because the discovery is performed in the current frame, and then used in the next. This creates a delay of one frame . This can usually be resolved by expanding the bounding box of the object so that it is registered before it becomes visible. However, this will not work here, because when we cross the portal, we teleport from one place to a completely different one.
Disabling the clipping system is also impossible, especially because at levels with many objects this will reduce performance. In addition, I tried many teams of the Unreal engine, but did not get positive results: in all cases, a delay of one frame remained. Fortunately, after a detailed study of the Unreal Engine source code, I managed to find a solution (the path was long - it took more than a week)!
As with the SceneCapture component, you can tell the player’s camera that we made a jump cut- the camera position jumped between two frames, which means we can not rely on the information of the previous frame. This behavior can be observed when using Matinee or Sequencer, for example, when switching cameras: motion blur or smoothing cannot rely on information from the previous frame.
To do this, we need to consider two aspects:
- LocalPlayer : this class processes various information (for example, the player’s viewport) and is associated with the PlayerController. This is where we can influence the rendering process of the player’s camera.
- PlayerController : when a player teleports, this class starts splicing thanks to access to LocalPlayer.
The big advantage of this solution is that the intervention in the rendering process of the engine is minimal and easy to maintain in future updates of Unreal Engine.
Let's start by creating a new class inherited from LocalPlayer. Below is a heading that identifies two main components: redefining Scene Viewport calculations and a new function for invoking camera gluing.
#pragma once
#include "CoreMinimal.h"
#include "Engine/LocalPlayer.h"
#include "ExedreLocalPlayer.generated.h"
UCLASS()
class EXEDRE_API UExedreLocalPlayer : public ULocalPlayer
{
	GENERATED_BODY()
	UExedreLocalPlayer();
	public:
		FSceneView* CalcSceneView( class FSceneViewFamily* ViewFamily, FVector& OutViewLocation, FRotator& OutViewRotation, FViewport* Viewport, class FViewElementDrawer* ViewDrawer, EStereoscopicPass StereoPass) override;
		void PerformCameraCut();
	private:
		bool bCameraCut;
};
Here's how everything is implemented:
#include "Exedre.h"
#include "ExedreLocalPlayer.h"
UExedreLocalPlayer::UExedreLocalPlayer()
{
	bCameraCut = false;
}
FSceneView* UExedreLocalPlayer::CalcSceneView( class FSceneViewFamily* ViewFamily, FVector& OutViewLocation, FRotator& OutViewRotation, FViewport* Viewport, class FViewElementDrawer* ViewDrawer, EStereoscopicPass StereoPass)
{
	// ULocalPlayer::CalcSceneView() use a ViewInitOptions to create
	// a FSceneView which contains a "bCameraCut" variable
	// See : H:\GitHub\UnrealEngine\Engine\Source\Runtime\Renderer\Private\SceneCaptureRendering.cpp
	// as well for bCameraCutThisFrame in USceneCaptureComponent2D
	FSceneView* View = Super::CalcSceneView(ViewFamily,
											OutViewLocation,
											OutViewRotation,
											Viewport,
											ViewDrawer,
											StereoPass );
	if( bCameraCut )
	{
		View->bCameraCut = true;
		bCameraCut = false;
	}
	return View;
}
void UExedreLocalPlayer::PerformCameraCut()
{
	bCameraCut = true;
}
PerformCameraCut () just starts Camera Cut with a boolean value. When the engine calls the CalcSceneView () function , we first run the original function. Then we check, we need to perform gluing. If so, we redefine the Camera Cut Boolean variable inside the FSceneView structure , which will be used by the engine rendering process, and then reset the Boolean variable (use it).
On the Player Controller side, the changes are minimal. You need to add a variable to the header to store a link to the LocalPlayer native class:
		UPROPERTY()
		UExedreLocalPlayer*	LocalPlayer;
Then in the BeginPlay () function :
LocalPlayer = Cast( GetLocalPlayer() ); I also added a function to quickly launch Cut:
void AExedrePlayerController::PerformCameraCut()
{
	if( LocalPlayer != nullptr )
	{
		LocalPlayer->PerformCameraCut();
	}
}
Finally, in the Portal Manager function RequestTeleportByPortal (), we can execute during Camera Cut teleportation:
void AExedrePortalManager::RequestTeleportByPortal( AExedrePortal* Portal, AActor* TargetToTeleport )
{
	if( Portal != nullptr && TargetToTeleport != nullptr )
	{
		if( ControllerOwner != nullptr )
		{
			ControllerOwner->PerformCameraCut();
		}
[...]
And that is all!
Camera Cut must be called before SceneCapture is updated, which is why it is at the beginning of the function.
Final result
Now we have learned to think in portals.
If the system works well, then we should be able to create these things:

If you are having problems, then check the following:
- Verify that Portal Manager is properly created and initialized.
- Render target is created correctly (you can use the one created in the content browser to get started).
- Portals are correctly activated and deactivated.
- Portals have the Target actor set correctly in the editor.
Questions and answers
Самые популярные вопросы, которые мне задавали об этом туториале:
Можно ли реализовать это на блюпринтах, а не через C++ ?
Основную часть кода можно реализовать в блюпринтах, за исключением двух аспектов:
- Функция LocalPlayer GetProjectionData(), используемая для получения матрицы проецирования, недоступна в блюпринтах.
- Функция LocalPlayer CalcSceneView(), критически важная для решения проблемы с системой отсечения, недоступна в блюпринтах.
Поэтому вам нужно или использовать реализацию на C++ для доступа к этим двум функциям, или изменить исходный код движка, чтобы сделать их доступными через блюпринты.
Можно ли использовать эту систему в VR ?
Да, по большей мере. Однако некоторые части придётся адаптировать, например:
- Нужно использовать два Render Targets (по одному для каждого глаза) и маскировать их в материале портала для отображения рядом в экранном пространстве. Каждый render target должен иметь половинную ширину от разрешения VR-устройства.
- Нужно использовать два SceneCapture для render target с правильным расстоянием (расстояние между глазами) для создания стереоскопических эффектов.
The main problem will be performance, because the other side of the portal will have to be rendered twice.
Can another object cross the portal?
There is no in my code. However, making it more general is not so difficult. To do this, the portal needs to track more information about all nearby objects in order to check whether they cross it.
Does the system support recursion (portal inside the portal)?
This tutorial is not. For recursion, you need additional render target and SceneCapture. It will also be necessary to determine which RenderTarget to render first, and so on. This is quite difficult and I did not want to do this, because for my project this is not necessary.
Can I cross the portal near the wall?
Unfortunately not. However, I see two ways to implement this (theoretically):
- Disable the player’s collisions so that he can pass through the walls. It’s easy to implement, but it will lead to many side effects.
- Hack a collision system to create a hole dynamically, which will allow the player to go through. To do this, you need to modify the physical system of the engine. However, from what I know, after loading the level, static physics cannot be updated. Therefore, to support this feature will require a lot of work. If your portals are static, then you can probably get around this problem by using level streaming to switch between different collisions.
