Download controllers without using the Arduino IDE console
Introduction
When working with controllers of a distributed system, controllers often have to be rebooted. Using the Arduino IDE to reboot the customer is not very convenient, because for each type of controller you need to configure (or check) the board type and COM port numbers, this work should be done by personnel familiar with the IDE, and not every customer wants to know that the system is built on Arduino controllers.
This paper discusses the options for loading controllers (Arduino on Atmega328 and Atmega32u4 and a compatible Teensy controller) by separate commands and through a batch file, without using the IDE.
Organization of USB COM communication of Arduino boards
According to the organization of the serial communication channel, the Arduino boards can be divided into boards with a USB-UART converter and boards with microcontrollers that support USB communication without external converters. The first are Arduino UNO, Arduino NANO, Arduino Mini, Arduino UNO Ethernet, Arduino UNO WiFi based on Atmega328 microcontrollers . To the second - the Arduino Leonardo, Arduino Micro, Arduino Yun Mini, Arduino Industrial 101, Arduino Leonardo Ethernet boards with Atmega32u4 controllers [1].
Download Arduino controller (Atmega328) program avrdude.exe
Charge hex file in controller Arduino can perform program avrdude.exe. This program is part of the IDE console package, for example, Arduino version 1.8.5. The avrdude.exe loader is started by the cmd or Command Prompt utility , which starts as shown in Figure 1.

Figure 1 . An example of running the Command Prompt utility.
To get a sample of writing the command to download the hex code to the Arduino controller on your computer, perform the following sequence.
• Connect Arduino
• Download the Arduino IDE
• Select the Arduino board type from the menu> Tools> Board>
• Select the board's COM port from the menu> Tools> Port>
• Select the upload checkbox in the Preferences tab: Arduino IDE menu> File> Preferences> Show verbose output during>
• Start the menu> Sketch> Upload.
After the download is complete, in the Arduino IDE console output window, find the command from avrdude , it looks like this:
To run the avrdude command using the Command Prompt utility, you must enter double quotes in the command, as shown below.
This command can be used to load hex programs into an Arduino controller with an Atmega328 chip and a separate USB to UART converter. For controllers with Atmega32u4 that support USB communication without a hardware converter, additional steps are required to execute the command, which are described below in the corresponding section.
Since the compiled program - the hex file is stored in the temporary files folder while the IDE console is open (.. \ AppData \ Local \ Temp \ ..), it is better to copy the hex file to a separate folder, copy the avrdude.exe loader and the avrdude.conf file as well .
After moving files (Figure 2), for example, in the C: \ ArdIDE folder, the download command with updated file access paths takes the form as shown in Figure 3.

Figure 2. Placing the loader files and the hex file in a separate folder.

Figure 3 . Run the avrdude loader with the Command Prompt utility.
Loading the Teensy controller with the teensy_post_compile.exe loader
After installing the Teensyduino software of the Teensy controllers, the corresponding controllers appear in the Arduino IDE console device list (see Figure 4).
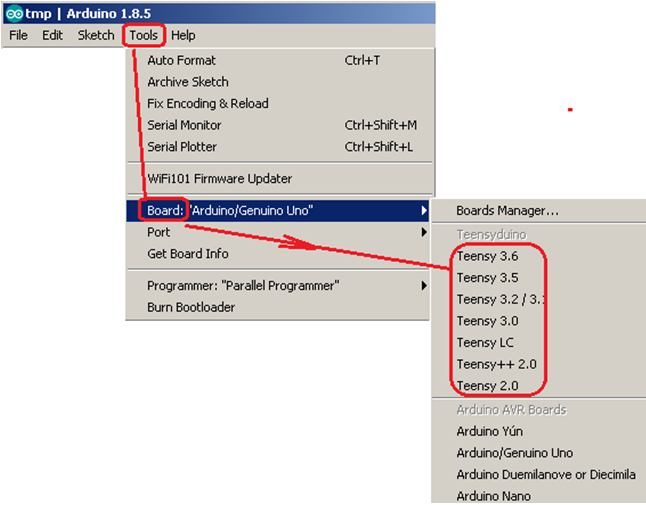
Figure 4 . List of Teensy controllers in the Arduino IDE console.
An example of writing a command to load a hex code into a Teensy controller can be obtained by completing the sequence shown above for Arduino controllers. In the output window, you need to find a sample loader - the command teensy_post_compile. For offline download, the necessary files can be copied to a separate folder, for example, as shown below. The teensy_post_compile, teensy_post_compile.exe and teensy.exe files can be obtained from the Arduino package with the addition of the Teensy application.

Below are examples of commands to load hex files Blink_1.ino and Blink_2.ino into two Teensy controllers connected to a computer via a USB hub.
In these entries, the hub ports are denoted as usb: 0 / 1A0000 / 0/1/1/1 and usb: 0 / 1A0000 / 0/1/1/2.
Downloading the Arduino controller (Atmega32U4) with the avrdude.exe program The
Arduino UNO, Leonardo, Micro, etc. boards are based on the ATmega32U4 microcontroller. This microcontroller has a built-in USB channel (full speed USB 2.0), therefore downloading programs to it differs from the considered download to ATmega328 microcontrollers via an additional USB-UART converter.
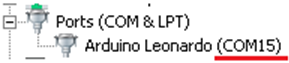
The Arduino controller's COM port number is listed in the device manager list, for example.

When the virtual COM port of the Arduino pro Micro controller is opened (with any transmission frequency of 1200, ..., 9600, ... 115200 baud), the controller is reset and the user program is started. In the MATLAB environment, the program for creating a virtual port looks like this.
After closing the virtual COM port with a frequency not equal to 1200 baud, for example, as shown below
the user program of the controller is executed.
The controller is reset and the controller loader is started after opening and closing the COM port with a frequency of 12,000 baud to the external environment, for example, MATLAB, as shown below.
The same operation can be performed with the mode command , as shown in Figure 5.

Figure 5 . Execute the mode command in Command Prompt. The command sets the transmission rate of 1200 baud for the COM15 port, which causes the controller to reset and the bootloader to start, as well as temporarily change the controller's virtual port numbers in the device list.
After the port is closed (the fclose (s) command), the controller loader creates its virtual (CDC) port, which is displayed in the device manager list with a new number for about 8 seconds.

After the lifetime of the new virtual port (8 sec.), The COM port with the original number is returned to the device manager list.
During the existence of a new COM port, a user program can be loaded into the controller through it using the sample command avrdude of the Arduino IDE console. Obtaining a sample of the avrdude bootloader command in the Arduino IDE is similar to the one shown above for Atmega328 microcontrollers. The created virtual port disappears from the list of devices after the board is rebooted and the COM port with the original number is returned to the list.
The loader can also be started by connecting the RST contact of the Arduino board to GND ground.
If the automatic reset of the controller (through the creation and disconnection of the COM port at 1200 baud) does not work, the device (Arduino Leonardo, Arduino Pro Micro) based on the ATmega32U4 microcontroller can be loaded via the Arduino IDE console in the following sequence.
1. Press and hold the “Reset” button (or close the RST contact to the ground). Serial USB connection is broken. The controller's COM port disappears from the device manager list.
2. Click the Upload (Ctrl + U) Arduino IDE button . Figure 6 shows the initial state of the device manager (left) and the Arduino IDE (right) at this stage.

Figure 6 . The number of the COM port in the device manager and the indication of the process of compiling the program in the Arduino IDE console.
3. Wait until the status indicator completes the “Compiling” compilation and proceeds to uploading the “Uploading”, as shown in Figure 7.

Figure 7 . The number of the new temporary COM port in the device manager and the indication of the process of loading the program in the Arduino IDE console.
4. Release the “Reset” button (open the RST contact). USB connection is restored. Loading. The end of loading is indicated by the phrase Done uploading (see Figure 8).

Figure 8 . The number of the COM port in the device manager and the indication of the completion of the program download in the Arduino IDE console.
Download controllers via batch (command) bat file
Offline boot (without using the Arduino IDE console) can be performed using a batch (command) file. An example of a batch file (with the bat extension) for downloading HEX files to two Arduino Pro Micro controllers (Atmega32u4) connected to a computer via the first hub, to two Teensy controllers connected to a computer via a second hub, and to the Arduino UNO controller (Atmega328) is shown below. The downloaded HEX files and all the necessary programs for this were previously placed in the shared folder shown in Figure 9.
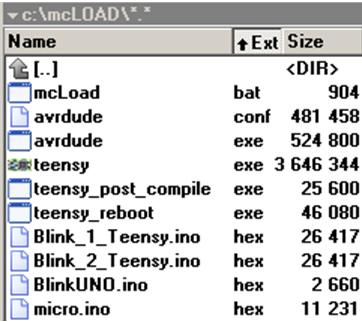
Figure 9 . An example of the contents of a folder for offline loading of 5 controllers: Arduino Pro Micro (Atmega32u4), Teensy and Arduino UNO (Atmega328)
The batch file mcLoad.bat for offline loading of five controllers is shown below. One second delays (TIMEOUT / T 1 / NOBREAK) are added before loading the Arduino Pro Micro controllers. A delay of 2 seconds is entered before loading the second Teensy controller. After all the controllers are loaded, the Teensy.exe program window closes.
Disconnecting the controller from the USB line does not affect the load on the other controllers.
To exclude an Arduino name from the device manager list, for example, “Arduino UNO (COMX)”, you can use programs, for example, RegOwnersahipEx, or hardware clones of Arduino controllers, for example, WAVGAT, which is indicated in the device list as “USB-SERIAL CH340 (COMX ) ”.
Bibliographic list
1. Comparison of Arduino boards (table) digitrode.ru/arduino-comparison.html
2. Arduino Micro, shop.pimoroni.com/products/arduino-micro
3. Dr. Bob Davidov. Computer control technologies in portalnp.ru/author/bobdavidov technical systems.
When working with controllers of a distributed system, controllers often have to be rebooted. Using the Arduino IDE to reboot the customer is not very convenient, because for each type of controller you need to configure (or check) the board type and COM port numbers, this work should be done by personnel familiar with the IDE, and not every customer wants to know that the system is built on Arduino controllers.
This paper discusses the options for loading controllers (Arduino on Atmega328 and Atmega32u4 and a compatible Teensy controller) by separate commands and through a batch file, without using the IDE.
Organization of USB COM communication of Arduino boards
According to the organization of the serial communication channel, the Arduino boards can be divided into boards with a USB-UART converter and boards with microcontrollers that support USB communication without external converters. The first are Arduino UNO, Arduino NANO, Arduino Mini, Arduino UNO Ethernet, Arduino UNO WiFi based on Atmega328 microcontrollers . To the second - the Arduino Leonardo, Arduino Micro, Arduino Yun Mini, Arduino Industrial 101, Arduino Leonardo Ethernet boards with Atmega32u4 controllers [1].
Download Arduino controller (Atmega328) program avrdude.exe
Charge hex file in controller Arduino can perform program avrdude.exe. This program is part of the IDE console package, for example, Arduino version 1.8.5. The avrdude.exe loader is started by the cmd or Command Prompt utility , which starts as shown in Figure 1.
Figure 1 . An example of running the Command Prompt utility.
To get a sample of writing the command to download the hex code to the Arduino controller on your computer, perform the following sequence.
• Connect Arduino
• Download the Arduino IDE
• Select the Arduino board type from the menu> Tools> Board>
• Select the board's COM port from the menu> Tools> Port>
• Select the upload checkbox in the Preferences tab: Arduino IDE menu> File> Preferences> Show verbose output during>
• Start the menu> Sketch> Upload.
After the download is complete, in the Arduino IDE console output window, find the command from avrdude , it looks like this:
C:\ProgramFiles (x86)\Arduino\hardware\tools\avr/bin/avrdude -CC:\ProgramFiles (x86)\Arduino\hardware\tools\avr/etc/avrdude.conf -v -patmega328p -carduino -PCOM3 -b115200 -D -Uflash:w:C:\Users\user-2\AppData\Local\Temp\arduino_build_628118/Blink.ino.hex:iTo run the avrdude command using the Command Prompt utility, you must enter double quotes in the command, as shown below.
"C:\Program Files (x86)\Arduino\hardware\tools\avr/bin/<b>avrdude</b>" -"CC:\Program Files (x86)\Arduino\hardware\tools\avr/etc/avrdude.conf" -v -patmega328p -carduino -PCOM3 -b115200 -D -Uflash:w:C:\Users\user-2\AppData\Local\Temp\arduino_build_628118/Blink.ino.hex:i This command can be used to load hex programs into an Arduino controller with an Atmega328 chip and a separate USB to UART converter. For controllers with Atmega32u4 that support USB communication without a hardware converter, additional steps are required to execute the command, which are described below in the corresponding section.
Since the compiled program - the hex file is stored in the temporary files folder while the IDE console is open (.. \ AppData \ Local \ Temp \ ..), it is better to copy the hex file to a separate folder, copy the avrdude.exe loader and the avrdude.conf file as well .
After moving files (Figure 2), for example, in the C: \ ArdIDE folder, the download command with updated file access paths takes the form as shown in Figure 3.
Figure 2. Placing the loader files and the hex file in a separate folder.
Figure 3 . Run the avrdude loader with the Command Prompt utility.
Loading the Teensy controller with the teensy_post_compile.exe loader
After installing the Teensyduino software of the Teensy controllers, the corresponding controllers appear in the Arduino IDE console device list (see Figure 4).
Figure 4 . List of Teensy controllers in the Arduino IDE console.
An example of writing a command to load a hex code into a Teensy controller can be obtained by completing the sequence shown above for Arduino controllers. In the output window, you need to find a sample loader - the command teensy_post_compile. For offline download, the necessary files can be copied to a separate folder, for example, as shown below. The teensy_post_compile, teensy_post_compile.exe and teensy.exe files can be obtained from the Arduino package with the addition of the Teensy application.
Below are examples of commands to load hex files Blink_1.ino and Blink_2.ino into two Teensy controllers connected to a computer via a USB hub.
"C:\TnsIDE/teensy_post_compile" -file=Blink_2.ino "-path=C:\TnsIDE" "-tools=C:\TnsIDE" -board=TEENSY31 -reboot -port=usb:0/1A0000/0/1/1/1 -portlabel=COM19 (Teensy 3.2) Serial -portprotocol=Teensy"C:\TnsIDE/teensy_post_compile" -file=Blink_1.ino "-path=C:\TnsIDE" "-tools=C:\TnsIDE" -board=TEENSY31 -reboot -port=usb:0/1A0000/0/1/1/2 -portlabel=COM23 (Teensy 3.2) Serial -portprotocol=TeensyIn these entries, the hub ports are denoted as usb: 0 / 1A0000 / 0/1/1/1 and usb: 0 / 1A0000 / 0/1/1/2.
Downloading the Arduino controller (Atmega32U4) with the avrdude.exe program The
Arduino UNO, Leonardo, Micro, etc. boards are based on the ATmega32U4 microcontroller. This microcontroller has a built-in USB channel (full speed USB 2.0), therefore downloading programs to it differs from the considered download to ATmega328 microcontrollers via an additional USB-UART converter.
The Arduino controller's COM port number is listed in the device manager list, for example.
When the virtual COM port of the Arduino pro Micro controller is opened (with any transmission frequency of 1200, ..., 9600, ... 115200 baud), the controller is reset and the user program is started. In the MATLAB environment, the program for creating a virtual port looks like this.
% create port.
s=serial('COM15','Baudrate',9600); % 115200
fopen(s);
After closing the virtual COM port with a frequency not equal to 1200 baud, for example, as shown below
fclose(s);
delete(s);
clear s
the user program of the controller is executed.
The controller is reset and the controller loader is started after opening and closing the COM port with a frequency of 12,000 baud to the external environment, for example, MATLAB, as shown below.
% create port.
s=serial('COM15','Baudrate',1200); % 115200
fopen(s);
pause(1.5);
fclose(s);
delete(s);
clear s
The same operation can be performed with the mode command , as shown in Figure 5.
Figure 5 . Execute the mode command in Command Prompt. The command sets the transmission rate of 1200 baud for the COM15 port, which causes the controller to reset and the bootloader to start, as well as temporarily change the controller's virtual port numbers in the device list.
After the port is closed (the fclose (s) command), the controller loader creates its virtual (CDC) port, which is displayed in the device manager list with a new number for about 8 seconds.
After the lifetime of the new virtual port (8 sec.), The COM port with the original number is returned to the device manager list.
During the existence of a new COM port, a user program can be loaded into the controller through it using the sample command avrdude of the Arduino IDE console. Obtaining a sample of the avrdude bootloader command in the Arduino IDE is similar to the one shown above for Atmega328 microcontrollers. The created virtual port disappears from the list of devices after the board is rebooted and the COM port with the original number is returned to the list.
The loader can also be started by connecting the RST contact of the Arduino board to GND ground.
If the automatic reset of the controller (through the creation and disconnection of the COM port at 1200 baud) does not work, the device (Arduino Leonardo, Arduino Pro Micro) based on the ATmega32U4 microcontroller can be loaded via the Arduino IDE console in the following sequence.
1. Press and hold the “Reset” button (or close the RST contact to the ground). Serial USB connection is broken. The controller's COM port disappears from the device manager list.
2. Click the
Upload (Ctrl + U) Arduino IDE button . Figure 6 shows the initial state of the device manager (left) and the Arduino IDE (right) at this stage. Figure 6 . The number of the COM port in the device manager and the indication of the process of compiling the program in the Arduino IDE console.
3. Wait until the status indicator completes the “Compiling” compilation and proceeds to uploading the “Uploading”, as shown in Figure 7.
Figure 7 . The number of the new temporary COM port in the device manager and the indication of the process of loading the program in the Arduino IDE console.
4. Release the “Reset” button (open the RST contact). USB connection is restored. Loading. The end of loading is indicated by the phrase Done uploading (see Figure 8).
Figure 8 . The number of the COM port in the device manager and the indication of the completion of the program download in the Arduino IDE console.
Download controllers via batch (command) bat file
Offline boot (without using the Arduino IDE console) can be performed using a batch (command) file. An example of a batch file (with the bat extension) for downloading HEX files to two Arduino Pro Micro controllers (Atmega32u4) connected to a computer via the first hub, to two Teensy controllers connected to a computer via a second hub, and to the Arduino UNO controller (Atmega328) is shown below. The downloaded HEX files and all the necessary programs for this were previously placed in the shared folder shown in Figure 9.
Figure 9 . An example of the contents of a folder for offline loading of 5 controllers: Arduino Pro Micro (Atmega32u4), Teensy and Arduino UNO (Atmega328)
The batch file mcLoad.bat for offline loading of five controllers is shown below. One second delays (TIMEOUT / T 1 / NOBREAK) are added before loading the Arduino Pro Micro controllers. A delay of 2 seconds is entered before loading the second Teensy controller. After all the controllers are loaded, the Teensy.exe program window closes.
echo OFF
echo UPLOAD: Arduino Pro Micro 1mode COM42 BAUD=12000
TIMEOUT /T 1 /NOBREAK
avrdude -Cavrdude.conf -v -patmega32u4 -cavr109 -PCOM45 -b57600 -D -Uflash:w:micro.ino.hex:i
echo UPLOAD: Arduino Pro Micro 2mode COM43 BAUD=12000
TIMEOUT /T 1 /NOBREAK
avrdude -Cavrdude.conf -v -patmega32u4 -cavr109 -PCOM44 -b57600 -D -Uflash:w:micro.ino.hex:i
echo UPLOAD: Arduino UNO
avrdude -Cavrdude.conf -v -patmega328p -carduino -PCOM3 -b115200 -D -Uflash:w: BlinkUNO.ino.hex:i
echo UPLOAD: Teensy 1
"C:\mcLOAD/teensy_post_compile" -file=Blink_1_Teensy.ino "-path=C:\mcLOAD" "-tools=C:\mcLOAD" -board=TEENSY31 -reboot -port=usb:0/1A0000/0/1/1/2 -portlabel=COM23 (Teensy 3.2) Serial -portprotocol=Teensy

REM Delay 2 seconds:
TIMEOUT /T 2 /NOBREAK
echo UPLOAD: Teensy 2
"C:\mcLOAD/teensy_post_compile" -file=Blink_2_Teensy.ino "-path=C:\mcLOAD" "-tools=C:\mcLOAD" -board=TEENSY31 -reboot -port=usb:0/1A0000/0/1/1/1 -portlabel=COM19 (Teensy 3.2) Serial -portprotocol=Teensy

REM Close Teensy.exetaskkill /f /IM Teensy.exe
Disconnecting the controller from the USB line does not affect the load on the other controllers.
To exclude an Arduino name from the device manager list, for example, “Arduino UNO (COMX)”, you can use programs, for example, RegOwnersahipEx, or hardware clones of Arduino controllers, for example, WAVGAT, which is indicated in the device list as “USB-SERIAL CH340 (COMX ) ”.
Bibliographic list
1. Comparison of Arduino boards (table) digitrode.ru/arduino-comparison.html
2. Arduino Micro, shop.pimoroni.com/products/arduino-micro
3. Dr. Bob Davidov. Computer control technologies in portalnp.ru/author/bobdavidov technical systems.