Kubernetes tips & tricks: about local development and Telepresence
We are increasingly being asked about the development of microservices in Kubernetes. Developers, especially interpreted languages, want to quickly fix the code in their favorite IDE and without waiting for the build / deployment to see the result - simply by pressing F5. And when it came to the monolithic application, it was enough to locally raise the database and the web server (in Docker, VirtualBox ...), after which - immediately enjoy the development. With the sawing of monoliths into microservices and the advent of Kubernetes, with the emergence of dependencies on each other, things got a little more complicated. The more of these microservices, the more problems. To enjoy the development again, you need to raise more than one or two Docker containers, and sometimes even more than a dozen ... In general, all this can take a lot of time, because you also need to keep it up to date.
At different times, we tried different solutions to the problem. And I'll start with the accumulated workarounds or simply “crutches”.
1. Crutches
Most IDEs have the ability to edit code directly on the server using FTP / SFTP. This way is very obvious and we immediately decided to use it. Its essence is as follows:
- In the pod for development environments (dev / review), an additional container is launched with access via SSH and forwarding the public SSH key of the developer who will commit / deploy the application.
- At the init stage (within the container
prepare-app), we transfer the code to inemptyDirorder to have access to the code from the containers with the application and the SSH server.
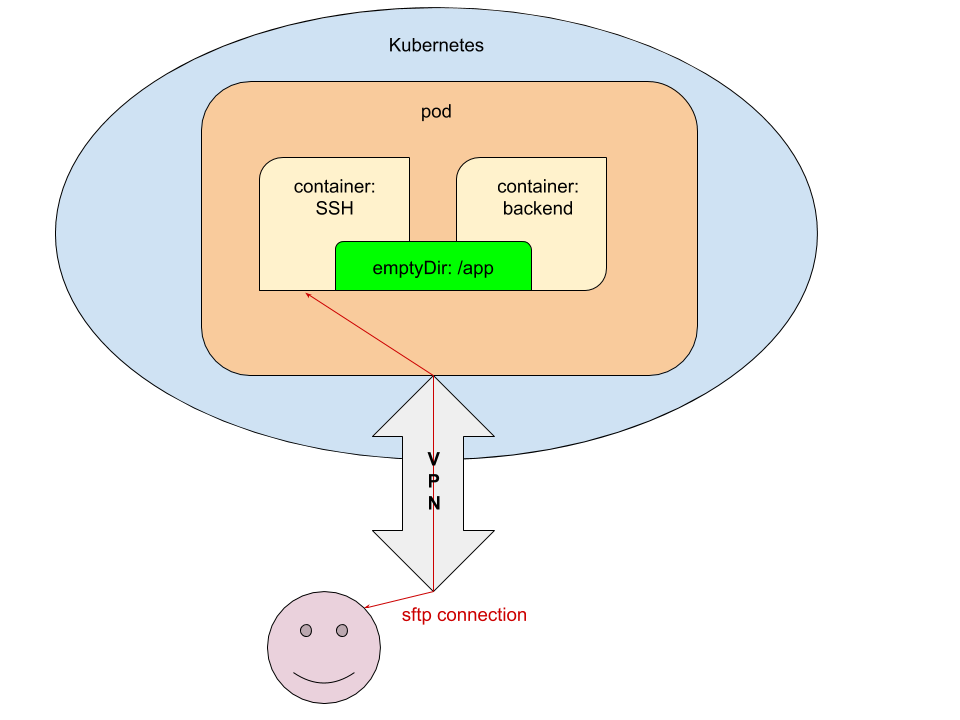
For a better understanding of the technical implementation of such a scheme, I will give fragments of the involved YAML configurations in Kubernetes.
Configurations
1.1. values.yaml
ssh_pub_key:
  vasya.pupkin:
Here
vasya.pupkinis the value of the variable ${GITLAB_USER_LOGIN}.1.2. deployment.yaml
...
{{ if eq .Values.global.debug "yes" }}
      volumes:
      - name: ssh-pub-key
        secret:
          defaultMode: 0600
          secretName: {{ .Chart.Name }}-ssh-pub-key
      - name: app-data
        emptyDir: {}
      initContainers:
      - name: prepare-app
{{ tuple "backend" . | include "werf_container_image" | indent 8 }}
        volumeMounts:
        - name: app-data
          mountPath: /app-data
        command: ["bash", "-c", "cp -ar /app/* /app-data/" ]
{{ end }}
      containers:
{{ if eq .Values.global.debug "yes" }}
      - name: ssh
        image: corbinu/ssh-server
        volumeMounts:
        - name: ssh-pub-key
          readOnly: true
          mountPath: /root/.ssh/authorized_keys
          subPath: authorized_keys
        - name: app-data
          mountPath: /app
        ports:
        - name: ssh
          containerPort: 22
          protocol: TCP
{{ end }}
      - name: backend
        volumeMounts:
{{ if eq .Values.global.debug "yes" }}
        - name: app-data
          mountPath: /app
{{ end }}
        command: ["/usr/sbin/php-fpm7.2", "--fpm-config", "/etc/php/7.2/php-fpm.conf", "-F"]
...
1.3. secret.yaml
{{ if eq .Values.global.debug "yes" }}
apiVersion: v1
kind: Secret
metadata:
  name: {{ .Chart.Name }}-ssh-pub-key
type: Opaque
data:
  authorized_keys: "{{ first (pluck .Values.global.username .Values.ssh_pub_key) }}"
{{ end }}
Final touch
After that, it remains only to pass the necessary variables to gitlab-ci.yml :
dev:
  stage: deploy
  script:
   - type multiwerf && source <(multiwerf use 1.0 beta)
   - type werf && source <(werf ci-env gitlab --tagging-strategy tag-or-branch --verbose)
   - werf deploy
     --namespace ${CI_PROJECT_NAME}-stage
     --set "global.env=stage"
     --set "global.git_rev=${CI_COMMIT_SHA}"
     --set "global.debug=yes"
     --set "global.username=${GITLAB_USER_LOGIN}"
 tags:
   - build
Voila: the developer who launched the deployment can connect using the service’s name ( we already told you how to safely issue access to the cluster ) from your desktop via SFTP and edit the code without waiting for it to be delivered to the cluster.
This is a completely working solution, but from the point of view of implementation it has obvious disadvantages:
- the need to refine the Helm chart, which further complicates its reading;
- Only one who has deployed the service can use it;
- you need to remember to synchronize it with the local directory with the code and commit in Git.
2. Telepresence
The Telepresence project has been known for quite some time, but seriously trying it in practice with us, as they say, “did not reach our hands”. However, the demand has done its job and now we are pleased to share experience that may be useful to readers of our blog - especially since there were still no other materials about Telepresence on the hub.
In short, it wasn’t so scary. All the actions that require execution by the developer, we placed in a text file Helm-chart called
NOTES.txt. Thus, the developer after deploying the service in Kubernetes sees the instruction for starting the local dev environment in the GitLab job log:!!! Разработка сервиса локально, в составе Kubernetes !!!
* Настройка окружения
* * Должен быть доступ до кластера через VPN
* * На локальном ПК установлен kubectl ( https://kubernetes.io/docs/tasks/tools/install-kubectl/ )
* * Получить config-файл для kubectl (скопировать в ~/.kube/config)
* * На локальном ПК установлен telepresence ( https://www.telepresence.io/reference/install )
* * Должен быть установлен Docker
* * Необходим доступ уровня reporter или выше к репозиторию https://gitlab.site.com/group/app
* * Необходимо залогиниться в registry с логином/паролем от GitLab (делается один раз):
#########################################################################
docker login registry.site.com
#########################################################################
* Запуск окружения
#########################################################################
telepresence --namespace {{ .Values.global.env }} --swap-deployment {{ .Chart.Name }}:backend --mount=/tmp/app --docker-run -v `pwd`:/app -v /tmp/app/var/run/secrets:/var/run/secrets -ti registry.site.com/group/app/backend:v8
#########################################################################We will not dwell on the steps described in this manual ... except for the last. What happens during the launch of Telepresence?
Work with Telepresence
At start (by the last command specified in the instructions above) we set:
- namespace (namespace) in which the microservice is launched;
- the names of the deployment and the container we want to penetrate.
The remaining arguments are optional. If our service interacts with the Kubernetes API and a ServiceAccount is created for it , we need to mount the certificates / tokens on our desktop. To do this, use the option
--mount=true(or --mount=/dst_path), which mounts the root (/) from the container in Kubernetes to us on the desktop. After that, we can (depending on the OS and the way the application is launched) use the “keys” from the cluster. First, consider the most versatile application launch option - in the Docker container. To do this, use the key
--docker-runand mount the directory with the code in the container: -v `pwd`:/appNote that this implies starting from the project directory. The application code will be mounted in a directory
/appin the container. Further:
-v /tmp/app/var/run/secrets:/var/run/secrets- to mount the directory with the certificate / token in the container. This option is finally followed by the image in which the application will be launched. NB : When assembling an image, you must specify
CMDor ENTRYPOINT! What, in fact, will happen next?
- In Kubernetes, for the specified Deployment, the number of replicas will be changed to 0. Instead, a new Deployment will be launched - with a replaced container
backend. - On the desktop, 2 containers will start: the first - with Telepresence (it will proxy requests from / to Kubernetes), the second - with the application being developed.
- If exec'nitsya in the container with the application, then we will have access to all the ENV variables passed by Helm during the deployment, as well as all services are available. All that remains is to edit the code in your favorite IDE and enjoy the result.
- At the end of the work, it’s enough to simply close the terminal where Telepresence is running (end the session using Ctrl + C), Docker containers will stop on the desktop, and everything will return to its original state in Kubernetes. All that remains is to commit, issue the MR and pass it to review / merge / ... (depending on your workflows).
If we don’t want to run the application in the Docker container — for example, we develop it not in PHP, but in Go, and still collect it locally — launching Telepresence will be even easier:
telepresence --namespace {{ .Values.global.env }} --swap-deployment {{ .Chart.Name }}:backend --mount=trueIf the application accesses the Kubernetes API, you will need to mount the directory with the keys . For Linux, there is a proot utility :
proot -b $TELEPRESENCE_ROOT/var/run/secrets/:/var/run/secrets bashAfter starting Telepresence without an option,
--docker-runall environment variables will be available in the current terminal, so you need to start the application in it. NB : When using, for example, PHP, you need to remember to disable various op_cache, apc and other accelerators for development - otherwise editing the code will not produce the desired result.
Summary
Local development with Kubernetes is a problem whose need for solution is growing in proportion to the spread of this platform. Having received relevant requests from the developers (from our customers), we began to solve them with the first available means, which, however, did not prove themselves over a long distance. Fortunately, this has become obvious not only now and not only to us, therefore more suitable means have already appeared in the world, and Telepresence is the most famous of them (by the way, there is still a skaffold from Google). Our experience of its use is not so great, but it already gives reason to recommend "colleagues" - try it!
PS
Other from the K8s tips & tricks cycle:
- “ Tools for application developers running on Kubernetes ”;
- « Kubernetes tips & tricks: custom error page in the Ingress NGINX »;
- “ Transfer of resources working in a cluster to Helm 2 management ”;
- “ On the allocation of nodes and the load on the web application ”;
- " Access to dev-sites ";
- “ Speeding up the bootstrap of large databases. ”