Tips for developing very large projects in Revit
Many teams have their own BIM standards. But what happens when a team begins work on a project much larger than they ever had to do in Revit. Are standards suitable for small projects for structures of hundreds of thousands of square meters applied?
Brian Kish, architect and project manager at AE7, in his article shares tips for creating very, very large projects in Revit. The following is a free retelling of this article.
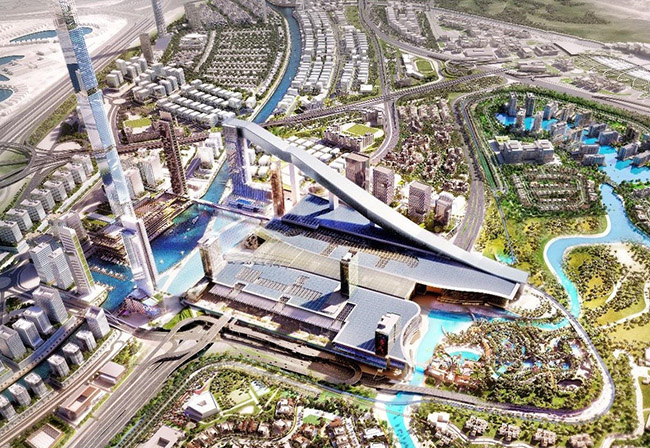
Using the example of Medyan One Mall, a very large shopping center that is currently under construction in Dubai, Brian shares the experience he gained as a BIM manager on this project.
1. Hardware
When you are preparing for a major project, you should pay attention to the hardware. There are many articles on how to choose hardware for comfortable work in Revit. Remember that desktop computers are easier to upgrade than laptops. Several slats of additional RAM and a new video card are insignificant during the entire project implementation period. Remember, the time of the staff, and not the cost of iron is the most significant asset of the company.
2. Strategy
Determining how people will work on a project is critical to the success of the project, but too often management makes such decisions too hastily. Mistakes in planning become apparent after the work on the project is in full swing and it is already impossible to change anything. It is important to conduct a series of kick-off meetings with project participants in advance, which will help determine the workflow and prevent problems that may arise. Please note the following:
- Where to place the central project files and how it will affect the workflow between different project participants located in different offices.
- What is the scale of the main drawings and how will this affect the number of sheets and organization of the model.
- What is the exchange protocol with different project participants.
Tables, charts, diagrams, screenshots - all these are useful tools to indicate different problems to colleagues who are not familiar with Revit, but are interested in answers to these important questions. These documents are also useful for explaining design decisions to new project participants who are not familiar with project management and the model.
Addendum: An exchange protocol with various project participants is closely related to the document management system, which must be adapted to store drawings. Autodesk cloud solutions can also act as a project documentation management system.
It is necessary to check in advance that the project documentation management system complies with legal requirements, the integration options with Revit, the simplicity and ease of use by all project participants, even those who are not directly involved in the project, for example, equipment suppliers. Remember, a document management system is often impossible to change when a large project is in full swing.
3. Separation of the model
More models do not mean more efficiency. In small and medium-sized projects, one model is enough, but the desire to share a large model will often lead to more confusion than to order and efficiency. Everyone in the team, from the modeler to the director, has his own idea of how the model should be divided. Keeping in mind how the models are broken down, each division of the model should be carefully thought out.
Remember, the presence of a large number of links leads to a long opening of the model and a decrease in the performance of the model. Instead, disable work sets that are not required for specific tasks. Use any methods to work to improve model performance and divide the model when nothing else helps. Here are a few factors to consider when working with the model:
A.The number of models will increase as work progresses with the model. Very large projects generally do not develop according to plan, so it is impossible to predict the number of models that will be necessary in the long run. When your key deadline for drawing is close, postpone the division of the model, because much can go wrong. After submitting the documentation, brainstorm, test the various options, and decide on the separation of the model.
B.A large project usually has several offices geographically located, both in different parts of the globe and in one city. Creating a local hosting of model working files will be an excellent solution that will help to dramatically increase model performance, opening and synchronization times. Strive to limit the team of modelers of each part of the model to six, eight people (maximum 15 people during the completion of the project stages). The more employees will be connected to each part of the model, the greater will be the load on productivity.
IN.There are two basic principles for dividing a model: by space or by types of components. The first option is to divide the model into parts, floors, levels, buildings, etc. This is easy and understandable. The disadvantage of this method is that the various components of the building, which must be connected and managed together, are divided into different files. The second way is dividing by related components. For example, a model of the outer shell of a building, a model of all walls, windows and doors, a model of suspended ceilings, etc. However, when making significant changes in one area of the project, many models need to be opened. Another consideration for this approach is that some families have a close relationship with the host, for example, the “border” families.
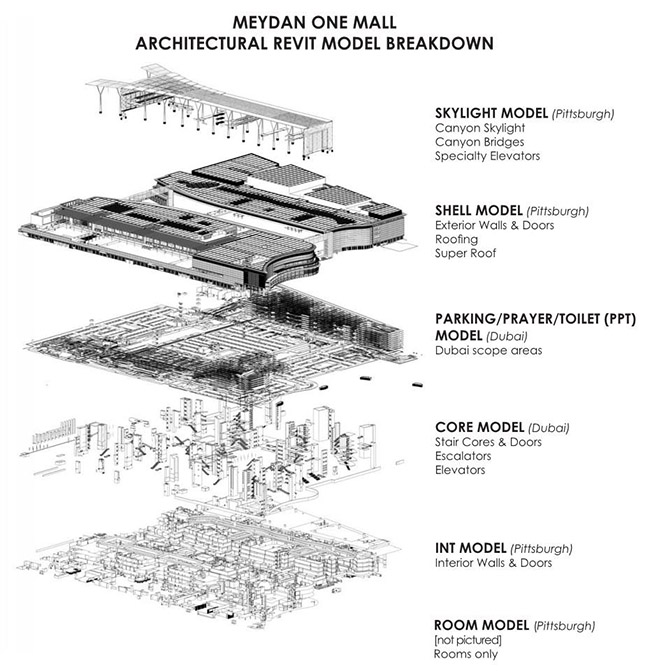
The division of the architectural model in the project Medyan One Mall.
Brian provides an interesting detail. At the design stage, they wanted to divide the model of related components into spatial parts, so that this part could be performed directly in the office in Dubai. However, instead, they retained a model of related components and bought several additional jobs for use as remote work machines.

Brian also kindly shared the model division diagram.
Addendum:Remember, Revit is not very friendly with second-level nesting models. For example, such a structure will lead to a sharp drop in productivity: Model A -> Model B -> Central file ("Model A" is embedded in "Model B" and "Model B" is embedded in the Central file) Work in such a central file will be very slow and not comfortable. Delete the link “Model A” or change its type to that superimposed inside “Model B” so that “Model A” does not load into the central file. Download “Model A” and “Model B” directly to the central file, so that the structure “Model A” -> Central file <- “Model B” is obtained.
Always compose the central files according to the direct link rule, that is, so that they contain only direct links to model files, and there are no links in which links are still embedded (that is, those that are not visible from the Central File Link Manager).
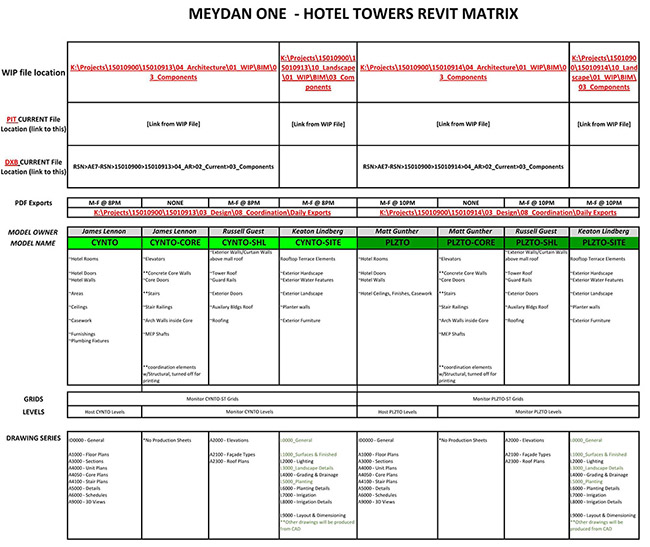
4. The matrix of the model
When you divide the model, communication will be a key factor that will allow the models to function as planned. The more models, the more confused it becomes. Always notify the team of all changes.
Brian shares the following diagram of the model matrix, with which all new team members in AE7 begin to meet.
- The name and owner of the file. Listing owners helps you understand who to contact in case of a problem with this part of the model.
- Model elements in each file. Listing items helps in searching, such as stairs or escalators.
- A set of drawings included in each model. There is nothing more unpleasant than opening a model and finding in it the blueprints that were needed.
- List of work sets and links in each file.
- The path to the file to search for the desired model.
5. Organization of sets of drawings
It is important to think about where the drawing sheets will be located. One approach is to create a single file containing all the drawings. This file will not contain any model elements, only sheets and annotations. However, this method means that the drawing file will contain a lot of related models and will open very slowly. The positive point is that all the elements are presented in one model, it is very simple to carry out all the notation and annotations, in contrast to the approach when the annotations are located along with the elements that they display.
It takes a very long time to open a drawing file and synchronize because all related files must be downloaded and properly displayed. In addition, due to the fact that this file will be simultaneously opened for a large number of users, over time, broken elements will appear in it that will make working with the file impossible.
Brian advises dividing the drawings into several models. Save drawings of stairs and elevators in a vertical transport model. Keep wall reamers along with doorway fill specifications with walls and doors.
Brian also recommends the active use of “Linked Views” to display annotations made in other models.
Addendum:carefully use the “Linked Views” if your design is in one file and many models are connected to it that already contain decorated views. In this case, the design drawings turn into hell, because in order to just move the callouts, you have to open a bunch of related models. You just at some point will not be able to figure out which file you need to open in order to move or place design elements.
Remember the direct link rule: the central file should contain only direct links to model files in order to edit any element or annotation. Second-level nested links (links that are not visible from the Central File Link Manager) should be a very rare exception.
Use a combination of hardware, trained personnel, and model organization before starting a project to create very large models in Revit. These considerations become even more important because projects are expanding in volume and these tips will prepare you for even larger projects in the future.
My additions marked in the text are not the opinion of the author of the original article. These additions are based on my own experience and the analysis of low productivity of those projects with which I was associated. If you have an opinion on model optimization in Revit, write his comments.
Images and the original text of the article are located on archsmarter.com .