How to create a game if you’re never an artist
There were moments in the life of every programmer when he dreamed of making an interesting game. Many programmers realize these dreams, and even successfully, but this is not about them. It's about those who like to play games, who (even without knowledge and experience) tried to create them once, being inspired by examples of lone heroes who achieved worldwide fame (and huge profits), but deep down understood that compete with the guru igrostroya he can not afford.
And it is not necessary…
Small introduction
I will make a reservation right away: our goal is not making money - there are a lot of articles on this topic on Habré. No, we will make a dream game.
Lyrical digression about the game of dreams
How many times have I heard this word from single developers and small studios. Wherever you look, all novice igrodelov hasten to reveal their dreams and “perfect vision” to the world, and then write long articles about their heroic efforts, work process, inevitable financial difficulties, problems with publishers and generally “players-ungrateful-dogs-im- give-graph-and-coins-and-all-free-and-pay-do-not-want-a-game-pirates-and-we-have-lost-profits-because of them-here. "
People, do not be fooled. You are not making a dream game, but a game that will sell well - these are two different things. Players (and especially sophisticated ones) do not care about your dream and they will not pay for it. If you want profits - study trends, see what's popular now, do something unique, do better, more unusual than others, read articles (there are many), communicate with publishers - in general, realize the dreams of end users, not yours.
If you have not run away yet and still want to realize your dream game, give up profits in advance. Don’t sell your dream at all - share it for free. Give people your dream, bring them to it, and if your dream is worth something, you will receive, if not money, but love and recognition. This is sometimes much more valuable.
Many people think that games are a waste of time and energy, and that serious people should not talk about this topic at all. But people gathered here are not serious, so we agree only in part - games really take a lot of time if you play them. However, the development of games, although it takes many times more time, can bring a lot of benefits. For example, it allows you to get acquainted with the principles, approaches and algorithms that are not found in the development of non-gaming applications. Or deepen the skills of owning tools (for example, a programming language), doing something unusual and exciting. On my own I can add (and many will agree) that game development (even unsuccessful) is always a special, incomparable experience, which you later recall with trepidation and love, which I want to experience for every developer at least once in my life.
We will not use new-fangled game engines, frameworks, libraries - we will look at the very essence of the gameplay and feel it from the inside. We give up flexible development methodologies (the task is simplified by the need to organize the work of just one person). We will not spend time and energy searching for designers, artists, composers and specialists in sound - we will do everything ourselves as we can (but at the same time we will do everything wisely - if we suddenly have an artist, we will not make much effort to fasten the fashionable graphics on the finished frame). In the end, we won’t even really study the tools and choose the right one - we’ll do it on the one that we know and know how to use. For example, in Java, so that later, if necessary, transfer it to Android (or to a coffee maker).
"A!!! Horror! Nightmare! How can you spend time on such nonsense! Get out of here, I'll go read something more interesting! ”
Why do this? I mean, reinvent the wheel? Why not use a ready-made game engine? The answer is simple: we don’t know anything about him, but we want the game now. Imagine the average programmer’s mindset: “I want to make a game! There will be meat, and explosions, and pumping,
So, let's continue.
I will not go into the details of my own bitter experience, but I will say that one of the main problems for a programmer in developing games is graphics. Programmers usually do not know how to draw (although there are exceptions), and artists usually do not know how to program (although there are exceptions). And without graphics, you must admit, a rare game is bypassed. What to do?
There are options:
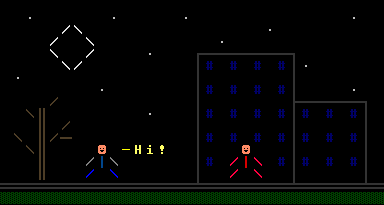
1. Draw everything yourself in a simple graphical editor
Screenshots of the game "Kill Him All", 2003
Screenshots of the game "Kill Him All", 2003
2. Draw everything yourself in a vector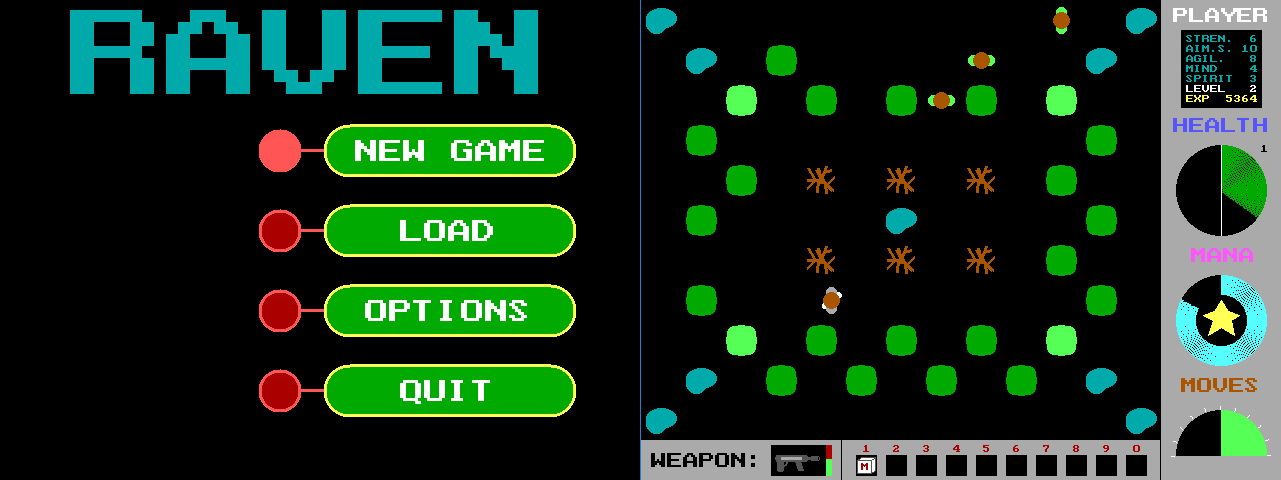
Screenshots of the game "Raven", 2001 Screenshots of the game "Inferno", 2002
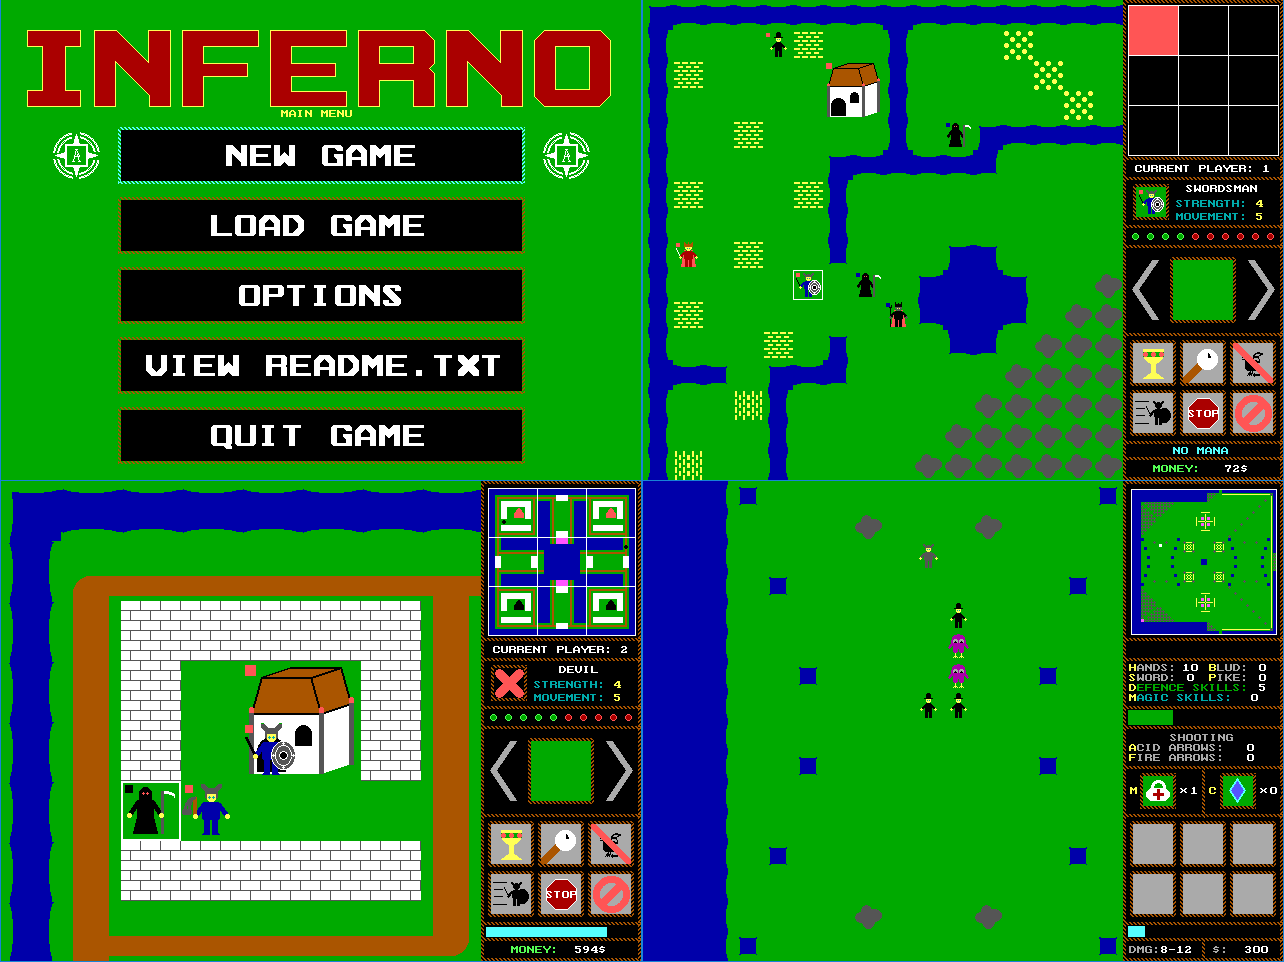
Screenshots of the game "Raven", 2001 Screenshots of the game "Inferno", 2002
3. Ask a brother who also does not know how to draw (but does it a little better)
Screenshots of the game "Fucking", 2004
Screenshots of the game "Fucking", 2004
4. Download some program for 3D-modeling and drag assets from there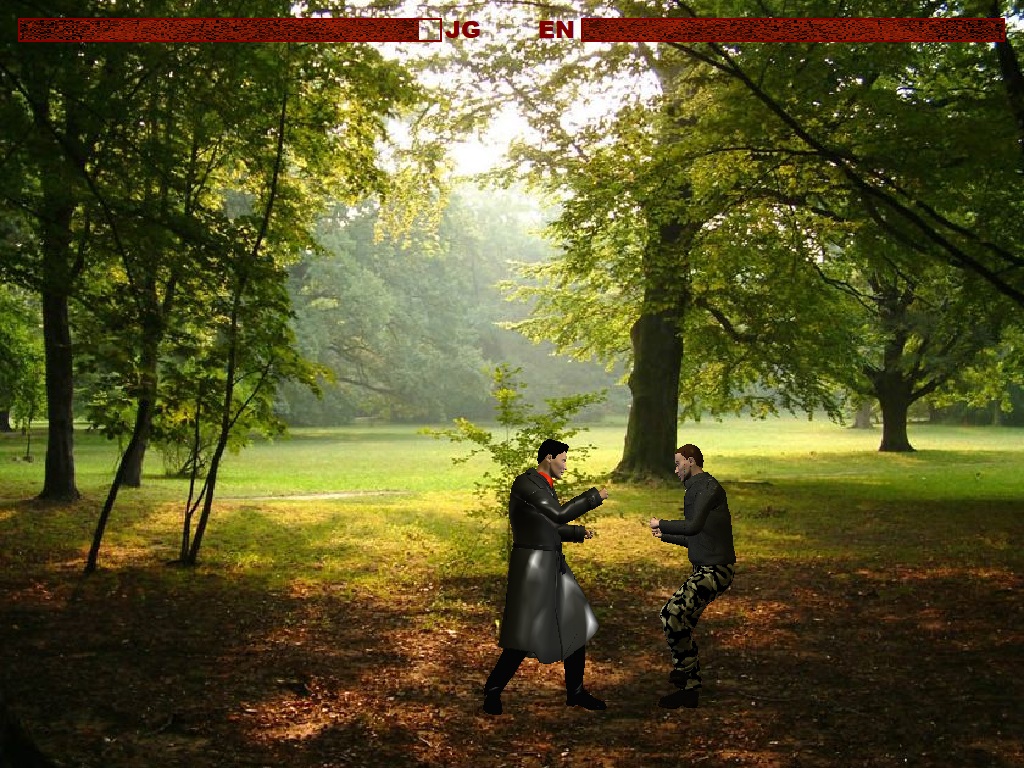
Screenshots of the game "Fucking 2. Demo", 2006
Screenshots of the game "Fucking 2. Demo", 2006
5. In desperation, tearing hair on the head
Screenshots of the game "Fucking", 2004
Screenshots of the game "Fucking", 2004
6. Draw everything yourself in pseudographics (ASCII)
Screenshots of the game "Fifa", 2000 Screenshots of the game "Sumo", 1998
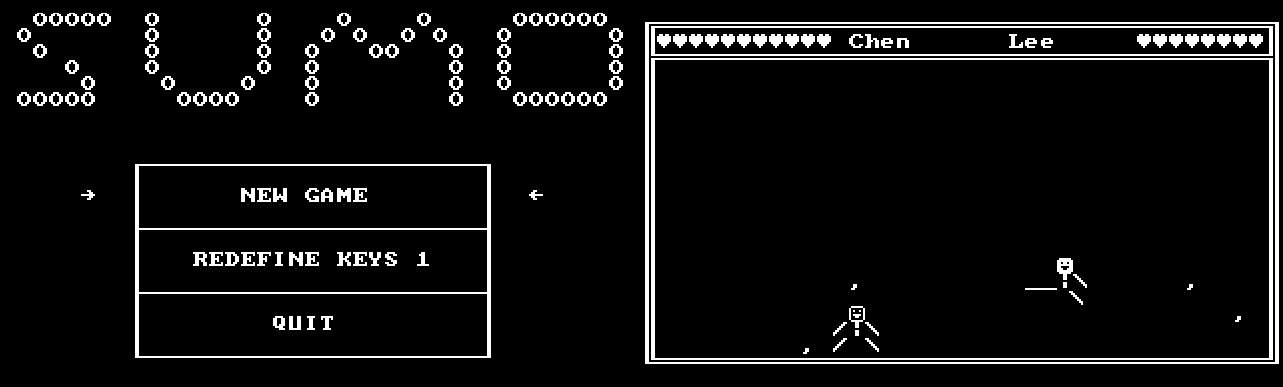
Screenshots of the game "Fifa", 2000 Screenshots of the game "Sumo", 1998
Let us dwell on the latter (in part because it does not look as depressing as the rest). Many inexperienced gamers believe that games without cool modern graphics are not able to win the hearts of players - even the name of the game doesn’t even turn them into games. Developers of such masterpieces as ADOM , NetHack and Dwarf Fortress tacitly object to such arguments . Appearance is not always a decisive factor, the use of ASCII gives some interesting advantages:
- in the process of development, the programmer focuses on gameplay, game mechanics, the plot component and more, without being distracted by minor things;
- developing a graphic component does not take too much time - a working prototype (that is, a version by playing which you can understand, but is it worth it to continue) will be ready much earlier;
- no need to learn frameworks and graphic engines;
- your graphics will not become obsolete in the five years that you will develop the game;
- hardcore workers will be able to evaluate your product even on platforms that do not have a graphical environment;
- if everything is done correctly, then the cool graphics can be fastened later, later.
The above long introduction was intended to help novice igrodelov overcome fears and prejudices, stop worrying and still try to do something like that. Ready? Then let's get started.
Step one. Idea
How? Still have no idea?
Turn off the computer, go eat, walk, exercise. Or sleep, at worst. To come up with a game is not to wash windows - insight in the process does not come. Usually the idea of a game is born suddenly, unexpectedly, when you do not think about it at all. If this suddenly happened, grab a pencil faster and write down until the idea flew away. Any creative process is implemented in this way.
And you can copy other people's games. Well, copy. Of course, do not shamelessly tear, telling on every corner how smart you are, but use the experience of others in your product. How much after this will remain specifically from your dream in it is a secondary question, because often gamers have this: they like everything in the game, except for some two or three annoying things, but if it were done differently ... Who knows perhaps bringing to the mind of someone’s good idea is your dream.
But we will go the simple way - suppose that we already have an idea, and we have not thought about it for a long time. As our first grandiose project, we will make a clone of a good game from Obsidian - Pathfinder Adventures .
“What the hell is this! Any tables? ”
As the saying goes,pourquoi pas? We seem to have already abandoned prejudices, and so we boldly begin to refine the idea. Naturally, we will not clone the game one to one, but we will borrow the basic mechanics. In addition, the implementation of a turn-based board cooperative game has its advantages:
- it is step-by-step - this allows you not to worry about timers, synchronization, optimization, FPS and other dreary things;
- it is cooperative, that is, the player or players do not compete against each other, but against a certain "environment" playing according to deterministic rules - this eliminates the need to program AI ( AI ) - one of the most difficult stages of game development;
- it is meaningful - the tabletops are generally whimsical people, they won’t play anything: give them thoughtful mechanics and interesting gameplay - you won’t go out in one beautiful picture (it gives something to friends, right?);
- it is with the plot - many e-sportsmen will not agree, but for me personally the game should tell an interesting story - like a book, only using its special artistic means.
- she’s entertaining, which is not for everyone - the described approaches can be applied to any subsequent dream, no matter how many you have.
For those not familiar with the rules, a brief introduction:
Pathfinder Adventures is a digital version of a board card game created on the basis of a board role-playing game (or rather, an entire role-playing system) Pathfinder. Players (in the amount of 1 to 6) choose a character for themselves and, together with him, go on an adventure, divided into a number of scenarios. Each character has at his disposal cards of various types (such as: weapons, armor, spells, allies, items, etc.), with the help of which in each scenario he must find and brutally punish the Scoundrel - a special card with special properties.
Each scenario provides a number of locations or locations (their number depends on the number of players) that players need to visit and explore. Each location contains a deck of cards lying face down, which the characters explore in their turn - that is, they open the top card and try to overcome it according to the relevant rules. In addition to harmless cards replenishing the player’s deck, these decks also contain evil enemies and obstacles - they must be defeated in order to advance further. The Scoundrel card also lies in one of the decks, but the players do not know which one - it needs to be found.
To defeat the cards (and to acquire new ones), the characters must pass a test of one of their characteristics (standard for RPG strength, dexterity, wisdom, etc.) by throwing a die whose size is determined by the value of the corresponding characteristic (from d4 to d12), adding modifiers (defined rules and the level of character development) and playing to enhance the effect of the appropriate cards from the hand. Upon victory, the met card is either removed from the game (if it is an enemy) or replenishes a player’s hand (if it is an item) and the move goes to another player. When losing, the character is often damaged, causing him to discard cards from his hand. An interesting mechanic is that the character’s health is determined by the number of cards in his deck - as soon as the player needs to draw a card from the deck, but they are not there, his character dies.
The goal is, having made his way through location maps, to find and defeat the Scoundrel, having previously blocked his path to retreat (you can learn more about this and much more by reading the rules). This needs to be done for a while, which is the main difficulty of the game. The number of moves is strictly limited and a simple enumeration of all available cards does not reach the goal. Therefore, you have to apply various tricks and clever techniques.
As the scenarios are fulfilled, the characters will grow and develop, improving their characteristics and acquiring new useful skills. Managing the deck is also a very important element of the game, since the outcome of the scenario (especially in the later stages) usually depends on correctly selected cards (and on a lot of luck, but what do you want from a game with dice?).
In general, the game is interesting, worthy, worthy of attention, and, what is important for us, quite complicated (note that I say “difficult” not in the meaning of “difficult”) to make it interesting to implement its clone.
In our case, we will make one global conceptual change - we will abandon the cards. Rather, we won’t refuse at all, but we will replace the cards with cubes, still of different sizes and different colors (technically, it’s not quite correct to use their “cubes”, since there are other shapes besides the correct hexagon, but it's unusual for me to call them “bones” and it’s unpleasant, but to use American daisy is a sign of bad taste, so let’s leave it as it is). Now, instead of decks, players will have bags. And the locations will also have bags, from which players in the process of research will pull out arbitrary cubes. The color of the cube will determine its type and, accordingly, the rules for passing the test. The personal characteristics of the character (strength, dexterity, etc.), as a result, will be eliminated, but new interesting mechanics will appear (more about which later).
Will it be fun to play? I have no idea, and no one can understand this until a working prototype is ready. But we do not enjoy the game, but the development, right? Therefore, there should be no doubt of success.
Step Two Design
Having an idea is only a third of the story. Now it is important to develop this idea. That is, do not take a walk in the park or take a steam bath, but sit down at the table, take paper with a pen (or open your favorite text editor) and carefully write a design document, painstakingly working out every aspect of the game mechanics. Time for this will take a breakthrough, so do not expect to complete the writing in one sitting. And do not even hope to think through everything all at once - as you implement, you will see the need to make a bunch of changes and changes (and sometimes rework something globally), but some basis must be present before the development process begins.
At first, your design document will look something like this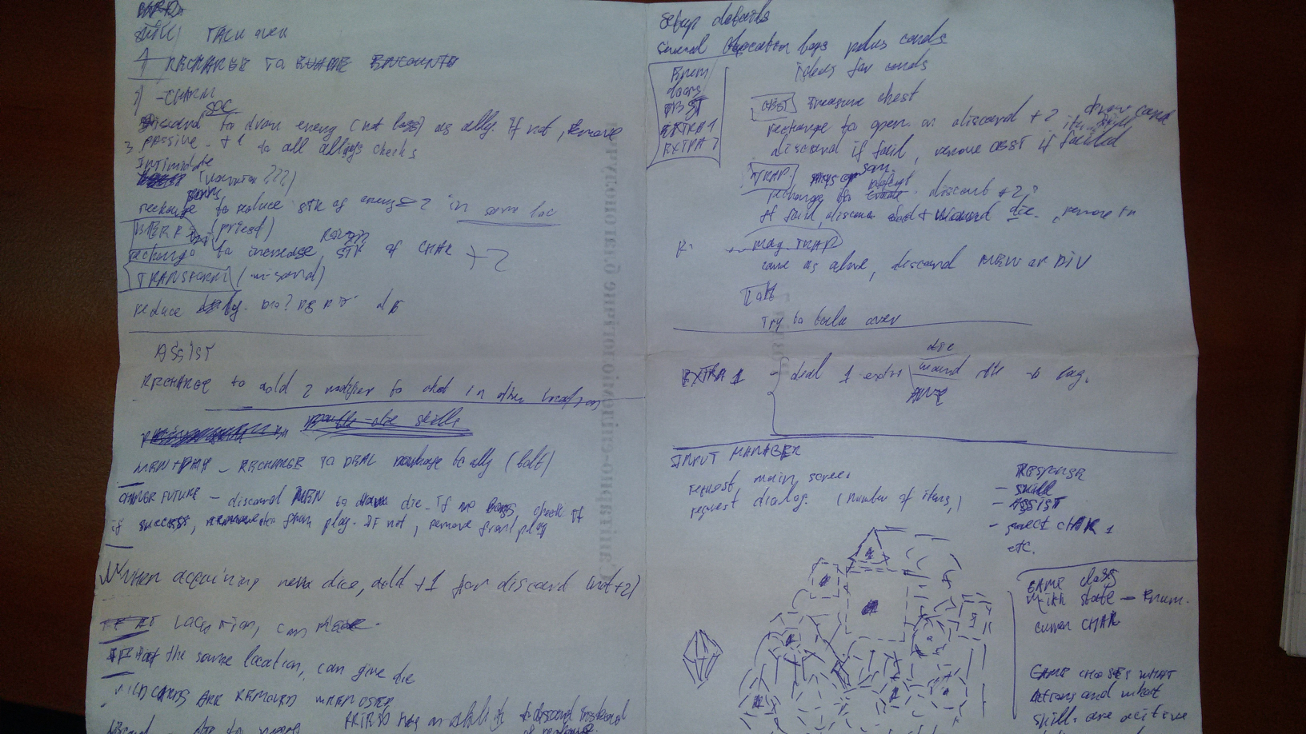

And only after coping with the first wave of grandiose ideas, you take up the head, decide on the structure of the document and begin to methodically fill it with content (checking every second with what has already been written in order to avoid unnecessary repetitions and especially contradictions). Gradually, step by step, you get something meaningful and concise, like this .
When describing the design, choose the language in which it is easier for you to express your thoughts, especially if you work alone. If you ever need to involve third-party developers in the project, make sure that they understand all the creative nonsense that is going on in your head.
To continue, I strongly recommend that you read the cited document at least diagonally, because in the future I will refer to the terms and concepts presented there, without dwelling in detail on their interpretation.
“Author, kill yourself against the wall. Too many letters. ”
Step Three Modeling
That is, all the same design, only more detailed.
I know that many are already eager to open an IDE and start coding, but be patient a little more. When ideas overwhelm our heads, it seems to us that we only need to touch the keyboard and our hands will rush to sky-high distances - before coffee has time to boil on the stove, when the working version of the application is ready ... to go to the trash. In order not to rewrite the same thing many times (and especially not to make sure after three hours of development that the layout is not working and needs to be started anew), I suggest that you first think over (and document) the main structure of the application.
Since we, as developers, are well acquainted with object-oriented programming (OOP), we will use its principles in our project. But for OOP there is nothing more expected than to start development with a bunch of boring UML diagrams. (How, you don’t know what UML is ? I also almost forgot, but I’ll remember it with pleasure - just to show what a diligent programmer I am, hehe.)
Let's start with the “use-case” diagram ) We will depict on it the ways in which our user (player) interacts with the future system:
Use cases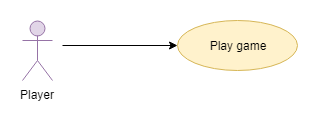
"Uh ... what's that all about?"
Just kidding, just kidding ... and, perhaps, I stop joking about it - this is a serious matter (a dream, after all). On the diagram of use cases, it is necessary to display the possibilities that the system provides to the user. In details. But it so happened historically that this particular type of diagrams is the worst for me - patience is not enough, apparently. And you don’t have to look at me like that - we are not at the university protecting the diploma, but we enjoy the work process. And for this process, use cases are not so important. It is much more important to correctly divide the application into independent modules, that is, implement the game in such a way that the features of the visual interface do not affect the game mechanics, and that the graphic component can be easily changed if desired.
This point can be detailed in the following components diagram:
System components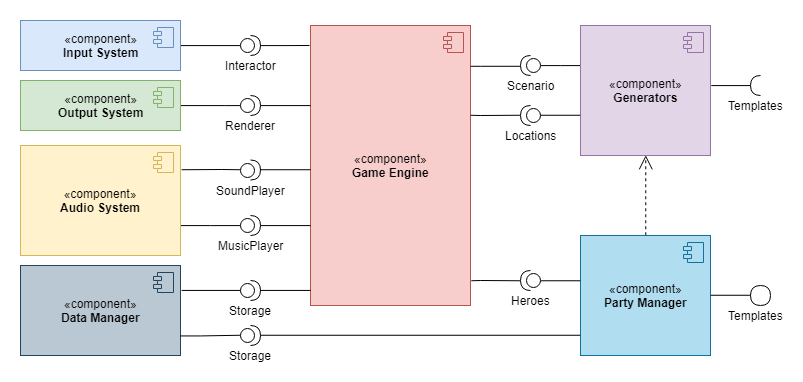
Here we have already identified specific subsystems that are part of our application and, as will be shown later, they will all be developed independently of each other.
Also, at the same stage, we’ll figure out what the main game cycle will look like (or rather, its most interesting part is the one that implements the characters in the script). For this, an activity diagram is suitable for us:
If you stand, sit down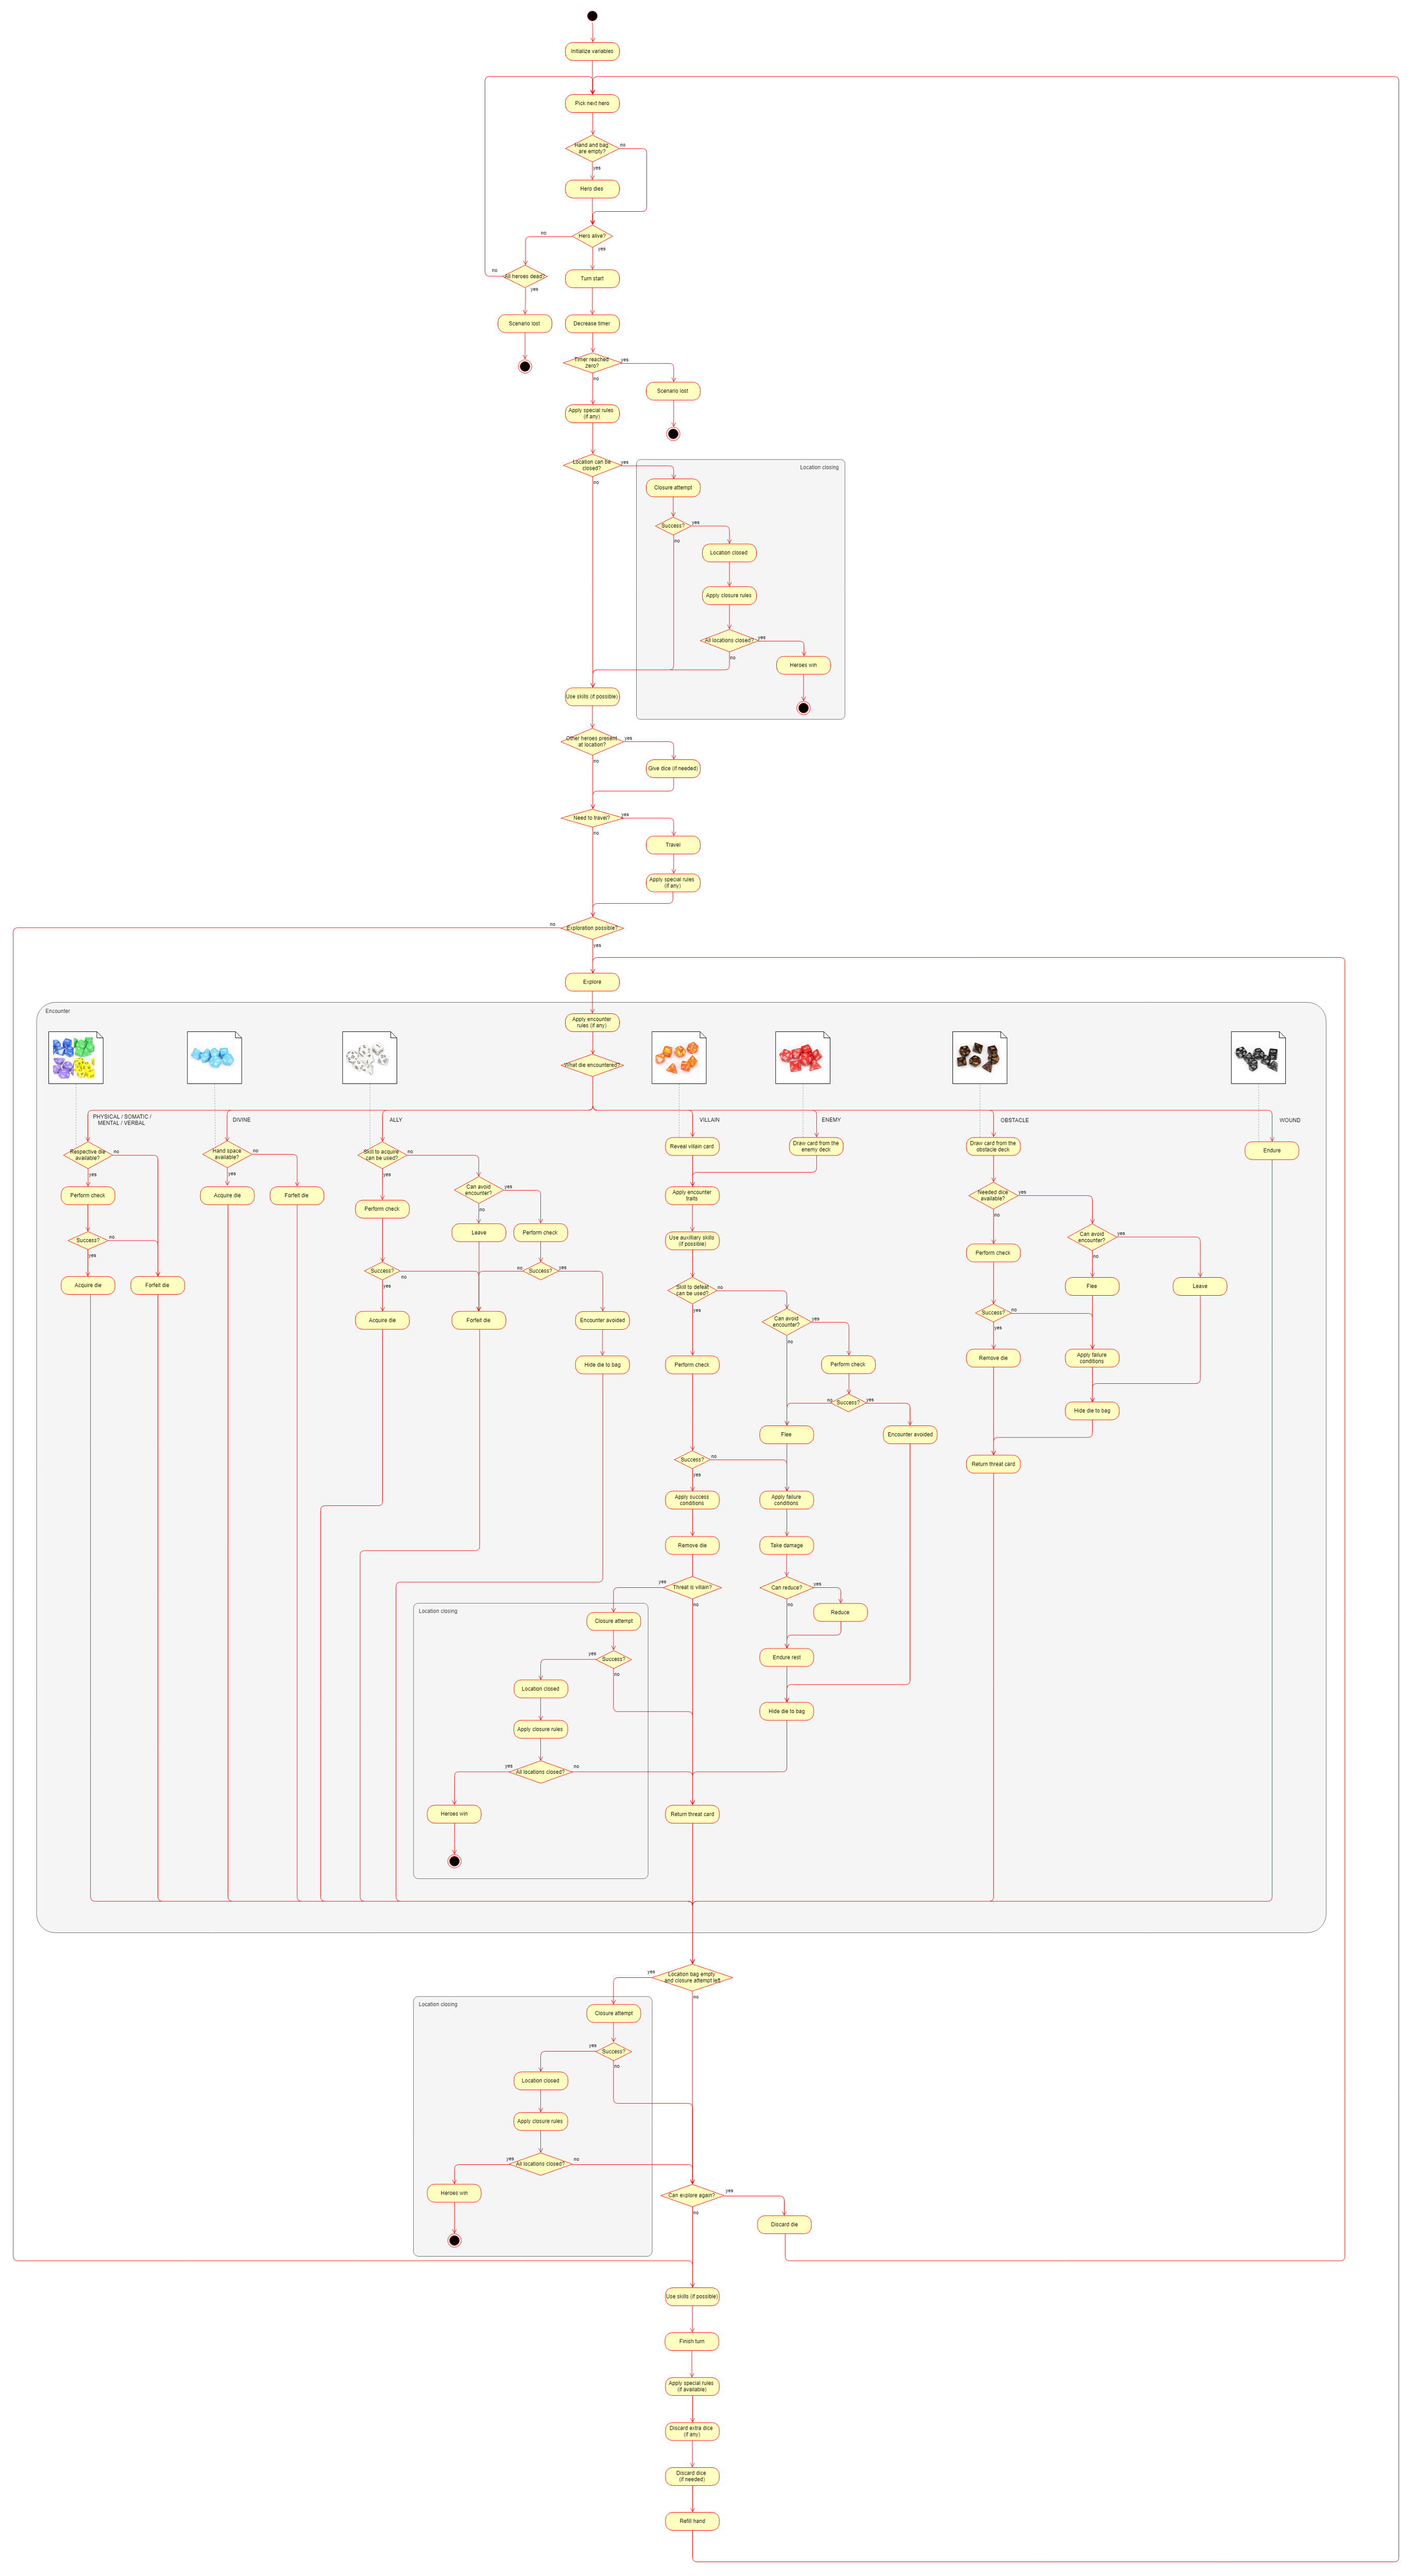
And finally, it would be nice to present in general terms the sequence of the interaction of the end user with the game engine through an input-output system.
Sausages
The night is long, far before dawn. After sitting as it should at the table, you will calmly draw the other two dozen diagrams - believe me, in the future their presence will help you to stay on track, increase your self-esteem, update the room’s interior, hanging faded wallpapers with colorful posters, and in simple terms bring your vision to fellow developers who will soon rush to the doors of your new studio in droves (we are not aiming for success, remember?).
So far we are not going to cite class diagrams (class) that we all love - classes are expected to
Step Four Tool selection
As already agreed, we will develop a cross-platform application that runs both on desktops running various operating systems and on mobile devices. We will choose Java as the programming language, and Kotlin is even better, since the latter is newer and fresher, and has not yet had time to swim in the waves of indignation that have swept its predecessor with its head (at the same time I’ll learn if someone else does not own it). The JVM , as you know, is available everywhere and everywhere (on three billion devices, hehe), we will support both Windows and UNIX, and even on a remote server it will be possible to play through an SSH connection (who may need it is unknown, but We will provide such an opportunity). We will also transfer it to Android when we get rich and hire an artist, but more on that later.
Libraries (we can’t get anywhere without them) we will choose according to our cross-platform requirement. We will use Maven as the build system. Or Gradle. Or all the same, Maven, let's start with it. Immediately I advise you to set up a version control system (whichever one you prefer), so that after many years it will be easier to recall with nostalgic feelings how great it was once. IDE also choose the familiar, favorite and convenient.
Actually, we don’t need anything else. You can start developing.
Step Five Creating and setting up a project
If you use an IDE, then creating a project is trivial. You just need to choose some sonorous name (for example, Dice ) for our future masterpiece , do not forget to enable Maven support in the settings, and
pom.xmlwrite the necessary identifiers in the file :4.0.0 my.company dice 1.0 jar Also add Kotlin support, which is missing by default:
org.jetbrains.kotlin kotlin-stdlib ${kotlin.version} and some settings that we will not dwell on in detail:
UTF-8 1.8 1.8 1.3.20 true A bit of information regarding hybrid projects
If you plan to use both Java and Kotlin in your project, then in addition to the folder
I can’t say how important this is - the projects are going quite well without this sheet. But just in case, you are warned.
src/main/kotlin, you will also have a folder src/main/java. Kotlin developers claim that the source files from the first folder ( *.kt) should be compiled earlier than the source files from the second folder ( *.java) and therefore strongly recommend that you change the settings of the standard Maven goals:org.jetbrains.kotlin kotlin-maven-plugin ${kotlin.version} compile process-sources compile ${project.basedir}/src/main/kotlin ${project.basedir}/src/main/java test-compile test-compile ${project.basedir}/src/test/kotlin ${project.basedir}/src/test/java org.apache.maven.plugins maven-compiler-plugin 3.5.1 default-compile none default-testCompile none java-compile compile compile java-test-compile test-compile testCompile I can’t say how important this is - the projects are going quite well without this sheet. But just in case, you are warned.
Let's create three packages at once (why trifle something?):
model- for classes describing objects of the game world;game- for classes that implement the gameplay;ui- for classes responsible for user interaction.
The latter will contain only interfaces, the methods of which we will use to input and output data. We will store specific implementations in a separate project, but more on that later. In the meantime, in order not to spray too much, we will add these classes here, side by side.
Do not try to immediately do it perfectly: think through the details of package names, interfaces, classes and methods; thoroughly prescribe the interaction of objects among themselves - all this will change, and more than a dozen times. As the project develops, many things will seem ugly, bulky, ineffective to you and the like - feel free to change them, since refactoring in modern IDEs is a very cheap operation.
We also create a class with a function
mainand we are ready for great accomplishments. You can use the IDE itself for launch, but as you will see later, this method is not suitable for our purposes (the standard IDE console is not able to display our graphical findings as it should), so we will configure the launch from the outside using batch (or shell on UNIX systems) file. But before that, we’ll make some additional settings. After the operation is completed,
mvn packagewe get the output of the JAR archive with all the compiled classes. First, by default, this archive does not include the dependencies necessary for the project to work (so far we do not have them, but they will certainly appear in the future). Secondly, the path to the main class containing the method is not specified in the archive manifest file main, so start the project with the commandjava -jar dice-1.0.jarit won’t work out with us. Fix this by adding additional settings to pom.xml:maven-assembly-plugin 2.6 package single jar-with-dependencies my.company.dice.MainKt Pay attention to the name of the main class. For Kotlin functions contained outside of classes (such as functions, for example
main), classes are still created during compilation (because the JVM knows nothing and does not want to know). The name of this class is the name of the file with the addition Kt. That is, if you named the main class Main, then it will be compiled into a file MainKt.class. It is this last one that we must indicate in the manifest of the jar file. Now, when building the project, we will get two jar files:
dice-1.0.jarand dice-1.0-jar-with-dependencies.jar. We are interested in the second. We will write a launch script for it. dice.bat (for Windows)
@ECHO OFF
rem Compiling
call "path_to_maven\mvn.bat" -f "path_to_project\Dice\pom.xml" package
if errorlevel 1 echo Project compilation failed! & pause & goto :EOF
rem Running
java -jar path_to_project\Dice\target\dice-1.0-jar-with-dependencies.jar
pause
dice.sh (for UNIX)
#!/bin/sh
# Compiling
mvn -f "path_to_project/Dice/pom.xml" package
if [[ "$?" -ne 0 ]] ; then
  echo 'Project compilation failed!'; exit $rc
fi
# Running
java -jar path_to_project/Dice/target/dice-1.0-jar-with-dependencies.jar
Please note that if compilation fails, we are forced to interrupt the script. Otherwise, not the last harp will be launched, but the file remaining from the previous successful assembly (sometimes we won’t even find the difference). Often, developers use the command
mvn clean packageto delete all previously compiled files, but in this case the whole compilation process will always start from the very beginning (even if the source code has not changed), which will take a lot of time. But we can’t wait - we need to make a game. So, the project starts up fine, but so far does nothing. Do not worry, we will fix it soon.
Step Six Main objects
Gradually, we will begin to fill the package with
modelthe classes necessary for the gameplay.Class diagram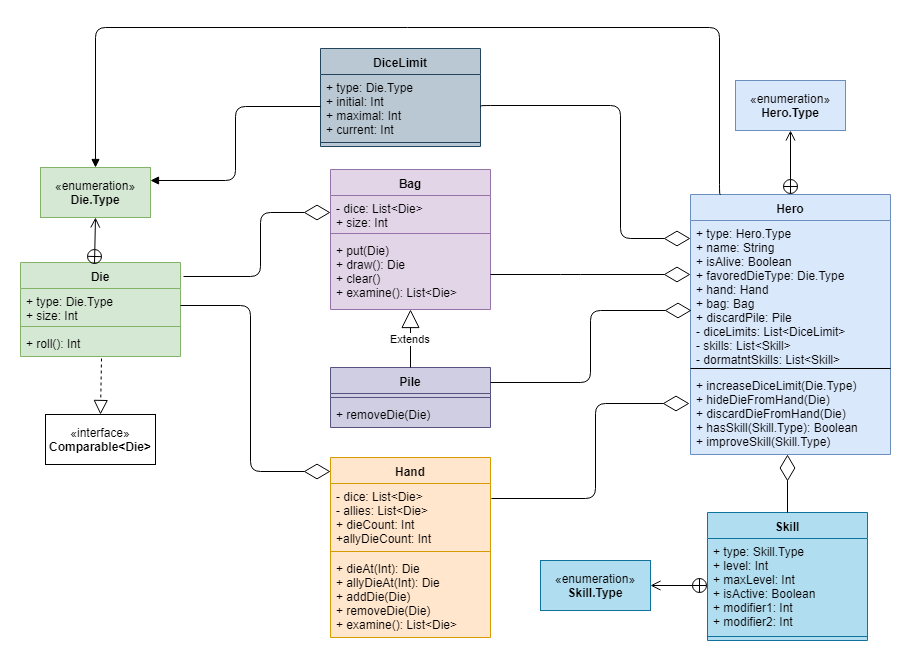
Cubes are our everything, add them first. Each cube (class instance
Die) is characterized by type (color) and size. For the types of cube Die.Type, we will make a separate enumeration ( ), mark the size with an integer from 4 to 12. We also implement a method roll()that will produce an arbitrary, uniformly distributed number from the range available for the cube (from 1 to the size value inclusive). The class implements the interface
Comparableso that the cubes can be compared with each other (useful later when we will display several cubes in an ordered row). Larger cubes will be placed earlier.class Die(val type: Type, val size: Int) : Comparable {
enum class Type {
PHYSICAL, //Blue
SOMATIC, //Green
MENTAL, //Purple
VERBAL, //Yellow
DIVINE, //Cyan
WOUND, //Gray
ENEMY, //Red
VILLAIN, //Orange
OBSTACLE, //Brown
ALLY //White
}
fun roll() = (1.. size).random()
override fun toString() = "d$size"
override fun compareTo(other: Die): Int {
return compareValuesBy(this, other, Die::type, { -it.size })
}
}
In order not to gather dust, cubes are stored in handbags (instances of the class
Bag). One can only guess what is going on inside the bag; therefore, it makes no sense to use an ordered collection. It seems to be. Sets (sets) well implement the idea we need, but do not fit for two reasons. First, when using them, you will have to implement methods equals()and hashCode(), it is not clear how, since it is incorrect to compare the types and sizes of cubes - any number of identical cubes can be stored in our set. Secondly, pulling the cube out of the bag, we expect to get not just something non-deterministic, but random, each time different. Therefore, I advise you nevertheless to use an ordered collection (list) and shuffle it each time you add a new element (in the methodput()) or immediately before issuing (in the method draw()). The method is
examine()suitable for cases when a player tired of uncertainty shakes out the contents of the bag in the hearts on the table (pay attention to sorting), and the method clear()- if the shaken out cubes are no longer returned to the bag.open class Bag {
protected val dice = LinkedList()
val size
get() = dice.size
fun put(vararg dice: Die) {
dice.forEach(this.dice::addLast)
this.dice.shuffle()
}
fun draw(): Die = dice.pollFirst()
fun clear() = dice.clear()
fun examine() = dice.sorted().toList()
}
In addition to bags with cubes, you also need heaps with cubes (instances of the class
Pile). From the first, the second ones differ in that their contents are visible to the players, and therefore, if necessary, remove a cube from the heap, the player can select a specific instance of interest. We realize this idea by the method removeDie().class Pile : Bag() {
fun removeDie(die: Die) = dice.remove(die)
}
Now we turn to our main characters - heroes. That is, characters that we will now call heroes (there is a good reason not to call your class a name
Character in Java). There are different types of characters (to put it in classes, although it’s classbetter not to use the word ), but for our working prototype we’ll take only two: Brawler (that is, Fighter with emphasis on strength and strength) and Hunter (aka Ranger / Thief, focusing on dexterity and stealth). The class of the hero determines his characteristics, skills and the initial set of cubes, but as it will be seen later, the heroes will not be strictly tied to classes, and therefore their personal settings can be easily changed in one single place.We will add the necessary properties to the hero in accordance with the design document: name, favorite type of cube, cube limits, skills learned and unstudied, hand, bag and pile for reset. Pay attention to the features of the implementation of collection properties. In the entire civilized world, it is considered bad form to provide outward access (with the help of a getter) to collections stored inside the object - unscrupulous programmers will be able to change the contents of these collections without the knowledge of the class. One way to deal with this is to implement separate methods for adding and removing elements, getting their number and accessing by index. You can implement getter, but at the same time return not the collection itself, but its immutable copy - for a small number of elements it’s not particularly scary to do just that.
data class Hero(val type: Type) {
    enum class Type {
        BRAWLER
        HUNTER
    }
    var name = ""
    var isAlive = true
    var favoredDieType: Die.Type = Die.Type.ALLY
    val hand = Hand(0)
    val bag: Bag = Bag()
    val discardPile: Pile = Pile()
    private val diceLimits = mutableListOf()
    private val skills = mutableListOf()
    private val dormantSkills = mutableListOf()
    fun addDiceLimit(limit: DiceLimit) = diceLimits.add(limit)
    fun getDiceLimits(): List = Collections.unmodifiableList(diceLimits)
    fun addSkill(skill: Skill) = skills.add(skill)
    fun getSkills(): List = Collections.unmodifiableList(skills)
    fun addDormantSkill(skill: Skill) = dormantSkills.add(skill)
    fun getDormantSkills(): List = Collections.unmodifiableList(dormantSkills)
    fun increaseDiceLimit(type: Die.Type) {
        diceLimits.find { it.type == type }?.let {
            when {
                it.current < it.maximal -> it.current++
                else -> throw IllegalArgumentException("Already at maximum")
            }
        } ?: throw IllegalArgumentException("Incorrect type specified")
    }
    fun hideDieFromHand(die: Die) {
        bag.put(die)
        hand.removeDie(die)
    }
    fun discardDieFromHand(die: Die) {
        discardPile.put(die)
        hand.removeDie(die)
    }
    fun hasSkill(type: Skill.Type) = skills.any { it.type == type }
    fun improveSkill(type: Skill.Type) {
        dormantSkills
                .find { it.type == type }
                ?.let {
                    skills.add(it)
                    dormantSkills.remove(it)
                }
        skills
                .find { it.type == type }
                ?.let {
                    when {
                        it.level < it.maxLevel -> it.level += 1
                        else -> throw IllegalStateException("Skill already maxed out")
                    }
                } ?: throw IllegalArgumentException("Skill not found")
    }
}
The hand of the hero (the cubes that he has at the moment) is described by a separate object (class
Hand). The design decision to keep the allied cubes separate from the main arm was one of the first that came to mind. At first it seemed like a super-cool feature, but later it generated a huge number of problems and inconveniences. Nevertheless, we are not looking for easy ways, and therefore the lists diceand alliesare at our services, with all the methods necessary for adding, receiving and deleting (some of them cleverly determine which of the two lists to apply to). When you remove a cube from your hand, all subsequent cubes will move to the top of the list, filling in the blanks - in the future this will greatly facilitate the search (no need to handle situations with null).class Hand(var capacity: Int) {
private val dice = LinkedList()
private val allies = LinkedList()
val dieCount
get() = dice.size
val allyDieCount
get() = allies.size
fun dieAt(index: Int) = when {
(index in 0 until dieCount) -> dice[index]
else -> null
}
fun allyDieAt(index: Int) = when {
(index in 0 until allyDieCount) -> allies[index]
else -> null
}
fun addDie(die: Die) = when {
die.type == Die.Type.ALLY -> allies.addLast(die)
else -> dice.addLast(die)
}
fun removeDie(die: Die) = when {
die.type == Die.Type.ALLY -> allies.remove(die)
else -> dice.remove(die)
}
fun findDieOfType(type: Die.Type): Die? = when (type) {
Die.Type.ALLY -> if (allies.isNotEmpty()) allies.first else null
else -> dice.firstOrNull { it.type == type }
}
fun examine(): List = (dice + allies).sorted()
}
The collection of class objects
DiceLimitsets limits on the number of cubes of each type that a hero can have at the beginning of the script. There is nothing special to say, we determine initially, the maximum and current values for each type.class DiceLimit(val type: Die.Type, val initial: Int, val maximal: Int, var current: Int)
But with skills it is more interesting. Each of them will have to be implemented individually (about which later), but we will consider only two: Hit and Shoot (one for each class, respectively). Skills can be developed (“pumped”) from the initial to the maximum level, which often affects the modifiers that are added to the dice rolls. Reflect this in the properties
level, maxLevel, modifier1and modifier2.class Skill(val type: Type) {
enum class Type {
//Brawler
HIT,
//Hunter
SHOOT,
}
var level = 1
var maxLevel = 3
var isActive = true
var modifier1 = 0
var modifier2 = 0
}
Pay attention to the auxiliary methods of the class
Hero, which allow you to hide or roll a die from your hand, check whether the hero has a certain skill, and also increase the level of the learned skill or learn a new one. All of them will be needed sooner or later, but now we will not dwell on them in detail. Please do not be afraid of the number of classes that we have to create. For a project of this complexity, several hundred is a common thing. Here, as in any serious occupation - we start small, gradually increase the pace, in a month we are terrified of the scope. Do not forget, we are still a small studio of one person - we are not faced with overwhelming tasks.
“Something got sick of me. I’ll go have a smoke or something ... ”
And we will continue.
The heroes and their abilities are described, it is time to move on to the opposing forces - the great and terrible Game Mechanics. Or rather, objects with which our heroes have to interact.
Another class diagram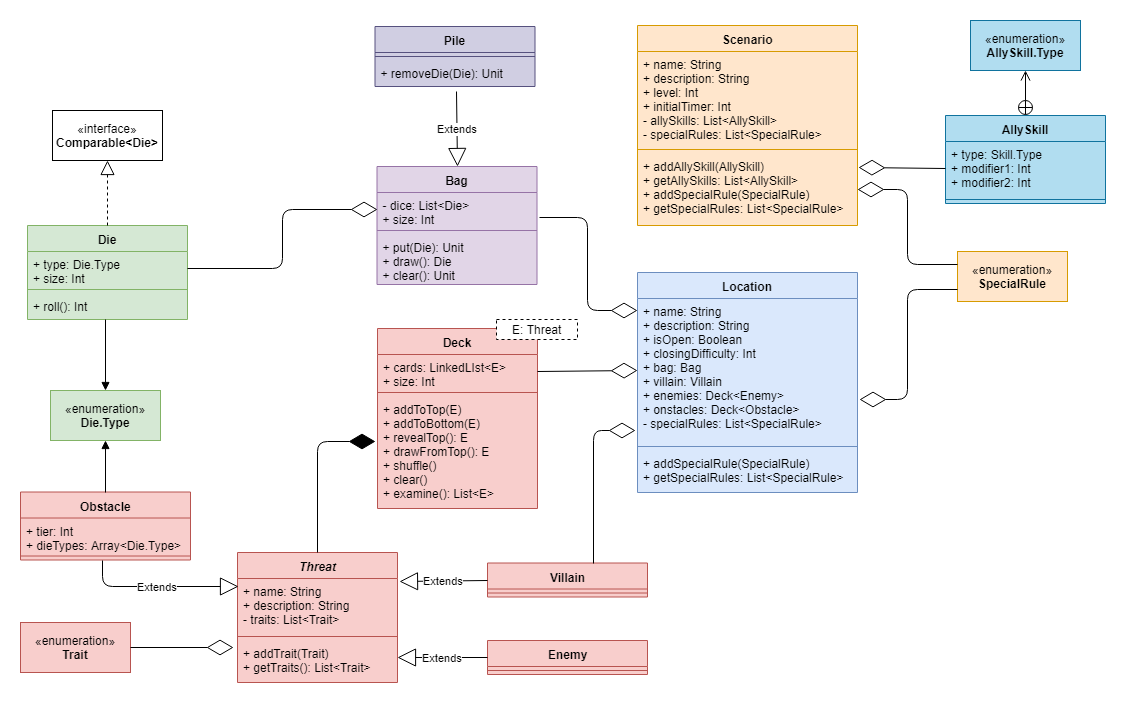
Three valiant cubes and cards will oppose our valiant protagonists: villains (class
Villain), enemies (class Enemy) and obstacles (class Obstacle), united under the general term “threats” ( Threat- abstract “locked” class, the list of its possible heirs is strictly limited). Each threat has a set of distinctive features ( Trait) that describe special rules of behavior when faced with such a threat and add variety to the gameplay.sealed class Threat {
var name: String = ""
var description: String = ""
private val traits = mutableListOf()
fun addTrait(trait: Trait) = traits.add(trait)
fun getTraits(): List = traits
}
class Obstacle(val tier: Int, vararg val dieTypes: Die.Type) : Threat()
class Villain : Threat()
class Enemy : Threat()
enum class Trait {
MODIFIER_PLUS_ONE, //Add +1 modifier
MODIFIER_PLUS_TWO, //Add +2 modifier
}
Note that the list of class objects is
Traitdefined as mutable ( MutableList), but is rendered outward as an immutable interface List. Although this will work in Kotlin, the approach is unsafe, because there is nothing stopping it from converting the resulting list to a mutable interface and making various modifications - it is especially easy to do this if you access the class from Java code (where the interface Listis mutable). The most paranoid way to protect your collection is to do something like this:fun getTraits(): List = Collections.unmodifiableList(traits) but we will not be so scrupulous in approaching the issue (you, however, are warned).
Due to the peculiarities of game mechanics, a class
Obstaclediffers from its counterparts by the presence of additional fields, but we will not focus on them. Threat cards (and if you carefully read the design document, then remember that these are cards) are combined into decks represented by the class
Deck:class Deck {
private val cards = LinkedList()
val size
get() = cards.size
fun addToTop(card: E) = cards.addFirst(card)
fun addToBottom(card: E) = cards.addLast(card)
fun revealTop(): E = cards.first
fun drawFromTop(): E = cards.removeFirst()
fun shuffle() = cards.shuffle()
fun clear() = cards.clear()
fun examine() = cards.toList()
}
There is nothing unusual here, except that the class is parameterized and contains an ordered list (or rather a two-way queue), which can be mixed using the appropriate method. Decks of enemies and obstacles will be needed to us literally in a second, when we proceed to consider ...
... a class
Location, each instance of which describes a unique area that our heroes will have to visit in the scenario.class Location {
var name: String = ""
var description: String = ""
var isOpen = true
var closingDifficulty = 0
lateinit var bag: Bag
var villain: Villain? = null
lateinit var enemies: Deck
lateinit var obstacles: Deck
private val specialRules = mutableListOf()
fun addSpecialRule(rule: SpecialRule) = specialRules.add(rule)
fun getSpecialRules() = specialRules
}
Each locality has a name, description, difficulty of closure and the sign of “open / closed”. Somewhere here the villain may be lurking (or it may not be lurking, as a result of which the property
villainmay take on value null). In each area there is a bag with cubes and a deck of cards with threats. Also, the area may have its own unique game features ( SpecialRule), which, like the properties of threats, add variety to the gameplay. As you can see, we are laying the foundation for future functionality, even if we do not plan to implement it in the near future (for which, in fact, we need the modeling stage). Finally, it remains to implement the scripts (class
Scenario):class Scenario {
var name = ""
var description = ""
var level = 0
var initialTimer = 0
private val allySkills = mutableListOf()
private val specialRules = mutableListOf()
fun addAllySkill(skill: AllySkill) = allySkills.add(skill)
fun getAllySkills(): List = Collections.unmodifiableList(allySkills)
fun addSpecialRule(rule: SpecialRule) = specialRules.add(rule)
fun getSpecialRules(): List = Collections.unmodifiableList(specialRules)
}
Each scenario is characterized by the level and initial value of the timer. Similar to what was seen earlier, special rules (
specialRules) and the skills of allies are set (we will lose sight of it). You might think that the script should also contain a list of localities (class objects Location) and, by logic of things, this is really so. But as it will be seen later, we will not use such a connection anywhere and it does not give any technical advantage. I remind you that all previously reviewed classes are contained in the package
model- We, as a child, in anticipation of an epic toy battle, placed the soldiers on the table surface. And now, after a few painful moments, at the signal of the Commander-in-Chief, we will rush into battle, pushing our toys together and enjoying the consequences of the gameplay. But before that, a little about the arrangement itself. “Well sooo ...”
Seventh step. Patterns and Generators
Let’s imagine for a second what the process of generating any of the previously considered objects will be, for example, location (terrain). We need to create an instance of the class
Location, initialize its fields with values, and so for each locality that we want to use in the game. But wait: each location should have a bag, which also needs to be generated. And bags have cubes - these are also instances of the corresponding class ( Die). This I’m not talking about enemies and obstacles - they generally need to be collected in decks. And the villain does not determine the terrain itself, but the features of the scenario located one level higher. Well, you get the point. The source code for the above may look like this:val location = Location().apply {
name = "Some location"
description = "Some description"
isOpen = true
closingDifficulty = 4
bag = Bag().apply {
put(Die(Die.Type.PHYSICAL, 4))
put(Die(Die.Type.SOMATIC, 4))
put(Die(Die.Type.MENTAL, 4))
put(Die(Die.Type.ENEMY, 6))
put(Die(Die.Type.OBSTACLE, 6))
put(Die(Die.Type.VILLAIN, 6))
}
villain = Villain().apply {
name = "Some villain"
description = "Some description"
addTrait(Trait.MODIFIER_PLUS_ONE)
}
enemies = Deck().apply {
addToTop(Enemy().apply {
name = "Some enemy"
description = "Some description"
})
addToTop(Enemy().apply {
name = "Other enemy"
description = "Some description"
})
shuffle()
}
obstacles = Deck().apply {
addToTop(Obstacle(1, Die.Type.PHYSICAL, Die.Type.VERBAL).apply {
name = "Some obstacle"
description = "Some Description"
})
}
}
This is also thanks to the Kotlin language and design
apply{}- in Java, the code would be twice as bulky. Moreover, there will be many places, as we said, and besides them there are also scenarios, adventures and heroes with their skills and characteristics - in general, there is something for the game designer to do.But the game designer will not write code, and it’s inconvenient for us to recompile the project at the slightest change in the game world. Here, any competent programmer will object that the descriptions of objects from the class code should be separated - ideally, so that instances of the latter are generated dynamically based on the former as necessary, similar to how a part is made from a drawing plant. We also implement such drawings, we only call them templates and represent them as instances of a special class. Having such patterns, a special program code (generator) will create the final objects from the previously described model.
The process of generating an object from a template
Thus, for each class of our objects, two new entities must be defined: the template interface and the generator class. And since a decent amount of objects has accumulated, then there will also be a number of entities ... indecent:
Class diagram
Please breathe deeper, listen carefully and not be distracted. Firstly, the diagram does not show all the objects of the game world, but only the main ones, which you can’t do without at first. Secondly, in order not to overload the circuit with unnecessary details, some of the connections already mentioned earlier in other diagrams were omitted.
Let's start with something simple - generating cubes. "How? - you say. - Are we not enough constructor? Yes, that’s the one with the type and size. ” No, I’ll answer, not enough. Indeed, in many cases (read the rules), cubes must be generated arbitrarily in an arbitrary amount (for example: “from one to three cubes of either blue or green”). Moreover, the size should be selected depending on the level of complexity of the script. Therefore, we introduce a special interface
DieTypeFilter.interface DieTypeFilter {
fun test(type: Die.Type): Boolean
}
Different implementations of this interface will check if the cube type corresponds to different sets of rules (any that only come to mind). For example, whether the type corresponds to a strictly specified value ("blue") or a range of values ("blue, yellow or green"); or, conversely, corresponds to any type other than the given one (“if only it weren’t white in any case” - anything, just not that). Even if it is not clear in advance what specific implementations are needed, it doesn’t matter - they can be added later, the system will not break from this (polymorphism, remember?).
class SingleDieTypeFilter(val type: Die.Type): DieTypeFilter {
    override fun test(type: Die.Type) = (this.type == type)
}
class InvertedSingleDieTypeFilter(val type: Die.Type): DieTypeFilter {
    override fun test(type: Die.Type) = (this.type != type)
}
class MultipleDieTypeFilter(vararg val types: Die.Type): DieTypeFilter {
    override fun test(type: Die.Type) = (type in types)
}
class InvertedMultipleDieTypeFilter(vararg val types: Die.Type): DieTypeFilter {
    override fun test(type: Die.Type) = (type !in types)
}
The size of the cube will also be set arbitrarily, but more on that later. In the meantime, we will write a cubes generator (
DieGenerator), which, unlike the class constructor Die, will not accept the explicit type and size of the cube, but the filter and the level of complexity.private val DISTRIBUTION_LEVEL1 = intArrayOf(4, 4, 4, 4, 6, 6, 6, 6, 8)
private val DISTRIBUTION_LEVEL2 = intArrayOf(4, 6, 6, 6, 6, 8, 8, 8, 8, 10)
private val DISTRIBUTION_LEVEL3 = intArrayOf(6, 8, 8, 8, 10, 10, 10, 10, 12, 12, 12)
private val DISTRIBUTIONS = arrayOf(
intArrayOf(4),
DISTRIBUTION_LEVEL1,
DISTRIBUTION_LEVEL2,
DISTRIBUTION_LEVEL3
)
fun getMaxLevel() = DISTRIBUTIONS.size - 1
fun generateDie(filter: DieTypeFilter, level: Int) = Die(generateDieType(filter), generateDieSize(level))
private fun generateDieType(filter: DieTypeFilter): Die.Type {
var type: Die.Type
do {
type = Die.Type.values().random()
} while (!filter.test(type))
return type
}
private fun generateDieSize(level: Int) =
DISTRIBUTIONS[if (level < 1 || level > getMaxLevel()) 0 else level].random()
In Java, these methods would be static, but since we are dealing with Kotlin, we do not need the class as such, which is also true for the other generators discussed below (nevertheless, at the logical level, we will still use the concept of the class).
Two private methods separately generate the type and size of the cube - something interesting can be said about each. The method
generateDieType()can be driven into an infinite loop by passing an input filter withoverride fun test(filter: DieTypeFilter) = false(the writers have a strong belief that one can get out of logical inconsistencies and plot holes if the characters themselves point them to the audience during the story). The method
generateDieSize()generates a pseudo-random size based on the distribution specified in the form of an array (one for each level). When in my old age I get rich and buy a pack of multi-colored playing cubes, I won’t be able to play Dice , because I won’t know how to randomly collect a bag from them (except to ask a neighbor and turn away at that time). This is not a deck of cards that can be shuffled upside down, it requires special mechanisms and devices. If someone has ideas (and he had the patience to read to this place), please share in the comments.And since we are talking about bags, we will develop a template for them. Unlike your mates, this template (
BagTemplate) will be a specific class. It contains other templates - each of them describes the rules (or Plan) by which one or more cubes (remember the requirements made earlier?) Are added to the bag.class BagTemplate {
class Plan(val minQuantity: Int, val maxQuantity: Int, val filter: DieTypeFilter)
val plans = mutableListOf()
fun addPlan(minQuantity: Int, maxQuantity: Int, filter: DieTypeFilter) {
plans.add(Plan(minQuantity, maxQuantity, filter))
}
}
Each plan defines a pattern for the type of cubes, as well as the number (minimum and maximum) of cubes that satisfy this pattern. Thanks to this approach, you can generate bags according to bizarre rules (and I again bitterly cry for old age, because my neighbor flatly refuses to help me). Something like this:
private fun realizePlan(plan: BagTemplate.Plan, level: Int): Array {
    val count = (plan.minQuantity..plan.maxQuantity).shuffled().last()
    return (1..count).map { generateDie(plan.filter, level) }.toTypedArray()
}
fun generateBag(template: BagTemplate, level: Int): Bag {
    return template.plans.asSequence()
            .map { realizePlan(it, level) }
            .fold(Bag()) { b, d -> b.put(*d); b }
    }
}
If you, just like me, are tired of all this functionalism, fasten yourself - it will only get worse. But then, unlike many indistinct tutorials on the Internet, we have the opportunity to study the use of various clever methods in relation to a real, understandable subject area.
By themselves, bags will not be lying on the field - you need to give them to the heroes and locations. Let's start with the latter.
interface LocationTemplate {
    val name: String
    val description: String
    val bagTemplate: BagTemplate
    val basicClosingDifficulty: Int
    val enemyCardsCount: Int
    val obstacleCardsCount: Int
    val enemyCardPool: Collection
    val obstacleCardPool: Collection
    val specialRules: List
}
In the Kotlin language, instead of methods,
getЧтоТо()you can use interface properties - this is much more concise. We are already familiar with the bag template, consider the remaining methods. The property basicClosingDifficultywill set the basic complexity of the check for closing the terrain. The word “basic” here means only that the final complexity will depend on the level of the scenario and is unclear at this stage. In addition, we need to define patterns for enemies and obstacles (and villains at the same time). Moreover, from the variety of enemies and obstacles described in the template, not all will be used, but only a limited number (to increase replay value). Please note that the special rules ( SpecialRule) of the area are implemented by a simple enumeration ( enum class), and therefore do not require a separate template.interface EnemyTemplate {
val name: String
val description: String
val traits: List
}
interface ObstacleTemplate {
val name: String
val description: String
val tier: Int
val dieTypes: Array
val traits: List
}
interface VillainTemplate {
val name: String
val description: String
val traits: List
}
And let the generator create not only individual objects, but also entire decks with them.
fun generateVillain(template: VillainTemplate) = Villain().apply {
    name = template.name
    description = template.description
    template.traits.forEach { addTrait(it) }
}
fun generateEnemy(template: EnemyTemplate) = Enemy().apply {
    name = template.name
    description = template.description
    template.traits.forEach { addTrait(it) }
}
fun generateObstacle(template: ObstacleTemplate) = Obstacle(template.tier, *template.dieTypes).apply {
    name = template.name
    description = template.description
    template.traits.forEach { addTrait(it) }
}
fun generateEnemyDeck(types: Collection, limit: Int?): Deck {
    val deck = types
            .map { generateEnemy(it) }
            .shuffled()
            .fold(Deck()) { d, c -> d.addToTop(c); d }
    limit?.let {
        while (deck.size > it) deck.drawFromTop()
    }
    return deck
}
fun generateObstacleDeck(templates: Collection, limit: Int?): Deck {
    val deck = templates
            .map { generateObstacle(it) }
            .shuffled()
            .fold(Deck()) { d, c -> d.addToTop(c); d }
    limit?.let {
        while (deck.size > it) deck.drawFromTop()
    }
    return deck
}
If there are more cards in the deck than we need (parameter
limit), we will remove them from there. Being able to generate bags with cubes and packs of cards, we can finally create terrain:fun generateLocation(template: LocationTemplate, level: Int) = Location().apply {
name = template.name
description = template.description
bag = generateBag(template.bagTemplate, level)
closingDifficulty = template.basicClosingDifficulty + level * 2
enemies = generateEnemyDeck(template.enemyCardPool, template.enemyCardsCount)
obstacles = generateObstacleDeck(template.obstacleCardPool, template.obstacleCardsCount)
template.specialRules.forEach { addSpecialRule(it) }
}
The terrain that we explicitly set in the code at the beginning of the chapter will now take a completely different look:
class SomeLocationTemplate: LocationTemplate {
    override val name = "Some location"
    override val description = "Some description"
    override val bagTemplate = BagTemplate().apply {
        addPlan(1, 1, SingleDieTypeFilter(Die.Type.PHYSICAL))
        addPlan(1, 1, SingleDieTypeFilter(Die.Type.SOMATIC))
        addPlan(1, 2, SingleDieTypeFilter(Die.Type.MENTAL))
        addPlan(2, 2, MultipleDieTypeFilter(Die.Type.ENEMY, Die.Type.OBSTACLE))
    }
    override val basicClosingDifficulty = 2
    override val enemyCardsCount = 2
    override val obstacleCardsCount = 1
    override val enemyCardPool = listOf(
            SomeEnemyTemplate(),
            OtherEnemyTemplate()
    )
    override val obstacleCardPool = listOf(
            SomeObstacleTemplate()
    )
    override val specialRules = emptyList()
}
class SomeEnemyTemplate: EnemyTemplate {
    override val name = "Some enemy"
    override val description = "Some description"
    override val traits = emptyList()
}
class OtherEnemyTemplate: EnemyTemplate {
    override val name = "Other enemy"
    override val description = "Some description"
    override val traits = emptyList()
}
class SomeObstacleTemplate: ObstacleTemplate {
    override val name = "Some obstacle"
    override val description = "Some description"
    override val traits = emptyList()
    override val tier = 1
    override val dieTypes = arrayOf(
            Die.Type.PHYSICAL,
            Die.Type.VERBAL
    )
}
val location = generateLocation(SomeLocationTemplate(), 1)
Scenario generation will occur in a similar way.
interface ScenarioTemplate {
    val name: String
    val description: String
    val initialTimer: Int
    val staticLocations: List
    val dynamicLocationsPool: List
    val villains: List
    val specialRules: List
    fun calculateDynamicLocationsCount(numberOfHeroes: Int) = numberOfHeroes + 2
}
In accordance with the rules, the number of dynamically generated locations depends on the number of heroes. The interface defines a standard calculation function, which, if desired, can be redefined in specific implementations. In connection with this requirement, the scenario generator will also generate terrain for these scenarios - in the same place villains will be randomly distributed among the localities.
fun generateScenario(template: ScenarioTemplate, level: Int) = Scenario().apply {
    name =template.name
    description = template.description
    this.level = level
    initialTimer = template.initialTimer
    template.specialRules.forEach { addSpecialRule(it) }
}
fun generateLocations(template: ScenarioTemplate, level: Int, numberOfHeroes: Int): List {
    val locations = template.staticLocations.map { generateLocation(it, level) } +
            template.dynamicLocationsPool
                    .map { generateLocation(it, level) }
                    .shuffled()
                    .take(template.calculateDynamicLocationsCount(numberOfHeroes))
    val villains = template.villains
            .map(::generateVillain)
            .shuffled()
    locations.forEachIndexed { index, location ->
        if (index < villains.size) {
            location.villain = villains[index]
            location.bag.put(generateDie(SingleDieTypeFilter(Die.Type.VILLAIN), level))
        }
    }
    return locations
}
Many attentive readers will object that the templates need to be stored not in the source code of the classes, but in some text files (scripts) so that even those far from programming could create and maintain them. I agree, I take off my hat, but I do not sprinkle ashes on my head - for one does not interfere with the other. If you want, just define a special implementation of the template, the property values of which will be loaded from an external file. The generation process will not change one iota from this.
Well, it seems they haven’t forgotten anything ... Oh yes, heroes - they also need to be generated, which means they also need their own templates. Here are some, for example:
interface HeroTemplate {
    val type: Hero.Type
    val initialHandCapacity: Int
    val favoredDieType: Die.Type
    val initialDice: Collection
    val initialSkills: List
    val dormantSkills: List
    fun getDiceCount(type: Die.Type): Pair?
}
And immediately we notice two oddities. Firstly, we do not use templates to generate bags and cubes in them. Why? Yes, because for each type (class) of heroes the list of initial cubes is strictly defined - it makes no sense to complicate the process of creating them. Secondly,
getDiceCount()- what kind of dregs is this ??? Calm down, these are the ones DiceLimitthat define the restrictions on the cubes. And the template for them was chosen in such a bizarre form that specific values were recorded more clearly. See for yourself from the example:class BrawlerHeroTemplate : HeroTemplate {
override val type = Hero.Type.BRAWLER
override val favoredDieType = PHYSICAL
override val initialHandCapacity = 4
override val initialDice = listOf(
Die(PHYSICAL, 6),
Die(PHYSICAL, 6),
Die(PHYSICAL, 4),
Die(PHYSICAL, 4),
Die(PHYSICAL, 4),
Die(PHYSICAL, 4),
Die(PHYSICAL, 4),
Die(PHYSICAL, 4),
Die(SOMATIC, 6),
Die(SOMATIC, 4),
Die(SOMATIC, 4),
Die(SOMATIC, 4),
Die(MENTAL, 4),
Die(VERBAL, 4),
Die(VERBAL, 4)
)
override fun getDiceCount(type: Die.Type) = when (type) {
PHYSICAL -> 8 to 12
SOMATIC -> 4 to 7
MENTAL -> 1 to 2
VERBAL -> 2 to 4
else -> null
}
override val initialSkills = listOf(
HitSkillTemplate()
)
override val dormantSkills = listOf()
}
class HunterHeroTemplate : HeroTemplate {
override val type = Hero.Type.HUNTER
override val favoredDieType = SOMATIC
override val initialHandCapacity = 5
override val initialDice = listOf(
Die(PHYSICAL, 4),
Die(PHYSICAL, 4),
Die(PHYSICAL, 4),
Die(SOMATIC, 6),
Die(SOMATIC, 6),
Die(SOMATIC, 4),
Die(SOMATIC, 4),
Die(SOMATIC, 4),
Die(SOMATIC, 4),
Die(SOMATIC, 4),
Die(MENTAL, 6),
Die(MENTAL, 4),
Die(MENTAL, 4),
Die(MENTAL, 4),
Die(VERBAL, 4)
)
override fun getDiceCount(type: Die.Type) = when (type) {
PHYSICAL -> 3 to 5
SOMATIC -> 7 to 11
MENTAL -> 4 to 7
VERBAL -> 1 to 2
else -> null
}
override val initialSkills = listOf(
ShootSkillTemplate()
)
override val dormantSkills = listOf()
}
But before writing a generator, we define a template for skills.
interface SkillTemplate {
    val type: Skill.Type
    val maxLevel: Int
    val modifier1: Int
    val modifier2: Int
    val isActive
        get() = true
}
class HitSkillTemplate : SkillTemplate {
    override val type = Skill.Type.HIT
    override val maxLevel = 3
    override val modifier1 = +1
    override val modifier2 = +3
}
class ShootSkillTemplate : SkillTemplate {
    override val type = Skill.Type.SHOOT
    override val maxLevel = 3
    override val modifier1 = +0
    override val modifier2 = +2
}
Unfortunately, we will not succeed in riveting skills in batches in the same way as enemies and scripts. Each new skill requires the expansion of game mechanics, adding a new code to the game engine - even with heroes in this regard is easier. Perhaps this process can be abstracted, but I have not yet come up with a way. Yes, and not too tried, to be honest.
fun generateSkill(template: SkillTemplate, initialLevel: Int = 1): Skill {
    val skill = Skill(template.type)
    skill.isActive = template.isActive
    skill.level = initialLevel
    skill.maxLevel = template.maxLevel
    skill.modifier1 = template.modifier1
    skill.modifier2 = template.modifier2
    return skill
}
fun generateHero(type: Hero.Type, name: String = ""): Hero {
    val template = when (type) {
        BRAWLER -> BrawlerHeroTemplate()
        HUNTER -> HunterHeroTemplate()
    }
    val hero = Hero(type)
    hero.name = name
    hero.isAlive = true
    hero.favoredDieType = template.favoredDieType
    hero.hand.capacity = template.initialHandCapacity
    template.initialDice.forEach { hero.bag.put(it) }
    for ((t, l) in Die.Type.values().map { it to template.getDiceCount(it) }) {
        l?.let { hero.addDiceLimit(DiceLimit(t, it.first, it.second, it.first)) }
    }
    template.initialSkills
            .map { generateSkill(it) }
            .forEach { hero.addSkill(it) }
    template.dormantSkills
            .map { generateSkill(it, 0) }
            .forEach { hero.addDormantSkill(it) }
    return hero
}
Just a few moments are striking. Firstly, the generation method itself selects the desired template depending on the class of the hero. Secondly, it is not necessary to specify a name immediately (sometimes at the generation stage we will not know it yet). Thirdly, Kotlin brought in an unprecedented amount of syntactic sugar, which some developers unreasonably abuse. And not a bit ashamed.
Step Eight. Game cycle
Finally, we got to the most interesting - the implementation of the game cycle. In simple terms, they began to "make the game." Many beginning developers often start precisely from this stage, apart from game-making, everything else. Especially all sorts of meaningless little schemes to draw, pfff ... But we won’t rush (it’s still far from the morning), and therefore a little more modeling. Yes, again.
Activity chart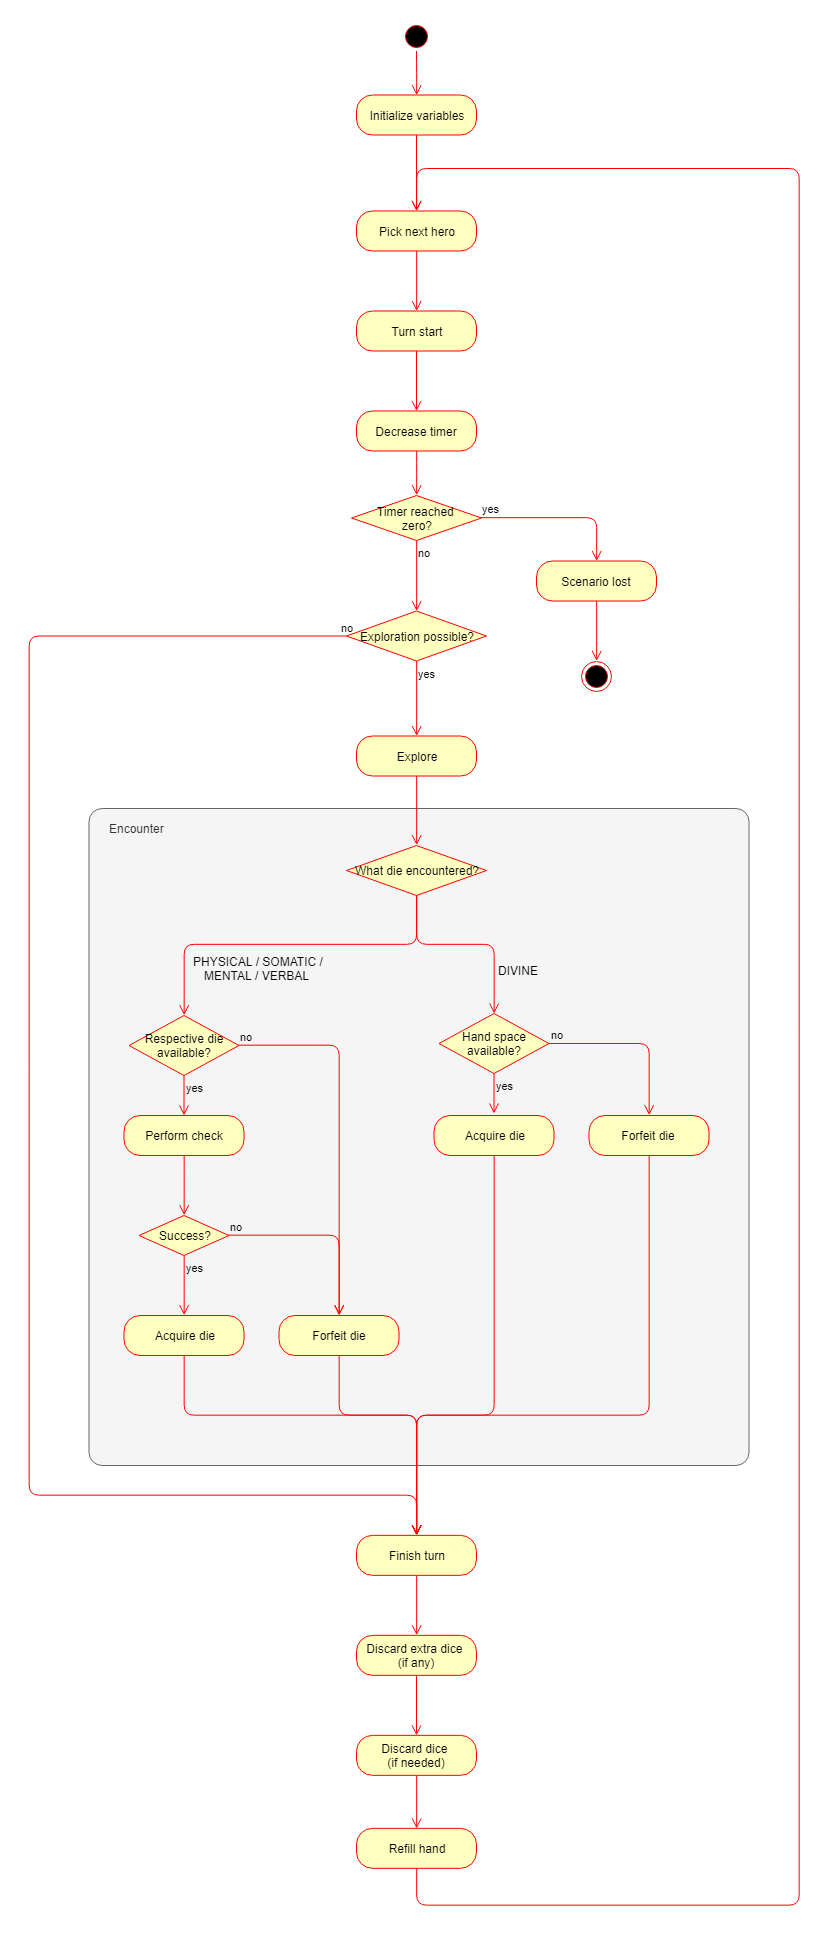
As you can see, the given fragment of the game cycle is an order of magnitude smaller than what we cited above. We will consider only the process of transferring the course, exploring the area (and we will describe the meeting with only two types of cubes) and discarding the cubes at the end of the turn. And completion of the scenario with a loss (yes, we won’t succeed in winning our game yet) - but how do you like? The timer will decrease every turn, and upon completion, something needs to be done. For example, display a message and end the game - everything is as it is written in the rules. Another game must be completed at the death of the heroes, but no one will harm them, therefore we will leave it. To win, you need to close all areas, which is difficult even if it is only one. Therefore, let’s leave this moment. It makes no sense to spray too much - it’s important for us to understand the essence, and to finish the rest later, in my free time (or rather, to finish it,of your dreams).
So, the first thing to do is decide which objects we need.
Heroes Scenario. Locations.
We have already reviewed the process of their creation - we will not repeat it. We only note the terrain pattern that we will use in our small example.
class TestLocationTemplate : LocationTemplate {
    override val name = "Test"
    override val description = "Some Description"
    override val basicClosingDifficulty = 0
    override val enemyCardsCount = 0
    override val obstacleCardsCount = 0
    override val bagTemplate = BagTemplate().apply {
        addPlan(2, 2, SingleDieTypeFilter(Die.Type.PHYSICAL))
        addPlan(2, 2, SingleDieTypeFilter(Die.Type.SOMATIC))
        addPlan(2, 2, SingleDieTypeFilter(Die.Type.MENTAL))
        addPlan(2, 2, SingleDieTypeFilter(Die.Type.VERBAL))
        addPlan(2, 2, SingleDieTypeFilter(Die.Type.DIVINE))
    }
    override val enemyCardPool = emptyList()
    override val obstacleCardPool = emptyList()
    override val specialRules = emptyList()
}
As you can see, in the bag are only "positive" cubes - blue, green, purple, yellow and blue. There are no enemies and obstacles in the area, villains and wounds are not found. There are no special rules either - their implementation is very secondary.
Heap for retained cubes.
Or a deterrent pile. Since we put the blue cubes in the bag of the terrain, they can be used in checks and after use, kept in a special heap. An instance of the class is useful for this
Pile. Modifiers.
That is, the numerical values that need to be added or subtracted from the result of the die roll. You can implement either a global modifier or a separate modifier for each cube. We will choose the second option (so more clearly), therefore we will create a simple class
DiePair.class DiePair(val die: Die, var modifier: Int = 0)
The location of the characters in the area.
In a good way, this moment needs to be tracked using a special structure. For example, maps of the form where each locality will contain a list of heroes currently in it (as well as a method for the opposite - determining the locality in which a particular hero is located). If you decide to follow this path, then do not forget to add methods to the implementation class and , I hope, there is no need to explain why. We will not waste time on this, since the area is only one and the heroes do not leave it anywhere. Checking the hands of the hero.
Map> Locationequals()hashCode()In the process of the game, the heroes constantly have to go through checks (which are described below), that is, take cubes from the hand, throw them (add modifiers), aggregate the results if there are several cubes (summarize, take the maximum / minimum, average, etc.), compare them with the throw another cube (one that is removed from the bag of the area) and, depending on the result, perform the following actions. But first of all, it is necessary to understand whether the hero is in principle able to pass the test, that is, whether he has the necessary cubes in his hand. For this, we provide a simple interface
HandFilter.interface HandFilter {
fun test(hand: Hand): Boolean
}
Interface implementations take the hero's hand (class object
Hand) as an input and return trueeither falsedepending on the results of the check. For our fragment of the game, we need a single implementation: if a blue, green, purple or yellow cube is met, we need to determine whether the hero’s hand has a cube of the same color.class SingleDieHandFilter(private vararg val types: Die.Type) : HandFilter {
override fun test(hand: Hand) =
(0 until hand.dieCount).mapNotNull { hand.dieAt(it) }.any { it.type in types }
|| (Die.Type.ALLY in types && hand.allyDieCount > 0)
}
Yes, functionalism again.
Active / selected items.
Now that we have made sure that the hero’s hand is suitable for performing the test, it is necessary for the player to choose from the hand that dice (or cubes) with which he will pass this test. Firstly, you need to highlight (highlight) the appropriate positions (in which there are cubes of the desired type). Secondly, you need to somehow mark the selected cubes. For both of these requirements, a class is suitable
HandMask, which, in fact, contains a set of integers (numbers of selected positions) and methods for adding and removing them.class HandMask {
private val positions = mutableSetOf()
private val allyPositions = mutableSetOf()
val positionCount
get() = positions.size
val allyPositionCount
get() = allyPositions.size
fun addPosition(position: Int) = positions.add(position)
fun removePosition(position: Int) = positions.remove(position)
fun addAllyPosition(position: Int) = allyPositions.add(position)
fun removeAllyPosition(position: Int) = allyPositions.remove(position)
fun checkPosition(position: Int) = position in positions
fun checkAllyPosition(position: Int) = position in allyPositions
fun switchPosition(position: Int) {
if (!removePosition(position)) {
addPosition(position)
}
}
fun switchAllyPosition(position: Int) {
if (!removeAllyPosition(position)) {
addAllyPosition(position)
}
}
fun clear() {
positions.clear()
allyPositions.clear()
}
}
I have already said how I suffer from the “ingenious” idea of storing white cubes in a separate hand? Because of this stupidity, you have to deal with two sets and duplicate each of the methods presented. If someone has ideas on how to simplify the implementation of this requirement (for example, use one set, but for white cubes the indices start with a hundred - or something else equally obscure) - share them in the comments.
By the way, a similar class needs to be implemented to select cubes from the heap (
PileMask), but this functionality is outside the scope of this example. The choice of cubes from the hand.
But it’s not enough to “highlight” acceptable positions; it is important to change this “highlight” in the process of choosing cubes. That is, if a player is required to take only one die from his hand, then when choosing this die, all other positions should become inaccessible. Moreover, at each stage, it is necessary to control the player’s fulfillment of the goal - that is, to understand whether the selected cubes are enough to pass one or another test. Such a difficult task requires a complex instance of a complex class.
abstract class HandMaskRule(val hand: Hand) {
    abstract fun checkMask(mask: HandMask): Boolean
    abstract fun isPositionActive(mask: HandMask, position: Int): Boolean
    abstract fun isAllyPositionActive(mask: HandMask, position: Int): Boolean
    fun getCheckedDice(mask: HandMask): List {
        return ((0 until hand.dieCount).filter(mask::checkPosition).map(hand::dieAt))
                .plus((0 until hand.allyDieCount).filter(mask::checkAllyPosition).map(hand::allyDieAt))
                .filterNotNull()
    }
}
Quite complicated logic, I will understand and forgive you if this class is incomprehensible to you. And still try to explain. Implementations of this class always store a reference to the hand (object
Hand) with which they will deal. Each of the methods receives a mask ( HandMask), which reflects the current state of the selection (which positions are selected by the player and which are not). The method checkMask()reports whether the selected cubes are enough to pass the test. The method isPositionActive()says whether it is necessary to highlight a specific position - whether it is possible to add a cube in this position to the test (or remove a cube that is already selected). The method isAllyPositionActive()is the same for white dice (yes, I know, I'm an idiot). Well and the helper methodgetCheckedDice()it simply returns a list of all the cubes from the hand that correspond to the mask - this is necessary in order to take them all at once, throw them on the table and enjoy the funny knock, with which they scatter in different directions. We will need two realizations of this abstract class (surprise, surprise!). The first controls the process of passing the test when acquiring a new cube of a specific type (not white). As you remember, any number of blue cubes can be added to such a check.
class StatDieAcquireHandMaskRule(hand: Hand,
                                 private val requiredType: Die.Type)
    : HandMaskRule(hand) {
    /**
     * Define how many dice of specified type are currently checked
     */
    private fun checkedDieCount(mask: HandMask) =
            (0 until hand.dieCount)
                    .filter(mask::checkPosition)
                    .mapNotNull(hand::dieAt)
                    .count { it.type === requiredType }
    override fun checkMask(mask: HandMask) =
            (mask.allyPositionCount == 0 && checkedDieCount(mask) == 1)
    override fun isPositionActive(mask: HandMask, position: Int) =
            with(hand.dieAt(position)) {
                when {
                    mask.checkPosition(position) -> true
                    this == null -> false
                    this.type === Die.Type.DIVINE -> true
                    this.type === requiredType && checkedDieCount(mask) < 1 -> true
                    else -> false
                }
            }
    override fun isAllyPositionActive(mask: HandMask, position: Int) = false
}
The second implementation is more complicated. She controls the die roll at the end of the turn. In this case, two options are possible. If the number of cubes in the hand exceeds its maximum allowable size (capacity), we must discard all the extra cubes plus any number of additional cubes (if we want). If the size is not exceeded, then you can not reset anything (or you can reset, if desired). In no case can gray dice be discarded.
class DiscardExtraDiceHandMaskRule(hand: Hand) : HandMaskRule(hand) {
    private val minDiceToDiscard = if (hand.dieCount > hand.capacity) min(hand.dieCount - hand.woundCount, hand.dieCount - hand.capacity) else 0
    private val maxDiceToDiscard = hand.dieCount - hand.woundCount
    override fun checkMask(mask: HandMask) =
            (mask.positionCount in minDiceToDiscard..maxDiceToDiscard) &&
                    (mask.allyPositionCount in 0..hand.allyDieCount)
    override fun isPositionActive(mask: HandMask, position: Int) = when {
        mask.checkPosition(position) -> true
        hand.dieAt(position) == null -> false
        hand.dieAt(position)!!.type == Die.Type.WOUND -> false
        mask.positionCount < maxDiceToDiscard -> true
        else -> false
    }
    override fun isAllyPositionActive(mask: HandMask, position: Int) = hand.allyDieAt(position) != null
}
Nezhdanchik:
Handa property suddenly appeared in the class woundCountthat did not exist before. You can write its implementation yourself, it’s easy. Practice at the same time. Passing checks.
Finally got to them. When the dice are taken from the hand, it's time to throw them. For each cube it is necessary to consider: its size, its modifiers, the result of its throw. Although only one cube can be taken out of the bag at a time, several dice can be set against it, aggregating the results of their rolls. In general, let's abstract from the dice and represent the troops on the battlefield. On the one hand, we have an enemy - he is only one, but he is strong and ferocious. On the other hand, an opponent equal in strength to him, but with support. The outcome of the battle will be decided in one short skirmish, the winner can be only one ...
Sorry, carried away. To simulate our general battle, we implement a special class.
class DieBattleCheck(val method: Method, opponent: DiePair? = null) {
    enum class Method { SUM, AVG_UP, AVG_DOWN, MAX, MIN }
    private inner class Wrap(val pair: DiePair, var roll: Int)
    private infix fun DiePair.with(roll: Int) = Wrap(this, roll)
    private val opponent: Wrap? = opponent?.with(0)
    private val heroics = ArrayList()
    var isRolled = false
    var result: Int? = null
    val heroPairCount
        get() = heroics.size
    fun getOpponentPair() = opponent?.pair
    fun getOpponentResult() = when {
        isRolled -> opponent?.roll ?: 0
        else -> throw IllegalStateException("Not rolled yet")
    }
    fun addHeroPair(pair: DiePair) {
        if (method == Method.SUM && heroics.size > 0) {
            pair.modifier = 0
        }
        heroics.add(pair with 0)
    }
    fun addHeroPair(die: Die, modifier: Int) = addHeroPair(DiePair(die, modifier))
    fun clearHeroPairs() = heroics.clear()
    fun getHeroPairAt(index: Int) = heroics[index].pair
    fun getHeroResultAt(index: Int) = when {
        isRolled -> when {
            (index in 0 until heroics.size) -> heroics[index].roll
            else -> 0
        }
        else -> throw IllegalStateException("Not rolled yet")
    }
    fun roll() {
        fun roll(wrap: Wrap) {
            wrap.roll = wrap.pair.die.roll()
        }
        isRolled = true
        opponent?.let { roll(it) }
        heroics.forEach { roll(it) }
    }
    fun calculateResult() {
        if (!isRolled) {
            throw IllegalStateException("Not rolled yet")
        }
        val opponentResult = opponent?.let { it.roll + it.pair.modifier } ?: 0
        val stats = heroics.map { it.roll + it.pair.modifier }
        val heroResult = when (method) {
            DieBattleCheck.Method.SUM -> stats.sum()
            DieBattleCheck.Method.AVG_UP -> ceil(stats.average()).toInt()
            DieBattleCheck.Method.AVG_DOWN -> floor(stats.average()).toInt()
            DieBattleCheck.Method.MAX -> stats.max() ?: 0
            DieBattleCheck.Method.MIN -> stats.min() ?: 0
        }
        result = heroResult - opponentResult
    }
}
Since each cube can have a modifier, we will store data in objects
DiePair. It seems to be. Actually, no, because in addition to the cube and the modifier, you also need to store the result of its throw (remember, although the cube itself generates this value, it does not store it among its properties). Therefore, wrap each pair in a wrapper ( Wrap). Pay attention to the infix method with, hehe. The class constructor defines the aggregation method (an instance of the internal enumeration
Method) and the opponent (which may not exist). The list of hero cubes is formed using the appropriate methods. It also provides a bunch of methods to get the pairs involved in the test, and the results of their throws (if any). Method
roll()calls the method of the same name of each cube, saves the intermediate results and marks the fact of its execution with a flag isRolled. Please note that the final result of the throw is not calculated immediately - there is a special method for this calculateResult(), the result of which is to write the final value to the property result. Why is this needed? For a dramatic effect. The method roll()will be run several times, each time on the faces of the cubes different values will be displayed (just like in real life). And only when the cubes calm down on the table, we learn The state of the game engine.
Sophisticated objects sorted out, now things are simpler. It will not be a great discovery to say that we need to control the current “progress” of the game engine, the stage or phase in which it is located. A special enumeration is useful for this.
enum class GamePhase {
    SCENARIO_START,
    HERO_TURN_START,
    HERO_TURN_END,
    LOCATION_BEFORE_EXPLORATION,
    LOCATION_ENCOUNTER_STAT,
    LOCATION_ENCOUNTER_DIVINE,
    LOCATION_AFTER_EXPLORATION,
    GAME_LOSS
}
Actually, there are more phases, but we selected only those that are used in our example. To change the phase of the game engine, we will use methods
changePhaseX(), where Xis the value from the above listing. In these methods, all internal variables of the engine will be reduced to values adequate for the beginning of the corresponding phase, but more on that later. Messages
Keeping the state of the game engine is not enough. It is also important for the user to somehow inform about him - otherwise how will the latter know what is happening on his screen? That is why we need another listing.
enum class StatusMessage {
    EMPTY,
    CHOOSE_DICE_PERFORM_CHECK,
    END_OF_TURN_DISCARD_EXTRA,
    END_OF_TURN_DISCARD_OPTIONAL,
    CHOOSE_ACTION_BEFORE_EXPLORATION,
    CHOOSE_ACTION_AFTER_EXPLORATION,
    ENCOUNTER_PHYSICAL,
    ENCOUNTER_SOMATIC,
    ENCOUNTER_MENTAL,
    ENCOUNTER_VERBAL,
    ENCOUNTER_DIVINE,
    DIE_ACQUIRE_SUCCESS,
    DIE_ACQUIRE_FAILURE,
    GAME_LOSS_OUT_OF_TIME
}
As you can see, all possible states from our example are described by the values of this enumeration. For each of them, a text line is provided, which will be displayed on the screen (except
EMPTY- this is a special meaning), but we will learn about this a little later. Actions.
For communication between the user and the game engine, simple messages are not enough. It is also important to inform the first of the actions that he can take at the moment (to research, pass the blocks, complete the move - that’s all good). To do this, we will develop a special class.
class Action(
        val type: Type,
        var isEnabled: Boolean = true,
        val data: Int = 0
) {
    enum class Type {
        NONE, //Blank type
        CONFIRM, //Confirm some action
        CANCEL, //Cancel action
        HAND_POSITION, //Some position in hand
        HAND_ALLY_POSITION, //Some ally position in hand
        EXPLORE_LOCATION, //Explore current location
        FINISH_TURN, //Finish current turn
        ACQUIRE, //Acquire (DIVINE) die
        FORFEIT, //Remove die from game
        HIDE, //Put die into bag
        DISCARD, //Put die to discard pile
    }
}
An internal enumeration
Typedescribes the type of action performed. The field is isEnablednecessary in order to display actions in an inactive state. That is, to report that this action is usually available, but at the moment for some reason cannot be performed (such a display is much more informative than when the action is not displayed at all). The property data(necessary for some types of actions) stores a special value that communicates some additional details (for example, the index of the position selected by the user or the number of the selected item from the list). Klas
Actionis the main "interface" between the game engine and input-output systems (about which below). Since there are often several actions (otherwise, why then choose?), They will be combined into groups (lists). Instead of using standard collections, we’ll write our own extended one.class ActionList : Iterable {
private val actions = mutableListOf()
val size
get() = actions.size
fun add(action: Action): ActionList {
actions.add(action)
return this
}
fun add(type: Action.Type, enabled: Boolean = true): ActionList {
add(Action(type, enabled))
return this
}
fun addAll(actions: ActionList): ActionList {
actions.forEach { add(it) }
return this
}
fun remove(type: Action.Type): ActionList {
actions.removeIf { it.type == type }
return this
}
operator fun get(index: Int) = actions[index]
operator fun get(type: Action.Type) = actions.find { it.type == type }
override fun iterator(): Iterator = ActionListIterator()
private inner class ActionListIterator : Iterator {
private var position = -1
override fun hasNext() = (actions.size > position + 1)
override fun next() = actions[++position]
}
companion object {
val EMPTY
get() = ActionList()
}
}
The class contains many different methods for adding and removing actions from the list (which can be chained together), as well as getting both by index and by type (note the “overload”
get()- the square bracket operator is applicable to our list). The implementation of the interface Iteratorallows us to do various stream manipulations (functionality, aha) with our Screens.
Finally, another listing that describes the various types of content currently being displayed ... You look at me and blink your eyes, I know. When I began to think up how to more clearly describe this class, I hit my head on the table, because I couldn’t really figure anything out. Understand yourself, I hope.
enum class GameScreen {
    HERO_TURN_START,
    LOCATION_INTERIOR,
    GAME_LOSS
}
Selected only those used in the example. A separate rendering method will be provided for each of them ... I again inexplicably explain.
"Display" and "input".
And now we finally come to the most important point - the interaction of the game engine with the user (player). If such a long introduction has not yet bored you, then you probably remember that we agreed to functionally separate these two parts from each other. Therefore, instead of a specific implementation of the I / O system, we will only provide an interface. More precisely, two.
First interface
GameRenderer, designed to display pictures on the screen. I remind you that we abstract from screen sizes, from specific graphic libraries, etc. We simply send the command: “draw me this” - and those of you who understood our slurred conversation about screens have already guessed that each of these screens has its own method within the interface.interface GameRenderer {
fun drawHeroTurnStart(hero: Hero)
fun drawLocationInteriorScreen(
location: Location,
heroesAtLocation: List,
timer: Int,
currentHero: Hero,
battleCheck: DieBattleCheck?,
encounteredDie: DiePair?,
pickedDice: HandMask,
activePositions: HandMask,
statusMessage: StatusMessage,
actions: ActionList
)
fun drawGameLoss(message: StatusMessage)
}
I think there is no need for additional explanations here - the purpose of all transferred objects is discussed in detail above.
For user input, we implement a different interface -
GameInteractor(yes, spell-checking scripts will always always emphasize this word, although it would seem ...). His methods will ask the player for the required commands for various situations: select an action from the list of proposed ones, select an element from the list, select cubes from the hand, just at least press something, etc. It should be immediately noted that the input occurs synchronously (the game is step-by-step), that is, the execution of the game loop is suspended until the user responds to the request.interface GameInteractor{
fun anyInput()
fun pickAction(list: ActionList): Action
fun pickDiceFromHand(activePositions: HandMask, actions: ActionList): Action
}
About the last method a little more. As the name implies, from invites the user to select cubes from the hand, providing an object
HandMask- the numbers of active positions. The execution of the method will continue until some of them is selected - in this case, the method will return an action of type HAND_POSITION(or HAND_ALLY_POSITION, mda) with the number of the selected position in the field data. In addition, it is possible to select another action (for example, CONFIRMor CANCEL) from the object ActionList. Implementations of input methods should distinguish between situations when the field is isEnabledset to falseand ignore user input of such actions. Game engine class.
We examined everything necessary for work, the time has come and the engine to implement. Create a class
Gamewith the following content:Sorry, this is not to be shown to impressionable people.
class Game(
            private val renderer: GameRenderer,
            private val interactor: GameInteractor,
            private val scenario: Scenario,
            private val locations: List,
            private val heroes: List) {
    private var timer = 0
    private var currentHeroIndex = -1
    private lateinit var currentHero: Hero
    private lateinit var currentLocation: Location
    private val deterrentPile = Pile()
    private var encounteredDie: DiePair? = null
    private var battleCheck: DieBattleCheck? = null
    private val activeHandPositions = HandMask()
    private val pickedHandPositions = HandMask()
    private var phase: GamePhase = GamePhase.SCENARIO_START
    private var screen = GameScreen.SCENARIO_INTRO
    private var statusMessage = StatusMessage.EMPTY
    private var actions: ActionList = ActionList.EMPTY
    fun start() {
        if (heroes.isEmpty()) throw IllegalStateException("Heroes list is empty!")
        if (locations.isEmpty()) throw IllegalStateException("Location list is empty!")
        heroes.forEach { it.isAlive = true }
        timer = scenario.initialTimer
        //Draw initial hand for each hero
        heroes.forEach(::drawInitialHand)
        //First hero turn
        currentHeroIndex = -1
        changePhaseHeroTurnStart()
        processCycle()
    }
    private fun drawInitialHand(hero: Hero) {
        val hand = hero.hand
        val favoredDie = hero.bag.drawOfType(hero.favoredDieType)
        hand.addDie(favoredDie!!)
        refillHeroHand(hero, false)
    }
    private fun refillHeroHand(hero: Hero, redrawScreen: Boolean = true) {
        val hand = hero.hand
        while (hand.dieCount < hand.capacity && hero.bag.size > 0) {
            val die = hero.bag.draw()
            hand.addDie(die)
            if (redrawScreen) {
                Audio.playSound(Sound.DIE_DRAW)
                drawScreen()
                Thread.sleep(500)
            }
        }
    }
    private fun changePhaseHeroTurnEnd() {
        battleCheck = null
        encounteredDie = null
        phase = GamePhase.HERO_TURN_END
        //Discard extra dice (or optional dice)
        val hand = currentHero.hand
        pickedHandPositions.clear()
        activeHandPositions.clear()
        val allowCancel =
                if (hand.dieCount > hand.capacity) {
                    statusMessage = StatusMessage.END_OF_TURN_DISCARD_EXTRA
                    false
                } else {
                    statusMessage = StatusMessage.END_OF_TURN_DISCARD_OPTIONAL
                    true
                }
        val result = pickDiceFromHand(DiscardExtraDiceHandMaskRule(hand), allowCancel)
        statusMessage = StatusMessage.EMPTY
        actions = ActionList.EMPTY
        if (result) {
            val discardDice = collectPickedDice(hand)
            val discardAllyDice = collectPickedAllyDice(hand)
            pickedHandPositions.clear()
            (discardDice + discardAllyDice).forEach { die ->
                Audio.playSound(Sound.DIE_DISCARD)
                currentHero.discardDieFromHand(die)
                drawScreen()
                Thread.sleep(500)
            }
        }
        pickedHandPositions.clear()
        //Replenish hand
        refillHeroHand(currentHero)
        changePhaseHeroTurnStart()
    }
    private fun changePhaseHeroTurnStart() {
        phase = GamePhase.HERO_TURN_START
        screen = GameScreen.HERO_TURN_START
        //Tick timer
        timer--
        if (timer < 0) {
            changePhaseGameLost(StatusMessage.GAME_LOSS_OUT_OF_TIME)
            return
        }
        //Pick next hero
        do {
            currentHeroIndex = ++currentHeroIndex % heroes.size
            currentHero = heroes[currentHeroIndex]
        } while (!currentHero.isAlive)
        currentLocation = locations[0]
        //Setup
        Audio.playMusic(Music.SCENARIO_MUSIC_1)
        Audio.playSound(Sound.TURN_START)
    }
    private fun changePhaseLocationBeforeExploration() {
        phase = GamePhase.LOCATION_BEFORE_EXPLORATION
        screen = GameScreen.LOCATION_INTERIOR
        encounteredDie = null
        battleCheck = null
        pickedHandPositions.clear()
        activeHandPositions.clear()
        statusMessage = StatusMessage.CHOOSE_ACTION_BEFORE_EXPLORATION
        actions = ActionList()
        actions.add(Action.Type.EXPLORE_LOCATION, checkLocationCanBeExplored(currentLocation))
        actions.add(Action.Type.FINISH_TURN)
    }
    private fun changePhaseLocationEncounterStatDie() {
        Audio.playSound(Sound.ENCOUNTER_STAT)
        phase = GamePhase.LOCATION_ENCOUNTER_STAT
        screen = GameScreen.LOCATION_INTERIOR
        battleCheck = null
        pickedHandPositions.clear()
        activeHandPositions.clear()
        statusMessage = when (encounteredDie!!.die.type) {
            Die.Type.PHYSICAL -> StatusMessage.ENCOUNTER_PHYSICAL
            Die.Type.SOMATIC -> StatusMessage.ENCOUNTER_SOMATIC
            Die.Type.MENTAL -> StatusMessage.ENCOUNTER_MENTAL
            Die.Type.VERBAL -> StatusMessage.ENCOUNTER_VERBAL
            else -> throw AssertionError("Should not happen")
        }
        val canAttemptCheck = checkHeroCanAttemptStatCheck(currentHero, encounteredDie!!.die.type)
        actions = ActionList()
        actions.add(Action.Type.HIDE, canAttemptCheck)
        actions.add(Action.Type.DISCARD, canAttemptCheck)
        actions.add(Action.Type.FORFEIT)
    }
    private fun changePhaseLocationEncounterDivineDie() {
        Audio.playSound(Sound.ENCOUNTER_DIVINE)
        phase = GamePhase.LOCATION_ENCOUNTER_DIVINE
        screen = GameScreen.LOCATION_INTERIOR
        battleCheck = null
        pickedHandPositions.clear()
        activeHandPositions.clear()
        statusMessage = StatusMessage.ENCOUNTER_DIVINE
        actions = ActionList()
        actions.add(Action.Type.ACQUIRE, checkHeroCanAcquireDie(currentHero, Die.Type.DIVINE))
        actions.add(Action.Type.FORFEIT)
    }
    private fun changePhaseLocationAfterExploration() {
        phase = GamePhase.LOCATION_AFTER_EXPLORATION
        screen = GameScreen.LOCATION_INTERIOR
        encounteredDie = null
        battleCheck = null
        pickedHandPositions.clear()
        activeHandPositions.clear()
        statusMessage = StatusMessage.CHOOSE_ACTION_AFTER_EXPLORATION
        actions = ActionList()
        actions.add(Action.Type.FINISH_TURN)
    }
    private fun changePhaseGameLost(message: StatusMessage) {
        Audio.stopMusic()
        Audio.playSound(Sound.GAME_LOSS)
        phase = GamePhase.GAME_LOSS
        screen = GameScreen.GAME_LOSS
        statusMessage = message
    }
    private fun pickDiceFromHand(rule: HandMaskRule, allowCancel: Boolean = true, onEachLoop: (() -> Unit)? = null): Boolean {
        //Preparations
        pickedHandPositions.clear()
        actions = ActionList().add(Action.Type.CONFIRM, false)
        if (allowCancel) {
            actions.add(Action.Type.CANCEL)
        }
        val hand = rule.hand
        while (true) {
            //Recurring action
            onEachLoop?.invoke()
            //Define success condition
            val canProceed = rule.checkMask(pickedHandPositions)
            actions[Action.Type.CONFIRM]?.isEnabled = canProceed
            //Prepare active hand commands
            activeHandPositions.clear()
            (0 until hand.dieCount)
                    .filter { rule.isPositionActive(pickedHandPositions, it) }
                    .forEach { activeHandPositions.addPosition(it) }
            (0 until hand.allyDieCount)
                    .filter { rule.isAllyPositionActive(pickedHandPositions, it) }
                    .forEach { activeHandPositions.addAllyPosition(it) }
            //Draw current phase
            drawScreen()
            //Process interaction result
            val result = interactor.pickDiceFromHand(activeHandPositions, actions)
            when (result.type) {
                Action.Type.CONFIRM -> if (canProceed) {
                    activeHandPositions.clear()
                    return true
                }
                Action.Type.CANCEL -> if (allowCancel) {
                    activeHandPositions.clear()
                    pickedHandPositions.clear()
                    return false
                }
                Action.Type.HAND_POSITION -> {
                    Audio.playSound(Sound.DIE_PICK)
                    pickedHandPositions.switchPosition(result.data)
                }
                Action.Type.HAND_ALLY_POSITION -> {
                    Audio.playSound(Sound.DIE_PICK)
                    pickedHandPositions.switchAllyPosition(result.data)
                }
                else -> throw AssertionError("Should not happen")
            }
        }
    }
    private fun collectPickedDice(hand: Hand) =
            (0 until hand.dieCount)
                    .filter(pickedHandPositions::checkPosition)
                    .mapNotNull(hand::dieAt)
    private fun collectPickedAllyDice(hand: Hand) =
            (0 until hand.allyDieCount)
                    .filter(pickedHandPositions::checkAllyPosition)
                    .mapNotNull(hand::allyDieAt)
    private fun performStatDieAcquireCheck(shouldDiscard: Boolean): Boolean {
        //Prepare check
        battleCheck = DieBattleCheck(DieBattleCheck.Method.SUM, encounteredDie)
        pickedHandPositions.clear()
        statusMessage = StatusMessage.CHOOSE_DICE_PERFORM_CHECK
        val hand = currentHero.hand
        //Try to pick dice from performer's hand
        if (!pickDiceFromHand(StatDieAcquireHandMaskRule(currentHero.hand, encounteredDie!!.die.type), true) {
                    battleCheck!!.clearHeroPairs()
                    (collectPickedDice(hand) + collectPickedAllyDice(hand))
                            .map { DiePair(it, if (shouldDiscard) 1 else 0) }
                            .forEach(battleCheck!!::addHeroPair)
                }) {
            battleCheck = null
            pickedHandPositions.clear()
            return false
        }
        //Remove dice from hand
        collectPickedDice(hand).forEach { hand.removeDie(it) }
        collectPickedAllyDice(hand).forEach { hand.removeDie(it) }
        pickedHandPositions.clear()
        //Perform check
        Audio.playSound(Sound.BATTLE_CHECK_ROLL)
        for (i in 0..7) {
            battleCheck!!.roll()
            drawScreen()
            Thread.sleep(100)
        }
        battleCheck!!.calculateResult()
        val result = battleCheck?.result ?: -1
        val success = result >= 0
        //Process dice which participated in the check
        (0 until battleCheck!!.heroPairCount)
                .map(battleCheck!!::getHeroPairAt)
                .map(DiePair::die)
                .forEach { d ->
                    if (d.type === Die.Type.DIVINE) {
                        currentHero.hand.removeDie(d)
                        deterrentPile.put(d)
                    } else {
                        if (shouldDiscard) {
                            currentHero.discardDieFromHand(d)
                        } else {
                            currentHero.hideDieFromHand(d)
                        }
                    }
                }
        //Show message to user
        Audio.playSound(if (success) Sound.BATTLE_CHECK_SUCCESS else Sound.BATTLE_CHECK_FAILURE)
        statusMessage = if (success) StatusMessage.DIE_ACQUIRE_SUCCESS else StatusMessage.DIE_ACQUIRE_FAILURE
        actions = ActionList.EMPTY
        drawScreen()
        interactor.anyInput()
        //Clean up
        battleCheck = null
        //Resolve consequences of the check
        if (success) {
            Audio.playSound(Sound.DIE_DRAW)
            currentHero.hand.addDie(encounteredDie!!.die)
        }
        return true
    }
    private fun processCycle() {
        while (true) {
            drawScreen()
            when (phase) {
                GamePhase.HERO_TURN_START -> {
                    interactor.anyInput()
                    changePhaseLocationBeforeExploration()
                }
                GamePhase.GAME_LOSS -> {
                    interactor.anyInput()
                    return
                }
                GamePhase.LOCATION_BEFORE_EXPLORATION ->
                    when (interactor.pickAction(actions).type) {
                        Action.Type.EXPLORE_LOCATION -> {
                            val die = currentLocation.bag.draw()
                            encounteredDie = DiePair(die, 0)
                            when (die.type) {
                                Die.Type.PHYSICAL, Die.Type.SOMATIC, Die.Type.MENTAL, Die.Type.VERBAL -> changePhaseLocationEncounterStatDie()
                                Die.Type.DIVINE -> changePhaseLocationEncounterDivineDie()
                                else -> TODO("Others")
                            }
                        }
                        Action.Type.FINISH_TURN -> changePhaseHeroTurnEnd()
                        else -> throw AssertionError("Should not happen")
                    }
                GamePhase.LOCATION_ENCOUNTER_STAT -> {
                    val type = interactor.pickAction(actions).type
                    when (type) {
                        Action.Type.DISCARD, Action.Type.HIDE -> {
                            performStatDieAcquireCheck(type === Action.Type.DISCARD)
                            changePhaseLocationAfterExploration()
                        }
                        Action.Type.FORFEIT -> {
                            Audio.playSound(Sound.DIE_REMOVE)
                            changePhaseLocationAfterExploration()
                        }
                        else -> throw AssertionError("Should not happen")
                    }
                }
                GamePhase.LOCATION_ENCOUNTER_DIVINE ->
                    when (interactor.pickAction(actions).type) {
                        Action.Type.ACQUIRE -> {
                            Audio.playSound(Sound.DIE_DRAW)
                            currentHero.hand.addDie(encounteredDie!!.die)
                            changePhaseLocationAfterExploration()
                        }
                        Action.Type.FORFEIT -> {
                            Audio.playSound(Sound.DIE_REMOVE)
                            changePhaseLocationAfterExploration()
                        }
                        else -> throw AssertionError("Should not happen")
                    }
                GamePhase.LOCATION_AFTER_EXPLORATION ->
                    when (interactor.pickAction(actions).type) {
                        Action.Type.FINISH_TURN -> changePhaseHeroTurnEnd()
                        else -> throw AssertionError("Should not happen")
                    }
                else -> throw AssertionError("Should not happen")
            }
        }
    }
    private fun drawScreen() {
        when (screen) {
            GameScreen.HERO_TURN_START -> renderer.drawHeroTurnStart(currentHero)
            GameScreen.LOCATION_INTERIOR -> renderer.drawLocationInteriorScreen(currentLocation, heroes, timer, currentHero, battleCheck, encounteredDie, null, pickedHandPositions, activeHandPositions, statusMessage, actions)
            GameScreen.GAME_LOSS -> renderer.drawGameLoss(statusMessage)
        }
    }
    private fun checkLocationCanBeExplored(location: Location) = location.isOpen && location.bag.size > 0
    private fun checkHeroCanAttemptStatCheck(hero: Hero, type: Die.Type): Boolean {
        return hero.isAlive && SingleDieHandFilter(type).test(hero.hand)
    }
    private fun checkHeroCanAcquireDie(hero: Hero, type: Die.Type): Boolean {
        if (!hero.isAlive) {
            return false
        }
        return when (type) {
            Die.Type.ALLY -> hero.hand.allyDieCount < MAX_HAND_ALLY_SIZE
            else -> hero.hand.dieCount < MAX_HAND_SIZE
        }
    }
}
Method
start()- the entry point to the game. Here variables are initialized, heroes are weighed, hands are filled with cubes, and reporters shine with cameras from all sides. The main cycle will be launched any minute, after which it can no longer be stopped. The method drawInitialHand()speaks for itself (we did not seem to consider the code of the drawOfType()class method Bag, but after going such a long way together, you can write this code yourself). The method refillHeroHand()has two options (depending on the value of the argument redrawScreen): fast and quiet (when you need to fill the hands of all the heroes at the beginning of the game), and loud with a bunch of pathos, when at the end of the move you need to pointedly remove the cubes from the bag, bringing the hand to the right size. A bunch of methods with names starting with
changePhase, - as we already said, they serve to change the current game phase and are engaged in the assignment of the corresponding values of the game variables. Here, a list is formed actionswhere the actions characteristic of this phase are added. The utility method
pickDiceFromHand()in a generalized form is engaged in the selection of cubes from the hand. An object of a familiar class HandMaskRulethat defines the selection rules is passed here . It also indicates the ability to refuse the selection ( allowCancel), as well as a function onEachLoopwhose code must be called each time the list of selected cubes is changed (usually a screen redraw). The cubes selected by this method can be assembled from the hand using the collectPickedDice()and methods collectPickedAllyDice(). Another utility method
performStatDieAcquireCheck()fully implements the hero passing the test for the acquisition of a new cube. The central role in this method is played by the object DieBattleCheck. The process begins with the selection of cubes by the method pickDiceFromHand()(at each step the list of “participants” is updated DieBattleCheck). The selected cubes are removed from the hand, after which a “roll" occurs - each die updates its value (eight times in a row), after which the result is calculated and displayed. On a successful roll, a new die falls into the hero’s hand. The cubes participating in the test are either held (if they are blue), or discarded (if shouldDiscard = true), or are hidden back in the bag (if shouldDiscard = false). Main method
processCycle()contains an infinite loop (I ask without fainting) in which the screen is drawn first, then the user is prompted for input, then this input is processed - with all the ensuing consequences. The method drawScreen()calls the desired interface method GameRenderer(depending on the current value screen), passing it the required objects to the input. Also, the class contains several helper methods:
checkLocationCanBeExplored(), checkHeroCanAttemptStatCheck()and checkHeroCanAcquireDie(). Their names speak for themselves, therefore we will not dwell on them in detail. And there are also class method calls Audio, underlined by a red wavy line. Comment them for the time being - we will consider their purpose later.Who doesn’t understand anything at all, here is a diagram (for clarity, so to speak):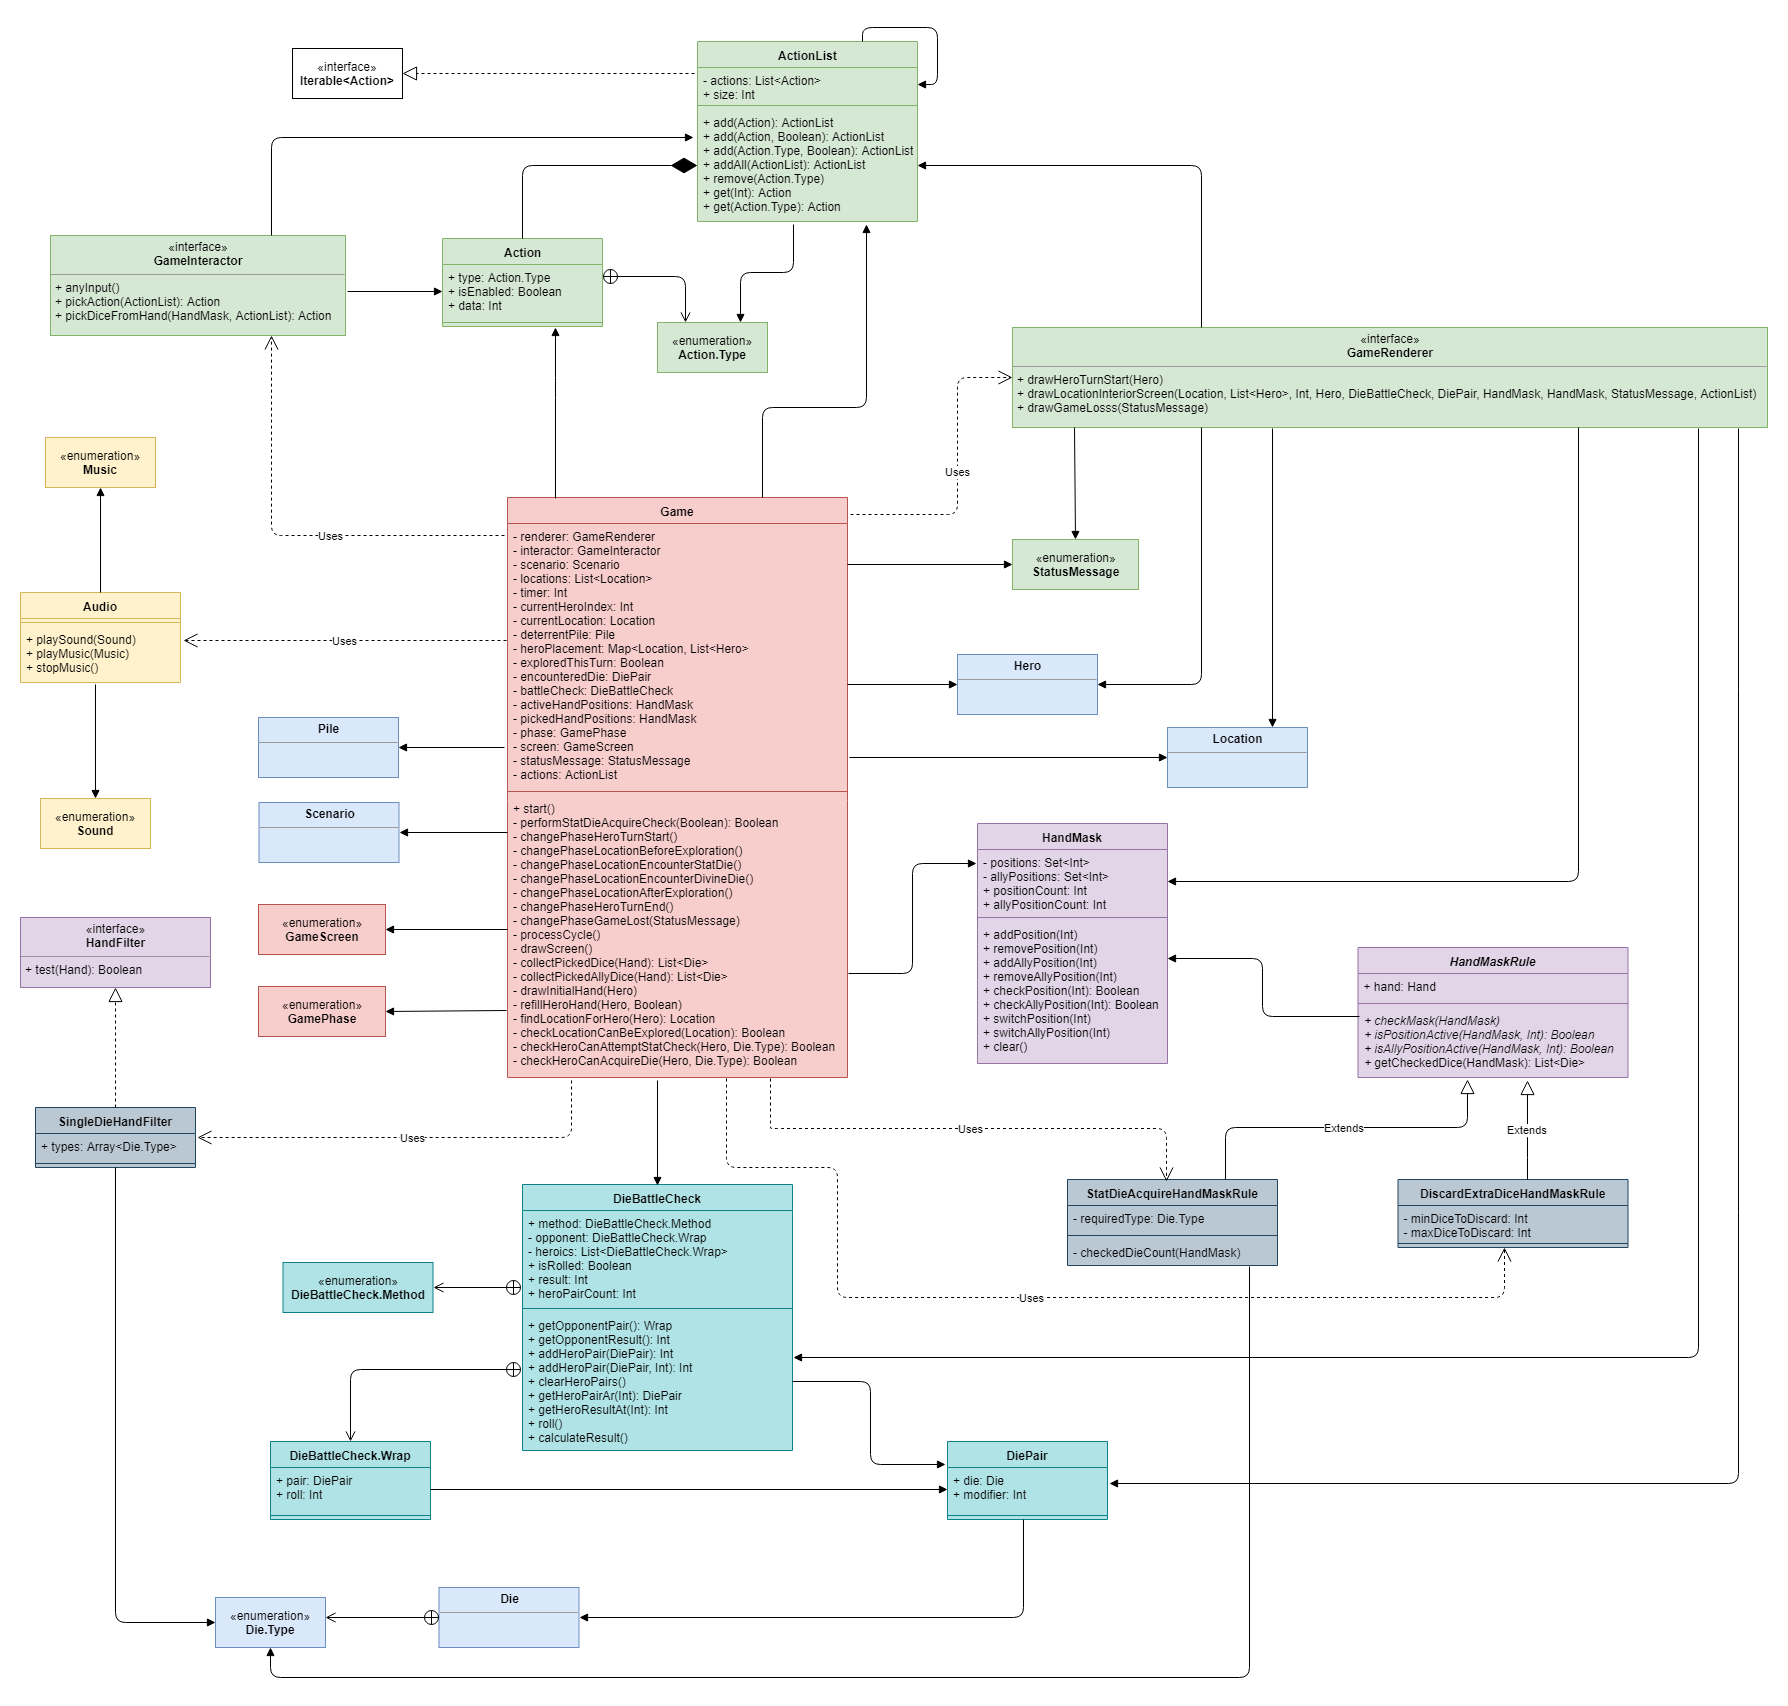
That's all, the game is ready (hehe). There were real little things, about them below.
Step Nine. Display Image
So we come to the main topic of today's conversation - the graphic component of the application. As you remember, our task is to implement the interface
GameRendererand its three methods, and since there is still no talented artist in our team, we will do this ourselves using pseudographics. But to begin with, it would be nice to understand what we generally expect to see at the exit. And we want to see three screens of approximately the following contents:Screen 1. Player Turn ID
Screen 2. Information about the area and the current hero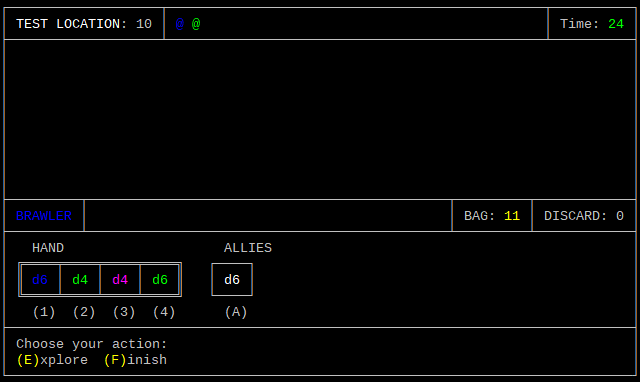
Screen 3. Script Loss Message
I think the majority have already realized that the images presented are different from everything that we are usually used to seeing in the console of Java applications, and that the usual features
prinltn()will obviously not be enough for us. I would also like to be able to jump to arbitrary places on the screen and draw symbols in different colors. rush to our aid
org.fusesource.jansi jansi 1.17.1 compile And you can start to create. This library provides us with a class object
Ansi(obtained as a result of a static call Ansi.ansi()) with a bunch of convenient methods that can be chained. It works on the principle of StringBuilder'a - first we form the object, then send it to print. Of the useful methods we will find useful:a()- to display characters;cursor()- to move the cursor on the screen;eraseLine()- as if speaks for itself;eraseScreen()- similarly;fg(), bg(), fgBright(), bgBright()- very inconvenient methods for working with text and background colors - we will make our own, more pleasant;reset()- to reset the set color settings, flicker, etc.
Let's create a class
ConsoleRendererwith utility methods that may be useful to us in our work. The first version will look something like this:abstract class ConsoleRenderer() {
protected lateinit var ansi: Ansi
init {
AnsiConsole.systemInstall()
clearScreen()
resetAnsi()
}
private fun resetAnsi() {
ansi = Ansi.ansi()
}
fun clearScreen() {
print(Ansi.ansi().eraseScreen(Ansi.Erase.ALL).cursor(1, 1))
}
protected fun render() {
print(ansi.toString())
resetAnsi()
}
}
The method
resetAnsi()creates a new (empty) object Ansi, which will be filled with the necessary commands (move, output, etc.). Upon completion of filling, the generated object is sent for printing by the method render(), and the variable is initialized with a new object. Nothing complicated yet, right? And if so, then we will begin to fill this class with other useful methods. Let's start with the sizes. The standard console of most terminals is 80x24 in size. We note this fact with two constants
CONSOLE_WIDTHand CONSOLE_HEIGHT. We will not be attached to specific values and will try to make the design as rubbery as possible (like on the web). The numbering of coordinates begins with one, the first coordinate is a row, the second is a column. Knowing all this, we write a utility method drawHorizontalLine()for filling the specified string with the specified character.protected fun drawHorizontalLine(offsetY: Int, filler: Char) {
ansi.cursor(offsetY, 1)
(1..CONSOLE_WIDTH).forEach { ansi.a(filler) }
//for (i in 1..CONSOLE_WIDTH) { ansi.a(filler) }
}
Once again, I remind you that invoking commands
a()or cursor()does not lead to any instant effect, but only adds the Ansicorresponding sequence of commands to the object . Only when these sequences are sent to print will we see them on the screen. There is no fundamental difference between using the classical cycle
forand the functional approach with ClosedRangeand forEach{}- each developer decides for himself what is more convenient for him. However, I will continue to fool your heads with functionalism, simply because We implement another utility method
drawBlankLine()that does the same thing asdrawHorizontalLine(offsetY, ' '), only with extension. Sometimes we need to make the line empty not completely, but leave a vertical line at the beginning and end (frame, yeah). The code will look something like this:protected fun drawBlankLine(offsetY: Int, drawBorders: Boolean = true) {
ansi.cursor(offsetY, 1)
if (drawBorders) {
ansi.a('│')
(2 until CONSOLE_WIDTH).forEach { ansi.a(' ') }
ansi.a('│')
} else {
ansi.eraseLine(Ansi.Erase.ALL)
}
}
How, you never drew frames from pseudographics? Symbols can be inserted directly into the source code. Hold down the Alt key and type the character code on the numeric keypad. Then let go. The ASCII codes we need in any encoding are the same, here is the minimum gentleman's set:

And then, like in minecraft, the possibilities are limited only by the limits of your imagination. And the screen size.
protected fun drawCenteredCaption(offsetY: Int, text: String, color: Color, drawBorders: Boolean = true) {
val center = (CONSOLE_WIDTH - text.length) / 2
ansi.cursor(offsetY, 1)
ansi.a(if (drawBorders) '│' else ' ')
(2 until center).forEach { ansi.a(' ') }
ansi.color(color).a(text).reset()
(text.length + center until CONSOLE_WIDTH).forEach { ansi.a(' ') }
ansi.a(if (drawBorders) '│' else ' ')
}
Let's talk a little about the flowers. The class
Ansicontains constants Colorfor eight primary colors (black, blue, green, cyan, red, violet, yellow, gray), which you need to pass to the input of methods fg()/bg()for the dark version or fgBright()/bgBright()for the light one, which is terribly inconvenient to do, since to identify the color by way, one value is not enough for us - we need at least two (color and brightness). Therefore, we will create our list of constants and our extension methods (as well as map-binding colors to types of cubes and classes of heroes):protected enum class Color {
BLACK, DARK_BLUE, DARK_GREEN, DARK_CYAN, DARK_RED, DARK_MAGENTA, DARK_YELLOW, LIGHT_GRAY,
DARK_GRAY, LIGHT_BLUE, LIGHT_GREEN, LIGHT_CYAN, LIGHT_RED, LIGHT_MAGENTA, LIGHT_YELLOW, WHITE
}
protected fun Ansi.color(color: Color?): Ansi = when (color) {
Color.BLACK -> fgBlack()
Color.DARK_BLUE -> fgBlue()
Color.DARK_GREEN -> fgGreen()
Color.DARK_CYAN -> fgCyan()
Color.DARK_RED -> fgRed()
Color.DARK_MAGENTA -> fgMagenta()
Color.DARK_YELLOW -> fgYellow()
Color.LIGHT_GRAY -> fg(Ansi.Color.WHITE)
Color.DARK_GRAY -> fgBrightBlack()
Color.LIGHT_BLUE -> fgBrightBlue()
Color.LIGHT_GREEN -> fgBrightGreen()
Color.LIGHT_CYAN -> fgBrightCyan()
Color.LIGHT_RED -> fgBrightRed()
Color.LIGHT_MAGENTA -> fgBrightMagenta()
Color.LIGHT_YELLOW -> fgBrightYellow()
Color.WHITE -> fgBright(Ansi.Color.WHITE)
else -> this
}
protected fun Ansi.background(color: Color?): Ansi = when (color) {
Color.BLACK -> ansi.bg(Ansi.Color.BLACK)
Color.DARK_BLUE -> ansi.bg(Ansi.Color.BLUE)
Color.DARK_GREEN -> ansi.bgGreen()
Color.DARK_CYAN -> ansi.bg(Ansi.Color.CYAN)
Color.DARK_RED -> ansi.bgRed()
Color.DARK_MAGENTA -> ansi.bgMagenta()
Color.DARK_YELLOW -> ansi.bgYellow()
Color.LIGHT_GRAY -> ansi.bg(Ansi.Color.WHITE)
Color.DARK_GRAY -> ansi.bgBright(Ansi.Color.BLACK)
Color.LIGHT_BLUE -> ansi.bgBright(Ansi.Color.BLUE)
Color.LIGHT_GREEN -> ansi.bgBrightGreen()
Color.LIGHT_CYAN -> ansi.bgBright(Ansi.Color.CYAN)
Color.LIGHT_RED -> ansi.bgBrightRed()
Color.LIGHT_MAGENTA -> ansi.bgBright(Ansi.Color.MAGENTA)
Color.LIGHT_YELLOW -> ansi.bgBrightYellow()
Color.WHITE -> ansi.bgBright(Ansi.Color.WHITE)
else -> this
}
protected val dieColors = mapOf(
Die.Type.PHYSICAL to Color.LIGHT_BLUE,
Die.Type.SOMATIC to Color.LIGHT_GREEN,
Die.Type.MENTAL to Color.LIGHT_MAGENTA,
Die.Type.VERBAL to Color.LIGHT_YELLOW,
Die.Type.DIVINE to Color.LIGHT_CYAN,
Die.Type.WOUND to Color.DARK_GRAY,
Die.Type.ENEMY to Color.DARK_RED,
Die.Type.VILLAIN to Color.LIGHT_RED,
Die.Type.OBSTACLE to Color.DARK_YELLOW,
Die.Type.ALLY to Color.WHITE
)
protected val heroColors = mapOf(
Hero.Type.BRAWLER to Color.LIGHT_BLUE,
Hero.Type.HUNTER to Color.LIGHT_GREEN
)
Now, each of the 16 available colors is uniquely identified by a single constant. We’ll write a couple more utility methods, but before that we’ll figure out one more thing:
Where to store the constants for text strings?
“String constants need to be taken out in separate files so that they are stored all in one place - this makes them easier to maintain. And it’s also important for localization ... ”
String constants need to be moved to separate files ... well, yes. We will endure. The standard Java mechanism for working with this kind of resources is the objects
java.util.ResourceBundlethat work with files .properties. Here we start from such a file:# Game status messages
choose_dice_perform_check=Choose dice to perform check:
end_of_turn_discard_extra=END OF TURN: Discard extra dice:
end_of_turn_discard_optional=END OF TURN: Discard any dice, if needed:
choose_action_before_exploration=Choose your action:
choose_action_after_exploration=Already explored this turn. Choose what to do now:
encounter_physical=Encountered PHYSICAL die. Need to pass respective check or lose this die.
encounter_somatic=Encountered SOMATIC die. Need to pass respective check or lose this die.
encounter_mental=Encountered MENTAL die. Need to pass respective check or lose this die.
encounter_verbal=Encountered VERBAL die. Need to pass respective check or lose this die.
encounter_divine=Encountered DIVINE die. Can be acquired automatically (no checks needed):
die_acquire_success=You have acquired the die!
die_acquire_failure=You have failed to acquire the die.
game_loss_out_of_time=You ran out of time
# Die types
physical=PHYSICAL
somatic=SOMATIC
mental=MENTAL
verbal=VERBAL
divine=DIVINE
ally=ALLY
wound=WOUND
enemy=ENEMY
villain=VILLAIN
obstacle=OBSTACLE
# Hero types and descriptions
brawler=Brawler
hunter=Hunter
# Various labels
avg=avg
bag=Bag
bag_size=Bag size
class=Class
closed=Closed
discard=Discard
empty=Empty
encountered=Encountered
fail=Fail
hand=Hand
heros_turn=%s's turn
max=max
min=min
perform_check=Perform check:
pile=Pile
received_new_die=Received new die
result=Result
success=Success
sum=sum
time=Time
total=Total
# Action names and descriptions
action_confirm_key=ENTER
action_confirm_name=Confirm
action_cancel_key=ESC
action_cancel_name=Cancel
action_explore_location_key=E
action_explore_location_name=xplore
action_finish_turn_key=F
action_finish_turn_name=inish
action_hide_key=H
action_hide_name=ide
action_discard_key=D
action_discard_name=iscard
action_acquire_key=A
action_acquire_name=cquire
action_leave_key=L
action_leave_name=eave
action_forfeit_key=F
action_forfeit_name=orfeit
Each line contains a key-value pair, separated by a character
=. You can put the file anywhere - the main thing is that the path to it be part of the classpath. Please note that the text for actions consists of two parts: the first letter is not only highlighted in yellow when displayed on the screen, but also determines the key that must be pressed to perform this action. Therefore, it is convenient to store them separately. We abstract, however, from a specific format (in Android, for example, strings are stored differently) and describe the interface for loading string constants.
interface StringLoader {
fun loadString(key: String): String
}
The key is transmitted to the input, the output is a specific line. The implementation is as straightforward as the interface itself (suppose the file lies along the path
src/main/resources/text/strings.properties).class PropertiesStringLoader() : StringLoader {
private val properties = ResourceBundle.getBundle("text.strings")
override fun loadString(key: String) = properties.getString(key) ?: ""
}
Now it will not be difficult to implement a method
drawStatusMessage()for displaying the current state of the game engine ( StatusMessage) on the screen and a method drawActionList()for displaying a list of available actions ( ActionList). As well as other official methods that only the soul desires.There is a lot of code, part of it we have already seen ... so here is a spoiler for you
abstract class ConsoleRenderer(private val strings: StringLoader) {
protected lateinit var ansi: Ansi
init {
AnsiConsole.systemInstall()
clearScreen()
resetAnsi()
}
protected fun loadString(key: String) = strings.loadString(key)
private fun resetAnsi() {
ansi = Ansi.ansi()
}
fun clearScreen() {
print(Ansi.ansi().eraseScreen(Ansi.Erase.ALL).cursor(1, 1))
}
protected fun render() {
ansi.cursor(CONSOLE_HEIGHT, CONSOLE_WIDTH)
System.out.print(ansi.toString())
resetAnsi()
}
protected fun drawBigNumber(offsetX: Int, offsetY: Int, number: Int): Unit = with(ansi) {
var currentX = offsetX
cursor(offsetY, currentX)
val text = number.toString()
text.forEach {
when (it) {
'0' -> {
cursor(offsetY, currentX)
a(" ███ ")
cursor(offsetY + 1, currentX)
a("█ █ ")
cursor(offsetY + 2, currentX)
a("█ █ ")
cursor(offsetY + 3, currentX)
a("█ █ ")
cursor(offsetY + 4, currentX)
a(" ███ ")
}
'1' -> {
cursor(offsetY, currentX)
a(" █ ")
cursor(offsetY + 1, currentX)
a(" ██ ")
cursor(offsetY + 2, currentX)
a("█ █ ")
cursor(offsetY + 3, currentX)
a(" █ ")
cursor(offsetY + 4, currentX)
a("█████ ")
}
'2' -> {
cursor(offsetY, currentX)
a(" ███ ")
cursor(offsetY + 1, currentX)
a("█ █ ")
cursor(offsetY + 2, currentX)
a(" █ ")
cursor(offsetY + 3, currentX)
a(" █ ")
cursor(offsetY + 4, currentX)
a("█████ ")
}
'3' -> {
cursor(offsetY, currentX)
a("████ ")
cursor(offsetY + 1, currentX)
a(" █ ")
cursor(offsetY + 2, currentX)
a(" ██ ")
cursor(offsetY + 3, currentX)
a(" █ ")
cursor(offsetY + 4, currentX)
a("████ ")
}
'4' -> {
cursor(offsetY, currentX)
a(" █ ")
cursor(offsetY + 1, currentX)
a(" ██ ")
cursor(offsetY + 2, currentX)
a(" █ █ ")
cursor(offsetY + 3, currentX)
a("█████ ")
cursor(offsetY + 4, currentX)
a(" █ ")
}
'5' -> {
cursor(offsetY, currentX)
a("█████ ")
cursor(offsetY + 1, currentX)
a("█ ")
cursor(offsetY + 2, currentX)
a("████ ")
cursor(offsetY + 3, currentX)
a(" █ ")
cursor(offsetY + 4, currentX)
a("████ ")
}
'6' -> {
cursor(offsetY, currentX)
a(" ███ ")
cursor(offsetY + 1, currentX)
a("█ ")
cursor(offsetY + 2, currentX)
a("████ ")
cursor(offsetY + 3, currentX)
a("█ █ ")
cursor(offsetY + 4, currentX)
a(" ███ ")
}
'7' -> {
cursor(offsetY, currentX)
a("█████ ")
cursor(offsetY + 1, currentX)
a(" █ ")
cursor(offsetY + 2, currentX)
a(" █ ")
cursor(offsetY + 3, currentX)
a(" █ ")
cursor(offsetY + 4, currentX)
a(" █ ")
}
'8' -> {
cursor(offsetY, currentX)
a(" ███ ")
cursor(offsetY + 1, currentX)
a("█ █ ")
cursor(offsetY + 2, currentX)
a(" ███ ")
cursor(offsetY + 3, currentX)
a("█ █ ")
cursor(offsetY + 4, currentX)
a(" ███ ")
}
'9' -> {
cursor(offsetY, currentX)
a(" ███ ")
cursor(offsetY + 1, currentX)
a("█ █ ")
cursor(offsetY + 2, currentX)
a(" ████ ")
cursor(offsetY + 3, currentX)
a(" █ ")
cursor(offsetY + 4, currentX)
a(" ███ ")
}
}
currentX += 6
}
}
protected fun drawHorizontalLine(offsetY: Int, filler: Char) {
ansi.cursor(offsetY, 1)
(1..CONSOLE_WIDTH).forEach { ansi.a(filler) }
}
protected fun drawBlankLine(offsetY: Int, drawBorders: Boolean = true) {
    ansi.cursor(offsetY, 1)
    if (drawBorders) {
        ansi.a('│')
        (2 until CONSOLE_WIDTH).forEach { ansi.a(' ') }
        ansi.a('│')
    } else {
        ansi.eraseLine(Ansi.Erase.ALL)
    }
}
protected fun drawCenteredCaption(offsetY: Int, text: String, color: Color, drawBorders: Boolean = true) {
    val center = (CONSOLE_WIDTH - text.length) / 2
    ansi.cursor(offsetY, 1)
    ansi.a(if (drawBorders) '│' else ' ')
    (2 until center).forEach { ansi.a(' ') }
    ansi.color(color).a(text).reset()
    (text.length + center until CONSOLE_WIDTH).forEach { ansi.a(' ') }
    ansi.a(if (drawBorders) '│' else ' ')
}
protected fun drawStatusMessage(offsetY: Int, message: StatusMessage, drawBorders: Boolean = true) {
//Setup
val messageText = loadString(message.toString().toLowerCase())
var currentX = 1
val rightBorder = CONSOLE_WIDTH - if (drawBorders) 1 else 0
//Left border
ansi.cursor(offsetY, 1)
if (drawBorders) {
ansi.a('│')
currentX++
}
ansi.a(' ')
currentX++
//Text
ansi.a(messageText)
currentX += messageText.length
//Right border
(currentX..rightBorder).forEach { ansi.a(' ') }
if (drawBorders) {
ansi.a('│')
}
}
protected fun drawActionList(offsetY: Int, actions: ActionList, drawBorders: Boolean = true) {
val rightBorder = CONSOLE_WIDTH - if (drawBorders) 1 else 0
var currentX = 1
//Left border
ansi.cursor(offsetY, 1)
if (drawBorders) {
ansi.a('│')
currentX++
}
ansi.a(' ')
currentX++
//List of actions
actions.forEach { action ->
val key = loadString("action_${action.toString().toLowerCase()}_key")
val name = loadString("action_${action.toString().toLowerCase()}_name")
val length = key.length + 2 + name.length
if (currentX + length >= rightBorder) {
(currentX..rightBorder).forEach { ansi.a(' ') }
if (drawBorders) {
ansi.a('│')
}
ansi.cursor(offsetY + 1, 1)
currentX = 1
if (drawBorders) {
ansi.a('│')
currentX++
}
ansi.a(' ')
currentX++
}
if (action.isEnabled) {
ansi.color(Color.LIGHT_YELLOW)
}
ansi.a('(').a(key).a(')').reset()
ansi.a(name)
ansi.a(" ")
currentX += length + 2
}
//Right border
(currentX..rightBorder).forEach { ansi.a(' ') }
if (drawBorders) {
ansi.a('│')
}
}
protected enum class Color {
    BLACK, DARK_BLUE, DARK_GREEN, DARK_CYAN, DARK_RED, DARK_MAGENTA, DARK_YELLOW, LIGHT_GRAY,
    DARK_GRAY, LIGHT_BLUE, LIGHT_GREEN, LIGHT_CYAN, LIGHT_RED, LIGHT_MAGENTA, LIGHT_YELLOW, WHITE
}
 protected fun Ansi.color(color: Color?): Ansi = when (color) {
    Color.BLACK -> fgBlack()
    Color.DARK_BLUE -> fgBlue()
    Color.DARK_GREEN -> fgGreen()
    Color.DARK_CYAN -> fgCyan()
    Color.DARK_RED -> fgRed()
    Color.DARK_MAGENTA -> fgMagenta()
    Color.DARK_YELLOW -> fgYellow()
    Color.LIGHT_GRAY -> fg(Ansi.Color.WHITE)
    Color.DARK_GRAY -> fgBrightBlack()
    Color.LIGHT_BLUE -> fgBrightBlue()
    Color.LIGHT_GREEN -> fgBrightGreen()
    Color.LIGHT_CYAN -> fgBrightCyan()
    Color.LIGHT_RED -> fgBrightRed()
    Color.LIGHT_MAGENTA -> fgBrightMagenta()
    Color.LIGHT_YELLOW -> fgBrightYellow()
    Color.WHITE -> fgBright(Ansi.Color.WHITE)
    else -> this
}
protected fun Ansi.background(color: Color?): Ansi = when (color) {
    Color.BLACK -> ansi.bg(Ansi.Color.BLACK)
    Color.DARK_BLUE -> ansi.bg(Ansi.Color.BLUE)
    Color.DARK_GREEN -> ansi.bgGreen()
    Color.DARK_CYAN -> ansi.bg(Ansi.Color.CYAN)
    Color.DARK_RED -> ansi.bgRed()
    Color.DARK_MAGENTA -> ansi.bgMagenta()
    Color.DARK_YELLOW -> ansi.bgYellow()
    Color.LIGHT_GRAY -> ansi.bg(Ansi.Color.WHITE)
    Color.DARK_GRAY -> ansi.bgBright(Ansi.Color.BLACK)
    Color.LIGHT_BLUE -> ansi.bgBright(Ansi.Color.BLUE)
    Color.LIGHT_GREEN -> ansi.bgBrightGreen()
    Color.LIGHT_CYAN -> ansi.bgBright(Ansi.Color.CYAN)
    Color.LIGHT_RED -> ansi.bgBrightRed()
    Color.LIGHT_MAGENTA -> ansi.bgBright(Ansi.Color.MAGENTA)
    Color.LIGHT_YELLOW -> ansi.bgBrightYellow()
    Color.WHITE -> ansi.bgBright(Ansi.Color.WHITE)
    else -> this
}
protected val dieColors = mapOf(
        Die.Type.PHYSICAL to Color.LIGHT_BLUE,
        Die.Type.SOMATIC to Color.LIGHT_GREEN,
        Die.Type.MENTAL to Color.LIGHT_MAGENTA,
        Die.Type.VERBAL to Color.LIGHT_YELLOW,
        Die.Type.DIVINE to Color.LIGHT_CYAN,
        Die.Type.WOUND to Color.DARK_GRAY,
        Die.Type.ENEMY to Color.DARK_RED,
        Die.Type.VILLAIN to Color.LIGHT_RED,
        Die.Type.OBSTACLE to Color.DARK_YELLOW,
        Die.Type.ALLY to Color.WHITE
)
protected val heroColors = mapOf(
        Hero.Type.BRAWLER to Color.LIGHT_BLUE,
        Hero.Type.HUNTER to Color.LIGHT_GREEN
)
protected open fun shortcut(index: Int) = "1234567890ABCDEFGHIJKLMNOPQRSTUVWXYZ"[index]
}
Why did we all do this, you ask? Yes, in order to inherit our interface implementation from this wonderful class
GameRenderer.Class diagram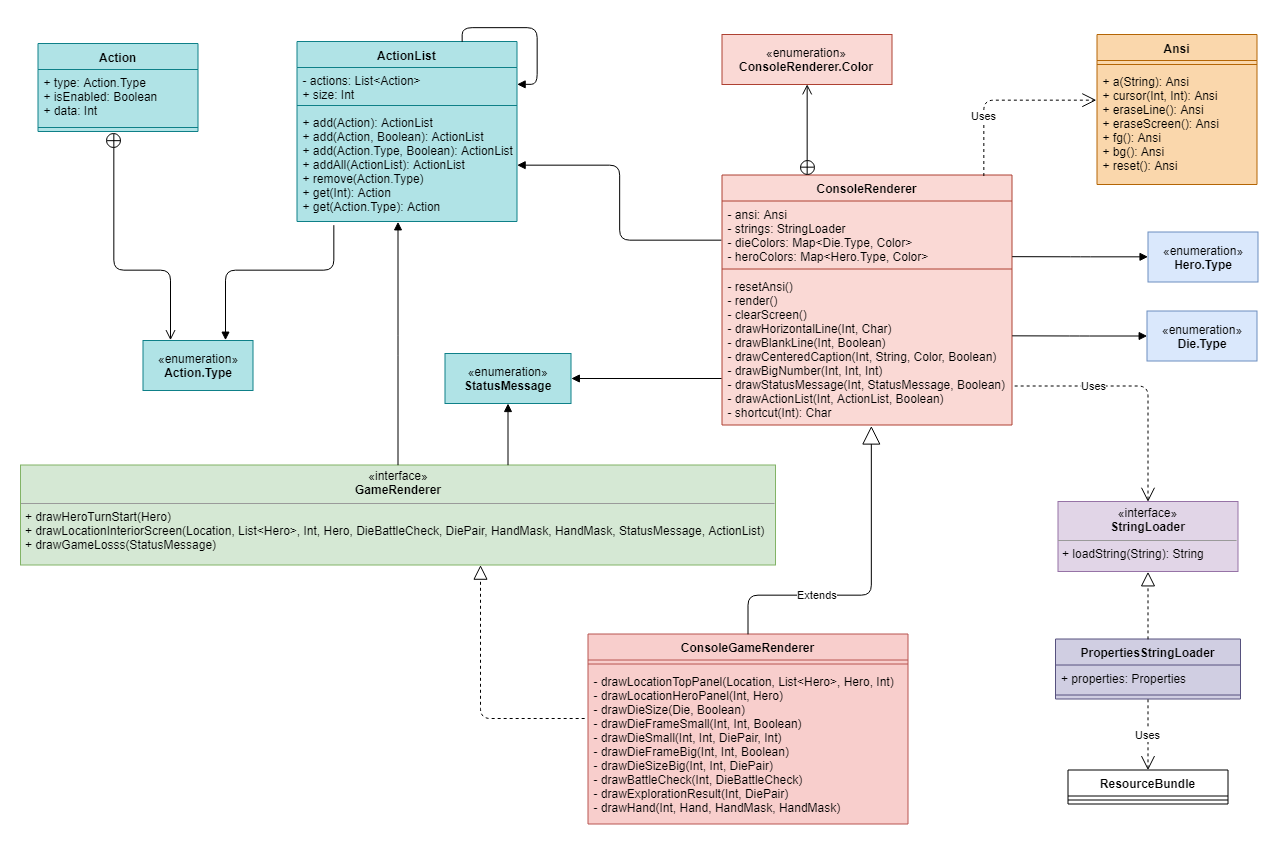
This is how the implementation of the first, simplest method will look like:
override fun drawGameLoss(message: StatusMessage) {
    val centerY = CONSOLE_HEIGHT / 2
    (1 until centerY).forEach { drawBlankLine(it, false) }
    val data = loadString(message.toString().toLowerCase()).toUpperCase()
    drawCenteredCaption(centerY, data, LIGHT_RED, false)
    (centerY + 1..CONSOLE_HEIGHT).forEach { drawBlankLine(it, false) }
    render()
}
Nothing supernatural, just one text line (
data) drawn in red in the center of the screen ( drawCenteredCaption()). The rest of the code fills the rest of the screen with blank lines. Perhaps someone will ask why this is necessary - after all clearScreen(), there is a method , it is enough to call it at the beginning of the method, clear the screen, and then draw the desired text. Alas, this is a lazy approach that we will not use. The reason is very simple: with this approach, some positions on the screen are drawn twice, which leads to a noticeable flicker, especially when the screen is sequentially drawn several times in a row (during animations). Therefore, our task is not just to draw the right characters in the right places, but to fill in the wholethe rest of the screen with empty characters (so that artifacts from other rendering do not remain on it). And this task is not so simple. The following method follows this principle:
override fun drawHeroTurnStart(hero: Hero) {
    val centerY = (CONSOLE_HEIGHT - 5) / 2
    (1 until centerY).forEach { drawBlankLine(it, false) }
    ansi.color(heroColors[hero.type])
    drawHorizontalLine(centerY, '─')
    drawHorizontalLine(centerY + 4, '─')
    ansi.reset()
    ansi.cursor(centerY + 1, 1).eraseLine()
    ansi.cursor(centerY + 3, 1).eraseLine()
    ansi.cursor(centerY + 2, 1)
    val text = String.format(loadString("heros_turn"), hero.name.toUpperCase())
    val index = text.indexOf(hero.name.toUpperCase())
    val center = (CONSOLE_WIDTH - text.length) / 2
    ansi.cursor(centerY + 2, center)
    ansi.eraseLine(Ansi.Erase.BACKWARD)
    ansi.a(text.substring(0, index))
    ansi.color(heroColors[hero.type]).a(hero.name.toUpperCase()).reset()
    ansi.a(text.substring(index + hero.name.length))
    ansi.eraseLine(Ansi.Erase.FORWARD)
    (centerY + 5..CONSOLE_HEIGHT).forEach { drawBlankLine(it, false) }
    render()
}
Here, in addition to the centered text, there are also two horizontal lines (see screenshots above). Please note that the center lettering is displayed in two colors. And also make sure that learning mathematics at school is still useful.
Well, we looked at the simplest methods and it's time to get to know the implementation
drawLocationInteriorScreen(). As you yourself understand, there will be an order of magnitude more code here. In addition, the contents of the screen will dynamically change in response to user actions and it will have to be constantly redrawn (sometimes with animation). Well, in order to finally finish you off: imagine that in addition to the screen shot above, in the framework of this method, it is necessary to implement the display of three more:1. Meeting with the cube removed from the bag
2. Selecting dice to pass the test
3. Displaying test results
Therefore, here is my great advice to you: do not shove all the code into one method. Break the implementation into several methods (even if each of them will be called only once). Well, do not forget about the "rubber".
If it starts to ripple in your eyes, blink for a couple of seconds - this should help
class ConsoleGameRenderer(loader: StringLoader)
: ConsoleRenderer(loader), GameRenderer {
private fun drawLocationTopPanel(location: Location, heroesAtLocation: List, currentHero: Hero, timer: Int) {
val closedString = loadString("closed").toLowerCase()
val timeString = loadString("time")
val locationName = location.name.toString().toUpperCase()
val separatorX1 = locationName.length + if (location.isOpen) {
6 + if (location.bag.size >= 10) 2 else 1
} else {
closedString.length + 7
}
val separatorX2 = CONSOLE_WIDTH - timeString.length - 6 - if (timer >= 10) 1 else 0
//Top border
ansi.cursor(1, 1)
ansi.a('┌')
(2 until CONSOLE_WIDTH).forEach { ansi.a(if (it == separatorX1 || it == separatorX2) '┬' else '─') }
ansi.a('┐')
//Center row
ansi.cursor(2, 1)
ansi.a("│ ")
if (location.isOpen) {
ansi.color(WHITE).a(locationName).reset()
ansi.a(": ").a(location.bag.size)
} else {
ansi.a(locationName).reset()
ansi.color(DARK_GRAY).a(" (").a(closedString).a(')').reset()
}
ansi.a(" │")
var currentX = separatorX1 + 2
heroesAtLocation.forEach { hero ->
ansi.a(' ')
ansi.color(heroColors[hero.type])
ansi.a(if (hero === currentHero) '☻' else '').reset()
currentX += 2
}
(currentX..separatorX2).forEach { ansi.a(' ') }
ansi.a("│ ").a(timeString).a(": ")
when {
timer <= 5 -> ansi.color(LIGHT_RED)
timer <= 15 -> ansi.color(LIGHT_YELLOW)
else -> ansi.color(LIGHT_GREEN)
}
ansi.bold().a(timer).reset().a(" │")
//Bottom border
ansi.cursor(3, 1)
ansi.a('├')
(2 until CONSOLE_WIDTH).forEach { ansi.a(if (it == separatorX1 || it == separatorX2) '┴' else '─') }
ansi.a('┤')
}
private fun drawLocationHeroPanel(offsetY: Int, hero: Hero) {
val bagString = loadString("bag").toUpperCase()
val discardString = loadString("discard").toUpperCase()
val separatorX1 = hero.name.length + 4
val separatorX3 = CONSOLE_WIDTH - discardString.length - 6 - if (hero.discardPile.size >= 10) 1 else 0
val separatorX2 = separatorX3 - bagString.length - 6 - if (hero.bag.size >= 10) 1 else 0
//Top border
ansi.cursor(offsetY, 1)
ansi.a('├')
(2 until CONSOLE_WIDTH).forEach { ansi.a(if (it == separatorX1 || it == separatorX2 || it == separatorX3) '┬' else '─') }
ansi.a('┤')
//Center row
ansi.cursor(offsetY + 1, 1)
ansi.a("│ ")
ansi.color(heroColors[hero.type]).a(hero.name.toUpperCase()).reset()
ansi.a(" │")
val currentX = separatorX1 + 1
(currentX until separatorX2).forEach { ansi.a(' ') }
ansi.a("│ ").a(bagString).a(": ")
when {
hero.bag.size <= hero.hand.capacity -> ansi.color(LIGHT_RED)
else -> ansi.color(LIGHT_YELLOW)
}
ansi.a(hero.bag.size).reset()
ansi.a(" │ ").a(discardString).a(": ")
ansi.a(hero.discardPile.size)
ansi.a(" │")
//Bottom border
ansi.cursor(offsetY + 2, 1)
ansi.a('├')
(2 until CONSOLE_WIDTH).forEach { ansi.a(if (it == separatorX1 || it == separatorX2 || it == separatorX3) '┴' else '─') }
ansi.a('┤')
}
private fun drawDieSize(die: Die, checked: Boolean = false) {
when {
checked -> ansi.background(dieColors[die.type]).color(BLACK)
else -> ansi.color(dieColors[die.type])
}
ansi.a(die.toString()).reset()
}
private fun drawDieFrameSmall(offsetX: Int, offsetY: Int, longDieSize: Boolean) {
//Top border
ansi.cursor(offsetY, offsetX)
ansi.a('╔')
(0 until if (longDieSize) 5 else 4).forEach { ansi.a('═') }
ansi.a('╗')
//Left border
ansi.cursor(offsetY + 1, offsetX)
ansi.a("║ ")
//Bottom border
ansi.cursor(offsetY + 2, offsetX)
ansi.a("╚")
(0 until if (longDieSize) 5 else 4).forEach { ansi.a('═') }
ansi.a('╝')
//Right border
ansi.cursor(offsetY + 1, offsetX + if (longDieSize) 6 else 5)
ansi.a('║')
}
private fun drawDieSmall(offsetX: Int, offsetY: Int, pair: DiePair, rollResult: Int? = null) {
ansi.color(dieColors[pair.die.type])
val longDieSize = pair.die.size >= 10
drawDieFrameSmall(offsetX, offsetY, longDieSize)
//Roll result or die size
ansi.cursor(offsetY + 1, offsetX + 1)
if (rollResult != null) {
ansi.a(String.format(" %2d %s", rollResult, if (longDieSize) " " else ""))
} else {
ansi.a(' ').a(pair.die.toString()).a(' ')
}
//Draw modifier
ansi.cursor(offsetY + 3, offsetX)
val modString = if (pair.modifier == 0) "" else String.format("%+d", pair.modifier)
val frameLength = 4 + if (longDieSize) 3 else 2
var spaces = (frameLength - modString.length) / 2
(0 until spaces).forEach { ansi.a(' ') }
ansi.a(modString)
spaces = frameLength - spaces - modString.length
(0 until spaces).forEach { ansi.a(' ') }
ansi.reset()
}
private fun drawDieFrameBig(offsetX: Int, offsetY: Int, longDieSize: Boolean) {
//Top border
ansi.cursor(offsetY, offsetX)
ansi.a('╔')
(0 until if (longDieSize) 3 else 2).forEach { ansi.a("══════") }
ansi.a("═╗")
//Left border
(1..5).forEach {
ansi.cursor(offsetY + it, offsetX)
ansi.a('║')
}
//Bottom border
ansi.cursor(offsetY + 6, offsetX)
ansi.a('╚')
(0 until if (longDieSize) 3 else 2).forEach { ansi.a("══════") }
ansi.a("═╝")
//Right border
val currentX = offsetX + if (longDieSize) 20 else 14
(1..5).forEach {
ansi.cursor(offsetY + it, currentX)
ansi.a('║')
}
}
private fun drawDieSizeBig(offsetX: Int, offsetY: Int, pair: DiePair) {
ansi.color(dieColors[pair.die.type])
val longDieSize = pair.die.size >= 10
drawDieFrameBig(offsetX, offsetY, longDieSize)
//Die size
ansi.cursor(offsetY + 1, offsetX + 1)
ansi.a(" ████ ")
ansi.cursor(offsetY + 2, offsetX + 1)
ansi.a(" █ █ ")
ansi.cursor(offsetY + 3, offsetX + 1)
ansi.a(" █ █ ")
ansi.cursor(offsetY + 4, offsetX + 1)
ansi.a(" █ █ ")
ansi.cursor(offsetY + 5, offsetX + 1)
ansi.a(" ████ ")
drawBigNumber(offsetX + 8, offsetY + 1, pair.die.size)
//Draw modifier
ansi.cursor(offsetY + 7, offsetX)
val modString = if (pair.modifier == 0) "" else String.format("%+d", pair.modifier)
val frameLength = 4 + 6 * if (longDieSize) 3 else 2
var spaces = (frameLength - modString.length) / 2
(0 until spaces).forEach { ansi.a(' ') }
ansi.a(modString)
spaces = frameLength - spaces - modString.length - 1
(0 until spaces).forEach { ansi.a(' ') }
ansi.reset()
}
private fun drawBattleCheck(offsetY: Int, battleCheck: DieBattleCheck) {
val performCheck = loadString("perform_check")
var currentX = 4
var currentY = offsetY
//Top message
ansi.cursor(offsetY, 1)
ansi.a("│ ").a(performCheck)
(performCheck.length + 4 until CONSOLE_WIDTH).forEach { ansi.a(' ') }
ansi.a('│')
//Left border
(1..4).forEach {
ansi.cursor(offsetY + it, 1)
ansi.a("│ ")
}
//Opponent
var opponentWidth = 0
var vsWidth = 0
(battleCheck.getOpponentPair())?.let {
//Die
if (battleCheck.isRolled) {
drawDieSmall(4, offsetY + 1, it, battleCheck.getOpponentResult())
} else {
drawDieSmall(4, offsetY + 1, it)
}
opponentWidth = 4 + if (it.die.size >= 10) 3 else 2
currentX += opponentWidth
//VS
ansi.cursor(currentY + 1, currentX)
ansi.a(" ")
ansi.cursor(currentY + 2, currentX)
ansi.color(LIGHT_YELLOW).a(" VS ").reset()
ansi.cursor(currentY + 3, currentX)
ansi.a(" ")
ansi.cursor(currentY + 4, currentX)
ansi.a(" ")
vsWidth = 4
currentX += vsWidth
}
//Clear below
for (row in currentY + 5..currentY + 8) {
ansi.cursor(row, 1)
ansi.a('│')
(2 until currentX).forEach { ansi.a(' ') }
}
//Dice
for (index in 0 until battleCheck.heroPairCount) {
if (index > 0) {
ansi.cursor(currentY + 1, currentX)
ansi.a(" ")
ansi.cursor(currentY + 2, currentX)
ansi.a(if (battleCheck.method == DieBattleCheck.Method.SUM) " + " else " / ").reset()
ansi.cursor(currentY + 3, currentX)
ansi.a(" ")
ansi.cursor(currentY + 4, currentX)
ansi.a(" ")
currentX += 3
}
val pair = battleCheck.getHeroPairAt(index)
val width = 4 + if (pair.die.size >= 10) 3 else 2
if (currentX + width + 3 > CONSOLE_WIDTH) { //Out of space
for (row in currentY + 1..currentY + 4) {
ansi.cursor(row, currentX)
(currentX until CONSOLE_WIDTH).forEach { ansi.a(' ') }
ansi.a('│')
}
currentY += 4
currentX = 4 + vsWidth + opponentWidth
}
if (battleCheck.isRolled) {
drawDieSmall(currentX, currentY + 1, pair, battleCheck.getHeroResultAt(index))
} else {
drawDieSmall(currentX, currentY + 1, pair)
}
currentX += width
}
//Clear the rest
(currentY + 1..currentY + 4).forEach { row ->
ansi.cursor(row, currentX)
(currentX until CONSOLE_WIDTH).forEach { ansi.a(' ') }
ansi.a('│')
}
if (currentY == offsetY) { //Still on the first line
currentX = 4 + vsWidth + opponentWidth
(currentY + 5..currentY + 8).forEach { row ->
ansi.cursor(row, currentX)
(currentX until CONSOLE_WIDTH).forEach { ansi.a(' ') }
ansi.a('│')
}
}
//Draw result
(battleCheck.result)?.let { r ->
val frameTopY = offsetY + 5
val result = String.format("%+d", r)
val message = loadString(if (r >= 0) "success" else "fail").toUpperCase()
val color = if (r >= 0) DARK_GREEN else DARK_RED
//Frame
ansi.color(color)
drawHorizontalLine(frameTopY, '▒')
drawHorizontalLine(frameTopY + 3, '▒')
ansi.cursor(frameTopY + 1, 1).a("▒▒")
ansi.cursor(frameTopY + 1, CONSOLE_WIDTH - 1).a("▒▒")
ansi.cursor(frameTopY + 2, 1).a("▒▒")
ansi.cursor(frameTopY + 2, CONSOLE_WIDTH - 1).a("▒▒")
ansi.reset()
//Top message
val resultString = loadString("result")
var center = (CONSOLE_WIDTH - result.length - resultString.length - 2) / 2
ansi.cursor(frameTopY + 1, 3)
(3 until center).forEach { ansi.a(' ') }
ansi.a(resultString).a(": ")
ansi.color(color).a(result).reset()
(center + result.length + resultString.length + 2 until CONSOLE_WIDTH - 1).forEach { ansi.a(' ') }
//Bottom message
center = (CONSOLE_WIDTH - message.length) / 2
ansi.cursor(frameTopY + 2, 3)
(3 until center).forEach { ansi.a(' ') }
ansi.color(color).a(message).reset()
(center + message.length until CONSOLE_WIDTH - 1).forEach { ansi.a(' ') }
}
}
private fun drawExplorationResult(offsetY: Int, pair: DiePair) {
val encountered = loadString("encountered")
ansi.cursor(offsetY, 1)
ansi.a("│ ").a(encountered).a(':')
(encountered.length + 5 until CONSOLE_WIDTH).forEach { ansi.a(' ') }
ansi.a('│')
val dieFrameWidth = 3 + 6 * if (pair.die.size >= 10) 3 else 2
for (row in 1..8) {
ansi.cursor(offsetY + row, 1)
ansi.a("│ ")
ansi.cursor(offsetY + row, dieFrameWidth + 4)
(dieFrameWidth + 4 until CONSOLE_WIDTH).forEach { ansi.a(' ') }
ansi.a('│')
}
drawDieSizeBig(4, offsetY + 1, pair)
}
private fun drawHand(offsetY: Int, hand: Hand, checkedDice: HandMask, activePositions: HandMask) {
val handString = loadString("hand").toUpperCase()
val alliesString = loadString("allies").toUpperCase()
val capacity = hand.capacity
val size = hand.dieCount
val slots = max(size, capacity)
val alliesSize = hand.allyDieCount
var currentY = offsetY
var currentX = 1
//Hand title
ansi.cursor(currentY, currentX)
ansi.a("│ ").a(handString)
//Left border
currentY += 1
currentX = 1
ansi.cursor(currentY, currentX)
ansi.a("│ ╔")
ansi.cursor(currentY + 1, currentX)
ansi.a("│ ║")
ansi.cursor(currentY + 2, currentX)
ansi.a("│ ╚")
ansi.cursor(currentY + 3, currentX)
ansi.a("│ ")
currentX += 3
//Main hand
for (i in 0 until min(slots, MAX_HAND_SIZE)) {
val die = hand.dieAt(i)
val longDieName = die != null && die.size >= 10
//Top border
ansi.cursor(currentY, currentX)
if (i < capacity) {
ansi.a("════").a(if (longDieName) "═" else "")
} else {
ansi.a("────").a(if (longDieName) "─" else "")
}
ansi.a(if (i < capacity - 1) '╤' else if (i == capacity - 1) '╗' else if (i < size - 1) '┬' else '┐')
//Center row
ansi.cursor(currentY + 1, currentX)
ansi.a(' ')
if (die != null) {
drawDieSize(die, checkedDice.checkPosition(i))
} else {
ansi.a(" ")
}
ansi.a(' ')
ansi.a(if (i < capacity - 1) '│' else if (i == capacity - 1) '║' else '│')
//Bottom border
ansi.cursor(currentY + 2, currentX)
if (i < capacity) {
ansi.a("════").a(if (longDieName) '═' else "")
} else {
ansi.a("────").a(if (longDieName) '─' else "")
}
ansi.a(if (i < capacity - 1) '╧' else if (i == capacity - 1) '╝' else if (i < size - 1) '┴' else '┘')
//Die number
ansi.cursor(currentY + 3, currentX)
if (activePositions.checkPosition(i)) {
ansi.color(LIGHT_YELLOW)
}
ansi.a(String.format(" (%s) %s", shortcut(i), if (longDieName) " " else ""))
ansi.reset()
currentX += 5 + if (longDieName) 1 else 0
}
//Ally subhand
if (alliesSize > 0) {
currentY = offsetY
//Ally title
ansi.cursor(currentY, handString.length + 5)
(handString.length + 5 until currentX).forEach { ansi.a(' ') }
ansi.a(" ").a(alliesString)
(currentX + alliesString.length + 5 until CONSOLE_WIDTH).forEach { ansi.a(' ') }
ansi.a('│')
//Left border
currentY += 1
ansi.cursor(currentY, currentX)
ansi.a(" ┌")
ansi.cursor(currentY + 1, currentX)
ansi.a(" │")
ansi.cursor(currentY + 2, currentX)
ansi.a(" └")
ansi.cursor(currentY + 3, currentX)
ansi.a(" ")
currentX += 4
//Ally slots
for (i in 0 until min(alliesSize, MAX_HAND_ALLY_SIZE)) {
val allyDie = hand.allyDieAt(i)!!
val longDieName = allyDie.size >= 10
//Top border
ansi.cursor(currentY, currentX)
ansi.a("────").a(if (longDieName) "─" else "")
ansi.a(if (i < alliesSize - 1) '┬' else '┐')
//Center row
ansi.cursor(currentY + 1, currentX)
ansi.a(' ')
drawDieSize(allyDie, checkedDice.checkAllyPosition(i))
ansi.a(" │")
//Bottom border
ansi.cursor(currentY + 2, currentX)
ansi.a("────").a(if (longDieName) "─" else "")
ansi.a(if (i < alliesSize - 1) '┴' else '┘')
//Die number
ansi.cursor(currentY + 3, currentX)
if (activePositions.checkAllyPosition(i)) {
ansi.color(LIGHT_YELLOW)
}
ansi.a(String.format(" (%s) %s", shortcut(i + 10), if (longDieName) " " else "")).reset()
currentX += 5 + if (longDieName) 1 else 0
}
} else {
ansi.cursor(offsetY, 9)
(9 until CONSOLE_WIDTH).forEach { ansi.a(' ') }
ansi.a('│')
ansi.cursor(offsetY + 4, currentX)
(currentX until CONSOLE_WIDTH).forEach { ansi.a(' ') }
ansi.a('│')
}
//Clear the end of the line
(0..3).forEach { row ->
ansi.cursor(currentY + row, currentX)
(currentX until CONSOLE_WIDTH).forEach { ansi.a(' ') }
ansi.a('│')
}
}
override fun drawHeroTurnStart(hero: Hero) {
val centerY = (CONSOLE_HEIGHT - 5) / 2
(1 until centerY).forEach { drawBlankLine(it, false) }
ansi.color(heroColors[hero.type])
drawHorizontalLine(centerY, '─')
drawHorizontalLine(centerY + 4, '─')
ansi.reset()
ansi.cursor(centerY + 1, 1).eraseLine()
ansi.cursor(centerY + 3, 1).eraseLine()
ansi.cursor(centerY + 2, 1)
val text = String.format(loadString("heros_turn"), hero.name.toUpperCase())
val index = text.indexOf(hero.name.toUpperCase())
val center = (CONSOLE_WIDTH - text.length) / 2
ansi.cursor(centerY + 2, center)
ansi.eraseLine(Ansi.Erase.BACKWARD)
ansi.a(text.substring(0, index))
ansi.color(heroColors[hero.type]).a(hero.name.toUpperCase()).reset()
ansi.a(text.substring(index + hero.name.length))
ansi.eraseLine(Ansi.Erase.FORWARD)
(centerY + 5..CONSOLE_HEIGHT).forEach { drawBlankLine(it, false) }
render()
}
override fun drawLocationInteriorScreen(
location: Location,
heroesAtLocation: List,
timer: Int,
currentHero: Hero,
battleCheck: DieBattleCheck?,
encounteredDie: DiePair?,
pickedDice: HandMask,
activePositions: HandMask,
statusMessage: StatusMessage,
actions: ActionList) {
//Top panel
drawLocationTopPanel(location, heroesAtLocation, currentHero, timer)
//Encounter info
when {
battleCheck != null -> drawBattleCheck(4, battleCheck)
encounteredDie != null -> drawExplorationResult(4, encounteredDie)
else -> (4..12).forEach { drawBlankLine(it) }
}
//Fill blank space
val bottomHalfTop = CONSOLE_HEIGHT - 11
(13 until bottomHalfTop).forEach { drawBlankLine(it) }
//Hero-specific info
drawLocationHeroPanel(bottomHalfTop, currentHero)
drawHand(bottomHalfTop + 3, currentHero.hand, pickedDice, activePositions)
//Separator
ansi.cursor(bottomHalfTop + 8, 1)
ansi.a('├')
(2 until CONSOLE_WIDTH).forEach { ansi.a('─') }
ansi.a('┤')
//Status and actions
drawStatusMessage(bottomHalfTop + 9, statusMessage)
drawActionList(bottomHalfTop + 10, actions)
//Bottom border
ansi.cursor(CONSOLE_HEIGHT, 1)
ansi.a('└')
(2 until CONSOLE_WIDTH).forEach { ansi.a('─') }
ansi.a('┘')
//Finalize
render()
}
override fun drawGameLoss(message: StatusMessage) {
val centerY = CONSOLE_HEIGHT / 2
(1 until centerY).forEach { drawBlankLine(it, false) }
val data = loadString(message.toString().toLowerCase()).toUpperCase()
drawCenteredCaption(centerY, data, LIGHT_RED, false)
(centerY + 1..CONSOLE_HEIGHT).forEach { drawBlankLine(it, false) }
render()
}
}
There is one small problem associated with checking the operation of all this code. Since the built-in IDE console does not support ANSI escape sequences, you will have to start the application in an external terminal (we already wrote a script for launching it earlier). In addition, with ANSI support, not everything is OK in Windows - as far as I know, only with the 10th version the standard cmd.exe can please us with a high-quality display (and that, with some problems that we will not focus on). And PowerShell did not immediately learn to recognize sequences (despite the current demand). If you are unlucky, do not be discouraged - there are always alternative solutions ( this, for example ). And we move on.
Step Ten User input
Displaying the image on the screen is still half the battle. It is equally important to correctly receive control commands from the user. And this task, I want to tell you, can turn out to be technically much more difficult to implement than all the previous ones. But first things first.
As you recall, we are faced with the need to implement class methods
GameInteractor. There are only three of them, but they require special attention. Firstly, synchronization. The game engine should be suspended until the player presses a key. Secondly, click processing. Unfortunately, the capacity of standard classes Reader, Scanner, Consoleis not enough to recognize these most pressing: we do not require the user to press ENTER after each command. We need something likeKeyListenerBut, but it is tightly tied to the Swing framework, and our console application is without all this graphic tinsel. What to do? Searching for libraries, of course, and this time their work will rely entirely on native code. What does it mean “goodbye, cross-platform” ... Or not? Alas, I have yet to find a library that implements simple functionality in a lightweight, platform-independent form. In the meantime, let's pay attention to the monster jLine , which implements a harvester for building advanced user interfaces (in the console). Yes, it has a native implementation, yes, it supports both Windows and Linux / UNIX (by providing the appropriate libraries). And yes, b aboutthree hundred years we do not need the most part of its functionality. All that is needed is a small, poorly documented opportunity, the work of which we will now analyze.
jline jline 2.14.6 compile Please note that we need not the third, latest version, but the second, where there is a class
ConsoleReaderwith a method readCharacter(). As the name implies, this method returns the code of the character pressed on the keyboard (while working synchronously, which is what we need). The rest is a technical matter: compile a table of correspondences between symbols and types of actions ( Action.Type) and, by clicking on one, return the other. “Do you know that not all keys on the keyboard can be represented with one character? Many keys use escape sequences of two, three, four different characters. How to be with them? ”
It should be noted that the input task is complicated if we want to recognize “non-character keys”: arrows, F-keys, Home, Insert, PgUp / Dn, End, Delete, num-pad and others. But we do not want, therefore we will continue. Let's create a class
ConsoleInteractorwith the necessary service methods.abstract class ConsoleInteractor {
private val reader = ConsoleReader()
private val mapper = mapOf(
CONFIRM to 13.toChar(),
CANCEL to 27.toChar(),
EXPLORE_LOCATION to 'e',
FINISH_TURN to 'f',
ACQUIRE to 'a',
LEAVE to 'l',
FORFEIT to 'f',
HIDE to 'h',
DISCARD to 'd',
)
protected fun read() = reader.readCharacter().toChar()
protected open fun getIndexForKey(key: Char) =
"1234567890abcdefghijklmnopqrstuvw".indexOf(key)
}
Set the map
mapperand method read(). In addition, we will provide a method getIndexForKey()used in situations where we need to select an item from a list or cubes from a hand. It remains to inherit our interface implementation from this class GameInteractor.Class diagram
And, in fact, the code:
class ConsoleGameInteractor : ConsoleInteractor(), GameInteractor {
    override fun anyInput() {
        read()
    }
    override fun pickAction(list: ActionList): Action {
        while (true) {
            val key = read()
            list
                    .filter(Action::isEnabled)
                    .find { mapper[it.type] == key }
                    ?.let { return it }
        }
    }
    override fun pickDiceFromHand(activePositions: HandMask, actions: ActionList)
            : Action {
        while (true) {
            val key = read()
            actions.forEach { if (mapper[it.type] == key && it.isEnabled) return it }
            when (key) {
                in '1'..'9' -> {
                    val index = key - '1'
                    if (activePositions.checkPosition(index)) {
                        return Action(HAND_POSITION, data = index)
                    }
                }
                '0' -> {
                    if (activePositions.checkPosition(9)) {
                        return Action(HAND_POSITION, data = 9)
                    }
                }
                in 'a'..'f' -> {
                    val allyIndex = key - 'a'
                    if (activePositions.checkAllyPosition(allyIndex)) {
                        return Action(HAND_ALLY_POSITION, data = allyIndex)
                    }
                }
            }
        }
    }
}
The implementation of our methods is quite polite and well-mannered so as not to bring out various inadequate nonsense. They themselves verify that the selected action is active, and the selected hand position is included in the set of valid. And I wish all of us to be as polite to the people around us.
Step eleven. Sounds and music
But how can it be without them? If you have ever played games with the sound turned off (for example, with a tablet under the covers while no one at home sees), you may have realized how much you are losing. It is like playing only half the game. Many games cannot be imagined without sound accompaniment, for many this is an inalienable requirement, although there are reverse situations (for example, when there are no sounds in principle, or they are so miserable that it would be better without them). To do a good job is actually not as simple as it seems at first glance (not without reason highly qualified specialists do this in large studios), but be that as it may, in most cases it is much better to have an audio component (at least some) in your game than not having her at all. As a last resort, sound quality can be improved later,
Due to the specifics of the genre, our game will not be characterized by masterpiece sound effects - if you played digital adaptations of board games, then you understand what I mean. Sounds repel their monotony, soon become boring and after some time playing without them no longer seems like a serious loss. The problem is compounded by the fact that there are no effective ways to deal with this phenomenon. Replace game sounds with completely different ones, and over time they will become disgusted. In good games, sounds complement the gameplay, reveal the atmosphere of the ongoing action, make it lively - this is difficult to achieve if the atmosphere is just a table with a bunch of dusty bags, and the whole gameplay consists of throwing dice. Nevertheless, this is exactly what we will be voicing: the silk is here, the cast is here, rustling and rustling to loud screams - as if we were not observing a picture on the screen, but were really interacting with real physical objects. They need to be voiced fully, but unobtrusively - throughout the script you will hear the same a hundred times, so the sounds should not come to the fore - just gently shade the gameplay. How to competently achieve this? I have no idea, I'm not special in sound. I can only advise you to play your game as much as possible, noticing and polishing conspicuous flaws (this advice, by the way, applies not only to sounds). How to competently achieve this? I have no idea, I'm not special in sound. I can only advise you to play your game as much as possible, noticing and polishing conspicuous flaws (this advice, by the way, applies not only to sounds). How to competently achieve this? I have no idea, I'm not special in sound. I can only advise you to play your game as much as possible, noticing and polishing conspicuous flaws (this advice, by the way, applies not only to sounds).
With the theory, it seems, sorted it out, now it's time to move on to practice. And before that you need to ask a question: where, in fact, to take game files? The easiest and surest way - to record them yourself in ugly quality, using an old microphone or even using the phone. The Internet is full of videos about how unscrewing the tops of pineapple or breaking ice with a boot can achieve the effect of crushing bones and a crispy spine. If you are not alien to the aesthetics of surrealism, you can use your own voice or kitchen utensils as a musical instrument (there are examples - and even successful ones - where this was done). Or you can go to freesound.orgwhere a hundred other people did this for you a long time ago. Pay attention only to the license: many authors are very sensitive to the audio recordings of their loud cough or coins thrown onto the floor - you by no means want to unscrupulously use the fruits of their labors without paying the original creator or not mentioning his creative pseudonym (sometimes very bizarre) in comments.
Drag the files you like and put them somewhere in the classpath. To identify them, we will use the enumeration, where each instance corresponds to one sound effect.
enum class Sound {
    TURN_START, //Hero starts the turn
    BATTLE_CHECK_ROLL, //Perform check, type
    BATTLE_CHECK_SUCCESS, //Check was successful
    BATTLE_CHECK_FAILURE, //Check failed
    DIE_DRAW, //Draw die from bag
    DIE_HIDE, //Remove die to bag
    DIE_DISCARD, //Remove die to pile
    DIE_REMOVE, //Remove die entirely
    DIE_PICK, //Check/uncheck the die
    TRAVEL, //Move hero to another location
    ENCOUNTER_STAT, //Hero encounters STAT die
    ENCOUNTER_DIVINE, //Hero encounters DIVINE die
    ENCOUNTER_ALLY, //Hero encounters ALLY die
    ENCOUNTER_WOUND, //Hero encounters WOUND die
    ENCOUNTER_OBSTACLE, //Hero encounters OBSTACLE die
    ENCOUNTER_ENEMY, //Hero encounters ENEMY die
    ENCOUNTER_VILLAIN, //Hero encounters VILLAIN die
    DEFEAT_OBSTACLE, //Hero defeats OBSTACLE die
    DEFEAT_ENEMY, //Hero defeats ENEMY die
    DEFEAT_VILLAIN, //Hero defeats VILLAIN die
    TAKE_DAMAGE, //Hero takes damage
    HERO_DEATH, //Hero death
    CLOSE_LOCATION,  //Location closed
    GAME_VICTORY, //Scenario completed
    GAME_LOSS, //Scenario failed
    ERROR, //When something unexpected happens
}
Since the method of reproducing sounds will vary depending on the hardware platform, we can be abstracted from a specific implementation using the interface. For example, this one:
interface SoundPlayer {
    fun play(sound: Sound)
}
Like the previously discussed interfaces
GameRendererand GameInteractor, its implementation also needs to be passed to the input to the class instance Game. For starters, an implementation could be like this:class MuteSoundPlayer : SoundPlayer {
override fun play(sound: Sound) {
//Do nothing
}
}
Subsequently, we will consider more interesting implementations, but for now let's talk about music.
Like sound effects, it plays a huge role in creating the atmosphere of the game, and in the same way, an excellent game can be ruined by inappropriate music. Like sounds, music should be unobtrusive, not come to the fore (except when it is necessary for an artistic effect) and adequately correspond to the action on the screen (do not hope that someone seriously imbued with the fate of an ambushed and mercilessly killed main hero, if the scene of his tragic death will be accompanied by a fun little music from a children's song). It is very difficult to achieve this, specially trained people deal with such issues (we are unfamiliar with them), but we, as beginners of the gamebuilding genius, can also do something. For example, go somewhere onfreemusicarchive.org or soundcloud.com (or even YouTube) and find something to your liking. For desktops, ambient is a good choice - quiet, smooth music without a pronounced melody, well suited for creating a background. Double pay attention to the license: even free music is sometimes written by talented composers who deserve, if not monetary reward, then at least universal recognition.
Let's create one more enumeration:
enum class Music {
    SCENARIO_MUSIC_1,
    SCENARIO_MUSIC_2,
    SCENARIO_MUSIC_3,
}
Similarly, we define the interface and its default implementation.
interface MusicPlayer {
    fun play(music: Music)
    fun stop()
}
class MuteMusicPlayer : MusicPlayer {
    override fun play(music: Music) {
        //Do nothing
    }
    override fun stop() {
        //Do nothing
    }
}
Please note that in this case two methods are needed: one to start playback, the other to stop it. It is also quite possible that additional methods (pause / resume, rewind, etc.) will come in handy in the future, but so far these two are enough.
Passing references to player classes between objects each time may not seem like a very convenient solution. At one time, we need only one ekzepmlyar player, so I would venture to suggest to make all the necessary to play sounds and music methods in a separate object and make it a loner (singleton). Thus, the audio subsystem responsible is always available from anywhere in the application without constantly transmitting links to the same instance. It will look like this:
Audio playback system class diagram
Class
Audiois our singleton. It provides a single facade to the subsystem ... by the way, here is the facade (facade) - another design pattern, thoroughly designed and repeatedly described (with examples) on these of your Internet. Therefore, having already heard dissatisfied screams from the back rows, I stop explaining the things known for a long time and move on. The code is:object Audio {
private var soundPlayer: SoundPlayer = MuteSoundPlayer()
private var musicPlayer: MusicPlayer = MuteMusicPlayer()
fun init(soundPlayer: SoundPlayer, musicPlayer: MusicPlayer) {
this.soundPlayer = soundPlayer
this.musicPlayer = musicPlayer
}
fun playSound(sound: Sound) = this.soundPlayer.play(sound)
fun playMusic(music: Music) = this.musicPlayer.play(music)
fun stopMusic() = this.musicPlayer.stop()
}
It is enough to call it
init()once only somewhere at the very beginning (by initializing it with the necessary objects) and in the future use convenient methods, completely forgetting about the implementation details. Even if you do not, don’t worry, the system will die - the object will be initialized by default classes. That's all. It remains to deal with the actual playback. As for playing sounds (or, as smart people say, samples ), Java has a convenient class
AudioSystemand interface Clip. All we need is to correctly set the path to the audio file (which lies in our classpath, remember?):import javax.sound.sampled.AudioSystem
class BasicSoundPlayer : SoundPlayer {
private fun pathToFile(sound: Sound) = "/sound/${sound.toString().toLowerCase()}.wav"
override fun play(sound: Sound) {
val url = javaClass.getResource(pathToFile(sound))
val audioIn = AudioSystem.getAudioInputStream(url)
val clip = AudioSystem.getClip()
clip.open(audioIn)
clip.start()
}
}
The method
open()can throw it away IOException(especially if he didn’t like the file format for some reason - in this case I recommend opening the file in an audio editor and re-saving it), so it would be nice to wrap it in a block try-catch, but at first we won’t do it so that the application is loud crashed every time with problems with sound. “I don’t even know what to say ...”
Things are much worse with music. As far as I know, there is no standard way to play music files (for example, in mp3 format) in Java, so in any case you will have to use a third-party library (there are dozens of different ones). Any lightweight with minimal functionality is suitable for us, for example, the rather popular JLayer . Add it depending:
com.googlecode.soundlibs jlayer 1.0.1.4 compile And we implement our player with its help.
class BasicMusicPlayer : MusicPlayer {
    private var currentMusic: Music? = null
    private var thread: PlayerThread? = null
    private fun pathToFile(music: Music) = "/music/${music.toString().toLowerCase()}.mp3"
    override fun play(music: Music) {
        if (currentMusic == music) {
            return
        }
        currentMusic = music
        thread?.finish()
        Thread.yield()
        thread = PlayerThread(pathToFile(music))
        thread?.start()
    }
    override fun stop() {
        currentMusic = null
        thread?.finish()
    }
    // Thread responsible for playback
    private inner class PlayerThread(private val musicPath: String) : Thread() {
        private lateinit var player: Player
        private var isLoaded = false
        private var isFinished = false
        init {
            isDaemon = true
        }
        override fun run() {
            loop@ while (!isFinished) {
                try {
                    player = Player(javaClass.getResource(musicPath).openConnection().apply {
                        useCaches = false
                    }.getInputStream())
                    isLoaded = true
                    player.play()
                } catch (ex: Exception) {
                    finish()
                    break@loop
                }
                player.close()
            }
        }
        fun finish() {
            isFinished = true
            this.interrupt()
            if (isLoaded) {
                player.close()
            }
        }
    }
}
Firstly, this library performs playback synchronously, blocking the main stream until the end of the file is reached. Therefore, we must implement a separate thread (
PlayerThread), and make it “optional” (daemon), so that in no case does it interfere with the application to terminate early. Secondly, the identifier of the currently playing music file ( currentMusic) is stored in the player code . If a second command suddenly comes to play it, we will not start playback from the very beginning. Thirdly, upon reaching the end of the music file, its playback will start again - and so on until the stream is explicitly stopped by the commandfinish()(or until other threads are completed, as already mentioned). Fourth, although the code above is replete with seemingly unnecessary flags and commands, it is thoroughly debugged and tested - the player works as expected, does not slow down the system, does not interrupt suddenly halfway, does not lead to memory leaks, does not contain genetically modified objects, shines freshness and purity. Take it and boldly use it in your projects.Step Twelve. Localization
Our game is almost ready, but no one will play it. Why?
"There is no Russian! .. There is no Russian! .. Add the Russian language! .. Developed by dogs!"
Open the page of any interesting story game (especially mobile) on the store’s website and read reviews. Will they start to praise amazing, hand-drawn graphics? Or marvel at the atmospheric sound? Or discuss an exciting story that is addictive from the first minute and does not let go until the very end?
Not. Dissatisfied "players" will instruct a bunch of units and generally delete the game. And then they will also require money back - and all this for one simple reason. Yes, you forgot to translate your masterpiece into all 95 world languages. Or rather, the one whose carriers shout the loudest. And that’s it! Do you understand? Months of hard work, long sleepless nights, constant nervous breakdowns - all this is a hamster under the tail. You have lost a huge number of players and this can not be fixed.
So think ahead. Decide on your target audience, select several main languages, order translation services ... in general, do everything that other people have described more than once in thematic articles (smarter than me). We will focus on the technical side of the issue and talk about how to painlessly localize our product.
First we get into the templates. Remember, before the names and descriptions were stored as simple
String? Now it won’t work. In addition to the default language, you also need to provide translation into all the languages that you plan to support. For example, like this:class TestEnemyTemplate : EnemyTemplate {
override val name = "Test enemy"
override val description = "Some enemy standing in your way."
override val nameLocalizations = mapOf(
"ru" to "Враг какой-то",
"ar" to "بعض العدو",
"iw" to "איזה אויב",
"zh" to "一些敵人",
"ua" to "Підступна тварюка"
)
override val descriptionLocalizations = mapOf(
"ru" to "Описание какого-то врага.",
"ar" to "وصف العدو",
"iw" to "תיאור האויב",
"zh" to "一些敵人的描述",
"ua" to "Воно стоїть і дивиться на тебе."
)
override val traits = listOf()
}
For templates, this approach is quite suitable. If you do not want to specify a translation for any language, then you do not need to - there is always a default value. However, in the final objects, I would not want to span lines into several different fields. Therefore, we will leave one, but replace its type.
class LocalizedString(defaultValue: String, localizations: Map) {
    private val default: String = defaultValue
    private val values: Map = localizations.toMap()
    operator fun get(lang: String) = values.getOrDefault(lang, default)
    override fun equals(other: Any?) = when {
        this === other -> true
        other !is LocalizedString -> false
        else -> default == other.default
    }
    override fun hashCode(): Int {
        return default.hashCode()
    }
}
And correct the generator code accordingly.
fun generateEnemy(template: EnemyTemplate) = Enemy().apply {
    name = LocalizedString(template.name, template.nameLocalizations)
    description = LocalizedString(template.description, template.descriptionLocalizations)
    template.traits.forEach { addTrait(it) }
}
Naturally, the same approach should be applied to the remaining types of templates. When the changes are ready, they can be used without difficulty.
val language = Locale.getDefault().language
val enemyName = enemy.name[language]
In our example, we have provided a simplified version of localization, where only the language is taken into account. In general, class objects
Localealso define the country and region. If this is important in your application, then yours LocalizedStringwill look a little different, but we are happy with that anyway. We dealt with the templates, it remains to localize the service lines used in our application. Fortunately, it
ResourceBundlealready contains all the necessary mechanisms. It is only necessary to prepare files with translations and change the way they are downloaded.# Game status messages
choose_dice_perform_check=Выберите кубики для прохождения проверки:
end_of_turn_discard_extra=КОНЕЦ ХОДА: Сбросьте лишние кубики:
end_of_turn_discard_optional=КОНЕЦ ХОДА: Сбросьте кубики по желанию:
choose_action_before_exploration=Выберите, что делать:
choose_action_after_exploration=Исследование завершено. Что делать дальше?
encounter_physical=Встречен ФИЗИЧЕСКИЙ кубик. Необходимо пройти проверку.
encounter_somatic=Встречен СОМАТИЧЕСКИЙ кубик. Необходимо пройти проверку.
encounter_mental=Встречен МЕНТАЛЬНЫЙ кубик. Необходимо пройти проверку.
encounter_verbal=Встречен ВЕРБАЛЬНЫЙ кубик. Необходимо пройти проверку.
encounter_divine=Встречен БОЖЕСТВЕННЫЙ кубик. Можно взять без проверки:
die_acquire_success=Вы получили новый кубик!
die_acquire_failure=Вам не удалось получить кубик.
game_loss_out_of_time=У вас закончилось время
# Die types
physical=ФИЗИЧЕСКИЙ
somatic=СОМАТИЧЕСКИй
mental=МЕНТАЛЬНЫЙ
verbal=ВЕРБАЛЬНЫЙ
divine=БОЖЕСТВЕННЫЙ
ally=СОЮЗНИК
wound=РАНА
enemy=ВРАГ
villain=ЗЛОДЕЙ
obstacle=ПРЕПЯТСТВИЕ
# Hero types and descriptions
brawler=Забияка
hunter=Охотник
# Various labels
avg=сред
bag=Сумка
bag_size=Размер сумки
class=Класс
closed=Закрыто
discard=Сброс
empty=Пусто
encountered=На пути
fail=Неудача
hand=Рука
heros_turn=Ходит %s
max=макс
min=мин
perform_check=Пройдите проверку:
pile=Куча
received_new_die=Получен новый кубик
result=Результат
success=Успех
sum=сумм
time=Время
total=Итого
# Action names and descriptions
action_confirm_key=ENTER
action_confirm_name=Подтвердить
action_cancel_key=ESC
action_cancel_name=Отменить
action_explore_location_key=E
action_explore_location_name=Исследовать
action_finish_turn_key=F
action_finish_turn_name=Завершить ход
action_hide_key=H
action_bag_name=Спрятать
action_discard_key=D
action_discard_name=Сбросить
action_acquire_key=A
action_acquire_name=Приобрести
action_leave_key=L
action_leave_name=Уйти
action_forfeit_key=F
action_forfeit_name=Отказаться
I will not say for the record: writing phrases in Russian is much more difficult than in English. If there is a requirement to use a noun in a definitive case or to disengage from the gender (and such requirements will necessarily stand), you will have to sweat a lot before you get a result that, firstly, meets the requirements, and secondly, does not look like a mechanical translation made by a cyborg with chicken brains. Also note that we do not change the action keys - as before, the same characters will be used to execute the latter as in the English language (which, by the way, will not work in a keyboard layout other than the Latin one, but this is not our business - for now let’s leave it as it is).
class PropertiesStringLoader(locale: Locale) : StringLoader {
    private val properties = ResourceBundle.getBundle("text.strings", locale)
    override fun loadString(key: String) = properties.getString(key) ?: ""
}
As already mentioned,
ResourceBundlehe himself will take on the responsibility of finding among the localization files the one that most closely matches the current locale. And if he doesn’t find it, he will take the default file ( string.properties). And all will be well…Yeah! There it was!
Увы, поддержка Unicode в файлах
Вижу как текут ваши слюнки в предвкушении поддержки всего этого добра. Сконвертировать файл один раз — дело несложное. Постоянно вносить изменения — легче повеситься. К счастью, некоторые IDE способны делать такие (и обратные) преобразования «на лету», но легче от этого не становится — иногда так хочется открыть файлик в любимом текстовом редакторе и быстренько что-то подправить (делаю это постоянно), не запуская громоздкую IDE, а тут такой облом.
Не волнуйтесь, выход есть. Метод
И, собственно, сама реализация:
Do not even ask me what is happening here ... or rather, ask (in the comments) - I will gladly tell you (I love Kotlin and its crazy designs). Or figure it out yourself - the main thing is that now you can safely save localized
.properties появилась только начиная с Java 9. До этого единственной поддерживаемой кодировкой была ISO-8859-1 — ResourceBundle открывает файлы только в ней. Кодировка однобайтная, потому ни о какой кирилице, ни тем более о иероглифах не может быть и речи — мы жестко ограничены единственным языком. Для всех остальных символов придется использовать Unicode-последовательности — ну, вы знаете, вот эти вот: '\uXXXX'. К огромной нашей радости, заниматься кодированием вручную нам не придется, так как Java имеет в своем арсенале замечательное приложение native2ascii, автоматически заменяющее все неподдерживаемые символы на соответствующие последовательности. В итоге наш файл примет вот такой веселый вид:# Game status messages
choose_dice_perform_check=\u0412\u044b\u0431\u0435\u0440\u0438\u0442\u0435 \u043a\u0443\u0431\u0438\u043a\u0438 \u0434\u043b\u044f \u043f\u0440\u043e\u0445\u043e\u0436\u0434\u0435\u043d\u0438\u044f \u043f\u0440\u043e\u0432\u0435\u0440\u043a\u0438:
end_of_turn_discard_extra=\u041a\u041e\u041d\u0415\u0426 \u0425\u041e\u0414\u0410: \u0421\u0431\u0440\u043e\u0441\u044c\u0442\u0435 \u043b\u0438\u0448\u043d\u0438\u0435 \u043a\u0443\u0431\u0438\u043a\u0438:
end_of_turn_discard_optional=\u041a\u041e\u041d\u0415\u0426 \u0425\u041e\u0414\u0410: \u0421\u0431\u0440\u043e\u0441\u044c\u0442\u0435 \u043a\u0443\u0431\u0438\u043a\u0438 \u043f\u043e \u0436\u0435\u043b\u0430\u043d\u0438\u044e:
choose_action_before_exploration=\u0412\u044b\u0431\u0435\u0440\u0438\u0442\u0435, \u0447\u0442\u043e \u0434\u0435\u043b\u0430\u0442\u044c:
choose_action_after_exploration=\u0418\u0441\u0441\u043b\u0435\u0434\u043e\u0432\u0430\u043d\u0438\u0435 \u0437\u0430\u0432\u0435\u0440\u0448\u0435\u043d\u043e. \u0427\u0442\u043e \u0434\u0435\u043b\u0430\u0442\u044c \u0434\u0430\u043b\u044c\u0448\u0435?
encounter_physical=\u0412\u0441\u0442\u0440\u0435\u0447\u0435\u043d \u0424\u0418\u0417\u0418\u0427\u0415\u0421\u041a\u0418\u0419 \u043a\u0443\u0431\u0438\u043a. \u041d\u0435\u043e\u0431\u0445\u043e\u0434\u0438\u043c\u043e \u043f\u0440\u043e\u0439\u0442\u0438 \u043f\u0440\u043e\u0432\u0435\u0440\u043a\u0443.
encounter_somatic=\u0412\u0441\u0442\u0440\u0435\u0447\u0435\u043d \u0421\u041e\u041c\u0410\u0422\u0418\u0427\u0415\u0421\u041a\u0418\u0419 \u043a\u0443\u0431\u0438\u043a. \u041d\u0435\u043e\u0431\u0445\u043e\u0434\u0438\u043c\u043e \u043f\u0440\u043e\u0439\u0442\u0438 \u043f\u0440\u043e\u0432\u0435\u0440\u043a\u0443.
encounter_mental=\u0412\u0441\u0442\u0440\u0435\u0447\u0435\u043d \u041c\u0415\u041d\u0422\u0410\u041b\u042c\u041d\u042b\u0419 \u043a\u0443\u0431\u0438\u043a. \u041d\u0435\u043e\u0431\u0445\u043e\u0434\u0438\u043c\u043e \u043f\u0440\u043e\u0439\u0442\u0438 \u043f\u0440\u043e\u0432\u0435\u0440\u043a\u0443.
encounter_verbal=\u0412\u0441\u0442\u0440\u0435\u0447\u0435\u043d \u0412\u0415\u0420\u0411\u0410\u041b\u042c\u041d\u042b\u0419 \u043a\u0443\u0431\u0438\u043a. \u041d\u0435\u043e\u0431\u0445\u043e\u0434\u0438\u043c\u043e \u043f\u0440\u043e\u0439\u0442\u0438 \u043f\u0440\u043e\u0432\u0435\u0440\u043a\u0443.
encounter_divine=\u0412\u0441\u0442\u0440\u0435\u0447\u0435\u043d \u0411\u041e\u0416\u0415\u0421\u0422\u0412\u0415\u041d\u041d\u042b\u0419 \u043a\u0443\u0431\u0438\u043a. \u041c\u043e\u0436\u043d\u043e \u0432\u0437\u044f\u0442\u044c \u0431\u0435\u0437 \u043f\u0440\u043e\u0432\u0435\u0440\u043a\u0438:
die_acquire_success=\u0412\u044b \u043f\u043e\u043b\u0443\u0447\u0438\u043b\u0438 \u043d\u043e\u0432\u044b\u0439 \u043a\u0443\u0431\u0438\u043a!
die_acquire_failure=\u0412\u0430\u043c \u043d\u0435 \u0443\u0434\u0430\u043b\u043e\u0441\u044c \u043f\u043e\u043b\u0443\u0447\u0438\u0442\u044c \u043a\u0443\u0431\u0438\u043a.
game_loss_out_of_time=\u0423 \u0432\u0430\u0441 \u0437\u0430\u043a\u043e\u043d\u0447\u0438\u043b\u043e\u0441\u044c \u0432\u0440\u0435\u043c\u044f
Вижу как текут ваши слюнки в предвкушении поддержки всего этого добра. Сконвертировать файл один раз — дело несложное. Постоянно вносить изменения — легче повеситься. К счастью, некоторые IDE способны делать такие (и обратные) преобразования «на лету», но легче от этого не становится — иногда так хочется открыть файлик в любимом текстовом редакторе и быстренько что-то подправить (делаю это постоянно), не запуская громоздкую IDE, а тут такой облом.
Не волнуйтесь, выход есть. Метод
getBundle(), который мы доселе использовали, имеет перегруженную версию, принимающую третьим параметром объект класса ResourceBundle.Control — он-то и занимается разными низкоуровневыми вещами на этапе загрузки файлов.class PropertiesStringLoader(locale: Locale) : StringLoader {
private val properties = ResourceBundle.getBundle(
"text.strings",
locale,
Utf8ResourceBundleControl())
override fun loadString(key: String) = properties.getString(key) ?: ""
}
И, собственно, сама реализация:
class Utf8ResourceBundleControl : ResourceBundle.Control() {
    @Throws(IllegalAccessException::class, InstantiationException::class, IOException::class)
    override fun newBundle(baseName: String, locale: Locale, format: String, loader: ClassLoader, reload: Boolean): ResourceBundle? {
        val bundleName = toBundleName(baseName, locale)
        return when (format) {
            "java.class" -> super.newBundle(baseName, locale, format, loader, reload)
            "java.properties" ->
                with((if ("://" in bundleName) null else toResourceName(bundleName, "properties")) ?: return null) {
                    when {
                        reload -> reload(this, loader)
                        else -> loader.getResourceAsStream(this)
                    }?.let { stream -> InputStreamReader(stream, "UTF-8").use { r -> PropertyResourceBundle(r) } }
                }
            else -> throw IllegalArgumentException("Unknown format: $format")
        }
    }
    @Throws(IOException::class)
    private fun reload(resourceName: String, classLoader: ClassLoader): InputStream {
        classLoader.getResource(resourceName)?.let { url ->
            url.openConnection().let { connection ->
                connection.useCaches = false
                return connection.getInputStream()
            }
        }
        throw IOException("Unable to load data!")
    }
}
Do not even ask me what is happening here ... or rather, ask (in the comments) - I will gladly tell you (I love Kotlin and its crazy designs). Or figure it out yourself - the main thing is that now you can safely save localized
.propertiesUTF-8 encodings without any conversion.To test the operation of the application in different languages, it is not necessary to change the settings of the operating system - just specify the required language when starting the JRE:
java -Duser.language=ru -jar path_to_project\Dice\target\dice-1.0-jar-with-dependencies.jar
If you are still working on Windows, expect problems
By default, the standard Windows console (cmd.exe) works with code page 437 (this is a single-byte DOSLatinUS encoding), where there are no Cyrillic characters - instead of Russian letters you will see krakozyabry. Fortunately, UTF-8 is supported, but to use it, the code page needs to be switched:
Well, since Java is very smart, it still thinks that the console uses the default encoding. We need to convince her of this:
Also make sure that a font that supports Unicode characters is selected in the console settings (for example, Lucida Console)
chcp 65001Well, since Java is very smart, it still thinks that the console uses the default encoding. We need to convince her of this:
java -Dfile.encoding=UTF-8 -Duser.language=ru -jar path_to_project\Dice\target\dice-1.0-jar-with-dependencies.jar
Also make sure that a font that supports Unicode characters is selected in the console settings (for example, Lucida Console)
After all our exciting adventures, the result can be proudly demonstrated to the general public and loudly declared: “We are not dogs!”
Racial Faithful Option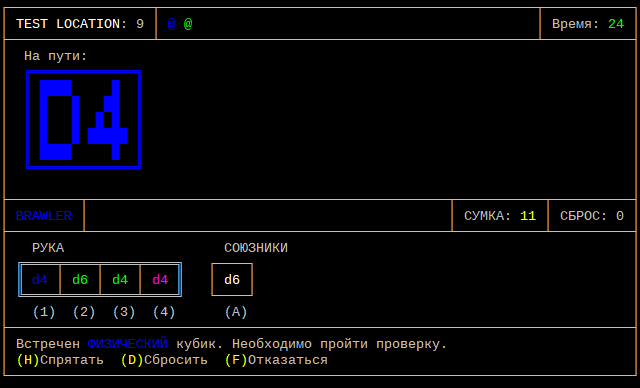
And this is good.
Step Thirteen Putting it all together
Attentive readers must have noticed that I mentioned the names of specific packages only once and never returned to them. Firstly, each developer has his own considerations regarding which class should be located in which package. Secondly, as you work on the project, with the addition of more and more new classes, your thoughts will change. Thirdly, changing the structure of the application is simple and cheap (and modern version control systems will detect migration, so you won’t lose history), so feel free to change the names of classes, packages, methods and variables - do not forget to only update the documentation (you keep it , true?).
And all that remains for us is to put together and launch our project. As you remember,
main()we already created a method , now we will fill it with contents. We will need:- script and terrain;
- Heroes
- interface implementation
GameInteractor; - implementation of interfaces
GameRendererandStringLoader; - implementation of interfaces
SoundPlayerandMusicPlayer; - class object
Game; - a bottle of champagne.
Go!
fun main(args: Array) {
    Audio.init(BasicSoundPlayer(), BasicMusicPlayer())
    val loader = PropertiesStringLoader(Locale.getDefault())
    val renderer = ConsoleGameRenderer(loader)
    val interactor = ConsoleGameInteractor()
    val template = TestScenarioTemplate()
    val scenario = generateScenario(template, 1)
    val locations = generateLocations(template, 1, heroes.size)
    val heroes = listOf(
            generateHero(Hero.Type.BRAWLER, "Brawler"),
            generateHero(Hero.Type.HUNTER, "Hunter")
    )
    val game = Game(renderer, interactor, scenario, locations, heroes)
    game.start()
}
We launch and enjoy the first working prototype. There you go.
Step fourteen. Game balance
Ummm ...
Step fifteen. Tests
Now that the bulk of the code for the first working prototype has been written, it would be nice to add a couple of unit tests ...
"How? Just now? Yes, tests had to be written at the very beginning, and then code! ”
Many readers rightly notice that writing unit tests should precede development of working code ( TDDand other fashionable methodologies). Others will be outraged: there is nothing for people to fool their brains with their tests, even if at least they start to develop something, otherwise all motivation will be lost. Another couple of people will crawl out of the gap in the baseboard and timidly say: “I don’t understand why these tests are needed - everything works for me” ... After that they will be pushed into the face with a boot and quickly pushed back. I will not begin to initiate ideological confrontations (they are already full of them on the Internet), and therefore I partially agree with everyone. Yes, tests are sometimes useful (especially in code that often changes or is associated with complex calculations), yes, unit testing is not suitable for all code (for example, it does not cover interactions with the user or external systems), yes, besides unit testing there is many other types of it (well, at least five were named),
Let's just say: many programmers (especially beginners) neglect tests. Many justify themselves by saying that the functionality of their applications is poorly covered by tests. For example, it’s much easier to launch the application and see if everything is in order with the appearance and interaction, rather than fencing complex constructions with the participation of specialized frameworks for testing the user interface (and there are such). And I’ll tell you when I was implementing the interfaces
Renderer- I did just that. However, there are methods among our code for which the concept of unit testing is great.For example, generators. And that’s all. This is an ideal black box: templates are sent to the input, objects of the game world are obtained at the output. There is something going on inside, but we need to test it. For example, like this:
public class DieGeneratorTest {
    @Test
    public void testGetMaxLevel() {
        assertEquals("Max level should be 3", 3, DieGeneratorKt.getMaxLevel());
    }
    @Test
    public void testDieGenerationSize() {
        DieTypeFilter filter = new SingleDieTypeFilter(Die.Type.ALLY);
        List> allowedSizes = Arrays.asList(
                null,
                Arrays.asList(4, 6, 8),
                Arrays.asList(4, 6, 8, 10),
                Arrays.asList(6, 8, 10, 12)
        );
        IntStream.rangeClosed(1, 3).forEach(level -> {
            for (int i = 0; i < 10; i++) {
                int size = DieGeneratorKt.generateDie(filter, level).getSize();
                assertTrue("Incorrect level of die generated: " + size, allowedSizes.get(level).contains(size));
                assertTrue("Incorrect die size: " + size, size >= 4);
                assertTrue("Incorrect die size: " + size, size <= 12);
                assertTrue("Incorrect die size: " + size, size % 2 == 0);
            }
        });
    }
    @Test
    public void testDieGenerationType() {
        List allowedTypes1 = Arrays.asList(Die.Type.PHYSICAL);
        List allowedTypes2 = Arrays.asList(Die.Type.PHYSICAL, Die.Type.SOMATIC, Die.Type.MENTAL, Die.Type.VERBAL);
        List allowedTypes3 = Arrays.asList(Die.Type.ALLY, Die.Type.VILLAIN, Die.Type.ENEMY);
        for (int i = 0; i < 10; i++) {
            Die.Type type1 = DieGeneratorKt.generateDie(new SingleDieTypeFilter(Die.Type.PHYSICAL), 1).getType();
            assertTrue("Incorrect die type: " + type1, allowedTypes1.contains(type1));
            Die.Type type2 = DieGeneratorKt.generateDie(new StatsDieTypeFilter(), 1).getType();
            assertTrue("Incorrect die type: " + type2, allowedTypes2.contains(type2));
            Die.Type type3 = DieGeneratorKt.generateDie(new MultipleDieTypeFilter(Die.Type.ALLY, Die.Type.VILLAIN, Die.Type.ENEMY), 1).getType();
            assertTrue("Incorrect die type: " + type3, allowedTypes3.contains(type3));
        }
    }
}
Or so:
public class BagGeneratorTest {
    @Test
    public void testGenerateBag() {
        BagTemplate template1 = new BagTemplate();
        template1.addPlan(0, 10, new SingleDieTypeFilter(Die.Type.PHYSICAL));
        template1.addPlan(5, 5, new SingleDieTypeFilter(Die.Type.SOMATIC));
        template1.setFixedDieCount(null);
        BagTemplate template2 = new BagTemplate();
        template2.addPlan(10, 10, new SingleDieTypeFilter(Die.Type.DIVINE));
        template2.setFixedDieCount(5);
        BagTemplate template3 = new BagTemplate();
        template3.addPlan(10, 10, new SingleDieTypeFilter(Die.Type.ALLY));
        template3.setFixedDieCount(50);
        for (int i = 0; i < 10; i++) {
            Bag bag1 = BagGeneratorKt.generateBag(template1, 1);
            assertTrue("Incorrect bag size: " + bag1.getSize(), bag1.getSize() >= 5 && bag1.getSize() <= 15);
            assertEquals("Incorrect number of SOMATIC dice", 5, bag1.examine().stream().filter(d -> d.getType() == Die.Type.SOMATIC).count());
            Bag bag2 = BagGeneratorKt.generateBag(template2, 1);
            assertEquals("Incorrect bag size", 5, bag2.getSize());
            Bag bag3 = BagGeneratorKt.generateBag(template3, 1);
            assertEquals("Incorrect bag size", 50, bag3.getSize());
            List dieTypes3 = bag3.examine().stream().map(Die::getType).distinct().collect(Collectors.toList());
            assertEquals("Incorrect die types", 1, dieTypes3.size());
            assertEquals("Incorrect die types", Die.Type.ALLY, dieTypes3.get(0));
        }
    }
}
Or even like this:
public class LocationGeneratorTest {
    private void testLocationGeneration(String name, LocationTemplate template) {
        System.out.println("Template: " + template.getName());
        assertEquals("Incorrect template type", name, template.getName());
        IntStream.rangeClosed(1, 3).forEach(level -> {
            Location location = LocationGeneratorKt.generateLocation(template, level);
            assertEquals("Incorrect location type", name, location.getName().get(""));
            assertTrue("Location not open by default", location.isOpen());
            int closingDifficulty = location.getClosingDifficulty();
            assertTrue("Closing difficulty too small", closingDifficulty > 0);
            assertEquals("Incorrect closing difficulty", closingDifficulty, template.getBasicClosingDifficulty() + level * 2);
            Bag bag = location.getBag();
            assertNotNull("Bag is null", bag);
            assertTrue("Bag is empty", location.getBag().getSize() > 0);
            Deck enemies = location.getEnemies();
            assertNotNull("Enemies are null", enemies);
            assertEquals("Incorrect enemy threat count", enemies.getSize(), template.getEnemyCardsCount());
            if (bag.drawOfType(Die.Type.ENEMY) != null) {
                assertTrue("Enemy cards not specified", enemies.getSize() > 0);
            }
            Deck obstacles = location.getObstacles();
            assertNotNull("Obstacles are null", obstacles);
            assertEquals("Incorrect obstacle threat count", obstacles.getSize(), template.getObstacleCardsCount());
            List specialRules = location.getSpecialRules();
            assertNotNull("SpecialRules are null", specialRules);
        });
    }
    @Test
    public void testGenerateLocation() {
        testLocationGeneration("Test Location", new TestLocationTemplate());
        testLocationGeneration("Test Location 2", new TestLocationTemplate2());
    }
}
“Stop, stop, stop!” What's this? Java ??? "
Did you understand. Moreover, it’s good to write such tests at the beginning, before you start to implement the generator itself. Of course, the code under test is quite simple and most likely the method will work the first time and without any tests, but writing a test once you
And further. Remember class
HandMaskRuleand his heirs? Now imagine that at some point in order to use the skill the hero needs to take three dice from his hand, and the types of these dice are occupied by severe restrictions (for example, “the first dice must be blue, green or white, the second - yellow, white or blue, and the third - blue or purple "- do you feel the difficulty?). How to approach class implementation? Well ... for starters, you can decide on the input and output parameters. Obviously, you need the class to accept three arrays (or sets), each of which contains valid types for, respectively, the first, second and third cubes. And then what? Busting? Recursions? What if I miss something? Make a deep entrance. Now postpone the implementation of class methods and write a test - since the requirements are simple, understandable, and well formalizable.public class TripleDieHandMaskRuleTest {
private Hand hand;
@Before
public void init() {
hand = new Hand(10);
hand.addDie(new Die(Die.Type.PHYSICAL, 4)); //0
hand.addDie(new Die(Die.Type.PHYSICAL, 4)); //1
hand.addDie(new Die(Die.Type.SOMATIC, 4)); //2
hand.addDie(new Die(Die.Type.SOMATIC, 4)); //3
hand.addDie(new Die(Die.Type.MENTAL, 4)); //4
hand.addDie(new Die(Die.Type.MENTAL, 4)); //5
hand.addDie(new Die(Die.Type.VERBAL, 4)); //6
hand.addDie(new Die(Die.Type.VERBAL, 4)); //7
hand.addDie(new Die(Die.Type.DIVINE, 4)); //8
hand.addDie(new Die(Die.Type.DIVINE, 4)); //9
hand.addDie(new Die(Die.Type.ALLY, 4)); //A (0)
hand.addDie(new Die(Die.Type.ALLY, 4)); //B (1)
}
@Test
public void testRule1() {
HandMaskRule rule = new TripleDieHandMaskRule(
hand,
new Die.Type[]{Die.Type.PHYSICAL, Die.Type.SOMATIC},
new Die.Type[]{Die.Type.MENTAL, Die.Type.VERBAL},
new Die.Type[]{Die.Type.PHYSICAL, Die.Type.ALLY}
);
HandMask mask = new HandMask();
assertTrue("Ally should be on", rule.isAllyPositionActive(mask, 0));
assertTrue("Ally should be on", rule.isAllyPositionActive(mask, 1));
assertTrue("Should be on", rule.isPositionActive(mask, 0));
assertTrue("Should be on", rule.isPositionActive(mask, 1));
assertTrue("Should be on", rule.isPositionActive(mask, 2));
assertTrue("Should be on", rule.isPositionActive(mask, 3));
assertTrue("Should be on", rule.isPositionActive(mask, 4));
assertTrue("Should be on", rule.isPositionActive(mask, 5));
assertTrue("Should be on", rule.isPositionActive(mask, 6));
assertTrue("Should be on", rule.isPositionActive(mask, 7));
assertFalse("Should be off", rule.isPositionActive(mask, 8));
assertFalse("Should be off", rule.isPositionActive(mask, 9));
assertFalse("Rule should not be met yet", rule.checkMask(mask));
mask.addPosition(0);
assertTrue("Ally should be on", rule.isAllyPositionActive(mask, 0));
assertTrue("Ally should be on", rule.isAllyPositionActive(mask, 1));
assertTrue("Should be on", rule.isPositionActive(mask, 0));
assertTrue("Should be on", rule.isPositionActive(mask, 1));
assertTrue("Should be on", rule.isPositionActive(mask, 2));
assertTrue("Should be on", rule.isPositionActive(mask, 3));
assertTrue("Should be on", rule.isPositionActive(mask, 4));
assertTrue("Should be on", rule.isPositionActive(mask, 5));
assertTrue("Should be on", rule.isPositionActive(mask, 6));
assertTrue("Should be on", rule.isPositionActive(mask, 7));
assertFalse("Should be off", rule.isPositionActive(mask, 8));
assertFalse("Should be off", rule.isPositionActive(mask, 9));
assertFalse("Rule should not be met yet", rule.checkMask(mask));
mask.addPosition(4);
assertTrue("Ally should be on", rule.isAllyPositionActive(mask, 0));
assertTrue("Ally should be on", rule.isAllyPositionActive(mask, 1));
assertTrue("Should be on", rule.isPositionActive(mask, 0));
assertTrue("Should be on", rule.isPositionActive(mask, 1));
assertTrue("Should be on", rule.isPositionActive(mask, 2));
assertTrue("Should be on", rule.isPositionActive(mask, 3));
assertTrue("Should be on", rule.isPositionActive(mask, 4));
assertFalse("Should be off", rule.isPositionActive(mask, 5));
assertFalse("Should be off", rule.isPositionActive(mask, 6));
assertFalse("Should be off", rule.isPositionActive(mask, 7));
assertFalse("Should be off", rule.isPositionActive(mask, 8));
assertFalse("Should be off", rule.isPositionActive(mask, 9));
assertFalse("Rule should not be met yet", rule.checkMask(mask));
mask.addAllyPosition(0);
assertTrue("Ally should be on", rule.isAllyPositionActive(mask, 0));
assertFalse("Ally should be off", rule.isAllyPositionActive(mask, 1));
assertTrue("Should be on", rule.isPositionActive(mask, 0));
assertFalse("Should be off", rule.isPositionActive(mask, 1));
assertFalse("Should be off", rule.isPositionActive(mask, 2));
assertFalse("Should be off", rule.isPositionActive(mask, 3));
assertTrue("Should be on", rule.isPositionActive(mask, 4));
assertFalse("Should be off", rule.isPositionActive(mask, 5));
assertFalse("Should be off", rule.isPositionActive(mask, 6));
assertFalse("Should be off", rule.isPositionActive(mask, 7));
assertFalse("Should be off", rule.isPositionActive(mask, 8));
assertFalse("Should be off", rule.isPositionActive(mask, 9));
assertTrue("Rule should be met", rule.checkMask(mask));
mask.removePosition(0);
assertTrue("Ally should be on", rule.isAllyPositionActive(mask, 0));
assertFalse("Ally should be off", rule.isAllyPositionActive(mask, 1));
assertTrue("Should be on", rule.isPositionActive(mask, 0));
assertTrue("Should be on", rule.isPositionActive(mask, 1));
assertTrue("Should be on", rule.isPositionActive(mask, 2));
assertTrue("Should be on", rule.isPositionActive(mask, 3));
assertTrue("Should be on", rule.isPositionActive(mask, 4));
assertFalse("Should be off", rule.isPositionActive(mask, 5));
assertFalse("Should be off", rule.isPositionActive(mask, 6));
assertFalse("Should be off", rule.isPositionActive(mask, 7));
assertFalse("Should be off", rule.isPositionActive(mask, 8));
assertFalse("Should be off", rule.isPositionActive(mask, 9));
assertFalse("Rule should not be met again", rule.checkMask(mask));
}
}
This is tiring, but not as much as it seems, until you start (at some point it becomes even fun). But having written such a test (and a couple of others, for different occasions), you will suddenly feel calm and self-confidence. Now, no small typo will spoil your method and lead to unpleasant surprises that are much more difficult to manually test. Little by little, slowly, we begin to implement the necessary methods of the class. And at the end we run the test to make sure that somewhere we made a mistake. Find the problem spot and rewrite. Repeat until done.
class TripleDieHandMaskRule(
        hand: Hand,
        types1: Array,
        types2: Array,
        types3: Array)
    : HandMaskRule(hand) {
    private val types1 = types1.toSet()
    private val types2 = types2.toSet()
    private val types3 = types3.toSet()
    override fun checkMask(mask: HandMask): Boolean {
        if (mask.positionCount + mask.allyPositionCount != 3) {
            return false
        }
        return getCheckedDice(mask).asSequence()
                .filter { it.type in types1 }
                .any { d1 ->
                    getCheckedDice(mask)
                            .filter { d2 -> d2 !== d1 }
                            .filter { it.type in types2 }
                            .any { d2 ->
                                getCheckedDice(mask)
                                        .filter { d3 -> d3 !== d1 }
                                        .filter { d3 -> d3 !== d2 }
                                        .any { it.type in types3 }
                            }
                }
    }
    override fun isPositionActive(mask: HandMask, position: Int): Boolean {
        if (mask.checkPosition(position)) {
            return true
        }
        val die = hand.dieAt(position) ?: return false
        return when (mask.positionCount + mask.allyPositionCount) {
            0 -> die.type in types1 || die.type in types2 || die.type in types3
            1 -> with(getCheckedDice(mask).first()) {
                (this.type in types1 && (die.type in types2 || die.type in types3))
                        || (this.type in types2 && (die.type in types1 || die.type in types3))
                        || (this.type in types3 && (die.type in types1 || die.type in types2))
            }
            2-> with(getCheckedDice(mask)) {
                val d1 = this[0]
                val d2 = this[1]
                (d1.type in types1 && d2.type in types2 && die.type in types3) ||
                (d2.type in types1 && d1.type in types2 && die.type in types3) ||
                (d1.type in types1 && d2.type in types3 && die.type in types2) ||
                (d2.type in types1 && d1.type in types3 && die.type in types2) ||
                (d1.type in types2 && d2.type in types3 && die.type in types1) ||
                (d2.type in types2 && d1.type in types3 && die.type in types1)
            }
            3 -> false
            else -> false
        }
    }
    override fun isAllyPositionActive(mask: HandMask, position: Int): Boolean {
        if (mask.checkAllyPosition(position)) {
            return true
        }
        if (hand.allyDieAt(position) == null) {
            return false
        }
        return when (mask.positionCount + mask.allyPositionCount) {
            0 -> ALLY in types1 || ALLY in types2 || ALLY in types3
            1 -> with(getCheckedDice(mask).first()) {
                (this.type in types1 && (ALLY in types2 || ALLY in types3))
                        || (this.type in types2 && (ALLY in types1 || ALLY in types3))
                        || (this.type in types3 && (ALLY in types1 || ALLY in types2))
            }
            2-> with(getCheckedDice(mask)) {
                val d1 = this[0]
                val d2 = this[1]
                (d1.type in types1 && d2.type in types2 && ALLY in types3) ||
                        (d2.type in types1 && d1.type in types2 && ALLY in types3) ||
                        (d1.type in types1 && d2.type in types3 && ALLY in types2) ||
                        (d2.type in types1 && d1.type in types3 && ALLY in types2) ||
                        (d1.type in types2 && d2.type in types3 && ALLY in types1) ||
                        (d2.type in types2 && d1.type in types3 && ALLY in types1)
            }
            3 -> false
            else -> false
        }
    }
}
If you have ideas on how to implement such functionality more easily, you are welcome to comment. And I’m incredibly glad that I was smart enough to start implementing this class with writing a test.
“And I <...> also <...> am very <...> glad <...>. Get in! <...> back! <...> into the gap! ”
Step sixteen. Modularity
As expected, matured children can’t be under the shelter of their parents all their lives - sooner or later they must choose their own path and boldly follow it, overcoming difficulties and disruptions. So the components developed by us matured so much that they became cramped under one roof. The time has come to divide them into several parts.
We are faced with a rather trivial task. It is necessary to break all the classes created so far into three groups:
- basic functionality: module, game engine, connector interfaces and platform-independent implementations ( core );
- templates of scenarios, terrain, enemies and obstacles - components of the so-called "adventure" ( adventure );
- specific implementations of interfaces specific to a particular platform: in our case, a console application ( cli ).
The result of this separation will ultimately look something like the following diagram:
Like the actors at the end of the show, our today's heroes re-enter the scene in full force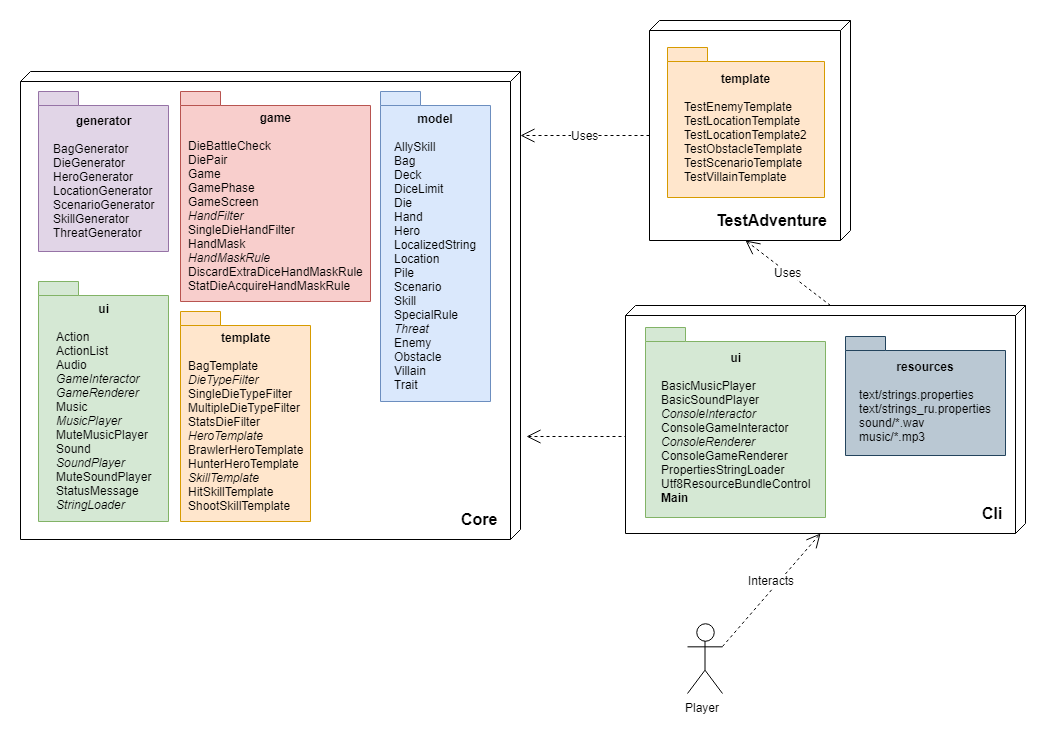
Create additional projects and transfer the corresponding class. And we just need to correctly configure the interaction of projects among themselves.
Core
project This project is a pure engine. All specific classes were transferred to other projects - only the basic functionality, the core, remained. Library if you want. There is no longer a launching class, there is not even a need to build a package. Assemblies of this project will be hosted in the local Maven repository (more on that later) and used by other projects as dependencies.
The file
pom.xmlis as follows:4.0.0 my.company dice-core 1.0 jar org.jetbrains.kotlin kotlin-stdlib ${kotlin.version} junit junit-dep 4.8.2 test org.jetbrains.kotlin UTF-8 1.8 1.8 1.3.20 true From now on we will collect it like this:
mvn -f "path_to_project/DiceCore/pom.xml" install
Cli project
Here is the entry point to the application - it is with this project that the end user will interact. The kernel is used as a dependency. Since in our example we are working with the console, the project will contain the classes necessary for working with it (if we suddenly want to start the game on a coffee maker, we simply replace this project with a similar one with the corresponding implementations). We will immediately add resources (lines, audio files, etc.). Dependencies on external libraries will be transferred to the
file
pom.xml:4.0.0 my.company dice-cli 1.0 jar org.jetbrains.kotlin kotlin-stdlib ${kotlin.version} my.company dice-core 1.0 compile org.fusesource.jansi jansi 1.17.1 compile jline jline 2.14.6 compile com.googlecode.soundlibs jlayer 1.0.1.4 compile org.jetbrains.kotlin maven-assembly-plugin 2.6 package single jar-with-dependencies my.company.dice.MainKt UTF-8 1.8 1.8 1.3.20 true We have already seen the script to build and run this project - we won’t start repeating it.
Adventures
Well, finally, in a separate project we take out the plot. That is, all the scenarios, terrain, enemies and other unique objects of the game world that the scenario department staff of your company can imagine (well, or so far only our own sick imagination - we are still the only game designer in the area). The idea is to group the scripts into sets (adventures) and distribute each such set as a separate project (similar to how it is done in the world of board and video games). That is, collect jar archives and put them in a separate folder so that the game engine scans this folder and automatically connects all the adventures contained there. However, the technical implementation of this approach is fraught with enormous difficulties.
What should I start with? Well, firstly, from the fact that we distribute templates in the form of specific java classes (yeah, beat me and scold me - I foresaw this). And if so, then these classes should be in the classpath of the application at startup. Enforcing this requirement is not difficult - you explicitly register your jar files in the appropriate environment variable (starting with Java 6, you can even use * - wildcards ).
java -classpath "path_to_project/DiceCli/target/adventures/*" -jar path_to_project/DiceCli/target/dice-1.0-jar-with-dependencies.jar
“A fool, or what? When using the -jar switch, the -classpath switch is ignored! ”
However, this will not work. The classpath for executable jar archives must be explicitly written in the internal file
META-INF/MANIFEST.MF(the section is called - Claspath:). It's okay, there are even special plugins for this ( maven-compiler-plugin or, at worst, maven-assembly-plugin ). But the wildcards in the manifest, alas, do not work - you will have to explicitly specify the names of the dependent jar-files. That is, to know them in advance, which in our case is problematic. And anyway, I didn’t want that. I wanted the project to not have to be recompiled. To folder
adventures/you could throw any number of adventures, and so that all of them were visible to the game engine during execution. Unfortunately, the seemingly obvious functionality goes beyond the standard representations of the Java world. Therefore, it is not welcome. A different approach needs to be taken to spread independent adventure. Which one? I don’t know, write in the comments - for sure someone has smart ideas. In the meantime, there are no ideas, here’s a small (or large, depending on how you look) trick that allows you to dynamically add dependencies to the classpath without even knowing their names and without having to recompile the project:
In Windows:
@ECHO OFF
call "path_to_maven\mvn.bat" -f "path_to_project\DiceCore\pom.xml" install
call "path_to_maven\mvn.bat" -f "path_to_project\DiceCli\pom.xml" package
call "path_to_maven\mvn.bat" -f "path_to_project\TestAdventure\pom.xml" package
mkdir path_to_project\DiceCli\target\adventures
copy "path_to_project\TestAdventure\target\test-adventure-1.0.jar" path_to_project\DiceCli\target\adventures\
chcp 65001
cd path_to_project\DiceCli\target\
java -Dfile.encoding=UTF-8 -cp "dice-cli-1.0-jar-with-dependencies.jar;adventures\*" my.company.dice.MainKt
pause
And on Unix:
#!/bin/sh
mvn -f "path_to_project/DiceCore/pom.xml" install
mvn -f "path_to_project/DiceCli/pom.xml" package
mvn -f "path_to_project/TestAdventure/pom.xml" package
mkdir path_to_project/DiceCli/target/adventures
cp path_to_project/TestAdventure/target/test-adventure-1.0.jar path_to_project/DiceCli/target/adventures/
cd path_to_project/DiceCli/target/
java -cp "dice-cli-1.0-jar-with-dependencies.jar:adventures/*" my.company.dice.MainKt
And here's the trick. Instead of using the key,
-jarwe add the Cli project to the classpath and explicitly specify the class contained within it as the entry point MainKt. Plus here we connect all the archives from the folder adventures/. No need to once again indicate how much this crooked decision is - I myself know, thanks. Better suggest your ideas in the comments. Please . (ಥ﹏ಥ)
Step seventeen. Plot
A bit of lyrics.
Our article is about the technical side of the workflow, but games are not just software code. These are exciting worlds with interesting events and lively characters, which you plunge into with your head, renouncing the real world. Each such world is unusual in its own way and interesting in its own way, many of which you still remember, after many years. If you want your world to be remembered with warm feelings too, make it unusual and interesting.
I know that we are programmers here, not scriptwriters, but we have some basic ideas about the narrative component of the game genre (gamers with experience, right?). As in any book, the story should have an eye (in which we gradually describe the problem facing the heroes), development, two or three interesting turns, a climax (the most acute moment of the plot, when readers freeze in excitement and forget to breathe) and denouement (in which events gradually come to its logical conclusion). Avoid understatement, logical groundlessness and plot holes - all started lines should come to an adequate conclusion.
Well, let's read our story to others - an unbiased look from the side very often helps to understand the flaws made and to correct them in time.
The plot of the game
Действие игры происходит с вымышленной фентезийной вселенной и начинается, как это часто бывает, с глобальной войны всех со всеми. Из восьми вступивших в противостояние государств, к концу осталось лишь два: Эстрелла (конституционная монархия) и Асмус (олигархическая республика), меньше всего пострадавших. Посколько дальнейшая борьба не имела никакого смысла, выжившие вынуждены были подписать перемирие.
Наши герои — подданные уничтоженного государства, в ходе перепетий военного времени попавшие в плен и отправленные на рудник добывать медь. Через два года тяжелой работы, по счастливому стечению обстоятельств они были вызволены войсками Асмуса и отправлены в один из наименее пострадавших его регионов, чтобы начать новую спокойную жизнь.
Но, как говорится, не тут-то было. Человек, к которому их направили, бесследно исчезает, а наши герои ввязываются в местные разборки с участием криминальных группировок, правохранительных органов и случайных лиц. В чем мы им с радостью помогаем.
Fortunately, I’m not Tolkien, I didn’t work out the game world in too much detail, but I tried to make it interesting enough and, most importantly, logically justified. At the same time, he allowed himself to introduce some ambiguities, which each player is free to interpret in his own way. For example, nowhere did he focus on the level of technological development of the described world: the feudal system and modern democratic institutions, evil tyrants and organized criminal groups, the highest goal and banal survival, bus rides and fights in taverns - even the characters shoot for some reason: from bows / crossbows, or from assault rifles. In the world there is a semblance of magic (its presence adds gameplay to tactical capabilities) and elements of mysticism (just to be).
I wanted to move away from plot cliches and fantasy consumer goods - all these elves, gnomes, dragons, black lords and absolute world evil (as well as: selected heroes, ancient prophecies, super-artifacts, epic battles ... although the latter can be left). I also really wanted to make the world alive, so that each character met (even a minor one) has his own story and motivation, that elements of game mechanics fit into the laws of the world, that the development of heroes occurs naturally, that the presence of enemies and obstacles in locations is logically justified by the features of the location itself … etc. Unfortunately, this desire played a cruel joke, slowing down the development process very much, and it was not always possible to depart from gaming conventions. Nevertheless, the satisfaction from the final product turned out to be an order of magnitude greater.
What do I want to say with all this? A well-thought-out interesting plot may not be so necessary, but your game will not suffer from its presence: in the best case, players will enjoy it, in the worst they will simply ignore it. And those who are especially enthusiastic will even forgive your game some functional flaws, just to find out how the story ends.
What's next?
Further programming ends and game design begins . Now it’s time not to write the code, but to think through scenarios, locations, enemies - you understand, this whole dregs. If you still work alone, I congratulate you - you have reached the stage at which most game projects rush. In large AAA studios, special people work as designers and scriptwriters who receive money for this - they simply have nowhere to go. But we have a lot of options: to go for a walk, to eat, to sleep in a banal way - but what can it be, even to start a new project using the accumulated experience and knowledge.
If you are still here and want to continue at all costs, then prepare for difficulties. Lack of time, laziness, lack of creative inspiration - something will constantly distract you. It is not easy to overcome all these obstacles (again, many articles have been written on this topic), but it is possible. First of all, I advise you to carefully plan the further development of the project. Fortunately, we work for our pleasure, the publishers do not push us, no one demands the fulfillment of any specific deadlines - which means there is an opportunity to get to the point without unnecessary haste. Make a “roadmap” of the project, determine the main stages and (if you have the courage) approximate terms for their implementation. Get yourself a notebook (you can electronic) and constantly write down ideas that arise in it (even suddenly waking up in the middle of the night).for example, such ) or other assistive devices. Start documentation: both external, public ( wiki, for example ) for the future huge community of fans, and internal, for yourself (I won’t share the link) - believe me, without it after a month's break, you won’t remember what exactly and how you did it. In general, write as much as possible accompanying information about your game, just remember to write the game itself. I proposed basic options, but I don’t give specific advice - each one decides for himself how it is more convenient for him to organize his work process.
“But still, you don’t want to talk about game balance?”
Immediately prepare yourself for the fact that creating the perfect game the first time will not work. A working prototype is good - at first it will show the viability of the project, convince or disappoint you and give an answer to a very important question: “is it worth continuing?”. However, he will not answer many other questions, the main one of which, probably: "will it be interesting to play my game in the long term?" There are a huge number of theories and articles (well, again) on this subject. An interesting game should be moderately difficult, since a too simple game does not make a challenge to the player. On the other hand, if the complexity is prohibitive, only stubborn hardcore players or people who are trying to prove something to someone will remain from the game audience. The game should be quite diverse, ideally - provide several options for achieving the goal, so that each player chooses an option to his liking. One passing strategy should not dominate the rest, otherwise they will only use it ... And so on.
In other words, the game needs to be balanced. This is especially true of the board game, where the rules are clearly formalized. How to do it? I have no idea. If you don’t have a math friend who can create a mathematical model (I have seen it, they’re doing it) and you don’t understand anything about it (but we don’t understand), then the only way out is
Joking aside, I wish us ... all of you success. Read more (who would have thought!) - about game design and more. All the issues we have examined have already been covered in one way or another in articles and literature (although, if you are still here, it is obviously unnecessary to urge you to read). Share your impressions, communicate on the forums - in general, you already know me better and better. Do not be lazy and you will succeed.
On this optimistic note, let me take your leave. Thank you all for your attention. See you!
“Eh! Which see you? How now to launch all this on a mobile phone? Did I wait in vain, or what? ”
Afterword. Android
To describe the integration of our game engine with the Android platform, let’s leave the class alone
Gameand consider a similar, but much simpler class MainMenu. As the name implies, it is intended to implement the main menu of the application and, in fact, is the first class with which the user starts interacting.In the console interface, it looks like this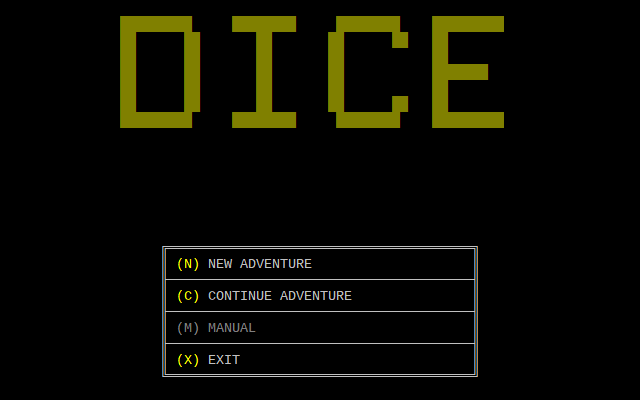
Like a class
Game, it defines an infinite loop, at each iteration of which a screen is drawn and a command is requested from the user. Only there is no complicated logic here and these commands are much smaller. We are implementing essentially one thing - “Exit”.Activity chart for main menu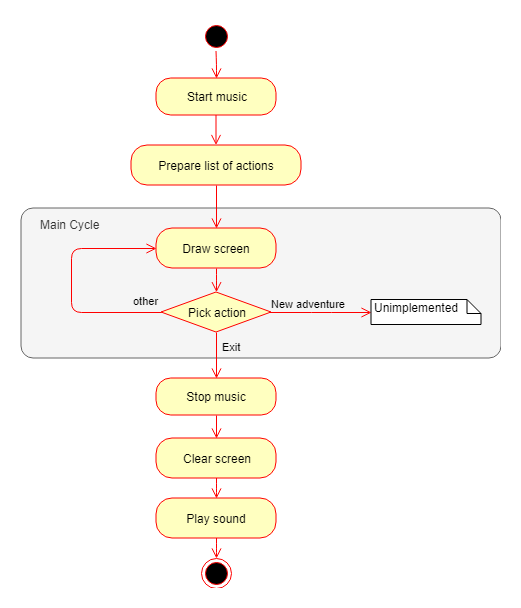
Easy, right? About that and speech. The code is also an order of magnitude simpler.
class MainMenu(
        private val renderer: MenuRenderer,
        private val interactor: MenuInteractor
) {
    private var actions = ActionList.EMPTY
    fun start() {
        Audio.playMusic(Music.MENU_MAIN)
        actions = ActionList()
        actions.add(Action.Type.NEW_ADVENTURE)
        actions.add(Action.Type.CONTINUE_ADVENTURE, false)
        actions.add(Action.Type.MANUAL, false)
        actions.add(Action.Type.EXIT)
        processCycle()
    }
    private fun processCycle() {
        while (true) {
            renderer.drawMainMenu(actions)
            when (interactor.pickAction(actions).type) {
                Action.Type.NEW_ADVENTURE -> TODO()
                Action.Type.CONTINUE_ADVENTURE -> TODO()
                Action.Type.MANUAL -> TODO()
                Action.Type.EXIT -> {
                    Audio.stopMusic()
                    Audio.playSound(Sound.LEAVE)
                    renderer.clearScreen()
                    Thread.sleep(500)
                    return
                }
                else -> throw AssertionError("Should not happen")
            }
        }
    }
}
Interaction with the user is implemented using interfaces
MenuRendererand MenuInteractorworking similarly to what was previously seen.interface MenuRenderer: Renderer {
fun drawMainMenu(actions: ActionList)
}
interface Interactor {
fun anyInput()
fun pickAction(list: ActionList): Action
}
As you already understood, we knowingly separated interfaces from specific implementations. All we now need is to replace the Cli project with a new project (let's call it Droid ), adding a dependency on the Core project . Let's do it.
Run Android Studio (usually projects for Android are developed in it), create a simple project, removing all unnecessary standard tinsel and leaving only support for the Kotlin language. We also add a dependency on the Core project , which is stored in the local Maven repository of our machine.
apply plugin: 'com.android.application'
apply plugin: 'kotlin-android'
apply plugin: 'kotlin-android-extensions'
android {
    compileSdkVersion 28
    defaultConfig {
        applicationId "my.company.dice"
        minSdkVersion 14
        targetSdkVersion 28
        versionCode 1
        versionName "1.0"
    }
}
dependencies {
    implementation "org.jetbrains.kotlin:kotlin-stdlib-jdk7:$kotlin_version"
    implementation "my.company:dice-core:1.0"
}
By default, however, no one will see our dependency - you must explicitly indicate the need to use a local repository (mavenLocal) when building the project.
buildscript {
    ext.kotlin_version = '1.3.20'
    repositories {
        google()
        jcenter()
        mavenLocal()
    }
    dependencies {
        classpath 'com.android.tools.build:gradle:3.3.0'
        classpath "org.jetbrains.kotlin:kotlin-gradle-plugin:$kotlin_version"
    }
}
allprojects {
    repositories {
        google()
        jcenter()
        mavenLocal()
    }
}
You will see that all previously developed classes are accessible for use, and interfaces for implementation. We are interested in, by and large, we are already familiar interfaces:
SoundPlayer, MusicPlayer, MenuInteractor(analog GameInteractor) MenuRenderer(analog GameRenderer) and StringLoaderfor which I will write a new, specific to the implementation of the android. But before that, we’ll figure out how the user’s interaction with our new system will generally take place. For rendering interface elements, we will not use standard components (buttons, pictures, input fields, etc.) of Android - instead, we restrict ourselves to the capabilities of the class
Canvas. To do this, it’s enough to create a single class descendantView- this will be our “canvas”. With input, it’s a bit more complicated, since we no longer have a keyboard, and the interface needs to be designed in such a way that user input on certain parts of the screen is considered as an input of commands. To do this, we will use the same heir View- in this way, he will act as an intermediary between the user and the game engine (similar to how the system console acted as such an intermediary). Let's create the main activity for our View and write it in the manifest.
We fix the activity in landscape orientation - as in the case with most other games, we won’t be able to portrait portrait. Moreover, we’ll expand it to the entire screen of the device, prescribing the main theme accordingly.