Creating Interface Elements Programmatically Using PureLayout (Part 1)
Hello, Habr! I present to you the translation of the article Creating UIViews Constraints Programmatically Using PureLayout by Aly Yaka.

Today I will guide you through creating a simple mobile application user interface with code, without using storyboards or NIBs. I will not go into discussions about which is better, because everything has its pros and cons, so I ’ll just leave a link that goes into this matter .
In the second part of this guide, we will create some of the most commonly used mobile application user interface elements with code, including a navigation bar, table view, and dynamic-sized cells.
This tutorial was written using Xcode 9 and Swift 4. I also assume that you are familiar with Xcode, Swift, and CocoaPods.
Without further delay, let's start creating our project: a simple Contact Card application. The purpose of this article is to teach you how to create the user interface of your application in code, and therefore it will not contain any logic regarding the functionality of the application, unless this is necessary for the purposes of this guide.
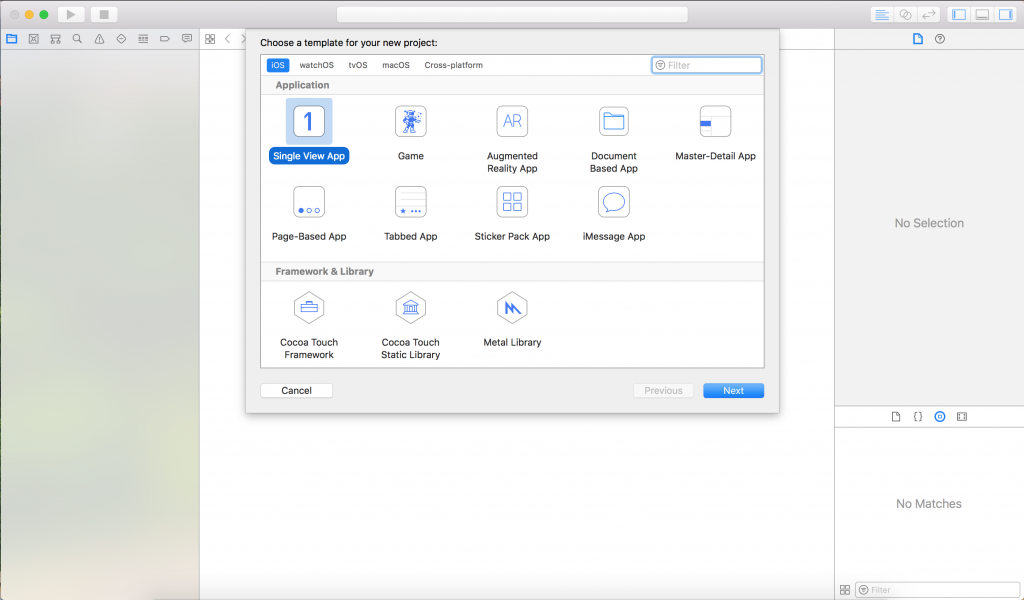
Start by launching Xcode -> "Create a New Xcode Project". Select “Single View App” and click “Next”.
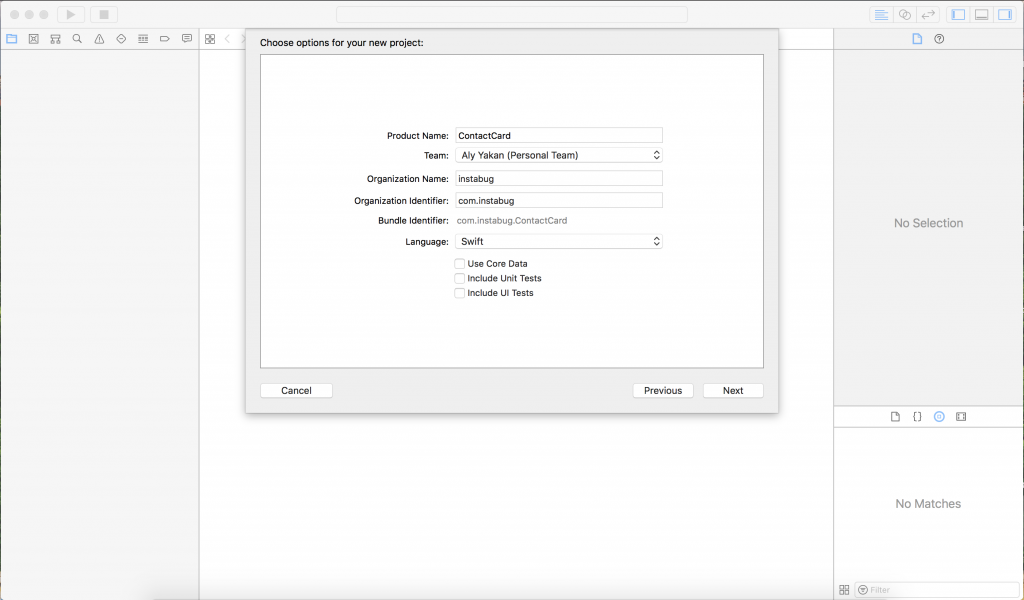
Name the project as you like, I decided to call it ContactCard. Clear all three options below and select Swift as your programming language, then click Next.
Select a location on your computer to save the project. Uncheck "Create Git Repository on my Mac."
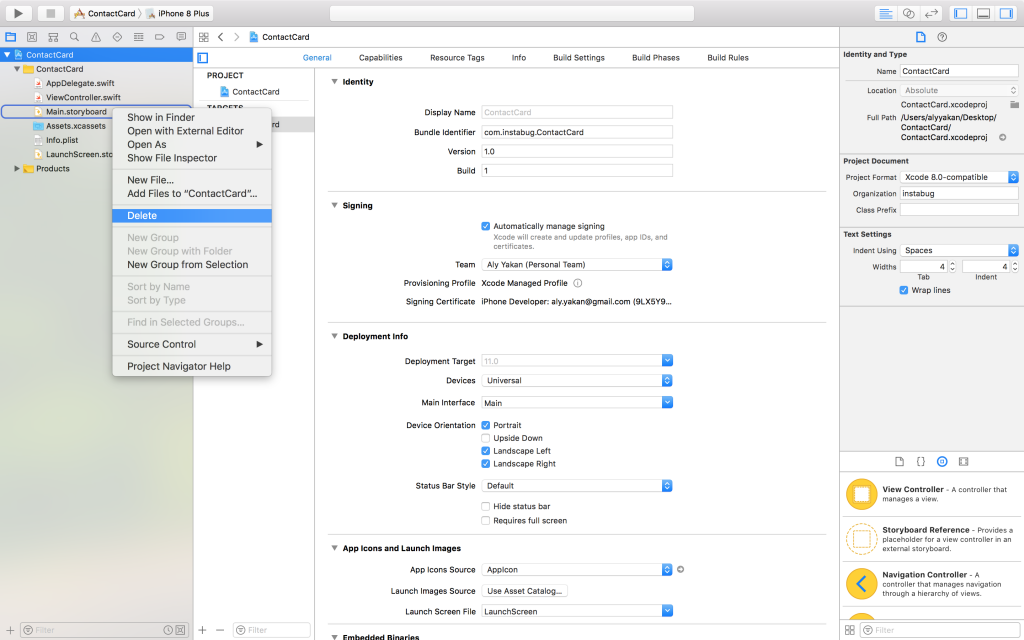
Since we will not use Storyboards or NIBs in this project, delete the “Main.storyboard”, which can be found in Project Navigator:
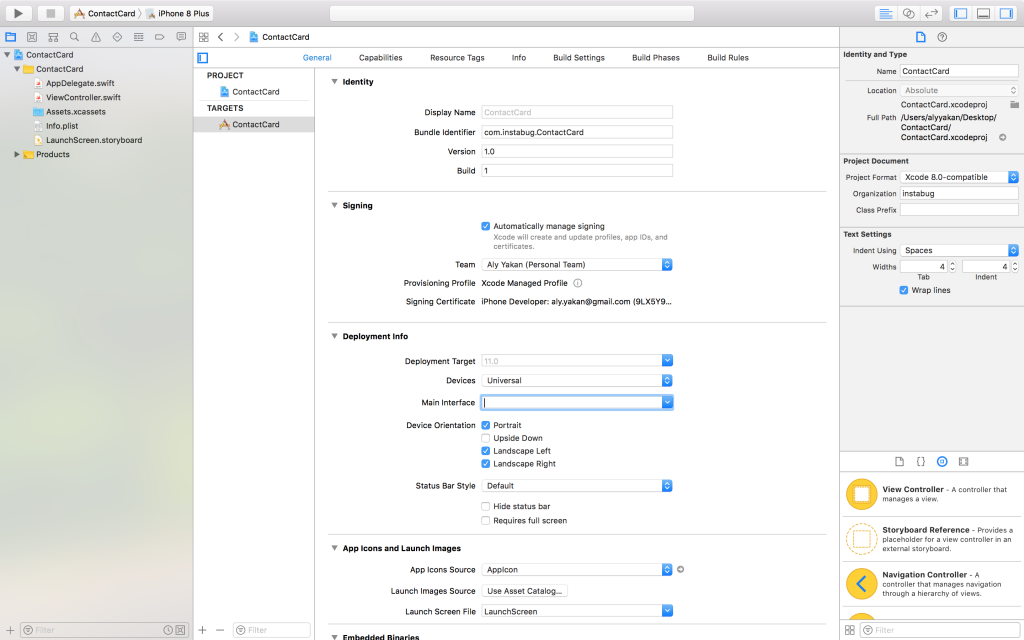
After that, click on the project in the project navigator and on the “General” tab, find the section with deployment information and delete everything that is written in the “Main Interface”. This is what tells Xcode which Storyboard file to load when the application starts, but since we just deleted “Main.storyboard”, Xcode will not find this file, which will cause the application to crash.
If you run the application now, a black screen will appear, since the application now has no source of the user interface, so in the next part we will create it. Open "AppDelegate.swift" and inside
This code provides a window for user interaction with the application, which can usually be found in "ViewController.swift". To quickly verify that everything works, go to "ViewController.swift" and in the method,
Now run the application.
To navigate between files in Xcode, use the “⇧⌘O” hotkeys, and then enter the file name or even the code fragment that you are looking for, and a list of files from which you can choose will appear on the screen.
After starting the application it should be the result on the screen of your simulator:
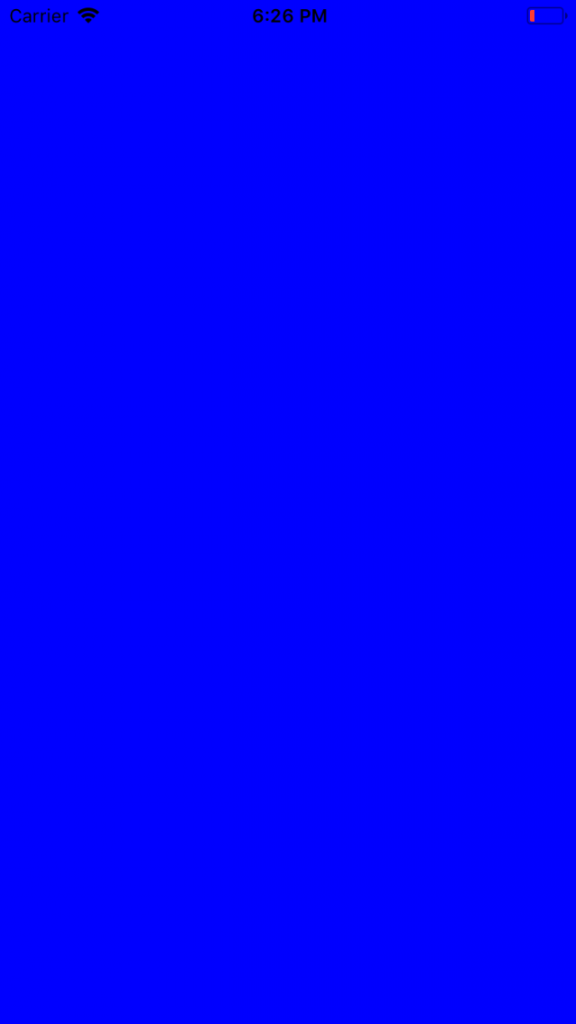
Of course, we will not use that disgusting blue, so just change the background to white and replaced
To create our user interface, we will use a library that will make our life much easier. To install PureLayout, you must first open your terminal and typing cd, then a space, drag your project folder into the terminal and press "Enter". Now run the following commands inside the terminal:
This should be the output of your terminal after the second command:

After that, close Xcode, open the folder in Finder, and you should find "<your project name> .xcworkspace". This is what we will open to access our application if we ever need to use CocoaPods. Now find the file named "PodFile" and write the following line under the phrase
Run it again
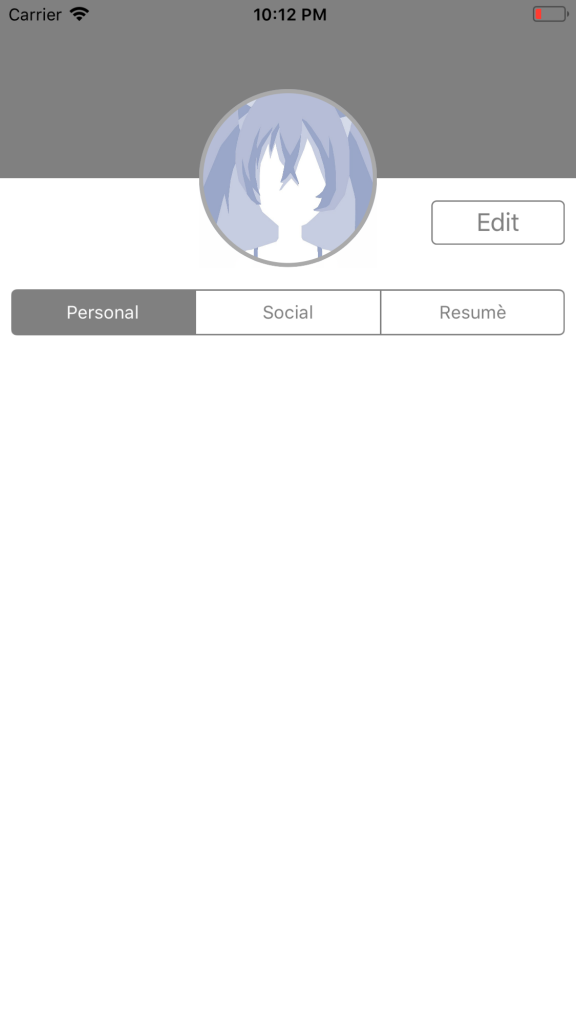
Now that everything is set up, let's start with the real work. Go to “ViewController.swift” and grab a cup of coffee, because this is what the final result will look like:
Insert a line
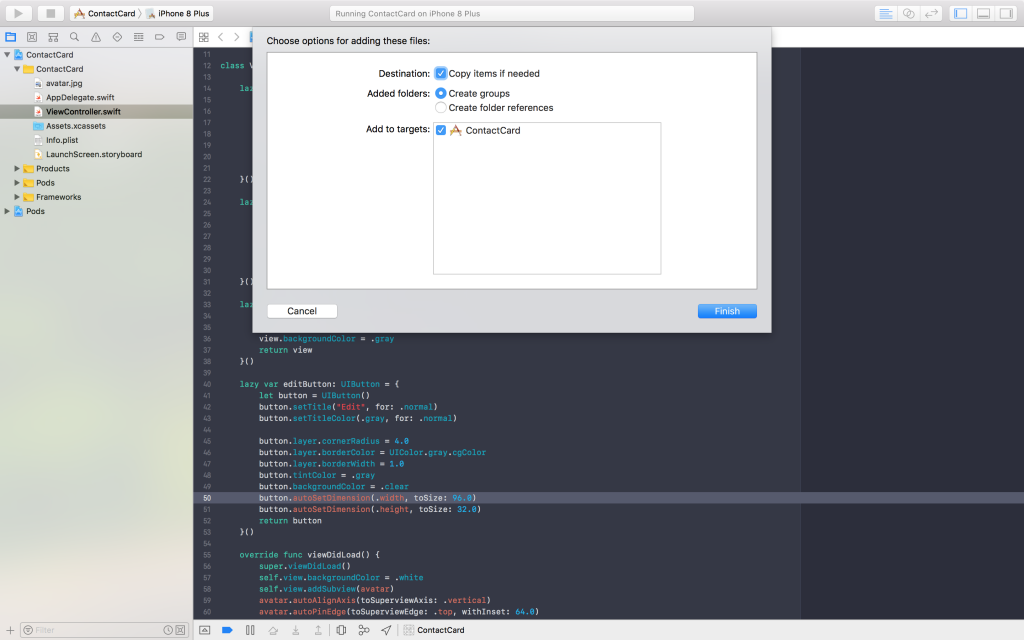
As for the image, save any image on the desktop that you will use as an avatar, and drag it into Xcode in the <Your Project Name> folder, which in my case is called “ContactCard”, and check the “Copy items if needed” box .
After that, write the name of this file along with its extension in the UIImage declaration instead of “avatar.jpg”.
For those of you who do not know, lazy variables are similar to ordinary variables, except that they are not initialized (or some memory space is allocated) until they are needed or called for the first time . This means that lazy variables are not initialized when the view controller is initialized, but rather expect a later point when they are really needed, which saves processing power and memory space for other processes. This is especially useful when initializing user interface components.
As you can see inside the initialization, the string
To make this image round, we set its angular radius to half its width or height, which is 64.0 points. In addition, we set the property to a
Then we move on to creating a UIView that will serve as the top of the view behind the gray painted avatar. Declare the following lazy variable for this view:
Before moving on, let's create a function
Now add the following line to
To just get an idea of how far we have come, let's set limits on these two kinds. Create another function named
Now, within the
Unfortunately, this is not what I would like to receive. As you can see, ours
This method will transfer the avatar from the bottom of the stack to the top, so choose the method that you like best. Of course, for readability, it is better to add subviews in the order in which they should be displayed if they intersect, while remembering that the first added subviews will be at the bottom of the stack, and therefore any other intersecting views will appear on top of it.
And this is how it should actually look:

Next, we will create a segmented control, which is a gray bar containing three sections. Actually, a segmented control is easy to create. Do the following:
I believe that everything is clear, the only difference is that after initialization we provide it with an array of strings, each row represents the heading of one of our desired sections. We also set it
Now let's continue and add it as a subview by inserting the following line at the end of the function
We tell the segmented control that we want to attach it to the left side of its superview, however we want to slightly increase the interval, and not attach it directly to the edge of the screen. If you notice, I use the so-called eight-point grid, where all distances and sizes are multiples of eight. I do the same on the right side of the segmented control. As for the last limitation, he says attach a vertex to the base of the avatar with an interval of 16 points.
After adding the above restrictions to,
Now we will pass to the last part of the user interface of the textbook, which is an “Edit” button. Add the following lazy variable:
Don't worry about how big the initialization is, but pay attention to how I set the title and its color by calling the
Now add the button as a subview, like the rest of the components, and add the following restrictions so that it appears where it should be:
Here we set only the right and upper limits for the button, because we gave it a size, it will not expand and nothing else will be needed. Now run the project to see the final result:
Practice, add as many interface elements as you want. Create views of any application that you find difficult. Start simple and gradually increase the difficulty. Try drawing UI components on a piece of paper to imagine how they fit together.
In the second part, I extend this guide to create a navigation bar, table view, and dynamic-sized cells in code.
Today I will guide you through creating a simple mobile application user interface with code, without using storyboards or NIBs. I will not go into discussions about which is better, because everything has its pros and cons, so I ’ll just leave a link that goes into this matter .
In the second part of this guide, we will create some of the most commonly used mobile application user interface elements with code, including a navigation bar, table view, and dynamic-sized cells.
Overview
This tutorial was written using Xcode 9 and Swift 4. I also assume that you are familiar with Xcode, Swift, and CocoaPods.
Without further delay, let's start creating our project: a simple Contact Card application. The purpose of this article is to teach you how to create the user interface of your application in code, and therefore it will not contain any logic regarding the functionality of the application, unless this is necessary for the purposes of this guide.
Creating constraints programmatically with PureLayout
Project setup
Start by launching Xcode -> "Create a New Xcode Project". Select “Single View App” and click “Next”.
Name the project as you like, I decided to call it ContactCard. Clear all three options below and select Swift as your programming language, then click Next.
Select a location on your computer to save the project. Uncheck "Create Git Repository on my Mac."
Since we will not use Storyboards or NIBs in this project, delete the “Main.storyboard”, which can be found in Project Navigator:
After that, click on the project in the project navigator and on the “General” tab, find the section with deployment information and delete everything that is written in the “Main Interface”. This is what tells Xcode which Storyboard file to load when the application starts, but since we just deleted “Main.storyboard”, Xcode will not find this file, which will cause the application to crash.
Creating a ViewController
If you run the application now, a black screen will appear, since the application now has no source of the user interface, so in the next part we will create it. Open "AppDelegate.swift" and inside
application(_ application: UIApplication, didFinishLaunchingWithOptions launchOptions: [UIApplicationLaunchOptionsKey: Any]?), insert this code fragment:self.window = UIWindow(frame: UIScreen.main.bounds)
let viewController = ViewController()
self.window?.rootViewController = viewController
self.window?.makeKeyAndVisible()
This code provides a window for user interaction with the application, which can usually be found in "ViewController.swift". To quickly verify that everything works, go to "ViewController.swift" and in the method,
viewDidLoad()insert the following line:self.view.backgroundColor = .blue
Now run the application.
To navigate between files in Xcode, use the “⇧⌘O” hotkeys, and then enter the file name or even the code fragment that you are looking for, and a list of files from which you can choose will appear on the screen.
After starting the application it should be the result on the screen of your simulator:
Of course, we will not use that disgusting blue, so just change the background to white and replaced
.blueon the .whiteinside viewDidLoad ().UI development
To create our user interface, we will use a library that will make our life much easier. To install PureLayout, you must first open your terminal and typing cd, then a space, drag your project folder into the terminal and press "Enter". Now run the following commands inside the terminal:
- pod init
- pod install
This should be the output of your terminal after the second command:
After that, close Xcode, open the folder in Finder, and you should find "<your project name> .xcworkspace". This is what we will open to access our application if we ever need to use CocoaPods. Now find the file named "PodFile" and write the following line under the phrase
use_frameworks!pod “PureLayout”Run it again
pod installin your terminal, and then build your project by pressing “Command + B”.Coffee break
Now that everything is set up, let's start with the real work. Go to “ViewController.swift” and grab a cup of coffee, because this is what the final result will look like:
Create ImageView
Insert a line
import PureLayoutbelow import UIKitso that you can use the library in this file. Then, under the class declaration and outside of any function, we start by creating a lazy (lazy) variable Avatar ImageViewas follows:lazy var avatar: UIImageView = {
let imageView = UIImageView(image: UIImage(named: "avatar.jpg"))
imageView.autoSetDimensions(to: CGSize(width: 128.0, height: 128.0))
imageView.layer.borderWidth = 3.0
imageView.layer.borderColor = UIColor.lightGray.cgColor
imageView.layer.cornerRadius = 64.0
imageView.clipsToBounds = true
return imageView
}()As for the image, save any image on the desktop that you will use as an avatar, and drag it into Xcode in the <Your Project Name> folder, which in my case is called “ContactCard”, and check the “Copy items if needed” box .
After that, write the name of this file along with its extension in the UIImage declaration instead of “avatar.jpg”.
For those of you who do not know, lazy variables are similar to ordinary variables, except that they are not initialized (or some memory space is allocated) until they are needed or called for the first time . This means that lazy variables are not initialized when the view controller is initialized, but rather expect a later point when they are really needed, which saves processing power and memory space for other processes. This is especially useful when initializing user interface components.
PureLayout in action
As you can see inside the initialization, the string
imageView.autoSetDimensions (to: CGSize (width: 128.0, height: 128.0))is PureLayout in action. In one line, we set a limit for both height and width of the UIImageView, and all the necessary NSLayoutConstraints are created without the need for huge function calls. If you were dealing with creating restrictions programmatically, then you most likely already fell in love with this wonderful library. To make this image round, we set its angular radius to half its width or height, which is 64.0 points. In addition, we set the property to a
clipsToBounds value truethat tells the image that it should clip everything that is outside the radius that we just set.Then we move on to creating a UIView that will serve as the top of the view behind the gray painted avatar. Declare the following lazy variable for this view:
lazy var upperView: UIView = {
    let view = UIView()
    view.autoSetDimension(.height, toSize: 128)
    view.backgroundColor = .gray
    return view
}()
Adding subviews
Before moving on, let's create a function
func addSubviews ()that adds the views we just created (and all the others that we are going to create) as subviews to the view controller:func addSubviews() {
self.view.addSubview(avatar)
self.view.addSubview(upperView)
}
Now add the following line to
viewDidLoad (): self.addSubviews ()Setting restrictions
To just get an idea of how far we have come, let's set limits on these two kinds. Create another function named
func setupConstraints()and insert the following restrictions:func setupConstraints() {
avatar.autoAlignAxis(toSuperviewAxis: .vertical)
avatar.autoPinEdge(toSuperviewEdge: .top, withInset: 64.0)
upperView.autoPinEdge(toSuperviewEdge: .left)
upperView.autoPinEdge(toSuperviewEdge: .right)
upperView.autoPinEdgesToSuperviewEdges(with: .zero, excludingEdge: .bottom)
}Now, within the
viewDidLoad()call setupConstraints(), as follows: self.setupConstraints(). Add this AFTER the call addSubviews(). This should be the final conclusion:Bring avatar to the forefront
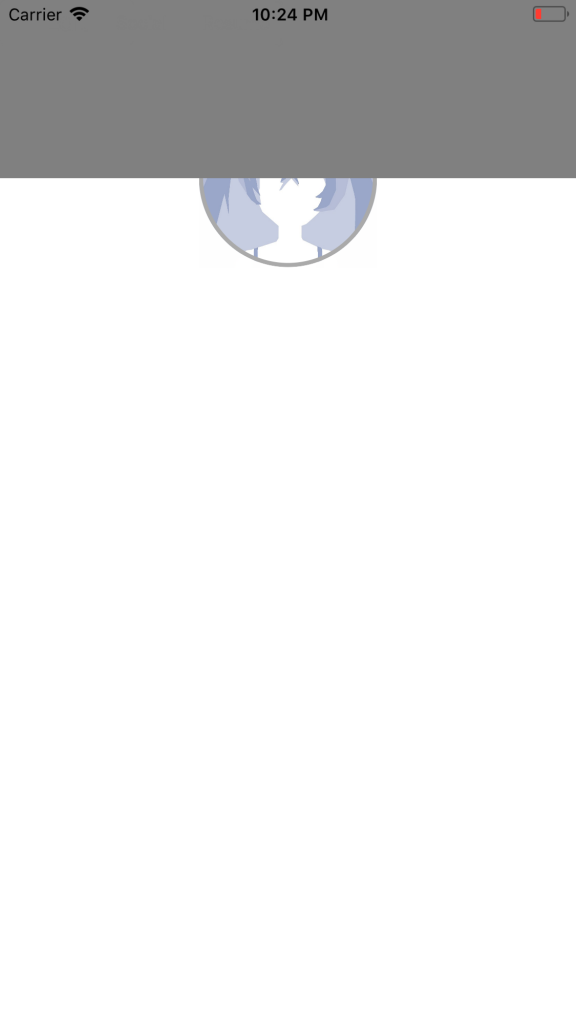
Unfortunately, this is not what I would like to receive. As you can see, ours
upperView lies on top of the avatar. This is due to the fact that we added an avatar as a subviews front upperView, and since these subviews are located in some form on the stack, we get this result. To fix this, we can simply replace these two lines to each other, but there is another trick I want to show you, as follows: self.view.bringSubview (toFront: avatar).This method will transfer the avatar from the bottom of the stack to the top, so choose the method that you like best. Of course, for readability, it is better to add subviews in the order in which they should be displayed if they intersect, while remembering that the first added subviews will be at the bottom of the stack, and therefore any other intersecting views will appear on top of it.
And this is how it should actually look:
Create Segmented Control
Next, we will create a segmented control, which is a gray bar containing three sections. Actually, a segmented control is easy to create. Do the following:
lazy var segmentedControl: UISegmentedControl = {
    let control = UISegmentedControl(items: ["Personal", "Social", "Resumè"])
    control.autoSetDimension(.height, toSize: 32.0)
    control.selectedSegmentIndex = 0
    control.layer.borderColor = UIColor.gray.cgColor
    control.tintColor = .gray
    return control
}()
I believe that everything is clear, the only difference is that after initialization we provide it with an array of strings, each row represents the heading of one of our desired sections. We also set it
selectedSegmentIndexto 0, which tells the segmented control to select / select the first segment during initialization. The rest is just a style to play with. Now let's continue and add it as a subview by inserting the following line at the end of the function
addCubviews(): self.view.addSubview(segmentedControl)and its limitations will be like this: segmentedControl.autoPinEdge(toSuperviewEdge: .left, withInset: 8.0)
segmentedControl.autoPinEdge(toSuperviewEdge: .right, withInset: 8.0)
segmentedControl.autoPinEdge(.top, to: .bottom, of: avatar, withOffset: 16.0)We tell the segmented control that we want to attach it to the left side of its superview, however we want to slightly increase the interval, and not attach it directly to the edge of the screen. If you notice, I use the so-called eight-point grid, where all distances and sizes are multiples of eight. I do the same on the right side of the segmented control. As for the last limitation, he says attach a vertex to the base of the avatar with an interval of 16 points.
After adding the above restrictions to,
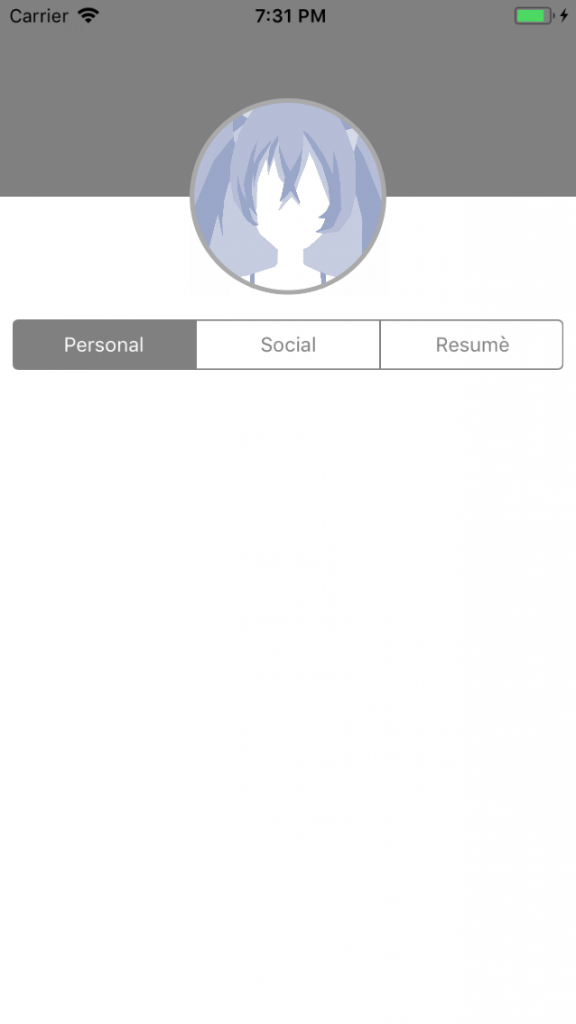
func setupConstraints()run the code and make sure it looks like this:Adding a Button
Now we will pass to the last part of the user interface of the textbook, which is an “Edit” button. Add the following lazy variable:
lazy var editButton: UIButton = {
    let button = UIButton()
    button.setTitle("Edit", for: .normal)
    button.setTitleColor(.gray, for: .normal)
    button.layer.cornerRadius = 4.0
    button.layer.borderColor = UIColor.gray.cgColor
    button.layer.borderWidth = 1.0
    button.tintColor = .gray
    button.backgroundColor = .clear
    button.autoSetDimension(.width, toSize: 96.0)
    button.autoSetDimension(.height, toSize: 32.0)
    return button
}()
Don't worry about how big the initialization is, but pay attention to how I set the title and its color by calling the
button.setTitleand functions button.setTitleColor. For certain reasons, we cannot set the title of a button by directly accessing it titleLabel, and this is because there are different states for a button, and many would be comfortable having different headers / colors for different states. Now add the button as a subview, like the rest of the components, and add the following restrictions so that it appears where it should be:
editButton.autoPinEdge(.top, to: .bottom, of: upperView, withOffset: 16.0)
editButton.autoPinEdge(toSuperviewEdge: .right, withInset: 8.0)
Here we set only the right and upper limits for the button, because we gave it a size, it will not expand and nothing else will be needed. Now run the project to see the final result:
A few recent notes
Practice, add as many interface elements as you want. Create views of any application that you find difficult. Start simple and gradually increase the difficulty. Try drawing UI components on a piece of paper to imagine how they fit together.
In the second part, I extend this guide to create a navigation bar, table view, and dynamic-sized cells in code.