Open webinar: “SSH / NC / Socat: tips & tricks”
Good day to all!
Next week, we start the next group “Linux Administrator” , in connection with which we held a number of events. One of them is an open lesson on SSH / NC / Socat: tips & tricks. On it we remembered what ssh is, its history and purpose. We considered various options for its use: remote, local port forwarding, secure copy, socks proxy, reverse proxy. We tried to actually use the nc and socat utilities in the virtual laboratory.
The webinar was conducted by an experienced system administrator Vladimir Drozdetsky - infrastructure developer letundra.com, exposcan.ru, crispmessenger.com.
We offer you a detailed description of the past event.
We remember what SSH is
SSH (English Secure Shell) - “secure shell”, the network protocol of the application layer. It allows you to remotely control the operating system and perform tunneling of TCP connections (for example, for transferring files). SSH is similar in functionality to the Telnet and rlogin protocols, but it differs from them because it encrypts all traffic, including passwords that are transmitted. The specification of the SSH-2 protocol is contained in RFC 4251.
Let's look at the various uses of SSH, both standard and non-standard. The following booth will help us in this: The
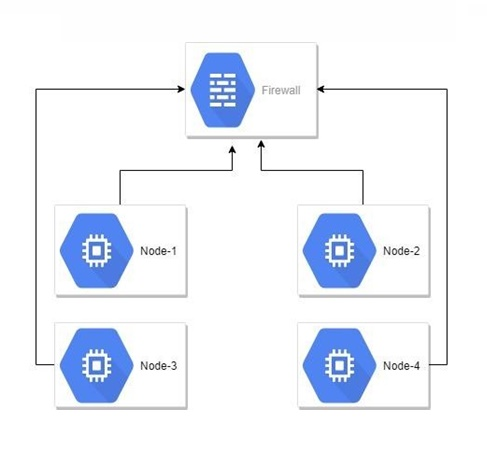
booth represents four virtual machines that are located behind the firewall. All actions will be performed from the machine Node-1.
Creating an SSH key
In order to use an SSH key, you must first create it. For this, a special utility that is absolutely in any Linux distribution is suitable:
SSH ssh-server settings
For further work, you will need to edit the / etc / ssh / sshd_config file and restart the ssh server. Here you should pay attention to the following options:
To copy the key to the server, proceed as follows:
In order to avoid entering the encryption key every time you connect to the remote server again, we can use ssh-agent. For this:
In this case:
For ease of connecting to a remote server, we can describe the connection parameters in the ssh config file, which is located along the path ~ / .ssh / config
Thus, we get the following SSH config file:
Everything is simple here:
SSH SCP
Go ahead. The easiest way to use SSH is to copy a file from one machine to a remote one. For this we use the SCP (Secure Copy Protocol) utility. With its help, you can copy a directory or file from a local server to a remote one, and vice versa:
Here:
SSH tunnel, proxy
Now let's consider the option how to forward a port to a local machine with a remote one. Take for example the classic case, that is, a bunch, when we have an “evil security agent” and one server with a web application, the ssh and https port is watching the world, and we really want to connect to the MySQL server.
So:
As a result, we can connect to the local port 9906 by the mysql client and get to our “secret” server.
With this command we create a socks5 proxy server using ssh. To check its performance, we can use the following command:
The classic example of port forwarding with ssh is when the server to which you want to connect is located behind naty. The following command will help us to connect to such a server:
On the remote server will open port 2255, which will be redirected to port 22 of our server for natom. To connect to such a server, we can use the command:
Note that:
Netcat (nc)
Our next stop is Netcat - a Unix utility that allows you to establish TCP and UDP connections, receive data from there and transfer them. Despite its usefulness and simplicity, this utility is not included in any standard and is not supplied as part of any distribution. Accordingly, it is necessary to install it by hand.
One of the interesting features of Netcat (nc) is the ability to scan ports:
After opening the port and connecting to it, we get a small network chat =).
Next, we consider the possibility of transferring files using the nc utility. To do this, the following command will help us:
We can complicate our pipe by adding file archiving on the fly:
n
A not very obvious nc feature is to create just an http server.
Please note that in order to use port 80, you must have root-rights.
Also note that:
Socat is
also a useful utility that allows you to establish TCP connections between machines, redirect ports, etc. It works according to the principle of Netcat: it opens two bidirectional connections, can transmit data, streams, etc. However, it has one interesting feature. For example, with the help of Socat, we can map COM ports to TCP ports, etc.
Examples of how Socat works:
Small transcript:
Should I watch the video version now?
Of course, yes, because in the description everything is presented thesis. In addition, in the webinar topics are disclosed in more detail, plus for some of them additional examples and implementation options are given. Thus, if you are interested in this topic, look at the open lesson in full and repeat all the steps followed by Vladimir Drozdetsky for maximum learning. And do not forget to leave your comments.
We, in turn, do not say goodbye and invite you to the course "Linux Administrator" !
Next week, we start the next group “Linux Administrator” , in connection with which we held a number of events. One of them is an open lesson on SSH / NC / Socat: tips & tricks. On it we remembered what ssh is, its history and purpose. We considered various options for its use: remote, local port forwarding, secure copy, socks proxy, reverse proxy. We tried to actually use the nc and socat utilities in the virtual laboratory.
The webinar was conducted by an experienced system administrator Vladimir Drozdetsky - infrastructure developer letundra.com, exposcan.ru, crispmessenger.com.
We offer you a detailed description of the past event.
We remember what SSH is
SSH (English Secure Shell) - “secure shell”, the network protocol of the application layer. It allows you to remotely control the operating system and perform tunneling of TCP connections (for example, for transferring files). SSH is similar in functionality to the Telnet and rlogin protocols, but it differs from them because it encrypts all traffic, including passwords that are transmitted. The specification of the SSH-2 protocol is contained in RFC 4251.
Let's look at the various uses of SSH, both standard and non-standard. The following booth will help us in this: The
booth represents four virtual machines that are located behind the firewall. All actions will be performed from the machine Node-1.
Creating an SSH key
In order to use an SSH key, you must first create it. For this, a special utility that is absolutely in any Linux distribution is suitable:
ssh-keygen -t RSA -N otuslinux -f ~/.ssh/otus
- -t - which encryption algorithm to use;
- -N - encryption key (convenient argument if you need to create a key without encrypting and replying to various ssh-keygen requests);
- -f - in which file to save the key.
SSH ssh-server settings
For further work, you will need to edit the / etc / ssh / sshd_config file and restart the ssh server. Here you should pay attention to the following options:
RSAAuthentication yes(is RSA authentication allowed); PubkeyAuthentication yes(is key authentication allowed); AuthorizedKeysFile %h/.ssh/authorized_keys(path to the public part of the key); PasswordAuthentication yes(is authentication allowed) To copy the key to the server, proceed as follows:
ssh-copy-id -i /path/to/pub/key user@server(copy the public part of the key to the remote server, the public key will be copied along the path to the% h / .ssh / authorized_keys file) In order to avoid entering the encryption key every time you connect to the remote server again, we can use ssh-agent. For this:
eval $(ssh-agent -s)(eval is part of POSIX. Its interface can also be a shell. The key in the agent will be stored in decrypted form). ssh-add ~/.ssh/our_private_key(Add a private key). In this case:
- -i - specify the location of the public key;
- user - username on the remote server;
- server - the target server's ip or dns.
For ease of connecting to a remote server, we can describe the connection parameters in the ssh config file, which is located along the path ~ / .ssh / config
Thus, we get the following SSH config file:
Host myserver
HostName ip/hostname Port 22/???
User username
IdentityFile ~/.ssh/id_rsa
Everything is simple here:
- Host is the name of our connection;
- HostName - server name;
- Port - ssh port
- User - username;
- IdentityFile - ssh-key.
SSH SCP
Go ahead. The easiest way to use SSH is to copy a file from one machine to a remote one. For this we use the SCP (Secure Copy Protocol) utility. With its help, you can copy a directory or file from a local server to a remote one, and vice versa:
scp test.txt username@server:/some/directory(Copy a file from a local server to a remote server). scp username@server:test.txt /some/directory(Copying a file from a remote server to a local one). scp -r dir_name username@server:/some/directory(Copying a folder from a local server to a remote one). Here:
- username - username;
- server - server address;
- / some / server - directory where we copy;
- dir_name - folder name;
- -r - use recursively.
SSH tunnel, proxy
Now let's consider the option how to forward a port to a local machine with a remote one. Take for example the classic case, that is, a bunch, when we have an “evil security agent” and one server with a web application, the ssh and https port is watching the world, and we really want to connect to the MySQL server.
So:
ssh -f -N -L 9906:127.0.0.1:3306 user@server(Just our case with MySQL) As a result, we can connect to the local port 9906 by the mysql client and get to our “secret” server.
ssh -D 8080 -q -C -N -f servername(Proxy traffic through SOCKS through port 8080) With this command we create a socks5 proxy server using ssh. To check its performance, we can use the following command:
curl -x socks5h://server-with-proxy:8080 https://test.domain
The classic example of port forwarding with ssh is when the server to which you want to connect is located behind naty. The following command will help us to connect to such a server:
ssh -f -N -R 2255:localhost:22 username@servername(forwarding from a remote server to a local server). On the remote server will open port 2255, which will be redirected to port 22 of our server for natom. To connect to such a server, we can use the command:
ssh -p 2255 username@localhost
Note that:
- -f - send ssh to background;
- -N - do not execute the command on the remote host;
- -L - forwarding of the local port (local port: local machine: remote port);
- -R - port on the remote machine;
- -q - silent mode;
- -D - defines the local dynamic routing of application-level ports;
- -C - request for data compression.
Netcat (nc)
Our next stop is Netcat - a Unix utility that allows you to establish TCP and UDP connections, receive data from there and transfer them. Despite its usefulness and simplicity, this utility is not included in any standard and is not supplied as part of any distribution. Accordingly, it is necessary to install it by hand.
One of the interesting features of Netcat (nc) is the ability to scan ports:
nc -vn ipaddress 22(scan one port); nc -v ipaddress 10-55(port range scan); nc -l 4444(open and listen to port 4444); nc servername 4444(connect to the server on the desired port). After opening the port and connecting to it, we get a small network chat =).
Next, we consider the possibility of transferring files using the nc utility. To do this, the following command will help us:
cat test_file | pv -b | nc -l 4444(open the port and transfer the file to it via the pipe, the pv utility with the -b key is used to display the progress of the file transfer in bytes). nc servername 4444 | pv -b > filename(we connect to the server to get the file, pv -b is used in the same way). We can complicate our pipe by adding file archiving on the fly:
tar -czf - /path/to/ | pv -b | nc -l 4444(archiving folders on the fly and sending); n
c servername 4444 | pv -b > file.tar.gz(receive sent archive). A not very obvious nc feature is to create just an http server.
while true; do nc -lp 80 < index.html; done Please note that in order to use port 80, you must have root-rights.
Also note that:
- -l - specify the listen mode;
- -n - do not use DNS queries;
- -v - verbose output.
Socat is
also a useful utility that allows you to establish TCP connections between machines, redirect ports, etc. It works according to the principle of Netcat: it opens two bidirectional connections, can transmit data, streams, etc. However, it has one interesting feature. For example, with the help of Socat, we can map COM ports to TCP ports, etc.
Examples of how Socat works:
socat -u FILE:file_name TCP-LISTEN:5778,reuseaddr# send a file; socat -u TCP:192.168.1.48:5778 STDOUT | pv -r > file_name# get file; socat TCP-LISTEN:80,fork TCP:ubuntunode-4:80# redirecting the port of the remote server to the local port; socat TCP-LISTEN:1234,reuseaddr EXEC:/bin/bash# Open remote shell =); socat - TCP:server_with_remote_shell:1234# Connect to the remote shell of the remote server. Small transcript:
- -u - use unidirectional mode;
- FILE - indicate that we use the file;
- TCP-LISTEN - we listen to tcp-port;
- reuseaddr - allows other sockets to communicate with the same address, even if it is used;
- fork - after the connection is established, the channel is processed in the child process;
- TCP is a type of connection.
Should I watch the video version now?
Of course, yes, because in the description everything is presented thesis. In addition, in the webinar topics are disclosed in more detail, plus for some of them additional examples and implementation options are given. Thus, if you are interested in this topic, look at the open lesson in full and repeat all the steps followed by Vladimir Drozdetsky for maximum learning. And do not forget to leave your comments.
We, in turn, do not say goodbye and invite you to the course "Linux Administrator" !