The tale of how I assembled a 120-inch home theater from pipes, ropes, a folding screen and black velvet
This post will be completely different from all previous ones, as it overlaps little with Epson, but I want to share the story. In addition, perhaps my experience will be useful to someone.
What, in fact, is about:
Everyone who is interested in how an obsession was born because of a projector accidentally aimed at the wall, which, after passing through several stages, resulted in a completed mini-project to create a kind of home theater - I ask for a cat. Stock up on tea or coffee, grab cookies and go!
Caution, traffic and a long story!
How did you come to such a life
Last October, I moved to a new apartment. During the move, packing and unpacking, cleaning and showdown, I would like to periodically completely distract from all this crazy house and just relax while watching YouTube, a movie or a series. But there were no other places except for bare walls and a battered sofa with an armchair in one of the rooms. Do not sit, chewing a bun in front of the tablet , honestly! An idea came up: to use the projector by simply directing it to the wall (even if pasted with wallpaper - not to the "fat", as they say) and connecting it to the laptop.
But where to get the projector from? I sold my old man Epson EH-TW450, which had been serving me the truth for almost ten years before the move, and did not have time to buy a new long-awaited Epson EH-TW5650 ! And there is no money for it yet. What to do?
Search for a “temporary” projector
It turned out that recently in the comments to the previous post I had a little polemic with a reader who was convinced that the Chinese projector from the brand was “ quieter and more vibrant than color ” and, of course, about “ LED life time against the lamp ”, which me especially interested.
Do not get it wrong: I am well aware that an LED light source can be cooler and more durable than a lamp that can be found in Epson "tube" projectors. However, in this case, another question arises: what, in fact, will happen to such a projector after, say, the first, third and further thousand hours of work? I will not go into details of how the RGB-LED DLP projector LED light source is arranged, in this case I am only interested in the final result: what will happen (and will happen) if I regularly “drive” the Chinese projector at rated power ?
A few words about LEDs
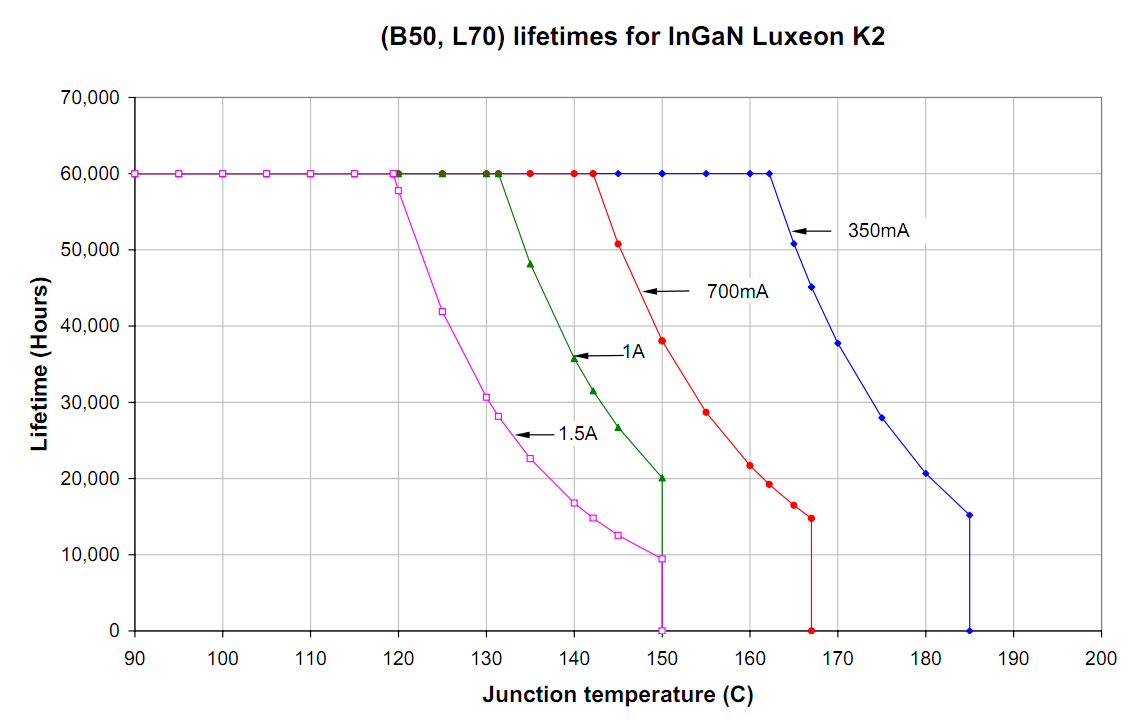
Recall that the durability of an LED depends primarily on current and temperature.
According to the Lumileds report regarding the durability of LED light sources depending on operating conditions (on the page is a link to a PDF document with a study), it is important for LED light sources to maintain certain temperature operating conditions . With increasing temperature (and current, about it below) above the "calculated", the service life is rapidly reduced:
Lighting Research Center comes to about the same conclusion .
As well as profpodsvetka.ru (hereinafter - from Russian-language publications, which were found on the topic):
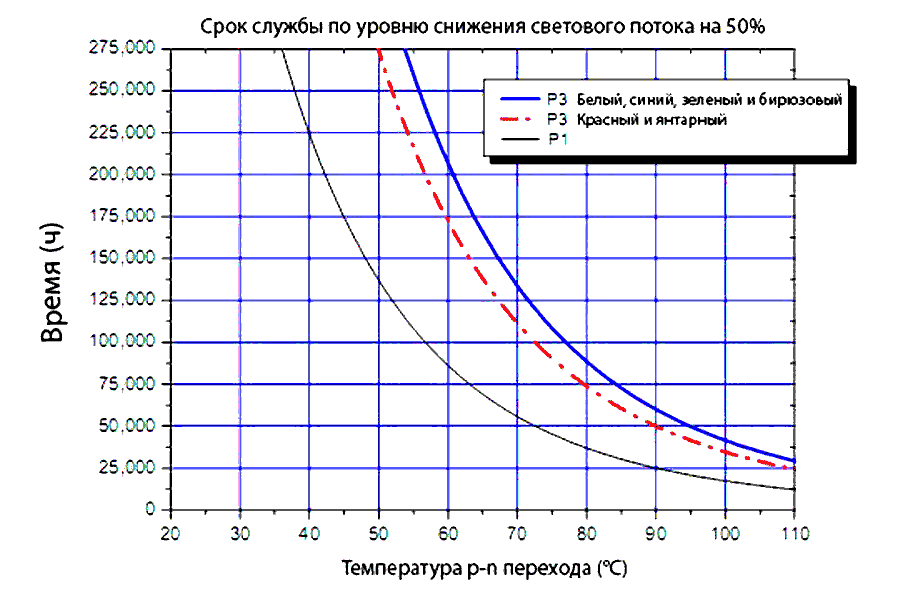
Led-obzor.ru further explains that when the operating temperature rises, the LEDs can also lose in brightness . A very interesting article, by the way.
Well, enough publications, let's get back to LED projectors. So, it is not known in advance in what temperature conditions the LEDs work in them and at what current . For no one forbade “overclocking” LEDs by deliberately exceeding the rated supply current by the manufacturer. As a result, nominally we can have an increase in the brightness of a weak LED to the level of a more expensive and brighter one, but at the cost of shortening the service life. The second unknown is superimposed on this - the operating temperature . As a result, strictly speaking, it is not known how much such an apparatus will actually work on its own light source.
You just don’t think bad: I’m not trying to “clever”, but just sharing those moments that I personally interested in while studying this issue and searching for a “temporary” projector .
In short, Sklifosovsky!
So what am I doing? “ Why ,” I thought, “ do not kill two birds with one stone: take the Chinese LED projector for testing as a temporary one (until it goes out) and, in fact, get at least some kind of projector at its disposal? It is advisable - free then! "
So did. True, free then it didn’t work ... And in the end I bought a small Chinese projector of a popular brand with the letter “X” for my money. What you just won’t do for the sake of science.
But now I finally got at least something that I could watch GSL SC2 championships in the evenings and all kinds of videos on YouTube, knowing that parallel to the top a good thing in the form of a regular “test of the LED projector for durability” .
The screen is needed ...
And so I sat on the armchair, watched whatever was horrible, and also periodically in the evenings admired such a picture on the wall:

But ... This wallpaper. Oh, this wallpaper! You need to do something with them! My patience was enough for a month, after which I began to figure out options.
There were two options:
- tear off the wallpaper to the famous mother, polish the wall for painting and paint it with matte paint;
- buy and hang up a roll screen;
I dismissed the first one, because I'm lazy, and the wallpaper is in excellent condition. Moreover, this is what - again to breed dirt in the very first weeks after the settlement!? .. Oh well it! Let's go in the second scenario and look for a roll screen under the ceiling.
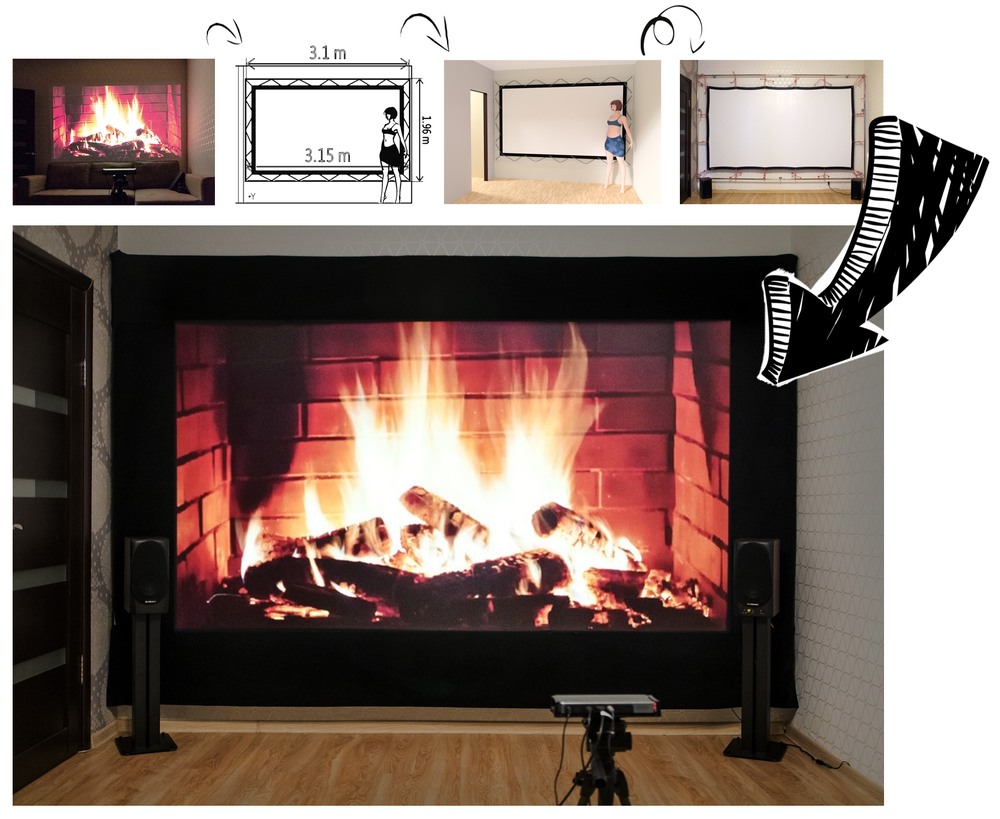
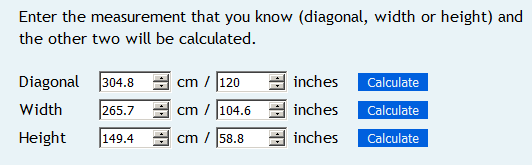
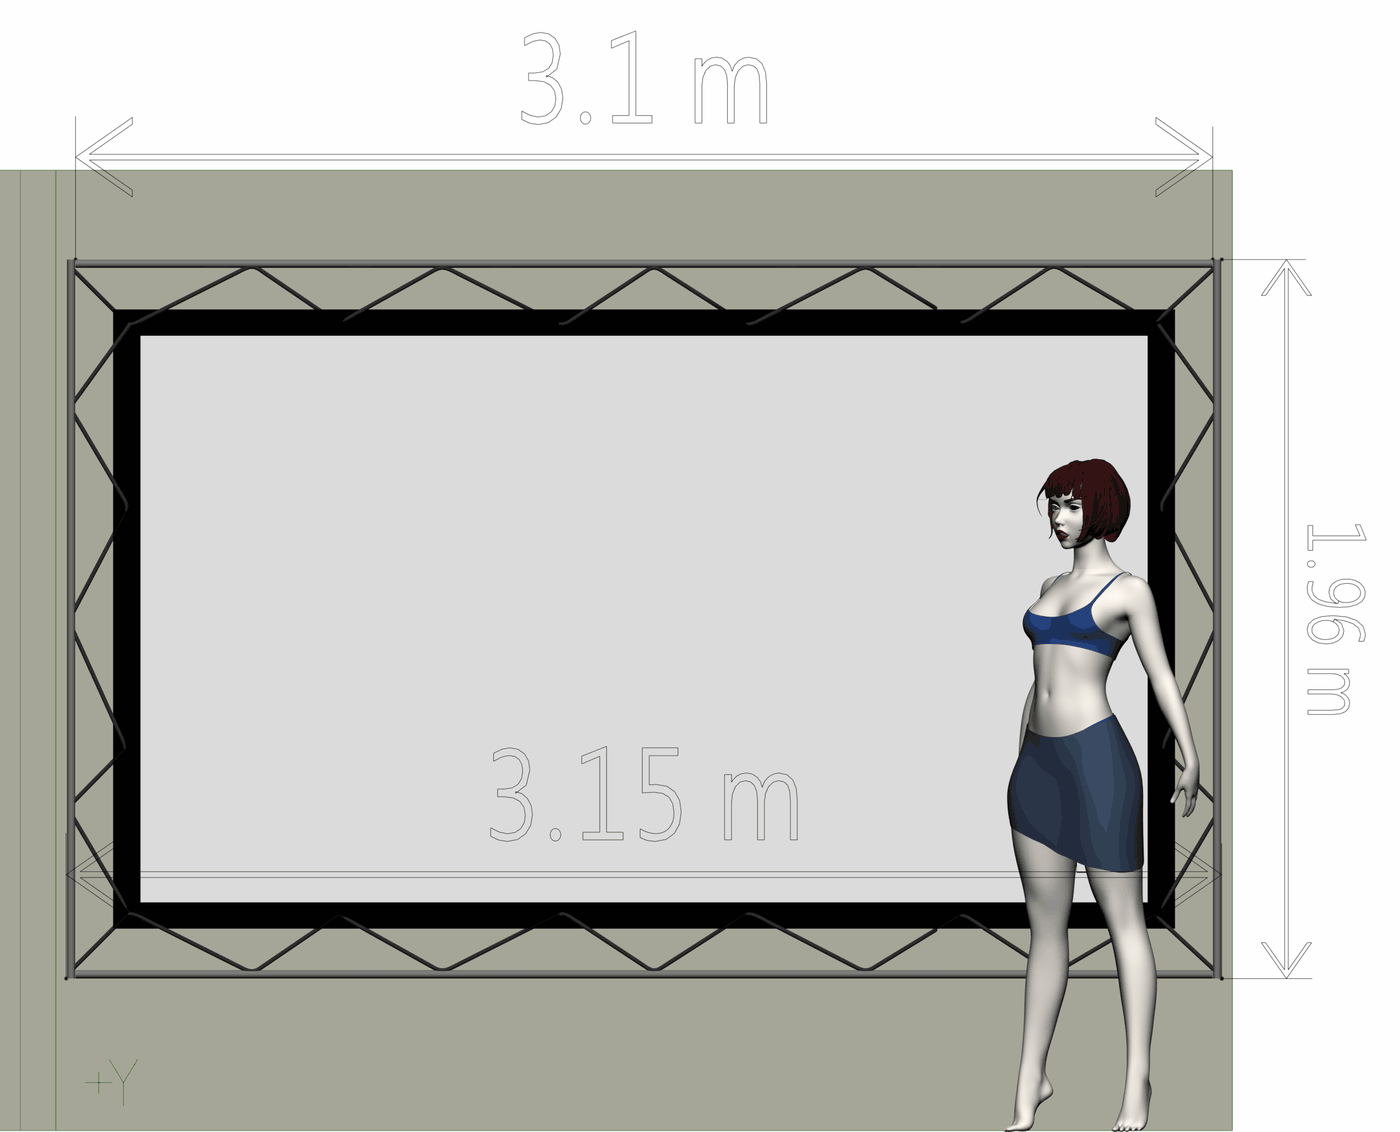
The width of the room, which I planned to allocate for the "entertainment center" - 3.23m. Ceiling height, taking into account the suspended structure - 2.6 m. Those. really, taking into account the dimensions of the case, etc. you can count on the screen in the region of 120 inches (up to 266 cm in width in the case of an aspect ratio of 16: 9, plus mounts, etc.):
Take a roll?
For a long time I was looking for a roll screen of such a diagonal and eventually found:

And even ordered! And then he thought with his head and decided to evaluate the size and weight:
- Screen Case Size (cm): 282 x7.2x7.2
- Package Size (cm): 290 x12x14
- Weight: 15 kg
Almost three-meter non-separable box! I’m not only going up the stairs, but I won’t even bring her into the staircase! (In fact, he went down and measured - not an option). Maybe through the window ... Oh well, some silly thoughts. Maybe you can also send the parcel by helicopter, hmm?
Hastily cancel the order.
What to do?
I did not even have time to get upset that, apparently, I still have to rip off the walls, as I remembered that there are folding screens !

Usually, they are vinyl or PVC based.
You won’t believe it, but for a completely incomprehensible reason to me, finding an inexpensive 120-inch folding (or “pull-up”) screen in Moscow , and just in some online store in Russia, turned out to be a very non-trivial task!
As my projection manager told me, these screens are called “ constant tension screens ”. But they are, firstly, very expensive, and, secondly, their wall mount system does not provide sufficient flexibility in terms of moving the entire canvas up / down and left / right. That is, if in the future I decide to put a cabinet under the screen with a UKF projector ( Epson EH-LS100 , for example) or with a decoder / blu-ray player, etc., there is a non-zero probability that the screen will have to be lifted above . And I don’t want to do this in advance, because the higher it is, the higher you need to raise your head when viewing. I want flexibility in installation and that's it!
But still I will return to the most important issue in my case - the issue of price . It turned out that the vast majority of offers with inexpensive screens are not on the frame - only from the sites of our dear Chinese friends! To which I eventually turned, ordering here such a 120-inch miracle made of colored PVC for 60 bucks (colored - so that it was opaque, because translucent ones can be found):
Those. it is assumed that for these technological holes it needs to be straightened and stretched to some kind of structure. Such, for example:
Search for installation options
Well, OK. The ordered screen is on its way. But how and where to hang it?
Again a few options:
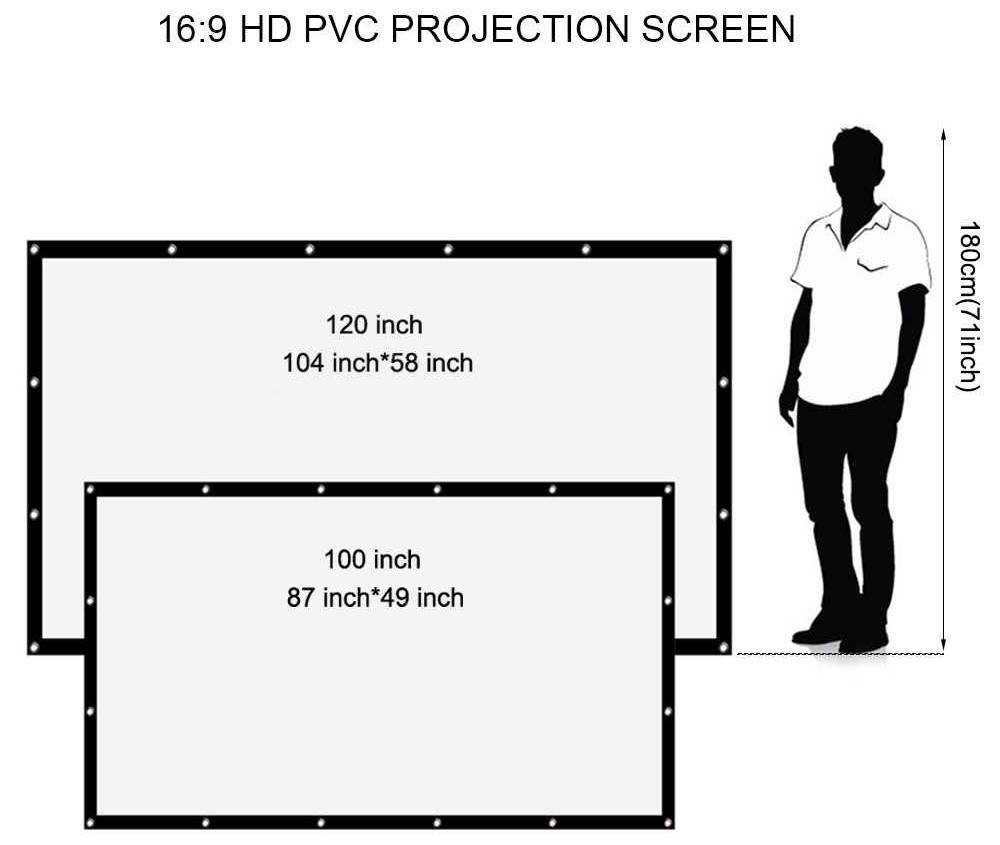
- buy or assemble a suspended stand construction. Such, you know, which with a screen of 120 inches will swing like a sail from a light breeze and look like the photo above? Will not do;
- get a few meters of Velcro tape. Glue the soft side along the edges of the screen, and the “hard” side - to the wall. Tighten the screen and secure with Velcro. Quite an option. That's just ... And if you want to lower the screen below ? Or higher ? Or shift to the side? Paste again? And peel the tape from the wall as - along with the wallpaper ? Not that again ...
- “Play the engineer-Kulibin” and assemble your own design with pipes and ropes, which: a) would allow you to adjust the position of the screen in two planes within 10-15 cm; b) if necessary, could be mounted / dismantled using conventional screws with a minimum of marks on the wall; c) it would look cool .
The farther into the forest, as they say ... In general, the third option seemed the most attractive, feasible and, importantly, flexible in terms of adjusting the position. Considering that I didn’t plan to use this side of the room for anything and do not plan, I stopped on it.
3D Entertainment
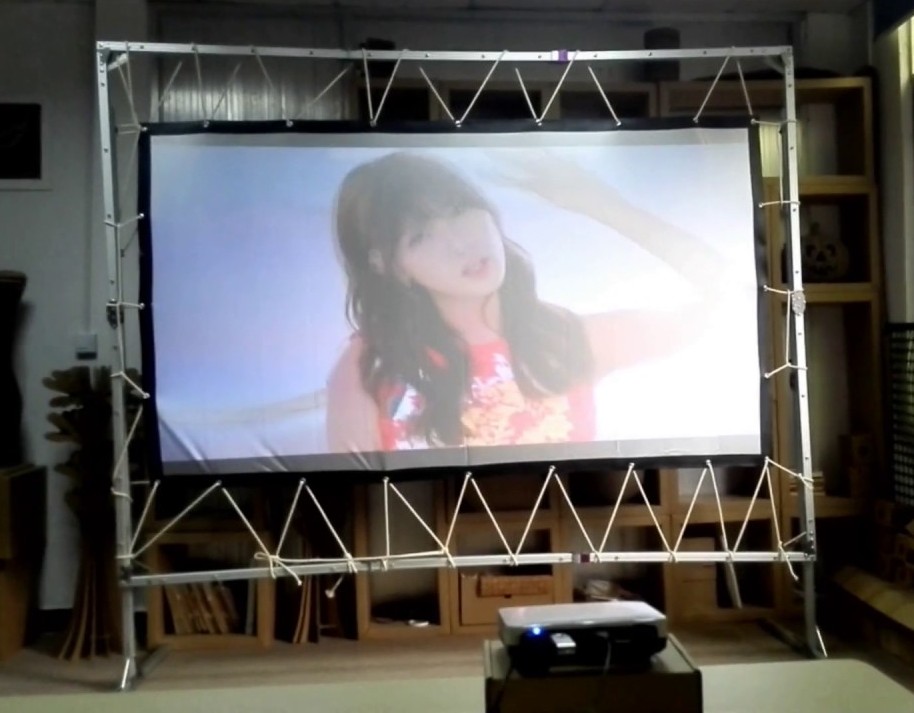
What is the most important stage of the project? Right! - Planning . And if it is also with visualization, moreover visual and realistic, then it’s absolutely wonderful.
First of all, I figured out the most suitable position for the 120-inch screen, placing the picture from the projector on the wall as I would like to see it as a result. Then he made the necessary measurements and opened his favorite Softimage XSI .
Having assembled and drawn the scene in the editor, I was able to visually evaluate how the design I needed might look like (added a mannequin for size estimation):

It seems nothing, just these ropes on which the screen is stretched ... But what if all this disgrace is covered with ribbons of black velvet (or velvet) fabric? Like this:

Another thing! Although it seems to be on the screen.
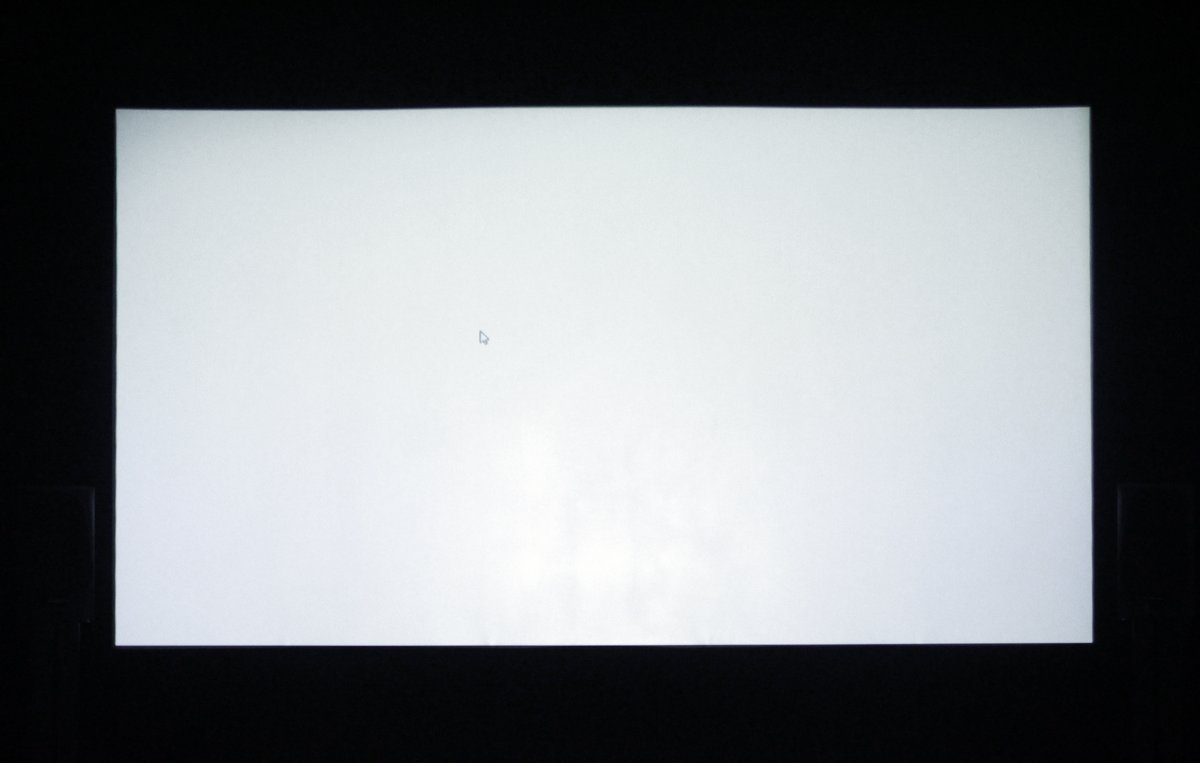
And this is how this whole thing will look when the projector is working in complete darkness and displays a bright scene:

As you can see from the results of drawing with 10 bounces , light walls are not the best option for a "canonical" home theater, because on bright scenes in the room there will be spurious illumination . But, in general, there is no disaster, which I can personally confirm based on the results of viewing on a real screen in a real room (I will devote a couple of paragraphs to this in the next post).
I print the finished result and put it in the bag.
I’m studying mounting options for this design, I consult with a fellow engineer, compile a list of necessary tools, accessories and fasteners and go to a hardware store for advice, and ideally, purchase everything I need.

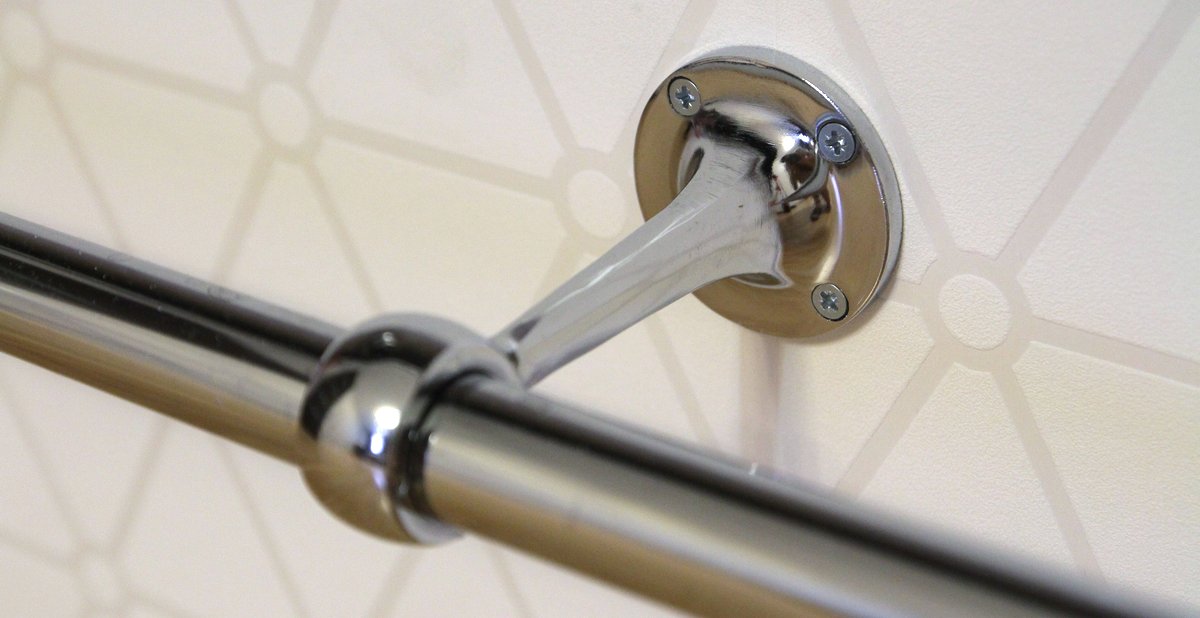
- The pipes steel chromeplated D25, 25х10х2000
- End pipe mounting to wall reinforced D25
- Pipe connectors are hidden (because pipes are longer than 2m and it’s not easy to find, and you can’t bring them into the apartment, as is the case with a roll screen)
- Connectors of two pipes T-shaped
- Pipe cutter
- Fasteners
- Ruler, level, winning drills, etc ...
In general, shopping was a success and all the necessary components cost around 7,000 rubles (in fact, if we take into account only the components for the assembly, it’s less, because this amount also includes all sorts of levels, rulers, drills, which during the initial move safely broken / lost). I got an order and got down to business ...
And then the screen just arrived
Here it is after unpacking:

Here is the canvas! It is one thing to see it in pictures, it is quite another to pick it up and deploy it.
In my eyes I see a question regarding folds . Will definitely come back to him a little later.
After careful , unhurried , neat , “ measure seven times - cut once ” calculations and measurements, the upper and lower pipes were cut and connected, 24 holes for the end fasteners were made, the fasteners themselves were screwed to the wall, and they were fixed in them pipes. The rope for tying the screen to the structure is cut into pieces, and the screen is triumphantly stretched on the ropes (for now - trial). Result:

On top of the pipe passed through three end mounts, and on the bottom and sides - one , because only the upper one is experiencing a significant load. Yes, and fasteners, and less work, of course, in this version (all holes had only one drill with a victorious tip).
So what about the creases?
Now you can return to the question of getting rid of wrinkles on the screen . They are clearly visible when the screen is a bright scene or uniform fill. On the one hand - "maybe it will hang - it will smooth out" ...

Hung a week. Not smoothed out . Something needs to be done with this.
Such a curious instruction came with the canvas:

I’m not sure that such severe folds can be “cured” by simply dipping the screen in “ slightly warm water ”, but I will try, of course.
Effect? - Zero , as I expected. What to do?
Again, I go to the Internet and meet the mention that folds can be smoothed out with a hairdryer. I turn on the hair dryer and with trembling hands I bring it to the screen. The first "cold" mode - nothing, the second "warm" - nothing, the third "hot" - nothing, and even the canvas was so hot that it became scary for the coating (but I have painted PVC). Well him, away from sin ...
And now what? There are not so many discussions on this topic in Runet and in the rest of the web, and there aren’t any specific tips. Oh no! Wait a minute! Well, look at the merchant’s response to similar screens on one of the product comments: “ You can use steam iron to get rid of wrinkles. This is what we do, it really works . ”
"Steam iron"? .. Yes, it's a steamer ! But it’s a great idea: it will allow you to solve the problem efficiently and safely for the screen material, because the steam has not prohibitively high, but sufficient temperature to warm the surface, and also quickly condenses on the surface when the heat supply stops, which is useful for “fixing” the result.
For steaming, I borrowed from friends here such a 1300 W steamer:

And for almost 6 hours he carefully smoothed the screen. And ironed it! It’s just that he carefully went overboard a little ... You see, the dullness of the surface of the PVC screen is provided not only by the material itself, but also by its texture . Those. the canvas itself is visually mottled with small, small "pimples", which allows it not to glare and evenly reflect light.
So, my advice to you is how to properly remove creases from the PVC screen: if you smooth it with a steamer, do not press the nozzle of the steamer to the screen !
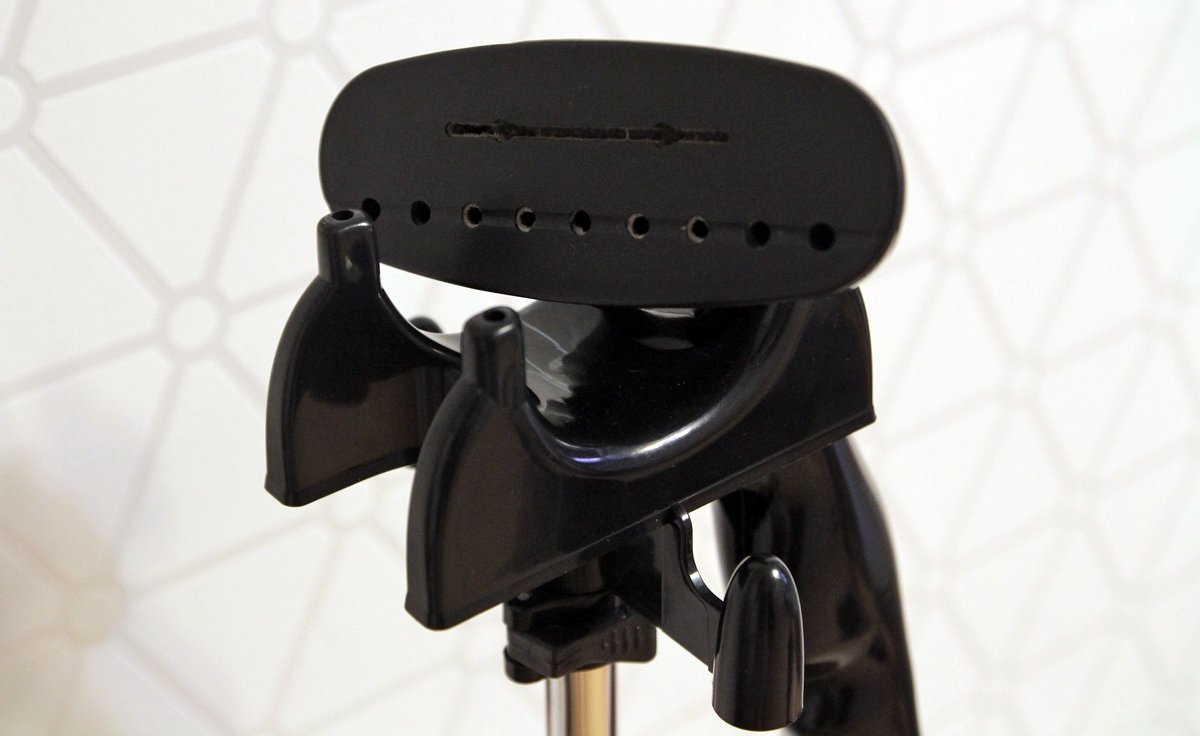
Otherwise, as I, in some places, diligently “smoothing” especially stubborn folds, smooth this fine surface texture ! Now, from a certain angle on the canvas, you can see as if the “greasy” (but actually smoother and therefore slightly glare) areas that are visible when the screen is filled with uniform white light from a certain angle (see the bottom of the photo, you can see the “track” in width - exactly with the nozzle of the steamer):
It’s not a catastrophe, but in the future I will most likely still order a new canvas and “rip it off” without too much fanaticism.
In general, there is no need to press the steamer nozzle to the cloth to smooth wrinkles, because PVC, when heated to the temperature of water vapor, tends to return to its normal, "factory" state.
And one more important point: after ironing the screen will "sit down" . In my case, from the 120-inch (according to the passport), actually turned out 116- inch screen. I suppose that the shrinkage would be less if there were one or two mounting holes on each side, since they would not allow the web to tighten strongly between the attachment points.

And here he is! - Smooth, evenly stretched by ropes screen on a frame of own manufacture:

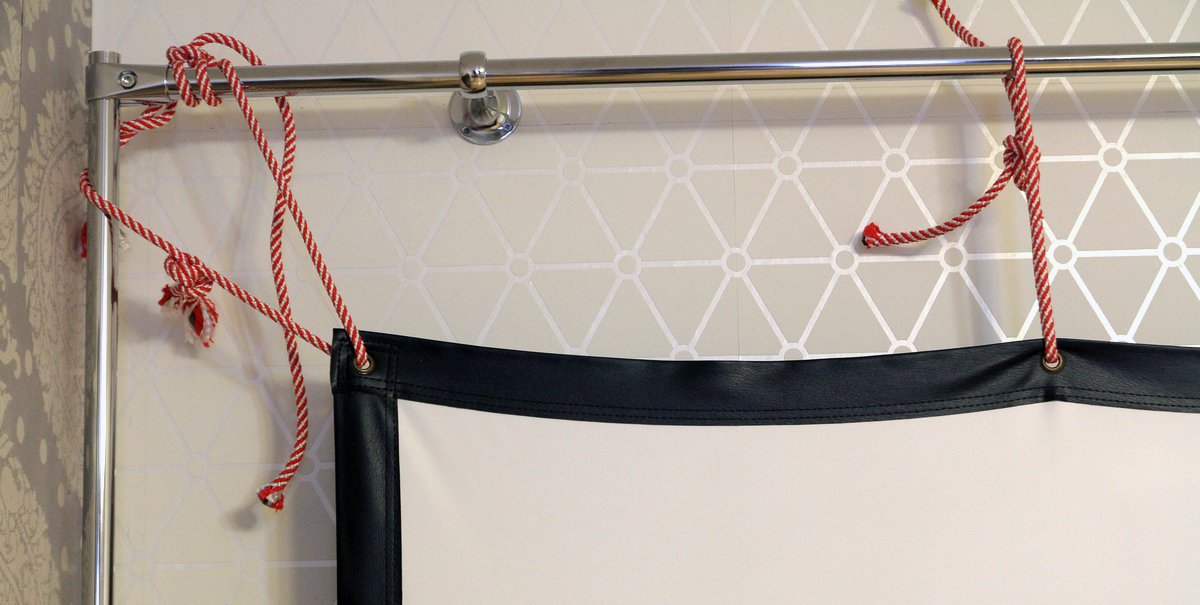
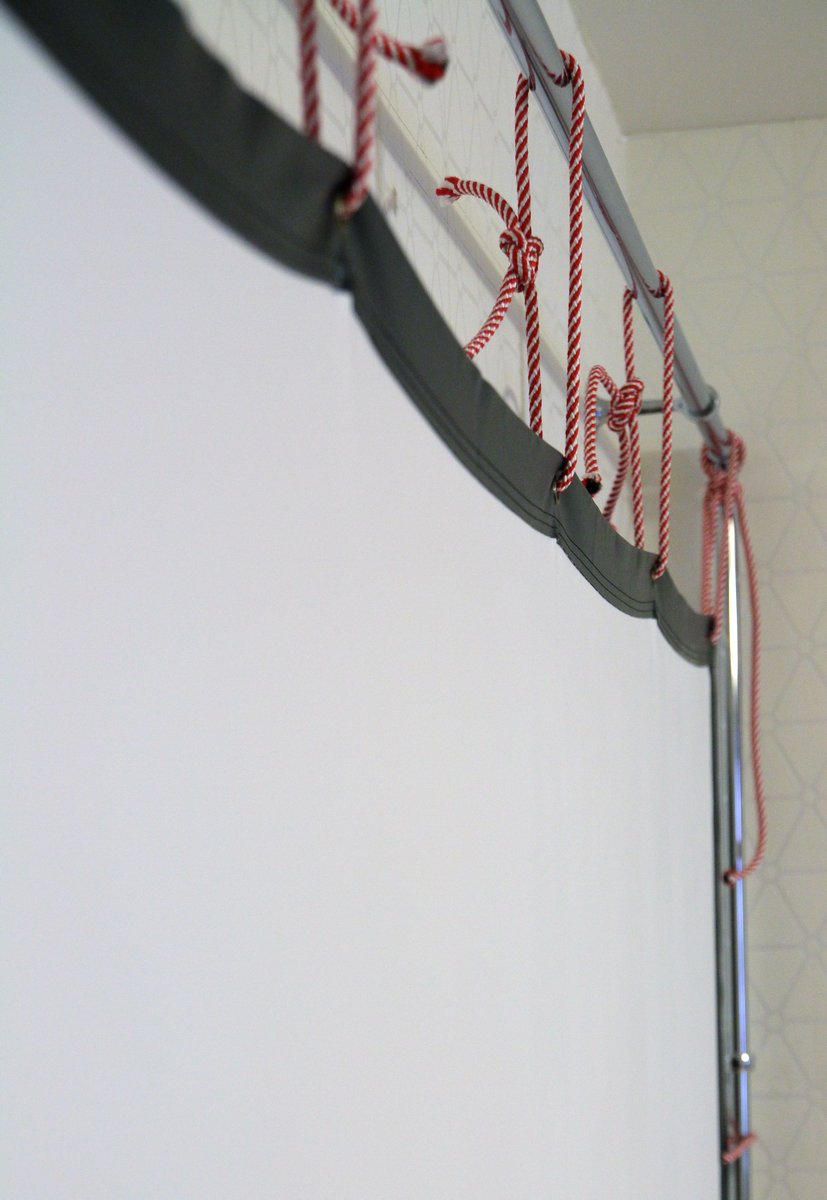
Have you admired? Now we will hide this “snake wedding” out of sight.
Making an adjustable velvet frame
For the edging of the structure, we will do the following: take black velvet (or velveteen) on a cotton basis (so as not to stretch and not sag):

We cut this velvet or velveteen into four ribbons of the desired width and sole. And we will attach to Velcro ( Velcro tape / burdock )! To do this, we attach the side with the “hooks” to the pipes, and glue the soft tape and sew it to the ribbons.
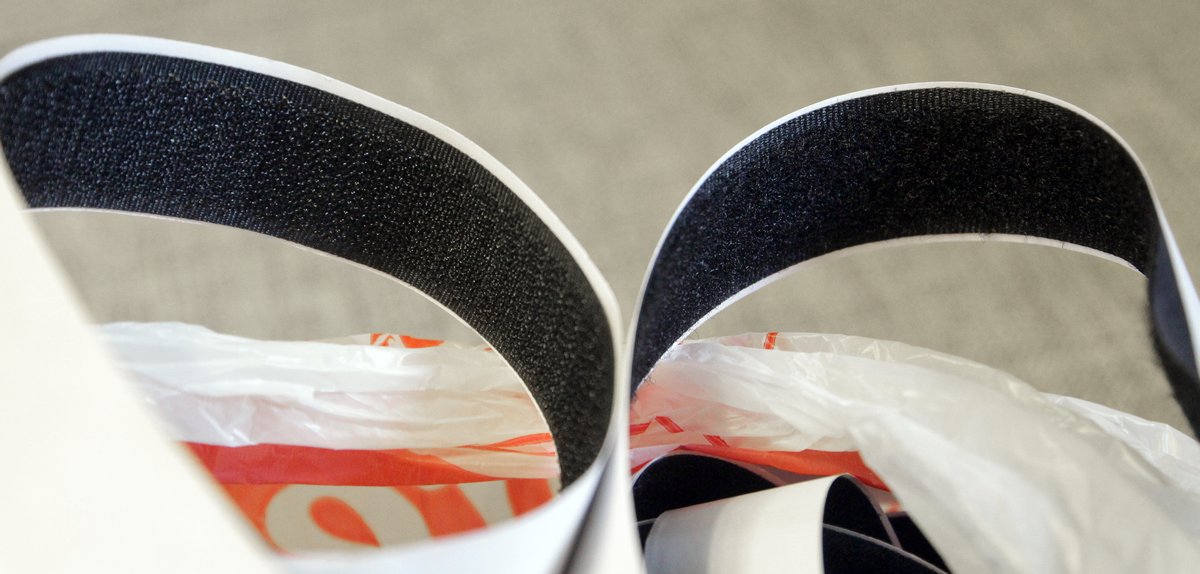
Using Velcro will solve several problems at once:
- will make it possible to stretch and fix fabric tapes between two attachment points;
- will allow you to change the diagonal of the screen by moving the tapes;
- help to remove the cleaning tape with ease;
- it will be possible to replace the tape with another if necessary.
No sooner said than done!
We measure and cut. Then we bend the edges and glue the braid (or "spider line", as it is also called), so that the material does not crumble.

We figure out where you need to sew on the Velcro tapes so that it is tight (without sagging above and below the screen).

We sew Velcro to the ribbons on the back side, and also - additionally - on two long horizontal ribbons - short Velcro in the middle of the ribbon and the screen to provide them with additional support and not to sag), we fix the Velcro on the pipes.

Voila! Done!
What about the sound?
I will do this: I will take my favorite stereo pair (the legendary JB-381 ) and put it on fashion stands. I already have a stereo pair, it remains to order for the speaker columns - I took the metal Bowers & Wilkins STAV24 S2 - and pass the wires by the fabric ribbons.
DONE !
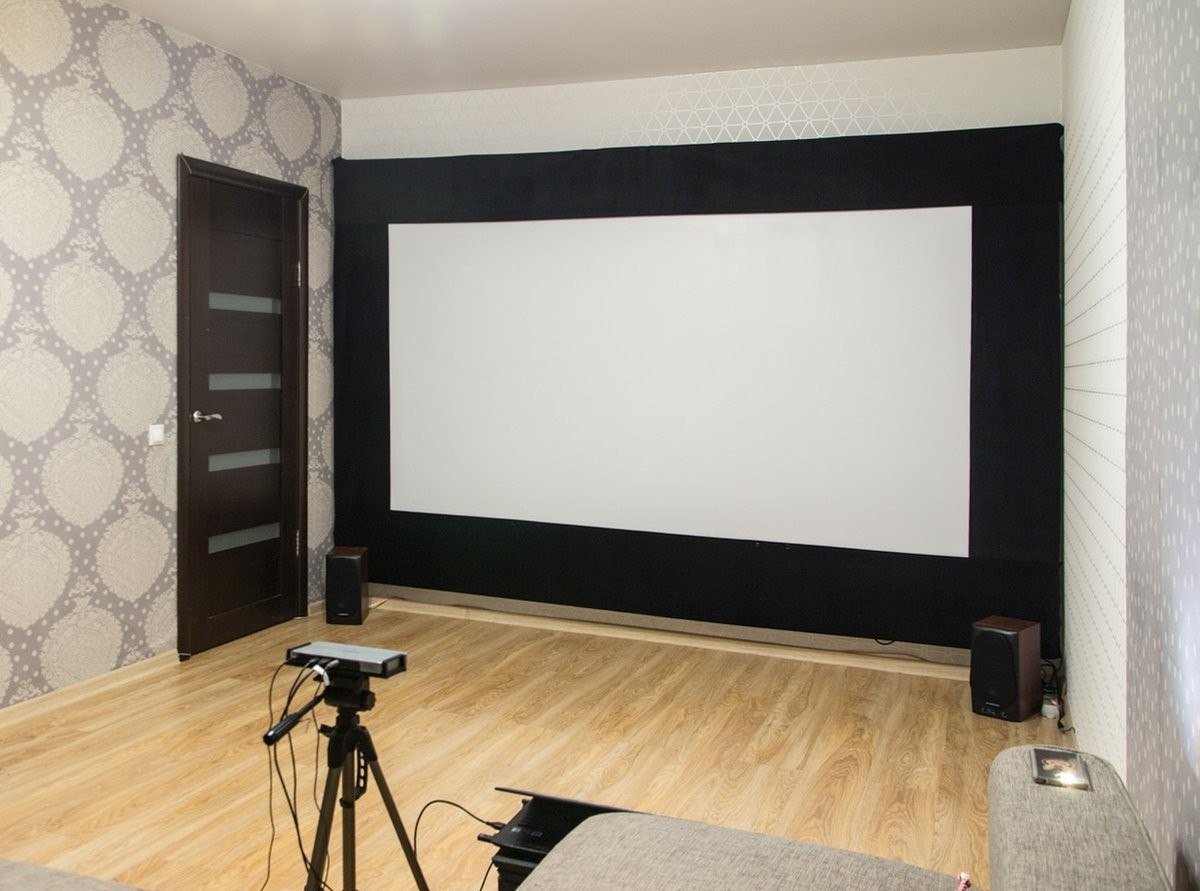
Result
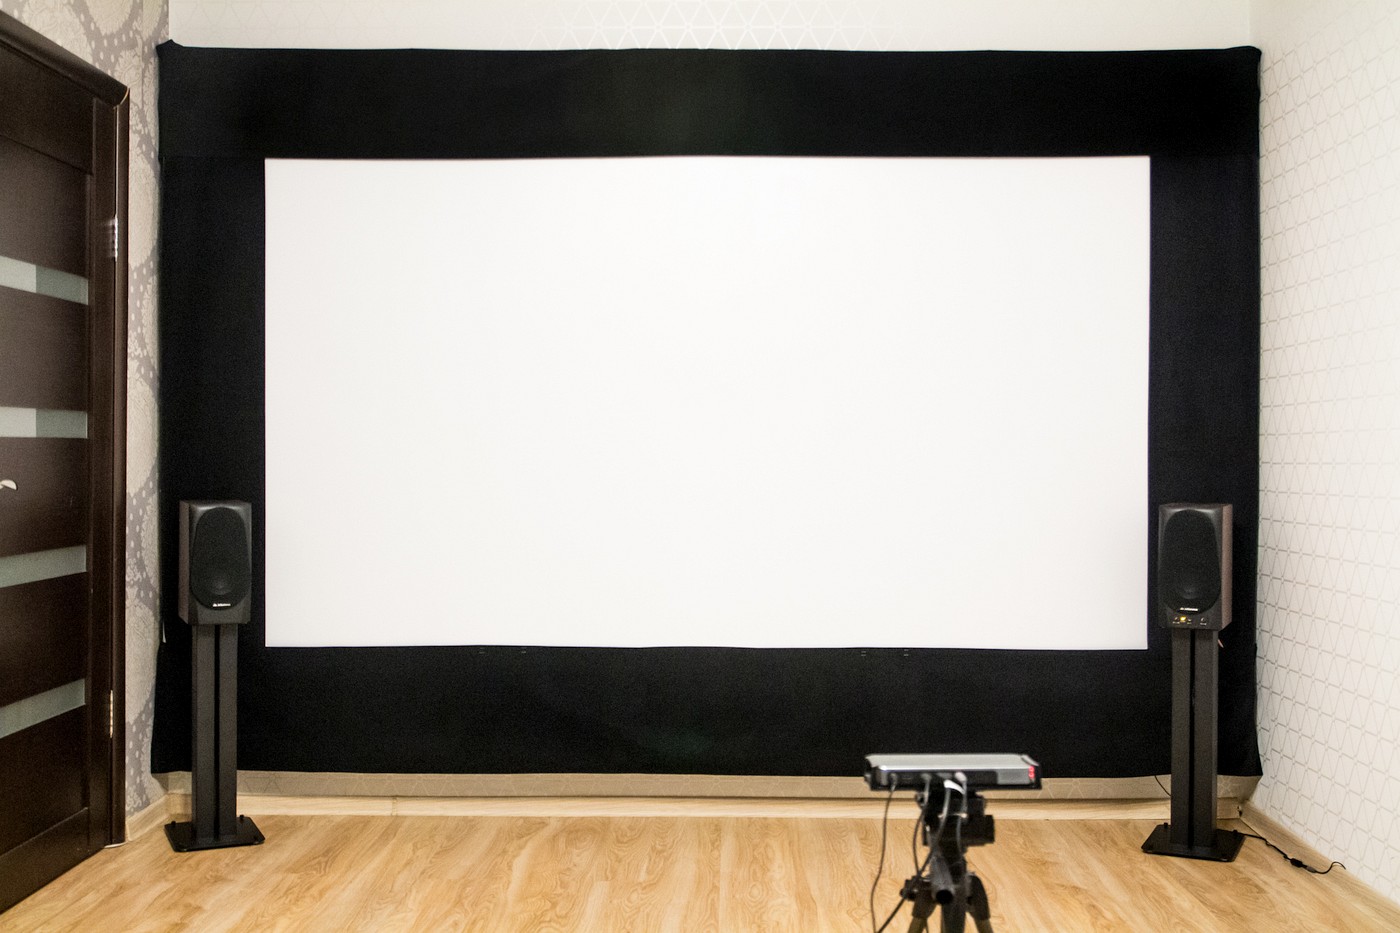

GIF-addition specially for perfectionists: the wiring is hidden, and the corner of the baseboard is returned to its place:

In my opinion, it turned out pretty well. Feelings when watching movies, games (yes any content, actually) you can roughly imagine. Remember nVidia's “ The way it ' s meant to be played ”? - Playing in the PS4 Pro on such a diagonal, I constantly spoke this phrase in my head. Modern console games just look amazing on the big screen (Horizon: Zero Dawn, Rachet & Clank, Driveclub, Uncharted, God of War - I will go through again, this is a completely different experience).
To be continued
In one of the following posts (already much more briefly) I’ll tell you how I got Epson EH-TW5650 (albeit only for a week) and about my impressions when viewing a picture from it in a dark and lighted room, as well as some more thoughts about the resource projector light source.
Well, over time, I plan to also share the experience of operating an LED projector.
Thank you for attention!