Chip protection against reverse engineering and unauthorized entry
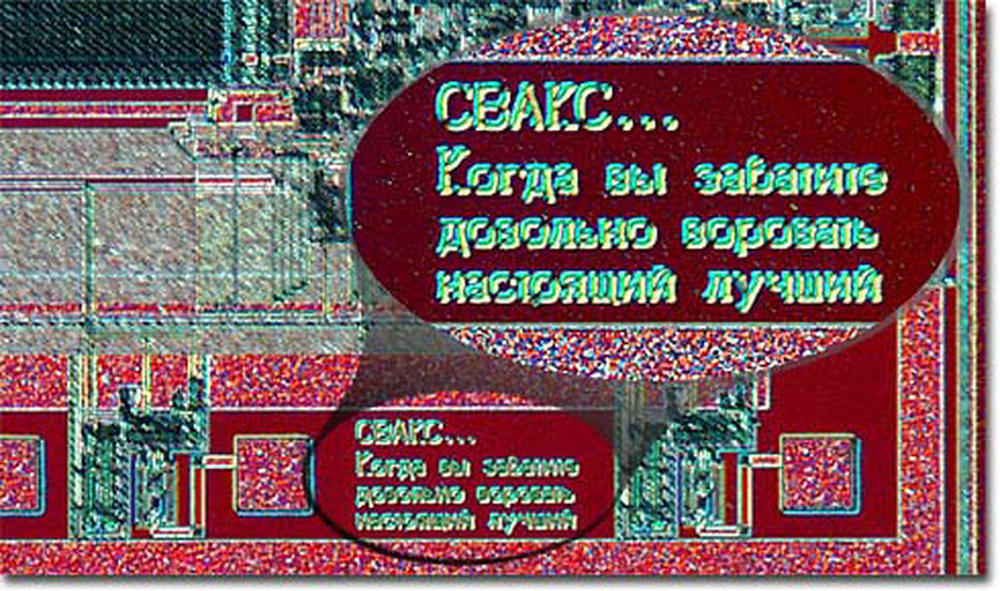
“CVAX - when you forget to pretty steal the real best”.
The inscription left by American engineers for Soviet colleagues in the topology of the microprocessor.
Reverse engineering of microcircuits is a headache for manufacturers from the very first years of microelectronics existence. All Soviet electronics at some point were built on it, and now they are engaged in the Celestial Empire with a much larger scale, and not only in it. In fact, reverse engineering is absolutely legal in the United States, the European Union and many other places, with the aim (I quote American law) “teaching, analyzing, or evaluating the concepts of work or circuitry”.
The most frequent legal application of reverse engineering is patent and licensing courts. Industrial espionage is also common, especially since electrical circuits (especially analog ones) are often key intellectual property and are rarely patented - just to avoid disclosing IPs and participating in patent courts as an accuser. Of course, being in a situation where you need to protect your intellectual property without patent it, developers and manufacturers try to think of ways to prevent copying their developments.
Another no less (and even more) important area of protecting circuits from reverse engineering is ensuring the security of information stored in memory. Such information can be either the FPGA firmware (that is, again, the developer’s intellectual property), or, for example, the PIN code from a bank card or the encryption key of a protected flash drive. The more valuable information we trust in the surrounding world, the more important it is to protect this information at all levels of the processing systems that process it, and the hardware level is no exception.
First things first: an important thing to understand. Speaking both about reverse engineering and about protection against data copying, one should understand that absolutely sustainable methods of protection do not exist, and all that is realistic is to make the process so long and / or expensive so that it becomes economically inexpedient.
Many years ago, the work of a reverse engineer or microelectronic pirate was much easier than now. Look, for example, at this snapshot (thanks to BarsMonster for our happy childhood and good photos): with a basic understanding of technology, restoring an electrical circuit from it is a matter of a few hours.
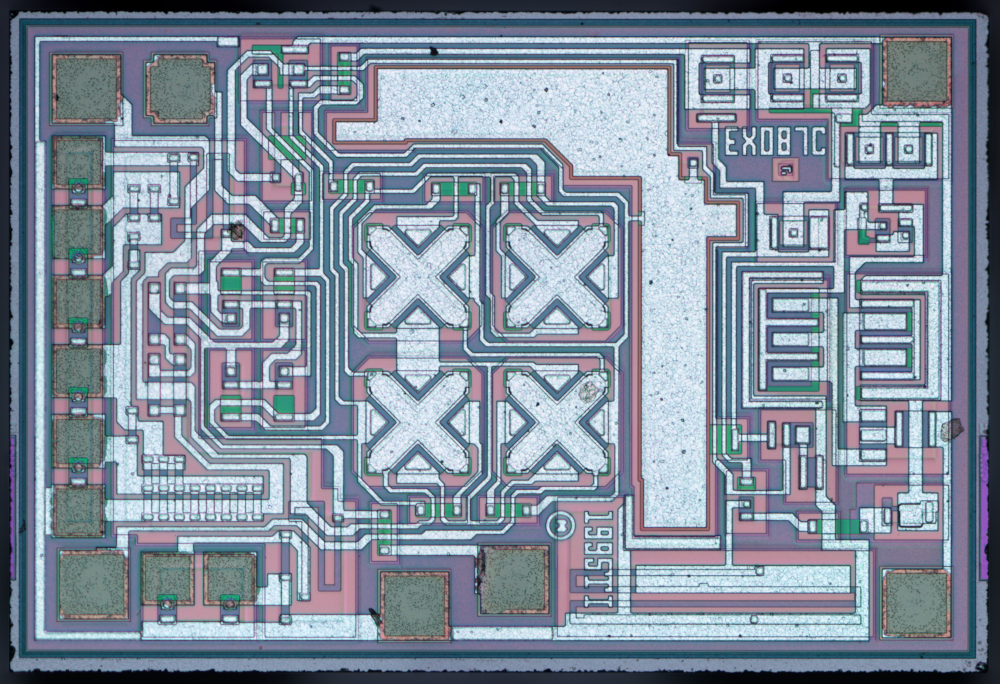
Figure 2. A snapshot of the topology of the OPA134PA op amp. Source - zeptobars.com
HereBy the way, there is an example of reverse-engineering of the TL431 chip made by Ken Shirriff from BarsMonster photos. And here is a Russian translation. Ken’s blog has a lot of cool stuff if you’re interested in amateur reverse engineering.
And here (carefully, traffic!) - a report from the reverse-engineering of the Zilog Z80-CTC chip, made in 1979, almost immediately after the release of the chip. Now this is a unique historical document, but then it was information that had enormous commercial value and was obtained (judging by several references to military standards), probably in the process of certifying the chip for special applications.
But we live in 2019, not in 1979, and now it is a matter of months or years to reverse the complete scheme of a fresh Intel microprocessor, even with a good level of automation of the process (not to mention the fact that even to capture an acceptable resolution topology with design standards 14 -10-7 nm is a very difficult task). Yes, what is Intel? Compare the amount of work on the reverse engineering or analysis of the amplifier from the image above and the processor “Baikal-T1”, performed by a very popular and relatively affordable 28 nm process technology. Complete reverse engineering of such large products is needed extremely rarely, it is more often interesting to look at some specific and relatively small blocks. For example, to find out if they violate your patent, or to compare your solution with competitors' products and try to understand why it is better or worse. Or to find out
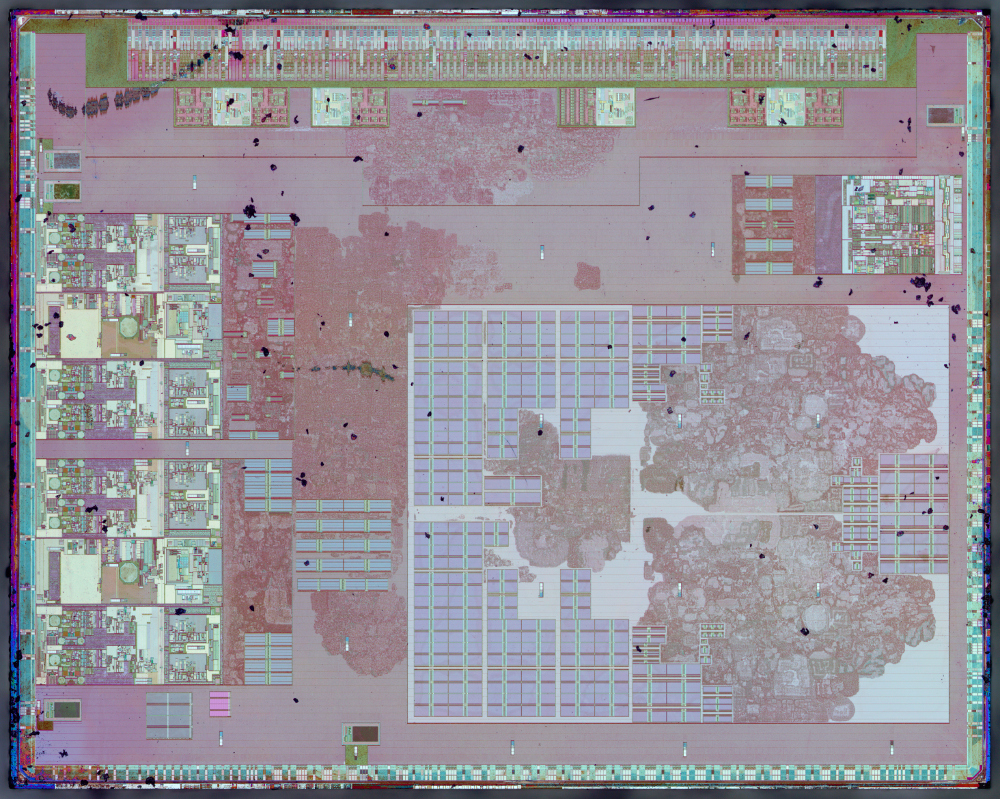
Figure 3. A snapshot of the topology of the “Baikal-T1” processor. Source - zeptobars.com
Here we move on to the next important part in the history of reverse engineering. In ancient times, the whole chip was developed from the beginning to the end within the same company, sometimes even by a very small team or a brilliant loner like Bob Widlar. Modern chips are full of IP blocks, the sale and purchase of which is a huge market, in which, of course, there is also copyright control, industrial espionage, and piracy. Therefore, it is possible and necessary to look at the problem of protection against unauthorized copying not only from the point of view of the developer of the final product, but also from the point of view of the IP developer for whom the product developer can also be a pirate.
In the case of burglary, the intruder’s internal structure is usually uninteresting to get data to the intruder, and partial reverse engineering is done (if at all) to find vulnerabilities and exploit these vulnerabilities, either using direct connection or other methods. The developer’s task in countering burglary is to prevent the exploitation of potential vulnerabilities and, if necessary, to destroy sensitive data when attempting to break.
CHARACTERS
First, let's see who can protect the design of the chip from that. In the chain from idea to use, the following entities are involved, having different types of access to information about the contents of the chip.
- Developer IP block. It has all the information, all the necessary files, measurement techniques, etc. etc.
- Chip developer. If Soft IP is used, Verilog / VHDL has a block code, in the case of Hard IP it can have both a topology and a black box. If there are any programmable or soft parts in the block, it has access to them too.
- Factory. It has access to the GDSII topology files, but does not have access to the software-dependent part of the chip (for example, the PROM firmware).
- Enclosing and testing production. It has access to the crystal, as well as to test methods and firmware maps of a single programmable memory. Someone is rarely protected from them, but they must be on the list, because some of the methods suitable for protection from the factory do not work against them.
- Competitor / cracker. It has access only to the finished product and user documentation.
In the simplest case, the developer of the chip (2) wants to be protected from copying by a competitor (5) or to make a chip with memory protected from unauthorized reading. In a little more complicated, the IP developer (1) wants to ensure that the developer of the chip (2) observes the license agreement. It also happens that the chip designer (2) does not trust the factory (3) and suspects that she can drive counterfeit on the night shift.
About what is IP in integrated circuitsI wrote in detail some time ago, so I will not repeat this article. There's also a little bit about how IP developers protect their intellectual property. In short, the factory’s participation as a third party is usually practiced to protect the topology, and the buyer doesn’t receive the actual topology of the IP, and for protecting the code on Verilog, obfuscation techniques similar to the obfuscation techniques of any other code are used.
INSTRUMENTS
What tools for analyzing the chip are there? The first level is a bit of acid in order to first open the microcircuit case, and then remove the layers one by one, and an ordinary optical microscope with a camera. It is not expensive, it is easy to work with them, and for the analysis of simple schemes made using not the newest technologies, this is quite enough.
For larger schemes, there are special CAD systems that allow one way or another to automate the recovery of data from the topology — providing the reverse engineer with a more convenient interface to work than just drawing lines in a graphical editor. Automation is also simplified by the fact that all modern digital circuits are built from libraries, and after reverse engineering of library elements, to assemble a circuit is a matter of time (or available computing power).
The next level, inaccessible to amateurs, but present in specialized laboratories, is a scanning electron microscope (SEM). It uses a focused electron beam instead of a light beam. SEM resolution can reach 1 nm and even slightly lower, which is enough for analyzing any modern integrated circuits.
FIB is an analogue of SEM, only using a beam of heavier ions instead of an electron beam. Actually, the FIB is a Focused Ion Beam. The main difference between FIB and SEM is that with its help one can not only analyze the microcircuit, but also modify it, for example, make cuts (in order to view the cross section of the microcircuit or remove some piece) or spray the material (in order to create a connection there where it is not). FIB is widely used by developers and manufacturers of microcircuits for working with test samples, because correcting an error with it, although it takes a long time, is still much faster and cheaper than restarting an experimental batch. For a reverse engineer, this is also a unique way to get to those parts of the crystal that the developer intended to not be available. And by designing a tamper-proof microchip,

Figure 4. Chip cut made with FIB. Source - SERESSA-2015 (carefully, a lot of traffic in pdf by reference).
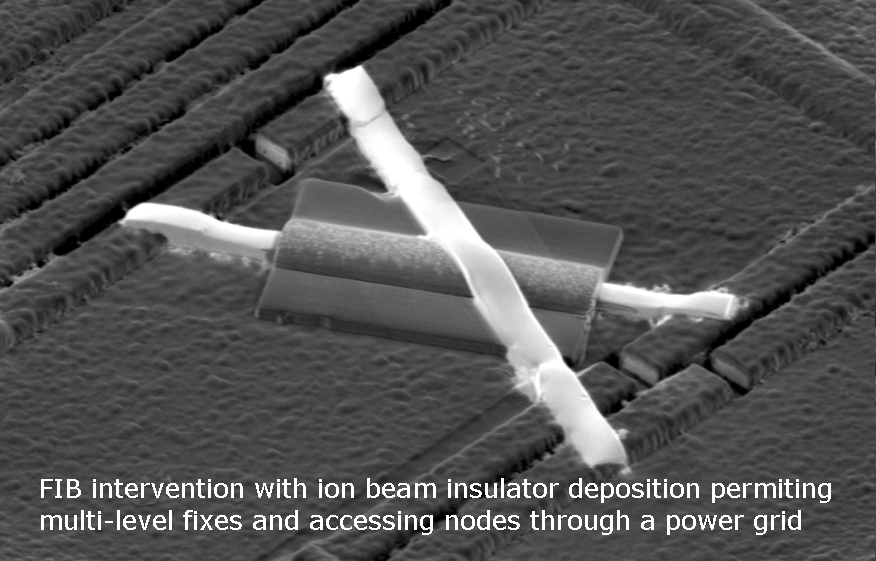
Figure 5. A FIB-made modification of the chip that changes several connections.
Another essential tool for reverse engineer is a set of lasers. Lovers have access to powerful lasers, with which you can open the microchips in plastic cases and gain access to the crystal. For professional lasers, depending on the wavelength, some parts of the microchip design can be transparent and others are opaque. This allows you to use a laser, for example, to accurately open passivation and insulation, so that you can later conveniently join a metal line without risking short circuiting it with your neighbors. Other parameters will allow you to cut metal or burn individual transistors. Still others - to induce current in transistors, switching cache cells or some sort of logical lines. The latter option is universally used as an inexpensive imitation of the effects of heavy charged particles, but in principle, the introduction of failures in a working chip can also be useful for compromising the information contained in it. For example, it may be interesting to rewrite any flag in the register file or slightly correct the work of the random number generator.
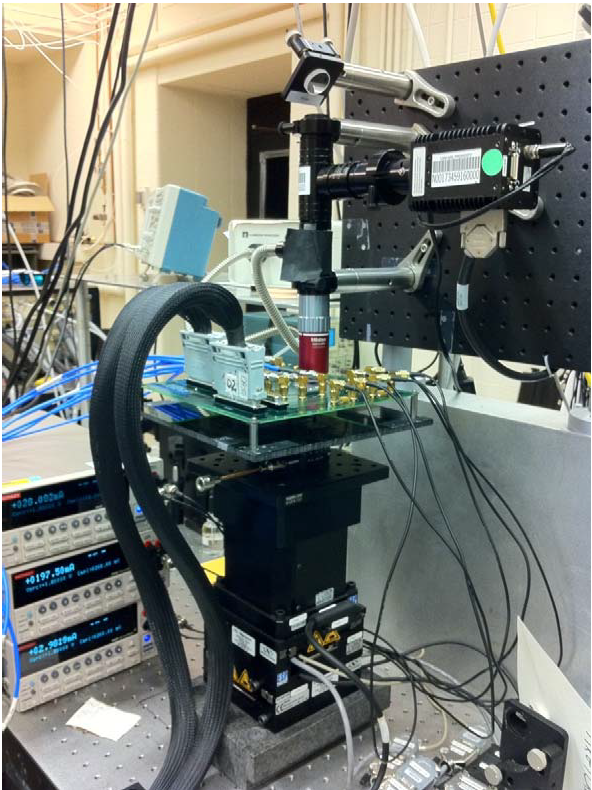
Figure 6. The appearance of the laser to study the effect of single failures on the chip. Source - SERESSA-2015.

Figure 7. An example laser-generated map of the sensitivity of a part of a microcircuit to single failures and failures. Source - SERESSA-2015.
In advanced laboratories, reverse engineering and you can find many other interesting tools; for example, a digital signal up to several tens of MHz can be monitored in real time by placing a small piece of lithium niobate on the appropriate line and illuminating it again with a laser.
CASE 1: UNRELIABLE FACTORY
What could be the reasons for not trusting the factory where you make your crystals? In an ideal world, of course, you will not get involved in a factory that you don’t trust, but sometimes commercial considerations force you to take risks. It can be minimized in two main ways:
- The so-called split fabrication or, in a simple way, production in two factories. But not in parallel (as is usually done to minimize the risk of shortages in case of unforeseen delays in production), but part of operations in one factory and part in another. This is rather inconvenient for all participants in the process (and certainly not every factory will agree to this), but this will force an unreliable factory to at least reverse the rest of the chip design and make the missing masks on its own. (which, ideally, should make the game not worth the candle). The main disadvantage of this approach is that the upper layers of the chip are metallization, which is reverse engineering quite simple. Split fabrication, however, can be really effective in combination with some technological know-how in metals, which an unreliable factory is unable to reproduce. For example, if the second factory chosen by you can do non-volatile memory (MRAM, memristors or something else like that) in the upper metallization layer, without which the entire design loses its meaning.
- If you do not have any technological know-how, then a simple and reliable way is to make the chip meaningless without further programming. Programmable blocks can be made independently using configuration memory, or as a block based on embedded FPGA (such IP is on the market). Configuration memory as a way of protection allows you to be sure that the factory cannot simply take and produce your chip around you. But you can read configuration memory, right? Yes, but the presence of configuration memory forces an unreliable factory instead of a simple way to increase production volumes to do the same reverse engineering as all other intruders.
Separately, I note that both of the described methods of protection from an unreliable factory help from unauthorized copying, but they do not save from the “bookmarks” that are popular in narrow circles. Moreover, a little further I will talk about how to make “bookmarks” in the topology myself.
CASE 2: MEMORY PROTECTION
The presence of programmable blocks and configuration memory in the chip is almost an indispensable attribute of any modern design, both digital and analog. With decreasing design standards, the variation of parameters from crystal to crystal increases, and digital tuning is the easiest and most reliable way to overcome it. And digital circuits (for example, microcontrollers) usually store data directly on a chip and can have a multi-level memory structure, different parts of which have different levels of access and protection. Therefore, it seems a logical idea, firstly, to use a tool that we already have to increase security and burglary, and secondly, the idea to think carefully about what type of memory to use.
Firmware metal connections(Mask ROM). It usually looks like the presence or absence of contact between two metal lines, a little less - as the presence or absence of a transistor between them. The most oak, is used in basic matrix crystals (BMC) - not only in the ancient defense industry, as you might think, but also in quite modern solutions, for example, in auxiliary chips inside Xeon processors. In addition, with the help of such a memory, families of microcircuits (mainly microcontrollers) are made, because flashing memory in production by changing one mask is cheaper than the total firmware of each produced crystal on a plate or in a case. Mask ROM is read very easily with a microscope and careful etching. Houses can be handled.
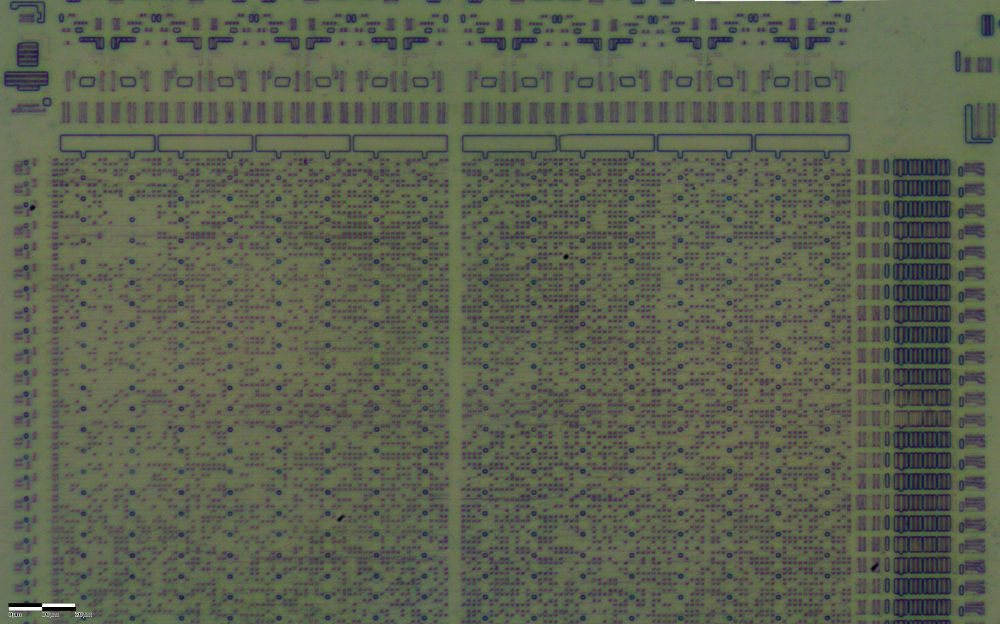
Figure 8. ROM firmware with metal interconnects on a fake FTDI FT232RL chip. Source - zeptobars.com.
It should also be noted here that memory can be flashed not only with a layer of contacts between metals, but also with the presence and absence of metal (easy to read optically), presence or absence of doping (easy to read optically) or, for example, the threshold voltage of a transistor, controlled doping level (poorly read optically). So in principle, for mask ROM, all is not lost if you really want to hide its contents.
Burnout Jumper Memory(Fuse ROM). Allows one entry (including the user record on the finished device) and an unlimited number of readings, is very easy to manufacture and programming, and therefore popular for all sorts of configuration memory and firmware.
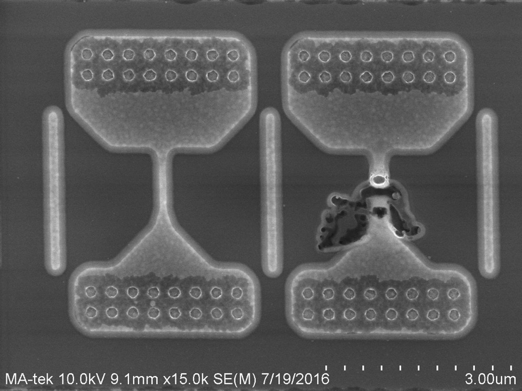
Figure 9. Two Fuse ROM states. Source - semiengineering.com
As you can see, the state of a conventional burned - through jumper (Fuse) is very easy to look through a microscope, that is, it is simply impossible to protect oneself from opening the crystal with its help. Well and, among other things, the classical burned-through jumper is quite large (several square microns) and therefore not suitable for large amounts of memory.
Flash memory and other EPROM and EEPROM options based on floating gate transistors.

Figure 10. Flash Memory Record. Source - techreport.com
The principle of operation of this type of memory is quite simple: in the thick dielectric layer there is a “floating” gate. An electric charge can be placed in this gate by means of tunneling, applying high voltage to it. And further, if the high voltage is not supplied, the charge can be stored in the “floating” gate for a very long time.
What about security? The good news is that the state of the EEPROM cannot be seen with a microscope. Bad? There are several of them at once.
The first bad news is that the EEPROM is erased not only by high voltage, but also by exposure to ultraviolet radiation (the old-timers probably remember chips with quartz glass). At the same time, if you carefully looked at the topology through a microscope, you may well be able to cover all the memory with an opaque material, except for those few bits that include protection against reading, and after illuminating your chip. Moral: using EEPROM in your project, cover it with metal on top. And it is desirable not only a solid shield from the radiation, but also some significant lines, so that the shield can not be carefully set off. However, there is also an ambush here (it’s the second bad news), because fundamentally the microcircuit or its individual parts can be highlighted from below. This is not easy, because it is likely to require removing the chip from the case and, for example, etching the bottom of the substrate, but possible. Such techniques are popular for testing microcircuits for single failures, because the metallization is opaque for both UV and laser, and the silicon substrate is almost transparent, the question is how to correctly focus the radiation beam if local effects are needed.
As an alternative option, you can configure the on / off bits of the protection so that erasing it turns on protection rather than turning it off.
The third bad news is that there are sensors capable of counting an electric charge in a floating gate or its residues after an erase operation. Moreover, in order to electrically count the memory, in general, the chip does not need to be energized, that is, there is no risk to include built-in mechanisms for destroying information.
MRAMalthough relatively rare, it nevertheless also deserves our attention. It, like flash, can not be considered optically. Of course, MRAM is impossible to erase with ultraviolet, but magnetic field sensors with a high enough resolution in order to bleed off the top metals and read the memory bit by bit do exist. Good news? A potential attacker is unlikely to find them quickly and inexpensively. In general, MRAM is a good alternative to flash from a security point of view, but for the time being it is not very accessible and has just gone into mass production in technologies accessible to fabless companies.
The most protected from reverse engineering memory today is considered antifuse ROM. As the name implies, it is a kind of antipode of burnout bridges, namely, it has a high resistance in the unprogrammed state and a low resistance in the programmed state. How is this achieved? With the help of breakdown of the gate dielectric of the transistor by high voltage. The breakdown area is so small that it is not visible either from above through a microscope or in a section on the FIB, but it also provides a good and reliable change in resistance by several orders of magnitude, which is quite enough for reliable reading of the memory state in a regular manner. Such a memory cell, however, can be read by connecting directly to the gate and the source of the memory transistor. The unshielded cell behaves like a capacitor, the flashed like a resistor.
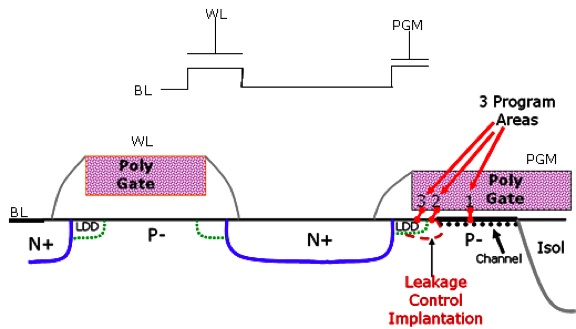
Figure 11. Cross section of antifuse memory cell. Several areas of possible transistor breakdown are shown. This can complicate the reading scheme somewhat.
Of course, there are other ways to learn the contents of the memory, in addition to visual inspection of the cells. The easiest way is to directly connect to the corresponding reading lines with the help of the FIB and send them any control signals that need to be sent in order to read information that is not available in the normal way. You can pre-disable the read protection by physically cutting off lines leading to the corresponding bits of memory. How to protect yourself from this? Having correctly designed the topology of your chip and, possibly, having built in it some additional functions. Here is an example of how Cypress does this:
It is possible to configure the password to provide password protected access. If you’re listening to your password, you’ll have to make sure that you’ve been able to complete your password. This is a special seven-address read sequence. If you’re on the road, you’ll find out how to complete the password. If you’re trying to find out how to use it, you can’t. The part can be configured to additionally destroy the functionality.
Usually done this way: the memory is covered from above with a grid of ground and power lines, and all signal lines are located strictly below them. At the same time, it is necessary to take care that the power lines, on the one hand, do not duplicate each other (that is, when cutting any of them, part of the chip stops working), and on the other hand, so that each of them serves quite a lot of memory bits , and the plunging of the ammeter into the power line could not allow assessing the state of memory by consumption in read mode (which is different for different logical states in most types of memory). With such an organization of the upper layers of the chip, the attacker will be as difficult as possible to open a part of the metallization in order to connect where it needs to be.
Even in the grid of land and power supplies, additional protective lines are arranged in such a way that a break on them (or their short circuit to power or ground) when energizing the chip initiates a complete erasure of the contents of the protected memory (or, as we saw above, physical damage chip). Such protective lines, located near the lines of land and power, greatly impede the work of intruders, because operations with FIB require a tangible place by the standards of current technical processes. In addition, due to the cone-shaped cut-out created by a microscope, the lower the layer to which you want to connect, the more area you need to clear over it.
But in fact, very often the attacker may not need the exact value of the memory contents, he may well be enough to reduce the number of options for iteration by several orders of magnitude. For example, if a memory cell consumes while reading a logical unit X, and while reading a logical zero is 100 * X, then when reading a byte of such memory we will get different consumption depending on the memory content:
0 - 800 * X
1,2,4, ..., 64, 128 - 701 * X
3, 6, 7, ..., 160, 192 - 602 * X
....
255 - 8 * X
So, if we don’t touch the memory, we need 256 attempts to find the password it contains. And if we know that consumption in read mode - 701 * X - then only eight. Convenient, isn't it? The easiest way to do something with this problem is to store data as a value and invert it in a neighboring cell; then the consumption of any amount of memory in read mode will not depend on the stored information. This, however, requires twice as much memory, but security is important to us, right?
CASE 3: WITHOUT MEMORY
And what if your chip does not contain configuration memory or contains only a few bits, to hide the contents of which is meaningless. Why? So much cheaper (not so much by reducing the cost of masks for lithography, but by the simpler packaging and testing process), and for most simple ICs, the price is a serious competitive advantage.
By the way, about testing. The process of rejection of crystals on the plates and firmware configuration memory is often outsourced, especially by small companies, because the appropriate equipment is usually not affordable for start-ups, and the quality must be ensured. So, if third-party production is aware of your test methods and has configuration memory firmware, then you better trust these people completely. Or to have additional methods of protection against reverse engineering, not tied to the configuration memory.
So what to do if configuration memory is not an option for protection, or if it is not enough?
The main drawback of both an optical microscope and SEM is that it is very difficult to distinguish between silicon doping types. That is, the presence of doping is visible, but the type is not. Therefore, when analyzing the topology and extraction of the circuit, the type of doping is restored from the context and implied logic of the circuit operation (n-channel transistors are connected to ground, p-channel to power, etc., etc.). Having drawn the topology of your microcircuit so that it will not coincide with the most intuitively most likely option, you can spoil the blood of a reverse engineer very well. Especially if you use several different schemes, disguised as the same. With some dexterity, you can not only complicate the analysis of your scheme, but also make it produced (or at least modeled, but more fun, if produced by the restored topology, the device does something definite, from shorting the ground with power to issuing obscene words to all outputs. Deterministic behavior of an incorrectly stolen design, by the way, can be useful not only to burn the oscilloscope pirates, but also so that when disappointed users of “your” chips come to you later, you can clearly demonstrate to them that they have bought fake

Figure 12. Section of three structures that are indistinguishable in a microscope. The left one is pMOSFET, the middle one is short circuit, the right one is reverse biased diode (break).

Figure 13. Topology of three digital library cells indiscernible in a microscope. The left one is an inverter, the middle one is a direct input and output connection, the right one is a logical one at the output.
Each of the cells in the figure above looks almost like the most common inverter, but can actually be an inverter, repeater, or generator of a logical zero or a logical unit. Our “inverter” issues only contacts to diffusion from the input and output. However, by abandoning them, we will get completely indistinguishable from the standard circuit in exchange for the impossibility of realizing the input and output connection (but we can use two inverters for this purpose). However, the possibility of using the same cell to invert or not to invert the signal is much more interesting to fight against an intruder, because nothing complicates the attempts to deal with problems of an unfamiliar design like an extra inverter somewhere in the clocking circuit or on / off.
But no, it happens. A well-built topology is usually well read. An excellent example is in the already mentioned Ken Shirriff blog.
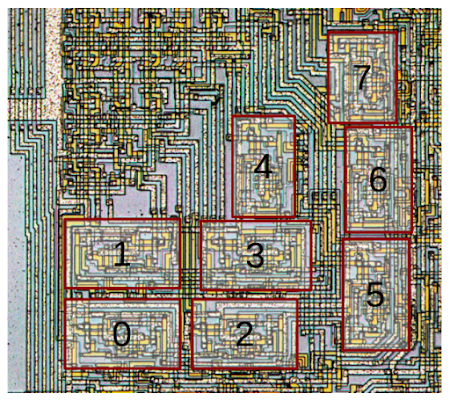
Figure 14. Arithmetic logic unit (ALU) of the Intel 8008 chip. Separate digits are shown.
On the topology of the Intel 8008 ALU, eight identical circuits are clearly visible - according to the number of digits. Understanding that this is an ALU, you can easily restore the circuit by topology. If some of the elements in it will be fake, it will somewhat complicate your work, but no more. And all because the topology fits well into the basic idea of the interfaces between the component parts. In order to confuse an intruder so strongly that he abandoned attempts at reverse engineering, it is necessary to make the topology unpredictable and non-repetitive. The easiest way is not to do any blocks manually, but to generate the entire netlist of a chip using CAD. Autotracers, in spite of the enormous time savings in creating topology (as compared with manual labor) they do an excellent job with the task of creating non-intuitive placement of elements and sometimes completely insane connections. And the more the design, the topology of which was synthesized as a whole, the more difficult it is to reverse-engineer it.
But this is the easiest way. There are more interesting options. For example, use a set of chameleon cells as a set of generators of logical zeros and ones for multiplexer inputs, while implementing an arbitrary logical function. Actually, this is how the elements of the FPGA, LUT (Look-Up Table), are arranged.

Figure 15. Implementing a three-way LUT. Source .
Putting several such LUTs in different places of the circuit and bringing some signals to the inputs of the “memory cells”, we will solve several problems at once:
- If our maneuver remains unsolved, then we can ask how the reverse-engineering scheme will behave. Options - any, limited only by your imagination.
- The use of arbitrary signals from other blocks as “input” for cells generating logical zero and one will make it difficult to visually divide the design into blocks.
- Even if the reverse engineer understands that we use such protected LUTs, he will have to go through many options in order to restore the circuit functionality by topology, so that even a relatively small number of protected cells can make reverse engineering too time-consuming. My favorite is to assemble a finite state machine on such LUTs that manages the transitions of the microcircuit from one operating mode to another.
TEST SCHEMES
Good engineers love to test their chips comprehensively. And by “comprehensively” I mean - something like this is done in the TI DC / DC converter in the figure below. Dozens of small pads to which you can connect before cutting the plate into individual crystals, to check all the necessary parameters, the status of important internal lines, decide whether a chip is suitable or not, and if necessary, find out the cause of the problems.
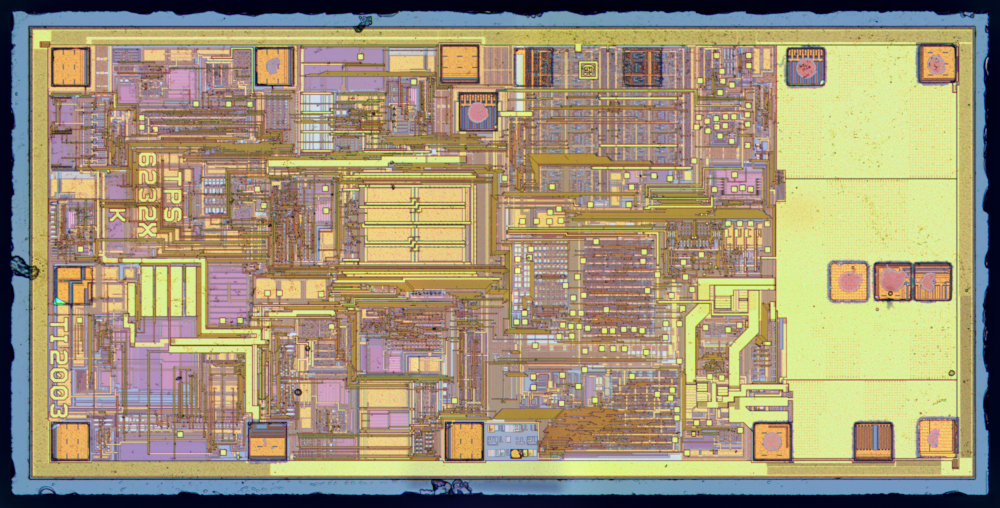
Figure 16. Topology of Texas Instruments TPS 62321. Source - zeptobars.com
Good coverage with test pads for test runs and prototypes is especially important, but for mass production they are often turned off (by correcting one or two masks or burned out jumpers) to minimize the effect on the behavior of the product. So, what am I talking about? Test pads - this is your great help to the attacker, because you yourself do not only point out important points in the design, but also give easy access to them. The burned out jumper is easily restored on FIB, and voila! Ideally, security requires the complete removal of test pads from a serial chip. If this option is not rational (for example, testing is required on a plate in mass production), then at least it is worthwhile to ensure that the mechanism for disconnecting test pads does not resist, for example,
About the fact that all modern digital designs have built-in JTAG for testing, allowing you to directly see the status of any trigger on a chip, I don’t even want to start. Testability is one of the key characteristics of any design, and it is precisely this circumstance that makes it extremely important to reliably and unrecoverablely disconnect all test interfaces before the chip leaves the manufacturing company.
Still good engineers like to place test circuits on the periphery of the crystal for the following revisions. Usually these are quite important schemes, otherwise why waste time and effort on organizing their testing? “Important schemes that constitute your intellectual property and critical to the functioning of the chip? Carefully laid apart from the whole design? Thank you very much! ”- the reverse engineer will tell you for such a royal gift. If you do not want the test to help an attacker to study and copy your design - take care that they do not fall into the crystals for mass production or destroyed after testing on the plates in the process of cutting the plate into crystals.
A LITTLE PRACTICE
In order to once again demonstrate how this works, an example of opening the PIC12C508A microcontroller, described in the dissertation of Sergey Skorobogatov, defended in 2004 in Cambridge. The translation is abbreviated and fairly free:
It is necessary to open the case and find on the crystal a protective memory erasable by ultraviolet radiation. This is done quite easily, by looking at the lines going to the pin of the programming chip. Then you cover the main memory with an opaque UV material, and after five to ten minutes of irradiation you can consider the memory as a regular programmer. Another option - after finding a copy protection memory cell, simply cut the metal track leading to it, which for some reason is located far from other lines on this chip - so far that you can cut it not only with FIB, but also just with a needle.

Figure 17. And here is the very ill-fated line. Indeed, it is located in the middle of an empty space, not protected at all, you can cut it.
CONCLUSION
Of course, it is impossible to embrace the immense, because the technology and reverse engineering of the microcircuit, and protection from it does not stand still and is constantly being improved. The topic of information security is one of the key when designing for the Internet of things, so developers give it a lot of attention, and such easy production as fifteen or twenty years ago cannot be expected by reverse engineers. Nevertheless, one should always remember that a poorly protected system means potential losses, huge losses or even people's lives, and protection against unauthorized access and reverse engineering should be part of the system at all levels of operation, not excluding iron. .
