How to connect Raspberry PI to Azure IoT: step-by-step instructions
Hi, Habr! I present to you the translation of the article Connecting Raspberry PI via Azure IoT: Step-By-Step Tutorial .
In this post, we will explain how to connect the Raspberry Pi as a peripheral device to transmit signals to the LED panel using the Azure IoT Edge module.
In most steps, we will use the Azure CLI as well as the Azure Portal to launch the Azure IoT Edge.
For this we will need:
Now we will install the Azure CLI, create an IoT Hub and connect our devices. We will also create an identifier for the Raspberry Pi and use its access parameters for recognition in the IoT Hub. In addition, we use add-edge-enabled to connect the Raspberry Pi to the Azure IoT Edge.
To install and configure Azure IoT for the first time, you need:
Azure IoT Edge Modules work like containers. To connect the Raspberry Pi to the Azure IoT Hub and the Azure IoT Edge we need:

Now we can install the LED panel control module.
Below is a simple example that clearly demonstrates the concept, deployment, and management of Azure IoT Edge modules:
Now we will use Azure Portal to deploy the container as a module. Before that, we need to create a docker image and save it in the Docker Hub as an example.
Go to IoT Edge Custom Modules and follow these steps:
This will launch the deployment of custom modules on the peripheral device.
You can also check the module connection to the device using the iotedge CLI on the Raspberry Pi:

As soon as the module is successfully deployed, the diodes on the panel connected to the Raspberry Pi will start flashing.

Using the Azure IoT cloud service, you can create much more complex and versatile IoT solutions. For example, instantly scale custom development on peripheral devices and send only current data to the cloud, while the main functions are used locally.
We think this sounds very promising.
There is a new cool feature that distinguishes Microsoft from other cloud service providers and, we believe, implements the concept of full decentralization of WEB 3.0 most fully. Of course, we mean distributed registry technology.
At Azure Blockchain Workbench, you can implement innovative blockchain solutions on a globally accessible platform. Honestly, there is little that can compete with the “wow effect” that professional decentralized applications (DApps) cause to users.
And yet, it means not only the crying popularity of crypto and HYIP around ICO. Using the Azure Blockchain Workbench, developers can incorporate the unique capabilities of a distributed registry into their projects, including IoT solutions. And it is this that brings the added value of the results that customers receive.
The technology of the distributed registry promises to bring the delivery of value to a completely new level, so even a superficial examination of the corresponding cloud service (like the same Azure Blockchain Workbench) will require a separate post. Of course, we are absolutely not against “diving” in particular the Azure Blockchain if you are also interested in this topic.
Stay in touch, stay tuned and tell what else you are interested in reading.
In this post, we will explain how to connect the Raspberry Pi as a peripheral device to transmit signals to the LED panel using the Azure IoT Edge module.
In most steps, we will use the Azure CLI as well as the Azure Portal to launch the Azure IoT Edge.
For this we will need:
- Raspberry Pi 3 Model B + (LED panel)
- Microsoft Azure Account
- Latest version of Azure CLI
- Extension (component) Azure IoT CLI
Install and configure Azure IoT
Now we will install the Azure CLI, create an IoT Hub and connect our devices. We will also create an identifier for the Raspberry Pi and use its access parameters for recognition in the IoT Hub. In addition, we use add-edge-enabled to connect the Raspberry Pi to the Azure IoT Edge.
To install and configure Azure IoT for the first time, you need:
- Install the latest version of the Azure CLI with docs.microsoft.com/en-us/cli/azure/install-azure-cli?view=azure-cli-latest
- Configure the Azure CLI using:
$ az extension add --name azure-cli-iot-ext</li> - Build a resource group for our project:
$ az group create --name rasp-IoT --location westus - Create a gateway to connect peripherals to Azure IoT:
$ az iot hub create --resource-group rasp-IoT --name rasp-IoT-Hub --sku S1 - Create ids for the Raspberry Pi and device:
$ az iot hub device-identity create --hub-name rasp-IoT-Hub --device-id myPi001 --edge-enabled
This command will produce a specific string that will be needed to connect the device. - Copy output line to file or clipboard. We use it later to connect the device to the IoT Hub.
Connecting Raspberry Pi
Azure IoT Edge Modules work like containers. To connect the Raspberry Pi to the Azure IoT Hub and the Azure IoT Edge we need:
- Install Docker on Raspberry Pi:
$ curl -fsSL get.docker.com -o get-docker.sh && sh get-docker.sh
You can also check its version using the command: $ sudo docker version - Install Azure IoT Edge Runtime, which will act as a background daemon:
$ curl -L https://aka.ms/libiothsm-std-linux-armhf-latest -o libiothsm-std.deb && sudo dpkg -i ./libiothsm-std.deb$ curl -L https://aka.ms/iotedged-linux-armhf-latest -o iotedge.deb && sudo dpkg -i ./iotedge.deb$sudo apt-get install -f$ curl -L https://aka.ms/iotedged-linux-armhf-latest -o iotedge.deb && sudo dpkg -i ./iotedge.deb$sudo apt-get install -f - Connect our device to Azure IoT Hub using:
$ az iot hub device-identity create --hub-name rasp-IoT-Hub --device-id myPi001 --edge-enabled
We have already used this command to create an identifier for the Raspberry Pi. - Open the
/etc/iotedge/config.yamlfile in any editor and replace “ADD DEVICE CONNECTION STRING HERE” with a specific line for connecting the device, which we previously copied to the file / buffer.
- Restart the IoT Edge background process and check its status:
$ sudo systemctl restart iotedge$ sudo systemctl status iotedgeNow we can install the LED panel control module.
Deploy Azure IoT Edge Modules
Below is a simple example that clearly demonstrates the concept, deployment, and management of Azure IoT Edge modules:
- Launch Azure Portal in a browser.
- Go to the IoT Hub and from the Automation Device Management select the IoT Edge.
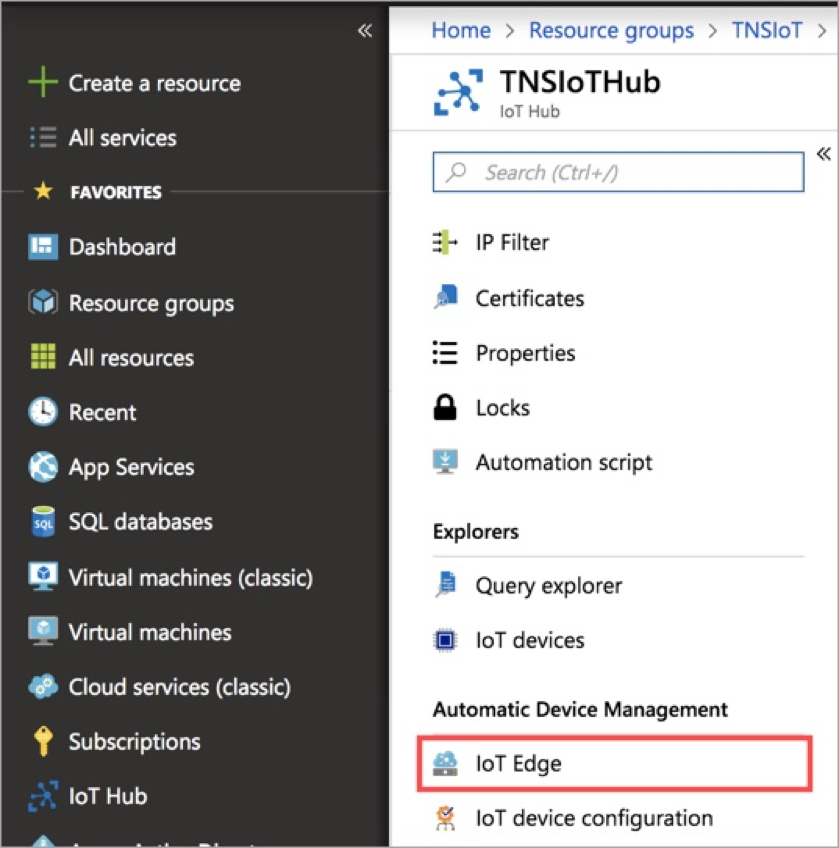
- In IoT Edge Devices, select the device PI1 and click Set Modules.

- Expand the Add list and select the IoT Edge Module to deploy a custom module.

Now we will use Azure Portal to deploy the container as a module. Before that, we need to create a docker image and save it in the Docker Hub as an example.
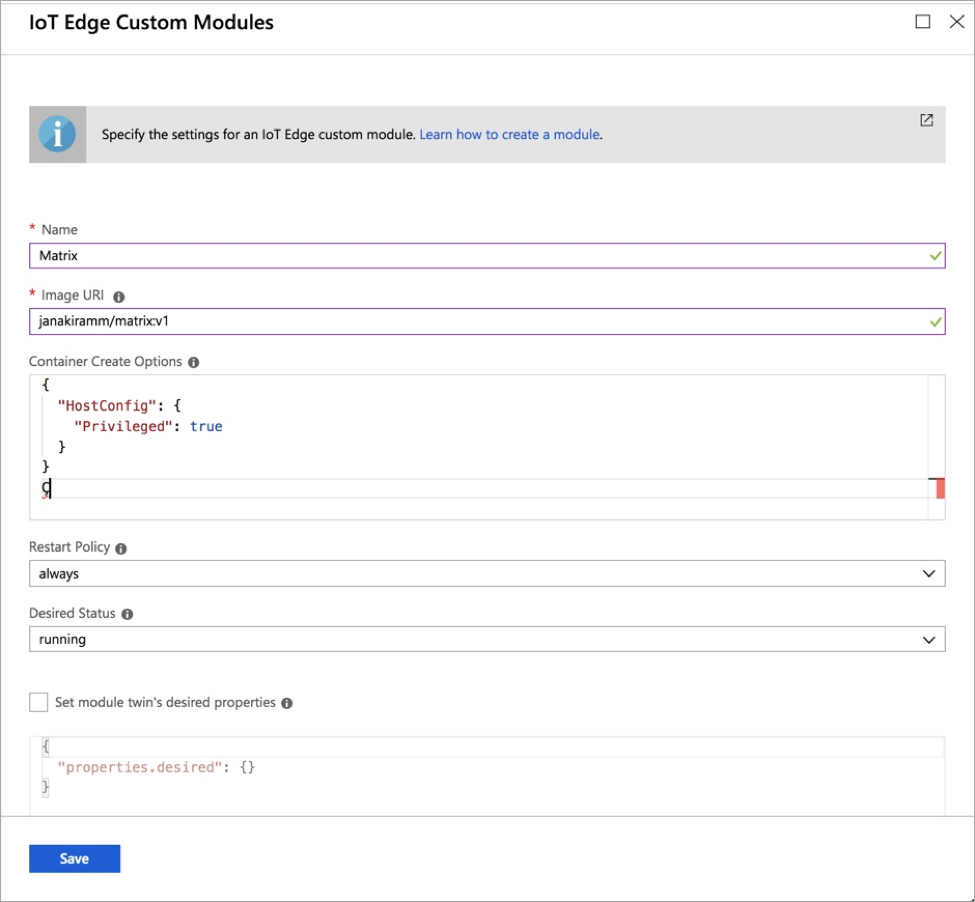
Go to IoT Edge Custom Modules and follow these steps:
- In the Name field, enter Matrix. This will be the name of our module.
- In the Image URI field, enter janakiramm / matrix: v1.
- Since you do not need access to the local I2C bus on the Raspberry Pi, you need to run the container in Privileged mode. To enable it, insert the following JSON line into the Container Create Options:
{ “HostConfig”: { “Privileged”: true } } - Leave the following Poles in the default settings.
- Click Save to confirm the deployment.
This will launch the deployment of custom modules on the peripheral device.
You can also check the module connection to the device using the iotedge CLI on the Raspberry Pi:
$ sudo iotedge listAs soon as the module is successfully deployed, the diodes on the panel connected to the Raspberry Pi will start flashing.
Using the Azure IoT cloud service, you can create much more complex and versatile IoT solutions. For example, instantly scale custom development on peripheral devices and send only current data to the cloud, while the main functions are used locally.
We think this sounds very promising.
Chips for decentralization in Azure
There is a new cool feature that distinguishes Microsoft from other cloud service providers and, we believe, implements the concept of full decentralization of WEB 3.0 most fully. Of course, we mean distributed registry technology.
At Azure Blockchain Workbench, you can implement innovative blockchain solutions on a globally accessible platform. Honestly, there is little that can compete with the “wow effect” that professional decentralized applications (DApps) cause to users.
And yet, it means not only the crying popularity of crypto and HYIP around ICO. Using the Azure Blockchain Workbench, developers can incorporate the unique capabilities of a distributed registry into their projects, including IoT solutions. And it is this that brings the added value of the results that customers receive.
The technology of the distributed registry promises to bring the delivery of value to a completely new level, so even a superficial examination of the corresponding cloud service (like the same Azure Blockchain Workbench) will require a separate post. Of course, we are absolutely not against “diving” in particular the Azure Blockchain if you are also interested in this topic.
Stay in touch, stay tuned and tell what else you are interested in reading.