Shine Christmas tree! We take a smartphone, mobile Internet and ... turn on the "Christmas tree" in the country

It will be about how to manage electrical appliances via the Internet. The task is quite simple if there is a good, wired Internet and, especially, a static IP address. But when access to the Internet is possible only through a GSM modem, for example, in the country, the choice of solutions is not so great ... but there is! Now more users are connected to the worldwide network than people on Earth. Various devices have been full-fledged Internet users for a long time and many of them communicate with each other using the popular MQTT protocol, which has been described more than once here. The Master Kit has several devices that also use the MQTT protocol and the free iot.eclipse.org cloud server. We will talk about their configuration and application.
First, in a nutshell about what MQTT-technology is for communicating devices among themselves on the Internet of Things. This is a chat, very similar to a chat for people to communicate. One device, for example, "Internet thermometer" creates its own record on a special server, the so-called "topic". Other interested devices “subscribe” to this topic and receive all updates that occur in real time, or send their information to the chat, for example, management commands.
Everything is very simple. You are required to deploy a local Wi-Fi network using a household router and connect to the Internet in any way, for example, using a GSM modem. For our case, any 2/3 / 4G modem of any mobile operator is suitable
Now, what are the devices from Master Kit? There are only three of them in this line. These are electronic boards assembled, of course, based on the widely known ESP8266-01. Since this chip has only two inputs / outputs that can be controlled or read information, the line of devices turned out as a combination of the capabilities of a temperature sensor and an electromagnetic relay.
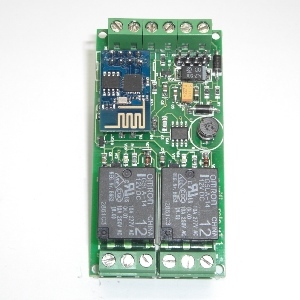
The purpose of the devices will be clear, I hope, from the name. Using the first one, you can control two electrical appliances (heaters, lighting, pumps, gates, irrigation, siren, etc. ...). As you can see, the board contains two sufficiently powerful electromagnetic relays.
MP3506 - Internet relay, 2 channels.
Second, MP3504 - Internet relay + thermometer
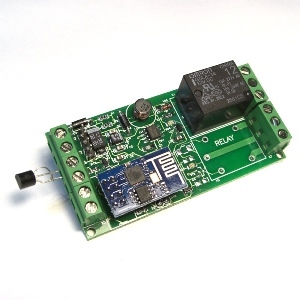
This device allows you to connect only one electrical appliance, but at the same time receive information about the temperature at the "object". Both devices are assembled on the same board and are powered by 12V DC. Relays allow switching loads up to 7A. But, if you want to control the heater, then it is better to do this through an additional contactor. The same DS18B20 is used as a temperature sensor, you want it in a normal case, you want it in a sealed one.
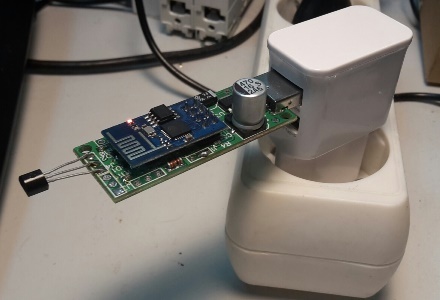
The third device is compact, powered by 5V via the most standard USB connector.
This is an MP3507 Internet Thermometer, 2 channels.
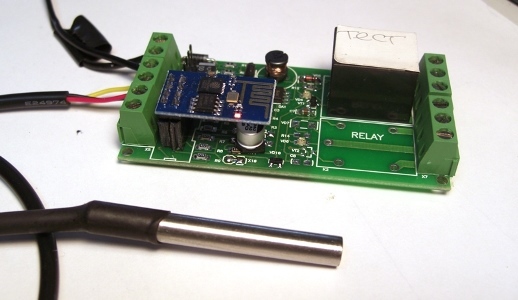
 Why two channels? The example is simple - one measures the temperature in the house, the second on the street. The kit includes 2 sensors, but for outdoor use, the sensor in a sealed version is well suited. The photo shows a sealed sensor along with the MP3504 module. But it is also compatible with the MP3507 module
The presence of a USB connector for power allows you to connect the module to any USB charge, which is very convenient.
After the side of iron is more or less described, it is necessary to talk about the application that controls it. Master Kit offers a free application for each of the described modules, which is more like a demo to show the capabilities of the module than a super-universal tool for managing a home from a distance. But the command system is open, so the modules can be safely connected to OpenHab or write your application on any operating system. And even with the help of the App Inventor constructor.
Here are examples of screenshots from Applications for Android.
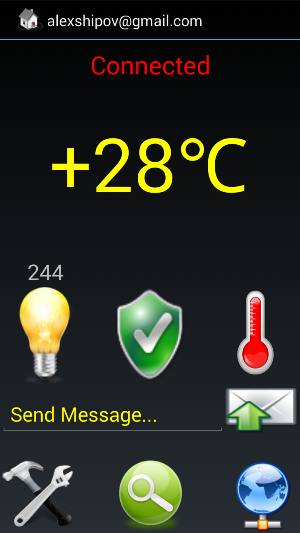 All of them are similar and differ in the set of necessary icons, based on the purpose of the module (some of the functions are laid out for the future):
"Light" - shows the status of the relay. Burning lamp - relay on. If you click on the lamp - it will turn off, again - turn on.
“Number above the light bulb” is the minute counter of the on state of the relay, you can use it as a recorder of the operating time of your appliance, for example, to calculate the revenue if it is light above the pool table, which turns on if the time is paid.
“Temperature” - current temperature sensor reading. If there are 2 of them, then there will be two values.
“Globe” - a button for connecting to a device from a smartphone
“Hammer with an adjustable wrench” - a button for invoking application settings.
Connecting and setting up consists of 2 steps
1. connecting the module of your local network
2. Install and configure the Android application to work specifically with your module.
To connect to your local network, you must put the module into configuration mode. To do this, within 1-2 seconds after applying power, you need to close 2 contacts and hold them in this state for 5-7 seconds. At this time, the blue LED will flash briefly 1 time per second. If it goes out, then you need to repeat the operation again. Look at the picture with the module with two thermometers.
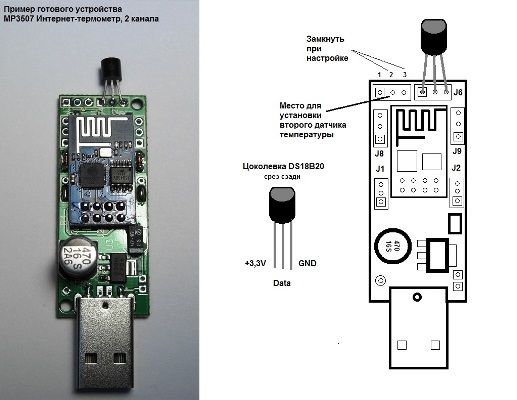
To configure, it is necessary to close, for example, tweezers or a piece of wire, contacts 2 and 3 (above).
After the module has entered the setup mode, it creates a local area network around itself, the name of which starts with the word MQTT and ends with a 7-digit ID. Between these parts of the name is a sign of functionality and version.
Here is an example: MQTT_2RELE V1.6_1234567 You need to connect to this network with a default password. And by the way, remember this number. It will come in handy when setting up the controlling Android application. This is the name of the topic to which your smartphone or tablet will connect.
Next, you have the choice to configure using the “Configurator” Android application or using its Windows version. I like Windows more. The settings window looks simple and clear

In the first two lines you write the Name and Password of the Wi-Fi network to which you want to connect your module. In the second block, you either allow the module to work simultaneously with the access point or prohibit it. If you do not prohibit, then you can connect to the module directly. And this is fraught with security. Better to ban. Then access to the module is protected by the access system of the router.
After settings, the module will automatically connect to your router and automatically register on the MQTT server. We chose the free iot.eclipse.org
It remains in the pre-installed application to click the Settings button (a hammer with an adjustable wrench) and go through several steps, basically you just need to confirm the action, only in one place you need to enter the module ID - the seven-digit number that we remembered during the connection to the network. More details are on the site in the instructions, so there is no point in retyping them here.
Now that the settings are made, it remains to connect your electrical appliances to the output relays, place temperature sensors, provide Internet and you can use it. The smartphone itself can also be connected to the Internet in any way. In the Moscow Metro also works.
Happy New Year, everyone!
