Cheap do-it-yourself chronograph for pneumatics
In my first publication, I want to tell you how I assembled a chronograph in a couple of evenings from cheap and affordable parts. As you probably guessed from the name, this device is used to measure the speed of a bullet in pneumatic (and not so) rifles and is useful for monitoring its technical condition.
1. Parts and accessories
- Chinese Digispark - 80 rubles at the time of purchase
- Segment display on TM1637 - 90 rubles at the time of purchase
- IR LEDs and IR phototransistors (10 pairs) - 110 rubles at the time of purchase, we need 2 pairs
- Resistors 220 Ohms (100pcs) - 70 rubles at the time of purchase, we only need 2 pieces
This ends the details that you need to buy. Resistors can not be ordered, similar at face value (but no less!) Can be pulled out of unnecessary consumer electronics. Thus, the total cost is less than 350 rubles, this is nothing compared to the price of a new factory chronograph (over 1000r for the simplest one, which in fact is even more primitive than our subject). In addition to the details we will need:
- Wires - finding offline for free is not a problem
- A piece of plastic water pipe longer than 10cm (diameter to taste) - just as easy to find
- Soldering supplies
- Multimeter (optional)
The first 3 details are worthy of separate consideration, since they have their own characteristics, so let's start with mini-reviews on them.
1.1. Digispark
It is a simple miniature Arduino-compatible board with ATtiny85 on board. How to connect to the Arduino IDE we read on the official website of the project , there you can also find drivers for it. There are two main types of this board: with microUSB and more brutal with a USB connector, wired directly on the board.

My chronograph does not have its own power supply, so I chose the first option board. The built-in battery / accumulator will greatly increase the price without adding practically anything to usability. Almost everyone has a Power bank and a cable for charging the phone.
Specificationsinherited from ATtiny85 by itself, its capabilities in our case are enough with a head. In fact, the MK in the chronograph does nothing but interrogate two sensors and control the display. For those who are faced with Digispark for the first time, I have summarized the most important features in a table:
| Flash memory | 6KB (2KB busy bootloader) |
| RAM | 512 bytes |
| Eeprom | 512 bytes |
| Frequency | 16.5 MHz (default) |
| Number of I / O pins | 6 |
| VIN powered | 5-12V |
| Pin 0 | PWM, SDA |
| Pin 1 | Pwm |
| Pin 2 | SCK, ADC1 |
| Pin 3 | USB +, ADC3 |
| Pin 4 | PWM, USB, ADC2 |
| Pin 5 | PWM, ADC0 |
I use this plate as a cheat sheet when developing various devices based on this board. As you probably noticed, the pin numbering for the analogRead () function is different, this should be taken into account. And another feature: a pull-up resistor of 1.5 kOhms hangs on the third pin, because It is used in USB.
1.2. TM1637 based display
The next important detail is the digital display on which information will be displayed. The display can be used by anyone, my choice is due only to the cheapness and simplicity of working with it. In principle, you can refuse the display altogether and output the data via cable to the PC, then the device will become even cheaper. For work, you need the DigitalTube library . The subject I referred to at the beginning of the post is a clone of the Grove display . Front view:

Back: The

distance between the numbers is the same, so when the colon is off, the numerical values are read normally. Along with the standard library, an example is supplied that works with Digispark without dancing with a tambourine:

All that the standard library can do is display the numbers 0-9 and the letters af, as well as change the brightness of the entire display. The value of the digit is set by the display function (int 0-3, int 0-15).
Express Display Usage Course
// 1. Объявить заголовочный файл
#include
// 2. Задать пины
#define CLK 0
#define DIO 1
// 3. Объявить объект
TM1637 tm1637(CLK, DIO);
// 4. Проинициализировать
void setup() {
  tm1637.init();
  tm1637.set(6); // Яркость
}
// 5. Использовать
void loop() {
  // Вывод числа x на дисплей
  int x = 1234;
  tm1637.display(0, x / 1000);
  tm1637.display(1, x / 100 % 10);
  tm1637.display(2, x / 10 % 10);
  tm1637.display(3, x % 10);
  delay(500);
}
If you try to display a character with a code outside the borders of [0, 15], the display shows nonsense, which is not static at the same time, so you won’t be able to cheat for displaying special characters (degrees, minus):

This did not suit me, because in my chronograph I wanted to provide a conclusion not only on speed, but also on the energy of the bullet (calculated on the basis of the mass predefined in the sketch), these two values should be displayed sequentially. To understand what the display is showing at a given moment in time, you need to somehow separate these two values visually, for example, using the “J” symbol. Of course, you can stupidly use the colon symbol as an indicator flag, but it’s neither labor nor kosher) Therefore, I got into understanding the library and based on the display function I made the setSegments function (byte addr, byte data), which lights up in the number with addr number segments encoded in data:
void setSegments(byte addr, byte data)
{
  tm1637.start();
  tm1637.writeByte(ADDR_FIXED);
  tm1637.stop();
  tm1637.start();
  tm1637.writeByte(addr|0xc0);
  tm1637.writeByte(data);
  tm1637.stop();
  tm1637.start();
  tm1637.writeByte(tm1637.Cmd_DispCtrl);
  tm1637.stop();
}
The segments are encoded very simply: the least significant bit of data is responsible for the uppermost segment, etc. clockwise, the seventh bit is responsible for the center segment. For example, the character '1' is encoded as 0b00000110. The eighth, most significant bit is used only in the second digit and is responsible for the colon, in all other digits it is ignored. To make my life easier, I, as any lazy IT specialist should, automated the process of obtaining character codes using excel:

Now you can easily do this:

Or like this:
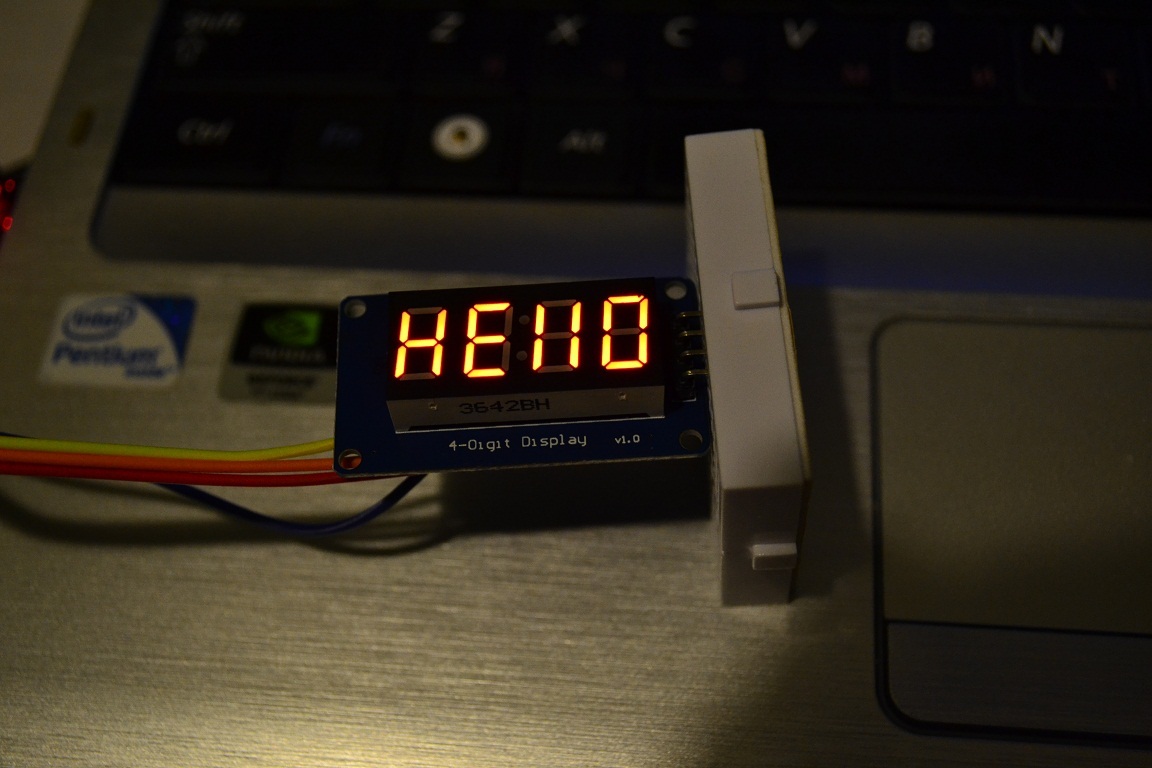
Let's say HELLO
#include
#define CLK 0
#define DIO 1
TM1637 tm1637(CLK, DIO);
void setSegments(byte addr, byte data)
{
  tm1637.start();
  tm1637.writeByte(ADDR_FIXED);
  tm1637.stop();
  tm1637.start();
  tm1637.writeByte(addr|0xc0);
  tm1637.writeByte(data);
  tm1637.stop();
  tm1637.start();
  tm1637.writeByte(tm1637.Cmd_DispCtrl);
  tm1637.stop();
}
void setup() {
  tm1637.init();
  tm1637.set(6);
}
void loop() {
  // Вывод Hello
  setSegments(0, 118);
  setSegments(1, 121);
  setSegments(2, 54);
  setSegments(3, 63);
  delay(500);
}
1.3. Sensors
Here, unfortunately, I can’t say anything special, because there is not a word on the product page about the characteristics or at least the markings by which it would be possible to dig out the datasheet. Typical noname. Only a wavelength of 940nm is known.

At the price of one LED, he determined that a current greater than 40 mA was fatal for them, and the supply voltage should be lower than 3.3 V. The phototransistor is slightly transparent and reacts to light.
2. Parts preparation and assembly
The circuit is very simple and straightforward, of all the digispark pins we need only P0, P1 for working with the display, and also P2 for working with sensors:
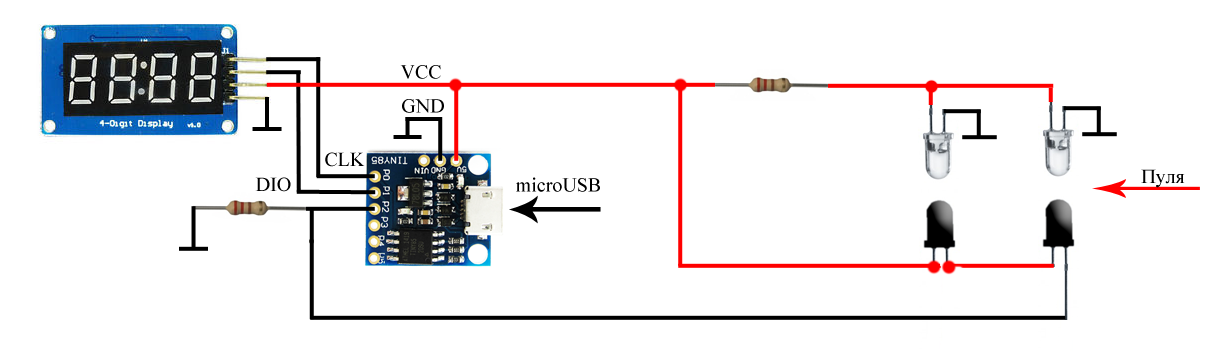
As you can see, one resistor limits the current on the LEDs, the second - pulls P2 to the ground . Phototransistors are connected in series, so the passage of a bullet in front of any optocoupler leads to a decrease in voltage by P2. By registering two successive power surges and measuring the time between them, we can determine the speed of the bullet (knowing the distance between the sensors, essno). Using one pin for measurements has another plus - there is no required direction of the bullet, you can shoot from both ends. We will collect from this handful of details:

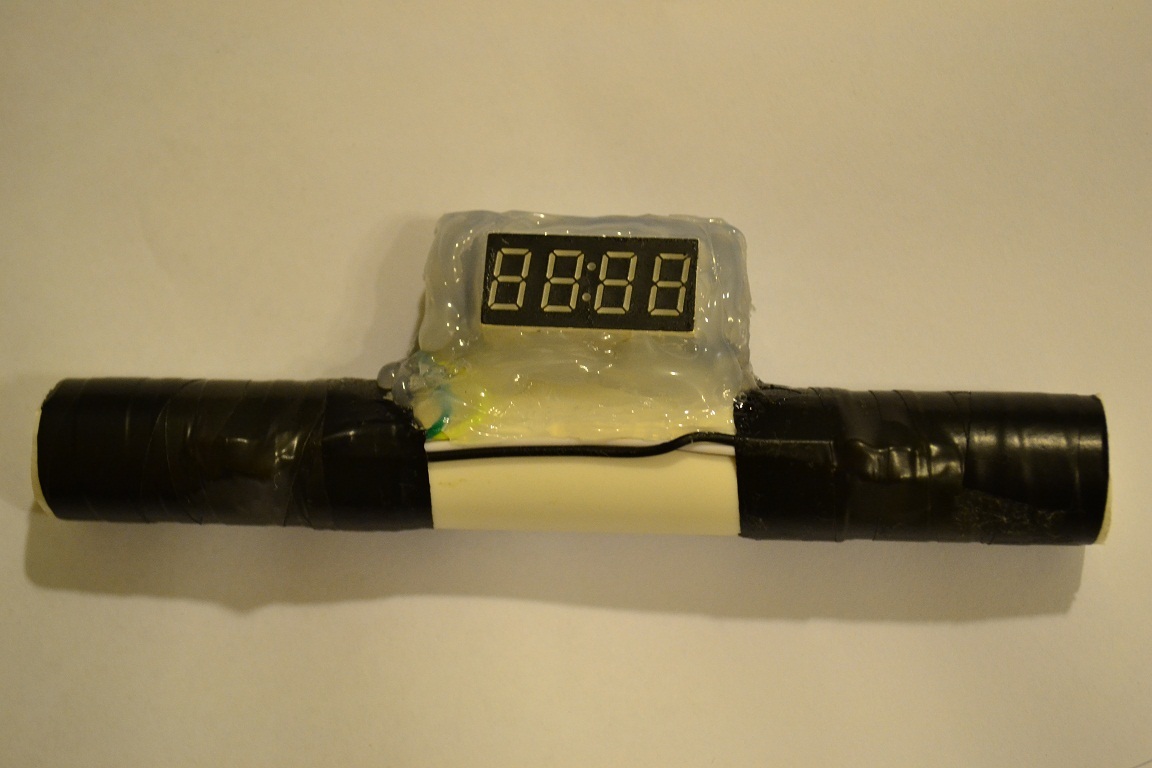
I went the way of miniaturization and decided to make a sandwich using a piece of the breadboard:

The whole sandwich was filled with hot-melt adhesive for strength:


It remains only to place the sensors in the tube and solder the wires:

The photo shows that I placed an additional electrolyte at 100 mKf parallel to the LEDs so that there would be no ripple IR diodes when powered by the power bank.

Pin P2 as an input was chosen for a reason. Let me remind you that P3 and P4 are used in USB, so using P2 makes it possible to flash the device already assembled. Secondly, P2 is an analog input, so you can not use interrupts, but simply measure the difference in the cycle between the previous and current values on it, if the difference is above a certain threshold, then the bullet passes between one of the optocouplers. But there is one software trick, without which the above scheme does not take off, we will talk about it later.
3. Firmware
3.1. A few words about prescaler
Prescaler is a frequency divider, by default in arduino-like boards it is 128. The maximum frequency of ADC polling depends on the value of this value, by default for a 16 MHz controller it turns out 16/128 = 125 kHz. For each digitization, 13 operations take place, therefore, the maximum sampling frequency of a pin is 9600 kHz (in theory, in practice, it really is not higher than 7 kHz). Those. the interval between measurements is approximately 120 μs, this is very, very much. A bullet flying at a speed of 300 m / s will fly 3.6 cm during this time - the controller simply does not have time to detect the fact that the bullet passed through an optocoupler. For normal operation, an interval between measurements of at least 20 μs is needed, the necessary divider value for this is 16. I went even further and use a divider 8 in my device, this is done as follows:
#ifndef cbi
#define cbi(sfr, bit) (_SFR_BYTE(sfr) &= ~_BV(bit))
#endif
#ifndef sbi
#define sbi(sfr, bit) (_SFR_BYTE(sfr) |= _BV(bit))
#endif
void setup() {
  sbi(ADCSRA,ADPS2);
  cbi(ADCSRA,ADPS1);
  cbi(ADCSRA,ADPS0);
  ...
}
Real measurements of the analogRead interval on different dividers:

3.2. Final sketch
I will not describe the code in detail; it is already well documented. Instead, I will describe in general terms the algorithm for its operation. So, all the logic comes down to the following steps:
- The first cycle - the difference between the current and previous value on the pin is measured
- If the difference is greater than the specified threshold, then exit the loop and remember the current time (micros ())
- The second cycle - similar to the previous + time counter in the cycle
- If the counter has reached the set value, then reporting the error and going to the beginning. This allows the cycle not to go into eternity if for some reason the bullet was not noticed by the second sensor
- If the counter does not overflow and the difference in values is greater than the threshold, then measure the current time (micros ())
- Based on the difference in time and distance between the sensors, we calculate the speed and display
- Go to the beginning
This is a greatly simplified model, in the code itself I added a whistle, including calculating and showing the energy of the bullet based on the mass of the bullet entered in advance in the code.
Actually, the whole code
/*
 * Хронограф для измерения скорости движения пули, © SinuX 23.03.2016
 */
#include
#define CLK 1   // Пин дисплея
#define DIO 0   // Пин дисплея
#define START_PIN 1   // Аналоговый пин старта
#define END_PIN 1     // Аналоговый пин финиша
#define START_LEV 50 // Порог срабатывания старта
#define END_LEV 50   // Порог срабатывания финиша
#define TIMEOUT 10000 // Время ожидания финиша в микросекундах
#define BULLET_WEIGHT 0.00051 // Масса пули в килограммах (для вычисления энергии)
#define ENCODER_DIST 0.1      // Расстояние между датчиками в метрах (10см = 0.1м)
#define SHOW_DELAY 3000       // Время показа результата
// Для ускорения analogRead
#ifndef cbi
#define cbi(sfr, bit) (_SFR_BYTE(sfr) &= ~_BV(bit))
#endif
#ifndef sbi
#define sbi(sfr, bit) (_SFR_BYTE(sfr) |= _BV(bit))
#endif
// Служебные переменные
int prevVal, curVal;
unsigned long startTime, endTime;
TM1637 tm1637(CLK, DIO);
/* Переделанная функция TM1637::display(), которая позволяет зажигать отдельные сегменты
 * Нумерация сегментов: младший бит - верхний сегмент и т.д. по часовой стрелке
 * Центральный сегмент - старший бит */
void setSegments(byte addr, byte data)
{
  tm1637.start();
  tm1637.writeByte(ADDR_FIXED);
  tm1637.stop();
  tm1637.start();
  tm1637.writeByte(addr|0xc0);
  tm1637.writeByte(data);
  tm1637.stop();
  tm1637.start();
  tm1637.writeByte(tm1637.Cmd_DispCtrl);
  tm1637.stop();
}
// Инициализация
void setup() {
  // Устанавливаем prescaler на 8 для ускорения analogRead
  cbi(ADCSRA,ADPS2);
  sbi(ADCSRA,ADPS1);
  sbi(ADCSRA,ADPS0);
  // Инициализация дисплея
  tm1637.init();
  tm1637.set(6);
  // Отображение приветствия
  setSegments(0, 118);
  setSegments(1, 121);
  setSegments(2, 54);
  setSegments(3, 63);
  delay(1000);
}
// Главный цикл
void loop() {
  // Заставка ожидания
  showReady();
  // Ожидание старта
  curVal = analogRead(START_PIN);
  do
  {
     prevVal = curVal;
     curVal = analogRead(START_PIN);
  } while (curVal - prevVal < START_LEV);
  startTime = micros();
  // Ожидание финиша
  curVal = analogRead(END_PIN);
  do
  {
     prevVal = curVal;
     curVal = analogRead(END_PIN);
     // Если превышен интервал ожидания - показ ошибки и выход из цикла
     if (micros() - startTime >= TIMEOUT) { showError(); return; }
  } while (curVal - prevVal < END_LEV);
  endTime = micros();
  // Вычисление и отображение результата
  showResult();
}
// Отображение заставки ожидания выстрела
void showReady()
{
  setSegments(0, 73);
  setSegments(1, 73);
  setSegments(2, 73);
  setSegments(3, 73);
  delay(100);
}
// Вычисление и отображение скорости, энергии пули
void showResult()
{
  // Вычисление скорости пули в м/с и вывод на дисплей
  float bulletSpeed = ENCODER_DIST * 1000000 / (endTime - startTime);
  tm1637.display(0, (int)bulletSpeed / 100 % 10);
  tm1637.display(1, (int)bulletSpeed / 10 % 10);
  tm1637.display(2, (int)bulletSpeed % 10);
  setSegments(3, 84);
  delay(SHOW_DELAY);
  // Вычисление энергии в джоулях и вывод на дисплей
  float bulletEnergy = BULLET_WEIGHT * bulletSpeed * bulletSpeed / 2;
  tm1637.point(1); // Вместо точки ':' - костыль, но пойдет)
  tm1637.display(0, (int)bulletEnergy / 10 % 10);
  tm1637.display(1, (int)bulletEnergy % 10);
  tm1637.display(2, (int)(bulletEnergy * 10) % 10);
  setSegments(3, 30);
  delay(SHOW_DELAY);
  tm1637.point(0);
}
// Вывод ошибки при превышении времени ожидания пули
void showError()
{
  setSegments(0, 121);
  setSegments(1, 80);
  setSegments(2, 80);
  setSegments(3, 0);
  delay(SHOW_DELAY);
}
4. Examples of work
With the right connection, the device took off almost immediately, the only drawback discovered - it reacts negatively to LED and fluorescent lighting (ripple frequency of about 40 kHz), from here spontaneous errors can appear. In total, the device has 3 operating modes:
Greeting after switching on and switching to standby mode (the screen is filled with stripes):

In case of an error, “Err” is displayed, and again switching to standby mode:

Well, the speed measurement itself:

After the shot, speed is shown first bullets (with the symbol 'n'), then energy (the symbol 'J'), and the energy is calculated to within one decimal place (the GIF shows that the colon is lit when the joule is displayed). I haven’t been able to find a prettier case so far, so I just flooded everything with thermal nozzles:
Perhaps this is all I have, I hope someone was useful.