December 19, 2017 at 22:22
Home weather station on esp8266 + aqara-xiaomi, part 2
Hello everybody.
It has been a year and a half since I published my first article about my project of the Home Weather Station. During this time, I received numerous reviews from readers about the functionality and security of the system, and also corrected a fair amount of bugs that were detected during installation and deployment of the system by other users (thanks to the most active users - HzXiO , enjoyneering , dimitriy16 ).
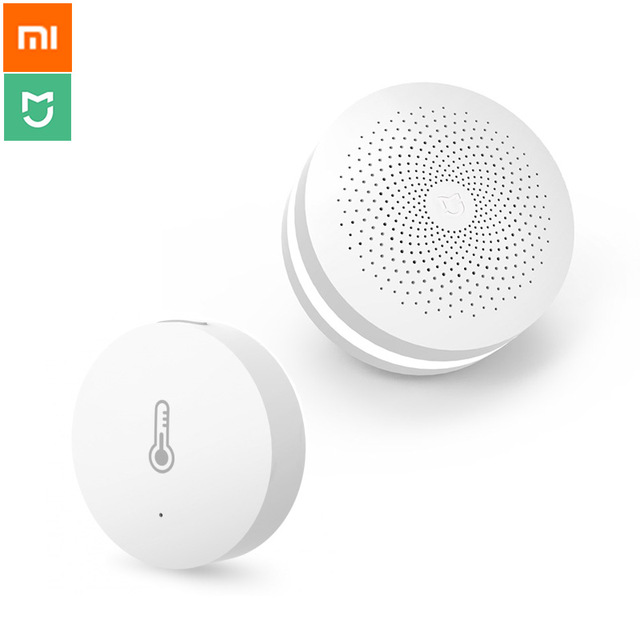
KDPV.
But it's all the lyrics, it's time to business!
So, what was done in the new version of the system.
Iron part (on esp8266):
Server side (php + mysql):
I want to dwell on the most interesting problems that I had to solve.
1. A program in the form of a footcloth of 1000+ lines of code has become completely unreadable, it has become too difficult to navigate in this code, it has become too difficult and time-consuming to check and debug changes. Therefore, the code was rewritten - basic interfaces appeared, declaring standard methods for working with sensors and displays, their heirs appeared, implementing logic specific to specific models, as well as factories responsible for creating the necessary classes.
Let me show you an example:
It is announced here that we have two sensors of the DHT22 type connected to pins 2 and 0, as well as arrays for wrapper classes above the sensors, and for an array of data received from them.
The display used is similarly declared - its type is set.
The initialization of the sensors and display occurs in the setup method:
At each measurement cycle, data is received from the sensors and transferred to the display for display:
Actually, these small pieces of code could be the whole program if it weren’t for working with Wi-Fi or creating an access point on esp8266 to configure the modules.
As you can see, if the user needs to change the sensor used, or connect a new display, this will be very simple: you just need to register their types and change the pin configuration.
If you need to add a new type of sensor or display, then you should create an heir from the base class, and redefine the methods for receiving data and rendering them.
2. Changes in security - now the access point created by the module has a password registered in the config when flashing the module - no one else can connect to the module without the knowledge of the user.
3. When rendering graphs on the site, the Kalman filter is now used to remove the chatter of values.
4. Now it is possible to control the visibility and names of sensors on the modules - this can be done on the settings page of each module on the site.
5. The main feature added in this revision of the weather station is support for working with Aqara sensors for the Xiaomi smart home ecosystem.
To implement this feature, you will need: a smart home gateway, transferred to the developer mode, and the temperature and humidity sensors themselves. Sensors must be connected to the gateway through the MiHome application, then you can forget about the application and the great Chinese clouds: data will be exchanged inside the local network, which is desirable to be placed in the guest segment without access to the Internet at all.
In order to receive data broadcast between the sensors and the gateway on the local network, in my project I use Malinka, which runs a module written in nodejs. The module listens to multicast messages transmitted over the network, parses them to find the necessary sensors, since all the data is transmitted in JSON format, and after searching for sensors, it extracts temperature and humidity data from the messages.
The data thus obtained - the module sends to the site specified in the config for further display and storage.
I will give the code of the module and config - see under the cut:
To launch the module on Malinka - the nodejs sensor.js command is used.
How to automate the launch of the module at Malinka startup - has not yet decided, probably someone will tell you in the comments how to do this easier and more beautiful.
Type of data received from the Malinki console:
As you can see from the output, there are two sensors in the network, with identifiers 52585 and 20046. The data from them is sent to the server specified in the config (http://weatherhub.ru) - where the site itself and the database for data storage are raised.
After starting the module, connecting sensors, and launching the site, new sensors can be immediately seen on the Settings page:
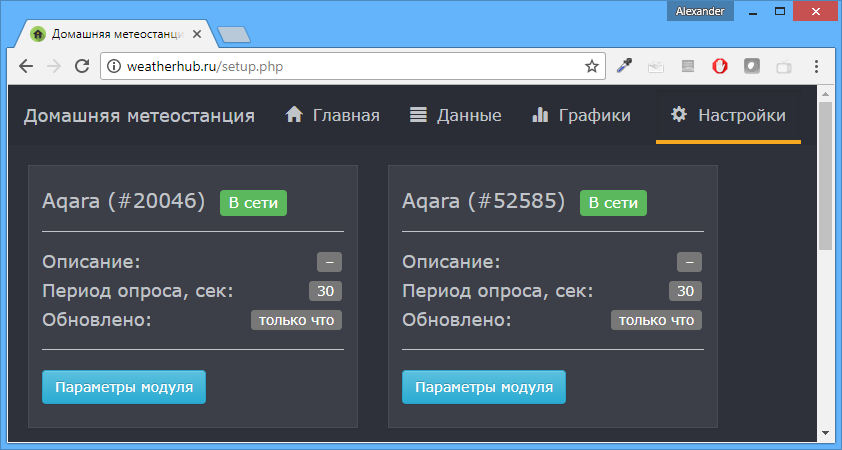
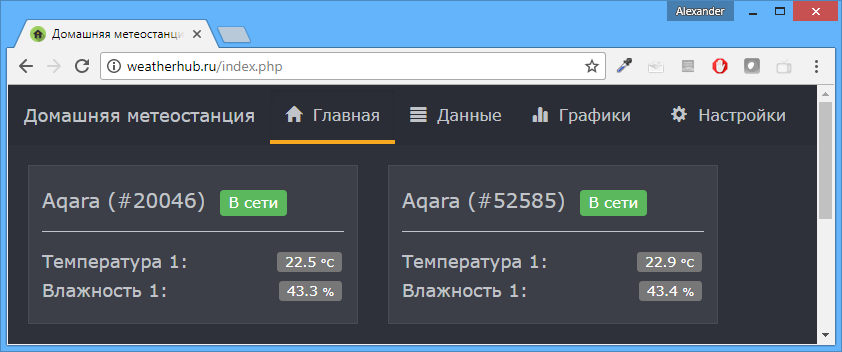
Using the Module Settings button, select the active sensors (in our case, Temperature 1 and Humidity 1), save the data, and go to the Main one, where we see the received data:
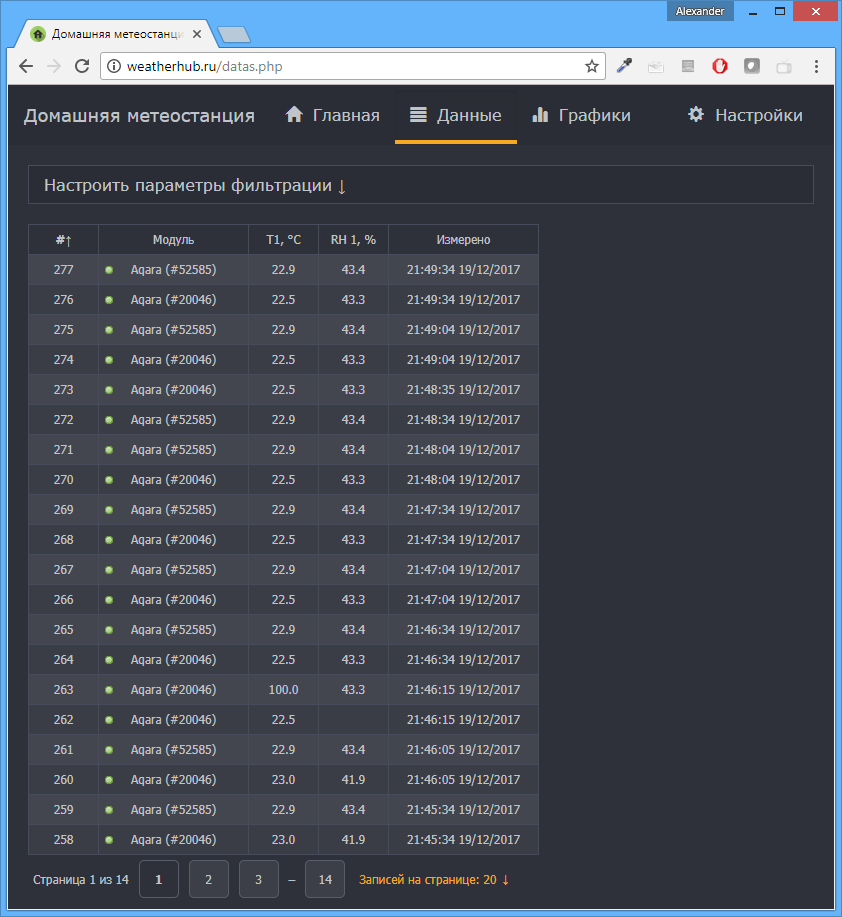
On the Data page - you can see the data in tabular form:
On the Charts page - graphs for which you can select the display period:
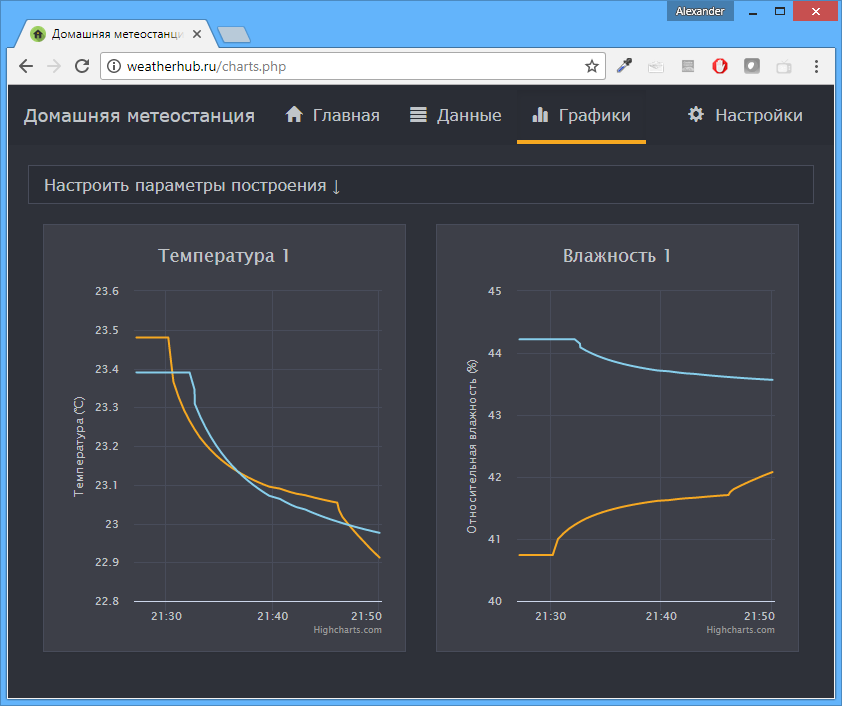
The site is launched in single user mode, without authorization. Therefore, the displayed data is available to everyone. When authorization is enabled, each user receives a unique validation code, which will need to be specified either in the firmware for the controller or in the nodejs module.
All weather station code is available on Github: github.com/aproschenko-dev/WeatherHub
Further development that I see:
From readers - I would like to hear in the comments criticism of the case, wishes for the system, and - what would be most valuable - personal experience in deploying and using the system, including with Aqara sensors, which have become quite inexpensive.
I am sure that when deploying and launching a weather station, many questions may arise - I am ready to give answers to them, and, based on the results, write a detailed manual on the system.
It has been a year and a half since I published my first article about my project of the Home Weather Station. During this time, I received numerous reviews from readers about the functionality and security of the system, and also corrected a fair amount of bugs that were detected during installation and deployment of the system by other users (thanks to the most active users - HzXiO , enjoyneering , dimitriy16 ).
KDPV.
But it's all the lyrics, it's time to business!
So, what was done in the new version of the system.
Iron part (on esp8266):
- The system code has been completely rewritten: OOP is now widely used for working with sensors and displays, in order to simplify the addition of new sensors and make the code clear and structured.
- Requirements regarding system security are taken into account.
- Simplified module setup pages
- Removed dependencies on RTC
Server side (php + mysql):
- Chart drawing algorithm changed - Kalman filter is used
- Each user of the system now sees exclusively their modules
- You can give your sensors names, control their visibility on the pages.
- Added the ability to view data from temperature-humidity sensors manufactured by Aqara-Xiaomi.
I want to dwell on the most interesting problems that I had to solve.
1. A program in the form of a footcloth of 1000+ lines of code has become completely unreadable, it has become too difficult to navigate in this code, it has become too difficult and time-consuming to check and debug changes. Therefore, the code was rewritten - basic interfaces appeared, declaring standard methods for working with sensors and displays, their heirs appeared, implementing logic specific to specific models, as well as factories responsible for creating the necessary classes.
Let me show you an example:
#define sensorsCount 2
int sensorTypes[sensorsCount] = {SENSOR_DHT22, SENSOR_DHT22};
int sensorPins[sensorsCount] = {2, 0};
SensorEntity** sensorEntities;
SensorOutputData* outputDatas;
It is announced here that we have two sensors of the DHT22 type connected to pins 2 and 0, as well as arrays for wrapper classes above the sensors, and for an array of data received from them.
DisplayEntity display = DisplayEntity(DISPLAY_LCD_I2C);
The display used is similarly declared - its type is set.
The initialization of the sensors and display occurs in the setup method:
void setupSensors()
{
    outputDatas = new SensorOutputData[sensorsCount];
    sensorEntities = new SensorEntity*[sensorsCount];
    for (int i = 0; i < sensorsCount; i++)
    {
        int sensorType = sensorTypes[i];
        int pin = sensorPins[i];
        SensorEntity* entity = new SensorEntity(sensorType);
        entity->setup(pin);
        sensorEntities[i] = entity;
    }
}
void setupDisplay()
{
    DisplayConfig displayConfig = DisplayConfig();
    displayConfig.address = 0x27;
    displayConfig.rows = 2;
    displayConfig.cols = 16;
    displayConfig.sda = 4;
    displayConfig.scl = 5;
    displayConfig.printSensorTitle = false;
    display.setup(displayConfig);
    display.clear();
}
At each measurement cycle, data is received from the sensors and transferred to the display for display:
void requestSensorValues()
{
    for (int i = 0; i < sensorsCount; i++)
    {
        SensorEntity* entity = sensorEntities[i];
        SensorOutputData sensorData = entity->getData();
        sensorData.sensorOrder = i;
        outputDatas[i] = sensorData;
    }
}
void renderSensorValues()
{
    for (int i = 0; i < sensorsCount; i++)
    {
        SensorOutputData sensorData = outputDatas[i];
        display.printData(sensorData);
    }
}
Actually, these small pieces of code could be the whole program if it weren’t for working with Wi-Fi or creating an access point on esp8266 to configure the modules.
As you can see, if the user needs to change the sensor used, or connect a new display, this will be very simple: you just need to register their types and change the pin configuration.
If you need to add a new type of sensor or display, then you should create an heir from the base class, and redefine the methods for receiving data and rendering them.
2. Changes in security - now the access point created by the module has a password registered in the config when flashing the module - no one else can connect to the module without the knowledge of the user.
3. When rendering graphs on the site, the Kalman filter is now used to remove the chatter of values.
4. Now it is possible to control the visibility and names of sensors on the modules - this can be done on the settings page of each module on the site.
5. The main feature added in this revision of the weather station is support for working with Aqara sensors for the Xiaomi smart home ecosystem.
To implement this feature, you will need: a smart home gateway, transferred to the developer mode, and the temperature and humidity sensors themselves. Sensors must be connected to the gateway through the MiHome application, then you can forget about the application and the great Chinese clouds: data will be exchanged inside the local network, which is desirable to be placed in the guest segment without access to the Internet at all.
In order to receive data broadcast between the sensors and the gateway on the local network, in my project I use Malinka, which runs a module written in nodejs. The module listens to multicast messages transmitted over the network, parses them to find the necessary sensors, since all the data is transmitted in JSON format, and after searching for sensors, it extracts temperature and humidity data from the messages.
The data thus obtained - the module sends to the site specified in the config for further display and storage.
I will give the code of the module and config - see under the cut:
Module and config on nodejs
Module:
Config:
var request = require("request");
var config = require('./config');
const dgram = require('dgram');
const serverPort = config.serverPort;
const serverSocket = dgram.createSocket('udp4');
const multicastAddress = config.multicastAddress;
const multicastPort = config.multicastPort;
const sensorDelay = config.sensorDelay;
var sidToAddress = {};
var sidToPort = {};
var gatewayAddress;
function sendSensorData(sensorId, temperature, humidity, gatewayAddress) {
    request({
            url: config.addDataUrl,
            method: 'GET',
            qs: {
                isaqara: 1,
                moduleid: sensorId,
                modulename: sensorId,
                code: config.validationCode,
                temperature1: temperature,
                humidity1: humidity,
                ip: gatewayAddress,
                mac: sensorId,
                delay: sensorDelay
            }
        },
        function (error, response, body) {
            if (error) {
                console.log(error);
            }
        }
    );
}
serverSocket.on('message', function (msg, rinfo) {
    console.log('Received \x1b[33m%s\x1b[0m (%d bytes) from client \x1b[36m%s:%d\x1b[0m.', msg, msg.length, rinfo.address, rinfo.port);
    var json;
    try {
        json = JSON.parse(msg);
    }
    catch (e) {
        console.log('\x1b[31mUnexpected message: %s\x1b[0m.', msg);
        return;
    }
    var cmd = json['cmd'];
    if (cmd === 'iam') {
        var address = json['ip'];
        var port = json['port'];
        gatewayAddress = address;
        var command = {
            cmd: "get_id_list"
        };
        var cmdString = JSON.stringify(command);
        var message = new Buffer(cmdString);
        serverSocket.send(message, 0, cmdString.length, port, address);
        console.log('Requesting devices list...');
    }
    else if (cmd === 'get_id_list_ack') {
        var data = JSON.parse(json['data']);
        console.log('Received devices list: %d device(s) connected.', data.length);
        for (var index in data) {
            var sid = data[index];
            var command = {
                cmd: "read",
                sid: new String(sid)
            };
            sidToAddress[sid] = rinfo.address;
            sidToPort[sid] = rinfo.port;
            var cmdString = JSON.stringify(command);
            var message = new Buffer(cmdString);
            serverSocket.send(message, 0, cmdString.length, rinfo.port, rinfo.address);
            console.log('Sending \x1b[33m%s\x1b[0m to \x1b[36m%s:%d\x1b[0m.', cmdString, rinfo.address, rinfo.port);
        }
    }
    else if (cmd === 'read_ack' || cmd === 'report' || cmd === 'heartbeat') {
        var model = json['model'];
        var data = JSON.parse(json['data']);
        if (model === 'sensor_ht') {
            var temperature = data['temperature'] ? data['temperature'] / 100.0 : 100;
            var humidity = data['humidity'] ? data['humidity'] / 100.0 : 0;
            var sensorId = json["short_id"];
            console.log("Received data from sensor \x1b[31m%s\x1b[0m (sensorId: %s) data: temperature %d, humidity %d.", json['sid'], sensorId, temperature, humidity);
            sendSensorData(sensorId, temperature, humidity, gatewayAddress);
            console.log('Sending sensor data to \x1b[36m%s\x1b[0m.', config.addDataUrl);
        }
    }
});
// err - Error object, https://nodejs.org/api/errors.html
serverSocket.on('error', function (err) {
    console.log('Error, message - %s, stack - %s.', err.message, err.stack);
});
serverSocket.on('listening', function () {
    console.log('Starting a UDP server, listening on port %d.', serverPort);
    serverSocket.addMembership(multicastAddress);
})
console.log('Starting Aqara daemon...');
serverSocket.bind(serverPort);
function sendWhois() {
    var command = {
        cmd: "whois"
    };
    var cmdString = JSON.stringify(command);
    var message = new Buffer(cmdString);
    serverSocket.send(message, 0, cmdString.length, multicastPort, multicastAddress);
    console.log('Sending WhoIs request to a multicast address \x1b[36m%s:%d\x1b[0m.', multicastAddress, multicastPort);
}
sendWhois();
setInterval(function () {
    console.log('Requesting data...');
    sendWhois();
}, sensorDelay * 1000);
Config:
var config = {
    validationCode: "0000000000000000",
    addDataUrl: "http://weatherhub.ru/aqara.php",
    serverPort: 9898,
    multicastAddress: '224.0.0.50',
    multicastPort: 4321,
    sensorDelay: 30
};
module.exports = config;
To launch the module on Malinka - the nodejs sensor.js command is used.
How to automate the launch of the module at Malinka startup - has not yet decided, probably someone will tell you in the comments how to do this easier and more beautiful.
Type of data received from the Malinki console:
Received Data
root@raspberrypi:/home/nodejs# nodejs sensor.js
Starting Aqara daemon...
Sending WhoIs request to a multicast address 224.0.0.50:4321.
Starting a UDP server, listening on port 9898.
Received {"cmd":"iam","port":"9898","sid":"f0b429cc178e","model":"gateway","ip":"192.168.1.112"} (87 bytes) from client 192.168.1.112:4321.
Requesting devices list...
Received {"cmd":"get_id_list_ack","sid":"f0b429cc178e","token":"GVke0tYsRZ5zlXWc","data":"[\"158d00015b2f98\",\"158d0001560c23\",\"158d00013eccc6\",\"158d000153db73\",\"158d000127883b\",\"158d0001581523\",\"158d0001101d54\"]"} (217 bytes) from client 192.168.1.112:9898.
Received devices list: 7 device(s) connected.
Sending {"cmd":"read","sid":"158d00015b2f98"} to 192.168.1.112:9898.
Sending {"cmd":"read","sid":"158d0001560c23"} to 192.168.1.112:9898.
Sending {"cmd":"read","sid":"158d00013eccc6"} to 192.168.1.112:9898.
Sending {"cmd":"read","sid":"158d000153db73"} to 192.168.1.112:9898.
Sending {"cmd":"read","sid":"158d000127883b"} to 192.168.1.112:9898.
Sending {"cmd":"read","sid":"158d0001581523"} to 192.168.1.112:9898.
Sending {"cmd":"read","sid":"158d0001101d54"} to 192.168.1.112:9898.
Received {"cmd":"read_ack","model":"sensor_ht","sid":"158d00015b2f98","short_id":20046,"data":"{\"voltage\":2975,\"temperature\":\"2297\",\"humidity\":\"4190\"}"} (153 bytes) from client 192.168.1.112:9898.
Received data from sensor 158d00015b2f98 (sensorId: 20046) data: temperature 22.97, humidity 41.9.
Sending sensor data to http://weatherhub.ru/aqara.php.
Received {"cmd":"read_ack","model":"motion","sid":"158d0001560c23","short_id":41212,"data":"{\"voltage\":3075}"} (103 bytes) from client 192.168.1.112:9898.
Received {"cmd":"read_ack","model":"switch","sid":"158d00013eccc6","short_id":4019,"data":"{\"voltage\":3042}"} (102 bytes) from client 192.168.1.112:9898.
Received {"cmd":"read_ack","model":"magnet","sid":"158d000153db73","short_id":4914,"data":"{\"voltage\":3015,\"status\":\"unknown\"}"} (125 bytes) from client 192.168.1.112:9898.
Received {"cmd":"read_ack","model":"plug","sid":"158d000127883b","short_id":52305,"data":"{\"voltage\":3600,\"status\":\"unknown\",\"inuse\":\"0\"}"} (140 bytes) from client 192.168.1.112:9898.
Received {"cmd":"read_ack","model":"sensor_ht","sid":"158d0001581523","short_id":52585,"data":"{\"voltage\":3035,\"temperature\":\"2287\",\"humidity\":\"4340\"}"} (153 bytes) from client 192.168.1.112:9898.
Received data from sensor 158d0001581523 (sensorId: 52585) data: temperature 22.87, humidity 43.4.
Sending sensor data to http://weatherhub.ru/aqara.php.
Received {"cmd":"read_ack","model":"switch","sid":"158d0001101d54","short_id":3344,"data":"{\"voltage\":3032}"} (102 bytes) from client 192.168.1.112:9898.
Received {"cmd":"heartbeat","model":"gateway","sid":"f0b429cc178e","short_id":"0","token":"oypMd4l87xHIR6oP","data":"{\"ip\":\"192.168.1.112\"}"} (136 bytes) from client 192.168.1.112:4321.
As you can see from the output, there are two sensors in the network, with identifiers 52585 and 20046. The data from them is sent to the server specified in the config (http://weatherhub.ru) - where the site itself and the database for data storage are raised.
After starting the module, connecting sensors, and launching the site, new sensors can be immediately seen on the Settings page:
Using the Module Settings button, select the active sensors (in our case, Temperature 1 and Humidity 1), save the data, and go to the Main one, where we see the received data:
On the Data page - you can see the data in tabular form:
On the Charts page - graphs for which you can select the display period:
The site is launched in single user mode, without authorization. Therefore, the displayed data is available to everyone. When authorization is enabled, each user receives a unique validation code, which will need to be specified either in the firmware for the controller or in the nodejs module.
All weather station code is available on Github: github.com/aproschenko-dev/WeatherHub
Further development that I see:
- The ability to display data in graphical form, in the form of a scale
- Adding to the standard set of supported sensors the most common models - bme280, bmp280 and others
- CO2 Sensor Support - MHT-Z19
From readers - I would like to hear in the comments criticism of the case, wishes for the system, and - what would be most valuable - personal experience in deploying and using the system, including with Aqara sensors, which have become quite inexpensive.
I am sure that when deploying and launching a weather station, many questions may arise - I am ready to give answers to them, and, based on the results, write a detailed manual on the system.