November 26, 2014 at 19:21
We disassemble the radio-controlled paper airplane PowerUP 3.0 for parts

Probably, many have heard or even played already with PowerUp 3.0 - a kit that allows you to turn almost any paper airplane (we all did these in childhood) into a phone-controlled gadget.
The author of the project is a pilot with 25 years of experience, who managed to gather a team of specialists around him, and then get a million dollars on Kickstarter instead of the requested 50 thousand. An overview of this kit was published on Habré , and material with comments and tips of those who have already tested the device in work was also published here . Today I want to show what the airplane is inside - more precisely, what the electronic “filling” is (carefully, a lot of photos).
The only thing we recall from past materials is the way to bring the device into working form. Everything is simple here:
1. Make an airplane out of paper (the author of the project even includes instructions on how to fold different airplanes);
2. We attach the corresponding module with special clamps to the axis of the aircraft;
3. Install and run a special application for a smartphone (free);
4. We launch the paper airplane by hand, and begin to control our fighter / attack aircraft, simply by tilting the smartphone.
Well, now - anboxing and disassembly, with the comments of an electronic engineer.

In this form, the airplane arrived at the office.

Top view.

And this is already without packaging and without a lid.

Now in front

Control module, carbon base and propeller

Control module with a clip that attaches to the paper

Attaches like this

Well, and the assembled airplane with the Medgadgets logo, where without it :)

Smart module with a clip

MicroUSB connector for charging a smart module. Next to the connector is a black switch (gate valve) for turning the power on and off. The

smart module is disassembled. Case + battery + control board

1. Left - Bluetooth Smart CC2541 www.ti.com/product/cc2541 (left).
2. In the middle is the antenna.
3. On the right is the power switch (on / off).
4. Below - an ultra miniature highly stable crystal in a ceramic case for surface mountingabracon.com/Resonators/ABM8X.pdf ). Most likely needed to control the frequency.

Bluetooth Smart CC2541

Left - microUSB connector
Black wire (-) - cathode. Goes to battery “-”.
The red wire (+) - the anode, goes to the "+" of the battery.

On the left, 3 elements marked "EBC" are most likely voltage regulators. A little to the right of them are soldered wires that go through the carbon frame to the tail of the airplane.

Battery with a nominal voltage of 3.7 V. Capacity 75 mAh The

tail of the airplane. Control board for a screw (propeller), an automatic traction for rotating the screw and a regulator of accuracy of flight.


The passage of wires leaving the carbon frame
Actually, that’s the whole dismantling, as we see, there’s not a lot of everything inside. The control module is assembled and the whole kit as a whole is good. Nothing backlash, does not fall off. According to experience, the control module withstands a lot of impacts on the ground. So far, the experimental airplane that has passed through the hands of a large number of people who want to play with it has not broken. This makes me happy :)
This is how it works.
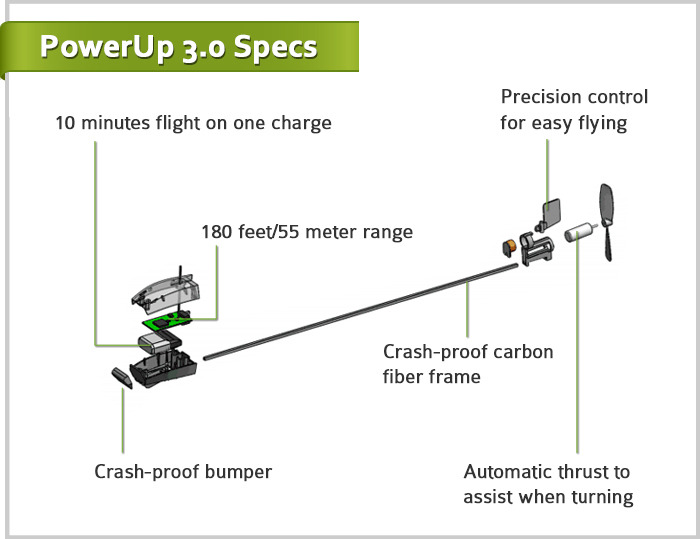
A few more drawings.
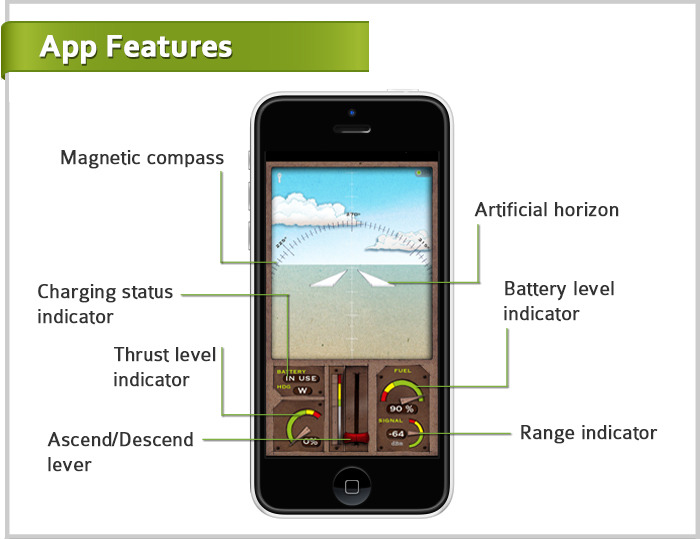
Management is done from a smartphone. For a normal launch, you need to work out.
Power Up 3.0 captures for a long time, and it’s understandable why, because there’s a combination of childhood, those same planes that we all launched, and the most advanced technologies, let them not the most difficult. Yes, and the smartphone is involved. In general, what the doctor prescribed for entertainment in front of the office or in the park, with the kids (maybe with older children, they like it even more).
The author already produces kits for creating radio-controlled paper boats, as well as various airplane templates. In principle, templates are not needed, everything works if you make an ordinary airplane out of the most ordinary thick paper.