 May 20, 2018 at 14:38
Practice test pyramid
- Transfer
 About the Author: Ham Fokke is a ThoughtWorks developer and consultant in Germany. Tired of the deployment at three nights, he added means of continuous delivery and thorough automation to his toolkit. Now it is establishing such systems for other teams to ensure reliable and efficient software delivery. So he saves companies the time these annoying little people spent on their antics.
The Test Pyramid is a metaphor that means grouping software tests by different levels of detail. It also gives an idea of how many tests should be in each of these groups. Despite the fact that the concept of a test pyramid has existed for a long time, many development teams are still trying to incorrectly put it into practice properly. This article discusses the initial concept of a test pyramid and shows how to bring it to life. It shows what types of tests should be sought at different levels of the pyramid, and gives practical examples of how they can be implemented.
Content
Notes
- The importance of automation (tests)
- Test pyramid
- What tools and libraries we will consider
- Application example
- Functionality
- High level structures
- Interior architecture
- Unit tests
- What is a unit?
- Sociable and lonely tests
- Imitations and stubs
- What to test?
- Test structure
- Unit test implementation
- Integration tests
- DB Integration
- Integration with individual services
- Contract tests
- Consumer Test (our team)
- Supplier test (another team)
- Supplier test (our team)
- UI tests
- End-to-end tests
- UI pass-through tests
- REST API pass-through test
- Acceptance tests - do your features work correctly?
- Research testing
- Confusion with terminology in testing
- Deploying Tests in a Deployment Pipeline
- Avoid duplicate tests
- Write clean code for tests
- Conclusion
Notes
- But I really need to test this private method
- Specialized Test Helpers

The dramatically shortened feedback loop, fueled by automated tests, goes hand in hand with agile development practices, continuous delivery and DevOps culture. An effective testing approach provides fast and confident development.
This article looks at how a well-formed test suite should look like in order to be flexible, reliable and supported - regardless of whether you are building a microservice architecture, mobile applications, or IoT ecosystems. We will also take a detailed look at creating effective and readable automated tests.
The importance of automation (tests)
Software has become an integral part of the world in which we live. It outgrew the original sole purpose of increasing business efficiency. Today, every company strives to become a first-class digital company. Every day we all act as users of more and more software. The speed of innovation is increasing.
If you want to keep up with the times, you need to look for faster ways to deliver software without sacrificing its quality. Continuous delivery can help. This is a practice that automatically ensures that software can be released into production at any time. For continuous delivery, an assembly pipeline is used to automatically test software and deploy it in test and production environments.
Soon, assembling, testing and deploying an ever-growing number of software manually becomes impossible - unless you want to spend all your time manually doing routine tasks instead of delivering working software. The only way is to automate everything from assembly to testing, deployment and infrastructure.

Fig. 1. Using assembly pipelines for automatic and reliable commissioning of software.
Traditionally, testing has required excessive manual work through deployment in a test environment, and then tests in the style of a black box, for example, by clicking everywhere in the user interface with the observation that bugs appear. Often, these tests are set by test scripts to ensure that testers test everything in sequence.
Obviously, testing all the changes manually takes a lot of time, it is monotonous and tedious. Monotony is boring, and boredom leads to mistakes.
Fortunately, there is a great tool for the same tasks: automation .
Automating uniform tests will change your life as a developer. Automate tests, and you will no longer have to thoughtlessly follow click protocols, checking the correct operation of the program. Automate tests, and without blinking, change the code base. If you've ever tried large-scale refactoring without the right set of tests, I'm sure you know what horror this can turn into. How do you know if you accidentally make a mistake in the process? Well, you have to click manually on all test cases, how else. But let's be honest: do you really like it? How about even after large-scale changes, any bugs manifest themselves within a few seconds while you are drinking coffee? In my opinion, this is much nicer.
Test pyramid
If you take automated tests seriously, there is one key concept: the test pyramid . She was introduced by Mike Cohn in his book , Scrum: Agile Software Development Using Scrum. This is a great visual metaphor, suggesting different levels of tests. It also shows the volume of tests at each level.
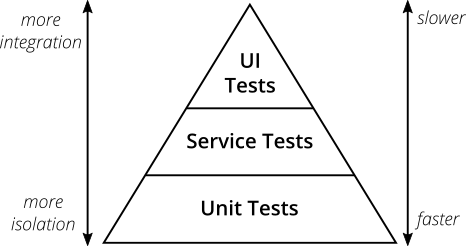
Fig. 2. Test
pyramid The original test pyramid of Mike Cohn consists of three levels (from bottom to top):
- Unit tests.
- Service Tests
- User Interface Tests
Unfortunately, a more thorough concept seems insufficient. Some argue that either naming or some conceptual aspects of the pyramid of tests by Mike Cohn are not perfect, and I have to agree. From a modern point of view, the test pyramid seems overly simplistic and therefore can be misleading.
However, because of its simplicity, the essence of the test pyramid is a good rule of thumb when it comes to creating your own test suite. From this pyramid, the main thing to remember is two principles:
- Write tests of different detail.
- The higher the level, the fewer tests.
Stick to the shape of the pyramid to come up with a healthy, fast and maintainable test suite. Write a lot of small and quick unit tests . Write some more general tests and very few high-level end-to-end tests that test the application from start to finish. Make sure that you did not end up with a test ice cream cone , which will become a support nightmare and will take too long to complete.
Do not get too attached to the names of the individual levels of the test pyramid. In fact, they can be misleading: the term “service test” is difficult to understand (Cohn himself noted that many developers completely ignore this level) Nowadays, frameworks for single-page applications like React, Angular, Ember.js and others, it becomes obvious that UI tests do not have a place at the top of the pyramid - you can perfectly test the UI in all of these frameworks.
Given the shortcomings of the original names in the pyramid, it is quite normal to come up with other names for your test levels. The main thing is that they correspond to your code and terminology adopted by your team.
What tools and libraries we will consider
- JUnit : to run tests
- Mockito : for simulation dependencies
- Wiremock : for stub external services
- Pact : for writing CDC tests
- Selenium : for writing end-to-end UI tests
- REST-assured : for writing end-to-end REST API tests
Application example
I wrote a simple microservice with tests from different levels of the pyramid.
This is an example of a typical microservice. It provides a REST interface, communicates with the database and extracts information from a third-party REST service. It is implemented on Spring Boot and should be understood even if you have never worked with Spring Boot.
Be sure to check the code on Github . The readme file contains instructions for running the application and automatic tests on your computer.
Functionality
The application has simple functionality. It provides a REST interface with three endpoints:
GET /hello

Возвращает "Hello World". Всегда.


GET /hello /{lastname}

Ищет человека с указанной фамилией. Если человек известен, возвращает "Hello {Firstname} {Lastname}".


GET /weather

Возвращает текущие погодные условия в Гамбурге, Германия.
High level structures
At a high level, the system has the following structure:

Fig. 3. High-level microservice structure
Our microservice provides a HTTP REST interface. For some endpoints, the service receives information from the database. In other cases, it accesses an external API via HTTP to receive and display current weather.
Interior architecture
Inside, Spring Service has a typical architecture for Spring:
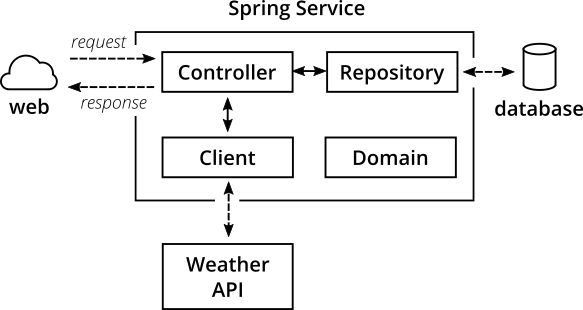
Fig. 4. The internal structure of the microservice
- Classes
Controllerprovide REST endpoints , handle HTTP requests and responses. - Classes
Repositoryinteract with the database , are responsible for writing and reading data to / from persistent storage. - Classes
Clientinteract with other APIs, in our case, they take JSON data via HTTPS from the weather API on darksky.net. - Classes
Domaincapture a domain model , including domain logic (which, frankly, is pretty trivial in our case).
Experienced Spring developers may notice that there is no commonly used layer: many developers inspired by problem-oriented design create a service layer consisting of service classes . I decided not to include it in the application. One of the reasons is that our application is quite simple, and the service layer will become an unnecessary level of indirection. Another reason is that in my opinion people often overdo it with these layers. Often you have to see codebases where service classes cover the entire business logic. The domain model becomes just a layer for data, not for behavior ( anemic domain model) For every non-trivial application, great opportunities are lost for good code structuring and testability, and the power of object orientation is not fully used.
Our repositories are simple and provide simple CRUD functionality . For simplicity of code, I used Spring Data . It provides a simple and universal implementation of the CRUD repository, and also takes care of deploying databases for our tests in memory, rather than using real PostgreSQL, as it would be in production.
Take a look at the code base and get acquainted with the internal structure. This is useful for the next step: testing the application!
Unit tests
The basis of your test suite consists of unit tests (unit tests). They verify that a separate unit ( test subject ) of the code base is working properly. Unit tests have the narrowest area among all the tests in the test suite. The number of unit tests in the set significantly exceeds the number of any other tests.

Fig. 5. Typically, a unit test replaces external users with test takes.
What is a unit?
If you ask three different people what “unit” means in the context of unit tests, you will probably get four different, slightly different answers. To a certain extent, this is a question of your own definition - and it is normal that there is no generally accepted canonical answer.
If you write in a functional language, then the unit will most likely be a separate function. Your unit tests will call a function with various parameters and provide a return of the expected values. In an object-oriented language, a unit can vary from a single method to an entire class.
Sociable and lonely tests
Some argue that all the participants (for example, caused classes) of the test subject should be changed to simulate (Mocks) or plugs (the stubs), to create the perfect insulation to avoid side effects and complicated setup test. Others argue that only participants who slow down the test or show strong side effects (for example, classes with access to the database or network calls) should be replaced with simulations and stubs.
Sometimes these two types of unit tests is called the lonely (solitary) in the case of total application simulations and plugs or outgoing (sociable) in the case of real communication with other members (the term coined for the book Jay Fields“Effective work with unit tests” ). If you have some free time, you can go down the rabbit hole and understand the advantages and disadvantages of different points of view.
But in the end, it doesn't matter what type of tests you choose. What really matters is their automation. Personally, I always use both approaches. If it is inconvenient to work with real participants, I will abundantly use simulations and stubs. If I feel that attracting a real participant gives more confidence in the test, then I will drown out only the most distant parts of the service.
Imitations and stubs
Imitations (mocks) and stubs (stubs) are two different types of test doubles (in general there are more of them). Many use the terms interchangeably. I think that it is better to maintain accuracy and keep in mind the specific properties of each of them. To objects from production, test doubles create an implementation for tests.
Simply put, you are replacing the real thing (such as a class, module, or function) with a fake copy. The fake looks and acts like the original (it gives the same answers to the same method calls), but these are predefined answers that you yourself define for the unit test.
Test doubles are used not only in unit tests. More sophisticated doubles are used to controlledly simulate entire parts of your system. However, unit tests use especially many imitations and stubs (depending on whether you prefer sociable or single tests) simply because many modern languages and libraries make it easy and convenient to create them.
Regardless of the technology you choose, the standard library of your language or some popular third-party library already has an elegant way to configure simulations. And even to write your own simulations from scratch, you just need to write a fake class / module / function with the same signature as the real one, and the simulation settings for the test.
Your unit tests will work very fast. On a decent machine, you can run thousands of unit tests in a few minutes. Test isolated small fragments of the code base in isolation and avoid contacts with the database, file system and HTTP requests (by setting simulations and stubs here) to maintain high speed.
Having understood the basics, over time you will begin to write unit tests more freely and easily. Stub external participants, configure the input, call the test subject - and verify that the return value is as expected. Look at development through testing(TDD) and let unit tests guide your development; if they are applied correctly, it will help you get into a powerful stream and create a good supported architecture, automatically issuing a comprehensive and fully automated test suite. But this is not a universal solution. Try it and see for yourself if TDD is right for you.
What to test?
It's good that unit tests can be written for all classes of production code, regardless of their functionality or to what level of internal structure they belong to. Unit tests are suitable for controllers, repositories, domain classes, or file readers. Just stick to the practical rule of one test class per production class .
The unit test should at least test the public interface of the class . private methods cannot be tested anyway, because they cannot be called from another test class. Protected or availableonly within the package (package-private) methods are available from the test class (given that the package structure of the test class is the same as in production), but testing these methods may already go too far.
When it comes to writing unit tests, there is a subtle feature: they must ensure that all non-trivial code paths are checked, including the default script and borderline situations. At the same time, they should not be too closely tied to implementation.
Why is that?
Tests that are too attached to the production code quickly begin to annoy. As soon as you refactor the code (that is, change the internal structure of the code without changing the external behavior), unit tests break immediately.
Thus, you lose the important advantage of unit tests: act as a security system for code changes. You will sooner get tired of these stupid tests, which fall each time after refactoring, bringing more problems than good; Whose idea was this stupid idea to implement tests?
What to do? Do not reflect the internal structure of the code in unit tests. Test observed behavior. For example:
if I enter the values of x and y, will the result be z?
instead:
if I introduce x and y, will the method first turn to class A, then to class B, and then add the results from class A and class B?
As a rule, private methods should be considered as part of the implementation. That is why there should not even be a desire to test them.
Often I hear from opponents of unit testing (or TDD) that writing unit tests becomes pointless if you need to test all the methods for a large test coverage. They often refer to scenarios where an overly impatient team lead forced them to write unit tests for getters and setters and other trivial code in order to reach 100% test coverage.
This is completely wrong.
Yes, you should test the public interface . But even more important is not to test the trivial code . Don't worry Kent Beck approves it. You will not get anything from testing simple getters or setters or other trivial implementations (for example, without any conditional logic). And you save time, so you can sit at another meeting, cheers!
But I really need to check this closed method.
If you ever find yourself in a situation where you really, really need to check the closed method, you need to take a step back and ask yourself: why?
I am sure that here is more likely a design problem. Most likely, you feel the need to test a private method, because it is complex, and testing the method through the class’s public interface requires too inconvenient settings.
Whenever I find myself in this situation, I usually come to the conclusion that the tested class is overcomplicated. He does too much and violates the principle of shared responsibility - one of the five principles of SOLID .
For me, the solution to split the source class into two classes often works. Often after a minute or two of thought, there is a good way to break up a large class into two smaller ones with individual responsibility. I move the private method (which we urgently need to test) to the new class and let the old class call the new method. Voila, the private method, inconvenient for testing, is now public and easy to test. In addition, I improved the code structure by introducing the principle of single responsibility.
Test structure
The good structure of all your tests (not just unit tests) is as follows:
- Test data setup.
- Call the test method.
- Check that the expected results are returned.
There is a good mnemonics for remembering this structure: three A ( Arrange, Act, Assert ). You can use other mnemonics with roots in BDD (development based on the description of behavior). This triad is given when, then , where “given” reflects the setting, “when” is a method call, and “then” is a statement.
This pattern can be applied to other, higher-level tests. In each case, they ensure that the tests remain easy and readable. In addition, tests written with this structure in mind are usually shorter and more expressive.
Unit test implementation
Now we know what exactly to test and how to structure unit tests. It's time to look at a real-world example.
Take a simplified version of the class
ExampleController.@RestController
public class ExampleController {
private final PersonRepository personRepo;
@Autowired
public ExampleController(final PersonRepository personRepo) {
this.personRepo = personRepo;
}
@GetMapping("/hello/{lastName}")
public String hello(@PathVariable final String lastName) {
Optional foundPerson = personRepo.findByLastName(lastName);
return foundPerson
.map(person -> String.format("Hello %s %s!",
person.getFirstName(),
person.getLastName()))
.orElse(String.format("Who is this '%s' you're talking about?",
lastName));
}
} A unit test for a method
hello(lastname)might look like this:public class ExampleControllerTest {
private ExampleController subject;
@Mock
private PersonRepository personRepo;
@Before
public void setUp() throws Exception {
initMocks(this);
subject = new ExampleController(personRepo);
}
@Test
public void shouldReturnFullNameOfAPerson() throws Exception {
Person peter = new Person("Peter", "Pan");
given(personRepo.findByLastName("Pan"))
.willReturn(Optional.of(peter));
String greeting = subject.hello("Pan");
assertThat(greeting, is("Hello Peter Pan!"));
}
@Test
public void shouldTellIfPersonIsUnknown() throws Exception {
given(personRepo.findByLastName(anyString()))
.willReturn(Optional.empty());
String greeting = subject.hello("Pan");
assertThat(greeting, is("Who is this 'Pan' you're talking about?"));
}
}We write unit tests in JUnit , the standard Java testing framework. We use Mockito to replace the real class
PersonRepositorywith a class with a stub for the test. This stub allows you to specify predefined answers that the stub method will return. This approach makes the test simpler and more predictable, making it easy to set up data validation. Following the structure of “three A” we write two unit tests for the positive and negative cases when the desired person cannot be found. A positive test case creates a new person object and tells the repository simulation to return this object when the parameter
lastNameis called with a Pan value . The test then calls the test method. Finally, he compares the answer with the expected.The second test works in a similar way, but it tests a scenario in which the test method does not find the person object for this parameter.
Specialized test helpers
It's great that you can write unit tests for the entire code base, regardless of the architecture level of your application. The example below shows a simple unit test for a controller. Unfortunately, when it comes to Spring controllers, this approach has a drawback: Spring MVC controller intensively uses annotations with declarations of listening paths, used HTTP commands, URL parsing parameters, request parameters and so on. A simple call to the controller method in a unit test will not test all these important things. Fortunately, the Spring community has come up with a good test helper that can be used to improve controller testing. Be sure to check out MockMVC. This will provide an excellent DSL for generating fake controller requests and verifying that everything is working fine. I have included an example in the code. Many frameworks have test helpers to simplify tests on specific parts of the code. Check out the documentation for your framework and see if it offers any useful helpers for your automated tests.
Integration tests
All non-trivial applications are integrated with some other parts (databases, file systems, network calls to other applications). In unit tests, you usually simulate them for better isolation and speed. However, your application will actually interact with other parts - and this should be tested. For this, integration tests are intended . They verify application integration with all components outside the application.
For automated tests, this means that you need to run not only your own application, but also an integrated component. If you are testing integration with the database, then when you run the tests, you must run the database. To check the reading of files from disk, you need to save the file to disk and load it into the integration test.
I mentioned earlier that unit tests are an indefinite term. This applies even more to integration tests. For some, “integration” means testing the entire stack of your application in conjunction with others. I like the narrower definition and testing of each integration point individually, replacing the rest of the services and databases with test understudies. Together with contract testing and execution of contract tests on understudies and real implementations, you can come up with integration tests that are faster, more independent and usually easier to understand.
Narrow integration tests live on the border of your service. Conceptually, they always trigger an action that leads to integration with the external part (file system, database, separate service). The database integration test is as follows:

Fig. 6. Database integration test integrates your code with a real database
- Running a database.
- Connecting the application to the database.
- Running a function in code that writes data to the database.
- Checking that the expected data is written to the database by reading it from the database.
Another example. The test for integrating your service with a separate service through the REST API may look like this:

Fig. 7. This type of integration test verifies that the application is able to correctly interact with individual services.
- Application Launch.
- Launching an instance of a separate service (or a test backup with the same interface).
- Running a function in code that reads data from the external service API.
- Verify that the application parses the response correctly.
Like unit tests, your integration tests can be done quite transparently (whitebox). Some frameworks allow you to simultaneously launch your application, and simulate its individual parts to verify the correct interaction.
Write integration tests for all pieces of code where data is serialized or deserialized . This happens more often than you think. Think of the following:
- REST API calls to their services.
- Reading and writing to the database.
- API calls to other applications.
- Reading from the queue and writing there.
- Writing to the file system.
Writing integration tests around these boundaries ensures that writing data and reading data from these external participants works fine.
When writing narrow integration tests , try to run external dependencies locally: a local MySQL database, a test on the local ext4 file system. If you integrate with a separate service, either start an instance of this service locally, or create and run a fake version that mimics the behavior of a real service.
If it is not possible to locally start a third-party service, then it is better to run a dedicated test instance and point to it in the integration test. In automated tests, avoid integration with a real production system. Running thousands of test requests to the production system is a sure way to make people angry because you are logging their logs (at best) or just serving up their service (at worst). Network integration is a typical feature of a broad integration test . Usually because of it, tests are harder to write and they work more slowly.
As for the test pyramid, integration tests are at a higher level than unit tests. The integration of file systems and databases is usually much slower than the execution of unit tests with their simulations. They are also harder to write than small, isolated unit tests. In the end, you need to think about the work of the external part of the test. Nevertheless, they have an advantage, because they give confidence in the correct operation of the application with all external parts with which it is necessary. Unit tests are useless here.
DB Integration
PersonRepository- the only repository class in the entire code base. It relies on Spring Data and does not have an actual implementation. It simply extends the interface CrudRepositoryand provides a single method header. The rest is Spring magic.public interface PersonRepository extends CrudRepository {
Optional findByLastName(String lastName);
} Through the interface
CrudRepositorySpring Boot provides a fully functional repository CRUD methods findOne, findAll, save, updateand delete. Our own definition of the method findByLastName ()extends this basic functionality and makes it possible to receive people, that is, objects Person, by their last names. Spring Data parses the return type of the method, the name of the method, and checks for compliance with naming conventions to determine what it should do. Although Spring Data does a great job of implementing database repositories, I still wrote a database integration test. You can say that this is a test of the framework.which should be avoided, because we are testing someone else's code. Nevertheless, I believe that the presence of at least one integration test is very important here. Firstly, it checks the normal operation of our method
findByLastName. Secondly, it proves that our repository uses Spring correctly and is able to connect to the database. To facilitate the execution of tests on your computer (without installing the PostgreSQL database), our test connects to the database in H2 memory .
I defined H2 as a test dependency in a file
build.gradle. The file application.propertiesin the test directory does not define any properties spring.datasource. This tells Spring Data to use the database in memory. Since he finds H2 on the way to the class, he simply uses H2. Real app with profile
int(for example, after setting as an environment variable SPRING_PROFILES_ACTIVE=int) will connect to the PostgreSQL database, as defined in application-int.properties. I understand that here you need to know and understand a bunch of Spring features. We'll have to shovel a bunch of documentation . The final code is simple in appearance, but hard to understand if you do not know the specific features of Spring.
In addition, working with a database in memory is a risky business. In the end, our integration tests work with databases of a different type than in production. Try it and decide for yourself whether to prefer Spring magic and simple code - or an explicit but more detailed implementation.
Well, enough explanation. Here is a simple integration test that saves the Person object to the database and finds it by last name.
@RunWith(SpringRunner.class)
@DataJpaTest
public class PersonRepositoryIntegrationTest {
    @Autowired
    private PersonRepository subject;
    @After
    public void tearDown() throws Exception {
        subject.deleteAll();
    }
    @Test
    public void shouldSaveAndFetchPerson() throws Exception {
        Person peter = new Person("Peter", "Pan");
        subject.save(peter);
        Optional maybePeter = subject.findByLastName("Pan");
        assertThat(maybePeter, is(Optional.of(peter)));
    }
}
As you can see, our integration test follows the same “three A” structure as unit tests. He said that this is a universal concept!
Integration with individual services
Our microservice receives weather data from darksky.net through the REST API. Of course, we want to make sure that the service sends requests correctly and parses the answers.
When performing automatic tests, it is advisable to avoid interaction with real darksky servers . The limits on our free rate are just one of the reasons. The main thing is the decoupling . Our tests should run no matter how nice people at darksky.net do their job. Even if our machine cannot reach darksky servers or they are closed for maintenance.
To avoid interaction with real darksky servers , we run our own, fake darksky server for integration tests. This may seem like a very difficult task. But it is simplified thanks to tools like Wiremock . See for yourself:
@RunWith(SpringRunner.class)
@SpringBootTest
public class WeatherClientIntegrationTest {
    @Autowired
    private WeatherClient subject;
    @Rule
    public WireMockRule wireMockRule = new WireMockRule(8089);
    @Test
    public void shouldCallWeatherService() throws Exception {
        wireMockRule.stubFor(get(urlPathEqualTo("/some-test-api-key/53.5511,9.9937"))
                .willReturn(aResponse()
                        .withBody(FileLoader.read("classpath:weatherApiResponse.json"))
                        .withHeader(CONTENT_TYPE, MediaType.APPLICATION_JSON_VALUE)
                        .withStatus(200)));
        Optional weatherResponse = subject.fetchWeather();
        Optional expectedResponse = Optional.of(new WeatherResponse("Rain"));
        assertThat(weatherResponse, is(expectedResponse));
    }
}
For Wiremock, create an instance
WireMockRuleon a fixed port ( 8089). Using DSL, you can configure the Wiremock server, determine the endpoints for listening, and predefined answers. Next, we call the test method — the one that accesses the third-party service — and verify that the result is correctly parsed.
It is important to understand how the test determines that it should turn to a fake Wiremock server instead of the real darksky API . The secret is in the file
application.propertiesthat is located at src/test/resources. Spring loads it when running tests. In this file, we redefine the configuration like API keys and URLs with values suitable for tests. In particular, we assign a call to a fake Wiremock server instead of the real one:weather.url = http://localhost:8089Please note that the port defined here should be the same as what we specified when creating the WireMockRule instance for the test. Replacing the real API URL with a fake one was made possible by introducing the URL into the class constructor
WeatherClient:@Autowired
public WeatherClient(final RestTemplate restTemplate,
@Value("${weather.url}") final String weatherServiceUrl,
@Value("${weather.api_key}") final String weatherServiceApiKey) {
this.restTemplate = restTemplate;
this.weatherServiceUrl = weatherServiceUrl;
this.weatherServiceApiKey = weatherServiceApiKey;
}So we tell our
WeatherClientto read the value of the weatherUrlproperty parameter weather.urlthat we defined in the properties of our application. With tools like Wiremock, writing narrow integration tests for a single service becomes a fairly simple task. Unfortunately, this approach has a drawback: how to ensure that the fake server we created behaves like a real one? With the current implementation, a separate service can change its API, and our tests will still pass as if nothing had happened. Now we are just testing what
WeatherClientis able to perceive responses from a fake server. This is the beginning, but it is very fragile. End -to-end tests solve the problem.and testing on a real service, but in this way we become dependent on its availability. Fortunately, there is a better solution to this dilemma - contract tests involving both simulation and a real server ensure that the simulation in our integration tests exactly matches the original. Let's see how it works.Contract tests
More modern companies have found a way to scale development by distributing work among different teams. They create separate, loosely coupled services without interfering with each other, and integrate them into a large, seamless system. This is what the recent hype around microservices is all about.
Dividing the system into many small services often means that these services must interact with each other through certain (preferably well-defined, but sometimes randomly created) interfaces.
Interfaces between different applications can be implemented in different formats and technologies. The most common:
- REST and JSON via HTTPS;
- RPC using something like gRPC ;
- building event-driven architecture using queues.
Each interface involves two sides: the supplier and the consumer. The supplier provides data to consumers. The consumer processes the data received from the supplier. In the REST world, a provider creates a REST API with all the necessary endpoints, and a consumer uses this REST API to retrieve data or initiate changes to another service. In an asynchronous world of event-driven architecture, a provider (often referred to as a publisher) publishes data in a queue; and the consumer (often called the subscriber) subscribes to these queues, reads and processes the data.

Fig. 8. Each interface involves the supplier (or publisher) and the consumer (or subscriber). An interface specification can be considered a contract.
Since the services of the supplier and the consumer are distributed according to different teams, you find yourself in a situation where you need to clearly indicate the interface between them (the so-called contract). Traditionally, companies approach this problem as follows:
- Write a long and detailed specification of the interface ( contract ).
- Implement the service of the supplier according to a specific contract.
- Transfer interface specifications to the consumer side.
- Wait until they implement their part of the interface.
- Run a large-scale manual system test to verify everything.
- It is hoped that both teams will always abide by the interface definitions and are not screwed up.
More modern companies have replaced steps 5 and 6 with automated contract tests , which verify that customer and supplier implementations still adhere to a specific contract. They are a good set of regression tests and guarantee early detection of deviations from the contract.
A more flexible organization should choose a more efficient and less wasteful route. The application is created within one organization. It should not be a problem to talk with developers of other services instead of throwing overly detailed documentation to them. In the end, these are your employees, not a third-party vendor with whom you can communicate only through customer support or bulletproof legal contracts.
User-oriented contract tests (CDC tests) allow consumers to manage contract implementation . Using CDCs, consumers write tests that test the interface for all the data they need. The team then publishes these tests so that vendor service developers can easily get and run these tests. Now they can develop their API by running CDC tests. After running all the tests, they know that they satisfy all the needs of the team on the consumer side.
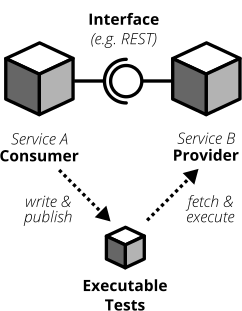
Fig. 9. Contract tests ensure that the supplier and all consumers of the interface adhere to a specific interface contract. Using CDC tests, interface consumers publish their requirements in the form of automated tests; vendors continuously receive and perform these tests.
This approach allows the interface provider team to implement only what is really needed (while maintaining simplicity, YAGNIetc). The vendor team must continuously receive and run these CDC tests (in its assembly pipeline) to immediately notice any critical changes. If they violate the interface, then their CDC tests will fail, preventing critical changes. While the tests pass, the team can make any changes it wants without worrying about other teams. A customer-oriented contract approach shortens the development process to the following:
- The consumer team writes automated tests with all the expectations from consumers.
- They publish tests for the supplier team.
- The vendor team runs and monitors CDC tests continuously.
- Teams immediately enter into negotiations when the CDC tests break.
If your organization implements a microservice approach, then conducting CDC tests is an important step toward creating autonomous groups. CDC tests are an automated way to encourage teamwork. They ensure that interfaces between teams work at all times. An unsuccessful CDC test is a good reason to go to the affected team, talk about upcoming API changes and find out where to go next.
The naive implementation of CDC tests is as simple as requesting an API and evaluating responses for everything you need. These tests are then packaged into an executable (.gem, .jar, .sh) and downloaded somewhere for another command (for example, a repository like Artifactory ).
In recent years, the CDC approach has become more popular and several tools have been created to simplify the writing and sharing of tests.
Pact is probably the most famous among them. It offers a sophisticated approach to writing tests for the consumer and the provider, provides stubs for individual services and allows you to share CDC tests with other teams. Pact is ported to many platforms and can be used with the JVM, Ruby, .NET, JavaScript, and many other languages.
Pact is the smart choice to get started with CDC. The documentation is staggering at first, but if you have patience, you can overcome it. It helps you gain a solid understanding of CDC, which in turn makes it easier for you to promote CDC for working with other teams.
User-oriented contract tests can dramatically simplify the work of autonomous teams that will act quickly and confidently. Do me a favor, check out and try this concept. A good set of CDC tests is invaluable to quickly continue development without breaking other services or upsetting other teams.
Consumer Test (our team)
Our microservice uses the weather API. So our responsibility is to write a consumer test that defines our expectations for a contract (API) between our microservice and the weather service.
First we include the library for writing consumer tests in our
build.gradle:testCompile('au.com.dius:pact-jvm-consumer-junit_2.11:3.5.5')Thanks to this library, we can implement a consumer test and use the Pact simulation services:
@RunWith(SpringRunner.class)
@SpringBootTest
public class WeatherClientConsumerTest {
    @Autowired
    private WeatherClient weatherClient;
    @Rule
    public PactProviderRuleMk2 weatherProvider =
            new PactProviderRuleMk2("weather_provider", "localhost", 8089, this);
    @Pact(consumer="test_consumer")
    public RequestResponsePact createPact(PactDslWithProvider builder) throws IOException {
        return builder
                .given("weather forecast data")
                .uponReceiving("a request for a weather request for Hamburg")
                    .path("/some-test-api-key/53.5511,9.9937")
                    .method("GET")
                .willRespondWith()
                    .status(200)
                    .body(FileLoader.read("classpath:weatherApiResponse.json"),
                            ContentType.APPLICATION_JSON)
                .toPact();
    }
    @Test
    @PactVerification("weather_provider")
    public void shouldFetchWeatherInformation() throws Exception {
        Optional weatherResponse = weatherClient.fetchWeather();
        assertThat(weatherResponse.isPresent(), is(true));
        assertThat(weatherResponse.get().getSummary(), is("Rain"));
    }
}
If you look closely, it is
WeatherClientConsumerTestvery similar to WeatherClientIntegrationTest. Only for the server stub instead of Wiremock this time we use Pact. On the consumer’s test itself, it works just like the integration test: we replace the real third-party server with a stub, determine the expected response and verify that the client can correctly parse it. In this sense, it WeatherClientConsumerTestis a narrow integration test. The advantage over the Wiremock-based test is that it generates a Pact file (located intarget/pacts/&pact-name>.json) It describes our contractual expectations in a special JSON format. This file can then be used to verify that the stub server behaves like a real one. We can take the pact file and pass it to the interface command. They take a pact file and write a provider test using the expectations specified there. So they check to see if their API meets all our expectations. As you can see, this is where the “customer focus” part of the CDC definition comes from. The consumer controls the implementation of the interface, describing their expectations. The supplier must ensure that it meets all expectations. No unnecessary specifications, YAGNI and all things.
Passing a pact file to a vendor command can be done in several ways. Simple - register it in the version control system and tell the vendor team to always take the latest version of the file. A more advanced way is to use an artifact repository like Amazon S3 or Pact Broker. Start simple and grow as needed.
In a real application, you do not need both an integration test and a consumer testfor the client class. Our sample code contains both just to demonstrate how to use each of them. If you want to write CDC tests in Pact, I recommend staying with it. In this case, the advantage is that you automatically receive a pact file with contract expectations, which other teams can use to easily make their supplier tests. Of course, this only makes sense if you can convince another team to use Pact. If not, then use the integration test integration with Wiremock as a decent alternative.
Supplier test (another team)
Vendor tests should be implemented by those who provide the weather API. We use the public API from darksky.net. Theoretically, the darksky team, for its part, should run a vendor test and make sure that it does not violate the contract between its application and our service.
Obviously, they do not care about our modest test application - and they will not do the CDC test for us. There is a big difference between a public API and an organization that uses microservices. The public API cannot take into account the needs of each individual consumer, otherwise it will not be able to work normally. Inside your organization, you can and should take them into account. Most likely, your application will serve several, well, maybe a couple of dozen consumers. Nothing prevents writing vendor tests for these interfaces in order to maintain a stable system.
The vendor team receives the pact file and runs it on its service. To do this, she implements a test that reads the pact file, puts a few stubs and checks on her service the expectations defined in the pact file.
The Pact project community has written several libraries for implementing vendor tests. Their main GitHub repositories have a good selection of libraries for consumers and providers. Choose the one that best suits your technology stack.
For simplicity, suppose the darksky API is also implemented in Spring Boot. In this case, they can use the Pact Spring library , which connects well to Spring's MockMVC mechanisms. A hypothetical vendor test that the darksky.net team could implement looks like this:
@RunWith(RestPactRunner.class)
@Provider("weather_provider") // same as the "provider_name" in our clientConsumerTest
@PactFolder("target/pacts") // tells pact where to load the pact files from
public class WeatherProviderTest {
    @InjectMocks
    private ForecastController forecastController = new ForecastController();
    @Mock
    private ForecastService forecastService;
    @TestTarget
    public final MockMvcTarget target = new MockMvcTarget();
    @Before
    public void before() {
        initMocks(this);
        target.setControllers(forecastController);
    }
    @State("weather forecast data") // same as the "given()" in our clientConsumerTest
    public void weatherForecastData() {
        when(forecastService.fetchForecastFor(any(String.class), any(String.class)))
                .thenReturn(weatherForecast("Rain"));
    }
}
As you can see, the supplier only needs to download the pact file (for example,
@PactFolderdetermines where to download the received pact files from) and then determine how to provide test data for predefined states (for example, using Mockito simulations). No need to write any special test. Everything is taken from the pact file. It is important that the supplier test matches the name of the supplier and the state declared in the consumer test.Supplier test (our team)
We looked at how to test the contract between our service and the weather information provider. In this interface, our service acts as a consumer, and the meteorological service as a supplier. Thinking more, we will see that our service also acts as a provider for others: we provide a REST API with several endpoints for other consumers.
Since we know the importance of contract tests, we will of course write a test for this contract as well. Fortunately, our contracts are consumer-oriented, so all consumer teams send us their pact files, which we can use to implement vendor tests for our REST API.
First, add the Pact provider library for Spring to our project:
testCompile('au.com.dius:pact-jvm-provider-spring_2.12:3.5.5')The implementation of the vendor test follows the same pattern described. For simplicity, I will register a pact file from our simple consumer in the repository of our service. This is easier for our case, but in real life you will probably have to use a more complex mechanism for distributing pact files.
@RunWith(RestPactRunner.class)
@Provider("person_provider")// same as in the "provider_name" part in our pact file
@PactFolder("target/pacts") // tells pact where to load the pact files from
public class ExampleProviderTest {
    @Mock
    private PersonRepository personRepository;
    @Mock
    private WeatherClient weatherClient;
    private ExampleController exampleController;
    @TestTarget
    public final MockMvcTarget target = new MockMvcTarget();
    @Before
    public void before() {
        initMocks(this);
        exampleController = new ExampleController(personRepository, weatherClient);
        target.setControllers(exampleController);
    }
    @State("person data") // same as the "given()" part in our consumer test
    public void personData() {
        Person peterPan = new Person("Peter", "Pan");
        when(personRepository.findByLastName("Pan")).thenReturn(Optional.of
                (peterPan));
    }
}
The one shown
ExampleProviderTestshould provide the state according to the received pact file, that’s all. When we run the test, Pact will pick up the pact file and send an HTTP request to our service, which will respond according to the given state.UI tests
Most applications have some kind of user interface. We usually talk about the web interface in the context of web applications. People often forget that the REST API or command line interface is the same UI as the fancy web interface.
UI tests verify the correct operation of the application user interface. User actions should trigger the correct events, data should be presented to the user, the state of the UI should change as expected.

It is sometimes said that UI tests and end-to-end tests are the same thing (as Mike Cohn says). For me, this is an identification of two things with very orthogonal concepts.
Yes, testing the application from start to finish often means going through the user interface. But the converse is not true.
User interface testing does not have to be end-to-end. Depending on the technology used, UI testing may be as simple as writing some unit tests for a JavaScript frontend with a muted backend.
Special tools like Selenium are designed to test the UI of traditional web applications.. If you consider the user interface to be a REST API, then the correct integration tests around the API are enough.
In web interfaces, it is desirable to test several aspects of the UI, including behavior, layout, usability, compliance with corporate identity, etc.
Fortunately, testing the behavior of the UI is quite simple. Click here, enter the data there - and check that the state of the UI changes accordingly. Modern frameworks for single-page applications ( react , vue.js , Angularand others) often come with tools and helpers for thoroughly testing these interactions at a fairly low level (in the unit test). Even if you roll out your own frontend implementation in vanilla JavaScript, you can still use regular testing tools such as Jasmine and Mocha . For a more traditional server-side rendering application, Selenium-based tests are the best choice. Web application layout
integrity is a little more difficult to verify. Depending on the application and the needs of users, it may be necessary to make sure that code changes do not accidentally violate the layout of the site.
But computers do a poor job of verifying that everything “looks normal” (perhaps some kind of smart machine learning algorithm will change that in the future).
There are some tools to try automatically checking the design of a web application in the assembly pipeline. Most of them use Selenium to open web applications in different browsers and formats, take screenshots and compare with previous screenshots. If the old and new screenshots differ unexpectedly, the tool will give a signal.
One such tool is Galen . Some teams use lineup and his brother's Java-based jlineup to achieve a similar result. Both tools use the same Selenium-based approach.
As soon as you want to test the usability and nice design - you leave the space of automated testing. Here you have to rely on research tests , usability tests (up to the simplest hall tests on random people). You will have to hold demonstrations to users and check whether they like the product and whether they can use all the functions without disappointment or annoyance.
End-to-end tests
Testing a deployed application through the UI is the most comprehensive test you can do. The UI tests described above through WebDriver are good examples of end-to-end tests.

Fig. 11. End-to-end tests test the entire integrated system.
End-to-end tests (also called wide-stack tests ) provide maximum assurance whether the software works or not. Selenium and the WebDriver protocol allow you to automate tests by automatically sending a headless browser to deployed services to perform clicks, enter data and check the status of the UI. You can use Selenium directly or use tools based on it, such as Nightwatch .
End-to-end tests have other problems. They are known for their insecurity, failures for unexpected and unforeseen reasons. Quite often, these are false positive failures. The more complex the UI, the more fragile the tests become. Browser quirks, timing issues, animations, and unexpected pop-ups are just some of the reasons I spent more time debugging than I would like.
In the world of microservices, it is also unclear who is responsible for writing these tests. Since they cover several services (the entire system), there is no one specific team responsible for writing end-to-end tests.
If there is a centralized quality assurance teamThey look like a good candidate. Again, starting a centralized QA team is strictly not recommended, this should not be in the DevOps world, where all teams are truly universal. There is no simple answer as to who needs to own end-to-end tests. Maybe your organization has some kind of initiative group or quality guild to take care of them. Much depends on the particular organization.
In addition, end-to-end tests require serious support and are fairly slow. If you have many microservices, then you won’t even be able to run end-to-end tests locally, because then you will need to run all microservices locally. Try to run hundreds of applications on your computer, there is not enough RAM.
Due to the high maintenance costs, the number of end-to-end tests should be kept to an absolute minimum.
Think about the most important user interactions with the application. Think of the main “routes” of users from screen to screen to automate the most important of these steps in end-to-end tests.
If you are doing an online store, then the most valuable “route” is to search for a product - put it in a basket - place an order. That's all. As long as this route works, there is no particular problem. You may find a couple more important routes for end-to-end tests. Everything else is likely to bring more problems than good.
Remember: in your test pyramid there are many low-level tests, where we have already tested all options for border situations and integration with other parts of the system. There is no need to repeat these tests at a higher level. Great maintenance efforts and many false positives will slow down your work too much, and sooner or later will deprive you of confidence in the tests at all.
End-to-End UI Tests
For end-to-end tests, many developers choose Selenium and the WebDriver protocol . With Selenium you can choose any browser and set it on the site. Let him push buttons and links everywhere, enter data and check the changes in the UI.
Selenium needs a browser that you can run and use for tests. There are several so-called “drivers” for different browsers. Select one (or several) and add it to yours
build.gradle. Whichever browser you choose, you should make sure that all developers and the CI server have the correct browser version installed. It may be difficult to ensure such synchronization. There is a small webdrivermanager library for Java, which automates the download and configuration of the correct browser version. Add two such dependencies to build.gradle:testCompile('org.seleniumhq.selenium:selenium-chrome-driver:2.53.1')
testCompile('io.github.bonigarcia:webdrivermanager:1.7.2')Running a full browser in a test suite can be a problem. Especially if the continuous delivery server, where our pipeline runs, is not able to deploy the browser with the UI (for example, because the X-Server is unavailable). In this case, you can run a virtual X-Server like xvfb .
A newer approach is to use a headless browser (i.e. a browser without a user interface) for WebDriver tests. Until recently, PhantomJS was most often used to automate browser tasks. But when Chromium and Firefoximplemented headless mode out of the box, PhantomJS is suddenly out of date. In the end, it’s better to test the site using a real browser, which users really have (for example, Firefox and Chrome), and not using an artificial browser just because it is convenient for you as a developer.
Both the Firefox and Chrome headless browsers are brand new and not yet widely used for WebDriver tests. We do not want to complicate anything. Instead of fussing with fresh headless modes, let's stick to the classic way, that is, Selenium in conjunction with a regular browser. Here's what a simple end-to-end test looks like that launches Chrome, goes to our service and checks the content of the site:
@RunWith(SpringRunner.class)
@SpringBootTest(webEnvironment = SpringBootTest.WebEnvironment.RANDOM_PORT)
public class HelloE2ESeleniumTest {
    private WebDriver driver;
    @LocalServerPort
    private int port;
    @BeforeClass
    public static void setUpClass() throws Exception {
        ChromeDriverManager.getInstance().setup();
    }
    @Before
    public void setUp() throws Exception {
        driver = new ChromeDriver();
    }
    @After
    public void tearDown() {
        driver.close();
    }
    @Test
    public void helloPageHasTextHelloWorld() {
        driver.get(String.format("http://127.0.0.1:%s/hello", port));
        assertThat(driver.findElement(By.tagName("body")).getText(), containsString("Hello World!"));
    }
}
Please note that this test will only work if Chrome is installed on the machine where the test is running (your local computer, CI server).
The test is simple. It runs a Spring application on a random port using
@SpringBootTest. Then a new “web driver” of Chrome is created, it is instructed to go to the endpoint of /helloour microservice and check that “Hello World!” Is printed in the browser window. Cool!REST API pass-through test
To increase the reliability of the tests, a good idea is to avoid the GUI. Such tests are more stable than full end-to-end tests, and at the same time cover a significant part of the application stack. This can come in handy if testing the application through the web interface is especially difficult. Maybe you don’t even have a web interface, but only a REST API (because a one-page application communicates with this API somewhere, or simply because you despise everything beautiful and brilliant). In any case, the situation is suitable for a subcutaneous test , which tests everything under the GUI. If you serve the REST API, then such a test will be correct, as in our example:
@RestController
public class ExampleController {
    private final PersonRepository personRepository;
    // shortened for clarity
    @GetMapping("/hello/{lastName}")
    public String hello(@PathVariable final String lastName) {
        Optional foundPerson = personRepository.findByLastName(lastName);
        return foundPerson
             .map(person -> String.format("Hello %s %s!",
                     person.getFirstName(),
                     person.getLastName()))
             .orElse(String.format("Who is this '%s' you're talking about?",
                     lastName));
    }
}
Let me show you another library that comes in handy when testing a service that provides a REST API. The REST-assured library provides a good DSL to run real HTTP API requests and evaluate received responses.
First of all, add the dependency to yours
build.gradle.testCompile('io.rest-assured:rest-assured:3.0.3')Using this library, you can implement an end-to-end test for our REST API:
@RunWith(SpringRunner.class)
@SpringBootTest(webEnvironment = SpringBootTest.WebEnvironment.RANDOM_PORT)
public class HelloE2ERestTest {
    @Autowired
    private PersonRepository personRepository;
    @LocalServerPort
    private int port;
    @After
    public void tearDown() throws Exception {
        personRepository.deleteAll();
    }
    @Test
    public void shouldReturnGreeting() throws Exception {
        Person peter = new Person("Peter", "Pan");
        personRepository.save(peter);
        when()
                .get(String.format("http://localhost:%s/hello/Pan", port))
        .then()
                .statusCode(is(200))
                .body(containsString("Hello Peter Pan!"));
    }
}
We are launching the entire Spring application again with
@SpringBootTest. In this case, we do @Autowirefor PersonRepositoryeasy recording of test data in the database. Now when we ask the REST API to say “hello” to our friend “Mr Pan”, we see a pleasant greeting. Awesome! And more than enough for an end-to-end test if there is no web interface at all.Acceptance tests - do your features work correctly?
The higher you go up in the test pyramid, the more likely you are to ask questions: do features work correctly from the user's point of view. You can consider the application as a black box and change the direction of the tests from the past:
when i enter x and y, the return value should be z
to the next:
considering that there is an authorized user
and there is a product “bicycle”
when the user goes to the product description page “bicycle”
and clicks the “Add to Cart” button,
then the product “bicycle” should be in his basket
It happens that such tests are called functional or acceptance . Some say that functional and acceptance tests are two different things. Sometimes the terms are combined. Sometimes people argue endlessly about wording and definitions. Often such discussions add even more confusion.
Here's what: at some point, you should make sure that your program works correctly from the point of view of the user , and not just from a technical point of view. What you call these tests is not really that important. But the presence of these tests is important. Choose any term, stick to it and write these tests.
You can also mention BDD (development based on the description of behavior) and tools for it. BDD and the appropriate style of writing tests are a good trick to change your thinking from implementation details to user needs. Do not be afraid and try.
You don’t even have to implement full-scale BDD tools such as Cucumber (although you can implement it). Some assertion libraries like chai.js allow you to write assertions with style keywords
shouldthat bring tests closer to BDD. And even if you don’t use a library that provides such notation, smart and well-designed code will allow you to write tests that focus on user behavior. Some helpers methods / functions can be very successful:# a sample acceptance test in Python
def test_add_to_basket():
# given
user = a_user_with_empty_basket()
user.login()
bicycle = article(name="bicycle", price=100)
# when
article_page.add_to_.basket(bicycle)
# then
assert user.basket.contains(bicycle)Acceptance tests can be carried out at different levels of detail. Basically, they will be of a sufficiently high level and test the service through the UI. But it is important to understand that there is technically no mandatory requirement to write acceptance tests at the highest level of the test pyramid. If the application structure and the existing script allow you to write an acceptance test at a lower level, do it. A low test is better than a high test. The concept of acceptance tests - to prove that the features of the application work correctly for the user - is completely orthogonal to your test pyramid.
Research testing
Even the most diligent efforts to automate tests are not ideal. Sometimes in automated tests you skip certain borderline cases. Sometimes it is simply not possible to detect a specific error by writing a unit test. Some quality problems will not appear at all in automated tests (think about design or usability). Despite the best intentions regarding test automation, manual tests are still indispensable in some respects.

Fig. 12. Research testing will identify quality problems that are not noticed during the assembly process.
Include research tests in your test suite. This manual testing procedure emphasizes the freedom and creativity of the tester, who is able to find quality problems in a working system. Just take a little time on the schedule, roll up your sleeves and try to cause the application to crash in some way. Turn on destructive thinking and think of ways to provoke problems and errors in the program. Document everything you find. Look for bugs, design issues, slow response times, missing or misleading error messages, and anything else that annoys you as a user.
The good news is that you can easily automate tests for most errors found. Writing automated tests for the errors found ensures that in the future there will be no regressions of this error. In addition, it helps to find out the root cause of the problem when fixing the bug.
During exploratory testing, you will find problems that quietly slipped through the assembly pipeline. Dont be upset. This is a good feedback to improve the assembly pipeline. As with any feedback, be sure to react on your part: think what actions to take to avoid this kind of problems in the future. Maybe you missed a certain set of automatic tests. You may have been sloppy with automated tests at this point and should be more thoroughly tested in the future. Perhaps there is some kind of brilliant new tool or approach that you can use in your pipeline to avoid such problems. Be sure to react so that your conveyor and the entire software delivery system become better and improved with every step.
Путаница с терминологией в тестировании
It is always difficult to talk about different classifications of tests. My understanding of unit tests (unit tests) may be slightly different from yours. Integration tests are even worse. For some people, integration testing is a very broad activity that tests many different parts of the entire system. For me, this is a rather narrow thing: testing only integration with one external part at a time. Some call it integration tests, some call component tests , others prefer the term service test . Someone will say that these are generally three completely different things. There is no right or wrong definition. The community of software developers simply did not establish clearly defined terms in testing.
Do not get hung up on ambiguous terms. It doesn’t matter whether you call it an end-to-end test, a wide-stack test, or a functional test. It doesn't matter if your integration tests mean different things to you than people at another company. Yes, it would be very good if our industry could clearly define the terms and all would adhere to them. Unfortunately, this has not happened yet. And since there are many nuances in testing, all the same, we are dealing more with a wide range of tests than with a bunch of discrete sets, which complicates clear terminology even more.
It's important to take it this way: you just find terms that work for you and your team. Clearly define for yourself the different types of tests you want to write. Agree terms on your team and find consensus on the scope of each type of test. If you are consistent with these terms in your team (or even throughout the organization), then this is all you need to take care of. Simon Stewart summarized this well in the approach used by Google. I think this is a great demonstration that you should not get too hung up on names and conventions in terms.
Deploying Tests in a Deployment Pipeline
If you use continuous integration or continuous delivery, then your deployment pipeline runs automatic tests every time you make changes to the software. Typically, the pipeline is divided into several stages, which gradually give more and more confidence that your program is ready for deployment in a production environment. Having heard about all kinds of tests, you may be wondering how to put them in the deployment pipeline. To answer this, you just need to think about one of the most fundamental values of continuous delivery (this is one of the key values of extreme programming and agile development): quick feedback .
A good assembly pipeline reports errors as quickly as possible. You don’t want to wait an hour to find out that the latest change broke some simple unit tests. If the conveyor runs so slowly, then you could already go home when the feedback arrived. Information should come within a few seconds or several minutes from quick tests in the early stages of the pipeline. Conversely, longer tests - usually with a wider scope - are placed at later stages so as not to slow down feedback from quick tests. As you can see, the steps of the deployment pipeline are not determined by the types of tests, but by their speed and scope. Therefore, it may be very reasonable to place some of the narrowest and fastest integration tests at the same stage as unit tests - simply because they provide faster feedback.
Avoid duplicate tests
There is another catch that should be avoided: duplicating tests at different levels of the pyramid. The flair says that there are not many tests, but let me assure you: it happens. Each test in the test kit is extra baggage that does not cost free. Writing and running tests takes time. Reading and understanding someone else's test takes time. And of course, running tests also takes time.
As with production code, you should strive for simplicity and avoid duplication. In the context of implementing the test pyramid, there are two rules of thumb:
- If an error is found in a test of a higher level, but not in tests of a lower level, then it is necessary to write a test of a lower level.
- Move the tests as low as possible across the pyramid levels.
The first rule is important because lower-level tests are better at narrowing the scope and reproducing the error in isolation. They work faster and are less bloated, which helps with manual debugging. And in the future they will serve as a good regression test. The second rule is important for quickly executing a test suite. If you confidently tested all the conditions in tests of a lower level, then a test of a higher level is not necessary. He just does not add confidence that everything works. Excessive tests will become a burden and will begin to annoy in everyday work. The test suite will work more slowly, and if you change the code, you will need to change more tests.
We formulate another way: if a test of a higher level gives more confidence that the application is working correctly, then you need to have such a test. Writing a unit test for a controller class helps verify the logic inside the controller itself. However, this will not tell you if the REST endpoint that this controller provides is really responding to HTTP requests. Thus, you move up the test pyramid and add a test that checks for exactly that, but nothing more. In a higher level test, you do not test all the conditional logic and borderline cases that are already covered by lower level unit tests. Make sure that the high-level test focuses only on what is not covered by the lower-level tests.
I am strict about excluding tests that have no value. I delete high-level tests that are already covered at a lower level (given that they do not provide additional value). I will replace higher level tests with lower level tests, if possible. Sometimes it’s difficult to remove an extra test, especially if it wasn’t easy to come up with. But you run the risk of creating sunk costs , so feel free to click Delete. There is no reason to waste precious time on a test that is no longer useful.
Write clean code for tests
As with regular code, you should take care of good and clean test code. Here are some more tips for creating a supported test code before you get started and create an automated test suite:
- Тестовый код так же важен, как и код в продакшне. Уделите ему столько же заботы и внимания. «Это всего лишь тест» — не оправдание для небрежного кода.
- Проверяйте только одно условие в каждом тесте. Тогда тесты останутся лаконичными и понятными.
- Правило трёх А (arrange, act, assert) или триада «дано, когда, тогда» — хорошая мнемоника, чтобы поддерживать хорошую структуру тестов.
- Читаемость имеет значение. Не злоупотребляйте DRY (правило «не повторяйся»). Повторение хорошо, если улучшает читаемость. Попробуйте найти баланс между кодом DRY и DAMP (DAMP — Descriptive And Meaningful Phrases, содержательные и осмысленные фразы).
- Если сомневаетесь насчёт рефакторинга или повторного использования кода, применяйте Правило Трёх. Use before reuse.
Заключение
That's all! I know this was a long and difficult explanation of why and how to conduct testing. The great news is that this information has virtually no statute of limitations and does not depend on which program you are creating. Are you working on microservices, IoT devices, mobile apps, or web apps, the lessons from this article apply to everything.
I hope there is something useful in the article. Now go ahead, study the sample code and apply the acquired concepts in your test suite. Creating a robust test suite requires some effort. It will pay off in the long run and make your developer life more relaxed, believe me.
See also:
“Antipatterns of software testing”









