Animated spaceship shield effect in Unity3D
Hi Habr! I want to tell how to make a shader for rendering the shield of a spaceship in Unity3D.
The article is intended for beginners, but I will be glad if experienced shaders write and criticize the article.
Interested, I ask for cat. (Caution! Inside are heavy pictures and gifs).
The article is written as a set of instructions with explanations, even a complete beginner will be able to execute them and get a ready-made shader, but to understand what is happening, it is advisable to navigate in basic terms:
The effect consists of 3 main components:
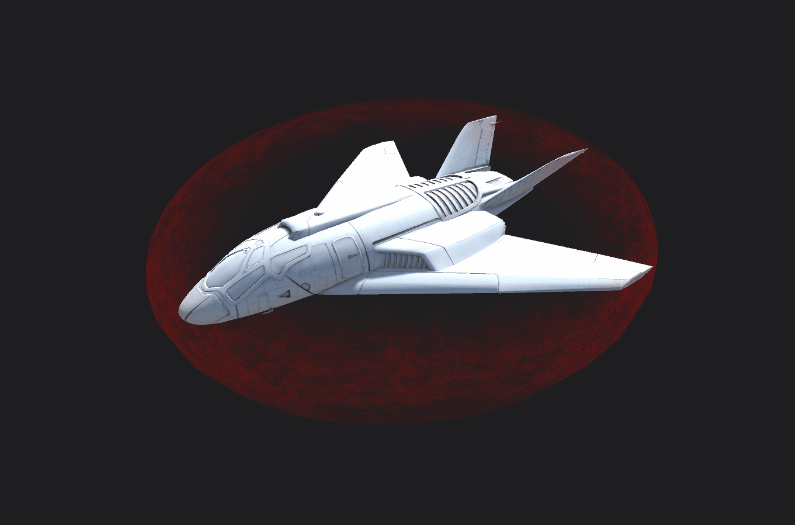
We will add these components in order to the shader in order and by the end of the article we will get the effect on both the KDPV.
Let's start with the standard Unity3D shader:
Prepare it for our purposes.
We got a basic unlit translucent shader. Now we need to make a shader out of it, which uses the texture as a translucent mask and the color specified by the user as the color of the pixel:
You should get something like the following:

It doesn’t look very good so far, but this is the basis on which the whole effect will be built.
In general, the Fresnel effect is the effect of increasing the intensity of the reflected beam with increasing its angle of incidence. But I use the formulas used to calculate this effect to set the dependence of the intensity of the shield’s glow on the viewing angle.
We proceed to implementation using the approximate formula from cg tutorial on nvidia

where I is the direction from the camera to the top, N is the normal to the surface at the point of incidence
Done! Having played the parameters of the Fresnel equation, you can get such a picture

Now you can move on to the most interesting - displaying hits on the shield.
I will describe only one of the possible reactions to a hit, it is quite simple and cheap in terms of performance, but it looks quite nice and, unlike the very simple ones, gives a beautiful picture with closely lying hits.
The final result:
Exactly what is needed.
That's so simple and not too expensive you can get a pretty beautiful effect of the shield of a spaceship.
I will outline the main areas of possible optimization:
Like this
The article is intended for beginners, but I will be glad if experienced shaders write and criticize the article.
Interested, I ask for cat. (Caution! Inside are heavy pictures and gifs).
The article is written as a set of instructions with explanations, even a complete beginner will be able to execute them and get a ready-made shader, but to understand what is happening, it is advisable to navigate in basic terms:
- Shader
- Vertex shader
- Fragment / Pixel Shader
- UV coordinates
The effect consists of 3 main components:
- Basic translucent shader using texture as transparency map and color as shield color
- Fresnel effect
- Shield Response
- Animation
We will add these components in order to the shader in order and by the end of the article we will get the effect on both the KDPV.
Base shader
Let's start with the standard Unity3D shader:
The source code for a standard unlit shader
Shader "Unlit/NewUnlitShader"
{
	Properties
	{
		_MainTex ("Texture", 2D) = "white" {}
	}
	SubShader
	{
		Tags { "RenderType"="Opaque" }
		LOD 100
		Pass
		{
			CGPROGRAM
			#pragma vertex vert
			#pragma fragment frag
			// make fog work
			#pragma multi_compile_fog
			#include "UnityCG.cginc"
			struct appdata
			{
				float4 vertex : POSITION;
				float2 uv : TEXCOORD0;
			};
			struct v2f
			{
				float2 uv : TEXCOORD0;
				UNITY_FOG_COORDS(1)
				float4 vertex : SV_POSITION;
			};
			sampler2D _MainTex;
			float4 _MainTex_ST;
			v2f vert (appdata v)
			{
				v2f o;
				o.vertex = UnityObjectToClipPos(v.vertex);
				o.uv = TRANSFORM_TEX(v.uv, _MainTex);
				UNITY_TRANSFER_FOG(o,o.vertex);
				return o;
			}
			fixed4 frag (v2f i) : SV_Target
			{
				// sample the texture
				fixed4 col = tex2D(_MainTex, i.uv);
				// apply fog
				UNITY_APPLY_FOG(i.fogCoord, col);
				return col;
			}
			ENDCG
		}
	}
}
Prepare it for our purposes.
- Rename it to Shields / Transparent. To do this, replace the line
Shader "Unlit/NewUnlitShader"withShader "Shields/Transparent" - Translucent elements in units drawn in a single stage and in a special way, it is necessary to inform that the Unity translucent shader replacing
Tags { "RenderType"="Opaque" }onTags { "Queue"="Transparent" "RenderType"="Transparent" }
for rendering translucent elements you want to set a special blending mode for it afterTags { "Queue"="Transparent" "RenderType"="Transparent" }adding a stringBlend SrcAlpha OneMinusSrcAlpha.
It is also necessary to disable writing to Z-Buffer - it is used to sort opaque objects, and will only interfere with rendering translucent objects. To do this, add the lineZWrite Off
afterTags { "Queue"="Transparent" "RenderType"="Transparent" } - The shield effect will not be used together with the fog effect built into the unit, so we will remove all references to it from the shader - delete lines
UNITY_FOG_COORDS(1)UNITY_TRANSFER_FOG(o,o.vertex)UNITY_APPLY_FOG(i.fogCoord, col)
We got a basic unlit translucent shader. Now we need to make a shader out of it, which uses the texture as a translucent mask and the color specified by the user as the color of the pixel:
- Now the shader has only one input parameter - the texture, add color as an input parameter, and the texture parameter is renamed to Transparency Mask. In the unit, the input parameters for the shader are set inside the Properties block, now it looks like this:
Properties
{
	_MainTex ("Texture", 2D) = "white" {}
}
Add the input parameter color and rename the texture:Properties { _ShieldColor("Shield Color", Color) = (1, 0, 0, 1) _MainTex ("Transparency Mask", 2D) = "white" {} }
For the input parameters set in the Properties block to become available in the vertex and fragment shaders, they must be declared as variables inside the shader passage - insert the linefloat4 _ShieldColor;
before the linev2f vert (appdata v)
You can read more about passing parameters to the shader in the official documentation . - The color of a single pixel is determined by the return value of the fragment shader,
now it looks like this:fixed4 frag (v2f i) : SV_Target { // sample the texture fixed4 col = tex2D(_MainTex, i.uv); return col; }What is v2fHerev2fis the return value of the vertex shaders interpolated for a given pixel on the screenstruct v2f { float2 uv : TEXCOORD0; float4 vertex : SV_POSITION; };uv- texture pixel coordinatevertext- pixel coordinate in screen coordinates
This simple function takes the color from the texture according to the texture coordinates that came from the vertex shader and returns it as the color of the pixel. We need the texture color to be used as a transparency mask, and the color should be taken from the shader parameters.
We do the following:fixed4 frag (v2f i) : SV_Target { // sample the texture fixed4 transparencyMask = tex2D(_MainTex, i.uv); return fixed4(_ShieldColor.r, _ShieldColor.g, _ShieldColor.b, transparencyMask.r); }
That is, we sample the texture as before, but instead of returning its color directly, we return the color as_ShieldColorwith an alpha channel taken from the red color of the texture. - We add another parameter - the shield intensity factor - so that you can adjust the translucency of the shield without changing the texture.
I suggest the reader to do it himself or look under the spoiler.Hidden textProperties { _ShieldIntensity("Shield Intensity", Range(0,1)) = 1.0 _ShieldColor("Shield Color", Color) = (1, 0, 0, 1) _MainTex ("Transparency Mask", 2D) = "white" {} }float _ShieldIntensity; fixed4 frag (v2f i) : SV_Target { // sample the texture fixed4 transparencyMask = tex2D(_MainTex, i.uv); return fixed4(_ShieldColor.r, _ShieldColor.g, _ShieldColor.b, _ShieldIntensity * transparencyMask.r); }
You should get something like the following:
Hereafter, I use this seamless noise texture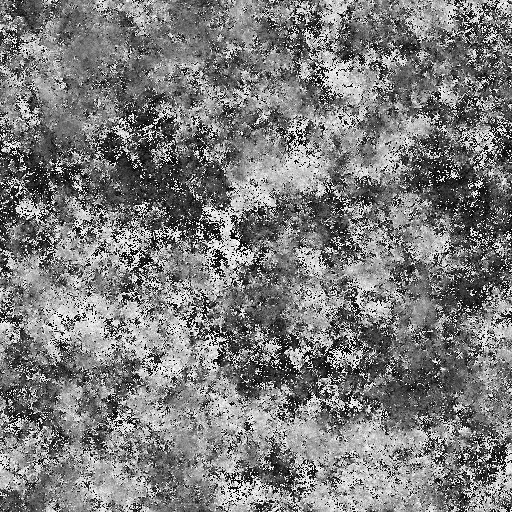
Full listing of the resulting shader
Shader "Shields/Transparent"
{
Properties
{
_ShieldIntensity("Shield Intensity", Range(0,1)) = 1.0
_ShieldColor("Shield Color", Color) = (1, 0, 0, 1)
_MainTex ("Transparency Mask", 2D) = "white" {}
}
SubShader
{
Tags { "Queue"="Transparent" "RenderType"="Transparent" }
ZWrite Off
Blend SrcAlpha OneMinusSrcAlpha
Pass
{
CGPROGRAM
#pragma vertex vert
#pragma fragment frag
#include "UnityCG.cginc"
struct appdata
{
float4 vertex : POSITION;
float3 normal: NORMAL;
float2 uv : TEXCOORD0;
};
struct v2f
{
	float2 uv : TEXCOORD0;
	float4 vertex : SV_POSITION;
};
sampler2D _MainTex;
float4 _MainTex_ST;
float4 _ShieldColor;
v2f vert (appdata v)
{
v2f o;
o.vertex = UnityObjectToClipPos(v.vertex);
o.uv = TRANSFORM_TEX(v.uv, _MainTex);
return o;
}
float _ShieldIntensity;
fixed4 frag (v2f i) : SV_Target
{
	// sample the texture
	fixed4 transparencyMask = tex2D(_MainTex, i.uv);
	return fixed4(_ShieldColor.r, _ShieldColor.g, _ShieldColor.b, _ShieldIntensity * transparencyMask.r);
}
ENDCG
}
}
}
It doesn’t look very good so far, but this is the basis on which the whole effect will be built.
Fresnel effect
In general, the Fresnel effect is the effect of increasing the intensity of the reflected beam with increasing its angle of incidence. But I use the formulas used to calculate this effect to set the dependence of the intensity of the shield’s glow on the viewing angle.
We proceed to implementation using the approximate formula from cg tutorial on nvidia
where I is the direction from the camera to the top, N is the normal to the surface at the point of incidence
- First, copy the shader to a new file and rename it to Shields / Fresnel to have a change history.
- As you can see from the formula, we will need 3 new parameters for the shader . I hope that the reader has already learned how to add parameters to the shader and will not give detailed instructions on how to do this. In case of difficulty, you can always look at the full code at the end of the section
Bias,

Scale, Power - Calculate I and N in the vertex shader. The vertex shader in our shader is the function
v2f vert (appdata v)return value - this is the structure described earlierv2f, andappdatathese are the vertex parameters taken from the mesh.What is appdatastruct appdata { float4 vertex : POSITION; float3 normal: NORMAL; float2 uv : TEXCOORD0; };vertex- coordinates of the vertex in local coordinatesnormal- normal to the surface specified for this vertexuv- texture coordinates of the vertex
I - direction from the camera to the top in world coordinates - can be calculated as the difference between the world coordinates of the top and the world coordinates of the camera. In Unity shaders, the transition matrix from local to world coordinates is available in a variableunity_ObjectToWorld, and world camera coordinates in a variable_WorldSpaceCameraPos. Knowing this, you can calculate I with the following lines in the vertex shader code:float4 worldVertex = mul(unity_ObjectToWorld, v.vertex); float3 I = normalize(worldVertex - _WorldSpaceCameraPos.xyz);
N - surface normal in world coordinates - even easier to calculate:float3 normWorld = normalize(mul(unity_ObjectToWorld, v.normal)); - Now you can calculate the opacity of the shield according to the formula of the Fresnel effect:
float fresnel = _Bias + _Scale * pow(1.0 + dot(I, normWorld), _Power);
You may notice that the fresnel value for certain values of the variables can be less than 0, this will give color artifacts when rendering. Limit the value of the variable to the interval [0; 1] using the functionsaturate:float fresnel = saturate(_Bias + _Scale * pow(1.0 + dot(I, normWorld), _Power)); - It remains only to transfer this value to the pixel shader. To do this, add the intensity field to the v2f structure:
struct v2f { float2 uv : TEXCOORD0; float intensity : COLOR0; float4 vertex : SV_POSITION; };
(COLOR0- this is semantics, an explanation of what it is is beyond the scope of this article, those interested can read about semantics in hlsl).
Now we can fill this field in the vertex shader and use in the fragment:v2f vert (appdata v) { v2f o; o.vertex = UnityObjectToClipPos(v.vertex); o.uv = TRANSFORM_TEX(v.uv, _MainTex); float4 worldVertex = mul(unity_ObjectToWorld, v.vertex); float3 normWorld = normalize(mul(unity_ObjectToWorld, v.normal)); float3 I = normalize(worldVertex - _WorldSpaceCameraPos.xyz); float fresnel = saturate(_Bias + _Scale * pow(1.0 + dot(I, normWorld), _Power)); o.intensity = fresnel; return o; } float _ShieldIntensity; fixed4 frag (v2f i) : SV_Target { // sample the texture fixed4 transparencyMask = tex2D(_MainTex, i.uv); return fixed4(_ShieldColor.r, _ShieldColor.g, _ShieldColor.b, (_ShieldIntensity + i.intensity) * transparencyMask.r); }
You can notice that now_ShieldIntensityit’si.intensitypossible to add it and it’s possible in the vertex shader, we’ll do that.
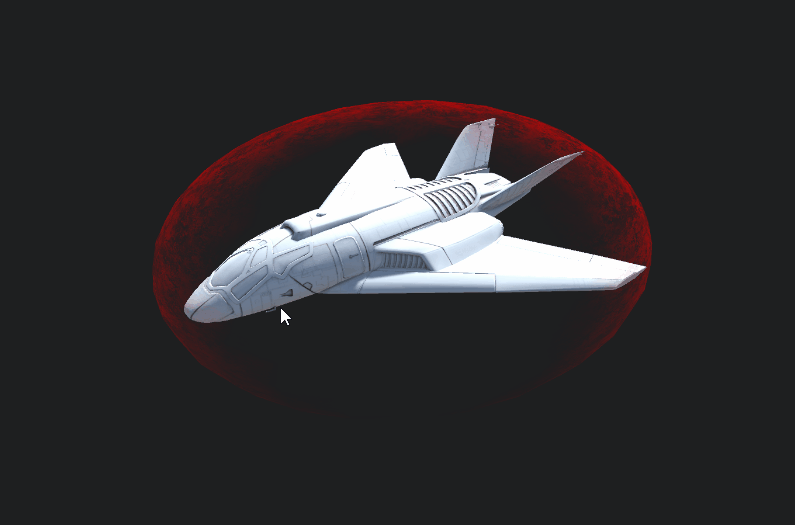
Done! Having played the parameters of the Fresnel equation, you can get such a picture
My parameters
Bias = -0.5, Scale = 1, Power = 1
Full Fresnel Shield Listing
Shader "Shields/Fresnel"
{
Properties
{
_ShieldIntensity("Shield Intensity", Range(0,1)) = 1.0
_ShieldColor("Shield Color", Color) = (1, 0, 0, 1)
_MainTex ("Transparency Mask", 2D) = "white" {}
_Bias("Bias", float) = 1.0
_Scale("Scale", float) = 1.0
_Power("Power", float) = 1.0
}
SubShader
{
Tags { "Queue"="Transparent" "RenderType"="Transparent" }
ZWrite Off
Blend SrcAlpha OneMinusSrcAlpha
Pass
{
CGPROGRAM
#pragma vertex vert
#pragma fragment frag
#include "UnityCG.cginc"
struct appdata
{
	float4 vertex : POSITION;
	float3 normal: NORMAL;
	float2 uv : TEXCOORD0;
};
struct v2f
{
	float2 uv : TEXCOORD0;
	float intensity : COLOR0;
	float4 vertex : SV_POSITION;
};
sampler2D _MainTex;
float4 _MainTex_ST;
float4 _ShieldColor;
float _ShieldIntensity;
float _Bias;
float _Scale;
float _Power;
v2f vert (appdata v)
{
v2f o;
o.vertex = UnityObjectToClipPos(v.vertex);
o.uv = TRANSFORM_TEX(v.uv, _MainTex);
float4 worldVertex = mul(unity_ObjectToWorld, v.vertex);
float3 normWorld = normalize(mul(unity_ObjectToWorld, v.normal));
float3 I = normalize(worldVertex - _WorldSpaceCameraPos.xyz);
float fresnel = saturate(_Bias + _Scale * pow(1.0 + dot(I, normWorld), _Power));
o.intensity = fresnel + _ShieldIntensity;
return o;
}
fixed4 frag (v2f i) : SV_Target
{
// sample the texture
fixed4 transparencyMask = tex2D(_MainTex, i.uv);
return fixed4(_ShieldColor.r, _ShieldColor.g, _ShieldColor.b, i.intensity * transparencyMask.r);
}
ENDCG
}
}
}
Now you can move on to the most interesting - displaying hits on the shield.
Hit drawing
I will describe only one of the possible reactions to a hit, it is quite simple and cheap in terms of performance, but it looks quite nice and, unlike the very simple ones, gives a beautiful picture with closely lying hits.
- To implement the effect, the shader needs to somehow find out at what point the hit occurred and at what time. The script on the GameObject shield will be involved in passing these arguments, and since c # scripting is not the subject of this article, I will simply give the source code for the scripts:Script listing for an object with a shield
public class ShieldHitter : MonoBehaviour
{
	private static int[] hitInfoId = new[] { Shader.PropertyToID("_WorldHitPoint0"), Shader.PropertyToID("_WorldHitPoint1"), Shader.PropertyToID("_WorldHitPoint2") };
	private static int[] hitTimeId = new[] { Shader.PropertyToID("_HitTime0"), Shader.PropertyToID("_HitTime1"), Shader.PropertyToID("_HitTime2") };
	private Material material;
	void Start()
	{
		if (material == null)
		{
			material = this.gameObject.GetComponent().material;
		}
	}
	int lastHit = 0;
	public void OnHit(Vector3 point, Vector3 direction)
	{
		material.SetVector(hitInfoId[lastHit], point);
		material.SetFloat(hitTimeId[lastHit], Time.timeSinceLevelLoad);
		lastHit++;
		if (lastHit >= hitInfoId.Length)
			lastHit = 0;
	}
	void OnCollisionEnter(Collision collision)
	{
		OnHit(collision.contacts[0].point, Vector3.one);
	}
}
Camera script listingusing UnityEngine; [ExecuteInEditMode] public class CameraControls : MonoBehaviour { private const int minDistance = 25; private const int maxDistance = 25; private const float minTheta = 0.01f; private const float maxTheta = Mathf.PI - 0.01f; private const float minPhi = 0; private const float maxPhi = 2 * Mathf.PI ; [SerializeField] private Transform _target; [SerializeField] private Camera _camera; [SerializeField] [Range(minDistance, maxDistance)] private float _distance = 25; [SerializeField] [Range(minTheta, maxTheta)] private float _theta = 1; [SerializeField] [Range(minPhi, maxPhi)] private float _phi = 2.5f; [SerializeField] private float _angleSpeed = 2.0f; [SerializeField] private float _distanceSpeed = 2.0f; // Update is called once per frame void Update () { if (_target == null || _camera == null) { return; } if (Application.isPlaying) { if (Input.GetKey(KeyCode.Q)) { _distance += _distanceSpeed * Time.deltaTime; } if (Input.GetKey(KeyCode.E)) { _distance -= _distanceSpeed * Time.deltaTime; } Mathf.Clamp(_distance, minDistance, maxDistance); if (Input.GetKey(KeyCode.A)) { _phi += _angleSpeed * Time.deltaTime; } if (Input.GetKey(KeyCode.D)) { _phi -= _angleSpeed * Time.deltaTime; } _phi = _phi % (maxPhi); if (Input.GetKey(KeyCode.S)) { _theta += _angleSpeed * Time.deltaTime; } if (Input.GetKey(KeyCode.W)) { _theta -= _angleSpeed * Time.deltaTime; } _theta = Mathf.Clamp(_theta, minTheta, maxTheta); Vector3 newCoords = new Vector3 { x = _distance * Mathf.Sin(_theta) * Mathf.Cos(_phi), z = _distance * Mathf.Sin(_theta) * Mathf.Sin(_phi), y = _distance * Mathf.Cos(_theta) }; this.transform.position = newCoords + _target.position; this.transform.LookAt(_target); if (Input.GetMouseButtonDown(0)) { Ray ray = _camera.ScreenPointToRay(Input.mousePosition); RaycastHit hit; var isHit = Physics.Raycast(ray, out hit); if (isHit) { ShieldHitter handler = hit.collider.gameObject.GetComponent(); Debug.Log(hit.point); if (handler != null) { handler.OnHit(hit.point, ray.direction); } } } } } } - As last time, save the shader under the new name Shields / FresnelWithHits
- The idea is to calculate the perturbation of the shield from hits next to each point of the shield, and the sooner the hit occurs, the less its impact on the shield perturbation.
I selected the following formula:
where:distanceis the fraction of the distance to the hit point from the maximum, [0, 1]timeis the fraction of the lifetime from the maximum, [0, 1]
Thus, the intensity is inversely proportional to the distance to the collision point,
proportional to the time remaining until the end of the hit, and is also equal to 0 at a distance equal to or greater than the maximum and with a remaining time equal to 0.
I would like to find a function that would satisfy these conditions without the need to limit the range of time and distance, but this is all I have. - Отрисовка эффектов попадания в шейдерах неизбежно накладывает ограничения на количество одновременно обрабатываемых попаданий, для примера я выбрал 3 одновременно отображающихся попадания. Добавим в шейдер входные параметры WorldHitPoint0, WorldHitPoint1, WorldHitPoint2, HitTime0, HitTime1, HitTime2 — по паре для каждого одновременно обрабатываемого попадания. Также нам понадобятся параметры MaxDistance — на какое максимальное расстояние распространяется возмущение щита от попадания, и HitDuration — длительность возмущения щита от попадания.
- Для каждого попадания рассчитаем в вершинном шейдере time и distance
float t0 = saturate((_Time.y - _HitTime0) / _HitDuration);
float d0 = saturate(distance(worldVertex.xyz, _WorldHitPoint0.xyz) / (_MaxDistance));
float t1 = saturate((_Time.y - _HitTime1) / _HitDuration);
float d1 = saturate(distance(worldVertex.xyz, _WorldHitPoint1.xyz) / (_MaxDistance));
float t2 = saturate((_Time.y - _HitTime2) / _HitDuration);
float d2 = saturate(distance(worldVertex.xyz, _WorldHitPoint2.xyz) / (_MaxDistance));
и посчитаем суммарную интенсивность попаданий по формуле:float hitIntensity = (1 - t0) * ((1 / (d0)) - 1) + (1 - t1) * ((1 / (d1)) - 1) + (1 - t2) * ((1 / (d2)) - 1);
Осталось лишь сложить интенсивность щита от попаданий с интенсивностью от других эффектов:o.intensity = fresnel + _ShieldIntensity + hitIntensity; - Настраиваем материал, выставляем правильные значения расстояния и вуаля:
Уже достаточно хорошо, так? Но есть одна проблема. Попадания на обратной стороне щита не видны. Причина этого в том, что, по умолчанию, полигоны, нормаль которых направлена от камеры, не рисуются. Чтобы заставить графический движок их рисовать нужно добавить послеZWrite OffстрокуCull off. Но и тут нас поджидает проблема:
эффект Френеля, реализованный в прошлом разделе, подсвечивает все полигоны, смотрящие от камеры — придется менять формулу наfloat dt = dot(I, normWorld); fresnel = saturate(_Bias + _Scale * pow(1.0 - dt * dt, _Power));
Since the initial formula is already an approximation, the use of a square does not have a significant effect on the result (it can be corrected with other parameters) and allows not to add an expensive branch operator and not to use an expensive sqrt.
We start, check and: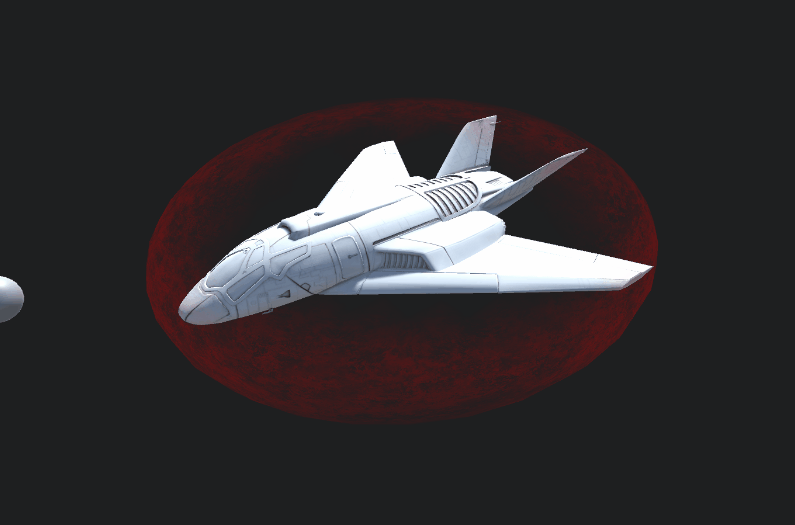
Now everything is very good. - There is one final touch: to give the effect of “liveliness”, you can add the current time to the texture coordinates of noise to create the effect of the shield moving around the sphere.
o.uv = TRANSFORM_TEX(v.uv, _MainTex) + _Time.x / 6;
The final result:
Listing the final version of the shader
Shader "Shields/FresnelWithHits"
{
Properties
{
_ShieldIntensity("Shield Intensity", Range(0,1)) = 1.0
_ShieldColor("Shield Color", Color) = (1, 0, 0, 1)
_MainTex ("Transparency Mask", 2D) = "white" {}
_Bias("Bias", float) = 1.0
_Scale("Scale", float) = 1.0
_Power("Power", float) = 1.0
_WorldHitPoint0("Hit Point 0", Vector) = (0, 1, 0, 0)
_WorldHitTime0("Hit Time 0", float) = -1000
_WorldHitPoint1("Hit Point 1", Vector) = (0, 1, 0, 0)
_WorldHitTime1("Hit Time 1", float) = -1000
_WorldHitPoint2("Hit Point 2", Vector) = (0, 1, 0, 0)
_WorldHitTime2("Hit Time 2", float) = -1000
_HitDuration("Hit Duration", float) = 10.0
_MaxDistance("MaxDistance", float) = 0.5
}
SubShader
{
Tags { "Queue" = "Transparent" "RenderType" = "Transparent" }
ZWrite Off
Cull Off
Blend SrcAlpha OneMinusSrcAlpha
Pass
{
CGPROGRAM
#pragma vertex vert
#pragma fragment frag
#include "UnityCG.cginc"
struct appdata
{
float4 vertex : POSITION;
float3 normal: NORMAL;
float2 uv : TEXCOORD0;
};
struct v2f
{
float2 uv : TEXCOORD0;
float intensity : COLOR0;
float4 vertex : SV_POSITION;
};
sampler2D _MainTex;
float4 _MainTex_ST;
float4 _ShieldColor;
float _ShieldIntensity;
float _Bias;
float _Scale;
float _Power;
float _MaxDistance;
float _HitDuration;
float _HitTime0;
float4 _WorldHitPoint0;
float _HitTime1;
float4 _WorldHitPoint1;
float _HitTime2;
float4 _WorldHitPoint2;
v2f vert (appdata v)
{
v2f o;
o.vertex = UnityObjectToClipPos(v.vertex);
o.uv = TRANSFORM_TEX(v.uv, _MainTex) + _Time.x / 6;
float4 worldVertex = mul(unity_ObjectToWorld, v.vertex);
float3 normWorld = normalize(mul(unity_ObjectToWorld, v.normal));
float3 I = normalize(worldVertex - _WorldSpaceCameraPos.xyz);
float fresnel = 0;
float dt = dot(I, normWorld);
fresnel = saturate(_Bias + _Scale * pow(1.0 - dt * dt, _Power));
float t0 = saturate((_Time.y - _HitTime0) / _HitDuration);
float d0 = saturate(distance(worldVertex.xyz, _WorldHitPoint0.xyz) / (_MaxDistance));
float t1 = saturate((_Time.y - _HitTime1) / _HitDuration);
float d1 = saturate(distance(worldVertex.xyz, _WorldHitPoint1.xyz) / (_MaxDistance));
float t2 = saturate((_Time.y - _HitTime2) / _HitDuration);
float d2 = saturate(distance(worldVertex.xyz, _WorldHitPoint2.xyz) / (_MaxDistance));
float hitIntensity = (1 - t0) * ((1 / (d0)) - 1) +
			(1 - t1) * ((1 / (d1)) - 1) +
			(1 - t2) * ((1 / (d2)) - 1);
o.intensity = fresnel + _ShieldIntensity + hitIntensity;
return o;
}
fixed4 frag (v2f i) : SV_Target
{
// sample the texture
fixed4 transparencyMask = tex2D(_MainTex, i.uv);
return fixed4(_ShieldColor.r, _ShieldColor.g, _ShieldColor.b, saturate(i.intensity * transparencyMask.r));
}
ENDCG
}
}
}
Exactly what is needed.
That's so simple and not too expensive you can get a pretty beautiful effect of the shield of a spaceship.
Instead of an afterword: optimization
I will outline the main areas of possible optimization:
- Remove unused: the Fresnel effect, the base translucent shield - all this is not free, and if some of the components are not needed, you need to remove them.
- t0, t1, t2 can be read on the CPU once per frame for each shield in the script. Thus, you can remove 3 saturate and a bunch of calculations.
- Using floating-point numbers with less precision, in many places you can get by with fixed or even half instead of float.
- If a lot of shields are drawn on the screen, it makes sense to consider the use of instantiation.