March 6, 2018 at 18:23
How to be a * compiler - creating a JavaScript compiler
Hello, Habr! I present to you the translation of the article " How to be * a compiler - make a compiler with JavaScript " by Mariko Kosaka.
* That's right! Being a compiler is great!
It was one wonderful Sunday afternoon in Bushwick, Brooklyn. In my local bookstore, I stumbled upon John Maed's book “Design by Numbers” . This was a step-by-step instruction for learning DBN, a programming language created in the late 90s at MIT Media Lab to visually present computer programming concepts.
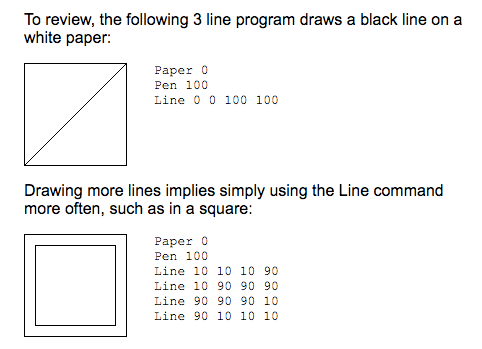
The three lines of code shown in the first figure draw a black line on white paper (an example is taken from here) To draw more complex shapes, such as, for example, a square, you just need to draw more lines (second picture).
I immediately thought that in 2016, this could be an interesting project - to create SVG from DBN without installing Java to execute the original DBN code.
I decided that for this I need to write a compiler from DBN to SVG, so my quest for writing a compiler began. Creating a compiler sounds like a rather complicated scientific process, but I never even wrote a graph traversal for an interview ... Can I write a compiler?
A compiler is a mechanism that takes a piece of code and converts it to something else. Let's compile a simple DBN code into a physical drawing.
Let's take three DBN commands: Paper sets the color of the paper, Pen sets the color of the brush and Line draws a line. Color 100 is equivalent to 100% black, which is rgb (0%, 0%, 0%) in CSS. Images created in DBN are always in grayscale. In DBN, the paper is always 100 × 100, the line width is always 1, and the line itself is specified by (x, y) coordinates, the count is taken from the lower left corner of the image.
Let's dwell on this and try to be a compiler ourselves. Take paper, pen and try to compile the following code into a drawing.
Have you drawn a horizontal line from the left edge of the sheet to the right, and is it centered vertically? Congratulations! You have just become a compiler.

Let's see what happened in our head while we were a compiler.
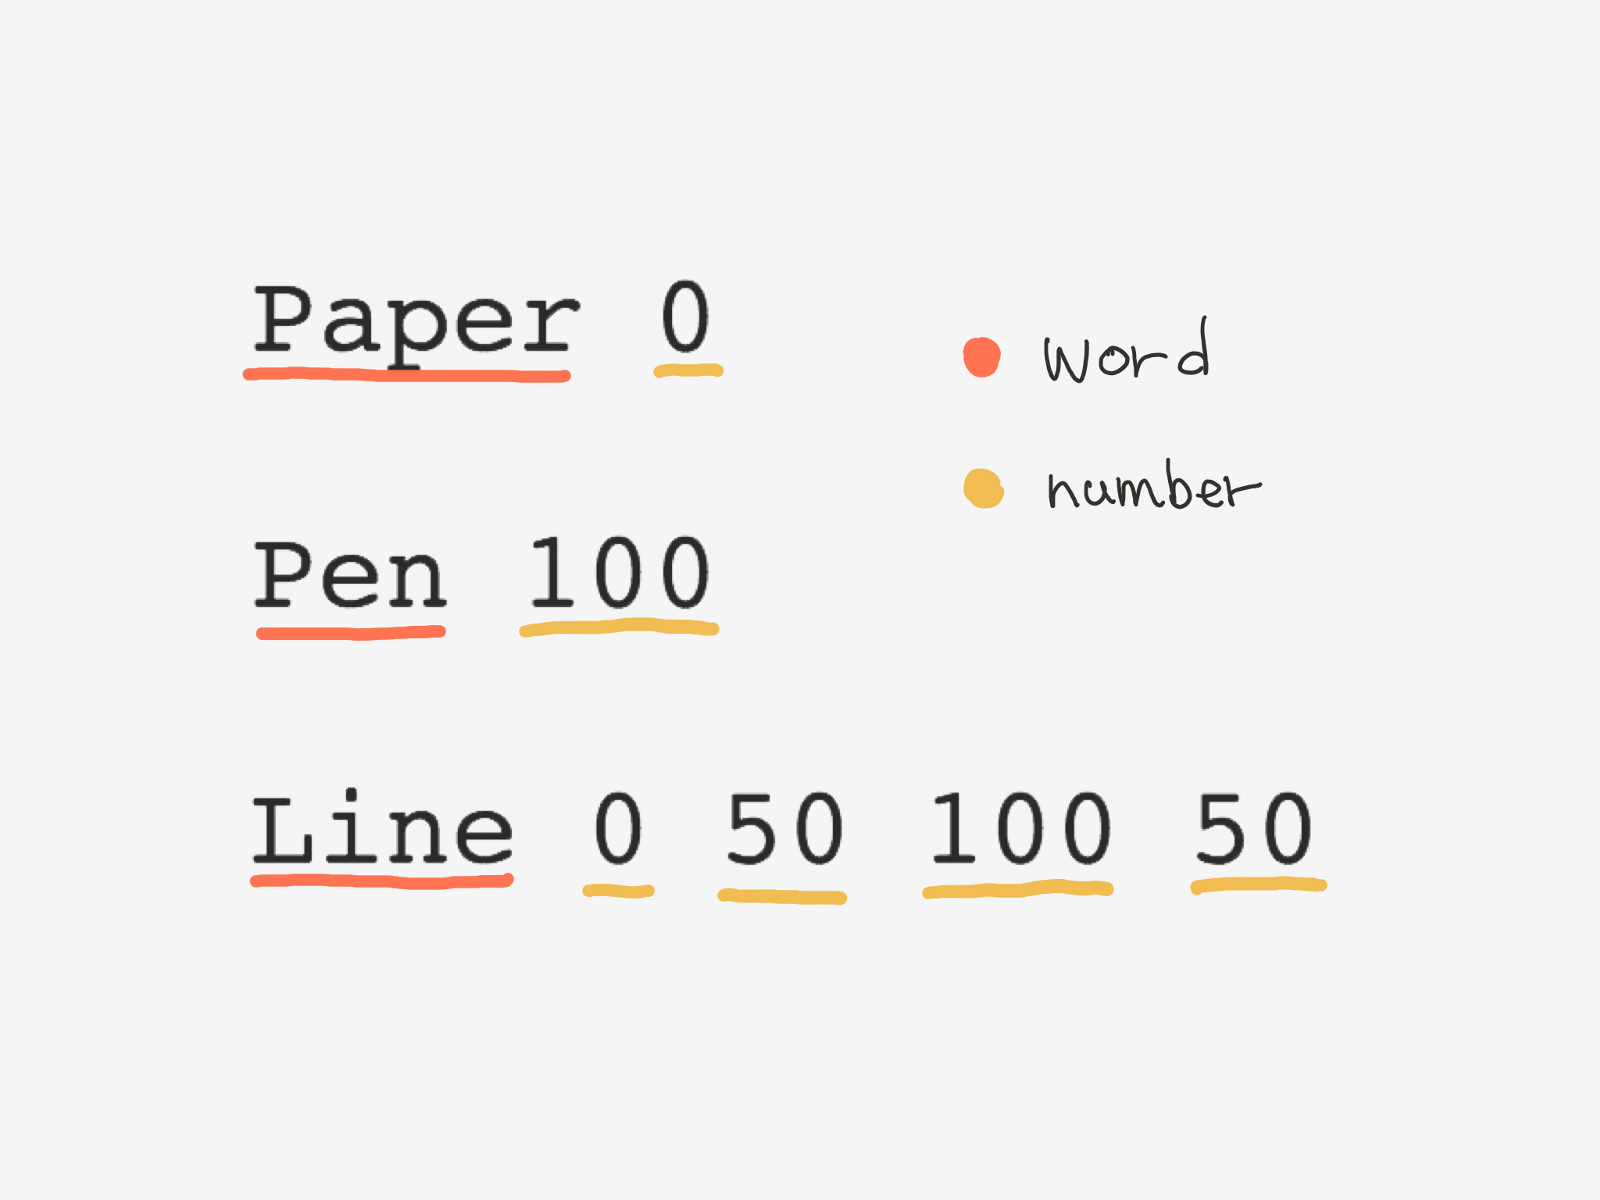
The first thing we did was break the source code into words by spaces. In the process, we conditionally determined primitive types for each token, such as “word” or “number”.
As soon as we broke a fragment of the text into tokens, we went through each of them and tried to find the relationship between them.
In this case, we have grouped together a set of numbers and the word related to them. Having done this, we began to distinguish between certain code structures.

After parsing, we transformed the resulting structures into something more suitable for the final result. In our case, we are going to draw an image, so we need to transform our structures into step-by-step instructions that are understandable to humans.

At this stage, we simply follow the instructions that we did in the previous step of preparing for drawing.

This is what the compiler does!
The figure we made is the compiled result (similar to the .exe file that is created during the compilation of the C program). We can send this picture to any person or to any device (scanner, camera, etc.) and everyone will recognize the black line in the center of the sheet.
Now that we know how the compiler works, let's write another one, but using JavaScript. This compiler will take DBN code and convert it to SVG.
In the same way as we can divide the sentence “I have a pen” into the words [I, I, have a pen], the lexical analyzer can break the code represented as a string into certain meaningful parts (tokens). In DBN, all tokens are separated by spaces and are classified as “word” or “number”.
The parser goes through each token, collects syntax information and builds the so-called Abstract Syntax Tree. You can see AST as a map of our code - a way to see how it is structured.
There are two syntax types “NumberLiteral” and “CallExpression” in our code. NumberLiteral means the value is a number. This number is used as an argument to CallExpression.
The Abstract Syntax Tree (AST) that we created in the previous step describes well what happens in the code, but we still cannot create SVG from this.
For example, the “Paper” command is clear only to code written in DBN. In SVG we would like to use paper for presentation element, so we need a function that converts our AST to another AST, more suitable for SVG.
In the last step of the compiler, a function is called that builds the SVG code based on the new AST that we created in the previous step.
Let's call our compiler “sbn compiler”. Create an sbn object with our lexer, parser, transformer and generator. Add a “compile” method that will call a chain of 4 of these methods.
Now we can pass the line of code to the compilation method and get the SVG.
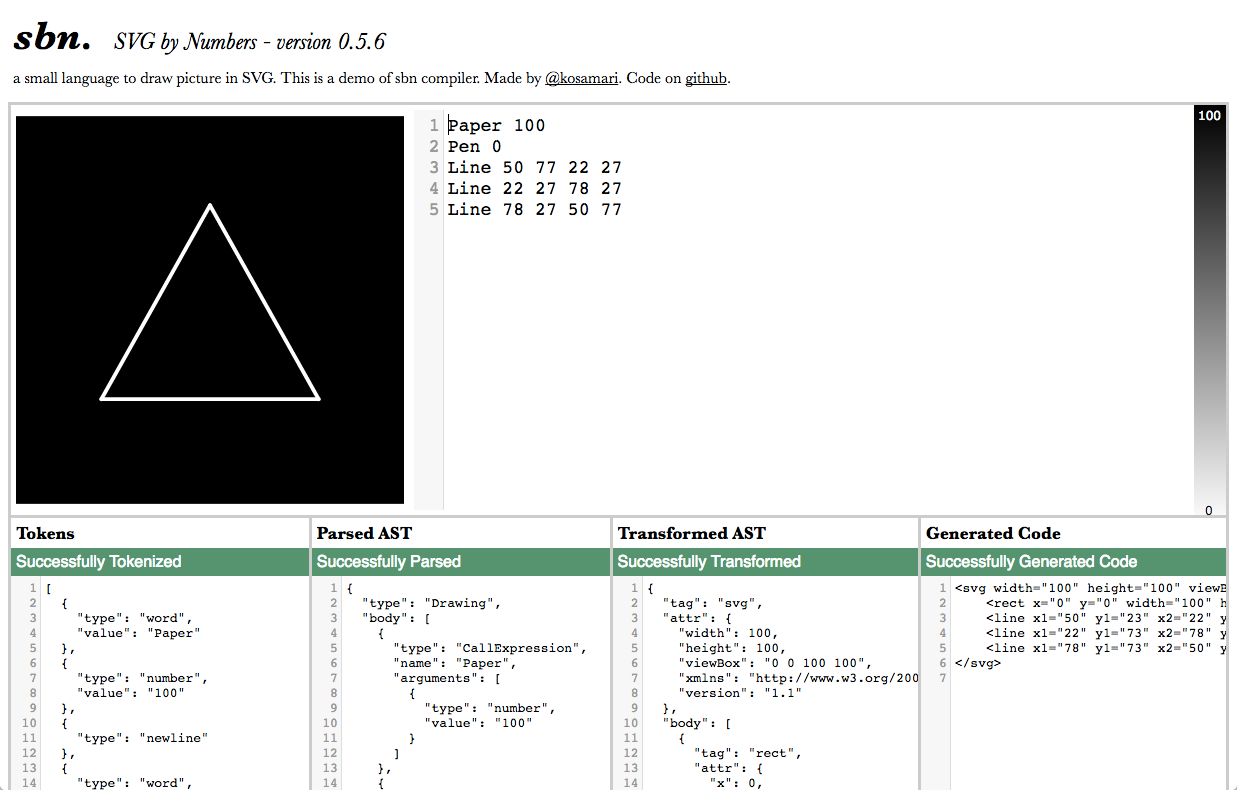
I made an interactive demo in which you can see the result of the compiler at each step. The code for the sbn compiler can be downloaded on github . I am currently working on extending the compiler functionality. If you want to see only the basic compiler, actually the one that was created in this article, you can find it here .
Yes, all of these techniques are certainly great for creating a compiler, but that doesn’t mean that you should immediately apply them in your compiler.
I started writing my compiler using only a small set of DBN commands. Gradually, I began to complicate the functionality, and now I'm going to add the use of variables, blocks and loops to the compiler. It is certainly good to have all of these constructions, but it is not necessary to apply them from the very beginning.
What can you do if you can write a compiler? You might want to write your new version of JavaScript in Spanish ... How about EspañolScript?
There are already those who wrote their language using Emoji (Emojicode) or color images (Piet) . The possibilities are endless!
Creating a compiler was fun, and I learned a lot about software development. I will list just a few things that I learned in the process of writing a compiler.

Like our lexical analyzer, you do not need to know everything from the very beginning. If you don’t quite understand a part of some code or technology, it’s normal to move work with this to the next step. Do not be nervous, sooner or later you will figure it out!
The role of the parser is to strictly follow the instructions and check whether everything is written as stated in the rules. Yes, mistakes happen often. When this happens, try sending an informative, friendly error message. It's easy to say “So it doesn't work” (“ILLEGAL Token” or “undefined is not a function” in JavaScript), but instead try to provide the user with as much useful information as possible.
This also applies to team communication. When someone is stuck with his task, instead of saying “Yes it doesn’t work”, you can start saying “I would search for information on google with keywords such as ...” or “I recommend reading such and such documentation”. You don’t need to take on the work of another person, but you can definitely help him do his job better and faster just by throwing him a fresh idea.
The Elm programming language uses this approach to output error messages, where the user is offered options for solving his problem (“Maybe you want to try this?”).
And finally, just like our transformer turned one type of AST into another, more suitable for the final result, everything in programming depends on the context.
There is not a single perfectly perfect solution. Do not do something, just because it is fashionable now, or because you have already done it before, think first about the context of the task. Things that work for one user can be absolutely terrible for another.
Therefore, appreciate the work of “transformers”, you quite possibly know such a person in your team, a person who completes well, someone started the work, or does refactoring. It essentially does not create new code, but the result of its work is damn important for the final high-quality product.
I hope you enjoyed this article and that I convinced you how cool it is to write compilers and be a compiler myself!
This is a translation of an article by Mariko Kosaka , which is part of her presentation at JSConf Colombia 2016 in Medellin, Colombia. If you want to know more about this, you can find the slides here and the original article here .
* That's right! Being a compiler is great!
It was one wonderful Sunday afternoon in Bushwick, Brooklyn. In my local bookstore, I stumbled upon John Maed's book “Design by Numbers” . This was a step-by-step instruction for learning DBN, a programming language created in the late 90s at MIT Media Lab to visually present computer programming concepts.
The three lines of code shown in the first figure draw a black line on white paper (an example is taken from here) To draw more complex shapes, such as, for example, a square, you just need to draw more lines (second picture).
I immediately thought that in 2016, this could be an interesting project - to create SVG from DBN without installing Java to execute the original DBN code.
I decided that for this I need to write a compiler from DBN to SVG, so my quest for writing a compiler began. Creating a compiler sounds like a rather complicated scientific process, but I never even wrote a graph traversal for an interview ... Can I write a compiler?
First try to become a compiler ourselves
A compiler is a mechanism that takes a piece of code and converts it to something else. Let's compile a simple DBN code into a physical drawing.
Let's take three DBN commands: Paper sets the color of the paper, Pen sets the color of the brush and Line draws a line. Color 100 is equivalent to 100% black, which is rgb (0%, 0%, 0%) in CSS. Images created in DBN are always in grayscale. In DBN, the paper is always 100 × 100, the line width is always 1, and the line itself is specified by (x, y) coordinates, the count is taken from the lower left corner of the image.
Let's dwell on this and try to be a compiler ourselves. Take paper, pen and try to compile the following code into a drawing.
Paper 0
Pen 100
Line 0 50 100 50
Have you drawn a horizontal line from the left edge of the sheet to the right, and is it centered vertically? Congratulations! You have just become a compiler.
How does the compiler work?
Let's see what happened in our head while we were a compiler.
1. Lexical analysis (Tokenization)
The first thing we did was break the source code into words by spaces. In the process, we conditionally determined primitive types for each token, such as “word” or “number”.
2. Parsing
As soon as we broke a fragment of the text into tokens, we went through each of them and tried to find the relationship between them.
In this case, we have grouped together a set of numbers and the word related to them. Having done this, we began to distinguish between certain code structures.
3. Transformation
After parsing, we transformed the resulting structures into something more suitable for the final result. In our case, we are going to draw an image, so we need to transform our structures into step-by-step instructions that are understandable to humans.
4. Code Generation
At this stage, we simply follow the instructions that we did in the previous step of preparing for drawing.
This is what the compiler does!
The figure we made is the compiled result (similar to the .exe file that is created during the compilation of the C program). We can send this picture to any person or to any device (scanner, camera, etc.) and everyone will recognize the black line in the center of the sheet.
Let's write a compiler
Now that we know how the compiler works, let's write another one, but using JavaScript. This compiler will take DBN code and convert it to SVG.
1. Lexer function
In the same way as we can divide the sentence “I have a pen” into the words [I, I, have a pen], the lexical analyzer can break the code represented as a string into certain meaningful parts (tokens). In DBN, all tokens are separated by spaces and are classified as “word” or “number”.
function lexer (code) {
  return code.split(/\s+/)
          .filter(function (t) { return t.length > 0 })
          .map(function (t) {
            return isNaN(t)
                    ? {type: 'word', value: t}
                    : {type: 'number', value: t}
          })
}
input: "Paper 100"
output:[
  { type: "word", value: "Paper" }, { type: "number", value: 100 }
]
2. Parser function
The parser goes through each token, collects syntax information and builds the so-called Abstract Syntax Tree. You can see AST as a map of our code - a way to see how it is structured.
There are two syntax types “NumberLiteral” and “CallExpression” in our code. NumberLiteral means the value is a number. This number is used as an argument to CallExpression.
function parser (tokens) {
  var AST = {
    type: 'Drawing',
    body: []
  }
  // Циклический перебор токенов
  while (tokens.length > 0){
    var current_token = tokens.shift()
    // Так как числовой токен сам по себе ничего не делает,
    // мы анализируем синтаксис только тогда, когда находим слово
    if (current_token.type === 'word') {
      switch (current_token.value) {
        case 'Paper' :
          var expression = {
            type: 'CallExpression',
            name: 'Paper',
            arguments: []
          }
          // Если текущим токеном является CallExpression типа Paper,
          // следующий токен должен быть аргументом цвета
          var argument = tokens.shift()
          if(argument.type === 'number') {
            expression.arguments.push({  // Добавить информацию об аргументе в объект выражения
              type: 'NumberLiteral',
              value: argument.value
            })
            AST.body.push(expression)    // Добавить наше выражение в АСТ
          } else {
            throw 'Paper command must be followed by a number.'
          }
          break
        case 'Pen' :
          ...
        case 'Line':
          ...
      }
    }
  }
  return AST
}
input: [
  { type: "word", value: "Paper" }, { type: "number", value: 100 }
]
output: {
  "type": "Drawing",
  "body": [{
    "type": "CallExpression",
    "name": "Paper",
    "arguments": [{ "type": "NumberLiteral", "value": "100" }]
  }]
}
3. Transformer function
The Abstract Syntax Tree (AST) that we created in the previous step describes well what happens in the code, but we still cannot create SVG from this.
For example, the “Paper” command is clear only to code written in DBN. In SVG we would like to use paper for presentation
function transformer (ast) {
  var svg_ast = {
    tag : 'svg',
    attr: {
      width: 100, height: 100, viewBox: '0 0 100 100',
      xmlns: 'http://www.w3.org/2000/svg', version: '1.1'
    },
    body:[]
  }
  var pen_color = 100 // Цвет по умолчанию - черный
  // Циклический перебор выражений
  while (ast.body.length > 0) {
    var node = ast.body.shift()
    switch (node.name) {
      case 'Paper' :
        var paper_color = 100 - node.arguments[0].value
        svg_ast.body.push({ // Добавить информацию о rect элементе в тело svg_ast
          tag : 'rect',
          attr : {
            x: 0, y: 0,
            width: 100, height:100,
            fill: 'rgb(' + paper_color + '%,' + paper_color + '%,' + paper_color + '%)'
          }
        })
        break
      case 'Pen':
        pen_color = 100 - node.arguments[0].value // Сохранить текущий цвет кисти в переменную `pen_color`
        break
      case 'Line':
        ...
    }
  }
  return svg_ast
 }
input: {
  "type": "Drawing",
  "body": [{
    "type": "CallExpression",
    "name": "Paper",
    "arguments": [{ "type": "NumberLiteral", "value": "100" }]
  }]
}
output: {
  "tag": "svg",
  "attr": {
    "width": 100,
    "height": 100,
    "viewBox": "0 0 100 100",
    "xmlns": "http://www.w3.org/2000/svg",
    "version": "1.1"
  },
  "body": [{
    "tag": "rect",
    "attr": {
      "x": 0,
      "y": 0,
      "width": 100,
      "height": 100,
      "fill": "rgb(0%, 0%, 0%)"
    }
  }]
}
4. Generator function
In the last step of the compiler, a function is called that builds the SVG code based on the new AST that we created in the previous step.
function generator (svg_ast) {
// Преобразовать объкет атрибутов в строку
// { "width": 100, "height": 100 } преобразуется в 'width="100" height="100"'
function createAttrString (attr) {
return Object.keys(attr).map(function (key){
return key + '="' + attr[key] + '"'
}).join(' ')
}
// Верхним узлом всегда является input: {
"tag": "svg",
"attr": {
"width": 100,
"height": 100,
"viewBox": "0 0 100 100",
"xmlns": "http://www.w3.org/2000/svg",
"version": "1.1"
},
"body": [{
"tag": "rect",
"attr": {
"x": 0,
"y": 0,
"width": 100,
"height": 100,
"fill": "rgb(0%, 0%, 0%)"
}
}]
}
output:
5. Putting it all together
Let's call our compiler “sbn compiler”. Create an sbn object with our lexer, parser, transformer and generator. Add a “compile” method that will call a chain of 4 of these methods.
Now we can pass the line of code to the compilation method and get the SVG.
var sbn = {}
sbn.VERSION = '0.0.1'
sbn.lexer = lexer
sbn.parser = parser
sbn.transformer = transformer
sbn.generator = generator
sbn.compile = function (code) {
  return this.generator(this.transformer(this.parser(this.lexer(code))))
}
// Вызвать sbn компилятор
var code = 'Paper 0 Pen 100 Line 0 50 100 50'
var svg = sbn.compile(code)
document.body.innerHTML = svg
I made an interactive demo in which you can see the result of the compiler at each step. The code for the sbn compiler can be downloaded on github . I am currently working on extending the compiler functionality. If you want to see only the basic compiler, actually the one that was created in this article, you can find it here .
Should the compiler use recursion, traversal, etc.?
Yes, all of these techniques are certainly great for creating a compiler, but that doesn’t mean that you should immediately apply them in your compiler.
I started writing my compiler using only a small set of DBN commands. Gradually, I began to complicate the functionality, and now I'm going to add the use of variables, blocks and loops to the compiler. It is certainly good to have all of these constructions, but it is not necessary to apply them from the very beginning.
Writing compilers is great
What can you do if you can write a compiler? You might want to write your new version of JavaScript in Spanish ... How about EspañolScript?
// ES (español script)
función () {
  si (verdadero) {
    return «¡Hola!»
  }
}
There are already those who wrote their language using Emoji (Emojicode) or color images (Piet) . The possibilities are endless!
Training in the process of creating a compiler
Creating a compiler was fun, and I learned a lot about software development. I will list just a few things that I learned in the process of writing a compiler.
1. It’s normal to not know something
Like our lexical analyzer, you do not need to know everything from the very beginning. If you don’t quite understand a part of some code or technology, it’s normal to move work with this to the next step. Do not be nervous, sooner or later you will figure it out!
2. Pay attention to the text of your error messages.
The role of the parser is to strictly follow the instructions and check whether everything is written as stated in the rules. Yes, mistakes happen often. When this happens, try sending an informative, friendly error message. It's easy to say “So it doesn't work” (“ILLEGAL Token” or “undefined is not a function” in JavaScript), but instead try to provide the user with as much useful information as possible.
This also applies to team communication. When someone is stuck with his task, instead of saying “Yes it doesn’t work”, you can start saying “I would search for information on google with keywords such as ...” or “I recommend reading such and such documentation”. You don’t need to take on the work of another person, but you can definitely help him do his job better and faster just by throwing him a fresh idea.
The Elm programming language uses this approach to output error messages, where the user is offered options for solving his problem (“Maybe you want to try this?”).
3. Our context is everything
And finally, just like our transformer turned one type of AST into another, more suitable for the final result, everything in programming depends on the context.
There is not a single perfectly perfect solution. Do not do something, just because it is fashionable now, or because you have already done it before, think first about the context of the task. Things that work for one user can be absolutely terrible for another.
Therefore, appreciate the work of “transformers”, you quite possibly know such a person in your team, a person who completes well, someone started the work, or does refactoring. It essentially does not create new code, but the result of its work is damn important for the final high-quality product.
I hope you enjoyed this article and that I convinced you how cool it is to write compilers and be a compiler myself!
This is a translation of an article by Mariko Kosaka , which is part of her presentation at JSConf Colombia 2016 in Medellin, Colombia. If you want to know more about this, you can find the slides here and the original article here .