How to whale eat Java application and not choke
Hello, dear habravchane! Today I would like to talk about how to “feed” a Java application to a docker, how to act better and what should not be done. I have been developing in Java for more than 10 years, and spent the last three years in the closest communication with Docker, so I had a certain idea that it can and cannot. But hypotheses need to be tested in practice, right?
I presented the whole process as a good old computer game with warm tube pixel art.
We will begin, as befits any game, with a briefing. As an introduction, let's take some docker advertising.
On the docker site you can find a number of advertising promises - namely, a promise to increase the speed of development and deployment as much as 13times and increase portability in development (in particular, get rid of the sacramental "works on my machine"). But is this true?
Now we will try to prove / refute these statements.
Since we are in the game, we will begin, as expected, from the simplest level.
What is our mission on the first level? Probably, for many this is something very trivial and understandable: we have to “wrap” the most primitive Java application in Docker.

To do this, we need a simple Java class that outputs the sacramental Hello JavaMeetup! Also, in order to create a docker image, we need a Dockerfile . In terms of syntax, it is extremely simple - we use java: 8 as the base image , add our Java class ( ADD command ), compile it (using the RUN command ) and specify the command that will be executed when the container starts ( CMD command ).
HelloWorld.java
Dockerfile
Docker commands:

To collect all this business, we need, in fact, one command - this is docker build . When assembling, specify the name of our image and the tag that we assign to it (this way we can version the various assemblies of our application). Next, make sure that we assembled the image by running the docker images command . In order to run our application, execute the docker run command .
Hooray, everything went perfectly, and we are well done ... Or not?
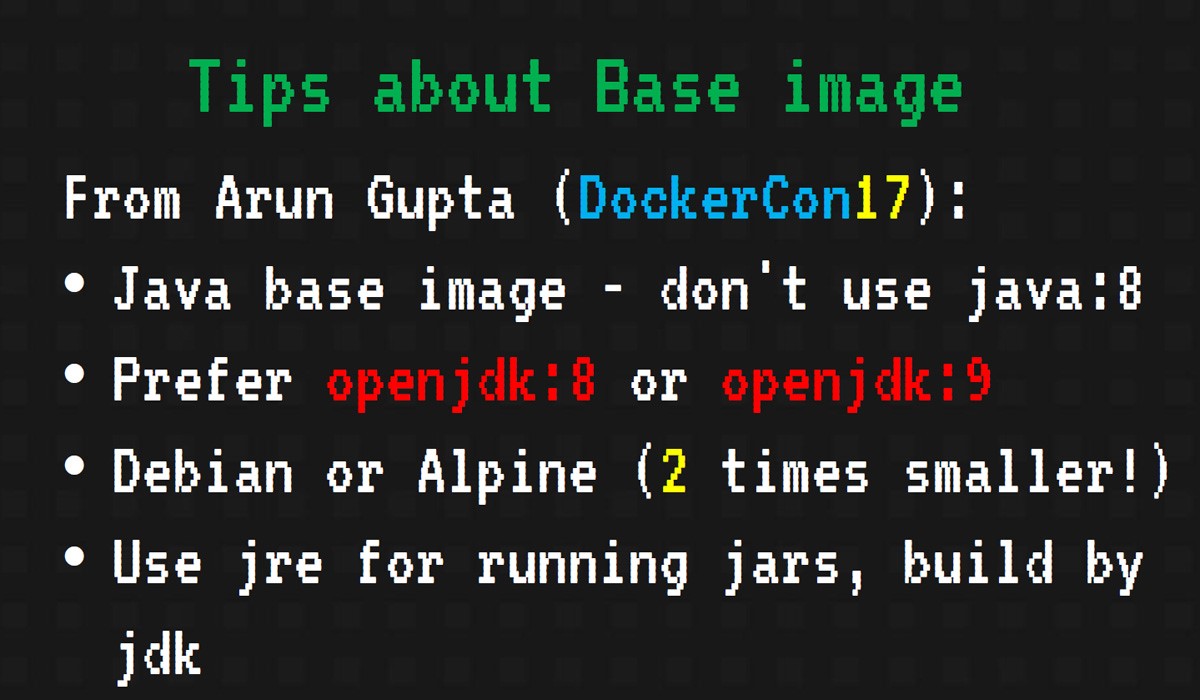
Yes, we completed the mission. But there are reasons to take points with us. Why, you ask, and how to avoid such mistakes next time?
Now, we can assume that the first level has been completed successfully. We rise to the second.
Useful link for passing the first level

When dealing with Java, we will most likely use Maven or Gradle. Therefore, it would be convenient to somehow integrate our build systems with Docker in order to have a single environment for building the project and docker images.
Fortunately for us, most plugins have already been written - for both Maven and Gradle.
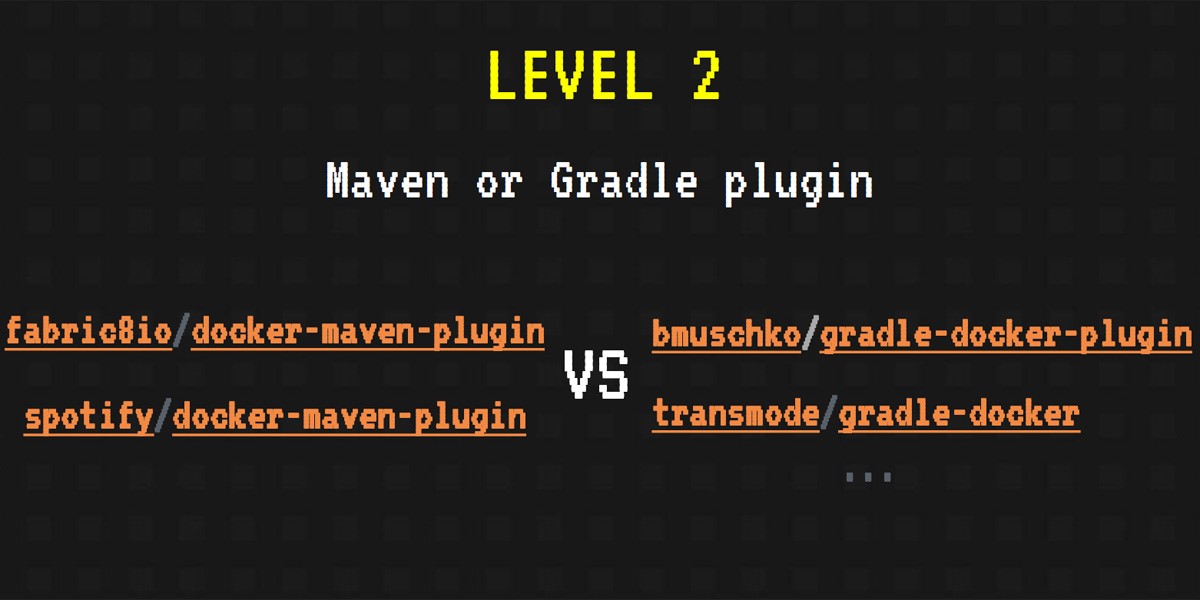
The most popular Maven plugins for Docker fabric8io and spotify . For Gradle, we can use the plugin Benjamin Mushko - one of the developers of Gradle and author of the book "Gradle in Action".
To connect the docker to the application’s build system, in the gradle configuration it’s enough to create several tasks that will collect and run our containers, as well as indicate some general information from the category — which image to use as the base image and which name to give to the collected image.
Let's not be verbose: take the bmuschko / gradle-docker-plugin and Gradle plugin (Maven fans and XML lovers, wait a bit!).
We will complete our first task, but now with the help of this plugin. The main parts of build.gradle that we will need:
We run the gradle startContainer command and see the assembly of our image and even the launch of the container. But instead of the welcome message “Hello JavaMeetup!” We get a notification of a successful build!

Have we made a mistake somewhere? Not really, just redirect the output of our container to the console:
We run the gradle logContainer command and ... Hooray, the coveted message and the level passed.
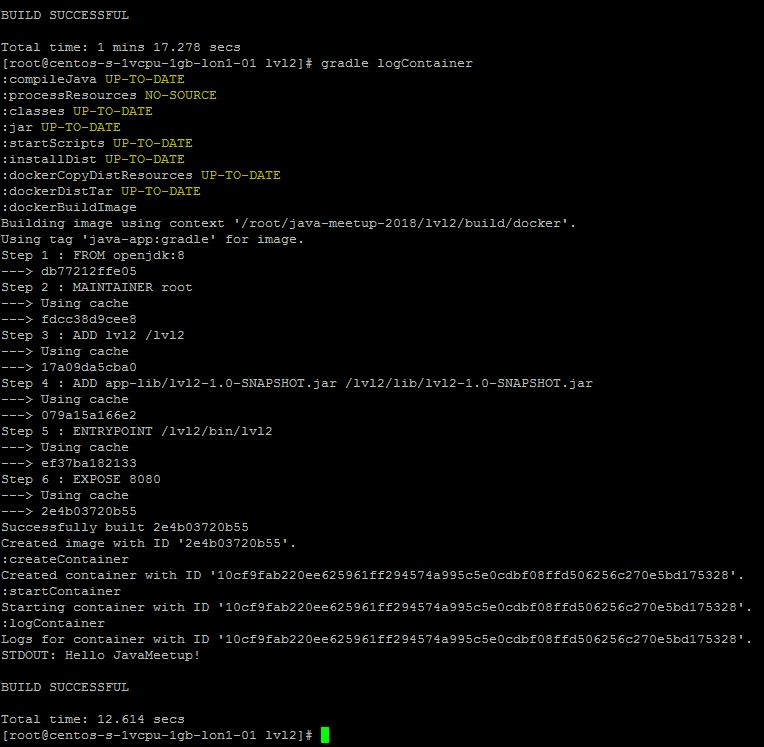
That, in fact, is all. We do not even need a Dockerfile (but it will not be superfluous - you never know, Gradle will not be at hand).
Let's move on!
Most likely, in real life, our application will do something trickier than displaying “Hello World." Therefore, at the next level, we will learn how to run a complex application - Spring web application, which will bring us some records from the database.
In order to raise the base and the application itself, we will use Docker Compose . First, create a new file (another new configuration file, you will breathe, but it won’t stop us?) - docker-compose.yml . In it, we simply prescribe services for raising the image of the database and the image of the application. Docker Compose itself will find the yml file in the current directory and pick up or collect the containers and images we need.

In order for this whole thing to start, we will first collect the image. In this examplethe maven plugin for Docker (hooray, XML!) from fabric8io was used - so to get started, run the mvn install command :
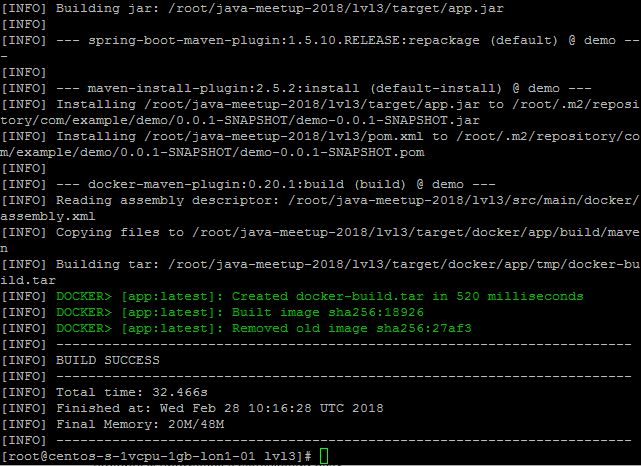
Let's wait until our project and the docker image are assembled, go to the directory with the yml file and run the docker-compose up -d command .

Check that both of our containers are running by running docker ps .
In order to make sure that our web application is working and pulls something out of the database, we can directly change something in the database, and then go to the address http: // localhost: 8080 / and see the desired data.
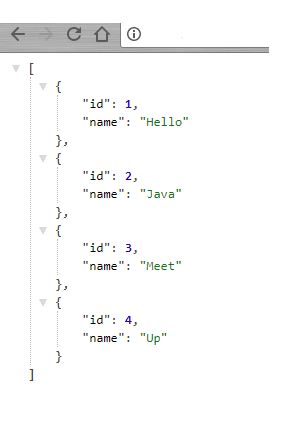
All this may seem complicated, but in fact it is extremely simple. The third level is completed. Almost.
We still have a bonus level. On it, we will play a little (very little) Docker Swarm - and to be precise, in Docker Swarm Mode .
Docker Swarm Mode is not particularly complicated - it's just a cluster of machines on which Docker stands. For the user, this cluster looks like one machine, and all the teams work almost the same as if this Docker Swarm weren’t.
In swarm mode, you can run multiple instances of our application - for load balancing, for example. Also, such an abstraction as a stack appears here: using Docker Swarm we can deploy a whole bunch of applications as a whole. And, like normal scaling, we can expand multiple replicas of the stack .
Docker commands in swarm mode:
In fact, the command syntax is extremely simple and resembles the creation of ordinary containers.
We can also use docker compose:
Well, over the past three levels, we kind of have achieved portability of java applications. It’s time to go to the last level and try to confirm or refute the statement that Docker makes the phrase “works on my machine” no longer relevant.

Imagine that we have a heavy application. Or a large number of microservices that can be on the same machine. In this case, the Java application (to be precise, the JVM) will certainly grapple with our little blue whale in the fight for the resources of the host machine. By the way, this is well described in this article .

At this level, there will be fewer examples of code, but there will be different docker container launch configurations. The main means of isolating processes and resources used by Docker are cgroups and namespaces. But the main problem is that Java on all this is a little drum. She is voracious and a little greedy, she sees that there are actually more resources, even if we set memory limits when creating a container with a java application using the - memory flag. You can verify this simply by running the free command inside the container. From here follows a rather general recommendation for Java 8 to set the –Xmx parameter, and to make the –memory parameter at least twice as large as –Xmx. Good news from the fields of Java 9 - they added support for cgroups.
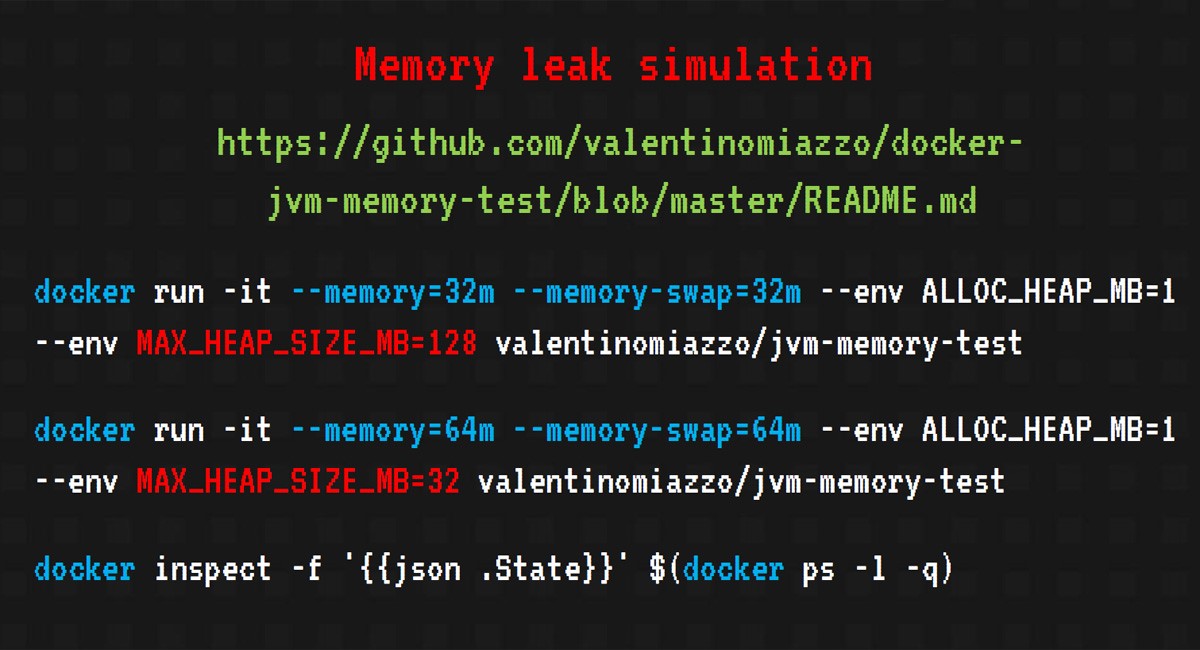
Simulating a memory leak in Java is pretty simple. We just take the ready-made image valentinomiazzo / jvm-memory-test and run with various heap size options and --memory for docker.

In the first case, the container has less memory than the java application, and we get an indistinct error. And I would like to get an OutOfMemoryException. If you inspect a "dead" container, you will notice that it was killed by OOMKiller , and this can lead to unpredictable consequences, a java process freezing, improper shutdown of resources and all sorts of other offensive things (I even met kernel-panic). Not the nicest thing that can happen.
Raise rates, give more memory to the container. This time we can catch an OutOfMemoryException and after inspecting make sure that OOMKiller did not touch our container, and we are spared all of the above troubles.

The last level is passed, let's try to summarize.
So, what did we get as a result, having passed all the levels of our game? What about the Docker promises to turn our mountains to us?
Portability is not as good as we would like, but Java 9 seems to promise to solve these problems. With increasing flexibility, everything is already more pleasant: with the docker, we get a reproducible configuration of the environment in the code, and not far from the main code. It’s easier to keep track of such things than those who, when and what they corrected, replaced or ruined somewhere under the root. And in general, you can achieve a good reduction in resources due to the ability to run many containers on one machine - this can be critical during testing.
That is, I would say that for testing and / or development, the docker is ideal. But when working in production, you need to be more careful, since the load in this case can be much higher. And getting a drop through the fault of the docker is absolutely unpleasant.
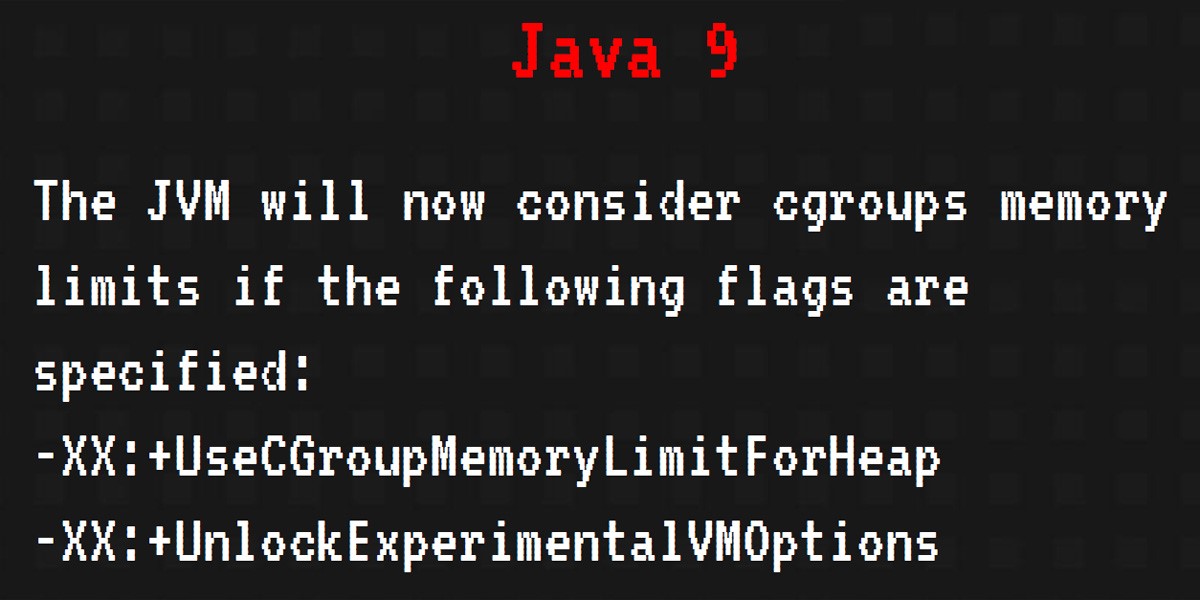
And finally - the same flags that are needed in order to make friends Java 9 with docker!
Useful links for passing the last level:
https://hackernoon.com/crafting-perfect-Java-docker-build-flow-740f71638d63
https://jaxenter.com/nobody-puts-Java-container-139373.html
https: / /github.com/valentinomiazzo/docker-jvm-memory-test
P.S. All the examples mentioned and above can be found here:
github.com/alexff91/Java-meetup-2018
I presented the whole process as a good old computer game with warm tube pixel art.
We will begin, as befits any game, with a briefing. As an introduction, let's take some docker advertising.
On the docker site you can find a number of advertising promises - namely, a promise to increase the speed of development and deployment as much as 13times and increase portability in development (in particular, get rid of the sacramental "works on my machine"). But is this true?
Now we will try to prove / refute these statements.
Level 1
Since we are in the game, we will begin, as expected, from the simplest level.
What is our mission on the first level? Probably, for many this is something very trivial and understandable: we have to “wrap” the most primitive Java application in Docker.
To do this, we need a simple Java class that outputs the sacramental Hello JavaMeetup! Also, in order to create a docker image, we need a Dockerfile . In terms of syntax, it is extremely simple - we use java: 8 as the base image , add our Java class ( ADD command ), compile it (using the RUN command ) and specify the command that will be executed when the container starts ( CMD command ).
HelloWorld.java
publicclassHelloWorld{
 publicstaticvoidmain(String[] args){
  System.out.println("Hello World!");
 }
}
Dockerfile
FROM java:8ADD HelloWorld.java .
RUN javac HelloWorld.java
CMD ["java", "HelloWorld"]
Docker commands:
$ docker build -t java-app:demo .
$ docker images
$ docker run java-app:demo
To collect all this business, we need, in fact, one command - this is docker build . When assembling, specify the name of our image and the tag that we assign to it (this way we can version the various assemblies of our application). Next, make sure that we assembled the image by running the docker images command . In order to run our application, execute the docker run command .
Hooray, everything went perfectly, and we are well done ... Or not?
Yes, we completed the mission. But there are reasons to take points with us. Why, you ask, and how to avoid such mistakes next time?
- The basic docker image we used is declared deprecated and is not supported by the docker community . Even on DockerCon17, many of the Java EE worlds familiar Arun Gupta recommended using openjdk as their base image (which we are also hinted at by the description and update date of the images https://hub.docker.com/_/openjdk/ ).
- To reduce the size, it is better to use images based on Alpine - images based on this distribution are the most lightweight.
- We compile using the jdk image, start using jre (we save disk space, we still need it).
Now, we can assume that the first level has been completed successfully. We rise to the second.
Useful link for passing the first level
Level 2
When dealing with Java, we will most likely use Maven or Gradle. Therefore, it would be convenient to somehow integrate our build systems with Docker in order to have a single environment for building the project and docker images.
Fortunately for us, most plugins have already been written - for both Maven and Gradle.
The most popular Maven plugins for Docker fabric8io and spotify . For Gradle, we can use the plugin Benjamin Mushko - one of the developers of Gradle and author of the book "Gradle in Action".
To connect the docker to the application’s build system, in the gradle configuration it’s enough to create several tasks that will collect and run our containers, as well as indicate some general information from the category — which image to use as the base image and which name to give to the collected image.
Let's not be verbose: take the bmuschko / gradle-docker-plugin and Gradle plugin (Maven fans and XML lovers, wait a bit!).
We will complete our first task, but now with the help of this plugin. The main parts of build.gradle that we will need:
docker {
  javaApplication {
    baseImage = 'openjdk:latest'
    tag = 'java-app:gradle'
  }
}
task createContainer(type: DockerCreateContainer) {
    dependsOn dockerBuildImage
    targetImageId { dockerBuildImage.getImageId() }
}
task startContainer(type: DockerStartContainer) {
    dependsOn createContainer
    targetContainerId { createContainer.getContainerId() }
}
We run the gradle startContainer command and see the assembly of our image and even the launch of the container. But instead of the welcome message “Hello JavaMeetup!” We get a notification of a successful build!
Have we made a mistake somewhere? Not really, just redirect the output of our container to the console:
task logContainer(type: DockerLogsContainer, dependsOn: startContainer) {
    targetContainerId { startContainer.getContainerId() }
    follow = true
    tailAll = true
    onNext {
        message -> logger.quiet message.toString()
    }
}
We run the gradle logContainer command and ... Hooray, the coveted message and the level passed.
That, in fact, is all. We do not even need a Dockerfile (but it will not be superfluous - you never know, Gradle will not be at hand).
Let's move on!
Level 3
Most likely, in real life, our application will do something trickier than displaying “Hello World." Therefore, at the next level, we will learn how to run a complex application - Spring web application, which will bring us some records from the database.
In order to raise the base and the application itself, we will use Docker Compose . First, create a new file (another new configuration file, you will breathe, but it won’t stop us?) - docker-compose.yml . In it, we simply prescribe services for raising the image of the database and the image of the application. Docker Compose itself will find the yml file in the current directory and pick up or collect the containers and images we need.
In order for this whole thing to start, we will first collect the image. In this examplethe maven plugin for Docker (hooray, XML!) from fabric8io was used - so to get started, run the mvn install command :
<plugin><groupId>io.fabric8</groupId><artifactId>docker-maven-plugin</artifactId><version>0.20.1</version><configuration><images><image><name>app</name><build><dockerFileDir>${project.basedir}/src/main/docker</dockerFileDir><assembly><mode>dir</mode><targetDir>/app</targetDir><descriptor>${project.basedir}/src/main/docker/assembly.xml</descriptor></assembly></build></image></images></configuration><executions><execution><id>build</id><phase>install</phase><goals><goal>build</goal></goals></execution></executions></plugin>Let's wait until our project and the docker image are assembled, go to the directory with the yml file and run the docker-compose up -d command .
Check that both of our containers are running by running docker ps .
In order to make sure that our web application is working and pulls something out of the database, we can directly change something in the database, and then go to the address http: // localhost: 8080 / and see the desired data.
All this may seem complicated, but in fact it is extremely simple. The third level is completed. Almost.
We still have a bonus level. On it, we will play a little (very little) Docker Swarm - and to be precise, in Docker Swarm Mode .
Bonus level
Docker Swarm Mode is not particularly complicated - it's just a cluster of machines on which Docker stands. For the user, this cluster looks like one machine, and all the teams work almost the same as if this Docker Swarm weren’t.
In swarm mode, you can run multiple instances of our application - for load balancing, for example. Also, such an abstraction as a stack appears here: using Docker Swarm we can deploy a whole bunch of applications as a whole. And, like normal scaling, we can expand multiple replicas of the stack .
Docker commands in swarm mode:
$ docker service create --name japp --publish 8080:80 --replicas 3 java-app:demo
$ docker stack deploy -c docker-compose.yml javahelloworld
In fact, the command syntax is extremely simple and resembles the creation of ordinary containers.
We can also use docker compose:
$ docker-compose scale jm-app=3Well, over the past three levels, we kind of have achieved portability of java applications. It’s time to go to the last level and try to confirm or refute the statement that Docker makes the phrase “works on my machine” no longer relevant.
Final level
Imagine that we have a heavy application. Or a large number of microservices that can be on the same machine. In this case, the Java application (to be precise, the JVM) will certainly grapple with our little blue whale in the fight for the resources of the host machine. By the way, this is well described in this article .
At this level, there will be fewer examples of code, but there will be different docker container launch configurations. The main means of isolating processes and resources used by Docker are cgroups and namespaces. But the main problem is that Java on all this is a little drum. She is voracious and a little greedy, she sees that there are actually more resources, even if we set memory limits when creating a container with a java application using the - memory flag. You can verify this simply by running the free command inside the container. From here follows a rather general recommendation for Java 8 to set the –Xmx parameter, and to make the –memory parameter at least twice as large as –Xmx. Good news from the fields of Java 9 - they added support for cgroups.
Simulating a memory leak in Java is pretty simple. We just take the ready-made image valentinomiazzo / jvm-memory-test and run with various heap size options and --memory for docker.
In the first case, the container has less memory than the java application, and we get an indistinct error. And I would like to get an OutOfMemoryException. If you inspect a "dead" container, you will notice that it was killed by OOMKiller , and this can lead to unpredictable consequences, a java process freezing, improper shutdown of resources and all sorts of other offensive things (I even met kernel-panic). Not the nicest thing that can happen.
Raise rates, give more memory to the container. This time we can catch an OutOfMemoryException and after inspecting make sure that OOMKiller did not touch our container, and we are spared all of the above troubles.
The last level is passed, let's try to summarize.
Resume
So, what did we get as a result, having passed all the levels of our game? What about the Docker promises to turn our mountains to us?
Portability is not as good as we would like, but Java 9 seems to promise to solve these problems. With increasing flexibility, everything is already more pleasant: with the docker, we get a reproducible configuration of the environment in the code, and not far from the main code. It’s easier to keep track of such things than those who, when and what they corrected, replaced or ruined somewhere under the root. And in general, you can achieve a good reduction in resources due to the ability to run many containers on one machine - this can be critical during testing.
That is, I would say that for testing and / or development, the docker is ideal. But when working in production, you need to be more careful, since the load in this case can be much higher. And getting a drop through the fault of the docker is absolutely unpleasant.
And finally - the same flags that are needed in order to make friends Java 9 with docker!
Game over
Useful links for passing the last level:
https://hackernoon.com/crafting-perfect-Java-docker-build-flow-740f71638d63
https://jaxenter.com/nobody-puts-Java-container-139373.html
https: / /github.com/valentinomiazzo/docker-jvm-memory-test
P.S. All the examples mentioned and above can be found here:
github.com/alexff91/Java-meetup-2018
Only registered users can participate in the survey. Please come in.