A couple of ways to send notifications to a smartphone from your server
In this tutorial, I will take a step-by-step look at how to send notifications from my server to my (or not my) smartphone, what tools will be needed for this. These methods are universal and suitable for any programming language, as use google API directly, without using libraries. You can send it to smartphones with Android, iOS and browsers with Push API support (today it’s Chrome, Firefox and their derivatives).
In general, it is dedicated to all those who have long wanted to send notifications from their home server to their smartphone, but did not know where to start.
A bit of history. In the beginning (from the version of android 2.2), Google used the C2DM system (Android Cloud to Device Messaging) for delivery, starting in June 2012 they began to suggest using GCM (Google cloud messaging) for this.
Currently, the universal Firebase platform is used , which, in addition to delivering notifications, has many other features. Firebase has also evolved and the first generation protocol is already considered obsolete and it is recommended to use the second generation protocol for message delivery.
Technically, notifications are sent from the server not directly to the smartphone, but to a certain intermediate server on which, if necessary, they are stored for up to 4 weeks (configurable), and if possible are sent to the recipient. Those. if the smartphone is offline, the server is waiting. As soon as the opportunity arises - sends.
To register with Firebase, you need Google account.

Click "Go to console."
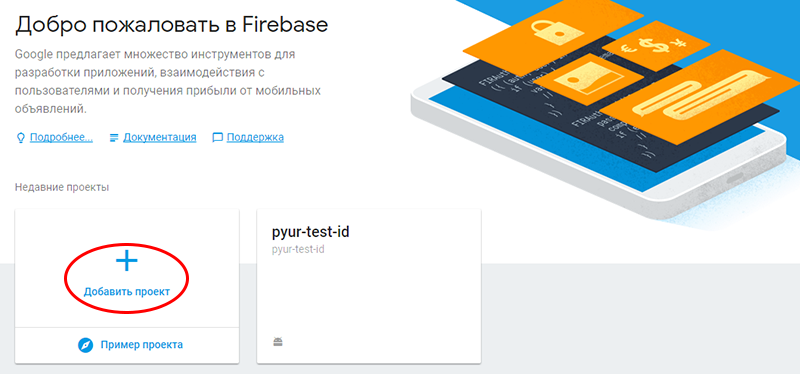
Then "Add Project."
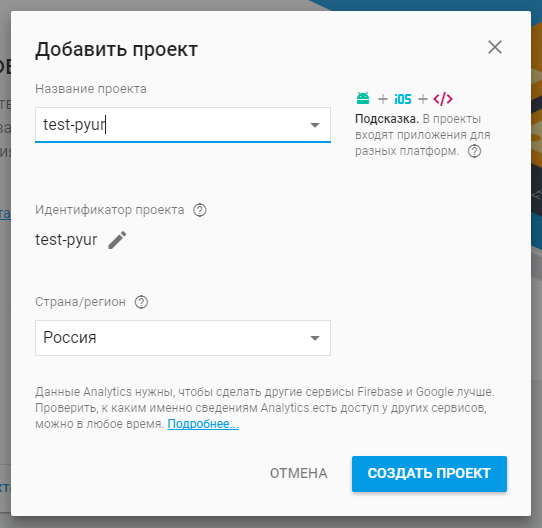
Enter the name of the project. I recommend in the range of 8-16 characters.
Choose a country. Click "Create Project."
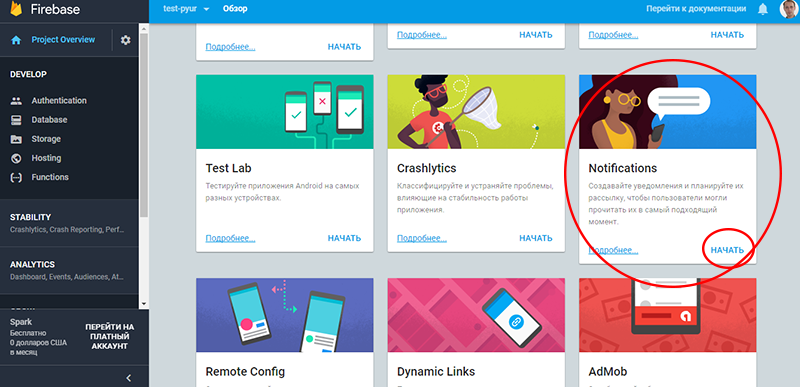
Scroll to the “Notifications” block, click “Start”.
You will be prompted to select the application for which your notifications will be sent.

Steps for the Andriod application:

Step 1 - Enter the name of the project on Andriod.
Click "Register application."
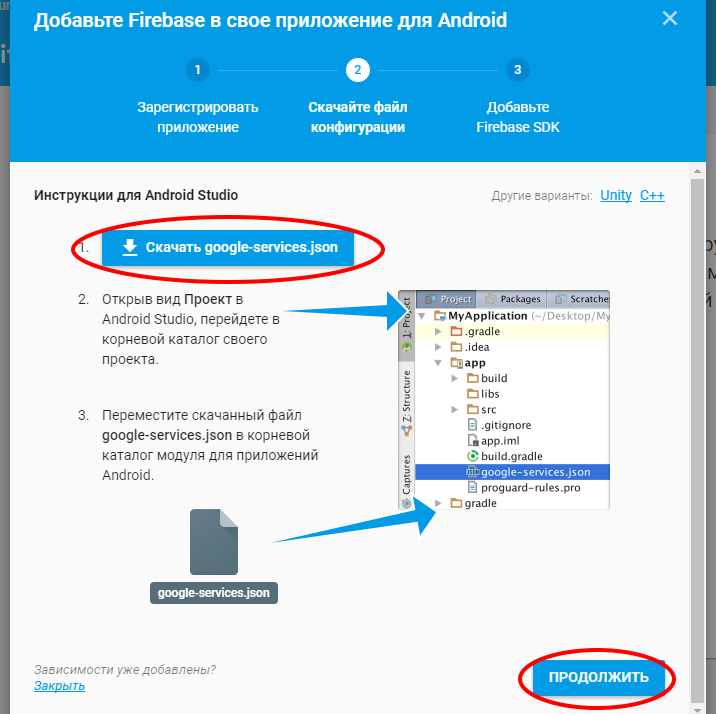
Step 2 - Click "Download google-services.com".
Add the downloaded configuration file to the project, next to the build.gradle file (the one that is personal to the application).
Click "Continue."

Step 3 - Add dependencies to the project.
to the file /build.gradle line
classpath 'com.google.gms: google-services: 3.1.0'
to the file //build.gradle line
apply plugin: 'com.google.gms.google-services'
That's all, click Finish.
After setting up the application, you can immediately test whether the connection works by sending a test message (no, you can’t, we don’t have a client ID yet, where to send it).
Important note: some shells, such as MIUI, can block notifications if the application is not running or does not hang in the background. This is allegedly done to save battery power.
Roughly speaking, you can send two types of notifications:
- notification on request,
- notification with a payload.
They have different ways of interacting with the application.
A notification notification will display a notification in the notification area, but only if the application is minimized. When a user tapes it, it will open the application activity selected in advance (when sending) and pass extra parameters to the bundle.
A notification with a payload requires a pair of services in the application to which control is transferred, but for a duration of no longer than 10 seconds.
The following is an example of a service that is responsible for generating the client ID.
And an example of a code for a service that receives messages. The application must be running, or hanging in the background, otherwise the reception of messages is not guaranteed. Some shells, for example MIUI, for the sake of economy, cut everything in a row, including privileges of background services.
do not forget to register services in the manifest.
The client ID is generated on the device, but you yourself choose the method of delivering this ID to your server.
Now you can test by sending a test message from the console.
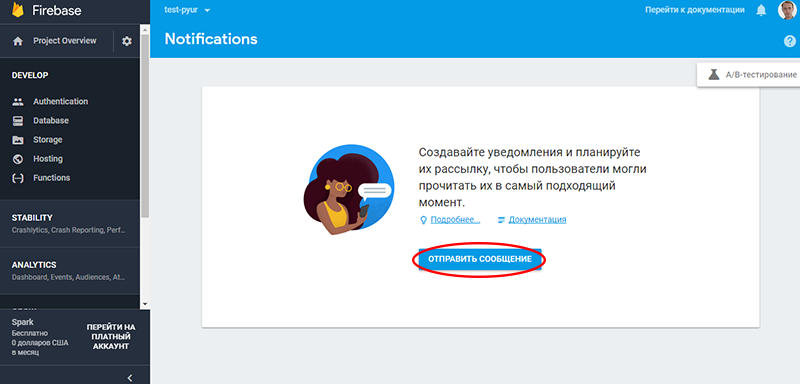

There are several ways to communicate with the Firebase server. We will look at two ways to exchange using the HTTP protocol.
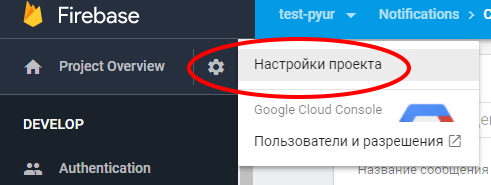
You will need a key. Click on the nut, select "Project Settings".
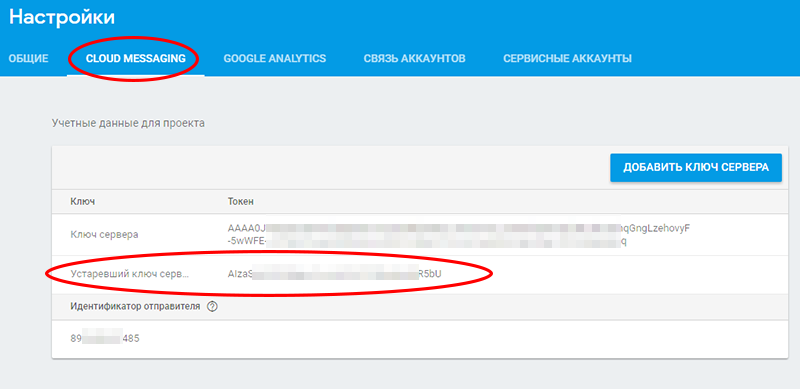
Cloud Messaging Tab
Copy the "Outdated Server Key".
Here in the field “to” you need to substitute the client ID. In the http header, "Authorization: key =" substitute "Deprecated server key."
(source: developers.google.com/identity/protocols/OAuth2ServiceAccount )
Do not ask why the second version of the protocol is called V1, apparently the first was considered a beta and had a zero number.
I did not go into details, but as I understand it, this protocol is more universal and has more features than just sending notifications.
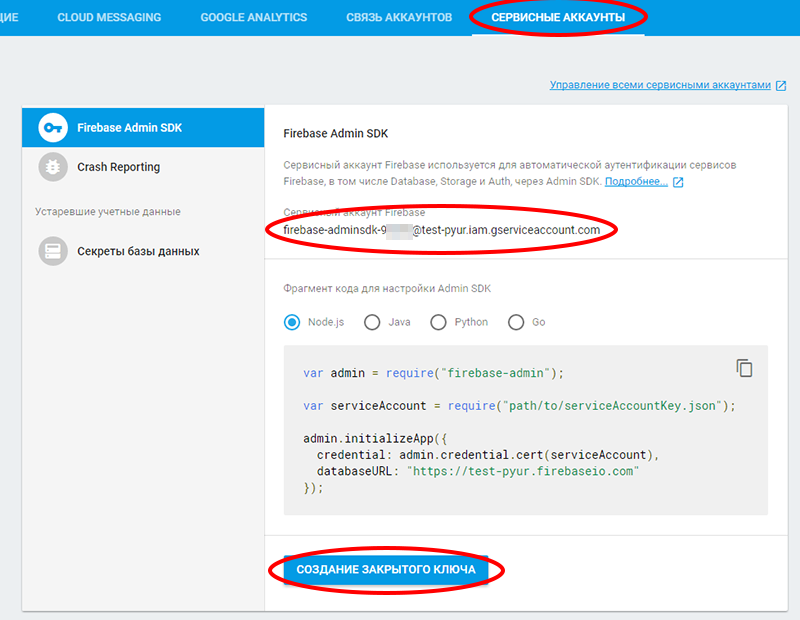
at console.firebase.google.com/project/poject-id/settings/serviceaccounts/adminsdk you need to copy the "Firebase service account" and substitute it into the variable "$ JWT_claim_set", in the field "iss".
Click "Create Private Key"
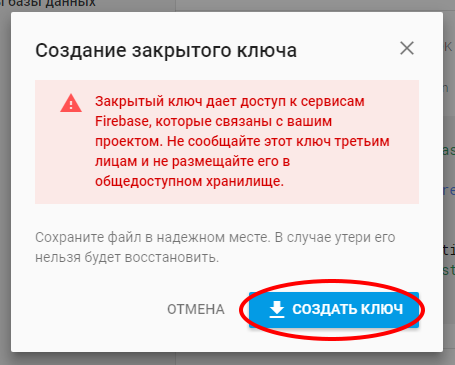
Create a key, save, do not show it to anyone. The downloaded file will contain the "Private Key", we substitute it into the variable "$ private_key".
Hint: the token obtained in steps 1 and 2 can and should be cached in a local temporary storage, for example, a file, or a database. And only after the time has passed (by default, one hour), request the next token from the authorization server.

Important! Before using the Modern Http API, you must explicitly enable its use here:console.developers.google.com/apis/library/fcm.googleapis.com/?project=your-project
sound is either “default” or the name of the resource in the application. Must be located in "/ res / raw /". Format MP3, AAC or something else suitable.
icon - changes the notification icon. Must be stored in the "drawable" application. If absent, FCM will use the application icon (indicated as “launcher icon” in the application manifest).
tag - Should be used to group similar notifications. New notifications will be displayed on top of the existing ones with the same tag.
color - the color of the icon, set as "#rrggbb" (it didn’t work in MIUI)
click_action - the activated activity when the user clicks on the notification.
In the future, the API will probably change, be declared depricated, etc. Therefore, today I think it’s worth doing right away on the HTTP v1 protocol.
It will be interesting for me to read the original ways of using notifications in the comments, in addition to new messages from VKontakte. For example, I have configured monitoring of arduino fans, and if they stop, a notification is sent.
Yes, I am aware that there is Zabbix, etc., but the topic of the article is home servers, and other smart homes. I think enterprise-class systems are overkill in amateur crafts.
In general, it is dedicated to all those who have long wanted to send notifications from their home server to their smartphone, but did not know where to start.
A bit of history. In the beginning (from the version of android 2.2), Google used the C2DM system (Android Cloud to Device Messaging) for delivery, starting in June 2012 they began to suggest using GCM (Google cloud messaging) for this.
Currently, the universal Firebase platform is used , which, in addition to delivering notifications, has many other features. Firebase has also evolved and the first generation protocol is already considered obsolete and it is recommended to use the second generation protocol for message delivery.
Technically, notifications are sent from the server not directly to the smartphone, but to a certain intermediate server on which, if necessary, they are stored for up to 4 weeks (configurable), and if possible are sent to the recipient. Those. if the smartphone is offline, the server is waiting. As soon as the opportunity arises - sends.
1. Register in Firebase
To register with Firebase, you need Google account.
Click "Go to console."
Then "Add Project."
Enter the name of the project. I recommend in the range of 8-16 characters.
Choose a country. Click "Create Project."
2. Configure Firebase
Scroll to the “Notifications” block, click “Start”.
You will be prompted to select the application for which your notifications will be sent.
Steps for the Andriod application:
Step 1 - Enter the name of the project on Andriod.
Click "Register application."
Step 2 - Click "Download google-services.com".
Add the downloaded configuration file to the project, next to the build.gradle file (the one that is personal to the application).
Click "Continue."
Step 3 - Add dependencies to the project.
to the file /build.gradle line
classpath 'com.google.gms: google-services: 3.1.0'
to the file /
apply plugin: 'com.google.gms.google-services'
That's all, click Finish.
3. Setting up the Android application to receive notifications.
Important note: some shells, such as MIUI, can block notifications if the application is not running or does not hang in the background. This is allegedly done to save battery power.
Roughly speaking, you can send two types of notifications:
- notification on request,
- notification with a payload.
They have different ways of interacting with the application.
A notification notification will display a notification in the notification area, but only if the application is minimized. When a user tapes it, it will open the application activity selected in advance (when sending) and pass extra parameters to the bundle.
A notification with a payload requires a pair of services in the application to which control is transferred, but for a duration of no longer than 10 seconds.
The following is an example of a service that is responsible for generating the client ID.
package ru.pyur.loga;
import android.util.Log;
import com.google.firebase.iid.FirebaseInstanceId;
import com.google.firebase.iid.FirebaseInstanceIdService;
public class TestFirebaseInstanceIdService extends FirebaseInstanceIdService {
  public static final String TAG = "TestFbseInstIdSvc";
  @Override
  public void onTokenRefresh() {
    String refreshedToken = FirebaseInstanceId.getInstance().getToken();
    Log.d(TAG, "Refreshed token: " + refreshedToken);
    //~sendRegistrationToServer(refreshedToken);
  }
}
And an example of a code for a service that receives messages. The application must be running, or hanging in the background, otherwise the reception of messages is not guaranteed. Some shells, for example MIUI, for the sake of economy, cut everything in a row, including privileges of background services.
package ru.pyur.loga;
import android.app.Notification;
import android.app.NotificationManager;
import android.content.Context;
import android.support.v4.app.NotificationCompat;
import android.util.Log;
import com.google.firebase.messaging.FirebaseMessagingService;
import com.google.firebase.messaging.RemoteMessage;
import static ru.pyur.loga.AcMain.context;
public class TestFirebaseMessagingService extends FirebaseMessagingService {
  public static final String TAG = "TestFbseMsgngSvc";
  @Override
  public void onMessageReceived(RemoteMessage remoteMessage) {
    Log.d(TAG, "From: " + remoteMessage.getFrom());
    if (remoteMessage.getData().size() > 0) {
      Log.d(TAG, "Message data payload: " + remoteMessage.getData());
      String val1 = remoteMessage.getData().get("val1");
      String val2 = remoteMessage.getData().get("val2");
      String val3 = remoteMessage.getData().get("val3");
      int color = (1<<16)|(1<<8)|(0);
      ShowNotification(val1, val2, color);
    }
    if (remoteMessage.getNotification() != null) {
      Log.d(TAG, "Message Notification Body: " + remoteMessage.getNotification().getBody());
    }
  }
  @Override
  public void onDeletedMessages() {
    // In some situations, FCM may not deliver a message. This occurs when there are too many messages (>100) pending for your app on a particular device
    // at the time it connects or if the device hasn't connected to FCM in more than one month. In these cases, you may receive a callback
    // to FirebaseMessagingService.onDeletedMessages() When the app instance receives this callback, it should perform a full sync with your app server.
    // If you haven't sent a message to the app on that device within the last 4 weeks, FCM won't call onDeletedMessages().
  }
  void ShowNotification(String title, String text, int color) {
    NotificationCompat.Builder mNotify = new NotificationCompat.Builder(context, "");
    mNotify.setLights(color, 100, 200);
    mNotify.setSmallIcon(R.drawable.service_icon);
    mNotify.setContentTitle(title);
    mNotify.setContentText(text);
    mNotify.setDefaults(Notification.DEFAULT_SOUND);
    NotificationManager mNotificationManager = (NotificationManager) getSystemService(Context.NOTIFICATION_SERVICE);
    int mId = 1001;
    try { mNotificationManager.notify(mId, mNotify.build()); }
    catch (Exception e) { e.printStackTrace(); }
  }
}
do not forget to register services in the manifest.
The client ID is generated on the device, but you yourself choose the method of delivering this ID to your server.
Now you can test by sending a test message from the console.
4. Send a notification from your server
There are several ways to communicate with the Firebase server. We will look at two ways to exchange using the HTTP protocol.
First Generation Protocol - Legacy HTTP
You will need a key. Click on the nut, select "Project Settings".
Cloud Messaging Tab
Copy the "Outdated Server Key".
'.$receive.'';
?>
Here in the field “to” you need to substitute the client ID. In the http header, "Authorization: key =" substitute "Deprecated server key."
Second Generation Protocol - (Modern) HTTP v1.
(source: developers.google.com/identity/protocols/OAuth2ServiceAccount )
Do not ask why the second version of the protocol is called V1, apparently the first was considered a beta and had a zero number.
I did not go into details, but as I understand it, this protocol is more universal and has more features than just sending notifications.
.iam.gserviceaccount.com",'.
'"scope":"https://www.googleapis.com/auth/firebase.messaging",'.
'"aud":"https://www.googleapis.com/oauth2/v4/token",'.
'"exp":'.($issue_time + 3600).','.
'"iat":'.$issue_time.'}');
// см. примечание
$private_key = '
-----BEGIN PRIVATE KEY-----
MIIEvQIBADANBgkqhkiG9w0BAQEFAASCBKcwggSjAgEAAoIBAQCwR1biSUCv4J4W
****************************************************************
****************************************************************
...
****************************************************************
teTJImCT6sg7go7toh2ODfaPmeI0nA/LwSjzWs0b8gdIYPT5fAsvfQiND0vu/M3V
7C/z/SmIKeIcfOYrcbWQwTs=
-----END PRIVATE KEY-----
';
$data = $JWT_header.'.'.$JWT_claim_set;
$binary_signature = '';
openssl_sign($data, $binary_signature, $private_key, 'SHA256');
$JWT_signature = base64_encode($binary_signature);
$JWT = $JWT_header.'.'.$JWT_claim_set.'.'.$JWT_signature;
// -- шаг 2. авторизируемся и получаем токен -- //
$socket = @fsockopen('ssl://www.googleapis.com', 443, $errno, $errstr, 10);
if (!$socket) die('error: remote host is unreachable.');
$payload = 'grant_type=urn%3Aietf%3Aparams%3Aoauth%3Agrant-type%3Ajwt-bearer&assertion='.rawurlencode($JWT);
$send = '';
$send .= 'POST /oauth2/v4/token HTTP/1.1'."\r\n";
$send .= 'Host: www.googleapis.com'."\r\n";
$send .= 'Connection: close'."\r\n";
$send .= 'Content-Type: application/x-www-form-urlencoded'."\r\n";
$send .= 'Content-Length: '.strlen($payload)."\r\n";
$send .= "\r\n";
$send .= $payload;
$result = fwrite($socket, $send);
$receive = '';
while (!feof($socket)) $receive .= fread($socket, 8192);
fclose($socket);
echo ''.$receive.'
';
// -- parse answer JSON (lame) -- //
$line = explode("\r\n", $receive);
if ($line[0] != 'HTTP/1.1 200 OK') die($line[0]);
$pos = FALSE;
if (($pos = strpos($receive, "\r\n\r\n", 0)) !== FALSE ) {
if (($pos = strpos($receive, "{", $pos+4)) !== FALSE ) {
if (($pose = strpos($receive, "}", $pos+1)) !== FALSE ) {
$post = substr($receive, $pos, ($pose - $pos+1) );
$aw = json_decode($post, TRUE);
$access_token = $aw['access_token'];
}
else die('} not found.');
}
else die('{ not found.');
}
else die('\r\n\r\n not found.');
// -- шаг 3. отправляем запрос на Firebase сервер -- //
$socket = @fsockopen('ssl://fcm.googleapis.com', 443, $errno, $errstr, 10);
if (!$socket) die('error: remote host is unreachable.');
$payload = '{
"message":{
"token" : "cGAFgPJGf-s:APA91bF**...**aEVM17c9peqZ",
"notification" : {
"title" : "Заголовок сообщения",
"body" : "(Modern API) Моё первое сообщение через Firebase!"
}
}
}';
// или
$payload = '{
"message": {
"token" : "cGAFgPJGf-s:APA91bF**...**aEVM17c9peqZ",
"data":{
"val1" : "Заголовок сообщения",
"val2" : "(Modern API) Моё первое сообщение через Firebase!",
"val3" : "дополнительные данные"
}
}
}';
$send = '';
$send .= 'POST /v1/projects/pyur-test-id/messages:send HTTP/1.1'."\r\n";
$send .= 'Host: fcm.googleapis.com'."\r\n";
$send .= 'Connection: close'."\r\n";
$send .= 'Content-Type: application/json'."\r\n";
$send .= 'Authorization: Bearer '.$access_token."\r\n";
$send .= 'Content-Length: '.strlen($payload)."\r\n";
$send .= "\r\n";
$send .=$payload;
$result = fwrite($socket, $send);
$receive = '';
while (!feof($socket)) $receive .= fread($socket, 8192);
fclose($socket);
echo ''.$receive.'
';
?>
at console.firebase.google.com/project/poject-id/settings/serviceaccounts/adminsdk you need to copy the "Firebase service account" and substitute it into the variable "$ JWT_claim_set", in the field "iss".
Click "Create Private Key"
Create a key, save, do not show it to anyone. The downloaded file will contain the "Private Key", we substitute it into the variable "$ private_key".
Hint: the token obtained in steps 1 and 2 can and should be cached in a local temporary storage, for example, a file, or a database. And only after the time has passed (by default, one hour), request the next token from the authorization server.
Important! Before using the Modern Http API, you must explicitly enable its use here:console.developers.google.com/apis/library/fcm.googleapis.com/?project=your-project
Bonus, additional options for notifications:
sound is either “default” or the name of the resource in the application. Must be located in "/ res / raw /". Format MP3, AAC or something else suitable.
icon - changes the notification icon. Must be stored in the "drawable" application. If absent, FCM will use the application icon (indicated as “launcher icon” in the application manifest).
tag - Should be used to group similar notifications. New notifications will be displayed on top of the existing ones with the same tag.
color - the color of the icon, set as "#rrggbb" (it didn’t work in MIUI)
click_action - the activated activity when the user clicks on the notification.
Conclusion
In the future, the API will probably change, be declared depricated, etc. Therefore, today I think it’s worth doing right away on the HTTP v1 protocol.
It will be interesting for me to read the original ways of using notifications in the comments, in addition to new messages from VKontakte. For example, I have configured monitoring of arduino fans, and if they stop, a notification is sent.
Yes, I am aware that there is Zabbix, etc., but the topic of the article is home servers, and other smart homes. I think enterprise-class systems are overkill in amateur crafts.