Git bottom up
- Transfer
This translation is not a very common story. Version control systems are far from my professional interests. I didn’t need them often for working projects, moreover, they were different, so every time such a need arose, I again recalled how this or that operation is being done in them. And for personal projects, I had enough Dropbox capabilities, which stores the version history of files.
Twitter image @girlie_mac
But once I went to a maternity hospital for three unforgettable days - this sometimes happens to women. For entertainment, I had a newborn daughter and a large-screen telephone. At first, the daughter entertained poorly (she quickly corrected herself at home), and in addition to books and films, the text “Git from the bottom up” appeared on the phone, which turned out to be more than suitable ... Since then, almost 3 years have passed,it’s time for my daughter to start using Git herself. Git has become mainstream, if not the standard in modern development, and I was surprised to find that there is still no translation into Russian of this miracle, useful not only for beginners, but also for advanced Git users. Correcting this situation.
Welcome to the world of git. While looking from the outside, Git’s abundance of features seems confusing, when viewed from the bottom up, Git is beautiful and simple. I hope this document helps you deal with this powerful version control system.
And we will start with a list of terms found in the text and necessary for its understanding.
Interaction with Git usually looks like this:
After creating the repository, the work happens in the working tree. As soon as a significant milestone is reached - elimination of the bug; end of the working day; the moment when, at last, everything starts to compile - you add your changes to the index. As soon as everything that you are going to commit appears in the index, you write its contents to the repository. The diagram below shows a typical project life cycle:

Now let's see how each of the entities shown in the picture works in git
As follows from the definitions above, what Git does is elementary: it contains snapshots of the contents of the directory. Most of its internal design can be understood in terms of this core task.
The design of the Git repository in many ways reproduces the UNIX file system. The file system begins with a root directory, which usually consists of other directories, many of which have leaf nodes, i.e. files containing data. File metadata is stored both in a directory (names) and in i-nodes that refer to the contents of these files (size, type, access permissions, etc.). Each i-node has a unique number that identifies the contents of the corresponding file. Although there may be many objects in a directory pointing to a particular i-node (ie hard links), it is the i-node that owns the content stored in your file system.
The internal architecture of Git has a strikingly similar structure with one slight difference.
It all starts with the fact that Git presents the contents of your files as so-called “blobs”, which are leaf nodes in a structure very similar to a directory and called a tree. Just as an i-node is uniquely identified by a number assigned to it by a system, a fragment in Git is marked by calculating the SHA-1 hash of its size and content. For all conceivable applications, this is just an arbitrary number, like the i-node, with the exception of two additional properties: firstly, it controls the immutability of the fragment content, and secondly, it guarantees that the same content will always be represented by the same the same fragment no matter where it appears - in different commits, repositories, or even in different parts of the Internet. If multiple trees refer to the same fragment,
The difference between a file in the file system and a fragment in Git is that the fragment itself does not store metadata about its contents. All this information is stored in the tree to which the fragment belongs. One tree may consider this content as a “foo” file created in August 2004, while another tree may know the same contents under the file name “bar” created five years later. In a normal file system, such two files with matching contents but different metadata will always be presented as two independent files.
What caused this difference? Basically, the fact that the file system is designed to support changing files, but Git does not. It is because of the immutability of the data in the repository that Git needed a new design. And, as it turned out, this design made it possible to store more compactly - after all, all objects with identical contents will be shared regardless of their location.
Now that the overall picture is drawn, let's look at practical examples. Let's create a test repository and show how Git works in it from the bottom. ( translator's note - all examples of this text are checked on git version 2.13.0.windows.1 )
Here I created a new sample directory containing a file with prosaically predictable content. So far I have not even created a repository, but I can already start using some Git commands to understand what it is going to do. First, I want to find out under what hash Git will store my greeting
When you run this command on your system, you will receive the same hash identifier ( translator's note: hereinafter in the text - the hash id ). Despite the fact that we are creating two different repositories (possibly in different parts of the world), our fragments with greetings will have the same hash id.
I can even get commits from your repository into mine, and Git will understand that we are tracking the same content and, accordingly, will only store one copy of it.
The next step is to initialize the new repository and commit to it:
At this stage, our fragment should be in the system and use, as we expected, the id hash defined above. For convenience, Git only requires the initial hash digits that uniquely identify the fragment in the repository. Usually 6 or 7 digits is enough for this.
Here it is! I did not even look at which commit or tree it was in, but based solely on the content, I was able to assume that it was there, and I was not mistaken. This content will have the same identifier regardless of the lifetime of the repository or the location of the file in it. That is, the data is guaranteed to be saved forever.
Thus, a fragment is a fundamental unit of data in Git. In fact, the whole system is just fragment management.
The unique contents of your files are stored in fragments, but these fragments themselves are completely faceless. They have neither a name, nor a structure, fragments - they are fragments. Therefore, to represent the structure and names of your files, Git attaches fragments as nodes - “leaves” to the tree.
Now I can’t find out which tree (s) the fragment belongs to, since it can have a lot of owners. But I know that it definitely should be somewhere in the tree owned by the commit I just created.
That is, this first commit, which added my greeting file to the repository, contains one tree with a single leaf: a fragment with a greeting.
Although I can look at the tree containing my fragment using the ls-tree HEAD command , I have not yet seen the basic object of the tree that this commit refers to.
Here are a few more commands to highlight this difference and explore my tree:
The first command decodes the HEAD header into the commit to which it refers, the second checks its type, and the third shows the hash id of the tree owned by the commit, as well as other information stored in the commit. The commit id hash is unique for my repository, since it includes my name and the commit date, but the tree id hash should be the same for my and your examples, since it contains the same fragment under the same name.
Make sure that this is indeed the same object:
That is, my repository contains a single commit that references a tree containing a fragment with what I want to write.
Here is another command I can use to confirm this:
This shows that my entire repository contains 3 objects, the id hash of which we have already seen in the previous examples. Let's just take a final look at the types of these objects out of curiosity:
I could also use the show command to view a summary of each of these objects, but I will leave this exercise to readers.
Each commit contains a single tree. But how are trees formed? We know that fragments are created by “slicing” the contents of your file, and that the trees own fragments, but we have not yet seen how these trees are formed and how the trees bind to their parent commits.
Let's start with the new repository again, but this time we'll do it manually.
It all starts with adding a file to the index. For now, you can assume that the index is what you use to initially create fragments from files. When I added the greeting file , changes occurred in my repository. Although this is not a commit yet, there is a way to look at them:
What is it? There are no commits yet, but the object already exists. It has the same id hash from which I started this whole enterprise, so I know that it represents the contents of the greeting file . I could use the git cat-file -t command for this hash id, and I would see that this is a fragment - the same one that I received the first time I created this repository (who would doubt it).
Neither the tree nor the commits are yet referencing this fragment. So far, a link to it is only in the .git / index file containing links to fragments and trees that actually form the current index. And now let's create a tree in the repository, on which fragments will hang:
A familiar number, isn't it? A tree containing the same fragments (and sub-trees) will always have the same hash. Although I still do not have a commit object, but in this repository there is a tree object containing fragments. The goal of the low-level write-tree command is to take the contents of the index and place it in a new tree to further create the commit.
A new commit object can be created manually using this tree directly. This is exactly what the commit-tree command does : it takes the hash of the tree id and creates a commit object for it. If I wanted the commit to have a parent object, I would have to specify it explicitly using the -p switch.
Note that the resulting hash id is different from the one that will turn out on your system because the commit refers to my name and the time it was created, and these details will always be different from yours.
But the work does not end there - I have not yet registered the commit as a new header for the current branch:
This command tells Git that the master branch should now reference this commit.
Another, safer way to achieve the same goal is to use the update-ref command :
After creating the master branch , we need to bind our tree to it. This usually happens when you switch the branch:
This command creates a symlink HEAD to the master branch . This is very important, since all further commits from the working tree will now automatically update the value of refs / heads / master .
It's hard to believe it's that simple, but now I can use the log command to view my freshly created commit.
I note that if I did not make refs / heads / master point to a new commit, it could be considered inaccessible - since no one refers to it, and it is not the parent of another accessible commit. In this case, the commit object will someday be deleted from the repository along with its tree and all fragments (this happens automatically with the “gc” command, which is rarely used by Git users manually). When binding a commit with a name in refs / heads , as we did above, it becomes available, which guarantees its further preservation of Git.
Some version control systems make branches magical, often distinguishing them from the main development line, while others discuss the concept of branching as if it is very different from commits. But in Git, branches are not a separate entity - there are exclusively fragments, trees and commits (well, tags, but they are just links to commits, so they can be ignored) Since a commit can have one or more parents, and these commits in turn, they can belong to their parents, we can consider a single commit as a branch - after all, he knows his whole “pedigree”.
You can see all top-level commits at any time using the branch command
Repeat after me: A branch is just a named link to a commit.
Branches and tags are identical with the only exception - tags can have their own descriptions - like the commits to which they refer. Branches are just names, and tags are descriptions, you can say labels.
In truth, we do not have a real need to use these “entity-pseudonyms”. For example, if I wanted, I could refer to any repository object using only the hash id of its commits.
Here, for example, is a command that reloads the NOTAD of my working tree to a given commit;
The --hard switch causes the deletion of all current changes in my working tree, regardless of whether they were registered for future placement in the repository (we will talk about this command below).
A safer way to jump to a specific commit is to use the checkout command :
The difference with the previous command is that the files modified in my working tree are saved. If I add the -f switch to checkout , the command will act in the same way as reset -hard , except that checkout only changes the working tree, and reset -hard also changes the HEAD of the current branch so that it points to the specified version of the tree.
Another advantage of a system based on commits is the ability to rephrase the terms of even the most complex version control systems in a simple language. For example, if a commit has several parents, then this is a merged commit. Or, if the commit has several descendants, then it represents the ancestor of the branch, and so on. But for Git, there is no difference between these entities; for it, the world is just a set of commits, each of which contains a tree that references other trees and fragments that store your data. Anything more complicated than that is just a symbol system.
Here is an illustration of how it all works:

Understanding commits is key to comprehending Git. You will understand that you have reached enlightenment when your mind will contain only topologies of commits, and not a mishmash of branches, tags, local and remote repositories, etc. I hope that this understanding will not require you to cut off your hands (as the second follower of the Zen teachings did), although I would appreciate if by that moment you had such a desire.
If commits are the key, then their names are the door to mastery. There are so many ways to name commits, commit groups, and even some of the objects contained in commits that are supported by most Git commands. Here is a summary of the main ones:
Most of these options can be combined. Here is an example showing how to get information about all the changes of the current branch (spun off from master) that I made in the last month and containing the text “foo”.
One of the most effective commands for working with commits is a command with the unassuming name rebase . It works like this: each existing branch in Git has one or more "basic commits" - those from which it originated. Let's take an example of the following typical scenario (in the figure below). Here, the arrows show back in time since each commit refers to its parent (s), but not descendants. Therefore, D and Z are the headers of their branches.

You can verify this with the command
And in the details:
You need to get used to this kind of notation, but, in essence, this is just a description of the diagram above. ( Translator's note: pay attention to the gaps in the record, they matter - divide the output into columns )
And here's what it tells us:
Our current branch was split for the first time at commit A (also known as commit
D ~ 3, and even Z ~ 4 if you like it better. For those who skipped the table above, let me remind you that the commit ^ syntax is used to indicate the parent of the commit, and commit ~ 3 is its third-level ancestor, that is, great-grandfather.
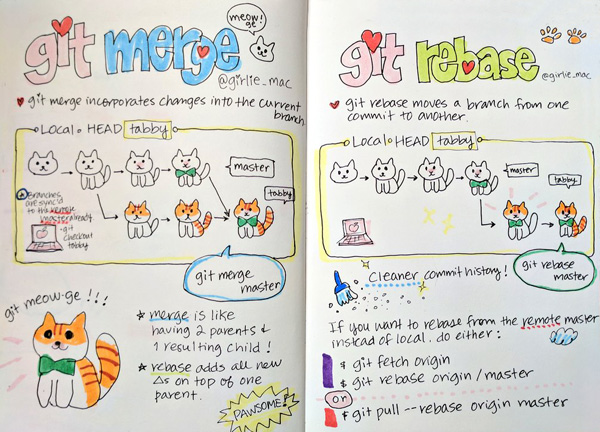
Now we need to bring the working branch Z in line with the main D. That is, include the work done in B, C, and D in Z. In other version control systems, such things are done exclusively through branch merge . Git also has a merge option. It is implemented by the merge team and is applied when Z is a published branch, and we do not want to change its commit history. Here are the commands necessary for this:
Now the repository will look like this:

If we now select the Z branch, it will contain everything that was there before, combined with the contents of D (here the translator sighs heavily: a real merge operation would require resolving conflicts between states D and Z) .
Although the new Z now contains changes from D, it also includes a new commit Z ', which is a merger of Z and D. It does not add anything new, but it represents the work of combining Z and D. In a sense, this is “meta -commit ”because its contents refer exclusively to the dimensions of the repository, and not to new work done in the working tree.
But Git has a method of transplanting Z directly into D, actually moving Z in time - using the powerful rebase command. Here is the graph we want to get as a result:

That is, our local development branch Z should be based on the last state of the main branch D. That is why the command is called rebase - it changes the basic commit of the branch from which it is called. If you call it several times, you can make an unlimited number of changes, while remaining in accordance with the main development branch, but without adding unnecessary merge commits to your development branch.
Here are the commands needed to perform the above operation with rebase - compare them using the merge above:
Although, in some situations, merge is preferable to rebase .
Rebase has a drawback - even if the rebased working tree is compiled, this does not guarantee that intermediate commits will be compiled, since they never compiled in their rebased state. If historical code validity is important to you, choose merge.
Note that with every rebase, you potentially change every commit in a branch. Previously, when W was based on A, it contained only the changes needed to convert A to W, and after rebasing it would contain the changes needed to convert D to W '. Even the conversions from W to X will change, since A + W + X now looks like D + W '+ X' and so on. Note that so far I have emphasized that the Z branch is local. If it was a branch whose changes are visible publicly, and someone spawned their local branches from Z, now their branches will point to the old Z, and not to the new Z '.
You can usually use the following simple rule - use rebase for local branches that do not have children, and for all other cases - merge. Merge will also be useful when you want to revert your local changes to the main development branch.
When using rebase above, it automatically rewrote all the commits from W to Z, in order to rebase branch Z to commit D (to the header commit of branch D). However, you can fully control what is happening manually. If you specify the -i switch for rebase, you can choose what will be done for each commit in the local branch Z.
The selection is made from the following options.
The full power of the rebase command is hard to appreciate at a glance, but it gives you virtually unlimited control over the look of each code branch. You can use rebase to:
In general, I would recommend you read the rebase manual , it contains some good examples of using the full power of this command. Here is a final example demonstrating the super-features of rebase .
Imagine the following scenario and think about what you would do if one day you would like auxiliary branch I to become the new heading Z:

That is, we have the main development line - D, which was branched three commits back to start the hypothetical development of Z. At some point in the middle of this process, when C and X were still the headings of their respective branches, we decided to start another the research branch, which eventually produced L. After which we found that the code in L is good, but not enough to pour it back into the main development line of D, so we decided to move the changes to the Z branch so that all changes are there . But in the process, we realize that it is necessary to quickly correct J, since there is a wrong year in copyright. Here are the commands needed to unravel this node:
After resolving possible conflicts (here the translator sighs heavily again) , the repository will look like this:

Between your files stored in the file system and the Git fragments stored in the repository, there is a somewhat mysterious entity - the Git index. It is not easy to understand, partly because he was not lucky with the name. This is an index in the sense that it refers to a set of new trees and fragments that you created using the add command. These new objects may soon be merged into a new tree to commit to your repository. But until then, only the index refers to them. This means that if you check out changes in the index using reset, then your fragments will be actually lost and subsequently deleted. An index is just a preparation area for your next commit, and there is a good reason for it to exist: it supports a development model,

But at the same time, there is a way to almost completely ignore the index - by passing the -a switch to the commit command. Let's see how, for example, another version control system, Subversion, works.
It has the svn status command , which lists the actions that will be applied to your repository the next time svn commit is called . This "list of next steps" is in some way an informal index, determined by comparing the state of your working tree with the state of HEAD. If any file has been modified, the next commit will save the changes. If the question mark is next to the file name in this list, it will be ignored, and the new file added using svn add will be placed in the repository.
This is exactly what happens when you use the commit -a command in Git : new unknown files are ignored, and new ones added to the add command get into the repository, just like any changes to existing files.
This action is almost identical to what Subversion does , with one exception: in the case of Subversion, the “list of next steps” is always determined by the current working tree, and in Git this sheet represents the contents of the index, that is, what will become the next HEAD state. Such preliminary preparation of changes gives you an additional level of control - the ability to influence what happens during the subsequent execution of commit .
If this is still not entirely clear, then let's look at the following example: suppose you have the source file foo.c, in which you made two sets of independent changes. And now you want to split these changes into 2 separate commits, each with its own description. Here's how to do it in Subversion :
Really fun? Now repeat these operations multiple times for a complex dynamic set of changes.
And now a version of the same operation for Git using an index:
One of the most difficult commands to master in Git is reset - it usually confuses more than other commands. Which is understandable, given the ability to reset to change both your working tree and the current HEAD. So it will be useful to give here a brief overview of the work of this team.
We can say that reset is an editor of links, index and working tree. So many things - no wonder and get confused. Let's look at the difference between these three modes and how they fit into the Git commit model.
If you use the --mixed option (or do not use the options at all, since mixed is the default), reset will return your index and HEAD to the state of the selected commit. The main difference between this option and -soft is that -soft only changes the HEAD value without affecting the index.
Using the -soft reset option is equivalent to simply moving HEAD to another commit. There are no changes in the working tree. This means the equivalence of the following two commands:
In both cases, your working tree now matches the previous HEAD state, so if you run git status , you will see more changes. And this is not a real change in your files, but simply a reflection of the fact that they are now being compared with previous versions. This gives you the chance to create a new commit instead of the old one.
It should be mentioned here that if you want to change the most recently selected commit, then for this there is a commit -amend command that adds your latest changes to the last commit as if you made them there initially.
But please note: if your project has external users and they did something on top of your previous HEAD, the one you dropped with reset, then this will lead to automatic merge ( merge ) after users take the new version of the project.
Here is what your tree will look like after a soft reset and a new commit:

And here is what your users' HEAD will look like after they take the new version - the colors in the picture show the correspondence of different commits:

The --hard option of the reset command is a potentially dangerous thing, because if you hard reset the current HEAD, it will erase all changes in your working tree so that your current files will correspond to the contents of HEAD.
There is another command - checkout , which acts the same as reset --hard, but only if the index is empty. Otherwise, it brings your working tree in accordance with the index.
Now, if you do a hard reset before some early commit, then this will be equivalent to using first reset --soft , and then reset -hard to reboot your working tree. That is, the following commands are equivalent:
As you can see, hard reset can be very destructive. Fortunately, there is a safer way to achieve the same effect - using git stash (see next section)
This approach has two significant advantages when you are not sure that you really want to radically change the current branch:
If you make changes to the new branch new-branch and then decide that it should become your new master, then you need to run the following commands:
The moral of this section is this: although you can make significant operational interventions in your current branch using reset --soft and reset --hard (which also modifies the working tree), I see no reason why this should be done. Git makes branching so simple and cheap that it is almost always worth making your destructive changes in a new branch and then moving it so that it takes the place of your old master. This is the true wisdom of the Jedi!
But what if you accidentally reset -hard , losing not only your current changes, but also the commits from your master? If you did not use stash to take snapshots of the state (see the next section), then your working tree is lost forever.
The only thing you can do is restore your branch to its previous state using reflog (also described in the next section):
Git work safety requires stash before reset -hard . This will subsequently protect you from the appearance of gray hair. If you used stash , then you can use it to restore your working tree as follows:
So far, we have described two segments of the way in which fragments get into Git: first they are created in the index, without the parent tree and their own commit, and then they are committed to the repository, where they exist as leaves hanging on the tree contained in this commit.
But it turns out that there are two more places where fragments stay in your repository. The first is Git reflog, a meta repository that writes all changes to your repository in the form of commits. This means that when you create a tree from your index and save it in a commit (the commit command does all this ), you also quietly add this commit to reflog, which you can see using the following command:
The beauty of reflog is that it saves data regardless of other changes in your repository. This means that I can untie any commit from my repository (using reset ), but the link to it will remain in the reflog for another 30 days, protecting it from automatic "garbage collection". Which gives me a month for a possible restoration of the commit, if such a need suddenly arises.
The second place where fragments exist, although indirect, is the working tree itself. And that’s what I mean. If you, for example, changed the file foo.c but didn’t add these changes to the index yet, Git might not have created fragments yet, but these changes already exist, because the new contents of the file exist. Only it is in the file system, not in the Git repository. Despite the fact that there are no real fragments there, the file even has its own SHA1 hash id, which can be viewed like this:
What is the use of this for you? Suppose that at the end of a hard working day, you stop at a completely clouded working tree. Then a good habit to postpone your changes in the stash: ( approx .: pens one of the most interesting options for translation of the word stash into Russian - "zanykat." )
This command will take all the contents of your directory, including both the working tree and the contents of the index, and create for them: fragments in the repository, a tree containing these fragments, as well as a couple of stash commits for the working tree and index. The time you call stash will also be recorded.
The next day, you simply pull your changes from stash using stash apply , but you still have a reflog of all pending changes.
Here is what you will do when you come to work the next morning (here WIP stands for “Work in Progress” - “We Work ...”:
Since your working tree stored in stash was stored in a commit, you can work with it in the same way as with any code branch at any time. This means that you can look at the log, see what you saved and select any of your previous working trees from the moment they were saved:
The last command is especially powerful: look, I just got at my disposal a work tree that has not been included in any commits for more than a month! I never added these files to the index, I just used a simple trick: calling stash before logging out every day in the evening (of course, only if I made any changes to my working tree), and the corresponding call to stash apply with each new login.
If you want to clean your stash - say, to store there only actions for the last 30 days, do not use stash clear, use the reflog expire command instead
That is, stash allows you to use invisible version control with respect to the workflow itself - the different states of your work tree every day. If you wish, you can even use stash on a regular basis, using the following script (Unix OS):
And I see no reason not to run this script automatically every hour, and every week - the reflog expire command
Over the years, I have used many version control systems and backup schemes. All of them included a means of obtaining the previous contents of the file. Many of them could show how the file changed over time. Many allowed returning back in time and starting an alternative line of development, and subsequently connecting this new line with the current one. A much smaller number of them allowed fine control over this process, allowing you to decide which parts you want to make public. Git can do all of these things, and is relatively simple - once you understand its basics.
This is not the only system with a similar set of features, and it cannot be said that it always provides a better interface to them. But what Git does is a great foundation for the job. I can introduce many new systems that will be developed in the future to leverage the flexibility provided by Git.
Most of the other systems I know left a feeling of reaching their conceptual plateau - that is, that all their further development will come down to slow improvements already seen before. Git gives me the exact opposite impression. It seems to me that we have just begun to reveal the potential possibilities of its deceptively simple design.
From translator. The original text was written in 2009. Although I have been using git constantly lately and even have my own repository on GitHub, alas, I don’t know if the author’s prediction about the further development of Git has since been fulfilled. Do you know? This is, by the way, a great topic for discussion in the comments.
Twitter image @girlie_mac
But once I went to a maternity hospital for three unforgettable days - this sometimes happens to women. For entertainment, I had a newborn daughter and a large-screen telephone. At first, the daughter entertained poorly (she quickly corrected herself at home), and in addition to books and films, the text “Git from the bottom up” appeared on the phone, which turned out to be more than suitable ... Since then, almost 3 years have passed,
Welcome to the world of git. While looking from the outside, Git’s abundance of features seems confusing, when viewed from the bottom up, Git is beautiful and simple. I hope this document helps you deal with this powerful version control system.
And we will start with a list of terms found in the text and necessary for its understanding.
- Working tree - Any directory in your file system associated with the repository (which can be seen by the presence of the “.git” subdirectory in it). Includes all files and subdirectories.
- Commit (Commit) . In the role of a noun: a “snapshot” of a working tree at some point in time. In the role of the verb: commit (commit) - add a commit to the repository .
- Repository is a set of commits , i.e. just an archive of past states of the project working tree on your or someone else's machine.
- A Branch is simply a name for a commit , also called a reference . Defines the origin - the "pedigree" of the commit , and thus is a typical representation of the "development branch"
- Checkout - operation of switching between branches or restoring working tree files
- The Tag is also a name for a commit , which differs from a branch in that it always constantly points to the same commit , and may also have its own text description
- Master (Master) . Conditionally, the "main" or "main" branch of the repository , but essentially no different from other branches
- Index (the Index) . Unlike other similar tools, Git does not push changes from the working tree to the repository directly. Instead, changes are first recorded in the index , or “staging area”. This can be seen as a way to "confirm" your changes before committing to commit , which will record in a repository all the approved changes.
- HEAD is the header. Used by the repository to determine what is selected with checkout.
- If the subject of checkout is a branch, then HEAD will refer to it, indicating that the branch name should be updated during the next commit
- If the subject of checkout is a commit, then HEAD will only refer to it. In this case, HEAD is called detached.
Interaction with Git usually looks like this:
After creating the repository, the work happens in the working tree. As soon as a significant milestone is reached - elimination of the bug; end of the working day; the moment when, at last, everything starts to compile - you add your changes to the index. As soon as everything that you are going to commit appears in the index, you write its contents to the repository. The diagram below shows a typical project life cycle:
Now let's see how each of the entities shown in the picture works in git
Repository: tracking directory contents
As follows from the definitions above, what Git does is elementary: it contains snapshots of the contents of the directory. Most of its internal design can be understood in terms of this core task.
The design of the Git repository in many ways reproduces the UNIX file system. The file system begins with a root directory, which usually consists of other directories, many of which have leaf nodes, i.e. files containing data. File metadata is stored both in a directory (names) and in i-nodes that refer to the contents of these files (size, type, access permissions, etc.). Each i-node has a unique number that identifies the contents of the corresponding file. Although there may be many objects in a directory pointing to a particular i-node (ie hard links), it is the i-node that owns the content stored in your file system.
The internal architecture of Git has a strikingly similar structure with one slight difference.
It all starts with the fact that Git presents the contents of your files as so-called “blobs”, which are leaf nodes in a structure very similar to a directory and called a tree. Just as an i-node is uniquely identified by a number assigned to it by a system, a fragment in Git is marked by calculating the SHA-1 hash of its size and content. For all conceivable applications, this is just an arbitrary number, like the i-node, with the exception of two additional properties: firstly, it controls the immutability of the fragment content, and secondly, it guarantees that the same content will always be represented by the same the same fragment no matter where it appears - in different commits, repositories, or even in different parts of the Internet. If multiple trees refer to the same fragment,
The difference between a file in the file system and a fragment in Git is that the fragment itself does not store metadata about its contents. All this information is stored in the tree to which the fragment belongs. One tree may consider this content as a “foo” file created in August 2004, while another tree may know the same contents under the file name “bar” created five years later. In a normal file system, such two files with matching contents but different metadata will always be presented as two independent files.
What caused this difference? Basically, the fact that the file system is designed to support changing files, but Git does not. It is because of the immutability of the data in the repository that Git needed a new design. And, as it turned out, this design made it possible to store more compactly - after all, all objects with identical contents will be shared regardless of their location.
Get to know the fragment
Now that the overall picture is drawn, let's look at practical examples. Let's create a test repository and show how Git works in it from the bottom. ( translator's note - all examples of this text are checked on git version 2.13.0.windows.1 )
$ mkdir sample; cd sample
$ echo 'Hello, world!' > greeting
Here I created a new sample directory containing a file with prosaically predictable content. So far I have not even created a repository, but I can already start using some Git commands to understand what it is going to do. First, I want to find out under what hash Git will store my greeting
$ git hash-object greeting
af5626b4a114abcb82d63db7c8082c3c4756e51b
When you run this command on your system, you will receive the same hash identifier ( translator's note: hereinafter in the text - the hash id ). Despite the fact that we are creating two different repositories (possibly in different parts of the world), our fragments with greetings will have the same hash id.
I can even get commits from your repository into mine, and Git will understand that we are tracking the same content and, accordingly, will only store one copy of it.
The next step is to initialize the new repository and commit to it:
$ git init
$ git add greeting
$ git commit -m "Added my greeting"
At this stage, our fragment should be in the system and use, as we expected, the id hash defined above. For convenience, Git only requires the initial hash digits that uniquely identify the fragment in the repository. Usually 6 or 7 digits is enough for this.
$ git cat-file -t af5626b
blob
$ git cat-file blob af5626b
Hello, world!
Here it is! I did not even look at which commit or tree it was in, but based solely on the content, I was able to assume that it was there, and I was not mistaken. This content will have the same identifier regardless of the lifetime of the repository or the location of the file in it. That is, the data is guaranteed to be saved forever.
Thus, a fragment is a fundamental unit of data in Git. In fact, the whole system is just fragment management.
Fragments are stored in trees.
The unique contents of your files are stored in fragments, but these fragments themselves are completely faceless. They have neither a name, nor a structure, fragments - they are fragments. Therefore, to represent the structure and names of your files, Git attaches fragments as nodes - “leaves” to the tree.
Now I can’t find out which tree (s) the fragment belongs to, since it can have a lot of owners. But I know that it definitely should be somewhere in the tree owned by the commit I just created.
$ git ls-tree HEAD
100644 blob af5626b4a114abcb82d63db7c8082c3c4756e51b greeting
That is, this first commit, which added my greeting file to the repository, contains one tree with a single leaf: a fragment with a greeting.
Although I can look at the tree containing my fragment using the ls-tree HEAD command , I have not yet seen the basic object of the tree that this commit refers to.
Here are a few more commands to highlight this difference and explore my tree:
$ git rev-parse HEAD
588483b99a46342501d99e3f10630cfc1219ea32 # отличается на вашей системе
$ git cat-file -t HEAD
commit
$ git cat-file commit HEAD
tree 0563f77d884e4f79ce95117e2d686d7d6e282887
author John Wiegley  1209512110 -0400
committer John Wiegley  1209512110 -0400
Added my greeting
The first command decodes the HEAD header into the commit to which it refers, the second checks its type, and the third shows the hash id of the tree owned by the commit, as well as other information stored in the commit. The commit id hash is unique for my repository, since it includes my name and the commit date, but the tree id hash should be the same for my and your examples, since it contains the same fragment under the same name.
Make sure that this is indeed the same object:
$ git ls-tree 0563f77
100644 blob af5626b4a114abcb82d63db7c8082c3c4756e51b greeting
That is, my repository contains a single commit that references a tree containing a fragment with what I want to write.
Here is another command I can use to confirm this:
$ find .git/objects -type f | sort
.git/objects/05/63f77d884e4f79ce95117e2d686d7d6e282887
.git/objects/58/8483b99a46342501d99e3f10630cfc1219ea32
.git/objects/af/5626b4a114abcb82d63db7c8082c3c4756e51b
This shows that my entire repository contains 3 objects, the id hash of which we have already seen in the previous examples. Let's just take a final look at the types of these objects out of curiosity:
$ git cat-file -t 588483b99a46342501d99e3f10630cfc1219ea32
commit
$ git cat-file -t 0563f77d884e4f79ce95117e2d686d7d6e282887
tree
$ git cat-file -t af5626b4a114abcb82d63db7c8082c3c4756e51b
blob
I could also use the show command to view a summary of each of these objects, but I will leave this exercise to readers.
How are trees formed?
Each commit contains a single tree. But how are trees formed? We know that fragments are created by “slicing” the contents of your file, and that the trees own fragments, but we have not yet seen how these trees are formed and how the trees bind to their parent commits.
Let's start with the new repository again, but this time we'll do it manually.
$ rm -fr greeting .git
$ echo 'Hello, world!' > greeting
$ git init
$ git add greeting
It all starts with adding a file to the index. For now, you can assume that the index is what you use to initially create fragments from files. When I added the greeting file , changes occurred in my repository. Although this is not a commit yet, there is a way to look at them:
$ git log  # не сработает -коммиты отсутствуют!
fatal: bad default revision 'HEAD'
$ git ls-files --stage # покажет фрагменты, на которые ссылается индекс
100644 af5626b4a114abcb82d63db7c8082c3c4756e51b 0 greeting
What is it? There are no commits yet, but the object already exists. It has the same id hash from which I started this whole enterprise, so I know that it represents the contents of the greeting file . I could use the git cat-file -t command for this hash id, and I would see that this is a fragment - the same one that I received the first time I created this repository (who would doubt it).
Neither the tree nor the commits are yet referencing this fragment. So far, a link to it is only in the .git / index file containing links to fragments and trees that actually form the current index. And now let's create a tree in the repository, on which fragments will hang:
$ git write-tree # записать содержимое индекса в дерево
0563f77d884e4f79ce95117e2d686d7d6e282887
A familiar number, isn't it? A tree containing the same fragments (and sub-trees) will always have the same hash. Although I still do not have a commit object, but in this repository there is a tree object containing fragments. The goal of the low-level write-tree command is to take the contents of the index and place it in a new tree to further create the commit.
A new commit object can be created manually using this tree directly. This is exactly what the commit-tree command does : it takes the hash of the tree id and creates a commit object for it. If I wanted the commit to have a parent object, I would have to specify it explicitly using the -p switch.
$ echo "Initial commit" | git commit-tree 0563f77
5f1bc85745dcccce6121494fdd37658cb4ad441f
Note that the resulting hash id is different from the one that will turn out on your system because the commit refers to my name and the time it was created, and these details will always be different from yours.
But the work does not end there - I have not yet registered the commit as a new header for the current branch:
$ echo 5f1bc85745dcccce6121494fdd37658cb4ad441f > .git/refs/heads/masterThis command tells Git that the master branch should now reference this commit.
Another, safer way to achieve the same goal is to use the update-ref command :
$ git update-ref refs/heads/master 5f1bc857After creating the master branch , we need to bind our tree to it. This usually happens when you switch the branch:
$ git symbolic-ref HEAD refs/heads/masterThis command creates a symlink HEAD to the master branch . This is very important, since all further commits from the working tree will now automatically update the value of refs / heads / master .
It's hard to believe it's that simple, but now I can use the log command to view my freshly created commit.
$ git log
commit 5f1bc85745dcccce6121494fdd37658cb4ad441f
Author: John Wiegley
Date: Mon Apr 14 11:14:58 2008 -0400
Initial commit
I note that if I did not make refs / heads / master point to a new commit, it could be considered inaccessible - since no one refers to it, and it is not the parent of another accessible commit. In this case, the commit object will someday be deleted from the repository along with its tree and all fragments (this happens automatically with the “gc” command, which is rarely used by Git users manually). When binding a commit with a name in refs / heads , as we did above, it becomes available, which guarantees its further preservation of Git.
The beauty of commits
Some version control systems make branches magical, often distinguishing them from the main development line, while others discuss the concept of branching as if it is very different from commits. But in Git, branches are not a separate entity - there are exclusively fragments, trees and commits (well, tags, but they are just links to commits, so they can be ignored) Since a commit can have one or more parents, and these commits in turn, they can belong to their parents, we can consider a single commit as a branch - after all, he knows his whole “pedigree”.
You can see all top-level commits at any time using the branch command
$ git branch -v
* master 5f1bc85 Initial commit
Repeat after me: A branch is just a named link to a commit.
Branches and tags are identical with the only exception - tags can have their own descriptions - like the commits to which they refer. Branches are just names, and tags are descriptions, you can say labels.
In truth, we do not have a real need to use these “entity-pseudonyms”. For example, if I wanted, I could refer to any repository object using only the hash id of its commits.
Here, for example, is a command that reloads the NOTAD of my working tree to a given commit;
$ git reset --hard 5f1bc85The --hard switch causes the deletion of all current changes in my working tree, regardless of whether they were registered for future placement in the repository (we will talk about this command below).
A safer way to jump to a specific commit is to use the checkout command :
$ git checkout 5f1bc85The difference with the previous command is that the files modified in my working tree are saved. If I add the -f switch to checkout , the command will act in the same way as reset -hard , except that checkout only changes the working tree, and reset -hard also changes the HEAD of the current branch so that it points to the specified version of the tree.
Another advantage of a system based on commits is the ability to rephrase the terms of even the most complex version control systems in a simple language. For example, if a commit has several parents, then this is a merged commit. Or, if the commit has several descendants, then it represents the ancestor of the branch, and so on. But for Git, there is no difference between these entities; for it, the world is just a set of commits, each of which contains a tree that references other trees and fragments that store your data. Anything more complicated than that is just a symbol system.
Here is an illustration of how it all works:
Commit under any other name ...
Understanding commits is key to comprehending Git. You will understand that you have reached enlightenment when your mind will contain only topologies of commits, and not a mishmash of branches, tags, local and remote repositories, etc. I hope that this understanding will not require you to cut off your hands (as the second follower of the Zen teachings did), although I would appreciate if by that moment you had such a desire.
If commits are the key, then their names are the door to mastery. There are so many ways to name commits, commit groups, and even some of the objects contained in commits that are supported by most Git commands. Here is a summary of the main ones:
- The name of the branch of the code (branchname) - As mentioned above, the name of any branch is simply an alias of the most recent commit to this branch. This is equivalent to using the word HEAD when choosing this branch.
- Tag Name (tagname) - Like the branch name, this is the name of the commit. The only difference is that the tag name never changes, while the branch name changes every time a new commit arrives.
- HEAD - Alias the name of the currently selected commit. If you select a specific commit - instead of the branch name, then HEAD refers exclusively to it, and not to the branch name. This is a special case called “using a separate head” (I'm sure there should be some kind of joke).
- c82a22c39cbc32 ... - The commit can always be accessed by its full, 40-character hash id. This usually happens during copy and paste, as usually there are other, more convenient ways.
- c82a22c - You only need to use the part of the hash id that uniquely identifies the commit in the repository. Usually 6-7 digits are enough for this.
- name ^ - The ^ character is used to refer to the parent of any commit. If the commit has more than one parent (merge commit), the first one is taken. If you need the nth parent, then you can access it as name ^ n
- name ^^ - Parent of the parent of this commit. This sequence can be continued ...
- name ~ 10 - .... but not necessary. To refer to the n-ancestor of this commit, ~ n is used (which is equivalent to n characters ^ in a row)
- name: path - To access a specific file inside the commit tree, specify the file name after the colon. This is useful for the show command or for comparing two versions of a file between commits:
$ git diff HEAD^1:Makefile HEAD^2:Makefile - name ^ {tree} - You can refer not to the commit itself, but to the tree containing it.
- name1..name2 - This and the following names belong to the range of commits and are very useful in commands like log for viewing changes made in a selected period of time.
In this case, the command addresses all previous commits from name2 up to (but not inclusive!) Name1. If one of these names is omitted, HEAD is used instead. - name1 ... name2 - An ellipse in a range is not at all like two dots. For commands like log, it means all commits referenced by either name1 or name2, but not both. The result is a list of unique commits in both branches.
- --since = "2 weeks ago" - Addresses all commits starting from a given date
- --until = "1 week ago" - Addresses all commits, up to a given date
- --grep = pattern - Addresses all commits whose message matches the specified regular expression pattern
- --committer = pattern - Addresses all commits made to the repository by a person whose information matches the specified template
- --author = pattern - Addresses all commits whose author information matches the given pattern. The author of a commit is the creator of the changes that the commit represents. For local development, this is the same person who commits. But when patches are mailed, the author and the person actually committing are usually different.
- --no-merges - Addresses all commits with a single parent, i.e. ignores merge commits
Most of these options can be combined. Here is an example showing how to get information about all the changes of the current branch (spun off from master) that I made in the last month and containing the text “foo”.
$ git log --grep='foo' --author='johnw' --since="1 month ago" master..Branching and rebase strength
One of the most effective commands for working with commits is a command with the unassuming name rebase . It works like this: each existing branch in Git has one or more "basic commits" - those from which it originated. Let's take an example of the following typical scenario (in the figure below). Here, the arrows show back in time since each commit refers to its parent (s), but not descendants. Therefore, D and Z are the headers of their branches.
You can verify this with the command
$ git branch
  Z
* D
And in the details:
$ git show-branch
! [Z] Z
 * [D] D
--
 * [D] D
 * [D^] C
 * [D~2] B
+  [Z]Z
+  [Z^]Y
+  [Z~2] X
+  [Z~3] W
+* [D~3] A
You need to get used to this kind of notation, but, in essence, this is just a description of the diagram above. ( Translator's note: pay attention to the gaps in the record, they matter - divide the output into columns )
And here's what it tells us:
Our current branch was split for the first time at commit A (also known as commit
D ~ 3, and even Z ~ 4 if you like it better. For those who skipped the table above, let me remind you that the commit ^ syntax is used to indicate the parent of the commit, and commit ~ 3 is its third-level ancestor, that is, great-grandfather.
- If you read from bottom to top, the first column (with + signs) shows the budding branch Z with four commits - W, X, Y and Z.
- The second column (with asterisks) shows the commits made in the current branch (and the * symbol always indicates it), namely the three commits - B, C and D.
- And finally, the upper part of the output, separated from the bottom by a dividing line, shows a list of available branches, then in which column their commits are located and what symbol they are marked with.
Now we need to bring the working branch Z in line with the main D. That is, include the work done in B, C, and D in Z. In other version control systems, such things are done exclusively through branch merge . Git also has a merge option. It is implemented by the merge team and is applied when Z is a published branch, and we do not want to change its commit history. Here are the commands necessary for this:
$ git checkout Z # переключаемся в ветку Z
$ git merge D # объединяем B, C и D в Z
Now the repository will look like this:
If we now select the Z branch, it will contain everything that was there before, combined with the contents of D (here the translator sighs heavily: a real merge operation would require resolving conflicts between states D and Z) .
Although the new Z now contains changes from D, it also includes a new commit Z ', which is a merger of Z and D. It does not add anything new, but it represents the work of combining Z and D. In a sense, this is “meta -commit ”because its contents refer exclusively to the dimensions of the repository, and not to new work done in the working tree.
But Git has a method of transplanting Z directly into D, actually moving Z in time - using the powerful rebase command. Here is the graph we want to get as a result:
That is, our local development branch Z should be based on the last state of the main branch D. That is why the command is called rebase - it changes the basic commit of the branch from which it is called. If you call it several times, you can make an unlimited number of changes, while remaining in accordance with the main development branch, but without adding unnecessary merge commits to your development branch.
Here are the commands needed to perform the above operation with rebase - compare them using the merge above:
$ git checkout Z # переключаемся в ветку Z
$ git rebase D  #изменяем базовый коммит  Z, чтобы он указывал на D
Although, in some situations, merge is preferable to rebase .
Rebase has a drawback - even if the rebased working tree is compiled, this does not guarantee that intermediate commits will be compiled, since they never compiled in their rebased state. If historical code validity is important to you, choose merge.
Note that with every rebase, you potentially change every commit in a branch. Previously, when W was based on A, it contained only the changes needed to convert A to W, and after rebasing it would contain the changes needed to convert D to W '. Even the conversions from W to X will change, since A + W + X now looks like D + W '+ X' and so on. Note that so far I have emphasized that the Z branch is local. If it was a branch whose changes are visible publicly, and someone spawned their local branches from Z, now their branches will point to the old Z, and not to the new Z '.
You can usually use the following simple rule - use rebase for local branches that do not have children, and for all other cases - merge. Merge will also be useful when you want to revert your local changes to the main development branch.
Interactive rebase
When using rebase above, it automatically rewrote all the commits from W to Z, in order to rebase branch Z to commit D (to the header commit of branch D). However, you can fully control what is happening manually. If you specify the -i switch for rebase, you can choose what will be done for each commit in the local branch Z.
The selection is made from the following options.
- pick (выбрать) — Поведение по умолчанию, используемое для каждого коммита в ветке, если вы не используете интерактивный режим. Оно означает, что данный коммит должен быть применен к своему (теперь уже переписанному) родительскому коммиту. При возникновении конфликтов rebase предложит вам их разрешить.
- squash (сплющить)— Содержимое коммита будет «вложено» в содержимое предыдущего коммита. Это может быть сделано любое количество раз. Если взять вышеиспользованную для примера ветку и сплющить все ее коммиты (конечно же, кроме первого, который должен быть просто выбран), то новая ветка Z будет иметь единственный коммит поверх D. Это может быть полезным, если ваши изменения размазаны по множественным коммитам, но вы хотите, чтобы в истории они показывались как единый коммит.
- edit - if you mark the commit this way, the rebase process will stop, and you will be taken to a shell where you can make additional necessary changes, after which the rebase --continue command will continue to execute as if the changes were there initially.
- drop - if you remove the commit from the interactive rebase, it will simply disappear - as if it had never been done. Note that in this case, merge conflicts are possible if later commits were dependent on these changes.
The full power of the rebase command is hard to appreciate at a glance, but it gives you virtually unlimited control over the look of each code branch. You can use rebase to:
- combining several commits into one,
- reordering commits
- remove unwanted changes that you started to regret
- moving your branch to any existing commit in the repository,
- changes to a single commit a considerable time after its creation.
In general, I would recommend you read the rebase manual , it contains some good examples of using the full power of this command. Here is a final example demonstrating the super-features of rebase .
Imagine the following scenario and think about what you would do if one day you would like auxiliary branch I to become the new heading Z:
That is, we have the main development line - D, which was branched three commits back to start the hypothetical development of Z. At some point in the middle of this process, when C and X were still the headings of their respective branches, we decided to start another the research branch, which eventually produced L. After which we found that the code in L is good, but not enough to pour it back into the main development line of D, so we decided to move the changes to the Z branch so that all changes are there . But in the process, we realize that it is necessary to quickly correct J, since there is a wrong year in copyright. Here are the commands needed to unravel this node:
$ git checkout L
$ git rebase -i Z
After resolving possible conflicts (here the translator sighs heavily again) , the repository will look like this:
Index: Meet the Reseller
Between your files stored in the file system and the Git fragments stored in the repository, there is a somewhat mysterious entity - the Git index. It is not easy to understand, partly because he was not lucky with the name. This is an index in the sense that it refers to a set of new trees and fragments that you created using the add command. These new objects may soon be merged into a new tree to commit to your repository. But until then, only the index refers to them. This means that if you check out changes in the index using reset, then your fragments will be actually lost and subsequently deleted. An index is just a preparation area for your next commit, and there is a good reason for it to exist: it supports a development model,
But at the same time, there is a way to almost completely ignore the index - by passing the -a switch to the commit command. Let's see how, for example, another version control system, Subversion, works.
It has the svn status command , which lists the actions that will be applied to your repository the next time svn commit is called . This "list of next steps" is in some way an informal index, determined by comparing the state of your working tree with the state of HEAD. If any file has been modified, the next commit will save the changes. If the question mark is next to the file name in this list, it will be ignored, and the new file added using svn add will be placed in the repository.
This is exactly what happens when you use the commit -a command in Git : new unknown files are ignored, and new ones added to the add command get into the repository, just like any changes to existing files.
This action is almost identical to what Subversion does , with one exception: in the case of Subversion, the “list of next steps” is always determined by the current working tree, and in Git this sheet represents the contents of the index, that is, what will become the next HEAD state. Such preliminary preparation of changes gives you an additional level of control - the ability to influence what happens during the subsequent execution of commit .
If this is still not entirely clear, then let's look at the following example: suppose you have the source file foo.c, in which you made two sets of independent changes. And now you want to split these changes into 2 separate commits, each with its own description. Here's how to do it in Subversion :
$ svn diff foo.c > foo.patch
$ vi foo.patch
<редактируем foo.patch, сохраняя изменения, которые я хочу позже включить в коммит>
$ patch -p1 -R < foo.patch # убираем второй набор изменений
$ svn commit -m "Сообщение первого коммита"
$ patch -p1 < foo.patch # применяем оставшиеся изменения
$ svn commit -m "Сообщение второго коммита"
Really fun? Now repeat these operations multiple times for a complex dynamic set of changes.
And now a version of the same operation for Git using an index:
$ git add --patch foo.c
<интерактивно выбираем изменения для первого коммита>
$ git commit -m "Сообщение первого коммита"
$ git add foo.c # добавляем оставшиеся изменения
$ git commit -m "Сообщение второго коммита"
Reset or not reset?
One of the most difficult commands to master in Git is reset - it usually confuses more than other commands. Which is understandable, given the ability to reset to change both your working tree and the current HEAD. So it will be useful to give here a brief overview of the work of this team.
We can say that reset is an editor of links, index and working tree. So many things - no wonder and get confused. Let's look at the difference between these three modes and how they fit into the Git commit model.
Making a combined reset
If you use the --mixed option (or do not use the options at all, since mixed is the default), reset will return your index and HEAD to the state of the selected commit. The main difference between this option and -soft is that -soft only changes the HEAD value without affecting the index.
$ git add foo.c # добавляем изменения в индекс в виде нового фрагмента
$ git reset HEAD # убираем все изменения, внесенные в индекс
$ git add foo.c # мы ошиблись, возвращаем все назад
Making a soft reset
Using the -soft reset option is equivalent to simply moving HEAD to another commit. There are no changes in the working tree. This means the equivalence of the following two commands:
$ git reset --soft HEAD^ # перевести  HEAD  на ее родителя, т.е.  фактически игнорировать последний коммит
$ git update-ref HEAD HEAD^ #  делает то же самое вручную
In both cases, your working tree now matches the previous HEAD state, so if you run git status , you will see more changes. And this is not a real change in your files, but simply a reflection of the fact that they are now being compared with previous versions. This gives you the chance to create a new commit instead of the old one.
It should be mentioned here that if you want to change the most recently selected commit, then for this there is a commit -amend command that adds your latest changes to the last commit as if you made them there initially.
But please note: if your project has external users and they did something on top of your previous HEAD, the one you dropped with reset, then this will lead to automatic merge ( merge ) after users take the new version of the project.
Here is what your tree will look like after a soft reset and a new commit:
And here is what your users' HEAD will look like after they take the new version - the colors in the picture show the correspondence of different commits:
Making a hard reset
The --hard option of the reset command is a potentially dangerous thing, because if you hard reset the current HEAD, it will erase all changes in your working tree so that your current files will correspond to the contents of HEAD.
There is another command - checkout , which acts the same as reset --hard, but only if the index is empty. Otherwise, it brings your working tree in accordance with the index.
Now, if you do a hard reset before some early commit, then this will be equivalent to using first reset --soft , and then reset -hard to reboot your working tree. That is, the following commands are equivalent:
$ git reset --hard HEAD~3 #  Возвращаемся назад во времени, отбрасывая изменения
$ git reset --soft HEAD~3 # Устанавливаем HEAD на ранний коммит
$ git reset --hard #  Стираем изменения в рабочем дереве
As you can see, hard reset can be very destructive. Fortunately, there is a safer way to achieve the same effect - using git stash (see next section)
$ git stash
$ git checkout -b new-branch HEAD~3 # заголовок вернулся назад во времени!
new HEAD
HEAD
This approach has two significant advantages when you are not sure that you really want to radically change the current branch:
- It saves your work in storage (stash), from where you can take it back at any time. Note that this repository is not tied to a specific branch, so you can save the state of your working tree in one branch, and later superimpose differences on another branch.
- Stash returns your tree to its previous state, but in a new branch. So if you decide to commit with your changes compared to the previous state, you will not change your original branch.
If you make changes to the new branch new-branch and then decide that it should become your new master, then you need to run the following commands:
$ git branch -D master # прощай, старый master (пока еще сохранится в reflog)
$ git branch -m new-branch master # new-branch становится master
The moral of this section is this: although you can make significant operational interventions in your current branch using reset --soft and reset --hard (which also modifies the working tree), I see no reason why this should be done. Git makes branching so simple and cheap that it is almost always worth making your destructive changes in a new branch and then moving it so that it takes the place of your old master. This is the true wisdom of the Jedi!
But what if you accidentally reset -hard , losing not only your current changes, but also the commits from your master? If you did not use stash to take snapshots of the state (see the next section), then your working tree is lost forever.
The only thing you can do is restore your branch to its previous state using reflog (also described in the next section):
$ git reset --hard HEAD@{1} # восстановить из reflog перед изменением Git work safety requires stash before reset -hard . This will subsequently protect you from the appearance of gray hair. If you used stash , then you can use it to restore your working tree as follows:
$ git stash # просто потому, что это хорошо бы сделать
$ git reset --hard HEAD~3 # возвращаемся назад во времени
$ git reset --hard HEAD@{1} # АААА! это была ошибка, давайте вернем все назад
$ git stash apply # возвращаем прежнее состояние нашего рабочего дерева.
Last links in the chain: stash and reflog
So far, we have described two segments of the way in which fragments get into Git: first they are created in the index, without the parent tree and their own commit, and then they are committed to the repository, where they exist as leaves hanging on the tree contained in this commit.
But it turns out that there are two more places where fragments stay in your repository. The first is Git reflog, a meta repository that writes all changes to your repository in the form of commits. This means that when you create a tree from your index and save it in a commit (the commit command does all this ), you also quietly add this commit to reflog, which you can see using the following command:
$ git reflog
5f1bc85... HEAD@{0}: commit (initial): Initial commit
The beauty of reflog is that it saves data regardless of other changes in your repository. This means that I can untie any commit from my repository (using reset ), but the link to it will remain in the reflog for another 30 days, protecting it from automatic "garbage collection". Which gives me a month for a possible restoration of the commit, if such a need suddenly arises.
The second place where fragments exist, although indirect, is the working tree itself. And that’s what I mean. If you, for example, changed the file foo.c but didn’t add these changes to the index yet, Git might not have created fragments yet, but these changes already exist, because the new contents of the file exist. Only it is in the file system, not in the Git repository. Despite the fact that there are no real fragments there, the file even has its own SHA1 hash id, which can be viewed like this:
$git hash-object foo.c
<покажет  hash id>
What is the use of this for you? Suppose that at the end of a hard working day, you stop at a completely clouded working tree. Then a good habit to postpone your changes in the stash: ( approx .: pens one of the most interesting options for translation of the word stash into Russian - "zanykat." )
$ git stashThis command will take all the contents of your directory, including both the working tree and the contents of the index, and create for them: fragments in the repository, a tree containing these fragments, as well as a couple of stash commits for the working tree and index. The time you call stash will also be recorded.
The next day, you simply pull your changes from stash using stash apply , but you still have a reflog of all pending changes.
Here is what you will do when you come to work the next morning (here WIP stands for “Work in Progress” - “We Work ...”:
$ git stash list
stash@{0}: WIP on master: 5f1bc85... Initial commit
$ git reflog show stash # тот же вывод плюс хэш id для stash коммита
2add13e... stash@{0}: WIP on master: 5f1bc85... Initial commit
$ git stash apply
Since your working tree stored in stash was stored in a commit, you can work with it in the same way as with any code branch at any time. This means that you can look at the log, see what you saved and select any of your previous working trees from the moment they were saved:
$ git stash list
stash@{0}: WIP on master: 73ab4c1... Initial commit
...
stash@{32}: WIP on master: 5f1bc85... Initial commit
$ git log stash@{32} # когда я это сделал?
$ git show stash@{32} # покажите мне, над чем я работал
$ git checkout -b temp stash@{32} # посмотрим на это старое рабочее дерево!
The last command is especially powerful: look, I just got at my disposal a work tree that has not been included in any commits for more than a month! I never added these files to the index, I just used a simple trick: calling stash before logging out every day in the evening (of course, only if I made any changes to my working tree), and the corresponding call to stash apply with each new login.
If you want to clean your stash - say, to store there only actions for the last 30 days, do not use stash clear, use the reflog expire command instead
$ git stash clear # Только не это! Вы потеряете всю эту историю
$ git reflog expire --expire=30.days refs/stash
<покажет сохраненные узлы stash >
That is, stash allows you to use invisible version control with respect to the workflow itself - the different states of your work tree every day. If you wish, you can even use stash on a regular basis, using the following script (Unix OS):
$ cat < /usr/local/bin/git-snapshot
#!/bin/sh
git stash && git stash apply
EOF
$ chmod +x $_
$ git snapshot
And I see no reason not to run this script automatically every hour, and every week - the reflog expire command
conclusions
Over the years, I have used many version control systems and backup schemes. All of them included a means of obtaining the previous contents of the file. Many of them could show how the file changed over time. Many allowed returning back in time and starting an alternative line of development, and subsequently connecting this new line with the current one. A much smaller number of them allowed fine control over this process, allowing you to decide which parts you want to make public. Git can do all of these things, and is relatively simple - once you understand its basics.
This is not the only system with a similar set of features, and it cannot be said that it always provides a better interface to them. But what Git does is a great foundation for the job. I can introduce many new systems that will be developed in the future to leverage the flexibility provided by Git.
Most of the other systems I know left a feeling of reaching their conceptual plateau - that is, that all their further development will come down to slow improvements already seen before. Git gives me the exact opposite impression. It seems to me that we have just begun to reveal the potential possibilities of its deceptively simple design.
From translator. The original text was written in 2009. Although I have been using git constantly lately and even have my own repository on GitHub, alas, I don’t know if the author’s prediction about the further development of Git has since been fulfilled. Do you know? This is, by the way, a great topic for discussion in the comments.