Unreal Engine Tutorial. Part 2: Blueprints
- Transfer
- Tutorial

Blueprints is Unreal Engine 4's visual scripting system. It is a quick way to prototype games. Instead of writing code line by line, everything can be done visually: drag and drop nodes (nodes), set their properties in the interface, and connect their "wires".
In addition to rapid prototyping, Blueprints also simplify scripting for non-programmers.
In this part of the tutorial, we will use Blueprints for the following operations:
- Top view camera setup
- Creating a player-controlled actor with simple movements
- Player Input Settings
- Creating an element that disappears on contact with the player
Note: this part assumes that you know the Unreal Engine 4 interface. You should understand basic Blueprint concepts, such as components and nodes. If you need to refresh your knowledge, read the first part of the Unreal Engine 4 tutorial .
Vectors are also used in this part. If you are unfamiliar with them, then I recommend this article about vectors on gamedev.net.
Note: this article is one of eight parts of the Unreal Engine tutorial:
- Part 1: Introducing the Engine
- Part 2: Blueprints
- Part 3: Materials
- Part 4: UI
- Part 5: How to create a simple game
- Part 6: Animation
- Part 7: Sound
- Part 8: Particle Systems
- Part 9: Artificial Intelligence
- Part 10: How to create a simple FPS
Getting to work
Download the initial project and unzip it. To open a project, go to the project folder and open BananaCollector.uproject .
Note: if a window opens informing that the project was created in an earlier version of the Unreal editor, then everything is in order (the engine is often updated). You can either select the option to create a copy, or the option to convert the project itself.
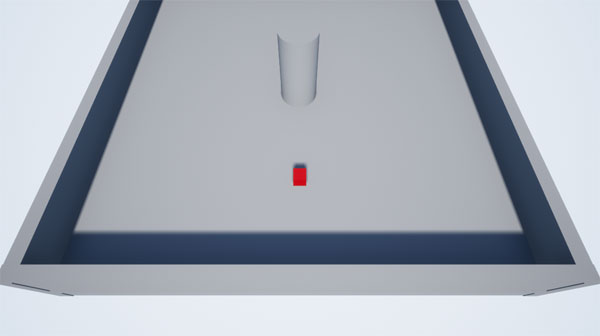
The image below shows the scene. It is in it that the player will move and collect objects.

For ease of navigation, I split the project files into folders, as shown in the figure:

The button highlighted in red can be used to show or hide the source panel.
Player Creation
In Content Browser, browse to the Blueprints folder . Click on the Add New button and select the Blueprint Class .
We want the actor to receive the information entered by the player, so the Pawn class is suitable for us . Select Pawn in the popup window and name it BP_Player .
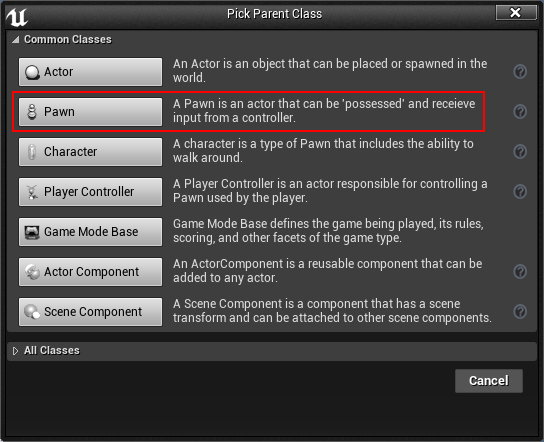
Note: Character class is fine too. It even has a default move component. However, we will implement our own movement system, so the Pawn class is enough for us.
Camera attachment
A camera is a player’s way of looking at the world. We will create a camera looking down at the player.
In Content Browser, double-click on BP_Player to open it in the Blueprint editor.
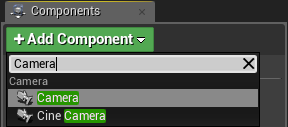
To create a camera, go to the Components panel. Click on Add Component and select Camera .
For the camera to look from top to bottom, you need to position it above the player. After selecting the camera component, go to the Viewport tab.
Activate the motion pad by pressing the W key , and then move the camera to (-1100, 0, 2000) . Or you can enter the coordinates in the Location fields . It is located in the Transform section of the Details panel.
If you lose sight of the camera, press the F key to focus on it.
Then activate the rotation manipulator by pressing the E key . Rotate the camera down -60 degrees along the Y axis .

Display player
We will mark the player’s character with a red cube, therefore, to display it, you will need to use the Static Mesh component.
First, deselect the Camera component by left-clicking on an empty space in the Components panel. If this is not done, then the next added component will be a child of the camera.
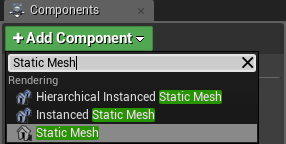
Click on Add Component and select Static Mesh .
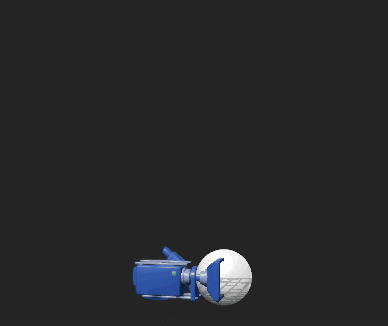
To display the red cube, select the Static Mesh component , and then go to the Details tab. Click on the drop-down list to the right of the Static Mesh and select SM_Cube .

You should see the following (you can press F inside the Viewport to focus on the cube if you don't see it):
Now is the time to spawn actor Pawn player. Click on Compile and return to the main editor.
Player spawn
In order for a player to control Pawn, there are two things to be said:
- The Pawn class that the player will control.
- Pawn Spawn Place
You can complete the first task by creating a new Game Mode class .
Creating Game Mode
The Game Mode class is a class that controls how a player enters a game. For example, in a multiplayer game, Game Mode is used to set the spawn of each player. More importantly, Game Mode defines. which Pawn the player will use.
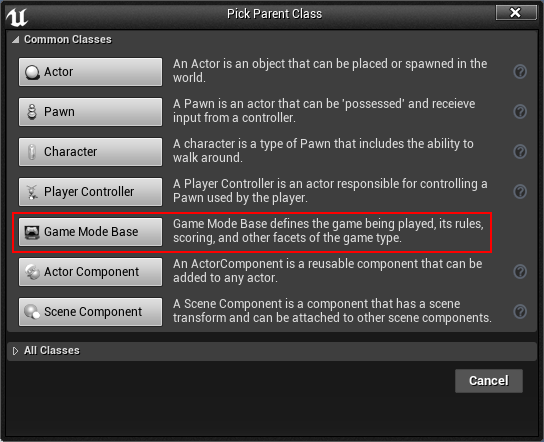
Go to Content Browser and go to the Blueprints folder . Click on the Add New button and select the Blueprint Class . From the
pop-up menu, select Game Mode Base and name it GM_Tutorial .
Now you need to specify which Pawn class will be used by default. Double-click on GM_Tutorial to open it.
Go to the Details panel and look in the Classes section . Click on the Default Pawn Class drop-down list and select BP_Player .

To use the new Game Mode, you need to tell the level which Game Mode it should use. This can be specified in World Settings . Click on Compile and close the Blueprint editor.
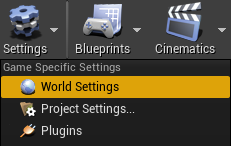
Each level has its own parameters. You can access these options by choosing Window \ World Settings . Or you can go to the Toolbar and select Settings \ World Settings .
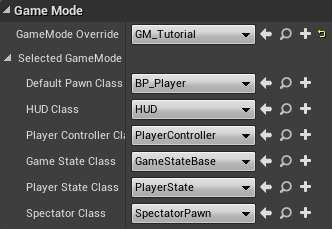
Next to the Details tab, a new World Settings tab opens. In it, click on the GameMode Override drop-down list and select GM_Tutorial .
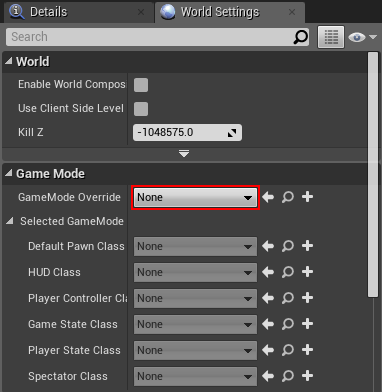
Now you will see that the classes have changed to those selected in the GM_Tutorial .
Finally, we need to set the player’s spawn point. This is done by placing at the Player Start actor level .
Placing Player Start
In the process of spawning a player, Game Mode searches for the Player Start actor. If Game Mode finds it, then it attempts to spawn the player there.
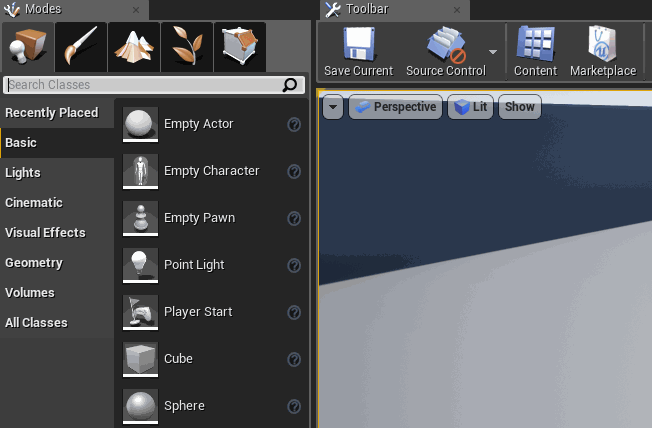
To place Player Start, go to the Modes panel and find Player Start . Left-click and drag Player Start from the Modes panel to the Viewport. Release the left mouse button to place it.
You can place it anywhere. When done, go to the Toolbar and click Play . You will be spawned at the location of the Player Start.
To exit the game, click the Stop button in the Toolbar or press the Esc key . If you do not see the cursor, press Shift + F1 .
This is not like a game if we cannot move. Our next task is to configure input parameters.
Input setting
Assigning a key to an action is called key binding.
In Unreal, you can configure key bindings to trigger events when pressed . Events are nodes that are executed during certain actions (in this case, when a specified key is pressed). When an event is triggered, all nodes connected to the event are executed.
This key binding method is convenient, because it means that we do not need to hard-code the keys in the code.
For example, you can snap the left mouse button and name it Shoot. Any actor who can shoot can use the Shoot event to know when a player presses the left mouse button. If you want to change the key, then this can be done in the input parameters.
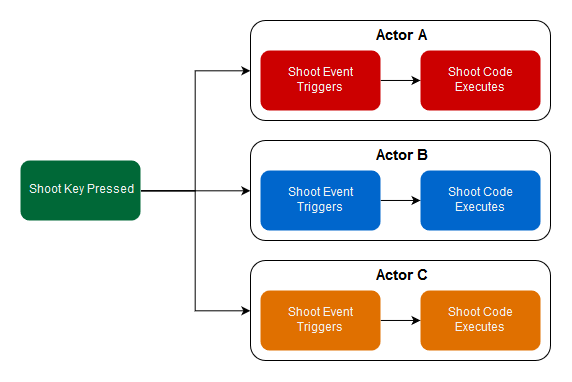
If we set the keys hard, then we will have to go into each actor and change the keys separately.
Axis and action binding
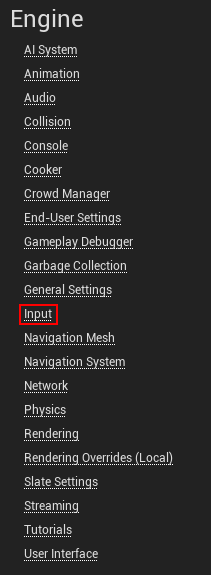
To go to the input options, go to Edit \ Project Settings . In the Engine section, select Input on the left .
The Bindings section configures input.
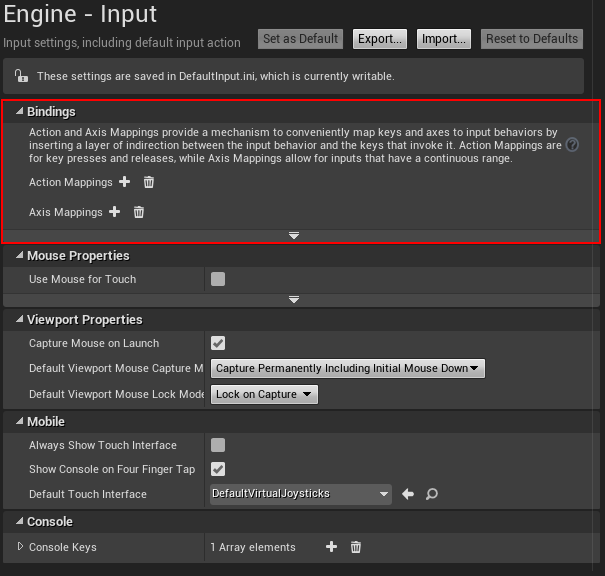
Unreal provides two ways to create key bindings:
- Binding actions: they can be in only two states - pressed and not pressed. Action events only fire when you press or release a key. Used for actions that do not have intermediate states, for example, for firing a cannon.
- Axis binding: axes transmit a numerical value called the axis value (more on this later). Axis events fire every frame. Commonly used for actions requiring stick or mouse control.
In this tutorial we will use axis bindings .
Creating Motion Snaps
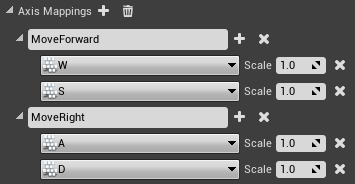
First, we will create two groups of axle bindings . Groups allow you to bind multiple keys to a single event.
To create a new axis snap group, click the + icon to the right of Axis Mappings . Create two groups and name them MoveForward and MoveRight .

MoveForward will drive forward and backward. MoveRight will control the movement left and right.
We tie towards the four keys: W , A , S and D . So far we have only two slots for key binding. Add one more axis binding to each group by clicking on the + icon next to the group name field .

To bind a key, click on the drop-down list with a list of keys. Bind the W and S keys to MoveForward . Bind the A and D keys to MoveRight .
Now you need to set the values in the Scale fields .
Axis value and input scale
Before defining Scale fields, we need to learn more about how to work with axis values .
The axis value is a numerical value determined by the type of input and how it is used. When you press the buttons and keys, 1. is output. The sticks have output values from -1 to 1, depending on the direction and inclination of the stick.
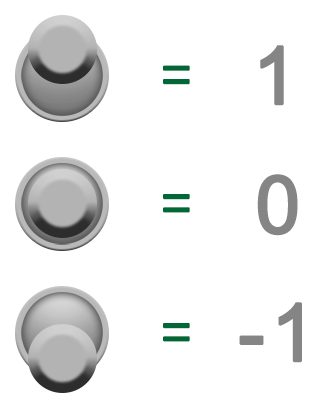
We can use the axis value to control the speed of the pawn. For example, if we push the stick all the way, the axis value will be 1. If you press halfway, the value will be 0.5.
Multiplying the axis value by a variable speed, we can adjust the speed of the movement with a stick.

You can also use the axis value to set the direction along the axis. If we multiply the Pawn speed by a positive axis value, we get a positive bias. When using a negative axis value, we get a negative offset. Adding this offset to the location of Pawn, we set the direction of its movement.

Keyboard keys can only output the values 1 or 0, then you can use scale to convert them to negative numbers. This can be done by taking the value of the axis and multiplying it by the scale.
Multiplying the positive (axis value) by negative (scale), we get a negative value.
Scale the keys S and A by clicking on the Scale field and entering -1 .

Now the fun begins: make Pawn move! Close Project Settings and open BP_Player in the Blueprints editor by double-clicking on it.
Player move
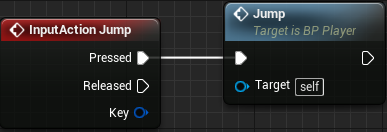
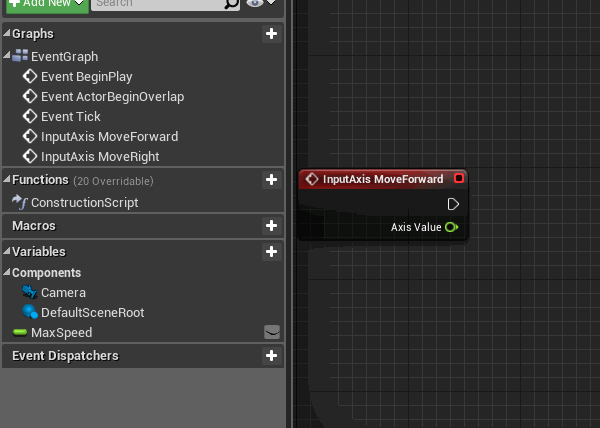
First we need to select the events for the motion bindings. Right-click on an empty space in the Event Graph to open a list of nodes. Find MoveForward in this menu . Add a MoveForward node from the Axis Events list . Note that you need a red node in Axis Events, not a green node in Axis Values.
Repeat the process for MoveRight .
Now we will configure the nodes for MoveForward .
Using Variables
To move, you need to specify how fast Pawn will move. One simple way to indicate speed is to store it in a variable .
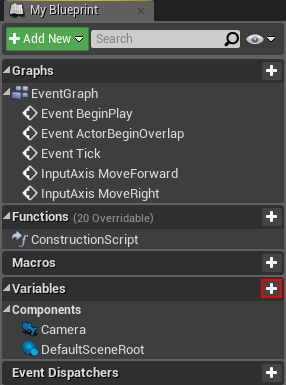
To create a variable, go to the My Blueprint tab and click on the + icon on the right side of the Variables section .
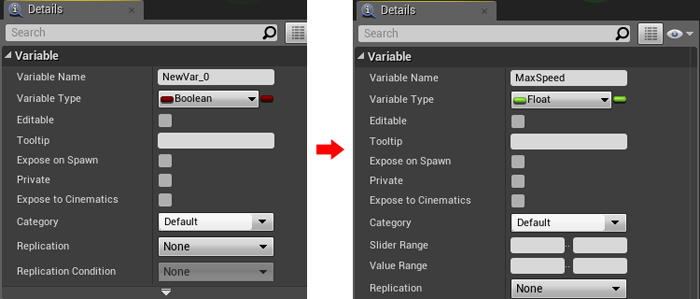
After choosing a new variable, go to the Details tab. Change the variable name to MaxSpeed . After that, replace the variable type with Float . To do this, click on the drop-down list next to Variable Type and select Float .
Now you need to set the default value. But to set it, you will need to click Compile in the Toolbar.
After selecting a variable, go to the Details tab. Go to the Default Value section and change the default MaxSpeed to 10 .

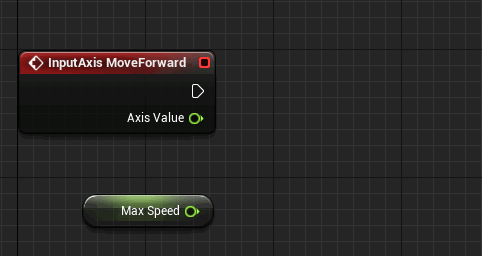
Then drag the MaxSpeed variable from the My Blueprint tab onto the Event Graph. Choose Get from the menu .
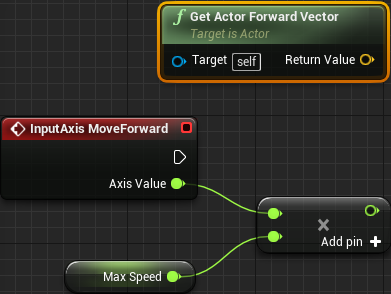
Now you need to multiply MaxSpeed by the axis value to get the final speed and direction. Add a float * float node and attach Axis Value and MaxSpeed to it .
Getting player directions
To move forward, we need to know where Pawn is looking. Fortunately, Unreal has a node for this. Add a Get Actor Forward Vector node .
Then add the Add Movement Input node . This node gets direction and value, transforming them into a stored offset. Connect the nodes as follows:
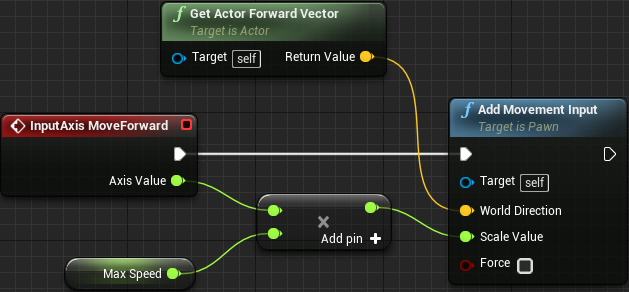
The white line indicates the execution chain. In other words, when a player moves the input axis, an event is generated that executes the InputAxis MoveForward node . The white line indicates that after that the Add Movement Input node is executed .
The Add Movement Input node receives the following data at the input:
- Target : set self, which in our case is the player’s character (red cube).
- World Direction : the direction for the target to move, which in our case is the direction the player is looking.
- Scale Value : how far we move the player, in our case this is max_speed * axis_value (which, as we recall, is a value in the range from -1 to 1).
Repeat the process for MoveRight , but replace Get Actor Forward Vector with Get Actor Right Vector . Try to do it yourself without consulting the instructions above!

Add Offset
To really move the Pawn, we need to get the offset calculated by the Add Movement Input and add it to the Pawn location.
In essence, our strategy will be to move the player a small amount in each frame of the game, so we need to add a move to the Event Tick event that is generated every frame.
Go to the Event Tick node in the Event Graph. It should be inactive and should be on the left, but if it is not there, then create the node yourself.
To get the offset, create a Consume Movement Input Vector node . To add an offset, create an AddActorLocalOffset node . After that, connect them as follows:

This means that in each frame of the game we will save the entire input of the move and add it to the current location of the actor.
Click Compile , go to the main editor and click on Play . Now you can move in the scene!

However, we have a small problem. Powerful computers can render frames faster. An Event Tick is called every frame, so move nodes will be executed more often. This means that Pawn will move faster on powerful computers, and vice versa.
To solve this problem, our movement must be independent of the frame rate .
Note: I configured key bindings to show the effect of the frame rate dependency. Press 0 to limit the frequency to 60 frames per second, and press 1 to remove the limit. Try moving at both frame rates and you will notice a difference in speed.
Frame rate independence
Independence from the frame rate means that we will constantly get the same results, regardless of the frame rate. Fortunately, achieving such independence in Unreal is easy.
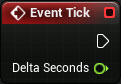
Exit the game, and then open BP_Player . Then go to the Event Tick node and look at the Delta Seconds .
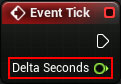
Delta Seconds is the amount of time that has passed since the previous Event Tick. By multiplying the offset by Delta Seconds, we will make the movement independent of the frame rate.
For example, our Pawn has a maximum speed of 100. If one second has passed since the previous Event Tick, then Pawn will move to the full 100 units. If half a second has passed, then it will move by 50 units.
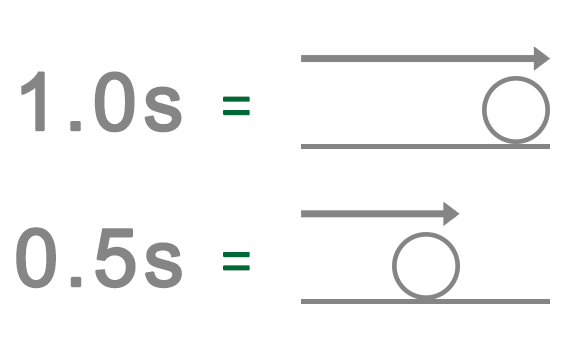
If the movement is dependent on the frame rate, then Pawn will move 100 units in each frame, regardless of the time between frames.
To multiply the offset by Delta Seconds, add a vector * float node . After that, connect the nodes as follows:
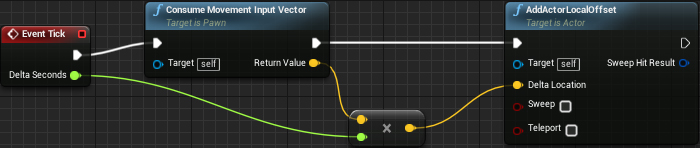
The time between frames (Delta Seconds) is very short, so Pawn will move much slower. This can be fixed by replacing the default MaxSpeed value with 600 .

Congratulations, you managed to achieve independence from the frame rate!

You may notice that the cube goes through all the objects. To fix this, we need to get acquainted with the collisions .
Wear a helmet, because now we have to face the theory!
Actor collisions
When we recall the collisions, we imagine car accidents. Fortunately, collisions in Unreal are much safer.
To be able to collide with objects, an actor needs a designation of his collision space (usually called a collision). You can use one of the following spaces:
- Collision Mesh: they are automatically generated (if you select this option) when importing meshes. The user can also create an arbitrary collision mesh in the 3D editor. The red cube already has an automatically generated collision mesh.
- Collision components: they can have one of three forms: parallelepiped, capsule and sphere. They can be added in the Components panel. Commonly used for simple collisions.
Below is an example of a character and its collision.
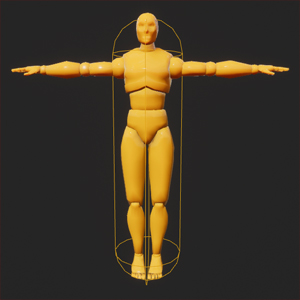
Collision occurs when an actor’s collision touches another actor’s collision.
Now it's time to turn on collisions.
Collision Inclusion
You probably wonder why the cube does not collide with objects, although it does have a collision mesh. When moving an actor, Unreal only considers the root component for collisions . Since the root component of Pawn has no collision, it passes through all the objects.
Note: an actor that does not have a collision in the root component can still block other actors. But if you move the actor, then he will not encounter anything.
So, to use a collision mesh, StaticMesh must be root . To do this, go to the Components panel. Then hold down the left mouse button and drag StaticMesh onto DefaultSceneRoot. Release the left mouse button to make StaticMesh the new root component.

For collisions to start working, you need to perform one more action. Switch to the Event Graph and go to the AddActorLocalOffset node . Find the entrance Sweep and change the value to to true , pressing the left mouse button on the box .
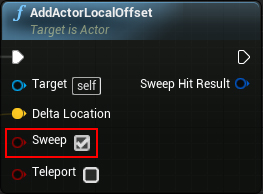
AddActorLocalOffset is committed to teleporting an actor to a new location. Sweep ensures that the actor is faced with everything that is between the old and the new location.
Go to the main editor and click on Play . Now the cube will respond to collisions with the level!
The last thing we will create is an item that disappears upon contact with the player’s character.
Item creation
In general, an item is any object that a player collects. We use BP_Banana as an item .
To recognize the contact of the cube and the object, we need a node of the event that is triggered by a collision. To generate such events, collision reactions can be used .
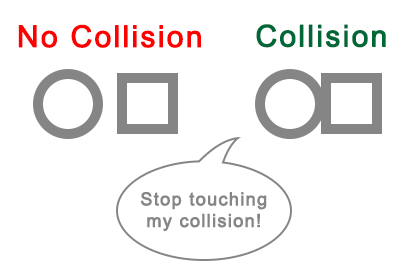
A collision reaction also determines how an actor reacts to a collision with another actor. There are three types of collision reactions: Ignore , Overlap, and Block . Here's how they interact with each other:
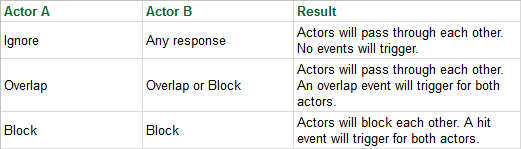
Although both Overlap and Block can be used here, in this tutorial we will use only Overlap.
Conflict reaction task
Close the game and open BP_Banana . Select the StaticMesh component , and then go to the Details panel. Collision reactions are defined in the Collision section .
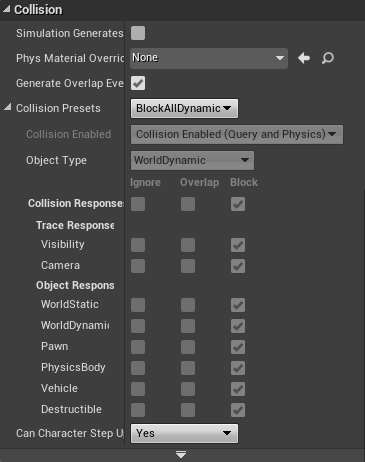
As you can see, most parameters are inactive. To make them mutable, click on the drop-down list next to Collision Presets . Select Custom from the list .

Now we need to indicate the reaction to the collision between the item and the cube.
Components have an attribute called object type . An object type is just a convenient way to group similar actors. You can read more about object types here .
The cube is of type WorldDynamic , so we need to change the reaction to a collision of this type. In the Collision Responses section, change the response to WorldDynamic collisions to Overlap . This can be done by clicking on the middle checkbox to the right of WorldDynamic .

Collision Handling
To handle collisions, you need to use an overlay event . Go to the Components panel and right-click on StaticMesh . In the context menu, select Add Event \ Add OnComponentBeginOverlap .
So we add the OnComponentBeginOverlap (StaticMesh) node to the Event Graph .
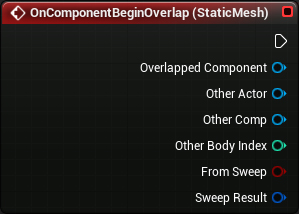
Finally, create the DestroyActor node and connect it to the OnComponentBeginOverlap (StaticMesh) node . As the name suggests, it removes the target actor from the game. However, since there is no target actor, it will destroy the actor that caused it.

Item placement
Close the Blueprint editor and go to the Blueprints folder .
Start arranging the bananas by holding down the left mouse button and dragging BP_Banana into the Viewport.

Click Play and start collecting bananas!

Where to go next?
The finished project can be downloaded from here .
You have taken another step towards becoming an Unreal Engine specialist.
If you want to continue training, then read the next post in the series , where we will take a closer look at Unreal Engine materials.