Using Google FireBase to create a simple chat on Android
- From the sandbox
- Tutorial
A few days ago, I started developing the simplest chat for Android, I decided to use Firebase, an easy-to-use real-time database that stores its data in JSON format. Despite the fact that Firebase provides a complete API and usage documentation, I found that it lacked details when trying to apply it to an architecture template such as MVP, so I decided to try and explain how I understood the implementation on Android. I also expanded the MVP template with a new layer, explicitly for Firebase - Interactors.
I will not go into the details of creating an account in Firebase, as well as about the “5-minute quick start”, I just go straight to the implementation.
First, we’ll look at the directories we need in our Firebase template, for example, Firebase creates users in a separate database, and when creating stored information, it’s an email, a password (which you cannot directly observe) and a unique UID (a randomly generated key, which the user adheres to throughout his entire life cycle), so if we wanted to keep the username, we wouldn’t succeed. That's why we need “Users” as a directory in our template, which will contain the username and, possibly, an avatar so that we can store certain specific information.
We may also have a directory called curentUsers that will contain all the users who are currently logged into our chat application. We definitely need the Messages folder to store our messages.
So, our three directories are Users, currentUsers, Messages ... The
links to them look like this:
"https: /// currentUsers / "
" https: /// Users / "
" https: /// messages / »
These are links to directories that we use when we want to add / retrieve data, and basically everything that we need for the user and message system to work.
Let's move on to a real conversation with Android. If you imported a Firebase dependency into Gradle, you should have all the features of the Firebase client available ... Our chat application will have four screens:
Here we look for the entry point that the user wants to (register or log in), and display the number of current users in the TextView.
The MainInteractor:
What's going on here? In the interaction, we have a Firebase link, whose constructor parameter is a link (currentUsers directory), and we add a listener to a link that sends one request to the Firebase currentUsers directory and receives a DataSnapshot - a special Firebase function ... The snapshot is essentially a list of all objects data in the specified directory, so if we do dataSnapshot.getChildrenCount (), we just get the number of objects that are currently in the directory, which is equal to the number of users online! We show it in TextView, and the user sees how many of his peers are on the network. Quite simple, but powerful, because we use this principle of querying data in all aspects of communicating with our Firebase.
We saw the code for the main screen in the previous section, but here is what it looks like. In addition, by clicking Register, we will go through a three-stage process, first select Username, which, if displayed, displays an error, otherwise we will go to the Emoji fragment in which we will choose our own “avatar”, then go to the detailed account the screen where we complete our registration if an email is not sent, in which case we also get an error, so here are the screens:
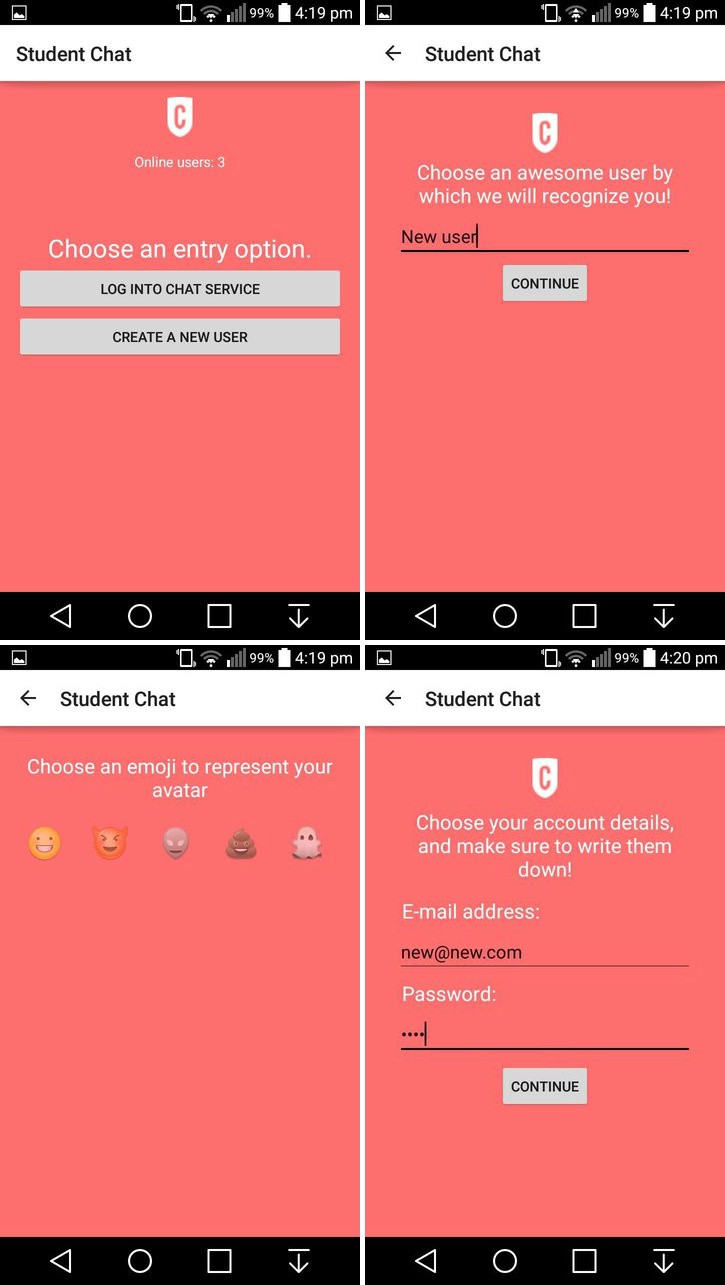
We have some simple EditTexts, one for Username, one for Email and one for Password. A grid of emoji to choose from (currently one line will add more) and a progress bar to display rotation animations during authentication. The “Register” button accepts the values combined in the “Fragments” and sends them to the presenter:
Here we have several new features:
- .createUser (), .push () and .setValue () methods
- custom UID
.createUser () - creates users! In a separate database, so when we create a user, we also need to create his object in the / Users directory (to see it).
This is done by pressing “Pushing”. The specified .push () “pushes” deeper into the directory, creating a subdirectory with a random generated key for its name, but before that we attach the UID to the link, so we can compare the directories with the user UID. The UID is a randomly generated key and, using it as the name of a subdirectory (and parameter in the User object), we can later determine which username corresponds to a specific UID, and get the username after logging in or even delete Child of currentUsers (displays the user from the system).
The .setValue () method adds an object (or objects) to the directory, so we can just store whatever data we want.
The interface of the login screen is quite simple: two EditTexts (email address and password) and a login button, as well as a progress bar to spice things up.
This part is complicated, we know that our users are in a separate database, so when we register a user, how do we find out which user name is he or she going to?
This is the whole purpose of the / Users directory, as mentioned earlier. Also, naming it after the user UID, we can simply search for the directory with the corresponding UID (if, for example, we want to extrapolate certain pieces of information from a specific user). Also, if we call the UID objects, we can enter the object with the specified UID and delete it in the onTestroy () of the chat activity - a very simple way to register a user.
Login Presenter:
It receives an email and a password, shows the scroll bar until the request is completed, and calls the "View" methods, given the result:
If the user authentication is successful, we get the username for the specified user and send it to the chat screen, but before that we add the user to the / currentUsers directory so that we can just see who is logged in. Obtained by default AuthData and serves to display some specific Firebase data about the user (for example, UID, special key generated by authentication ..)
ChatActivity uses 2 fragments, one for the messaging service, and one for displaying a list of active users. By clicking on the menu menu icon once, we will replace the message fragment with the list fragment, and clicking it again, we will set the BackStack (and come back!).

The problem here is that we get all of our data from Firebase, that is, we cannot implement Firebase in our views, but ListView / RecyclerView adapters are also components of Android View, so how do we continue here?
The answer again is MVP (+ Interactors)! A good architecture reflects itself in the components that it is implemented, which means that we can also write our adapters in MVP, which are the “View” component, in which there is a presenter that sends new values to ListView elements (and requests the specified values from Interactor) Since the values are generated by an Interactor that has a link to Firebase - we can separate Android from Java - from Backend.
It's very simple, we have a method that inflates our ViewHolder, which fills the holder mentioned, a method for requesting messages from Firebase, and one that adds a message to ArrayList if there is a new message to display.
The adapter needs a new message, it tells Presenter to request messages, but this is not Presenter's job, so he tells Interactor to request them from Firebase, having done this, we have a clean structure and data flow, completely independent, so changing the view, we don’t everything needs to be changed, we just set up the POJO of the data, speakers and interactors do not need to change what they do, the requests remain unchanged! Therefore, if we switch the amount of data, just add more fields to the POJO, if we want to display them differently, just change the view (by adding more widgets).
A request simply means a request, .orderByValue () means that we get objects (values) there, .limitToLast (100) means that we always get the last 100 messages. Although if the chat is active for a while, all messages (even after 100) will be displayed until the fragment of the message is destroyed / restarted.
Also, in our onDestroy ChatActivity, we send the UID to the interactor (via the Present'ator) to remove the user from currentUsers (exit it).
The Firebase library for Android is very well built, the documentation is a little complicated to understand, but the basic principles are easy to get if you dig and try to combine things.
- A link to Firebase is just a link to the directory into which you want to make changes, requests or just add new data.
The listeners give us “Rx-like” functions, they constantly monitor the addition of new users (each object in the directory is a child), and we can work with their data.
DataSnapshot is a list of current values in one directory.
AuthData is like a bundle of all data for a specific user / request, UID, unique key ...
Before using any references to your Firebase, you must call Firebase.setAndroidContext (this) in each onCreate () method
Firebase is an extremely powerful tool for simple Backend databases, it is very fast and easy to use on small projects, but can be used even for more complex applications like this chat application.
It is cross-platform, so you can create Firebase applications for Android, iOS and JS with full support (JS supports Angular, React and Node, I believe) and use the same Firebase template on all three major platforms.
PS I do not guarantee full performance for a long time, since FireBase is constantly updated and changed. Making a few changes will change the situation.
Create a basic Firebase template
I will not go into the details of creating an account in Firebase, as well as about the “5-minute quick start”, I just go straight to the implementation.
First, we’ll look at the directories we need in our Firebase template, for example, Firebase creates users in a separate database, and when creating stored information, it’s an email, a password (which you cannot directly observe) and a unique UID (a randomly generated key, which the user adheres to throughout his entire life cycle), so if we wanted to keep the username, we wouldn’t succeed. That's why we need “Users” as a directory in our template, which will contain the username and, possibly, an avatar so that we can store certain specific information.
We may also have a directory called curentUsers that will contain all the users who are currently logged into our chat application. We definitely need the Messages folder to store our messages.
So, our three directories are Users, currentUsers, Messages ... The
links to them look like this:
"https: //
" https: //
" https: //
These are links to directories that we use when we want to add / retrieve data, and basically everything that we need for the user and message system to work.
Let's move on to a real conversation with Android. If you imported a Firebase dependency into Gradle, you should have all the features of the Firebase client available ... Our chat application will have four screens:
- The main screen for selecting an input parameter (Login or Registration) and displaying the number of registered users
- Login for user authentication
- The registration screen in which we create a new Users - Chat screen (which can display a chat fragment or a ListOfUsers fragment)
Main screen
Here we look for the entry point that the user wants to (register or log in), and display the number of current users in the TextView.
MainActivityPresenter :
  public class MainActivityPresenterImpl implements MainPresenter {
    private final MainView mainView;
    private final MainInteractor interactor;
    public MainActivityPresenterImpl(MainView view) {
        this.mainView = view;
        interactor = new MainInteractor(this);
    }
    @Override
    public void receiveRequest() {
        interactor.receiveRequest();
    }
    @Override
    public String getNumberOfUsers(long numberOfUsers) {
        return "Online users: " + String.valueOf(numberOfUsers);
    }
    @Override
    public void sendNumberOfChildren(long number) {
        mainView.setNumberOfUsersTextView(getNumberOfUsers(number));
    }
}
The MainInteractor:
  public class MainInteractor implements MInteractor {
    private final Firebase mainRef = new Firebase("https:///currentUsers");
    private final MainPresenter presenter;
    public MainInteractor(MainPresenter pre) {
        this.presenter = pre;
    }
    @Override
    public void receiveRequest() {
        mainRef.addListenerForSingleValueEvent(new ValueEventListener() {
            @Override
            public void onDataChange(DataSnapshot dataSnapshot) {
                presenter.sendNumberOfChildren(dataSnapshot.getChildrenCount());
            });
    }
}
What's going on here? In the interaction, we have a Firebase link, whose constructor parameter is a link (currentUsers directory), and we add a listener to a link that sends one request to the Firebase currentUsers directory and receives a DataSnapshot - a special Firebase function ... The snapshot is essentially a list of all objects data in the specified directory, so if we do dataSnapshot.getChildrenCount (), we just get the number of objects that are currently in the directory, which is equal to the number of users online! We show it in TextView, and the user sees how many of his peers are on the network. Quite simple, but powerful, because we use this principle of querying data in all aspects of communicating with our Firebase.
Registration screen
We saw the code for the main screen in the previous section, but here is what it looks like. In addition, by clicking Register, we will go through a three-stage process, first select Username, which, if displayed, displays an error, otherwise we will go to the Emoji fragment in which we will choose our own “avatar”, then go to the detailed account the screen where we complete our registration if an email is not sent, in which case we also get an error, so here are the screens:
We have some simple EditTexts, one for Username, one for Email and one for Password. A grid of emoji to choose from (currently one line will add more) and a progress bar to display rotation animations during authentication. The “Register” button accepts the values combined in the “Fragments” and sends them to the presenter:
public class FirebaseUserRegisterPresenterImpl implements FirebaseUserRegisterPresenter {
    private final RegisterView registerView;
    private final RegisterInteractor interactor;
    public FirebaseUserRegisterPresenterImpl(RegisterView view) {
        this.registerView = view;
        this.interactor = new RegisterInteractor(this);
    }
    @Override
    public void receiveRegisterRequest(String username, String email, String password, String emoji) {
        interactor.receiveRegisterRequest(username, email, password, emoji);
        registerView.spinProgressBar();
    }
    @Override
    public void onFailure() {
        registerView.onFailure();
        registerView.stopProgressBar();
    }
    @Override
    public void onSuccess() {
        registerView.onSuccess();
        registerView.stopProgressBar();
    }
}
Interactor:
   public class RegisterInteractor implements RInteractor {
    private Firebase userRef = new Firebase("https:///Users/");
    private final FirebaseUserRegisterPresenter presenter;
    public RegisterInteractor(FirebaseUserRegisterPresenter pre) {
        this.presenter = pre;
    }
    @Override
    public void receiveRegisterRequest(final String username, String email, String password, final String emoji) {
        userRef.createUser(email, password, new Firebase.ValueResultHandler>() {
            @Override
            public void onSuccess(Map stringObjectMap) {
                String uid = stringObjectMap.get("uid").toString();
                userRef = new Firebase("https:///Users/" + uid);
                userRef.setValue(createUser(username, emoji));
                presenter.onSuccess();
            }
            @Override
            public void onError(FirebaseError firebaseError) {
                presenter.onFailure();
            }
        });
    }
    @Override
    public Map createUser(String username, String emoji) {
        Map user = new HashMap<>();
        user.put("username", username);
        user.put("emoji", emoji);
        return user;
    }
}
Here we have several new features:
- .createUser (), .push () and .setValue () methods
- custom UID
.createUser () - creates users! In a separate database, so when we create a user, we also need to create his object in the / Users directory (to see it).
This is done by pressing “Pushing”. The specified .push () “pushes” deeper into the directory, creating a subdirectory with a random generated key for its name, but before that we attach the UID to the link, so we can compare the directories with the user UID. The UID is a randomly generated key and, using it as the name of a subdirectory (and parameter in the User object), we can later determine which username corresponds to a specific UID, and get the username after logging in or even delete Child of currentUsers (displays the user from the system).
The .setValue () method adds an object (or objects) to the directory, so we can just store whatever data we want.
Login screen
The interface of the login screen is quite simple: two EditTexts (email address and password) and a login button, as well as a progress bar to spice things up.
What happens when a user clicks Login?
This part is complicated, we know that our users are in a separate database, so when we register a user, how do we find out which user name is he or she going to?
This is the whole purpose of the / Users directory, as mentioned earlier. Also, naming it after the user UID, we can simply search for the directory with the corresponding UID (if, for example, we want to extrapolate certain pieces of information from a specific user). Also, if we call the UID objects, we can enter the object with the specified UID and delete it in the onTestroy () of the chat activity - a very simple way to register a user.
Login Presenter:
public class FirebaseLoginPresenterImpl implements FirebaseLoginPresenter {
    private final LoginView loginView;
    private final LoginInteractor interactor;
    public FirebaseLoginPresenterImpl(LoginView view) {
        this.loginView = view;
        interactor = new LoginInteractor(this);
    }
    @Override
    public void receiveUserLogin(String email, String password) {
        loginView.spinProgressBar();
        interactor.attemptToLogIn(email, password);
    }
    @Override
    public void onFailure() {
        loginView.stopProgressBar();
        loginView.onFailure();
    }
    @Override
    public void onSuccess(String user, String uid) {
        loginView.stopProgressBar();
        loginView.logTheUserIn(user, uid);
    }
}
It receives an email and a password, shows the scroll bar until the request is completed, and calls the "View" methods, given the result:
- A successful login sends the username of the user, and the UID sends the intention in which the ChatActivity login starts - Failed warns the user with Toast.
If the user authentication is successful, we get the username for the specified user and send it to the chat screen, but before that we add the user to the / currentUsers directory so that we can just see who is logged in. Obtained by default AuthData and serves to display some specific Firebase data about the user (for example, UID, special key generated by authentication ..)
Chat screen
ChatActivity uses 2 fragments, one for the messaging service, and one for displaying a list of active users. By clicking on the menu menu icon once, we will replace the message fragment with the list fragment, and clicking it again, we will set the BackStack (and come back!).
The problem here is that we get all of our data from Firebase, that is, we cannot implement Firebase in our views, but ListView / RecyclerView adapters are also components of Android View, so how do we continue here?
The answer again is MVP (+ Interactors)! A good architecture reflects itself in the components that it is implemented, which means that we can also write our adapters in MVP, which are the “View” component, in which there is a presenter that sends new values to ListView elements (and requests the specified values from Interactor) Since the values are generated by an Interactor that has a link to Firebase - we can separate Android from Java - from Backend.
Adapter
:public class CustomMessageRecyclerAdapter extends RecyclerView.Adapter implements MessageAdapterView {
private final ArrayList mMessageList = new ArrayList<>();
private final String user;
private final MessagePresenterImpl presenter;
public CustomMessageRecyclerAdapter(String username) {
this.user = username;
presenter = new MessagePresenterImpl(this);
}
@Override
public ViewHolder onCreateViewHolder(ViewGroup parent, int viewType) {
View v = LayoutInflater.from(parent.getContext()).inflate(R.layout.chat_message, parent, false);
return new ViewHolder(v);
}
@Override
public void onBindViewHolder(ViewHolder holder, int position) {
Message current = mMessageList.get(position);
if (current.getAuthor().equals(user)) {
holder.mAuthorTextView.setText("You");
} else {
holder.mAuthorTextView.setText(current.getAuthor());
}
holder.mMessageTextView.setText(current.getMessage());
holder.mEmojiTextView.setText(current.getEmoji());
}
@Override
public int getItemCount() {
return mMessageList.size();
}
@Override
public void addItem(Message message) {
mMessageList.add(message);
notifyDataSetChanged();
}
@Override
public void request() {
presenter.requestMessages();
}
public class ViewHolder extends RecyclerView.ViewHolder {
private TextView mAuthorTextView;
private TextView mMessageTextView;
private TextView mEmojiTextView;
public ViewHolder(View itemView) {
super(itemView);
mAuthorTextView = (TextView) itemView.findViewById(R.id.message_author);
mMessageTextView = (TextView) itemView.findViewById(R.id.message_value);
mEmojiTextView = (TextView) itemView.findViewById(R.id.message_emoji);
}
}
}
It's very simple, we have a method that inflates our ViewHolder, which fills the holder mentioned, a method for requesting messages from Firebase, and one that adds a message to ArrayList if there is a new message to display.
Presenter:
public class MessagePresenterImpl implements MessagePresenter {
    private final MessageAdapterView adapterView;
    private final MessageInteractor interactor;
    public MessagePresenterImpl(MessageAdapterView view) {
        this.adapterView = view;
        this.interactor = new MessageInteractor(this);
    }
    @Override
    public void sendMessageToAdapter(Message message) {
        adapterView.addItem(message);
    }
    @Override
    public void requestMessages() {
        interactor.request();
    }
}
Interactor :
public class MessageInteractor {
    private final MessagePresenter presenter;
    private final Firebase mMessagesRef = new Firebase("https:///messages");
    private final Query mMessageQuery;
    public MessageInteractor(MessagePresenter pre) {
        this.presenter = pre;
        this.mMessageQuery = mMessagesRef.orderByValue().limitToLast(100);
    }
    public void request() {
        mMessageQuery.addChildEventListener(new ChildEventListener() {
            @Override
            public void onChildAdded(DataSnapshot dataSnapshot, String s) {
                presenter.sendMessageToAdapter(dataSnapshot.getValue(Message.class));
            }
//some more auto-generated methods
The adapter needs a new message, it tells Presenter to request messages, but this is not Presenter's job, so he tells Interactor to request them from Firebase, having done this, we have a clean structure and data flow, completely independent, so changing the view, we don’t everything needs to be changed, we just set up the POJO of the data, speakers and interactors do not need to change what they do, the requests remain unchanged! Therefore, if we switch the amount of data, just add more fields to the POJO, if we want to display them differently, just change the view (by adding more widgets).
A request simply means a request, .orderByValue () means that we get objects (values) there, .limitToLast (100) means that we always get the last 100 messages. Although if the chat is active for a while, all messages (even after 100) will be displayed until the fragment of the message is destroyed / restarted.
Also, in our onDestroy ChatActivity, we send the UID to the interactor (via the Present'ator) to remove the user from currentUsers (exit it).
public class ChatLoginInteractor implements CLoginInteractor {
    @Override
    public void logTheUserOut(String uid) {
        Firebase userRef = new Firebase("https:///currentUsers/" + uid);
        userRef.removeValue(); //removes the Child from Firebase
    }
}
How it works, step by step .
The Firebase library for Android is very well built, the documentation is a little complicated to understand, but the basic principles are easy to get if you dig and try to combine things.
- A link to Firebase is just a link to the directory into which you want to make changes, requests or just add new data.
The listeners give us “Rx-like” functions, they constantly monitor the addition of new users (each object in the directory is a child), and we can work with their data.
DataSnapshot is a list of current values in one directory.
AuthData is like a bundle of all data for a specific user / request, UID, unique key ...
- Firebase uses Jackson parsing, so your POJOs need empty constructors, and setters need generation
- you really don't need special REST clients, since the DataSnapshot function can do all the parsing of the data using .getValue (POJO.class)
- In real time ... All requests and clicks on Firebase are extremely fast, since all data is formatted as JSON objects.
Before using any references to your Firebase, you must call Firebase.setAndroidContext (this) in each onCreate () method
Conclusion :
Firebase is an extremely powerful tool for simple Backend databases, it is very fast and easy to use on small projects, but can be used even for more complex applications like this chat application.
It is cross-platform, so you can create Firebase applications for Android, iOS and JS with full support (JS supports Angular, React and Node, I believe) and use the same Firebase template on all three major platforms.
PS I do not guarantee full performance for a long time, since FireBase is constantly updated and changed. Making a few changes will change the situation.