 December 14, 2017 at 15:21
Recommendations for installing InterSystems Caché DBMS in grocery mode
- Tutorial
This article was written as an attempt to share experience in installing InterSystems Caché DBMS in grocery mode. Everyone knows that the configuration of the DBMS for development is very different from the combat conditions. If development, as a rule, is carried out in greenhouse conditions with minimal security settings, then when we upload our project to the live Internet, we should take care of its reliable and uninterrupted existence in an aggressive environment.
Recently, for one project, I needed to check how the Caché DBMS complies with the requirements of the new edition of the PCI DSS 3.2 payment card industry data security standard adopted in April 2016.
The settings for disconnecting the database for inactive user sessions depend on the type of connection to Caché.
For SQL and object access via TCP, the parameter is set in the control portal section [Home]> [Configuration]> [SQL Settings]> [General SQL Settings] , TCP Keep Alive interval (in seconds) parameter: set to 900, which will correspond to 900 15 minutes.
For web access, the parameter is set in the “No Activity Timeout” setting for [Home]> [Configuration]> [CSP Gateway Management] . The default value must be replaced by 900 seconds, and the "Apply timeout to all connections" option must be enabled.
To enable logging of audit events, you must enable this option for the entire Caché DBMS instance. To do this, go to the System Management Portal on the Audit management page [Home]> [Security Management]> [Auditing] , and make sure that the "Disable Auditing" option is available, and the "Enable Auditing" option is not available, which means that audit switched on. The converse means that auditing is turned off.
If audit is turned off, it must be turned on by selecting the “Enable Auditing” menu item. Viewing the event log is possible through the System Management Portal: [Home]> [Security Management]> [Auditing]> [View Audit Database]
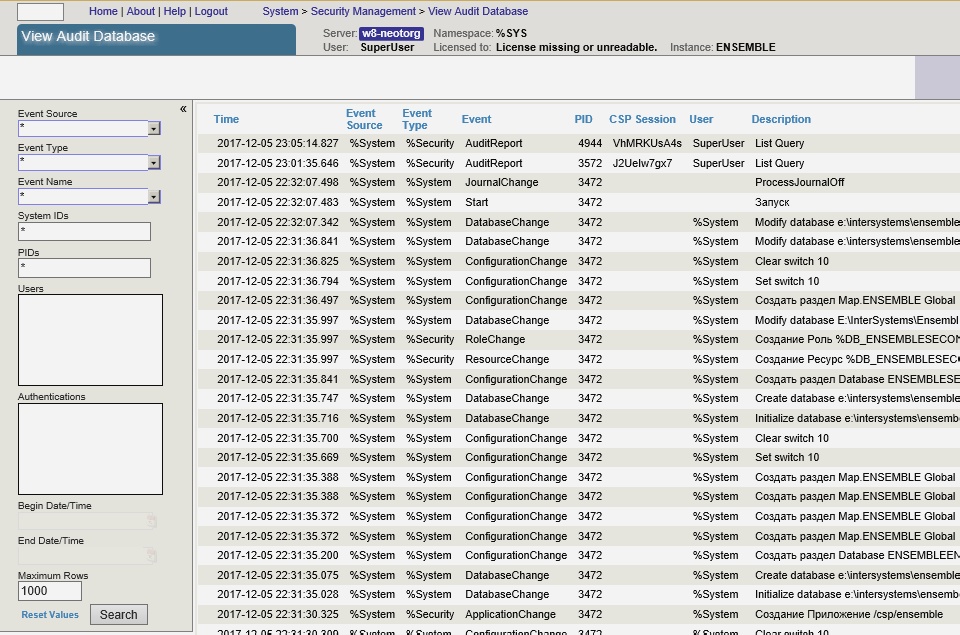
There are also system classes (utilities) for viewing the event log. The following data is logged in the event log:
Access to audit data is controlled by the% DB_CACHEAUDIT resource. To disable public access to this resource, you need to make sure that the properties of this resource are not open for Public in either Read (Write) or write (Write). Access to the list of resources is possible in the system management portal [Home]> [Security Management]> [Resources]> [Edit Resource], after which you must click the Edit link for the selected resource.
By default, the% DB_CACHEAUDIT role of the same name is assigned to the resource% DB_CACHEAUDIT. To limit user access to the event logs, you need to establish a list of users who enter this role, which can be done by the system management portal:
[Home]> [Security Management]> [Roles ]>
Logging of access to tables (data sets) containing payment card data is carried out using the following mechanisms:
1. A system audit mechanism that records an event of the ResourceChange type in the event log when access rights to a resource responsible for storing payment card data change (access to the audit log for viewing is called through the system management portal [Home]> [Security Management]> [Auditing]> [View Audit Database] );
2. At the application level, for logging access to an individual record, you can register an application event in the system and call it from the application program each time the corresponding event occurs.
[System]> [Security Management]> [Configure User Audit Events]> [Edit Audit Event]
The actions of all users are logged in the Caché DBMS, the method of logging is configured by specifying the events to be logged
[Home]> [Security Management]> [Auditing]> [Configure SystemEvents] Logging of all system events must be enabled.
Caché DBMS uses a single audit log, which cannot be changed, except for a natural change in its contents and the facts of an error, cleaning the log, changing the list of audited events, etc., which cause the corresponding AuditChange event to be logged.
The AuditChange event logging task was performed by enabling the audit of all events (see 2.2.2).
The task of logging an unsuccessful attempt to obtain logical access was performed by enabling the audit of all events (see 2.2.2).
Upon the fact of an attempt to obtain logical access, an “LoginFailure” event is generated in the audit log.
The task of logging attempts to gain access to the system was accomplished by including an audit of all events (see 2.2.2).
Upon an unsuccessful attempt to gain access, an “LoginFailure” event is generated in the audit log. Upon the fact of a successful attempt to gain access, an “Login” event is generated in the audit log.
The task of logging changes in audit parameters was performed by including the audit of all events (see 2.2.2).
Upon the fact of an attempt to obtain logical access, an AuditChange event is generated in the audit log.
Caché DBMS records the creation, modification, and deletion of the following system objects: roles, privileges, resources, users.
The task of logging the creation and deletion of system objects was accomplished by including an audit of all events (see 2.2.2).
Upon the creation, modification and deletion of system objects, the events “ResourceChange”, “RoleChange”, “ServiceChange”, “UserChange” are created in the audit log.
You must ensure that access to the% DB_CACHEAUDIT resource is restricted. That is, only administrators or persons whose duties include monitoring logs have the right to read and write to this resource.
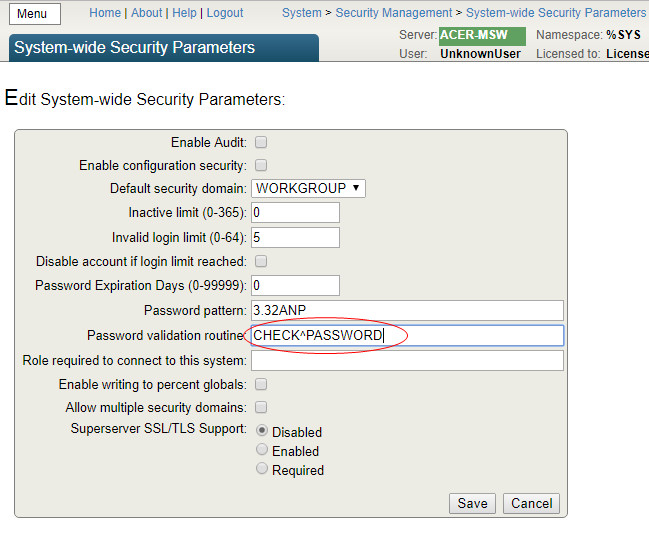
Following the above recommendations, I installed the Caché DBMS in the maximum safe mode. To demonstrate compliance with the requirements of the PCI DSS standard of clause 8.2.5 “Prohibition of reuse of old passwords”, I implemented a small program that will be launched by the system when the user edits his password and checks the repeated use of it.
And in the management portal, save the name of this program.
It turned out that my product configuration differed from the test one not only in the level of security, but in the number of users. There were several thousand of them in combat use. And when administering the system, I was faced with the inability to create a new user by copying the settings from an existing one.

DBMS developers have limited the list to 1000 items. My standard was lost somewhere below and did not get on the list. After consulting with the Intersystems WRC support service, I received recommendations that this problem can be solved by creating a special global node in the system area with the command:
That is how it was possible to increase the number of displayed users in the drop-down list. Exploring this global, I found in it many other useful saved settings for the current user. But there is an inconvenience: this global has mapping to a temporary CacheTemp database and will be deleted after a reboot. And this problem can be solved only by saving this global before shutting down the system and restoring it at startup.
For this, I created two programs ^% ZSART and ^% ZSTOP with the required functionality.
And returning to security and the requirements of the standard, one cannot fail to say about the backup procedure. The PCI DSS standard requires backups of not only data, but also event logs. In Caché DBMS, all logged events are recorded in the CACHEAUDIT database, which, along with other databases, can be included in the list of databases for backup.
The Caché DBMS distribution already has several ready-made backup tasks,
but they didn’t always suit me. Each time, in a particular project, features were required that were not in the tasks “out of the box”. For one project, it was required to automate control over the number of copies with the ability to delete old ones. For another, before copying it was necessary to evaluate the projected occupied volume of the future file. And I implemented my backup program.
All the main wishes are implemented in it: the limitation of the number of copies with the removal of the old ones and the forecast of the size of the new file, and different ways to select or exclude from the list of databases. We import into the system and create a new task using the Task Manager.
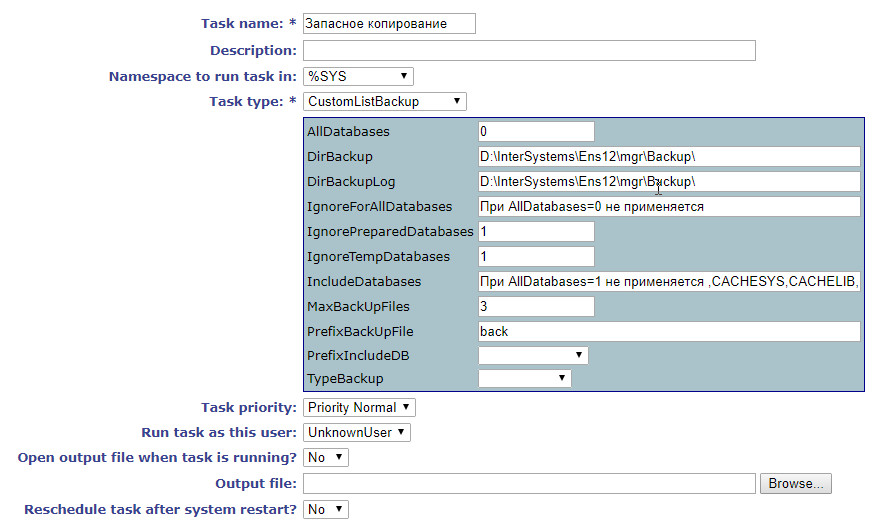
And we include the database in the list of copied databases.
All examples are given for the Caché DBMS version 2016.1. Examples are provided for informational purposes only and installing them in a product system should be done only after serious testing. I will be glad if the above code helped someone in their work, or saved me from errors.
→ Repository on Github
The following materials were used in the preparation of this article:
How to Install InterSystems Caché DBMS at Advanced Security
You need to start with the operating system, you must do the following:
DBMS manufacturer InterSystems strongly recommends deploying application solutions only on versions no lower than Caché 2015.2.
Disabled all services and resources that are not used by application systems of the certified solution.
For services using network access, IP addresses must be explicitly specified from which remote interaction is possible.
Unused CSP web applications must be disabled.
For the required CSP applications, access to them without authentication and authorization must be excluded.
It must be password protected and access to the CSP Gateway restricted.
The audit of the DBMS should be included.
The encryption option must be enabled for the configuration file.
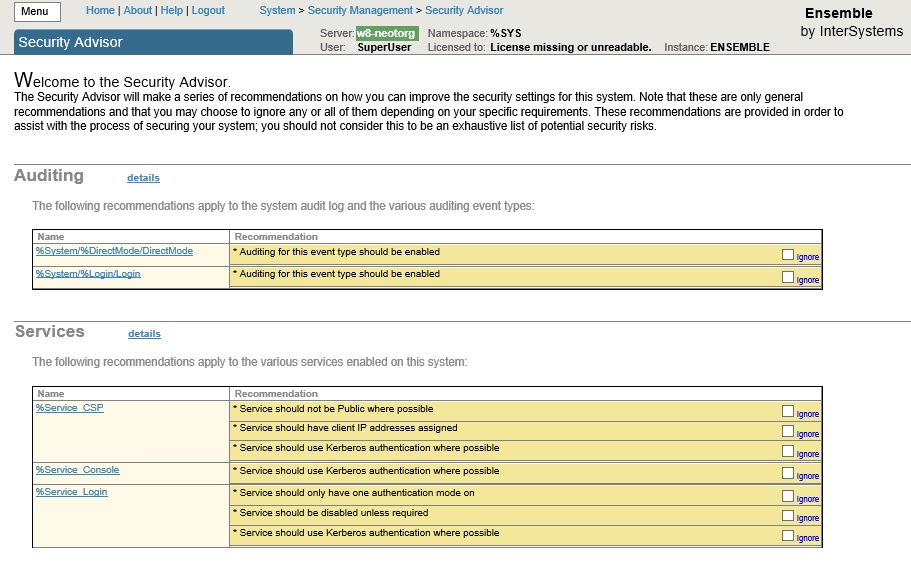
As a security check, the system settings should be started from the Security Advisor management portal and recommendations based on the results of its work should be implemented.
[Home] -> [System]> [Security Management]> [Services]
For services (Services section):
Ability to set% globals should be turned off - The ability to change percentage globals should be turned off . Since such globals are often used for the operation of system code, changes to such variables can lead to unpredictable consequences.
Unauthenticated should be off - Unauthenticated access should be turned off. Unauthenticated access to the service provides all users access to it.
Service should be disabled unless required - If the service is not used, it must be disabled. Access to any service that is not used by the application solution can provide an unjustified level of access to the system.
Service should use Kerberos authentication - Access through any other authentication mechanism does not provide the maximum level of security.
Service should have client IP addresses assigned - IP addresses of connections to the service must be specified explicitly. Limiting the IP addresses from which connections will be accepted allows more tight control over connections to Caché
Service is Public - Public services enable all users, including the UnknownUser account, which does not require authentication, to gain unregulated access to Caché
[Home] -> [System]> [Security Management]> [Web Applications]
Applications (CSP, Privileged Routine, and Client Applications)

Application is Public - Public applications enable all users, including the unauthenticated UnknownUser account, to gain unregulated access to the Caché
Application conditionally grants the% AII role - The system cannot be considered secure if the application has the potential to delegate all privileges to its users. Applications should not delegate all privileges.
Application grants the% AII role - The application explicitly delegates all privileges to its users. Applications do not have to delegate all privileges
You must ensure that unused system accounts are blocked or deleted, and that the password for the used system accounts is changed.
To identify these accounts, you must use the Security Advisor management portal component. To do this, go to the management portal on [Home]> [Security Management]> [Security Advisor] and for entries in the Users section for which Recommendations = "Password should be changed from default password", the passwords must be changed for the corresponding users .
If several people administer the DBMS, then a personal account should be created for each, endowed with the minimum necessary privileges for the performance of official duties.
When delimiting access, you must be guided by the principle of minimum privileges. That is, to prohibit the user everything, and then provide only the rights necessary for the performance of official duties. When assigning privileges, you must be guided by the rule of granting privileges only by role. That is, you can assign rights only to a role, and not to a specific user, then assign the role to a specific user.
To check the security settings in terms of access control, run the Security Advisor. The following steps must be followed, depending on the recommendations issued by the Security Advisor.
This role holds privileges on the Audit database - This role has access privileges to the audit database. Read access allows the use of audit data inappropriately. Write access allows you to compromise audit data
This role holds the% Admin_Secure privilege - This role includes the% Admin_Secure role, which allows you to change access privileges for other users /
This role holds WRITE privilege on the CACHESYS database - This role gives write access to CACHESYS system database, which allows you to change the Caché system code and system settings
At least 2 and at most 5 users should have the% AII role - At least 2 and no more than 5 users must have the% All role. Too few users with this role can lead to access problems in emergency situations; too many users could compromise the overall security of the system.
This user holds the% AII role - This user has the% All role. You must verify the need to assign this role to this user.
UnknownUser account should not have the% AII role - The system cannot be considered safe if UnknownUser has the% All role.
Account has never been used - The account has never been used . Unused accounts can be used when trying to gain unauthorized access.
Account appears dormant and should be disabled - The account is inactive and must be disabled. Inactive accounts (those that have not been used for 30 days) can be used when trying to gain unauthorized access.
Password should be changed from default password - The default value for the password must be changed.
When deleting a user, you must ensure that the roles and privileges created by this user are deleted if they are not required.
Password case sensitivity support is included in Caché by default.
The password policy is implemented through the system management portal in the section:
[Home]> [Security Management]> [System Security Settings]> [System-wide Security Parameters] .
The required password complexity is set by specifying the password template in the Password Pattern parameter . The default setting for maximum
security Password Pattern= 8.32ANP, which means using passwords with a minimum length of 8 characters, a maximum size of 32 characters, the use of alphanumeric characters and punctuation characters is allowed. To connect specific password validation algorithms, the Password validation routine parameter is used.
A detailed description is given in [1], section “Password Strength and Password Policies”.
In addition to using internal mechanisms, authentication in Caché can be delegated to the operating system, Kerberos, or LDAP servers.
OS Security Settings
You need to start with the operating system, you must do the following:
- Minimize Caché DBMS Technology Account Rights
- Rename the local computer administrator account.
- Leave only the minimum required users in the OS.
- Timely install security updates for the OS and the services used.
- Use and regularly update antivirus software
- Disable or delete unused services and services.
- Restrict access to database files
- Limit rights to Caché data files (leave only to the owner and database administrators)
- For UNIX / Linux systems, it is required to create the following types of groups and users, which must be created before installation:
- Owner user ID
- Management group ID
- Internal Caché system group ID
- Internal Caché user ID
InterSystems Caché installation time security settings
DBMS manufacturer InterSystems strongly recommends deploying application solutions only on versions no lower than Caché 2015.2.
During installation, you must perform the following steps:
- Select installation mode Locked down
- Select the Custom Setup installation mode and select only those components that are minimally necessary for the application to work
- When installing, specify a SuperServer port that is different from the standard for TCP port 1972 installations
- When installing, specify the port of the internal web server that is different from the standard for TCP installations port 57772
- Specify a path different from the standard one for the location of the Caché instance (for Windows systems, the default path is C: \ lnterSystems \ Cache, for UNIX / Linux systems - / usr / Cachesys
Caché security settings after installation
After installation, the following actions should be performed (most of them are performed during the installation mode Locked down (Elevated):
Disabled all services and resources that are not used by application systems of the certified solution.
For services using network access, IP addresses must be explicitly specified from which remote interaction is possible.
Unused CSP web applications must be disabled.
For the required CSP applications, access to them without authentication and authorization must be excluded.
It must be password protected and access to the CSP Gateway restricted.
The audit of the DBMS should be included.
The encryption option must be enabled for the configuration file.
As a security check, the system settings should be started from the Security Advisor management portal and recommendations based on the results of its work should be implemented.
[Home] -> [System]> [Security Management]> [Services]
For services (Services section):
Ability to set% globals should be turned off - The ability to change percentage globals should be turned off . Since such globals are often used for the operation of system code, changes to such variables can lead to unpredictable consequences.
Unauthenticated should be off - Unauthenticated access should be turned off. Unauthenticated access to the service provides all users access to it.
Service should be disabled unless required - If the service is not used, it must be disabled. Access to any service that is not used by the application solution can provide an unjustified level of access to the system.
Service should use Kerberos authentication - Access through any other authentication mechanism does not provide the maximum level of security.
Service should have client IP addresses assigned - IP addresses of connections to the service must be specified explicitly. Limiting the IP addresses from which connections will be accepted allows more tight control over connections to Caché
Service is Public - Public services enable all users, including the UnknownUser account, which does not require authentication, to gain unregulated access to Caché
[Home] -> [System]> [Security Management]> [Web Applications]
Applications (CSP, Privileged Routine, and Client Applications)
Application is Public - Public applications enable all users, including the unauthenticated UnknownUser account, to gain unregulated access to the Caché
Application conditionally grants the% AII role - The system cannot be considered secure if the application has the potential to delegate all privileges to its users. Applications should not delegate all privileges.
Application grants the% AII role - The application explicitly delegates all privileges to its users. Applications do not have to delegate all privileges
1. User management
1.1 System Account Management
You must ensure that unused system accounts are blocked or deleted, and that the password for the used system accounts is changed.
To identify these accounts, you must use the Security Advisor management portal component. To do this, go to the management portal on [Home]> [Security Management]> [Security Advisor] and for entries in the Users section for which Recommendations = "Password should be changed from default password", the passwords must be changed for the corresponding users .
1.2 Privileged Account Management
If several people administer the DBMS, then a personal account should be created for each, endowed with the minimum necessary privileges for the performance of official duties.
1.3 Rights and privileges management
When delimiting access, you must be guided by the principle of minimum privileges. That is, to prohibit the user everything, and then provide only the rights necessary for the performance of official duties. When assigning privileges, you must be guided by the rule of granting privileges only by role. That is, you can assign rights only to a role, and not to a specific user, then assign the role to a specific user.
1.4 Differentiation of access rights
To check the security settings in terms of access control, run the Security Advisor. The following steps must be followed, depending on the recommendations issued by the Security Advisor.
For roles (Roles):
This role holds privileges on the Audit database - This role has access privileges to the audit database. Read access allows the use of audit data inappropriately. Write access allows you to compromise audit data
This role holds the% Admin_Secure privilege - This role includes the% Admin_Secure role, which allows you to change access privileges for other users /
This role holds WRITE privilege on the CACHESYS database - This role gives write access to CACHESYS system database, which allows you to change the Caché system code and system settings
For users:
At least 2 and at most 5 users should have the% AII role - At least 2 and no more than 5 users must have the% All role. Too few users with this role can lead to access problems in emergency situations; too many users could compromise the overall security of the system.
This user holds the% AII role - This user has the% All role. You must verify the need to assign this role to this user.
UnknownUser account should not have the% AII role - The system cannot be considered safe if UnknownUser has the% All role.
Account has never been used - The account has never been used . Unused accounts can be used when trying to gain unauthorized access.
Account appears dormant and should be disabled - The account is inactive and must be disabled. Inactive accounts (those that have not been used for 30 days) can be used when trying to gain unauthorized access.
Password should be changed from default password - The default value for the password must be changed.
When deleting a user, you must ensure that the roles and privileges created by this user are deleted if they are not required.
1.5 Configuring a password policy
Password case sensitivity support is included in Caché by default.
The password policy is implemented through the system management portal in the section:
[Home]> [Security Management]> [System Security Settings]> [System-wide Security Parameters] .
The required password complexity is set by specifying the password template in the Password Pattern parameter . The default setting for maximum
security Password Pattern= 8.32ANP, which means using passwords with a minimum length of 8 characters, a maximum size of 32 characters, the use of alphanumeric characters and punctuation characters is allowed. To connect specific password validation algorithms, the Password validation routine parameter is used.
A detailed description is given in [1], section “Password Strength and Password Policies”.
In addition to using internal mechanisms, authentication in Caché can be delegated to the operating system, Kerberos, or LDAP servers.
Recently, for one project, I needed to check how the Caché DBMS complies with the requirements of the new edition of the PCI DSS 3.2 payment card industry data security standard adopted in April 2016.
Compliance of Caché DBMS Security Settings with PCI DSS Version 3.2 [5]
| Controlled setting password policies | PCI DSS Requirements | Settings in the System Management Portal |
| User authentication before changing the password. | 8.3 Examine the password and authentication procedures and verify that the user is authenticated before changing the password by phone, email, using a web application or other remote method. | [System]> [Security Management]> [Users]> [Edit User] > Two-factor Authentication For authentication, you can enable two-factor authentication using SMS by mobile phone. |
| Set a unique initial password for each user and immediately change it at the first user login. | 8.2.6 Setting a unique initial password for each user and changing it immediately when the user first logs in. | [System]> [Security Management]> [Users]> [Edit User] > Change password on next login |
| Maximum Password Expiration | 8.2.4 90 days | [System Security]> [System-wide Security Parameters] Password Expiration Days = 80 |
| Minimum Password Length | 8.2.3 7 characters | [System Security]> [System-wide Security Parameters] Password Pattern = 7.32ANP |
| Password complexity | 8.2.3 numbers and symbols | [System Security]> [System-wide Security Parameters] Password Pattern = 7.32ANP |
| Prevent reuse of old passwords | 8.2.5 4 old passwords | By default, no. For implementation, you can connect external authentication, or expand the functionality by implementing the application code [System]> [Security Management]> [Users]> [Edit User]> Password validation routine |
| Limiting the number of invalid input attempts, after exceeding which, the account is locked | 8.1.6 6 attempts 8.1.7 blocking duration not less than 30 minutes | [System Security]> [System-wide Security Parameters] Invalid login limit = 6 Disable account if login limit reached = checked |
1.6 Configuring disconnection with the inactive connection base
The settings for disconnecting the database for inactive user sessions depend on the type of connection to Caché.
For SQL and object access via TCP, the parameter is set in the control portal section [Home]> [Configuration]> [SQL Settings]> [General SQL Settings] , TCP Keep Alive interval (in seconds) parameter: set to 900, which will correspond to 900 15 minutes.
For web access, the parameter is set in the “No Activity Timeout” setting for [Home]> [Configuration]> [CSP Gateway Management] . The default value must be replaced by 900 seconds, and the "Apply timeout to all connections" option must be enabled.
2 Event Logging
2.1 General settings
To enable logging of audit events, you must enable this option for the entire Caché DBMS instance. To do this, go to the System Management Portal on the Audit management page [Home]> [Security Management]> [Auditing] , and make sure that the "Disable Auditing" option is available, and the "Enable Auditing" option is not available, which means that audit switched on. The converse means that auditing is turned off.
If audit is turned off, it must be turned on by selecting the “Enable Auditing” menu item. Viewing the event log is possible through the System Management Portal: [Home]> [Security Management]> [Auditing]> [View Audit Database]
There are also system classes (utilities) for viewing the event log. The following data is logged in the event log:
- date and time
- Event type
- Account Name (user identification)
Access to audit data is controlled by the% DB_CACHEAUDIT resource. To disable public access to this resource, you need to make sure that the properties of this resource are not open for Public in either Read (Write) or write (Write). Access to the list of resources is possible in the system management portal [Home]> [Security Management]> [Resources]> [Edit Resource], after which you must click the Edit link for the selected resource.
By default, the% DB_CACHEAUDIT role of the same name is assigned to the resource% DB_CACHEAUDIT. To limit user access to the event logs, you need to establish a list of users who enter this role, which can be done by the system management portal:
[Home]> [Security Management]> [Roles ]>
2.2 List of logged event types
2.2.1 Logging access to tables containing payment card data (PCI DSS 10.2.1)
Logging of access to tables (data sets) containing payment card data is carried out using the following mechanisms:
1. A system audit mechanism that records an event of the ResourceChange type in the event log when access rights to a resource responsible for storing payment card data change (access to the audit log for viewing is called through the system management portal [Home]> [Security Management]> [Auditing]> [View Audit Database] );
2. At the application level, for logging access to an individual record, you can register an application event in the system and call it from the application program each time the corresponding event occurs.
[System]> [Security Management]> [Configure User Audit Events]> [Edit Audit Event]
2.2.2 Logging Attempts to Use Administrative Privileges (PCI DSS 10.2.2)
The actions of all users are logged in the Caché DBMS, the method of logging is configured by specifying the events to be logged
[Home]> [Security Management]> [Auditing]> [Configure SystemEvents] Logging of all system events must be enabled.
2.2.3 Logging Changes to the Event Log (PCI DSS 10.2.3)
Caché DBMS uses a single audit log, which cannot be changed, except for a natural change in its contents and the facts of an error, cleaning the log, changing the list of audited events, etc., which cause the corresponding AuditChange event to be logged.
The AuditChange event logging task was performed by enabling the audit of all events (see 2.2.2).
2.2.4 Logging unsuccessful logical access attempts (PCIDSS 10.2.4)
The task of logging an unsuccessful attempt to obtain logical access was performed by enabling the audit of all events (see 2.2.2).
Upon the fact of an attempt to obtain logical access, an “LoginFailure” event is generated in the audit log.
2.2.5 Logging Attempts to Access the System (PCI DSS 10.2.5)
The task of logging attempts to gain access to the system was accomplished by including an audit of all events (see 2.2.2).
Upon an unsuccessful attempt to gain access, an “LoginFailure” event is generated in the audit log. Upon the fact of a successful attempt to gain access, an “Login” event is generated in the audit log.
2.2.6 Logging audit parameter changes (PCI DSS 10.2.6)
The task of logging changes in audit parameters was performed by including the audit of all events (see 2.2.2).
Upon the fact of an attempt to obtain logical access, an AuditChange event is generated in the audit log.
2.2.7 Logging the creation and deletion of system objects (PCI DSS 10.2.7)
Caché DBMS records the creation, modification, and deletion of the following system objects: roles, privileges, resources, users.
The task of logging the creation and deletion of system objects was accomplished by including an audit of all events (see 2.2.2).
Upon the creation, modification and deletion of system objects, the events “ResourceChange”, “RoleChange”, “ServiceChange”, “UserChange” are created in the audit log.
2.3 Protecting event logs
You must ensure that access to the% DB_CACHEAUDIT resource is restricted. That is, only administrators or persons whose duties include monitoring logs have the right to read and write to this resource.
Following the above recommendations, I installed the Caché DBMS in the maximum safe mode. To demonstrate compliance with the requirements of the PCI DSS standard of clause 8.2.5 “Prohibition of reuse of old passwords”, I implemented a small program that will be launched by the system when the user edits his password and checks the repeated use of it.
To install this program, you need to import the source code using Caché Studio, Atelier or the class import page through the control panel
ROUTINE PASSWORD
PASSWORD ; Программа проверки паролей
#include %occInclude
CHECK(Username,Password) PUBLIC {
	if '$match(Password,"(?=.*[0-9])(?=.*[a-zA-Z]).{7,}") quit $$$ERROR($$$GeneralError,"Пароль не соответствует стандарту PCI_DSS_v3.2")
        set Remember=4 ;Количество последних паролей, которых нельзя использовать по PCI-DSS
	set GlobRef="^PASSWORDLIST" ; Имя глобальной ссылки
  	set PasswordHash=$System.Encryption.SHA1Hash(Password)
	if $d(@GlobRef@(Username,"hash",PasswordHash)){
	   	quit $$$ERROR($$$GeneralError,"Этот пароль уже использовался")
	}
	set hor=""
  	for i=1:1 {
	  	; Обходим узлы по хронологии от новых к старым
	  	set hor=$order(@GlobRef@(Username,"datetime",hor),-1)
	  	quit:hor=""
	  	; Удаляем старый сверх лимита
	  	if i>(Remember-1) {
		  	set hash=$g(@GlobRef@(Username,"datetime",hor))
		  	kill @GlobRef@(Username,"datetime",hor)
		  	kill:hash'="" @GlobRef@(Username,"hash",hash)
	  	}
  	}
  	; Сохраним текущий
  	set @GlobRef@(Username,"hash",PasswordHash)=$h
  	set @GlobRef@(Username,"datetime",$h)=PasswordHash
  	quit $$$OK
}
And in the management portal, save the name of this program.
It turned out that my product configuration differed from the test one not only in the level of security, but in the number of users. There were several thousand of them in combat use. And when administering the system, I was faced with the inability to create a new user by copying the settings from an existing one.
DBMS developers have limited the list to 1000 items. My standard was lost somewhere below and did not get on the list. After consulting with the Intersystems WRC support service, I received recommendations that this problem can be solved by creating a special global node in the system area with the command:
%SYS>set ^CacheTemp.MgtPortalSettings($Username,"MaxUsers")=5000That is how it was possible to increase the number of displayed users in the drop-down list. Exploring this global, I found in it many other useful saved settings for the current user. But there is an inconvenience: this global has mapping to a temporary CacheTemp database and will be deleted after a reboot. And this problem can be solved only by saving this global before shutting down the system and restoring it at startup.
For this, I created two programs ^% ZSART and ^% ZSTOP with the required functionality.
Source code for% ZSTOP
%ZSTOP ; останов
	quit
SYSTEM
	;сохраним предпочтения пользователей в неубиваемом глобале
	merge ^tmpMgtPortalSettings=^CacheTemp.MgtPortalSettings
	quit
Source code for% ZSTART
%ZSTART ; старт
	quit
SYSTEM
	;восстановим предпочтения пользователей из неубиваемого глобала
	if $data(^tmpMgtPortalSettings) merge ^CacheTemp.MgtPortalSettings=^tmpMgtPortalSettings
	quit
And returning to security and the requirements of the standard, one cannot fail to say about the backup procedure. The PCI DSS standard requires backups of not only data, but also event logs. In Caché DBMS, all logged events are recorded in the CACHEAUDIT database, which, along with other databases, can be included in the list of databases for backup.
The Caché DBMS distribution already has several ready-made backup tasks,
but they didn’t always suit me. Each time, in a particular project, features were required that were not in the tasks “out of the box”. For one project, it was required to automate control over the number of copies with the ability to delete old ones. For another, before copying it was necessary to evaluate the projected occupied volume of the future file. And I implemented my backup program.
CustomListBackup.cls
Include %occKeyword
/// Класс задачи резервного копирования
Class %SYS.Task.CustomListBackup Extends %SYS.Task.Definition [ LegacyInstanceContext ]
{
/// Если ..AllDatabases=1, то в копию включать все базы данных ..PrefixIncludeDB и ..IncludeDatabases - игнорируются
Property AllDatabases As %Integer [ InitialExpression = 0 ];
/// Если ..AllDatabases=1, то в копию включать все базы данных , исключая из ..IgnoreForAllDatabases через запятую
Property IgnoreForAllDatabases As %String(MAXLEN = 32000) [ InitialExpression = "При AllDatabases=0 не применяется " ];
/// Если ..IgnoreTempDatabases=1, то исключать временные базы
Property IgnoreTempDatabases As %Integer [ InitialExpression = 1 ];
/// Если ..IgnorePreparedDatabases=1, то исключать предустановленные базы
Property IgnorePreparedDatabases As %Integer [ InitialExpression = 1 ];
/// Если ..AllDatabases=0 и если PrefixIncludeDB не пустое, то будем бэкапить все бд, имена которых начинаются на ..PrefixIncludeDB
Property PrefixIncludeDB As %String [ SqlComputeCode = {S {*}=..ListNS()}, SqlComputed ];
/// Если ..AllDatabases=0, то в копию включать все базы данных из ..IncludeDatabases , через запятую
Property IncludeDatabases As %String(MAXLEN = 32000) [ InitialExpression = {"При AllDatabases=1 не применяется "_..ListDB()} ];
/// Имя задачи в общем списке
Parameter TaskName = "CustomListBackup";
/// Путь, где хранить бэкапы
Property DirBackup As %String(MAXLEN = 1024) [ InitialExpression = {##class(%File).NormalizeDirectory("Backup")} ];
/// Путь, куда писать протокол
Property DirBackupLog As %String(MAXLEN = 1024) [ InitialExpression = {##class(%File).NormalizeDirectory("Backup")} ];
/// Тип копии (Full-Полный, Incremental-Инкрементальный, Cumulative-Комулятивный)
Property TypeBackup As %String(DISPLAYLIST = ",Full,Incremental,Cumulative", VALUELIST = ",Full,Inc,Cum") [ InitialExpression = "Full", SqlColumnNumber = 4 ];
/// Префикс имени файла бэкапа
Property PrefixBackUpFile As %String [ InitialExpression = "back" ];
/// Максимальное количество файлов бэкап, самые старые удалять
Property MaxBackUpFiles As %Integer [ InitialExpression = 3 ];
ClassMethod DeviceIsValid(Directory As %String) As %Status
{
	If '##class(%Library.File).DirectoryExists(Directory) quit $$$ERROR($$$GeneralError,"Directory does not exist")
	quit $$$OK
}
ClassMethod CheckBackup(Device, MaxBackUpFiles, del = 0) As %Status
{
	set path=##class(%File).NormalizeFilename(Device)
	quit:'##class(%File).DirectoryExists(path) $$$ERROR($$$GeneralError,"Директория "_path_" не существует")
	set max=MaxBackUpFiles
	set result=##class(%ResultSet).%New("%File:FileSet")
	set st=result.Execute(path,"*.cbk",,1)
	while result.Next()
	{	If result.GetData(2)="F"	{
			continue:result.GetData(3)=0
			set ts=$tr(result.GetData(4),"-: ")
			set ts(ts)=$lb(result.GetData(1),result.GetData(3))
		}
	}
	#; Обойдем все файлы начиная с самого нового
	set i="" for count=1:1 { set i=$order(ts(i),-1) quit:i=""
		#; Получаем прирост в байтах как разницу размера от предыдущего бэкап
		if $data(size),'$data(delta) set delta=size-$lg(ts(i),2)
		#; Получим размер в байтах самого свежего файла бэкап
		if '$data(size) set size=$lg(ts(i),2)
		#; Если количество файлов бэкап больше или равно максимального, то удаляем самые старые вместе с логами
		if count'$g(free) $$$ERROR($$$GeneralError,"Прогнозируемый размер нового файла бэкап больше, чем свободное место на диске:("_$g(size)_"+"_$g(delta)_")>"_$g(free))
	quit $$$OK
}
Method OnTask() As %Status
{
	do $zu(5,"%SYS")
	set list=""
	merge oldDBList=^SYS("BACKUPDB")
	kill ^SYS("BACKUPDB")
	#; Добавление новых свойств для задание запуска бэкап
	set status=$$$OK
	try {
		##; Проврка на количество копий бд, если нужно то удалить самую старую
		##; Проверка на оставшийся объем на диске и прогнозируемый размер нового файла
		set status=..CheckBackup(..DirBackup,..MaxBackUpFiles,1)
		quit:$$$ISERR(status)
		#; Все базы данных
		if ..AllDatabases {
			set vals=""
			set disp=""
			set rss=##class(%ResultSet).%New("Config.Databases:List")
			do rss.Execute()
			while rss.Next(.sc) {
				if ..IgnoreForAllDatabases'="",(","_..IgnoreForAllDatabases_",")[(","_$zconvert(rss.Data("Name"),"U")_",") continue
				if ..IgnoreTempDatabases continue:..IsTempDB(rss.Data("Name"))
				if ..IgnorePreparedDatabases continue:..IsPreparedDB(rss.Data("Name"))
				set ^SYS("BACKUPDB",rss.Data("Name"))=""
			}
		}
		else {
			#; если свойство PrefixIncludeDB не пустое, то будем бэкапить все бд имена которых начинаются на ..PrefixIncludeDB
			if ..PrefixIncludeDB'="" {
					set rss=##class(%ResultSet).%New("Config.Databases:List")
					do rss.Execute(..PrefixIncludeDB_"*")
					while rss.Next(.sc) {
						if ..IgnoreTempDatabases continue:..IsTempDB(rss.Data("Name"))
						set ^SYS("BACKUPDB",rss.Data("Name"))=""
					}
			}
			#; Включим в список конкретные бд
			if ..IncludeDatabases'="" {
				set rss=##class(%ResultSet).%New("Config.Databases:List")
				do rss.Execute("*")
				while rss.Next(.sc) {
					if ..IgnoreTempDatabases continue:..IsTempDB(rss.Data("Name"))
					if (","_..IncludeDatabases_",")'[(","_$zconvert(rss.Data("Name"),"U")_",") continue
					set ^SYS("BACKUPDB",rss.Data("Name"))=""
				}
			}
		}
		do ..GetFileName(.backFile,.logFile)
		set typeB=$zconvert($e(..TypeBackup,1),"U")
		set:"FIC"'[typeB typeB="F"
		set res=$$BACKUP^DBACK("",typeB,"",backFile,"Y",logFile,"NOINPUT","Y","Y","","","")
		if 'res set status=$$$ERROR($$$GeneralError,"Ошибка: "_res)
	} catch {	set status=$$$ERROR($$$GeneralError,"Ошибка: "_$ze)
				set $ze=""
	  }
	kill ^SYS("BACKUPDB")
	merge ^SYS("BACKUPDB")=oldDBList
	quit status
}
/// Получить имена файлов
Method GetFileName(aBackupFile, ByRef aLogFile) As %Status
{
	set tmpName=..PrefixBackUpFile_"_"_..TypeBackup_"_"_$s(..AllDatabases:"All",1:"List")_"_"_$zd($h,8)_$tr($j($i(cnt),3)," ",0)
	do {
		s aBackupFile=##class(%File).NormalizeFilename(..DirBackup_"/"_tmpName_".cbk")
	} while ##class(%File).Exists(aBackupFile)
	set aLogFile=##class(%File).NormalizeFilename(..DirBackupLog_"/"_tmpName_".log")
	quit 1
}
/// Проверить предустановленная ли база данных
ClassMethod IsPreparedDB(name)
{
	if (",ENSDEMO,ENSEMBLE,ENSEMBLEENSTEMP,ENSEMBLESECONDARY,ENSLIB,CACHESYS,CACHELIB,CACHETEMP,CACHE,CACHEAUDIT,DOCBOOK,USER,SAMPLES,")[(","_$zconvert(name,"U")_",") quit 1
	quit 0
}
/// Проверить временная ли база данных
ClassMethod IsTempDB(name)
{
	quit:$zconvert(name,"U")["TEMP" 1
	quit:$zconvert(name,"U")["SECONDARY" 1
	quit 0
}
/// Получить список имен баз данных через запятую
ClassMethod ListDB()
{
	set list=""
	set rss=##class(%ResultSet).%New("Config.Databases:List")
	do rss.Execute()
	while rss.Next(.sc) {
		set list=list_","_rss.Data("Name")
	}
	quit list
}
ClassMethod ListNS() [ Private ]
{
	set disp=""
	set tRS = ##class(%ResultSet).%New("Config.Namespaces:List")
	set tSC = tRS.Execute()
	While tRS.Next() {
				set disp=disp_","_tRS.GetData(1)
	}
	set %class=..%ClassName(1)
	$$$comSubMemberSet(%class,$$$cCLASSproperty,"PrefixIncludeDB",$$$cPROPparameter,"VALUELIST",disp)
	quit ""
}
ClassMethod oncompile() [ CodeMode = generator ]
{
	$$$defMemberKeySet(%class,$$$cCLASSproperty,"PrefixIncludeDB",$$$cPROPtype,"%String")
	set updateClass=##class("%Dictionary.ClassDefinition").%OpenId(%class)
	set updateClass.Modified=0
	do updateClass.%Save()
	do updateClass.%Close()
}
}
All the main wishes are implemented in it: the limitation of the number of copies with the removal of the old ones and the forecast of the size of the new file, and different ways to select or exclude from the list of databases. We import into the system and create a new task using the Task Manager.
And we include the database in the list of copied databases.
All examples are given for the Caché DBMS version 2016.1. Examples are provided for informational purposes only and installing them in a product system should be done only after serious testing. I will be glad if the above code helped someone in their work, or saved me from errors.
→ Repository on Github
The following materials were used in the preparation of this article:
- Caché Security Administration Guide (InterSystems)
- Caché Installation Guide. Preparing for Caché Security (InterSystems)
- Caché System Administration Guide (InterSystems)
- Introduction to Caché. Caché Security (InterSystems)
- PCI DSS.RU. Requirements and security audit procedure. Version 3.2









