November 10, 2017 at 23:25
Distribution of the frontend via CDN
In the world of modern web technologies, everything is rapidly developing and changing. At a client’s request a couple of years ago it was normal to render the DOM structure on the server (for example, using PHP) and render the already fully formed page. Now more and more often there are sites with a complete separation of the frontend (Angular, React, Vue.js ...) from the backend (some API endpoints), where on the frontend almost all the content is generated through scripts, and the server gives only data on request. Here we could mention the SSR (Server Side Rendering), but not about this work.
At any time, the developers and site owners faced a difficult task: to deliver content as quickly as possible, to as many customers as possible. One of the most correct decisions is to use CDN (Content Delivery Network) to distribute static files. In the case of dynamic rendering of pages on the server, we had to limit ourselves to a small list of objects that could be placed on the CDN: style sheets, script files, images. However, the frontend written in Angular (React, Vue.js ...) is entirely static, including the index page. This is where the thought arises: why not organize the distribution of the entire frontend via CDN?
This article will discuss how to configure a comprehensive solution for the development, version control, automatic assembly and delivery of a static site using Gitlab CI, Amazon S3 and Amazon CloudFront. We will also talk about setting up related things: git, secure connection via HTTPS, domain mail, DNS hosting, backend server ...
If you are interested in this topic, welcome to cat. Caution! Lots of screenshots.
I spent a lot of time looking for suitable services for a number of criteria. Firstly, this is the price - I would like the service to be either free or not very expensive. Secondly, reliability. It is also good if the service takes on most of the responsibilities, eliminating the need to install and configure something. For example, why set up your own git server, use some third-party CI service (Continuous Integration), if Gitlab provides all these services out of the box, as well as an unlimited number of private repositories, organizations and co-workers? Why set up domain mail on your own server if you can provide this to Yandex? Regarding CDN - I just did not find anything cheaper than Amazon CloudFront. Amazon S3 file storage is also not expensive (but why store a lot of files on VDS if it's expensive?).
First, we’ll attach your domain to Yandex mail. We take this step primarily to configure domain mail. We will need to confirm ownership of the domain in order to receive the Amazon SSL certificate, and for this we will need to receive an email at [email protected].
1.1. Register / login to Yandex .
1.2. Go to Yandex domain mail and add your domain (menu item "Connect domain").

Here I want to immediately note that Yandex has "SDA 2.0" or "Yandex.Connect." However, I just can’t decide whether Yandex.Connect’s interface hasnot been finalized.It’s too simple and it lacks the necessary functionality, or it is just too difficult to find the necessary functionality. One way or another, I was not able to add several domains at once to Yandex.Connect, with the ability to edit the DNS records of each of them separately. Therefore, for me personally, it turned out to be easier to first add the domain to the SDA (Mail For Domain), and then transfer it to Yandex.Connect, which we will do.
1.3. We confirm the ownership of the domain.

The easiest way for us is to delegate the domain to Yandex. To do this, install the following NS servers for your domain in the registrar’s control panel: Attention! This step must be performed strictly after connecting the domain to the mail for the domain (paragraph 1.2). 1.4. We are waiting for up to 72 hours (with luck).
Verification of domain ownership should pass automatically. After that, on the traffic rules page in the list of “My domains” you should see a green message that “the domain is connected and delegated to Yandex”.
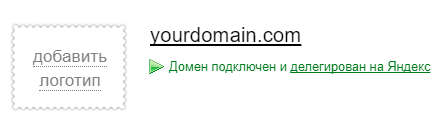
Now we can connect mail for the domain. There is no need to configure MX records for the domain, because we delegated the domain to Yandex NS servers.
At this stage, we have already received domain mail with the ability to add up to 1000 mailboxes and with the correct DNS mail records.
1.5. We create the first mailbox [email protected].
1.6. In the top menu, click on the link "Migrate to Connect."
We transfer the domain to Yandex.Connect, indicate the name of the organization. After that, the page becomes available to us.https://connect.yandex.ru/portal/home .

1.7. Go to the "Admin". Various settings are available here.
The most interesting thing for us is the menu item “DNS Management”. We will return to it later. Now we need to add an alias for the mailbox named [email protected]. We will need this box to receive an email with a confirmation of domain ownership from Amazon.
1.8. Go to the menu item "Organizational structure" and select the only (so far) user who was automatically created when the first mailbox was added (item 1.5).

1.9. Click the ellipsis in the upper right corner of the user’s card, select the “Manage aliases” item in the drop-down menu.
In the window that appears, click the "Add New" button.

Enter “webmaster” and click the “Add” button.
Now we have an alias for the [email protected] mailbox and we are ready to receive letters to domain mail.
To perform further steps in this guide, you need the AWS root user account .
If you do not already have an account, then you are fabulously lucky and you can take advantage of the level of free use of AWS. To do this, you must go through the registration procedure . During the registration process, you will be asked for bank card information, from where they will remove (and not return!) $ 1 to check solvency. You will also need to indicate your phone number, which will call the robot from America.
In general, the registration process is quite simple and in my opinion does not require a detailed description.
For automatic data exchange with AWS services, we will use the aws cli console utility (AWS Command Line Interface). The utility is authorized using a pair of Access key ID and Secret access key. Create them.
3.1. We go to the AWS console.
3.2. In the upper menu on the right, click on your username. In the drop-down menu, select the item "My Security Credentials".
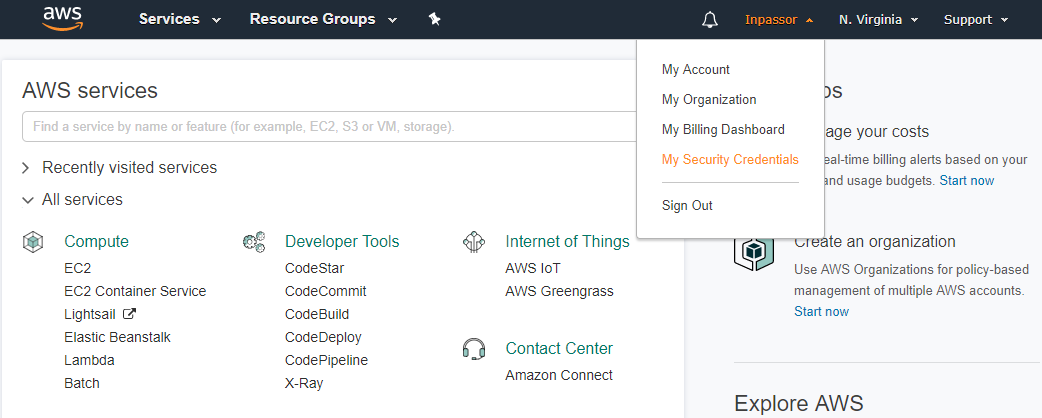
3.3. A warning window may appear here.
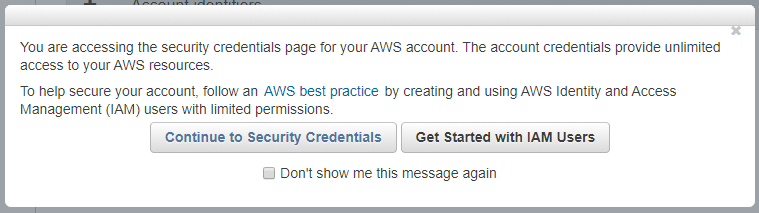
You can ignore it and click the “Continue to Security Credentials” button.
3.4. In the menu on the left, select the "Users" item. Click the "Add user" button.
3.5. In the field "User name" write the username. For example, "cli-manager".
In the item “Access type”, check the box “Programmatic access”.
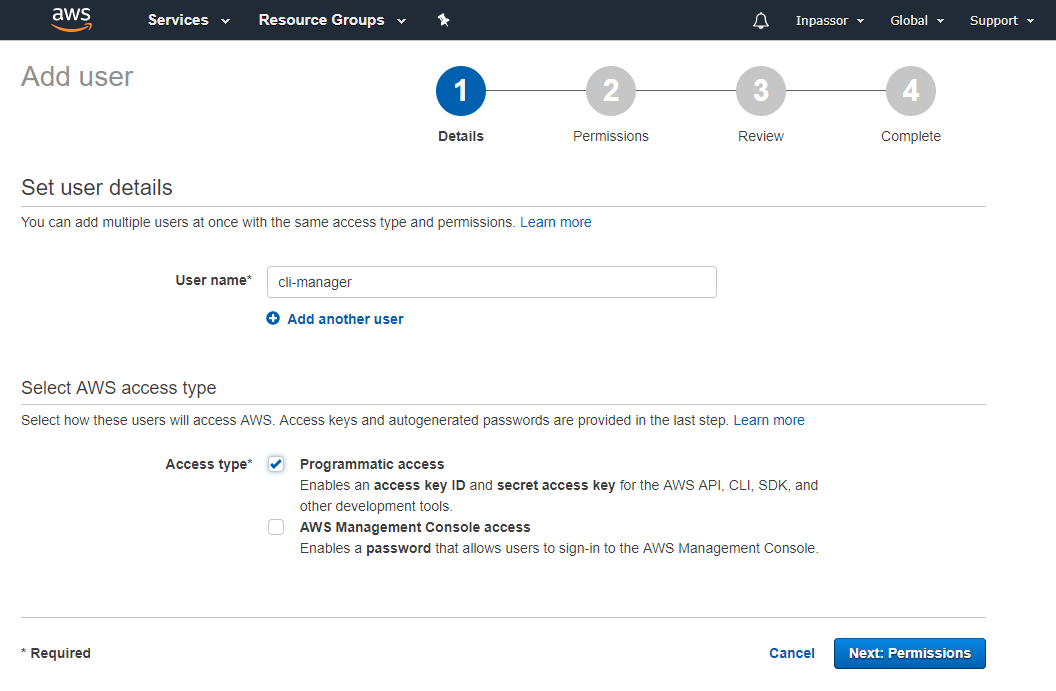
Click the “Next: Permissions” button.
3.6. In the next paragraph, select “Attach existing policies directly”. Select the “AdministratorAccess” checkbox.

Click the “Next: Review” button.
3.7. In the next paragraph, click the "Create user" button.
3.8. In the last paragraph we will see the newly created user and his data.

Attention! Immediately write down the Access key ID and Secret access key (you can see it by clicking "show") and / or download the .csv file with user data (by clicking the "Download .csv" button). You will never see the secret access key anywhere else.
Now we need to get an SSL certificate for our domain.
4.1. In the AWS console, select “Services” in the top menu.
4.2. In the search for services, type “Certificate manager”.
4.3. Click the button “Request a certificate”.
4.4. In the field "Domain name" write "* .yourdomain.com".
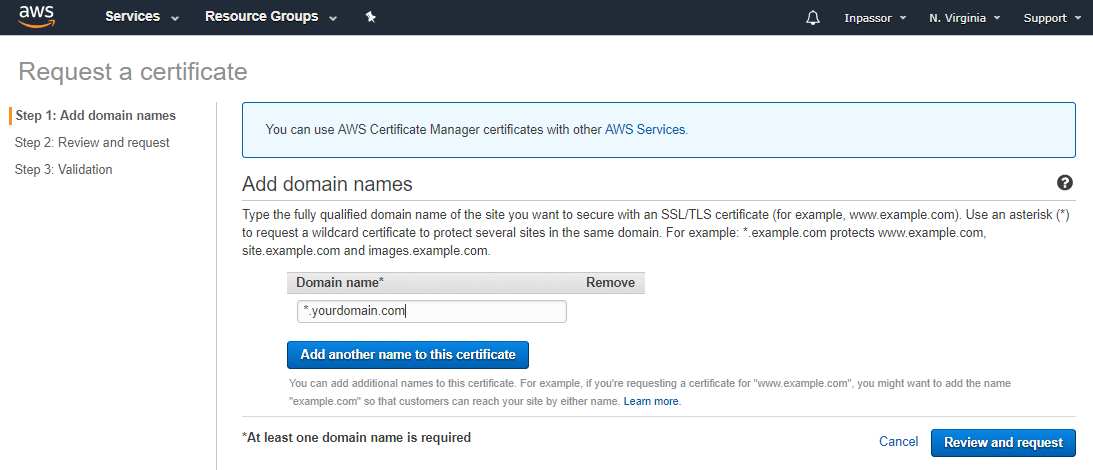
Pay attention to the asterisk and the dot in front of the domain name. This way we get a wildcard certificate for the domain and all its subdomains. Click the “Review and request” button.
4.5. In the next paragraph, click the "Confirm and request" button.
4.6. In the next paragraph, click the "Continue" button.

Here we will see the certificate just requested and its status: “Pending validation”.
4.7. Now go to the Yandex mail .
Log in to your domain mailbox that you created in paragraph 1.5. of this guide ([email protected]). You should have received an email requesting confirmation of domain ownership from Amazon.
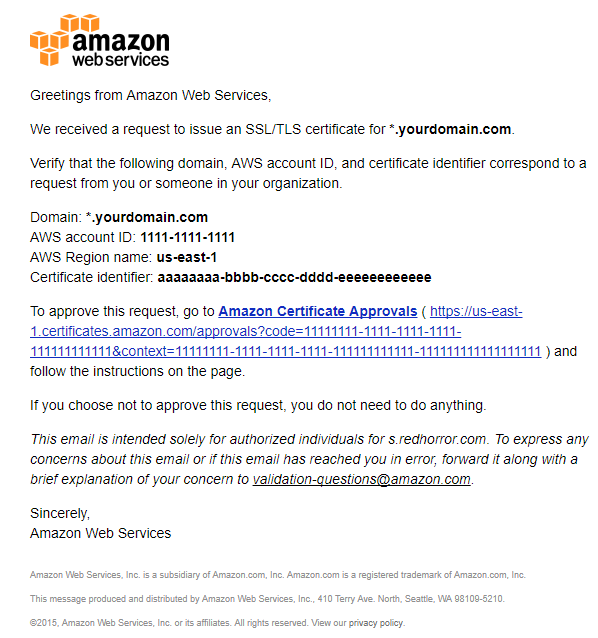
4.8. We follow the link in the letter.
A new browser tab opens with a domain ownership confirmation page.

Click the “I Approve” button.
The certificate must pass a successful confirmation.
Returning to the Certificate manager, we will see our certificate and its status: “Issued”.
Let's create an Amazon S3 basket in which static files of our frontend will be stored.
5.1. In the AWS console, select “Services” in the top menu.
5.2. In the search for services, we type “S3”.
5.3. Click the "Create bucket" button.
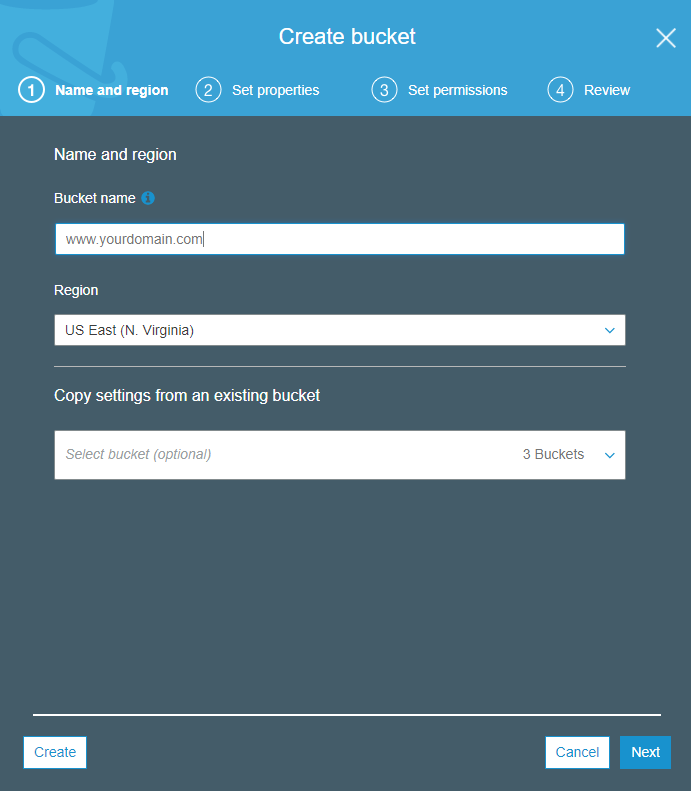
In the field "Bucket name" indicate the host name (along with www). It must be exactly the same as your domain name. For example: www.yourdomain.com .
In the "Region" field, select "US East (N. Virginia)." Firstly, this will avoid possible problems with redirecting to the wrong objects ( documentation article) Secondly, it is the most popular region and the lowest prices here. Thirdly, we don’t care in which region the basket is located, because CDN will distribute the content, and clients will not access the S3 files directly.
Click “Next” several times, leave all fields as they are.
A new basket with the name www.yourdomain.com
5.4 will appear in the list of your baskets . Editing the properties of the basket.
Click on the empty space next to the name of your basket. A pop-up window will appear on the right side of the window.

5.5. Select the “Properties” item.
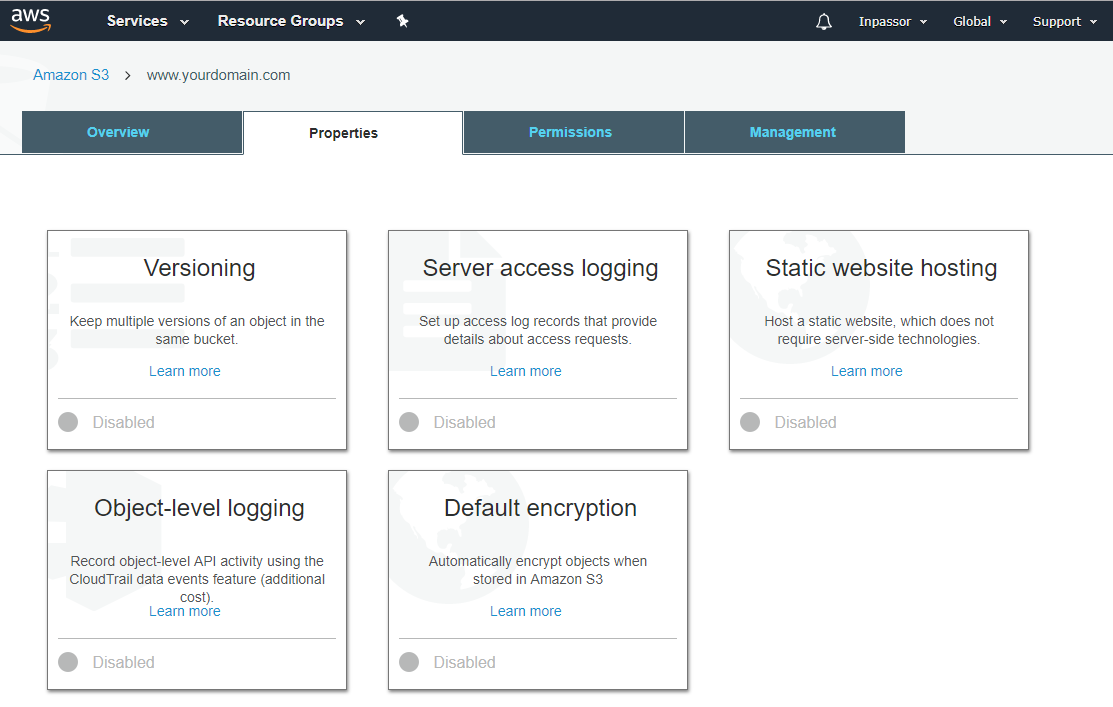
5.6. Click on “Static website hosting”.
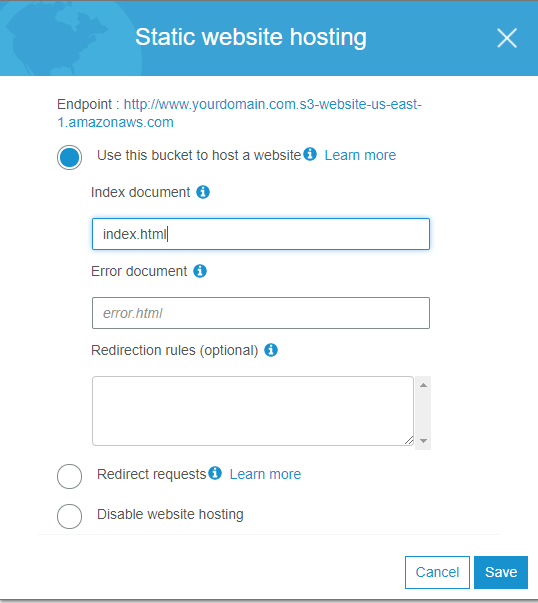
Copy the “Endpoint” URL immediately (located at the top of the window). It will be needed for further settings.
We select the first item "Use this bucket to host a website".
In the field “Index document” write “index.html”.
Click the “Save” button.
5.7. Select the “Permissions” tab.
Here we need to add www.yourdomain.com.s3-website-us-east-1.amazonaws.com and https: //*.yourdomain.com to the list of allowed hosts for cross-domain requests.

Press the button “CORS configuration”.
We will not parse the XML file format. For a detailed study of this issue, you can read the documentation . It is enough for us to simply copy this into the text box:
Replace the AllowedOrigin tag values with yours. The first address is the same Static website endpoint that you copied in paragraph 5.6 of this manual.
Click the “Save” button.
Now we need to organize distribution of files via CDN from just created basket.
6.1. In the AWS console, select “Services” in the top menu.
6.2. In the search for services, type “CloudFront”.
6.3. Click the Create Distribution button.
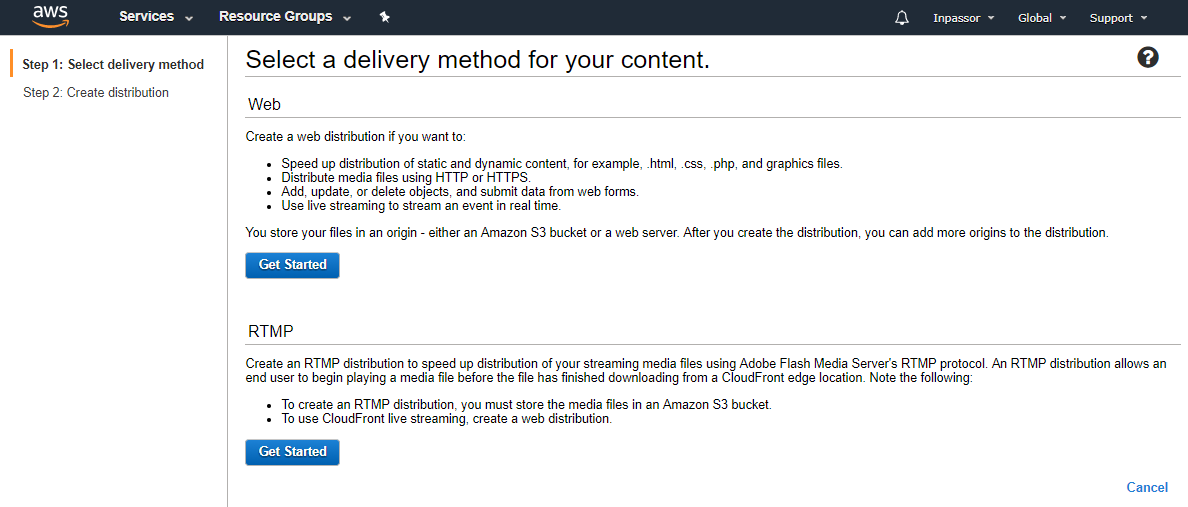
We select the delivery method "Web", click the corresponding button "Get Started".
A very large form will open (I will not do a screen).
Let's go through the fields we need. The remaining fields do not touch, leave as is. In any case, we have the opportunity to change all these settings in the future.
Origin Settings
Origin Domain Name : here carefully! No need to choose the domain “ www.yourdomain.com.s3.anazonaws.com»From the hint to this field! Paste here the Static website endpoint, which you copied in paragraph 5.6 of this manual, without the “http: //” at the beginning.
Default Cache Behavior Settings
Viewer Protocol Policy : select "Redirect HTTP to HTTPS".
Allowed HTTP Methods : select "GET, HEAD, OPTIONS".
Cached HTTP Methods : check the box next to “OPTIONS”.
Cache Based on Selected Request Headers : select "Whitelist". In the " Whitelist Headers " item that appears , select "Origin", click the "Add" button.
Object Caching : Select "Customize".
Minimum TTL : write the value "300".
Compress Objects Automatically: select "Yes".
Distribution Settings
Alternate Domain Names (CNAMEs) : in the text box we write “ www.yourdomain.com ” and “static.yourdomain.com” - one on each line. At static.yourdomain.com we will have access to all the same as through www.yourdomain.com . We will use it to obtain static files in order to reduce the number of queries to the main domain.
SSL Certificate : select "Custom SSL Certificate". Below in the drop-down list, select the previously received SSL certificate "* .yourdomain.com".
Default Root Object : enter “index.html” (without a slash at the beginning).
Click the Create Distribution button.
Distribution created. She will appear in the list with the status "In Progress". Over a period of time (usually up to 10 minutes), it will become “Enabled”.
Immediately copy the ID and Domain Name of our distribution, we will need them for further settings.
6.4. Set up error pages.
Click on the distribution ID in the list. Go to the “Error Pages” tab.
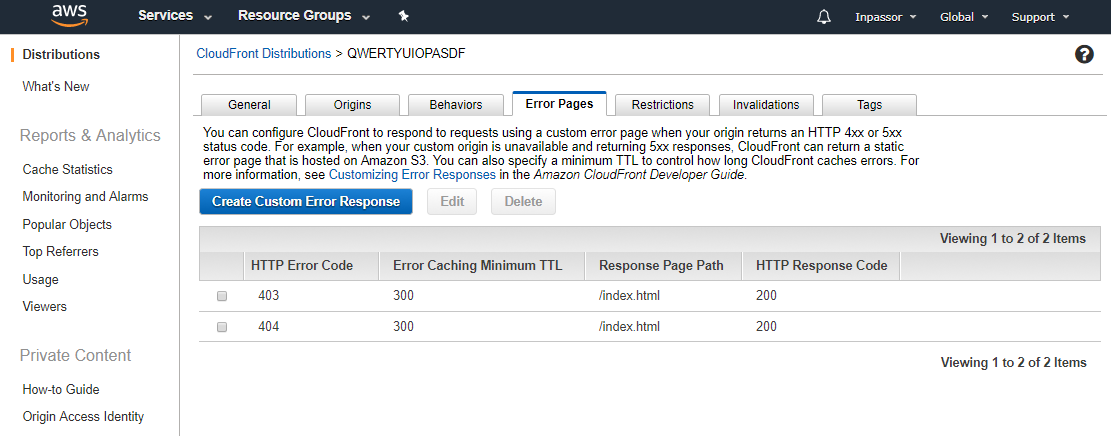
Click the "Create Custom Error Response" button.
In the “HTTP Error Code” field, select “403: Forbidden”.
“Customize Error Response” - select “Yes”.
In the field "Response Page Path" enter "/index.html".
In the field "HTTP Response Code" select "200: OK".
Repeat the same steps for error 404.
Thus, addresses not found or blocked will be redirected to index.html and processed by Angular Router.
It is time to set up the backend server.
Even if you have a completely static site that does not require API calls on the server, VDS will not hurt. The fact is that the root domain entry must be of type A (and / or AAAA, if you have IPv6) and, accordingly, refer to the IP address. My opinion - the easiest and cheapest way to get a permanent IP address on the Internet is to rent a VDS. In addition to this, we get the opportunity to host various services on this IP address: API, databases, real-time messaging service, and generally anything. Some DNS hosting companies provide the ability to use ALIAS instead of type A records, where you can specify not a IP address, but a domain name. For example, you can use Amazon Route 53, configure the root domain record as a link to another S3 basket, which will redirect to your CloudFront distribution.
In any case, it is everyone’s choice. I am inclined to rent a VDS, especially since the prices for them are now quite affordable. For example, Ayhor Hosting provides VDS (1 СPU / 512 MB RAM / 10 GB HDD) for only 1080 rubles a year. This is the cheapest rate, for starters it is quite suitable for us. Although, I recommend purchasing a VDS with an SSD drive.
Next, I will describe the process of setting up VDS (or a full server) with root access and the Debian 9 operating system on board.
In my work, I use several VDS of the same type and do not use any control panels, such as ISPManager. Therefore, I automated the server configuration process by writing a simple bash script. Let's do the same and create some files. Be careful! Line breaks in files should be in Unix (LF) style, not Windows (CRLF) style.
nginx.conf :
This is the main nginx configuration file. The main thing we do here is enable gzip compression and connect the configs that will be located in the / etc / nginx / sites-enabled directory .
ssl.conf :
Nginx configuration template for SSL. Here we connect the certificate that Let's Encrypt will give us and set the necessary SSL parameters, which should give us an A + rating in the Qualys SSL Server Test . Pay attention to the substrings {{DOMAIN}} - it should be so. The configuration script itself will replace them with your domain.
site.conf :
The nginx configuration template for the domain root zone. Here we connect the SSL configuration, make the directory accessible from the outside, into which Let's Encrypt will store files for domain validation. All requests to yourdomain.com or yourdomain.com are redirected to www.yourdomain.com .
api.conf :
The nginx configuration template for the api.yourdomain.com subdomain. Here we also connect the SSL configuration, make the directory accessible from the outside, into which Let's Encrypt will store files for domain validation. All requests to api.yourdomain.com are redirected to api.yourdomain.com . We connect PHP7.1-FPM.
setup.sh :
Bash script to automatically configure the server. Several variables are declared at the beginning of the file:
DOMAIN = yourdomain.com # your domain (without www at the beginning)
API_DOMAIN = "api. $ DOMAIN" # subdomain on which the API backend (here it is api.yourdomain.com)
SUPERUSER = "inpassor "#
Username of the superuser with root privileges SUPERUSER_PASSWORD =" 12341234 "# username of the superuser
USER =" johndoe "# username
USER_EMAIL =" [email protected] "# email of the user - used to register with Let's Encrypt
USER_PASSWORD =" 12341234 "# password user
Of course, you need to reassign them.
Next, the following actions are performed in sequence:
That's it, the server configuration script is ready for us.
Now we can access our VDS via SSH (at its IP address) as root, copy the * .conf and setup.sh files there, make setup.sh executable (chmod 700 setup.sh) and run it.
After the setup process, VDS is ready to go.
We have installed nginx, who listens to requests to address: yourdomain.com , yourdomain.com , api.yourdomain.com , api.yourdomain.com . Requests to http are redirected to https, requests to yourdomain.com are redirected to www.yourdomain.com . At api.yourdomain.comwe have an API. Now it’s empty there and in order for it to answer something to our requests, you need to create the index.php file in the /var/www/api.yourdomain.com/ directory.
But while this is not available, for the reason that we did not register the necessary DNS settings.
After we configured the CloudFront distribution and the backend server, we are ready to finalize the DNS records.
8.1. We return to Yandex.Connect .
8.2. Go to the "Admin".
8.3. Select the menu item "DNS Management".
We need to add four new DNS records.
We just sent requests to yourdomain.com (without www) and api.yourdomain.com to our VDS, and requests to www.yourdomain.com and static.yourdomain.com to the CloudFront distribution.
Next, we need to create a private git repository to store and version the source files of our project in Angular.
9.1. Register / login to Gitlab .
9.2. Press the button "New project".

9.3. Next, select the path to the project and its name.

Set the “Visibility Level” to “Private” and click on the “Create project” button.
9.4. Add your public SSH key in the settings.
If you do not have a key, you must create it. How to create a private key pair - a public key in Windows can be read, for example, here .
In the top menu, click on your avatar, select the “Settings” item in the drop-down menu.

In the menu on the left, select “SSH Keys”.
In the “Key” field, paste the contents of the public key file. On Windows, it is usually located along the path: C: \ Users \ YourUsername \ .ssh \ id_rsa.pub.
In the “Title” field, write the name of the key (whatever).
9.5. We clone the repository to the local computer.
To do this, git / git for Windows must be installed on our computer.
At the command line, go to the local folder with your projects, for example, in C: \ Projects .
Run the command:
The repository address “[email protected]: YourLogin / my-awesome-project.git” can be viewed on the main page of the project on the Gitlab website. Here “MyAwesomeProject” is the name of the local folder with the project, which will be created automatically.
We just cloned an empty repository to the local computer and we got a project folder in which you can start creating your project.
We configure Gitlab CI to automatically build the project, synchronize the collected files with the Amazon S3 bucket and update the distribution of CloudFront.
10.1. We go to our project on the website https://gitlab.com .
10.2. In the menu on the left, select "CI / CD" - "Environments".
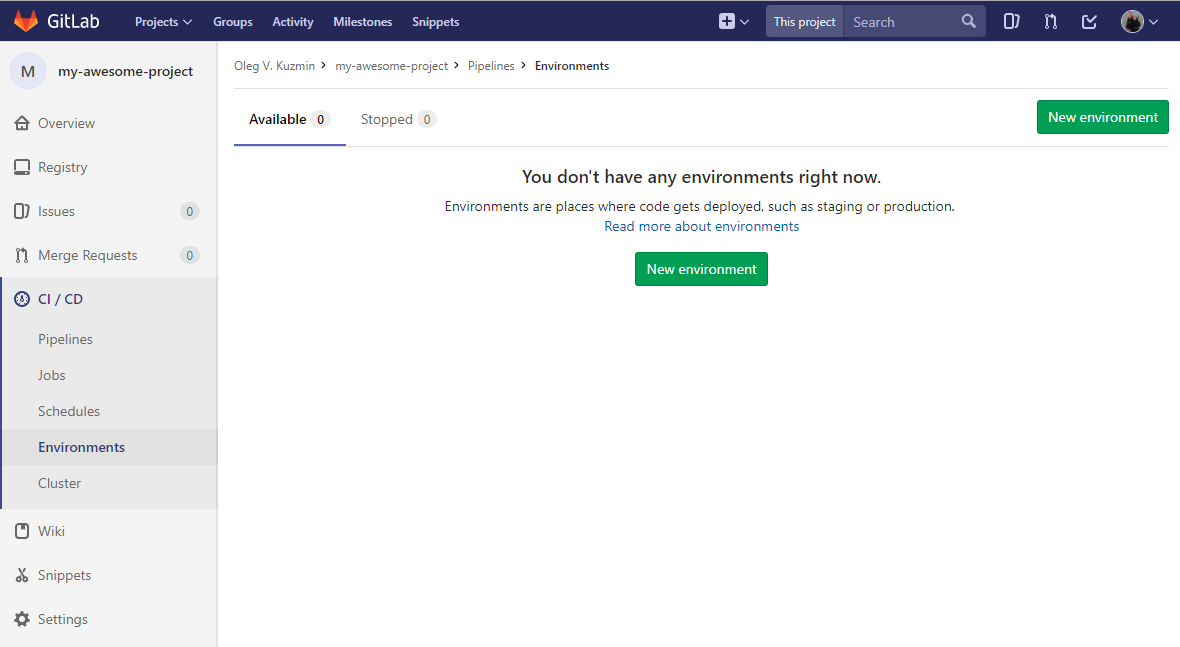
Press the button "New environment".
10.3. In the field "Name" enter "prod".
In the "External URL" field, enter your domain (along with https: // and www at the beginning). For example: www.yourdomain.com . Click the “Save” button.
10.4. In the menu on the left, select “Settings” - “CI / CD”.

10.5. Opposite the “Secret variables” item, click the “Expand” button.
In the field "Key" enter "AWS_ACCESS_KEY_ID".
In the “Value” field, enter your Access key ID obtained in paragraph 3.8 of this manual.
In the field "Environment scope" leave an asterisk.
Click the button "Add new variable".
Add another variable, “AWS_SECRET_ACCESS_KEY”.
We repeat the steps, in the “Value” field, enter your Secret access key obtained in paragraph 3.8 of this manual.
And another variable is “AWS_DISTRIBUTION_ID”.
We repeat the steps, in the “Value” field, enter your Distribution ID obtained in paragraph 6.3 of this manual.
This time, enter “prod” in the “Environment scope” field.
It should turn out like in the screenshot: We

set up the environment and CI variables, we write the rest directly in our project in the file.gitlab-ci.yml .
It is time to create our Angular project.
11.1. At the command line, we go to the directory of our project - where we cloned the empty repository (see paragraph 9.5 of this manual).
In our example, this is C: \ Projects \ MyAwesomeProject .
We execute the following commands:
we replace yourdomain.com with the name of your project (it does not have to coincide with the domain name).
We have installed Angular cli globally and in the project directory there are files that you can start working with.
11.2. Create a .gitignore file : 11.3. Edit the file .angular-cli.json . In the “apps” section we find the “assets” key and change its value to:
Thus, all files and directories that will be located in src / assets will fall into the root of our assembly.
In “styles”, replace “styles.scss” with “styles / styles.scss”.
11.4. Create the src / styles directory and transfer the src / styles.scss file there .
Create the src / styles / _variables.scss file with the following contents:
At the beginning of the src / styles / styles.scss file, insert the line:
In the future, the build script will update the $ static-url variable in the src / styles / _variables.scss file .
Thus, we will be able to prescribe in styles the paths to images and fonts through this variable.
11.5. Add src / assets / favicon.ico file . How are we without an icon then?
11.6. Create the src / assets / robots.txt file : 11.7. Create the src / assets / sitemap.xml file :
11.8. Create the .gitlab-ci.yml file :
Let's see what we have here.
The script uses the Docker image “node: 8.9”.
One build phase of the "deploy" is declared.
The node_modules directory is cached.
Before executing the build script, a global installation of angular / cli is performed, after that all project dependencies are installed.
Next, the necessary python-dev and unzip packages are installed, the aws cli utility is downloaded, unpacked and installed.
One task is announced with the name "deploy_prod", which is performed in the environment of "prod", at the stage of "deploy" and only in the "master" branch.
As a result of this task, artifacts will be created - the entire contents of the “dist” directory (the result of the project assembly).
The process of completing the task:
11.9. Run the following commands in the project directory:
All! If we have completed all the steps in this guide correctly, it remains to wait until Gitlab completes the task, and we will see our start site at www.yourdomain.com .
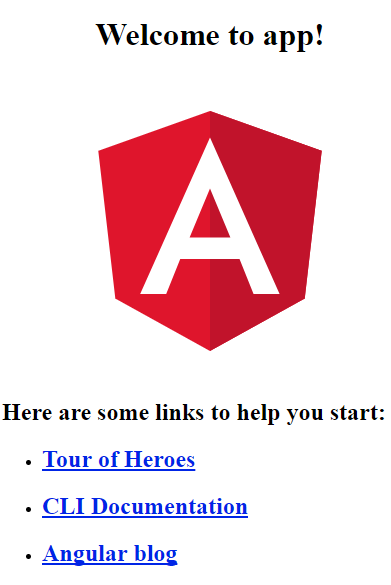
Congratulations!
So, we just deployed a convenient working environment for creating a site on Angular, set up automatic assembly of the project and its delivery via CDN. We also set up a backend server, SSL certificates, DNS records and we have domain mail.
What did I not mention in the article and what else can be done?
At any time, the developers and site owners faced a difficult task: to deliver content as quickly as possible, to as many customers as possible. One of the most correct decisions is to use CDN (Content Delivery Network) to distribute static files. In the case of dynamic rendering of pages on the server, we had to limit ourselves to a small list of objects that could be placed on the CDN: style sheets, script files, images. However, the frontend written in Angular (React, Vue.js ...) is entirely static, including the index page. This is where the thought arises: why not organize the distribution of the entire frontend via CDN?
This article will discuss how to configure a comprehensive solution for the development, version control, automatic assembly and delivery of a static site using Gitlab CI, Amazon S3 and Amazon CloudFront. We will also talk about setting up related things: git, secure connection via HTTPS, domain mail, DNS hosting, backend server ...
If you are interested in this topic, welcome to cat. Caution! Lots of screenshots.
What we will get as a result of the walkthrough:
- Starting site on Angular.
- Version Control (git).
- Automatically build and publish the frontend in the Amazon S3 bucket.
- Distribution of the frontend via CDN (Amazon CloudFront).
- Amazon's free SSL certificate with auto-renewal (for the site to work through HTTPS).
- Free domain mail from Yandex and a convenient interface for managing DNS records (and not only).
- Bash script to automatically configure the backend server.
- Backend server running on Debain 9 (nginx + PHP7.1-FPM).
- Free SSL certificate from Let's Encrypt with auto-renewal (for domain root zone and backend services via HTTPS).
What we need for this:
- Domain name with access to the control panel of the registrar.
- Gitlab account .
- AWS account (Amazon Web Services) .
- Yandex account .
- VDS (Virtual Dedicated Server) with installed Debain 9 OS.
A few words about this choice of tools
I spent a lot of time looking for suitable services for a number of criteria. Firstly, this is the price - I would like the service to be either free or not very expensive. Secondly, reliability. It is also good if the service takes on most of the responsibilities, eliminating the need to install and configure something. For example, why set up your own git server, use some third-party CI service (Continuous Integration), if Gitlab provides all these services out of the box, as well as an unlimited number of private repositories, organizations and co-workers? Why set up domain mail on your own server if you can provide this to Yandex? Regarding CDN - I just did not find anything cheaper than Amazon CloudFront. Amazon S3 file storage is also not expensive (but why store a lot of files on VDS if it's expensive?).
So let's go!
1. DNS hosting and Yandex mail
First, we’ll attach your domain to Yandex mail. We take this step primarily to configure domain mail. We will need to confirm ownership of the domain in order to receive the Amazon SSL certificate, and for this we will need to receive an email at [email protected].
1.1. Register / login to Yandex .
1.2. Go to Yandex domain mail and add your domain (menu item "Connect domain").
Here I want to immediately note that Yandex has "SDA 2.0" or "Yandex.Connect." However, I just can’t decide whether Yandex.Connect’s interface has
1.3. We confirm the ownership of the domain.
The easiest way for us is to delegate the domain to Yandex. To do this, install the following NS servers for your domain in the registrar’s control panel: Attention! This step must be performed strictly after connecting the domain to the mail for the domain (paragraph 1.2). 1.4. We are waiting for up to 72 hours (with luck).
dns1.yandex.net

dns2.yandex.net
Verification of domain ownership should pass automatically. After that, on the traffic rules page in the list of “My domains” you should see a green message that “the domain is connected and delegated to Yandex”.
Now we can connect mail for the domain. There is no need to configure MX records for the domain, because we delegated the domain to Yandex NS servers.
At this stage, we have already received domain mail with the ability to add up to 1000 mailboxes and with the correct DNS mail records.
1.5. We create the first mailbox [email protected].
1.6. In the top menu, click on the link "Migrate to Connect."
We transfer the domain to Yandex.Connect, indicate the name of the organization. After that, the page becomes available to us.https://connect.yandex.ru/portal/home .
1.7. Go to the "Admin". Various settings are available here.
The most interesting thing for us is the menu item “DNS Management”. We will return to it later. Now we need to add an alias for the mailbox named [email protected]. We will need this box to receive an email with a confirmation of domain ownership from Amazon.
1.8. Go to the menu item "Organizational structure" and select the only (so far) user who was automatically created when the first mailbox was added (item 1.5).
1.9. Click the ellipsis in the upper right corner of the user’s card, select the “Manage aliases” item in the drop-down menu.
In the window that appears, click the "Add New" button.
Enter “webmaster” and click the “Add” button.
Now we have an alias for the [email protected] mailbox and we are ready to receive letters to domain mail.
2. Amazon Web Services Account
To perform further steps in this guide, you need the AWS root user account .
If you do not already have an account, then you are fabulously lucky and you can take advantage of the level of free use of AWS. To do this, you must go through the registration procedure . During the registration process, you will be asked for bank card information, from where they will remove (and not return!) $ 1 to check solvency. You will also need to indicate your phone number, which will call the robot from America.
In general, the registration process is quite simple and in my opinion does not require a detailed description.
3. Amazon Security Credentials
For automatic data exchange with AWS services, we will use the aws cli console utility (AWS Command Line Interface). The utility is authorized using a pair of Access key ID and Secret access key. Create them.
3.1. We go to the AWS console.
3.2. In the upper menu on the right, click on your username. In the drop-down menu, select the item "My Security Credentials".
3.3. A warning window may appear here.
You can ignore it and click the “Continue to Security Credentials” button.
3.4. In the menu on the left, select the "Users" item. Click the "Add user" button.
3.5. In the field "User name" write the username. For example, "cli-manager".
In the item “Access type”, check the box “Programmatic access”.
Click the “Next: Permissions” button.
3.6. In the next paragraph, select “Attach existing policies directly”. Select the “AdministratorAccess” checkbox.
Click the “Next: Review” button.
3.7. In the next paragraph, click the "Create user" button.
3.8. In the last paragraph we will see the newly created user and his data.
Attention! Immediately write down the Access key ID and Secret access key (you can see it by clicking "show") and / or download the .csv file with user data (by clicking the "Download .csv" button). You will never see the secret access key anywhere else.
4. Amazon SSL Certificate
Now we need to get an SSL certificate for our domain.
4.1. In the AWS console, select “Services” in the top menu.
4.2. In the search for services, type “Certificate manager”.
4.3. Click the button “Request a certificate”.
4.4. In the field "Domain name" write "* .yourdomain.com".
Pay attention to the asterisk and the dot in front of the domain name. This way we get a wildcard certificate for the domain and all its subdomains. Click the “Review and request” button.
4.5. In the next paragraph, click the "Confirm and request" button.
4.6. In the next paragraph, click the "Continue" button.
Here we will see the certificate just requested and its status: “Pending validation”.
4.7. Now go to the Yandex mail .
Log in to your domain mailbox that you created in paragraph 1.5. of this guide ([email protected]). You should have received an email requesting confirmation of domain ownership from Amazon.
4.8. We follow the link in the letter.
A new browser tab opens with a domain ownership confirmation page.
Click the “I Approve” button.
The certificate must pass a successful confirmation.
Returning to the Certificate manager, we will see our certificate and its status: “Issued”.
5. Amazon S3 Basket
Let's create an Amazon S3 basket in which static files of our frontend will be stored.
5.1. In the AWS console, select “Services” in the top menu.
5.2. In the search for services, we type “S3”.
5.3. Click the "Create bucket" button.
In the field "Bucket name" indicate the host name (along with www). It must be exactly the same as your domain name. For example: www.yourdomain.com .
In the "Region" field, select "US East (N. Virginia)." Firstly, this will avoid possible problems with redirecting to the wrong objects ( documentation article) Secondly, it is the most popular region and the lowest prices here. Thirdly, we don’t care in which region the basket is located, because CDN will distribute the content, and clients will not access the S3 files directly.
Click “Next” several times, leave all fields as they are.
A new basket with the name www.yourdomain.com
5.4 will appear in the list of your baskets . Editing the properties of the basket.
Click on the empty space next to the name of your basket. A pop-up window will appear on the right side of the window.
5.5. Select the “Properties” item.
5.6. Click on “Static website hosting”.
Copy the “Endpoint” URL immediately (located at the top of the window). It will be needed for further settings.
We select the first item "Use this bucket to host a website".
In the field “Index document” write “index.html”.
Click the “Save” button.
5.7. Select the “Permissions” tab.
Here we need to add www.yourdomain.com.s3-website-us-east-1.amazonaws.com and https: //*.yourdomain.com to the list of allowed hosts for cross-domain requests.
Press the button “CORS configuration”.
We will not parse the XML file format. For a detailed study of this issue, you can read the documentation . It is enough for us to simply copy this into the text box:
http://www.yourdomain.com.s3-website-us-east-1.amazonaws.com GET HEAD Content-* Host Origin https://*.yourdomain.com GET HEAD Content-* Host Origin Replace the AllowedOrigin tag values with yours. The first address is the same Static website endpoint that you copied in paragraph 5.6 of this manual.
Click the “Save” button.
6. Amazon CloudFront distribution
Now we need to organize distribution of files via CDN from just created basket.
6.1. In the AWS console, select “Services” in the top menu.
6.2. In the search for services, type “CloudFront”.
6.3. Click the Create Distribution button.
We select the delivery method "Web", click the corresponding button "Get Started".
A very large form will open (I will not do a screen).
Let's go through the fields we need. The remaining fields do not touch, leave as is. In any case, we have the opportunity to change all these settings in the future.
Origin Settings
Origin Domain Name : here carefully! No need to choose the domain “ www.yourdomain.com.s3.anazonaws.com»From the hint to this field! Paste here the Static website endpoint, which you copied in paragraph 5.6 of this manual, without the “http: //” at the beginning.
Default Cache Behavior Settings
Viewer Protocol Policy : select "Redirect HTTP to HTTPS".
Allowed HTTP Methods : select "GET, HEAD, OPTIONS".
Cached HTTP Methods : check the box next to “OPTIONS”.
Cache Based on Selected Request Headers : select "Whitelist". In the " Whitelist Headers " item that appears , select "Origin", click the "Add" button.
Object Caching : Select "Customize".
Minimum TTL : write the value "300".
Compress Objects Automatically: select "Yes".
Distribution Settings
Alternate Domain Names (CNAMEs) : in the text box we write “ www.yourdomain.com ” and “static.yourdomain.com” - one on each line. At static.yourdomain.com we will have access to all the same as through www.yourdomain.com . We will use it to obtain static files in order to reduce the number of queries to the main domain.
SSL Certificate : select "Custom SSL Certificate". Below in the drop-down list, select the previously received SSL certificate "* .yourdomain.com".
Default Root Object : enter “index.html” (without a slash at the beginning).
Click the Create Distribution button.
Distribution created. She will appear in the list with the status "In Progress". Over a period of time (usually up to 10 minutes), it will become “Enabled”.
Immediately copy the ID and Domain Name of our distribution, we will need them for further settings.
6.4. Set up error pages.
Click on the distribution ID in the list. Go to the “Error Pages” tab.
Click the "Create Custom Error Response" button.
In the “HTTP Error Code” field, select “403: Forbidden”.
“Customize Error Response” - select “Yes”.
In the field "Response Page Path" enter "/index.html".
In the field "HTTP Response Code" select "200: OK".
Repeat the same steps for error 404.
Thus, addresses not found or blocked will be redirected to index.html and processed by Angular Router.
7. Backend server
It is time to set up the backend server.
Even if you have a completely static site that does not require API calls on the server, VDS will not hurt. The fact is that the root domain entry must be of type A (and / or AAAA, if you have IPv6) and, accordingly, refer to the IP address. My opinion - the easiest and cheapest way to get a permanent IP address on the Internet is to rent a VDS. In addition to this, we get the opportunity to host various services on this IP address: API, databases, real-time messaging service, and generally anything. Some DNS hosting companies provide the ability to use ALIAS instead of type A records, where you can specify not a IP address, but a domain name. For example, you can use Amazon Route 53, configure the root domain record as a link to another S3 basket, which will redirect to your CloudFront distribution.
In any case, it is everyone’s choice. I am inclined to rent a VDS, especially since the prices for them are now quite affordable. For example, Ayhor Hosting provides VDS (1 СPU / 512 MB RAM / 10 GB HDD) for only 1080 rubles a year. This is the cheapest rate, for starters it is quite suitable for us. Although, I recommend purchasing a VDS with an SSD drive.
Next, I will describe the process of setting up VDS (or a full server) with root access and the Debian 9 operating system on board.
In my work, I use several VDS of the same type and do not use any control panels, such as ISPManager. Therefore, I automated the server configuration process by writing a simple bash script. Let's do the same and create some files. Be careful! Line breaks in files should be in Unix (LF) style, not Windows (CRLF) style.
nginx.conf :
user www-data;
worker_processes 1;
error_log /var/log/nginx/error.log warn;
pid /var/run/nginx.pid;
events {
    worker_connections 1024;
    use epoll;
}
http {
    include /etc/nginx/mime.types;
    default_type application/octet-stream;
    log_format main '$remote_addr - $remote_user [$time_local] "$request" '
        '$status $body_bytes_sent "$http_referer" '
        '"$http_user_agent" "$http_x_forwarded_for"';
    access_log /var/log/nginx/access.log main;
    sendfile on;
    tcp_nopush on;
    client_header_timeout 30;
    client_body_timeout 30;
    reset_timedout_connection on;
    keepalive_timeout  30;
    client_max_body_size 32m;
    client_body_buffer_size 128k;
    server_tokens off;
    gzip on;
    gzip_vary on;
    gzip_disable "msie6";
    gzip_proxied any;
    gzip_min_length 1024;
    gzip_comp_level 5;
    gzip_types
        application/atom+xml
        application/javascript
        application/json
        application/ld+json
        application/manifest+json
        application/octet-stream
        application/rss+xml
        application/vnd.geo+json
        application/vnd.ms-fontobject
        application/x-font-ttf
        application/x-web-app-manifest+json
        application/xhtml+xml
        application/xml
        font/opentype
        image/bmp
        image/svg+xml
        image/x-icon
        text/cache-manifest
        text/css
        text/plain
        text/vcard
        text/vnd.rim.location.xloc
        text/vtt
        text/x-component
        text/x-cross-domain-policy;
    expires max;
    include /etc/nginx/conf.d/*.conf;
    include /etc/nginx/sites-enabled/*;
}
This is the main nginx configuration file. The main thing we do here is enable gzip compression and connect the configs that will be located in the / etc / nginx / sites-enabled directory .
ssl.conf :
ssi on;
ssl on;
ssl_certificate "/etc/letsencrypt/live/{{DOMAIN}}/fullchain.pem";
ssl_certificate_key "/etc/letsencrypt/live/{{DOMAIN}}/privkey.pem";
ssl_trusted_certificate "/etc/letsencrypt/live/{{DOMAIN}}/chain.pem";
ssl_ciphers AES256+EECDH:AES256+EDH;
ssl_prefer_server_ciphers on;
ssl_protocols TLSv1.2;
ssl_ecdh_curve secp384r1;
ssl_dhparam /etc/nginx/dhparam.pem;
ssl_stapling on;
ssl_stapling_verify on;
ssl_session_timeout 24h;
ssl_session_cache shared:SSL:24m;
ssl_buffer_size 1400;
Nginx configuration template for SSL. Here we connect the certificate that Let's Encrypt will give us and set the necessary SSL parameters, which should give us an A + rating in the Qualys SSL Server Test . Pay attention to the substrings {{DOMAIN}} - it should be so. The configuration script itself will replace them with your domain.
site.conf :
server {
    server_name {{DOMAIN}};
    listen 80;
    listen 443 ssl http2;
    error_log off;
    access_log off;
    add_header X-Content-Type-Options nosniff;
    add_header X-XSS-Protection "1; mode=block";
    add_header Strict-Transport-Security "max-age=31536000;";
    add_header Cache-Control public;
    include /etc/nginx/ssl.conf;
    location /.well-known/acme-challenge/ {
        alias /var/www/.well-known/acme-challenge/;
    }
    location / {
        return 301 https://www.$host:443$request_uri;
    }
}
The nginx configuration template for the domain root zone. Here we connect the SSL configuration, make the directory accessible from the outside, into which Let's Encrypt will store files for domain validation. All requests to yourdomain.com or yourdomain.com are redirected to www.yourdomain.com .
api.conf :
server {
    server_name {{DOMAIN}};
    listen 80;
    error_log off;
    access_log off;
    add_header X-Content-Type-Options nosniff;
    add_header X-XSS-Protection "1; mode=block";
    location /.well-known/acme-challenge/ {
        alias /var/www/.well-known/acme-challenge/;
    }
    location / {
        return 301 https://$host:443$request_uri;
    }
}
server {
    server_name {{DOMAIN}};
    listen 443 ssl http2;
    access_log /var/log/nginx/{{DOMAIN}}.access.log;
    error_log /var/log/nginx/{{DOMAIN}}.error.log;
    add_header X-Frame-Options DENY;
    add_header X-Content-Type-Options nosniff;
    add_header X-XSS-Protection "1; mode=block";
    add_header Strict-Transport-Security "max-age=31536000;";
    add_header Cache-Control public;
    add_header 'Access-Control-Allow-Origin' "$http_origin";
    add_header 'Access-Control-Allow-Credentials' 'true';
    add_header 'Access-Control-Allow-Methods' 'GET, HEAD, OPTIONS, POST, PUT, DELETE, PATCH';
    add_header 'Access-Control-Allow-Headers' 'Accept,Accept-Encoding,Accept-Language,Authorization,Cache-Control,Content-Length,Content-Type,Origin,If-Modified-Since,User-Agent,X-Requested-With';
    add_header 'Access-Control-Expose-Headers' 'X-Powered-By';
    set $root_path /var/www/{{DOMAIN}};
    root $root_path;
    disable_symlinks if_not_owner from=$root_path;
    charset utf-8;
    index index.php;
    autoindex off;
    include /etc/nginx/ssl.conf;
    if ($request_method ~* ^(OPTIONS|HEAD)$) {
        return 204;
    }
    location / {
        try_files $uri $uri/ /index.php?$query_string;
    }
    location ~ \.php$ {
        try_files $uri =404;
        fastcgi_pass unix:/var/run/php/php7.1-fpm.sock;
        fastcgi_index index.php;
        include fastcgi_params;
        fastcgi_param SCRIPT_FILENAME $document_root$fastcgi_script_name;
    }
}
The nginx configuration template for the api.yourdomain.com subdomain. Here we also connect the SSL configuration, make the directory accessible from the outside, into which Let's Encrypt will store files for domain validation. All requests to api.yourdomain.com are redirected to api.yourdomain.com . We connect PHP7.1-FPM.
setup.sh :
#!/usr/bin/env bash
time_start=`date +%s`
########################
# EDIT THESE VARIABLES:
########################
DOMAIN=yourdomain.com
API_DOMAIN="api.$DOMAIN"
SUPERUSER="inpassor"
SUPERUSER_PASSWORD="12341234"
USER="johndoe"
USER_EMAIL="[email protected]"
USER_PASSWORD="12341234"
########################
apt update
echo y | apt install dialog apt-utils
echo y | apt install sed wget gnupg nano htop curl zip unzip apt-transport-https lsb-release ca-certificates debian-archive-keyring certbot
# add users
adduser --quiet --disabled-password --gecos "" $SUPERUSER
echo "$SUPERUSER:$SUPERUSER_PASSWORD" | chpasswd
adduser --quiet --disabled-password --gecos "" $USER
echo "$USER:$USER_PASSWORD" | chpasswd
sed -i "s/$SUPERUSER:x:1000:1000/$SUPERUSER:x:0:0/" /etc/passwd
# add external repositories and GPG keys
echo "deb http://nginx.org/packages/debian/ stretch nginx" > /etc/apt/sources.list.d/nginx.list
wget --quiet -O - https://nginx.org/packages/keys/nginx_signing.key | apt-key add -
echo "deb https://packages.sury.org/php/ stretch main" > /etc/apt/sources.list.d/php.list
wget --quiet -O - https://packages.sury.org/php/apt.gpg | apt-key add -
apt update
echo y | apt upgrade
echo y | apt install nginx php7.1-cli php7.1-fpm php7.1-mbstring php7.1-curl php7.1-xml
# nginx setup
mkdir /var/www
mkdir "/var/www/$API_DOMAIN"
chown -R $USER:www-data /var/www
rm /etc/nginx/conf.d/default.conf
cp nginx.conf /etc/nginx/nginx.conf
echo "" > /etc/nginx/ssl.conf
mkdir /etc/nginx/sites-available
mkdir /etc/nginx/sites-enabled
sed "s@{{DOMAIN}}@$DOMAIN@g" site.conf > /etc/nginx/sites-available/$DOMAIN.conf
ln -s /etc/nginx/sites-available/$DOMAIN.conf /etc/nginx/sites-enabled
sed "s@{{DOMAIN}}@$API_DOMAIN@g" api.conf > /etc/nginx/sites-available/$API_DOMAIN.conf
ln -s /etc/nginx/sites-available/$API_DOMAIN.conf /etc/nginx/sites-enabled
# ssl setup
service nginx restart
certbot register --agree-tos --email $USER_EMAIL
certbot certonly --webroot -w /var/www -d $DOMAIN -d $API_DOMAIN --rsa-key-size 4096
openssl dhparam -out /etc/nginx/dhparam.pem 4096
sed "s@{{DOMAIN}}@$DOMAIN@g" ssl.conf > /etc/nginx/ssl.conf
service nginx restart
chown -R nginx:$USER /var/log/nginx
chmod 664 /var/log/nginx/*
time_end=`date +%s`
echo Execution time: $((time_end-time_start)) sec.
Bash script to automatically configure the server. Several variables are declared at the beginning of the file:
DOMAIN = yourdomain.com # your domain (without www at the beginning)
API_DOMAIN = "api. $ DOMAIN" # subdomain on which the API backend (here it is api.yourdomain.com)
SUPERUSER = "inpassor "#
Username of the superuser with root privileges SUPERUSER_PASSWORD =" 12341234 "# username of the superuser
USER =" johndoe "# username
USER_EMAIL =" [email protected] "# email of the user - used to register with Let's Encrypt
USER_PASSWORD =" 12341234 "# password user
Of course, you need to reassign them.
Next, the following actions are performed in sequence:
- The necessary packages are installed.
- Добавляются внешние репозитории и GPG ключи для доступа к более свежим пакетам nginx и PHP.
- Устанавливаются пакеты nginx, php7.1-cli, php7.1-fpm, php7.1-mbstring, php7.1-curl и php7.1-xml.
- Настраивается nginx.
- Запускается процесс получения SSL сертификата Let's Encrypt. Обратите внимание, что здесь же генерируется файл dhparam.pem. Этот процесс весьма долгий, поэтому можно сохранить сгенерированный файл и в дальнейшем копировать его.
That's it, the server configuration script is ready for us.
Now we can access our VDS via SSH (at its IP address) as root, copy the * .conf and setup.sh files there, make setup.sh executable (chmod 700 setup.sh) and run it.
After the setup process, VDS is ready to go.
We have installed nginx, who listens to requests to address: yourdomain.com , yourdomain.com , api.yourdomain.com , api.yourdomain.com . Requests to http are redirected to https, requests to yourdomain.com are redirected to www.yourdomain.com . At api.yourdomain.comwe have an API. Now it’s empty there and in order for it to answer something to our requests, you need to create the index.php file in the /var/www/api.yourdomain.com/ directory.
But while this is not available, for the reason that we did not register the necessary DNS settings.
8. DNS settings
After we configured the CloudFront distribution and the backend server, we are ready to finalize the DNS records.
8.1. We return to Yandex.Connect .
8.2. Go to the "Admin".
8.3. Select the menu item "DNS Management".
We need to add four new DNS records.
- Type A record: in the "Host" field, specify "@", in the "Record value" field - the IP address of our VDS, in the "TTL" field - "3600".
- Record A: “Host” - “api”, “Record Value” - IP address of VDS, “TTL” - “3600”.
- CNAME record: “Host” - “www”, “Record value” - Domain Name of CloudFront distribution (see paragraph 6.3 of this manual), “TTL” - “3600”.
- CNAME record: “Host” - “static”, “Record value” - Domain Name of CloudFront distribution, “TTL” - “3600”.
We just sent requests to yourdomain.com (without www) and api.yourdomain.com to our VDS, and requests to www.yourdomain.com and static.yourdomain.com to the CloudFront distribution.
9. Gitlab repository
Next, we need to create a private git repository to store and version the source files of our project in Angular.
9.1. Register / login to Gitlab .
9.2. Press the button "New project".
9.3. Next, select the path to the project and its name.
Set the “Visibility Level” to “Private” and click on the “Create project” button.
9.4. Add your public SSH key in the settings.
If you do not have a key, you must create it. How to create a private key pair - a public key in Windows can be read, for example, here .
In the top menu, click on your avatar, select the “Settings” item in the drop-down menu.
In the menu on the left, select “SSH Keys”.
In the “Key” field, paste the contents of the public key file. On Windows, it is usually located along the path: C: \ Users \ YourUsername \ .ssh \ id_rsa.pub.
In the “Title” field, write the name of the key (whatever).
9.5. We clone the repository to the local computer.
To do this, git / git for Windows must be installed on our computer.
At the command line, go to the local folder with your projects, for example, in C: \ Projects .
Run the command:
git clone [email protected]:YourLogin/my-awesome-project.git MyAwesomeProject
The repository address “[email protected]: YourLogin / my-awesome-project.git” can be viewed on the main page of the project on the Gitlab website. Here “MyAwesomeProject” is the name of the local folder with the project, which will be created automatically.
We just cloned an empty repository to the local computer and we got a project folder in which you can start creating your project.
10. Gitlab CI
We configure Gitlab CI to automatically build the project, synchronize the collected files with the Amazon S3 bucket and update the distribution of CloudFront.
10.1. We go to our project on the website https://gitlab.com .
10.2. In the menu on the left, select "CI / CD" - "Environments".
Press the button "New environment".
10.3. In the field "Name" enter "prod".
In the "External URL" field, enter your domain (along with https: // and www at the beginning). For example: www.yourdomain.com . Click the “Save” button.
10.4. In the menu on the left, select “Settings” - “CI / CD”.
10.5. Opposite the “Secret variables” item, click the “Expand” button.
In the field "Key" enter "AWS_ACCESS_KEY_ID".
In the “Value” field, enter your Access key ID obtained in paragraph 3.8 of this manual.
In the field "Environment scope" leave an asterisk.
Click the button "Add new variable".
Add another variable, “AWS_SECRET_ACCESS_KEY”.
We repeat the steps, in the “Value” field, enter your Secret access key obtained in paragraph 3.8 of this manual.
And another variable is “AWS_DISTRIBUTION_ID”.
We repeat the steps, in the “Value” field, enter your Distribution ID obtained in paragraph 6.3 of this manual.
This time, enter “prod” in the “Environment scope” field.
It should turn out like in the screenshot: We
set up the environment and CI variables, we write the rest directly in our project in the file.gitlab-ci.yml .
11. Starting site on Angular
It is time to create our Angular project.
11.1. At the command line, we go to the directory of our project - where we cloned the empty repository (see paragraph 9.5 of this manual).
In our example, this is C: \ Projects \ MyAwesomeProject .
We execute the following commands:
npm i -g @angular/cli
ng new yourdomain.com --style=scss --skip-git=true --directory=.
we replace yourdomain.com with the name of your project (it does not have to coincide with the domain name).
We have installed Angular cli globally and in the project directory there are files that you can start working with.
11.2. Create a .gitignore file : 11.3. Edit the file .angular-cli.json . In the “apps” section we find the “assets” key and change its value to:
/.idea

/dist

/out-tsc

/node_modules

/e2e/*.js

/e2e/*.map

npm-debug.log

package-lock.json
[
    {
        "glob": "**/*",
        "input": "./assets/",
        "output": "./"
    }
]
Thus, all files and directories that will be located in src / assets will fall into the root of our assembly.
In “styles”, replace “styles.scss” with “styles / styles.scss”.
11.4. Create the src / styles directory and transfer the src / styles.scss file there .
Create the src / styles / _variables.scss file with the following contents:
$static-url: 'https://static.yourdomain.com';
At the beginning of the src / styles / styles.scss file, insert the line:
@import 'variables';
In the future, the build script will update the $ static-url variable in the src / styles / _variables.scss file .
Thus, we will be able to prescribe in styles the paths to images and fonts through this variable.
11.5. Add src / assets / favicon.ico file . How are we without an icon then?
11.6. Create the src / assets / robots.txt file : 11.7. Create the src / assets / sitemap.xml file :
User-agent: *

Host: {{SERVER_URL}}

Sitemap: {{SERVER_URL}}/sitemap.xml
{{SERVER_URL}} 11.8. Create the .gitlab-ci.yml file :
image: node:8.9
stages:
  - deploy
cache:
  paths:
    - node_modules/
before_script:
  - npm install --unsafe-perm --silent --global @angular/cli
  - npm install --unsafe-perm --silent
  - apt update
  - echo y | apt install python-dev unzip
  - curl "https://s3.amazonaws.com/aws-cli/awscli-bundle.zip" -o "awscli-bundle.zip"
  - unzip awscli-bundle.zip
  - ./awscli-bundle/install -i /usr/local/aws -b /usr/local/bin/aws
deploy_prod:
  stage: deploy
  only:
    - master
  environment:
    name: prod
  artifacts:
    paths:
      - dist
  script:
    - DEPLOY_SERVER="${CI_ENVIRONMENT_URL/https:\/\/www./}"
    - STATIC_URL="https://static.$DEPLOY_SERVER"
    - sed -i "s@$static-url:.*;@$static-url:'$STATIC_URL';@g" src/styles/_variables.scss
    - ng build --prod --aot --build-optimizer --no-progress --extract-licenses=false
    - sed -i -e "s@\" href=\"@\" href=\"$STATIC_URL\/@g; s@href=\"styles@href=\"$STATIC_URL\/styles@g; s@src=\"@src=\"$STATIC_URL\/@g" dist/index.html
    - SED_PATTERN="s@{{STATIC_URL}}@$STATIC_URL@g; s@{{SERVER_URL}}@$CI_ENVIRONMENT_URL@g"
    - sed -i -e "$SED_PATTERN" dist/robots.txt
    - sed -i -e "$SED_PATTERN" dist/sitemap.xml
    - aws configure set aws_access_key_id $AWS_ACCESS_KEY_ID
    - aws configure set aws_secret_access_key $AWS_SECRET_ACCESS_KEY
    - aws s3 rm s3://www.$DEPLOY_SERVER/ --recursive --exclude "*" --include "*.css" --include "*.js" --include "*.json" --include "*.html" --include "*.xml" --include "*.txt"
    - aws s3 sync dist/ s3://www.$DEPLOY_SERVER/ --no-progress --delete --size-only --acl public-read
    - aws cloudfront create-invalidation --distribution-id $AWS_DISTRIBUTION_ID --paths /*.html /*.xml /*.txt /*.json
Let's see what we have here.
The script uses the Docker image “node: 8.9”.
One build phase of the "deploy" is declared.
The node_modules directory is cached.
Before executing the build script, a global installation of angular / cli is performed, after that all project dependencies are installed.
Next, the necessary python-dev and unzip packages are installed, the aws cli utility is downloaded, unpacked and installed.
One task is announced with the name "deploy_prod", which is performed in the environment of "prod", at the stage of "deploy" and only in the "master" branch.
As a result of this task, artifacts will be created - the entire contents of the “dist” directory (the result of the project assembly).
The process of completing the task:
- Объявляется переменная $DEPLOY_SERVER, которая формируется на основе $CI_ENVIRONMENT_URL (значение поля «External URL», см. пункт 10.3 настоящего руководства), без «www.» в начале (yourdomain.com).
- Объявляется переменная $STATIC_URL — static.$DEPLOY_SERVER (https://static.yourdomain.com).
- Значение переменной "$static-url" в файле src/styles/_variables.scss заменяется значением $STATIC_URL (https://static.yourdomain.com).
- Производится сборка проекта Angular (environment — production, AOT, используя build optimizer, не показывая прогресс на экране, не извлекая лицензии сторонних производителей).
- В файле index.html все пути к файлам таблиц стилей, скриптов и изображений заменяются на абсолютные пути к $STATIC_URL.
- In robots.txt and sitemap.xml files, the substring "{{SERVER_URL}}" is replaced with the value $ CI_ENVIRONMENT_URL (https://www.yourdomain.com), the substring "{{STATIC_URL}}" is replaced with the value $ STATIC_URL (https: //static.yourdomain.com).
- The access key ID and secret key are set to securely connect to AWS.
- All * .css, * .js, * .json, * .html, * .xml and * .txt files are recursively deleted from the S3 recycle bin.
- The “dist” directory is synchronized with the S3 bucket (without displaying progress on the screen, removing files that are not in the “dist” from the bucket, comparing only file sizes, publishing files for reading).
- To distribute CloudFront, invalidation ( documentation article ) is created with the removal of * .html, * .xml, * .txt and * .json files from the root folder.
11.9. Run the following commands in the project directory:
git add .
git commit -m "first commit"
git push
All! If we have completed all the steps in this guide correctly, it remains to wait until Gitlab completes the task, and we will see our start site at www.yourdomain.com .
Congratulations!
12. Conclusion
So, we just deployed a convenient working environment for creating a site on Angular, set up automatic assembly of the project and its delivery via CDN. We also set up a backend server, SSL certificates, DNS records and we have domain mail.
What did I not mention in the article and what else can be done?
- If we need an API backend, we must create it (in our example, in PHP). Most likely, you will need to complicate the bash server configuration script by adding, for example, database installation.
- Despite the fact that we created the robots.txt file and explicitly specified Host in it, it is still advisable to protect yourself from unwanted client access directly to the S3 basket and distributing CloudFront.
- In Gitlab CI, we have only one environment configured - “prod”. In conditions close to combat, you may need a test environment.
- You will probably need to run tests before building in Gitlab CI.
- Well, of course, you need to create your own Angular website. Do not leave the starting one?