November 5, 2017 at 18:58
ScadaPy - Using OPC UA
In the previous few articles, I described the possibilities of using the modbus protocol to create your own python-based Scada system. This time I want to share my experience in building a system for interrogating slaves using OPC technology.
The disadvantages of OPC servers are that they can only be used in operating systems of the Microsoft Windows family (as a rule, they are paid), and you could forget about devices using Linux OS.
But over time, the OPC Unified Architecture specification was created, which made it possible to use this data transfer technology on other operating systems other than Windows. This also applies to embedded systems where full Linux can be run.
You can read morehere.
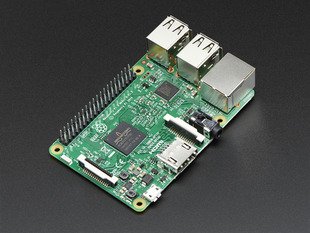
For example, on a single-board Raspberry Pi computer, you can run several different OPC UA servers simultaneously for polling terminal devices, meters, sensors, etc., while the system will work quite stably.
To work with OPC UA and modbus servers, Xubuntu 17.04 Desktop and Windows 8.1 are used. Xubuntu 17.04 already has Python 2.7 and Python 3.5 installed by default. Choosing Python 3.5.
If, after installing the operating system, the necessary packages were not added to the computer, then you need to do:
Solving the dependency problem:
After we put the necessary libraries:
For windows, you can install via pip3.exe, the library and examples are here.
To start the server, you need to import the library:
Now create an OPC UA server.
Here is all the python code to run OPC UA. It turned out to be nothing complicated, and if you now connect to a running server using UA Expert , you can see a hierarchical list of our objects and variables with values.
To modify the values of variables, use the set_value function of the type:
Of course, this is a very primitive example, but the OPC UA library has many more features that can be read about here .
The only thing that could not be figured out was how to set the username and password on the server, sort of through politics, I think I will solve this problem later.
In continuation of the above, the problem arose of the operational configuration of each newly created server.
For this purpose, the “Server Configurator” was written on the PyQt5 library.
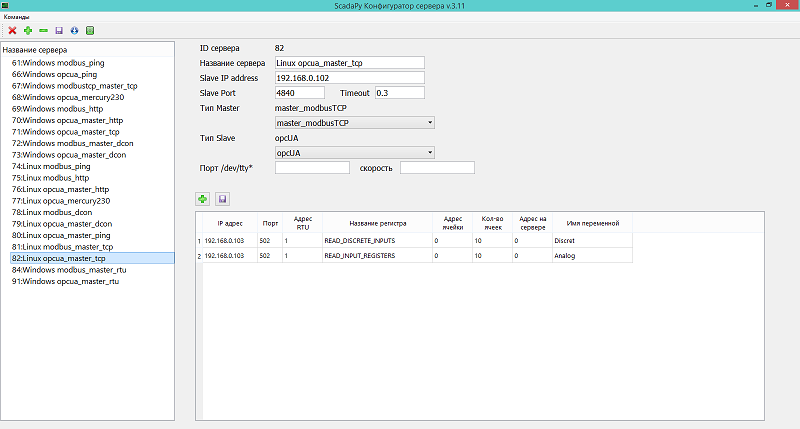
Principle of work:
- a database is created on sqlite3
- tables are created for the slave and master parts of the server.
- the tables are filled with the necessary parameters.
- a startup script is formed.
The basic idea is that servers should work the same on both Windows and Linux.
You can download it here
Directory structure:
srvconf.py - “Server Configurator” program
db - the database file srvDb.db is located.
img - .png files for
source buttons - server template files
scr - script files to start the server.
For Windows, a file of type start_XX.bat will be created, for Linux, a file of type start_XX.sh, where XX is the server serial number in the servers table.
The contents of the start_XX.bat file:
The contents of the start_XX.sh file for Linux:
The startup parameters for Linux use xfce4-terminal, as I work in Xubuntu 17.04,
but you can specify another type of launch, like gnome-terminal.
In the examples, the parameters for filling the tables are quite clearly described.
It is noteworthy that on the raspberry Pi 4 servers were launched simultaneously - mobus_ping, opcua_http, opcua_mercury230 on / dev / ttyUSB0 and modbus_dcon on / dev / ttyUSB1, while it worked quite stably and without failures.
The control at the moment is partially implemented and only in master_dcon, therefore only tele-signaling and tele-measurements are used. In the future, I think to add telecontrol.
The disadvantages of OPC servers are that they can only be used in operating systems of the Microsoft Windows family (as a rule, they are paid), and you could forget about devices using Linux OS.
But over time, the OPC Unified Architecture specification was created, which made it possible to use this data transfer technology on other operating systems other than Windows. This also applies to embedded systems where full Linux can be run.
You can read morehere.
For example, on a single-board Raspberry Pi computer, you can run several different OPC UA servers simultaneously for polling terminal devices, meters, sensors, etc., while the system will work quite stably.
Library Installation
To work with OPC UA and modbus servers, Xubuntu 17.04 Desktop and Windows 8.1 are used. Xubuntu 17.04 already has Python 2.7 and Python 3.5 installed by default. Choosing Python 3.5.
If, after installing the operating system, the necessary packages were not added to the computer, then you need to do:
sudo apt-get install python3-pip
sudo pip3 install pytz PyQt5
sudo apt-get install python3-opcua, libxml2-dev, python3-lxml
Solving the dependency problem:
sudo apt-get –f installAfter we put the necessary libraries:
sudo pip3 install requests pyserialFor windows, you can install via pip3.exe, the library and examples are here.
To start the server, you need to import the library:
import sys
from opcua import ua, Server
Now create an OPC UA server.
server = Server()
#можно прописать IP адрес сетевого интерфейса сервера, если их несколько
server.set_endpoint("opc.tcp://0.0.0.0:4840/")
#Записываем название сервера
server.set_server_name("Server")
#здесь указываем расположение сертификатов шифрования
# можно обойтись и без них , тогда данные между клиентом и сервером не будут шифроваться
server.load_certificate("server_cert.der")
server.load_private_key("server_private_key.pem")
#настраиваем собственное пространство имен
uri = "http://server"
idx = server.register_namespace(uri)
#получаем ссылку на объект где будут располагаться наши узлы
objects = server.get_objects_node()
#создаем объект и присваиваем ему имя
Object_1 =objects.add_object(idx,’MyFirstObject)
Object_2 =objects.add_object(idx,’MySecondObject)
Object_3 =objects.add_object(idx,’MyThirdObject)
#теперь создаем переменные
Discret_1 = Object_1.add_variable(idx,'Discret_1',[0,0,0,0,0,0,0,0])
Discret_2 = Object_2.add_variable(idx,'Discret_2',[0,0,0,0,0,0,0,0])
Analog_3  = Object_3.add_variable(idx,'Analog_3',[10,20,30,40,50])
#запускаем сервер
server.start()
Here is all the python code to run OPC UA. It turned out to be nothing complicated, and if you now connect to a running server using UA Expert , you can see a hierarchical list of our objects and variables with values.
To modify the values of variables, use the set_value function of the type:
Discret_1.set_value([1,1,1,1,1,1,1,1]) Of course, this is a very primitive example, but the OPC UA library has many more features that can be read about here .
The only thing that could not be figured out was how to set the username and password on the server, sort of through politics, I think I will solve this problem later.
Server Configurator
In continuation of the above, the problem arose of the operational configuration of each newly created server.
For this purpose, the “Server Configurator” was written on the PyQt5 library.
Principle of work:
- a database is created on sqlite3
- tables are created for the slave and master parts of the server.
- the tables are filled with the necessary parameters.
- a startup script is formed.
The basic idea is that servers should work the same on both Windows and Linux.
You can download it here
Directory structure:
srvconf.py - “Server Configurator” program
db - the database file srvDb.db is located.
img - .png files for
source buttons - server template files
- mercury.py - library for interrogation of counters of mercury 230
- modbustcp_master_dcon.py - modbusTCP slave server, master - polls slaves using the DCON protocol (Advantech). Currently, only the 4050 module.
- modbustcp_master_http.py - modbusTCP slave server, master - generates a request by GET by URL or IP, in response we get a list of values of type int or string separated by commas. Used for embedded systems with http servers on board, I used for ESP8266 with a wi-fi connection.
- modbustcp_master_ping.py - modbusTCP slave server, master - sends an ICMP ping packet to the specified server; if true, forms discrete 1, if false - 0.
- modbustcp_master_rtu.py - modbusTCP slave server, master - modbusRTU. Used to poll slaves using modbusRTU protocol
- modbustcp_master_tcp.py - modbusTCP slave server, master - modbusTCP. Used to poll remote devices using modbusTCP protocol.
- opcua_master_dcon.py - OPC-UA slave server, master - polls slaves using the DCON protocol (Advantech). Currently, only the 4050 module.
- opcua_master_http.py - OPC-UA slave server, master - generates a request by GET by URL or IP, in response we get a list of values of type int or string separated by commas. Used for embedded systems with http servers on board, I used for ESP8266 with wi-fi connection.
- opcua_master_mercury230.py - OPC-UA slave server, master - mercury 230 counters polling commands are generated. Implementation is exclusively for OPCUA, since not all response parameters using this protocol can be processed unambiguously to be placed in modbus registers.
- opcua_master_ping.py - OPC-UA slave server, master - sends an ICMP ping packet to the specified server; if true, forms discrete 1, if false - 0.
- opcua_master_rtu.py - OPC-UA slave server, master - modbusRTU. Used to poll slaves using modbusRTU protocol.
- opcua_master_tcp.py - OPC-UA slave server, master - modbusTCP. Used to poll remote devices using modbusTCP protocol.
scr - script files to start the server.
For Windows, a file of type start_XX.bat will be created, for Linux, a file of type start_XX.sh, where XX is the server serial number in the servers table.
The contents of the start_XX.bat file:
rem Скрипт создан в программе 'ScadaPy Конфигуратор сервера v.3.11'
rem Название сервера 'Windows opcua_mercury230 '
rem Slave адрес '192.168.0.103'
rem Slave порт '4840'
rem Тип master 'master_mercury230'
rem Тип slave 'opcUA'
rem Интерфейс tty 'com6'
rem Скорость tty '9600'
start c:\Python35\python.exe F:\scadapy\config\source\opcua_master_mercury230.py 68 F:\scadapy\config\db\srvDb.db
The contents of the start_XX.sh file for Linux:
# Скрипт создан в программе 'ScadaPy Конфигуратор сервера v.3.09'
# Название сервера 'Modbus TCP'
# Slave адрес '192.168.0.101'
# Slave порт '504'
# Тип master 'master_modbusTCP'
# Тип slave 'modbusTCP'
# Интерфейс tty '/dev/ttyUSB0'
# Скорость tty '9600'
/home/jack/config/source/modbustcp_master_tcp.py 67 /home/jack/config/db/srvDb.db
The startup parameters for Linux use xfce4-terminal, as I work in Xubuntu 17.04,
but you can specify another type of launch, like gnome-terminal.
xfce4-terminal --command='sudo /home/jack/config/scr/start_67.sh'In the examples, the parameters for filling the tables are quite clearly described.
It is noteworthy that on the raspberry Pi 4 servers were launched simultaneously - mobus_ping, opcua_http, opcua_mercury230 on / dev / ttyUSB0 and modbus_dcon on / dev / ttyUSB1, while it worked quite stably and without failures.
The control at the moment is partially implemented and only in master_dcon, therefore only tele-signaling and tele-measurements are used. In the future, I think to add telecontrol.