IPsec between Cisco ISR and 3G RUH2 using dynamically allocated IP
Task. It is necessary to organize the exchange of data with remote networks without resorting to the service of the cellular communication operator (hereinafter OpCoC) “Static White IP”, due to its high cost.
The diagram is presented in the following figure:

It is worth noting that the RUH2 router (manufactured by Radiofeed Systems) is currently out of production, but since several of these routers are already involved in organizing data exchange, I decided to optimize their work.
The router runs on Linux and for IPSec tunnels it contains the Racoon module, which is configured via the web interface.
A Cisco router (in my case CISCO1921 / K9) with a static external address (abcd) is installed on the LAN of the enterprise.
For RUH2 devices, OpCoS provides dynamic addresses, each time a connection is established, they are different, so you cannot know in advance from which address the connection will be established. Moreover, when the router is rebooted, this address is highly likely to be different.
The IPSec-session authentication device can be carried out using pre-defined key, but in view of the fact that the advance is not known at what address the device will make contact, you must register in the router string of the form:
Ie the key is valid for all addresses, and this is unsafe due to the fact that when a key is compromised, an attacker will be able to establish an encrypted channel and gain access to the enterprise network.
In this case, it is recommended to use X.509 certificates. You need to configure a certification authority on the router that will issue certificates for RUH2 routers. Strictly speaking, a certification authority may not necessarily be on a CISCO router, the main thing is that this certification authority would issue certificates to devices for establishing a connection. You can read more about setting up a certification authority on CISCO routers here .
To establish a connection on the router, you must configure trustpoint, which will be issued a certificate by a certification authority. In enable mode, you need to type the command:
Where VPN-key is the name of the key pair to use in trustpoint, modulus 2048 is the key dimension.
Next, configure trustpoint, give the command:
Next, the router enters trustpoint configuration mode, in this mode we give the following commands:
The path to the certification authority to request a certificate and to check the list of revoked certificates.
Do not include the serial number of the router in the certificate.
Do not include a custom domain name in the certificate.
Do not include the IP address of the router in the certificate.
The name of the subject of the certificate is set in accordance with the X.500 format. Description of some fields:
CN: Common Name - arbitrary name
O: Organization - organization name
L: Location - location, city
C: Country - country
Method for checking the list of revoked certificates.
How quickly you need to clear the cache after checking the list of revoked certificates.
The name of the key pair to use.
After making these settings, you must exit trustpoint configuration mode into global configuration mode (exit) and give the command:
The CISCO router will request the root certificate of the certification server and offer to confirm:
We answer yes, cisco will confirm that the root certificate is accepted:
Next, we ask the server to issue us a certificate:
During the request process, the router will ask for the password for the certificate and ask for confirmation. Enter the password (optional) and confirm the creation of the request.
After that, a request appears on the certification server:
You can view the request on the certification server (if it is on CISCO) with the following command:
To confirm the issuance of the certificate, you must give the following command:
After a while, trustpoint will automatically receive the issued certificate:
The next step is to issue a certificate to the RUH2 router, signed by the same certification authority.
Unlike CISCO RUH2 is not able to automatically request a certificate on its own, so we will do it manually.
For all the manipulations when creating a certificate to the router, I use the OpenSSL utility library.
First, create a private key:
A private.key file appeared in the c: \ keys folder with the following contents:
Next, based on this key, we will create a request to the certification authority: OpenSSL utility will ask a number of questions regarding this certificate:
These fields are analogous to what we specified in cisco in trustpoint with the subject-name command.
After entering the values in the c: \ keys folder, a certificate request file appears with the following contents:
You need to copy this to the clipboard, and on CISCO, where the certification authority works, enter the command: CISCO will issue a request
Next, you need to copy the request from the clipboard, type quit at the end.
Now you can see the created request:
We will see a request with the fields specified by the OpenSSL utility.
We confirm the issuance of the certificate on this request, the router will immediately issue it to us in the terminal window:
You must copy the certificate to the clipboard and save it to a file. Attention: you need to copy everything, including the first and last lines, which say BEGIN CERTIFICATE and END CERTIFICATE.
You also need to request your own trustpoint certificate (in global configuration mode):
The router will issue a root certificate of the certificate server and a trustpoint certificate. Each must be saved in a separate file.
Next, on the router with which you need to establish a connection (and where trustpoint is configured), configure ipsec.
Everything is done in global configuration mode.
Set up the 1st phase: The last command sets the type of certificate authentication, it acts by default and may not be displayed when viewing the configuration on CISCO. Create a certificate map. It is needed to accept connections from devices with certain certificate attributes: The last line says that only those that contain the ruh2.esko.local line correspond to this certificate card. Create an isakmp profile.
Next, set up the 2nd phase: The last command sets the tunnel mode and is the default command; it may not be displayed when viewing the router configuration. Now create a dynamic crypto card:
Now we will bind the dynamic crypto card to the static one: And we will apply the static crypto card on the interface that looks towards the Internet: The cisco router configuration is now over. Getting started with RUH2. To do this, go to the router’s web interface, in the Configuration section, then in the IPSec section. The settings are as follows:
After entering the settings, click Apply and check the established connection.
Check the 1st phase.
At CISCO we give the command
Among other things you can see:
In my case RUH2 is visible from the Internet under the address 188.170.72.35.
Check phase 2
Check ping:
For ping, we use the internal interface, looking at the building. network.
This completes the configuration of routers.
PS: Naturally, for the passage of IPSec traffic on the external interface, the appropriate protocols must be enabled and ports must be open. In my case, this is done using the following access-list:
The diagram is presented in the following figure:
It is worth noting that the RUH2 router (manufactured by Radiofeed Systems) is currently out of production, but since several of these routers are already involved in organizing data exchange, I decided to optimize their work.
The router runs on Linux and for IPSec tunnels it contains the Racoon module, which is configured via the web interface.
A Cisco router (in my case CISCO1921 / K9) with a static external address (abcd) is installed on the LAN of the enterprise.
For RUH2 devices, OpCoS provides dynamic addresses, each time a connection is established, they are different, so you cannot know in advance from which address the connection will be established. Moreover, when the router is rebooted, this address is highly likely to be different.
The IPSec-session authentication device can be carried out using pre-defined key, but in view of the fact that the advance is not known at what address the device will make contact, you must register in the router string of the form:
crypto isakmp key cisco123 address 0.0.0.0 0.0.0.0 no-xauthIe the key is valid for all addresses, and this is unsafe due to the fact that when a key is compromised, an attacker will be able to establish an encrypted channel and gain access to the enterprise network.
In this case, it is recommended to use X.509 certificates. You need to configure a certification authority on the router that will issue certificates for RUH2 routers. Strictly speaking, a certification authority may not necessarily be on a CISCO router, the main thing is that this certification authority would issue certificates to devices for establishing a connection. You can read more about setting up a certification authority on CISCO routers here .
To establish a connection on the router, you must configure trustpoint, which will be issued a certificate by a certification authority. In enable mode, you need to type the command:
ESKO-main-gw(config)#crypto key generate rsa general-keys label VPN-key modulus 2048Where VPN-key is the name of the key pair to use in trustpoint, modulus 2048 is the key dimension.
Next, configure trustpoint, give the command:
R1(config)#crypto pki trustpoint VPN-eskoNext, the router enters trustpoint configuration mode, in this mode we give the following commands:
enrollment url http://a.b.c.d:80The path to the certification authority to request a certificate and to check the list of revoked certificates.
serial-number noneDo not include the serial number of the router in the certificate.
fqdn noneDo not include a custom domain name in the certificate.
ip-address noneDo not include the IP address of the router in the certificate.
subject-name cn=ESKO-main-gw.esko.local,o=esko,l=spb,c=ruThe name of the subject of the certificate is set in accordance with the X.500 format. Description of some fields:
CN: Common Name - arbitrary name
O: Organization - organization name
L: Location - location, city
C: Country - country
revocation-check crlMethod for checking the list of revoked certificates.
crl cache delete-after 5How quickly you need to clear the cache after checking the list of revoked certificates.
rsakeypair VPN-keyThe name of the key pair to use.
After making these settings, you must exit trustpoint configuration mode into global configuration mode (exit) and give the command:
R1(config)#crypto pki authenticate VPN-eskoThe CISCO router will request the root certificate of the certification server and offer to confirm:
Certificate has the following attributes:
Fingerprint MD5: 4CDFCBCA 7807C4C9 5B054FA5 329301DB
Fingerprint SHA1: E0E35CC8 75C3639C 445D12D8 4BA298AB 2E4E7004
% Do you accept this certificate? [yes / no]:
We answer yes, cisco will confirm that the root certificate is accepted:
Trustpoint CA certificate accepted.
Next, we ask the server to issue us a certificate:
R1(config)#crypto pki enroll VPN-esko% Start certificate enrollment ...
% Create a challenge password. You will need to verbally provide this
password to the CA Administrator in order to revoke your certificate.
For security reasons your password will not be saved in the configuration.
Please make a note of it.
Password:
Re-enter password:
% The subject name in the certificate will include: cn = ESKO-main-gw.esko.local, o = esko, l = spb, c = en
% The fully-qualified domain name will not be included in the certificate
Request certificate from CA? [yes / no]: yes
% Certificate request sent to Certificate Authority
% The 'show crypto pki certificate verbose VPN-esko' commandwill show the fingerprint.
During the request process, the router will ask for the password for the certificate and ask for confirmation. Enter the password (optional) and confirm the creation of the request.
After that, a request appears on the certification server:
* Oct 15 13: 53: 45.367: CRYPTO_PKI: Certificate Request Fingerprint MD5: F70432EB 59E791A6 48F301C4 B59C67EB
* Oct 15 13: 53: 45.371: CRYPTO_PKI: Certificate Request Fingerprint SHA1: 18AA1D1A 1DD7BED2 FEA666FF
You can view the request on the certification server (if it is on CISCO) with the following command:
R1#sh crypto pki server CA-eskoEnrollment Request Database:
Subordinate CA certificate requests:
ReqID State Fingerprint SubjectName
- RA certificate requests:
ReqID State Fingerprint SubjectName
- Router certificates requests:
ReqID State Fingerprint SubjectName
- 1 pending F70432EB59E791A648F301C4B59C67EB cn = ESKO-main-gw.sko.lko , l = spb, c = ru
To confirm the issuance of the certificate, you must give the following command:
R1#crypto pki server CA-esko grant 1After a while, trustpoint will automatically receive the issued certificate:
* Oct 15 14: 03: 01.303:% PKI-6-CERTRET: Certificate received from Certificate Authority
The next step is to issue a certificate to the RUH2 router, signed by the same certification authority.
Unlike CISCO RUH2 is not able to automatically request a certificate on its own, so we will do it manually.
For all the manipulations when creating a certificate to the router, I use the OpenSSL utility library.
First, create a private key:
C:\OpenSSL\bin>Openssl genrsa -out c:\keys\private.key 2048Generating RSA private key, 2048 bit long modulus
......................................... ................... +++
............................ .................................................. .................................................. ................................. +++
e is 65537 (0x10001)
A private.key file appeared in the c: \ keys folder with the following contents:
The BEGIN the RSA the PRIVATE ----- ----- the KEY
MIIEogIBAAKCAQEAz1vjlthggHHmSBWVgcNf7aDDGPgik9xKZuJjEBgREr8x5RUa
...
GzmSg7cOhrzzTBWOUqTggMD5uKV4Cgei3cA TKRXv2dRjfVCL3s + =
----- the END the RSA the PRIVATE the KEY -----
Next, based on this key, we will create a request to the certification authority: OpenSSL utility will ask a number of questions regarding this certificate:
C:\OpenSSL\bin>openssl.exe req -new -key c:\keys\private.key -out c:\keys\request.csr
You are about to be asked to enter information that will be incorporated
into your certificate request.
What you are about to enter is what is called a Distinguished Name or a DN.
There are quite a few fields but you can leave some blank
For some fields there will be a default value,
If you enter '.', The field will be left blank.
- Country Name (2 letter code) [RU]:
State or Province Name (full name) []:
City [SPB]:
Organization Name (eg, company) [ESKO]:
Organizational Unit Name (eg, section) []:
Common Name []: RUH2.esko.local
email []:
Please enter the following 'extra' attributes
to be sent with your certificate request
A challenge password []:
An optional company name []:
These fields are analogous to what we specified in cisco in trustpoint with the subject-name command.
After entering the values in the c: \ keys folder, a certificate request file appears with the following contents:
The BEGIN CERTIFICATE the REQUEST ----- -----
MIICiTCCAXECAQAwRDELMAkGA1UEBhMCUlUxDDAKBgNVBAcMA1NQQjENMAsGA1UE
...
Q3H / EtMGltY1QS / 9DsEnta k7oCKPTeei3S2v9Y + =
----- the END CERTIFICATE ----- the REQUEST
You need to copy this to the clipboard, and on CISCO, where the certification authority works, enter the command: CISCO will issue a request
R1#crypto pki server CA-esko request pkcs10 terminal
PKCS10 request in base64 or pem
% Enter Base64 encoded or PEM formatted PKCS10 enrollment request.
% End with a blank line or “quit” on a line by itself.
Next, you need to copy the request from the clipboard, type quit at the end.
Now you can see the created request:
R1#sh crypto pki server CA-esko requestsEnrollment Request Database:
Subordinate CA certificate requests:
ReqID State Fingerprint SubjectName
- RA certificate requests:
ReqID State Fingerprint SubjectName
- Router certificates requests:
ReqID State Fingerprint SubjectName
- 2 pending 4468493FA262890CC75EEF18AC5AF6DF cn = RUH2.esko.local, o = ESKO, o = ESKO, l = ESKO, l = ESKO, l = ESKO, , c = RU
We will see a request with the fields specified by the OpenSSL utility.
We confirm the issuance of the certificate on this request, the router will immediately issue it to us in the terminal window:
R1#crypto pki server CA-esko grant 2The Granted certificate%:
----- the BEGIN CERTIFICATE -----
MIIEQjCCAiqgAwIBAgIBAzANBgkqhkiG9w0BAQQFADBBMQswCQYDVQQGEwJydTEM
...
jhHvAo / 0oVfLPZ9dPdj9Y1efawXI4a / zGf0GTmEi v7d8Psl9Wk + =
----- the END CERTIFICATE -----
You must copy the certificate to the clipboard and save it to a file. Attention: you need to copy everything, including the first and last lines, which say BEGIN CERTIFICATE and END CERTIFICATE.
You also need to request your own trustpoint certificate (in global configuration mode):
R1(config)#crypto pki export VPN-esko pem terminalCA certificate%:
----- the BEGIN CERTIFICATE -----
MIIFYDCCA0igAwIBAgIBATANBgkqhkiG9w0BAQQFADBBMQswCQYDVQQGEwJydTEM
...
uQVU8GLro73NQ9Jo2JXt2qfZY9SFsomiqJugxReyM4umZ9oX
----- the END CERTIFICATE -----
% of General Purpose Certificate:
----- the BEGIN CERTIFICATE -----
MIIEVzCCAj + gAwIBAgIBAjANBgkqhkiG9w0BAQUFADBBMQswCQYDVQQGEwJydTEM
...
a0G + T + rXEYq2ywc =
----- END CERTIFICATE -----
The router will issue a root certificate of the certificate server and a trustpoint certificate. Each must be saved in a separate file.
Next, on the router with which you need to establish a connection (and where trustpoint is configured), configure ipsec.
Everything is done in global configuration mode.
Set up the 1st phase: The last command sets the type of certificate authentication, it acts by default and may not be displayed when viewing the configuration on CISCO. Create a certificate map. It is needed to accept connections from devices with certain certificate attributes: The last line says that only those that contain the ruh2.esko.local line correspond to this certificate card. Create an isakmp profile.
crypto isakmp policy 30

 encr aes

 hash sha256

 group 14

 lifetime 3600

authentication rsa-sig
crypto pki certificate map RUH2-cert-map 10
subject-name co ruh2.esko.localcrypto isakmp profile RUH2-isapr
self-identity address
ca trust-point VPN-esko
match certificate RUH2-cert-map
local-address GigabitEthernet0/0Description of used commands
The identifier of the router will be the
Trustpoint IP address used for authentication.
It points to a certificate card for identifying the devices with which to establish a connection. Specifying command for determining the IP address of the CISCO router
self-identity addressThe identifier of the router will be the
ca trust-point VPN-eskoTrustpoint IP address used for authentication.
match certificate RUH2-cert-mapIt points to a certificate card for identifying the devices with which to establish a connection. Specifying command for determining the IP address of the CISCO router
local-address GigabitEthernet0/0
Next, set up the 2nd phase: The last command sets the tunnel mode and is the default command; it may not be displayed when viewing the router configuration. Now create a dynamic crypto card:
R1(config)#crypto ipsec transform-set RUH2-ts esp-aes esp-sha-hmac

R1 (cfg-crypto-trans)#mode tunnel
crypto dynamic-map RUH2-dyncm 1000
set security-association lifetime seconds 28800
set transform-set RUH2-ts
set pfs group2
set isakmp-profile RUH2-isapr
reverse-routeDescription of used commands
set security-association lifetime seconds 28800
Setting the lifetime of the 2nd phase session, i.e. how often the encryption key will change.
Indicates transform-set, i.e. how to encrypt traffic
For more security. Not required. Indicates an additional encryption key generation mode.
Indicates which isakmp profile to use.
Important team. The router will add a route to the routing table to send packets to the remote network.
Setting the lifetime of the 2nd phase session, i.e. how often the encryption key will change.
set transform-set RUH2-tsIndicates transform-set, i.e. how to encrypt traffic
set pfs group2For more security. Not required. Indicates an additional encryption key generation mode.
set isakmp-profile RUH2-isaprIndicates which isakmp profile to use.
reverse-routeImportant team. The router will add a route to the routing table to send packets to the remote network.
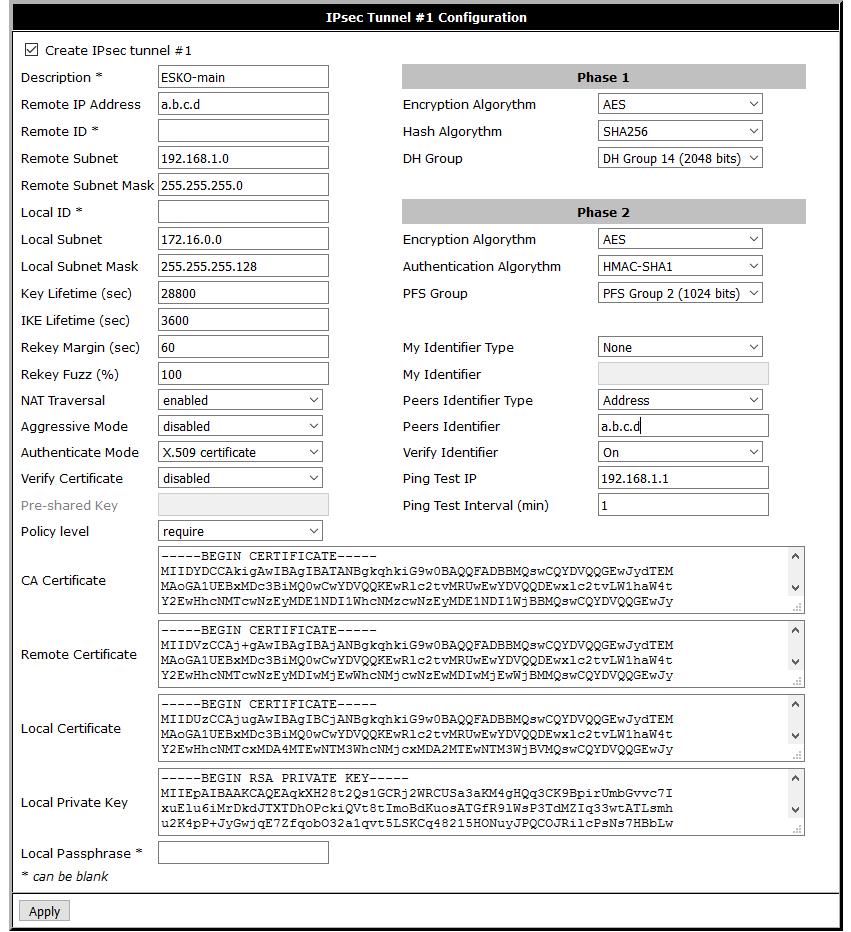
Now we will bind the dynamic crypto card to the static one: And we will apply the static crypto card on the interface that looks towards the Internet: The cisco router configuration is now over. Getting started with RUH2. To do this, go to the router’s web interface, in the Configuration section, then in the IPSec section. The settings are as follows:
R1(config)#crypto map ISP-statcm 500 ipsec-isakmp dynamic RUH2-dyncm
R1(config)#interface GigabitEthernet0/0

R1(config-if)#crypto map ISP-statcm
Description of the fields defined in the router
Description
The name of the tunnel. It can be any.
Remote IP Address The
address of the remote CISCO router.
Remote Subnet and Remote Subnet Mask
Indicates the traffic for which network will be routed to the tunnel.
Local Subnet and Local Subnet Mask
RUH2 sends this information to a remote CISCO router, so that it understands what traffic should be routed to the tunnel.
Key Lifetime (sec)
The key lifetime, which is for CISCO, is set by the set security-association lifetime seconds parameter.
IKE Lifetime (sec)
The lifetime of the 1st phase (isakmp), which is set on CISCO by the lifetime parameter in the isakmp policy.
NAT Traversal
Enables NAT-T mode, which is necessary if RUH2 works for NAT OpCoSa.
Authenticate Mode Authenticate
Meter. We select the mode of X.509 certificates.
Verify Certificate Certificate
verification mode. Need to disable. Otherwise, RUH2 throws errors about the absence of the AltSubjectName field, and it can only be set in CISCO in the self-signed trustpoint. In turn, you cannot use self-signed trustpoint, because it is necessary that all certificates are issued by one certification authority.
Encryption Algorythm
Hash Algorythm
DH Group The
settings of the 1st phase on RUH2 should match the settings of isakmp policy in CISCO.
Encryption Algorythm
Authentication Algorythm
PFS Group The
settings of the 2nd phase on RUH2 should match the transform-set and pfs group settings in CISCO.
My Identifier Type
Indicates how to identify RUH2 on the remote side, it does not matter since certificate verification is in progress.
Peers Identifier Type
Indicates how to identify the remote side. We use the IP address of the CISCO router.
Verify Identifier
Indicates whether to verify the remote side. Can be turned on for more security.
Ping Test IP and Ping Test Interval (min)
It is important to enable it, as the tunnel is created when there is traffic, and CISCO cannot initiate a connection if there is traffic to the network, because RUH2 has a dynamic IP address.
CA Certificate
Certificate of the certificate authority, must be copied from the saved file.
Remote certificate
The trustpoint certificate of the remote router must be copied from the saved file.
Local Certificate
RUH2 certificate issued by a certification authority must be copied from a saved file.
Local Private Key
Private key, must be copied from the saved file.
After entering the settings, click Apply and check the established connection.
Check the 1st phase.
At CISCO we give the command
R1#sh crypto isakmp saAmong other things you can see:
abcd 188.170.72.35 QM_IDLE 1014 ACTIVE
In my case RUH2 is visible from the Internet under the address 188.170.72.35.
Check phase 2
R1#sh crypto ipsec sa interface g0/0results
interface: GigabitEthernet0 / 0
Crypto map tag: ISP-statcm, local addr abcd
protected vrf: (none)
local ident (addr / mask / prot / port): (192.168.1.0/255.255.255.0/0/0)
remote ident ( addr / mask / prot / port): (172.16.0.0/255.255.255.128/0/0)
current_peer 188.170.72.35 port 48015
PERMIT, flags = {}
#pkts encaps: 133, #pkts encrypt: 133, #pkts digest: 133
#pkts decaps: 135, #pkts decrypt: 135, #pkts verify: 135
#pkts compressed: 0, #pkts decompressed: 0
#pkts not compressed: 0, #pkts compr. failed: 0
#pkts not decompressed: 0, #pkts decompress failed: 0
#send errors 0, #recv errors 8
local crypto endpt .: abcd, remote crypto endpt .: 188.170.72.35
path mtu 1500, ip mtu 1500, ip mtu idb GigabitEthernet0 / 0
current outbound spi: 0xEC8D5EF (248042991)
PFS (Y / N): Y, DH group: group2
inbound esp sas:
spi: 0x1231809D (305234077)
transform: esp-aes esp-sha-hmac,
in use settings = {Tunnel UDP-Encaps,}
conn id: 2019, flow_id: Onboard VPN: 19, sibling_flags 80000046, crypto map: ISP-statcm
sa timing: remaining key lifetime (k / sec): (4506190/27680)
IV size: 16 bytes
replay detection support: Y
Status: ACTIVE
inbound ah sas:
inbound pcp sas:
outbound esp sas:
spi: 0xEC8D5EF (248042991)
transform: esp-aes esp-sha-hmac,
in use settings = {Tunnel UDP-Encaps,}
conn id: 2020, flow_id: Onboard VPN: 20, sibling_flags 80000046, crypto map: ISP-statcm
sa timing: remaining key lifetime (k / sec): (4506229/27680)
IV size: 16 bytes
replay detection support: Y
Status: ACTIVE
outbound ah sas:
outbound pcp sas:
Checking the routing table:
R1 # sh ip route
Among other things, there are such lines:
172.16.0.0/25 is subnetted, 1 subnets
S 172.16.0.0 [1/0] via 188.170.72.35
Check ping:
R1#ping 172.16.0.1 source g0/1Type escape sequence to abort.
Sending 5, 100-byte ICMP Echos to 172.16.0.1, timeout is 2 seconds:
Packet sent with a source address of 192.168.1.1
!!!
Success rate is 100 percent (5/5), round-trip min / avg / max = 324/357/388 ms
For ping, we use the internal interface, looking at the building. network.
This completes the configuration of routers.
PS: Naturally, for the passage of IPSec traffic on the external interface, the appropriate protocols must be enabled and ports must be open. In my case, this is done using the following access-list:
ip access-list extended IPSEC-acl

 permit esp any any

 permit ahp any any

 permit udp host a.b.c.d eq isakmp any

 permit udp host a.b.c.d eq non500-isakmp any

 permit udp any host a.b.c.d eq isakmp

 permit udp any host a.b.c.d eq non500-isakmp