TDD applications on Spring Boot: working with a database
The second article from the series "Test-Driven Development Applications for Spring Boot" and this time I will talk about testing database access, an important aspect of integration testing. I will tell you how to determine the future service interface for data access through tests, how to use embedded in-memory databases for testing, work with transactions and load test data into the database.
I will not talk much about TDD and testing in general, I invite everyone to read the first article - How to build a pyramid in the trunk or Test-Driven Development applications for Spring Boot / Habr .
I will begin, as last time, with a small theoretical part, and proceed to the end-to-end test.
Pyramid testing
For a start, a small, but necessary, description of such an important entity in testing, like The Test Pyramid or the testing pyramid .
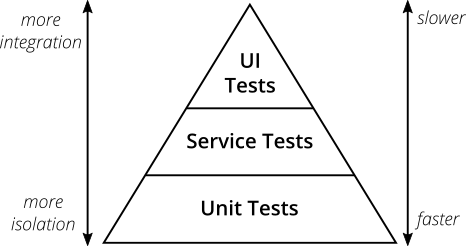
(taken from The Practical Test Pyramid website )
A testing pyramid is an approach where tests are organized in several levels.
- The UI (or end-to-end, E2E ) tests are few and slow, but they test the real application — no mocks or test doubles. At this level, business often thinks and all BDD frameworks reside here (see Cucumber in the previous article).
- They are followed by integration tests (service, component - each has its own terminology), which are already focused on a specific component (service) of the system, isolating it from other components through mocks / doubles, but still checking integration with real external systems - these tests are connected to the database, send REST requests, work with the message queue. In fact, these are tests that check the integration of business logic with the outside world.
- At the very bottom are fast unit tests that test minimal blocks of code (classes, methods) in complete isolation.
Spring helps with writing tests for each level - even for unit tests , although this may sound strange, because in the world of unit tests, no knowledge about the framework should exist at all. After writing the E2E test, I will show you how Spring allows even such purely “integration” things as controllers to test in isolation.
But I will start from the very top of the pyramid - the slow UI test, which starts and tests a full-fledged application.
End-to-end test
So, a new feature:
Feature: A list of available cakes
  Background: catalogue is updated
    Given the following items are promoted
      | Title           | Price |
      | Red Velvet      | 3.95  |
      | Victoria Sponge | 5.50  |
  Scenario: a user visiting the web-site sees the list of items
    Given a new user, Alice
    When she visits Cake Factory web-site
    Then she sees that "Red Velvet" is available with price £3.95
    And she sees that "Victoria Sponge" is available with price £5.50
And here immediately an interesting aspect - what to do with the previous test, about the greeting on the main page? It seems to be no longer relevant, after the launch of the site, the main one will already have a directory, not a greeting. There is no definite answer, I would say - it depends on the situation. But the main advice - do not get attached to the tests! Delete when they lose relevance, rewrite to make it easier to read. Especially E2E tests - it should be, in fact, a live and relevant specification . In my case, I simply deleted the old tests, and replaced them with new ones, using some previous steps and adding nonexistent ones.
Now I came to the important point - the choice of technology for data storage. In accordance with the lean approach, I would like to postpone the choice until the very last moment - when I will know for sure whether the relational model or not, what the requirement for consistency, transaction. In general, there are solutions for this - for example, the creation of test twins and various in-memory repositories, but for now I don’t want to complicate the article and immediately select the technology - relational databases. But in order to save at least some possibility of choosing a database, I will add an abstraction - Spring Data JPA . JPA itself is a fairly abstract specification for accessing relational databases, and Spring Data makes it even easier to use.
Spring Data JPA uses Hibernate by default as a provider, but also supports other technologies, such as EclipseLink and MyBatis. For people who are not very familiar with the Java Persistence API, JPA is like an interface, and Hibernate is the class that implements it.
So, to add support for JPA, I added a couple of dependencies:
implementation('org.springframework.boot:spring-boot-starter-data-jpa')
runtime('com.h2database:h2')
As a database, I will use H2 - an embedded database written in Java, with the ability to work in in-memory mode.
Using Spring Data JPA, I immediately define the interface for accessing data:
interfaceCakeRepositoryextendsCrudRepository<CakeEntity, String> { }And the essence:
@Entity@Builder@AllArgsConstructor@Table(name = "cakes")
classCakeEntity{
    publicCakeEntity(){
    }
    @Id@GeneratedValue(strategy = GenerationType.IDENTITY)
    Long id;
    @NotBlank
    String title;
    @Positive
    BigDecimal price;
    @NotBlank@NaturalId
    String sku;
    boolean promoted;
    @Overridepublicbooleanequals(Object o){
        if (this == o)
            returntrue;
        if (o == null || getClass() != o.getClass())
            returnfalse;
        CakeEntity cakeEntity = (CakeEntity) o;
        return Objects.equals(title, cakeEntity.title);
    }
    @OverridepublicinthashCode(){
        return Objects.hash(title);
    }
}
In the description of the essence there are a couple of not the most obvious things.
@NaturalIdfor the fieldsku. This field is used as a “natural identifier” to verify equality of entities — the use of all fields or@Idfields inequals/hashCodemethods is rather an anti-pattern. How correctly to check equality of entities is well written, for example, here .- To reduce the amount of boilerplate code a little bit, I use the Project Lombok -annotation processor for Java. It allows you to add different useful things, like
@Builder- to automatically generate a builder for a class and@AllArgsConstructorto create a constructor for all fields.
The interface implementation will be provided automatically by Spring Data.
Down the pyramid
Now is the time to go down to the next level of the pyramid. As a rule of thumb, I would recommend always starting with the e2e test , because it will allow you to define the “end goal” and the limits of the new feature, but there are no more strict rules. It is not necessary to write an integration test first, before moving to the unit level. It just happens that it’s more convenient and easier - and it’s quite natural to go “down”.
But specifically now, I would like to immediately break this rule and write a unit test that will help determine the interface and contract of a new component that does not exist yet. The controller must return a model that it fills out of some component X, and I wrote this test:
@ExtendWith(MockitoExtension.class)
classIndexControllerTest{
    @Mock
    CakeFinder cakeFinder;
    @InjectMocks
    IndexController indexController;
    private Set<Cake> cakes = Set.of(new Cake("Test 1", "£10"),
            new Cake("Test 2", "£10"));
    @BeforeEachvoidsetUp(){
        when(cakeFinder.findPromotedCakes()).thenReturn(cakes);
    }
    @TestvoidshouldReturnAListOfFoundPromotedCakes(){
        ModelAndView index = indexController.index();
        assertThat(index.getModel()).extracting("cakes").contains(cakes);
    }
}
This is a pure unit test - no contexts, no databases here, only Mockito for mocks. And this test is just a good demonstration of how Spring helps a unit with tests - the controller in Spring MVC is just a class whose methods take parameters of normal types and return POJO objects - View Models . There are no HTTP requests, no responses, heders, JSON, XML - all this will be automatically applied below the stack, in the form of converters and serializers. Yes, there is a small “hint” on Spring in the form ModelAndView, but this is a normal POJO and even you can get rid of it if you wish, it is necessary for UI controllers.
I will not talk much about the Mockito, you can read everything in the official documentation. Specifically, in this test there are only interesting points - I useMockitoExtension.classas a test performer, and he automatically generates mocks for the fields annotated@Mockand then injects these moks as dependencies into the constructor for the object in the field marked@InjectMocks. You can do all this manually using aMockito.mock()method and then creating a class.
And this test helps to determine the method of a new component - a findPromotedCakeslist of cakes that we want to show on the main page. It does not define what it is, or how it should work with the base. The sole responsibility of the controller is to take what was transferred to it and return it in a certain field of the model ("cakes"). Nevertheless, in my interface CakeFinderthere is already the first method, which means you can write an integration test for it.
I deliberately made all the classes inside the packagecakespackage private so that no one outside the package could use them. The only way to get data from the database is the CakeFinder interface, which is my “component X” for accessing the database. It becomes a natural “connector”, which I can easily lock further, if I need to test something in isolation and not touch the base. And its only implementation is JpaCakeFinder. And if, for example, in the future, the database type or data source changes, then you will need to add an interface implementationCakeFinderwithout changing the code that uses it.
Integration test for JPA using @DataJpaTest
Integration tests are Spring bread and butter. In it, in general, everything is so great done for integration testing, that developers sometimes do not want to go to a unit-level or neglect the UI level. This is not bad and not good - I repeat that the main goal of the tests is confidence. And a set of quick and effective integration tests can be enough to provide this confidence. However, there is a danger that over time these tests will either be slower and slower, or simply start testing the components in isolation, instead of integration.
Integration tests can run the application as is ( @SpringBootTest), or its separate component (JPA, Web). In my case, I want to write a focused test for JPA - so I don’t need to configure controllers or any other components. For this in Spring Boot Test is responsible abstract @DataJpaTest. This is a meta- abstract, i.e. it combines several different annotations at once, configuring different aspects of the test.
- @AutoConfigureDataJpa
- @AutoConfigureTestDatabase
- @AutoConfigureCache
- @AutoConfigureTestEntityManager
- @Transactional
First, I will tell about each separately, and then I will show the finished test.
@AutoConfigureDataJpa
Loads a whole set of configurations and configures - repositories (automatic generation of implementations for CrudRepositories), FlyWay and Liquibase database migration tools, database connection using DataSource, transaction manager, and finally Hibernate. In essence, this is just a set of configurations that are relevant to accessing data — neither DispatcherServletWeb MVC, nor other components are included here .
@AutoConfigureTestDatabase
This is one of the most interesting aspects of the JPA test. This configuration searches the classpath for one of the supported embedded databases and reconfigures the context so that the DataSource points to a randomly created in-memory database . Since I added a dependency on the H2 base, I don’t need to do anything else, just having this annotation automatically for each test run will provide an empty base, and this is incredibly convenient.
It is worth remembering that this database will be completely empty, without a schema. To generate a circuit, there are a couple of options.
- Use the Auto DDL feature from Hibernate. Spring Boot Test will automatically put this value in
create-drop, so that Hibernate generates a schema from the entity description and deletes it at the end of the session. This is an incredibly powerful feature of Hibernate, which is very useful for tests. - Use migrations created by Flyway or Liquibase .
More information about the different approaches to initializing the database can be found in the documentation .
@AutoConfigureCache
Simply configures the cache to use NoOpCacheManager - i.e. do not cache anything. This is useful to avoid surprises in tests.
@AutoConfigureTestEntityManager
Adds a special object to the context TestEntityManager, which itself is an interesting beast. EntityManagerthis is the main class of the JPA, which is responsible for adding entities to the session, deletion, and similar things. But when, for example, Hibernate comes into operation, adding an entity to a session does not mean that the request will be executed into the database, and loading from the session does not mean that the select request will be executed. Due to the internal mechanisms of Hibernate, real operations with the base will be executed at the right time, which will be determined by the framework itself. But in the tests it may be necessary to force something to send to the database, because the goal of the tests is to test the integration. And TestEntityManagerthis is just a helper, which will help some operations with the database be forcibly executed - for example,persistAndFlush() will force Hibernate to execute all requests.
@Transactional
This annotation makes all the tests in the class transactional, with automatic rollback of the transaction upon completion of the test. This is simply a “cleanup” mechanism for the database before each test, because otherwise it would be necessary to manually delete the data from each table.
Whether a test should manage a transaction is not as simple and obvious a question as it may seem. Despite the convenience of the “clean” state of the base,@Transactionalin tests, it can be an unpleasant surprise if the “combat” code does not start the transaction itself, but requires an existing one. This may lead to the integration test passing, but when executing the real code from the controller, and not from the test, the service will not have an active transaction and the method will throw an exception. Although it looks dangerous, in the presence of high-level tests of UI tests, the transactivity of tests is not so terrible. In my experience, I saw only once, when, with a passing integration test, production dropped, which clearly required an existing transaction. But if you still need to check that the services and components themselves correctly manage transactions, you can “block” the annotation@Transactionalon the test with the desired mode (for example, do not start a transaction).
Integration test with @SpringBootTest
I also want to note that @DataJpaTestthis is not a unique example of a focal integration test, there is still @WebMvcTest, @DataMongoTestand many others. But one of the most important test annotations remains @SpringBootTest, which launches the application “as is” for the tests - with all the configured components and integrations. There is a logical question - if you can run the entire application, why make focal DataJpa tests, for example? I would say that there are no strict rules again.
If it is possible to run applications every time, isolate crashes in tests, do not overload and do not over-complicate the Setup test - then of course you can and should use @SpringBootTest.
However, in real life, applications may require a lot of different settings, connect to different systems, but I would not want my database access tests to fail, because Connection to the message queue is not configured. Therefore, it is important to use common sense, and if in order to make the test with the @SpringBootTest annotation work, you need to lock half of the system - does it make any sense at all in the @SpringBootTest?
Data preparation for the test
One of the key points for tests is data preparation. Each test should be performed in isolation, and prepare the environment before starting, bringing the system to its original desired state. The easiest way to do this is to use @BeforeEach/ @BeforeAllannotations and add entries to the database there using the repository, EntityManageror TestEntityManager. But there is another option that allows you to run a prepared script or execute the necessary SQL query, this is the summary @Sql. Spring Boot Test before running the test will automatically run the specified script, eliminating the need to add a @BeforeAllblock, and take care of data cleaning @Transactional.
@DataJpaTestclassJpaCakeFinderTest{
    privatestaticfinal String PROMOTED_CAKE = "Red Velvet";
    privatestaticfinal String NON_PROMOTED_CAKE = "Victoria Sponge";
    private CakeFinder finder;
    @Autowired
    CakeRepository cakeRepository;
    @Autowired
    TestEntityManager testEntityManager;
    @BeforeEachvoidsetUp(){
        this.testEntityManager.persistAndFlush(CakeEntity.builder().title(PROMOTED_CAKE)
                .sku("SKU1").price(BigDecimal.TEN).promoted(true).build());
        this.testEntityManager.persistAndFlush(CakeEntity.builder().sku("SKU2")
                .title(NON_PROMOTED_CAKE).price(BigDecimal.ONE).promoted(false).build());
        finder = new JpaCakeFinder(cakeRepository);
    }
  ...
}
Red-green-refactor cycle
Despite this amount of text, for the developer, the test still looks like a simple class annotated with @DataJpaTest, but I hope that I could show how much useful is happening under the hood, which the developer can not think about. Now you can go to the TDD loop and this time I will show a couple of TDD iterations, with examples of refactoring and the minimum code. To make it clearer, I highly recommend viewing the history in Git, where each commit is a separate and significant step describing what and how it does.
Data preparation
I use the approach with @BeforeAll/ @BeforeEachand manually create, all records in the database. The example with the @Sqlannotation is in a separate class JpaCakeFinderTestWithScriptSetup, it duplicates the tests, which, of course, should not be, and exists for the sole purpose of demonstrating the approach.
The initial state of the system - there are two entries in the system, one cake participates in the promotion and should be included in the result returned by the method, the second one does not.
First test integration test
The first test is the easiest - findPromotedCakesmust include a description and price of the cake involved in the promotion.
Red
@TestvoidshouldReturnPromotedCakes(){
        Iterable<Cake> promotedCakes = finder.findPromotedCakes();
        assertThat(promotedCakes).extracting(Cake::getTitle).contains(PROMOTED_CAKE);
        assertThat(promotedCakes).extracting(Cake::getPrice).contains("£10.00");
    }
The test, of course, fails - the default implementation returns an empty Set.
Green
We naturally want to immediately write a filter, make a request to the database with whereand so on. But following TDD practice, I have to write a minimal code for the test to pass . And this minimum code is to return all records in the database. Yes, so simple and trite.
public Set<Cake> findPromotedCakes(){
        Spliterator<CakeEntity> cakes = this.cakeRepository.findAll()
                .spliterator();
        return StreamSupport.stream(cakes, false).map(
                cakeEntity -> new Cake(cakeEntity.title, formatPrice(cakeEntity.price)))
                .collect(Collectors.toSet());
    }
  private String formatPrice(BigDecimal price){
        return"£" + price.setScale(2, RoundingMode.DOWN).toPlainString();
    }
Probably some people will argue that here you can make the test green even without a base - just hard-code the result expected by the test. I occasionally hear such an argument, but I think everyone understands that TDD is not a dogma or a religion, it makes no sense to bring this to the point of absurdity. But if you really really want to - you can, for example, randomize the data on the installation, so that they are not hardcoded.
Refactor
I don’t see much refactoring here, so this phase can be skipped for this particular test. But I would not recommend to ignore this phase anyway, it is better to stop and think every time in the “green” state of the system - is it possible to change something to make it better and easier?
Second test
But the second test will already verify that not promoted cake will not fall into the result returned findPromotedCakes.
@TestvoidshouldNotReturnNonPromotedCakes(){
        Iterable<Cake> promotedCakes = finder.findPromotedCakes();
        assertThat(promotedCakes).extracting(Cake::getTitle)
                .doesNotContain(NON_PROMOTED_CAKE);
    }
Red
The test, as expected, falls - there are two entries in the database and the code simply returns them all.
Green
And again, you can think - and what is the minimum code you can write to pass the test? Once there is already a stream and its assembly, you can simply add a filterblock there .
public Set<Cake> findPromotedCakes(){
        Spliterator<CakeEntity> cakes = this.cakeRepository.findAll()
                .spliterator();
        return StreamSupport.stream(cakes, false)
                .filter(cakeEntity -> cakeEntity.promoted)
                .map(cakeEntity -> new Cake(cakeEntity.title, formatPrice(cakeEntity.price)))
                .collect(Collectors.toSet());
    }
Restart tests - integration tests are now green. An important point has come - due to the combination of the controller unit-test and integration test for working with the database, my feature is ready - and now the UI test passes!
Refactor
And once all the tests are green, it’s time to refactor. I think it is not necessary to clarify that filtering in memory is not the best idea, it is better to do this in the database. To do this, I added a new method to CakesRepository- findByPromotedIsTrue:
interfaceCakeRepositoryextendsCrudRepository<CakeEntity, String> {
    Iterable<CakeEntity> findByPromotedIsTrue();
}
For this method, Spring Data automatically generated a method that will execute a query of the form select from cakes where promoted = true. You can read more about query generation in the documentation for Spring Data.
public Set<Cake> findPromotedCakes(){
        Spliterator<CakeEntity> cakes = this.cakeRepository.findByPromotedIsTrue()
                .spliterator();
        return StreamSupport.stream(cakes, false).map(
                cakeEntity -> new Cake(cakeEntity.title, formatPrice(cakeEntity.price)))
                .collect(Collectors.toSet());
    }
This is a good example of the flexibility that integration testing and the black box approach provide. If the repository was locked, then adding a new method there without changing the tests was not impossible.
Connection to production base
To add a bit of “realism” and show how you can separate the configuration for the tests and the main application, I will add the data access configuration for the “production” application.
Everything is traditionally added to the section in application.yml:
datasource:
  url: jdbc:h2:./data/cake-factory
This automatically saves the data in the file system in a folder ./data. I note that in the tests of this folder will not be created - will @DataJpaTestautomatically replace the connection to the file base with a random base in memory due to the presence of @AutoConfigureTestDatabaseannotations.
Two useful things that may come in handy are filesdata.sqlandschema.sql. When you start the application, Spring Boot will check for the presence of these files in the resources and execute these scripts, if any. This feature can be useful for local development and prototyping, in real databases, of course, you need to use migration tools.
Conclusion
So, this time I showed how to determine through the tests an interface to the service for accessing data, how to write an integration test, and how to write minimal code in a TDD loop.
In the next article, I will add Spring Security - show you how to test the application for different users and roles and what tools Spring provides for this, as well as how to define the boundaries of the test.