Octopus Deploy. Improving the world in bloody enterprise

Today I want to talk about the Octopus Deploy deployment system . At the moment, Habré has only one introductory article on this subject, so in his article, I want to expand the description of the system, to elaborate on such important concepts as "life cycles» ( lifecycles ) and "channels» ( channels ), as well as about how we implemented and use Octopus in our work.
Who are we
We are the department of our own development Tinkoff.ru. The team I'm working on is developing the WebOffice cloud virtual desktop platform. At the moment, we have an Asp.Net MVC application and a REST API based on ServiceStack on the back end, and SPA on Angular at the front. In addition to this, there are SOAP services for integration with other banking systems, job security for periodic tasks, and a number of microservices on .Net Core 2.0.
Problems of the old deployment process
When I came to Tinkoff, the deployment of the system was carried out using TeamCity: MSDeploy and the nth number of powershell scripts of varying complexity were used. The build build responsible for building the project and deployment were grouped according to the contours available at that time: QA and Prod.
The old assembly and deployment process for each circuit can be conditionally represented as follows: we collect the project for a given environment (apply the appropriate transformations of xml configs) → collect the received artifacts into several zip files (one for each separately deployed application + database migration scripts + deployment scripts ) → deploy to the specified server environment.
Since in our work we use several servers for fault tolerance and load balancing, the deployment process took a decent amount of time, because it went sequentially through applications and servers (writing PowerShell parallel asynchronous tasks is rather painful). With the addition of additional QA2 and Preprod loops, the number of build configurations grew, and managing the deployment settings through disparate parameters became more complicated.
goal
We wanted to unify the deployment process to various circuits, speed it up if possible, and standardize the release delivery process depending on their type in our versioning system: major releases should go through QA → Pre → Prod, minor releases should QA2 → Pre → Prod , hotfixes - Pre → Prod.
In all these Wishlist Octopus Deploy helped us. Here are the main advantages that we got by implementing it in our release delivery process:
- a single deployment process for the entire application for all circuits;
- a single place for storing variables for the infrastructure settings of the application;
- parallel deployment to multiple servers;
- reducing a wide variety of build configurations in TeamCity to one;
- normal (correct) build life cycle (when the same binaries are deployed first on QA, then on Preprod and then on Prod; in the TeamCity version, a separate build configuration was configured for each environment);
- simplification of custom PowerShell scripts by throwing remoting bindings;
- visibility of the environment, the deployment process, the ability to flexibly configure specific deployments;
- flexible differentiation of access rights to release management.
Installation and setup
Installing the system itself is simple and straightforward: from external dependencies, only MS SQL Server is needed to store the database. Plus, on each server you are planning to deploy to, you need to install the Octopus Tentacle agent.
Its installation is well automated, which removes unnecessary manual work and allows you to prepare new servers for deployment. To do this, we use Ansible, and after installing the application itself, its configuration is performed using such a powershell script:
configure_tentacle.ps1
$tentacle = 'C:\Program Files\Octopus Deploy\Tentacle\Tentacle.exe'
& $tentacle create-instance --instance "Tentacle" --config "C:\Octopus\Tentacle.config" --console
& $tentacle import-certificate --instance "Tentacle" -f "C:\ansible_temp\tentacle_cert.txt" --console
& $tentacle configure --instance "Tentacle" --reset-trust --console
& $tentacle configure --instance "Tentacle" --home "C:\Octopus" --app "C:\Octopus\Applications" --port "10933" --console
& $tentacle configure --instance "Tentacle" --trust "{{ octopus_thumbprint }}" --console
& netsh advfirewall firewall add rule "name=Octopus Deploy Tentacle" dir=in action=allow protocol=TCP localport=10933
& $tentacle register-with --instance "Tentacle" --server "{{ octopus_server }}" --apiKey="{{ octopus_api_key }}" --role "{{ octopus_role }}" --environment "{{ octopus_env }}" --comms-style TentaclePassive --console
& $tentacle service --instance "Tentacle" --install --start --console
As a result, after creating a new server, it is automatically registered in the octopus and you can immediately deploy to it. Very comfortably.
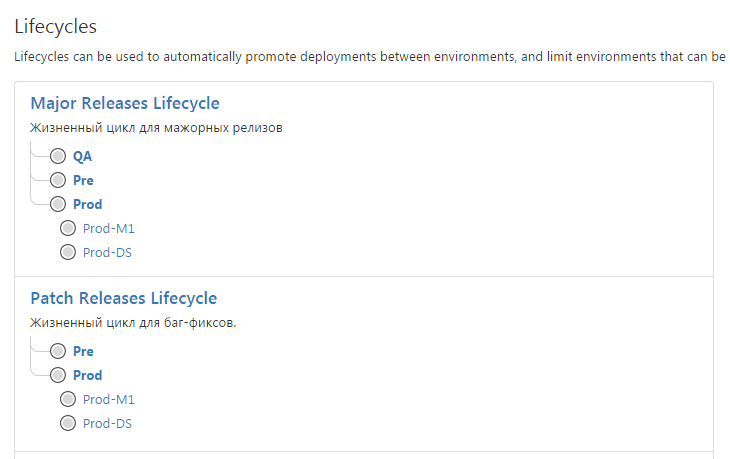
Life cycles
One of the key entities in Octopus Deploy is lifecycles . They are used both to automatically promote the release between environments, and to limit the environments on which the application can be deployed before passing the appropriate testing.
For example, for major versions, the life cycle of the system is defined as QA → Pre → Prod. This means that we will not be able to deploy the version in production before it goes to the test and preprod circuits. On the other hand, the life cycle of patch versions is shorter: Pre → Prod, because they are tested immediately on the preprode.
Channels
Using channels ( channels ) in Octopus can deploy multiple versions of the project independently. In addition to the rules restricting package versions, for each channel, you can specify the life cycle used to promote releases, configure the deployment process (since each step has a setting for which channels it should be performed), and also determine the values of variables. Each release created in Octopus Deploy necessarily refers to a channel.
In our project, we have channels for major, minor, patch versions, as well as specialized channels for directly launching hotfixes and deploying a system instance for integration testing.
The main charm is the ability to automatically create releases in the right channels. To do this, in the channel properties we specify the range of package versions (and we can also use SemVer tags) that you need to use to create a release in this channel. Octopus will automatically select packages that have the latest version.
Assume you are currently testing versions V10.1 and V11.0. After building the project from the V10.1 branch, TeamCity will fill in the collected packages (the version of packages will be 10.1.0.xxxx) in Octopus and will cause the release to be created in the channel of minor releases. At the same time, packages of version 10.1.0.xxxx will be released, despite the fact that Octopus already has newer packages with version 11.0.0.yyyy, because in the Version Range the channel of "minor" releases has the range [10.1.0.00000, 10.1.0.99999).

Thus, different versions of the application coexist perfectly with each other in the channels and follow their own deployment process to different environments.
Here is an example of how it looks in the project control panel:

Important! If you add new steps to the deployment process, add new packages to the channel rules. If no version restriction is set for any package in the channel, Octopus will use the latest version of the package. It may happen that you deploy the application version 10.1, but one package will be, for example, version 11.0, if it is already in Octopus.
Creating NuGet Packages
You can create packages for deployment during the build of projects using the Octopack tool. It is installed in the necessary projects as a NuGet package, and if you are satisfied with the default settings, you do not need to do anything else.
Octopack, based on the type of project (console application, web application, windows service), selects the files that will be needed during the deployment. If you need more fine-tuning, which files should be in the package, you can create a custom .nuspec file.
Integration with TeamCity
But the most interesting part begins when automating the processes of creating (and deploying) releases after building a project on TeamCity. Here is how this process looks with us:
- After the review, the developer merges his task into the version branch;
- TeamCity collects the project, determines the channel into which the assembly should go, and causes the release to be created in the required channel in Octopus Deploy;
- when ready, the tester clicks the Deploy button in the Octopus control panel and deploys the assembly in the test environment corresponding to this channel.
Part of the tasks of preparing NuGet packages, uploading them to Octopus and creating a release is very easy to do by installing the Octopus Deploy plugin for TeamCity. For some other operations (for example, automatically updating the Version Range of a channel), we wrote small powershell scripts.
Guided failures
If an error occurs in one of the steps in the deployment process, the entire deployment stops and is flagged as falling. This behavior is not always relevant: sometimes we are ready to come to terms with problems at some steps of the deployment. For these cases, there is a regime called Guided Failures.
If it is turned on and an error occurs during the deployment, Octopus pauses all operations and displays a special window. It can indicate the results of the investigation and decide whether to continue the deployment process or not. There will be a note in the deployment history about who, when, and what decision was made.
Deployment scripts in packages
Sometimes before deploying applications and services, we want to perform additional actions. For example, make sure that the application can access the port at startup on behalf of the service account. This can be done using additional installation scripts that can be written both in the Octopus web interface and can be part of a deployable application package.
In scripts, you can use octopus variables that will be thrown according to the rules for naming variables in PowerShell (dots and other special characters will be removed from variable names, so the octopus variable MyApp.ConnectionString will be available in the script as $ MyAppConnectionString).
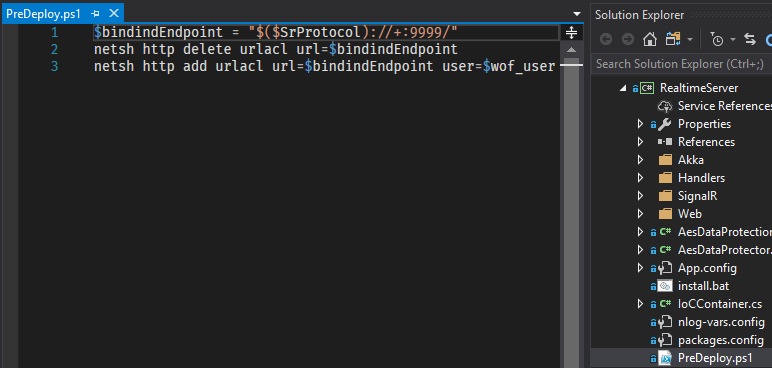
An example of a pre-deploy script that deletes and adds port reservation for one of our services
Retention policy
To one day not be in a situation with a completely full hard drive, Octopus provides a mechanism for removing packages that were used in older releases and are no longer needed.
A package storage policy is described at the life cycle level, but it can be redefined for its individual phases. So, for example, for all phases of the deployment of the application to test environments, we store only one latest version of the package.
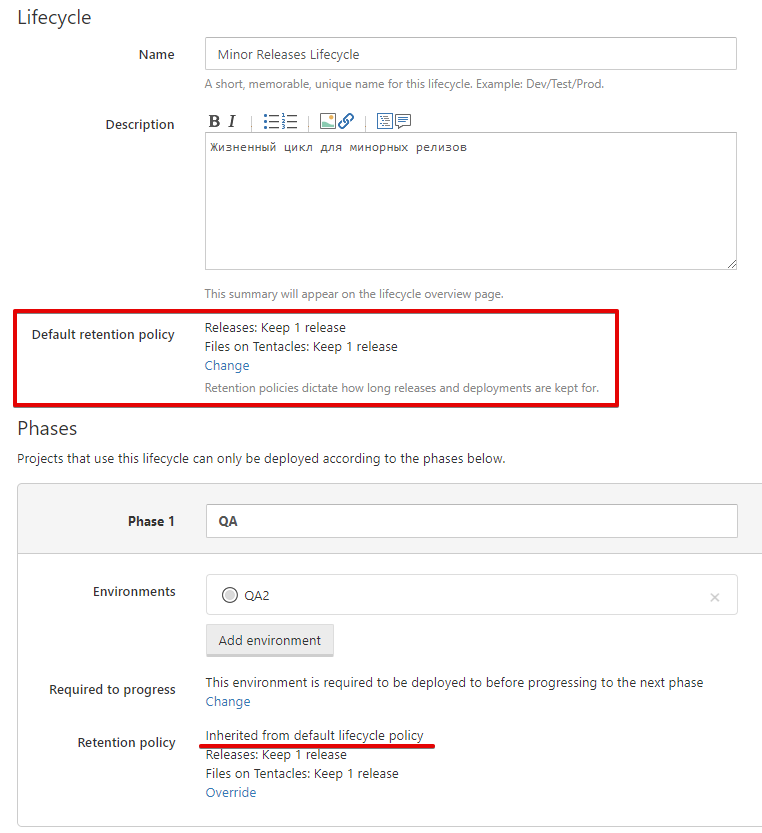
For the combat environment, we override this setting and store packages for the last five releases (in case you suddenly have to roll back). You can also specify for which releases to store packages on the machines themselves. In the event of a rollback, you can carry out the deployment faster without wasting time re-downloading packages from the Octopus server.

Additional nishtyaki
In this section I want to share some powershell scripts that we use on our system. You can use them as is or as an example to implement your own ideas.
Release notes generation
# Inspired by http://blogs.lessthandot.com/index.php/uncategorized/access-git-commits-during-a-teamcity-build-using-powershell/
function Get-CommitsFromGitLog([string] $StartCommit, [string] $EndCommit){
    $taskRegex = "(WOF-\d+)"
    $Cmd = "& ""%vcsroot.agentGitPath%"" log --pretty=format:""%an: %s
"" --encoding=cp866 --no-merges $StartCommit...$EndCommit"
    $Result = (Invoke-Expression $Cmd) -replace $taskRegex,'$1'
    return $Result
}
function Get-TeamCityLastSuccessfulRun(
    [string] $TeamCityUrl,
    [string] $TeamCityBuildTypeId,
    [string] $TeamCityUsername,
    [string] $TeamCityPassword,
    [string] $TeamCityBranchName)
{
    $Credentials = "$($TeamCityUsername):$($TeamCityPassword)"
    $AuthString = [System.Convert]::ToBase64String([System.Text.Encoding]::UTF8.GetBytes("$Credentials"))
    $Url = "$($TeamCityUrl)/app/rest/buildTypes/id:$($TeamCityBuildTypeId)/builds/branch:name:$($TeamCityBranchName),status:SUCCESS"
    $Content = Invoke-WebRequest "$Url" -Headers @{"Authorization" = "Basic $AuthString"} -UseBasicParsing
    return $Content
}
$Run = Get-TeamCityLastSuccessfulRun
    -TeamCityUrl "%teamcity.serverUrl%" `
    -TeamCityBuildTypeId "%system.teamcity.buildType.id%" `
    -TeamCityUsername "%system.teamcity.auth.userId%" `
    -TeamCityPassword "%system.teamcity.auth.password%" `
    -TeamCityBranchName "%teamcity.build.branch%"
$LatestCommitFromRun = (Select-Xml -Content "$Run" -Xpath "/build/revisions/revision/@version").Node.Value
$CommitsSinceLastSuccess = Get-CommitsFromGitLog -StartCommit "$LatestCommitFromRun" `
-EndCommit "%build.vcs.number%"
$CommitsSinceLastSuccess | Out-File releasenotes.txt -Force -Encoding utf8
Update Channel Settings (API)
function UpdateChannel ([string]$OctopusServer, [string]$ApiKey, [string]$ChannelId, [string]$MinVersion, [string]$MaxVersion)
{
    $url = "$OctopusServer/api/{0}/{1}"
    $headers = New-Object "System.Collections.Generic.Dictionary[[String],[String]]"
    $headers.Add("X-Octopus-ApiKey", $ApiKey)
    $channel = Invoke-RestMethod -Method Get -Uri ($url -f "channels", $ChannelId) -Headers $headers -ContentType 'application/json;charset=utf-8'
    $channel.Rules[0].VersionRange = "[{0},{1})" -f $MinVersion, $MaxVersion
    $utf8encodedString = [System.Text.Encoding]::UTF8.GetBytes(($channel | ConvertTo-Json -Depth 3))
    Invoke-RestMethod -Method Put -Uri ($url -f "channels", $ChannelId) -Headers $headers -Body $utf8encodedString
}
$minVersion = ("%CalculatedBuildBranch%").Trim("V") + ".00000"
$maxVersion = ("%CalculatedBuildBranch%").Trim("V") + ".99999"
if("%TargetChannel%" -eq "%PatchChannelName%") {
    UpdateChannel %OctopusServer% %OctopusApiKey% %PatchChannelId% $minVersion $maxVersion
}
if("%TargetChannel%" -eq "%MinorChannelName%") {
    UpdateChannel %OctopusServer% %OctopusApiKey% %MinorChannelId% $minVersion $maxVersion
}
if("%TargetChannel%" -eq "%MajorChannelName%") {
    UpdateChannel %OctopusServer% %OctopusApiKey% %MajorChannelId% $minVersion $maxVersion
}
Conclusion
We are very pleased that a year ago we started using Octopus Deploy, and after a short period of test operation, we completely switched to it to deploy the system in all our environments.
The project is actively developing, minor releases come out almost every week. In recent versions, Octopus Deploy has learned to deploy .net core and mono applications to linux machines, deploy docker containers, and in the latest release 3.17 they added first-class support for deploying Java applications to Tomcat, RedHat JBOSS and Wildfly application servers.
In the next article, I will talk about the multi-tenant deployments that we use to organize the process of deploying the feature of brunches to separate virtual machines automatically raised in the local OpenStack cloud to conduct isolated testing of individual tasks.